CT 160 - Battery charger GYS - Free user manual and instructions
Find the device manual for free CT 160 GYS in PDF.

| Product type | Lead-acid battery charger |
| Brand and model | GYS CT 160 |
| Supply voltage | 230 V ~ 50/60 Hz |
| Charging voltage | 12 V (6 cells) or 24 V (12 cells) |
| Charging current | Not explicitly specified, but adjustable via capacity selector |
| Device protection | Internal fuse 1.6 A, thermal protection (thermostat) |
| Reverse polarity protection | Front panel fuse |
| Charge indicator | Analog ammeter |
| Main functions | Normal charge and fast charge (Boost), voltage and capacity selection |
| Maintenance and cleaning | Disconnect before cleaning; use a dry cloth; dust with a blower; have connections checked by qualified personnel; do not use solvents |
| Safety | Indoor use only; do not expose to rain; do not charge non-rechargeable batteries; avoid flames and sparks; wear protective glasses and gloves; disconnect power before handling |
| Spare parts and repairability | Front accessible fuse; power cable replaceable only by manufacturer or service center; maintenance by qualified person |
| Warranty | 2 years (parts and labor) from date of purchase |
| Included accessories | Insulated charging clamps, charging cables, power cord |
| Weight and dimensions | Not specified |
Frequently Asked Questions - CT 160 GYS
User questions about CT 160 GYS
0 question about this device. Answer the ones you know or ask your own.
Ask a new question about this device
Download the instructions for your Battery charger in PDF format for free! Find your manual CT 160 - GYS and take your electronic device back in hand. On this page are published all the documents necessary for the use of your device. CT 160 by GYS.
USER MANUAL CT 160 GYS
natural_image
Line drawing of a CT-based medical device with clamps and control panel (no text or symbols on main body)FR 2-5 / 34-36
EN 6-9 / 34-36
DE 10-13 / 34-36
ES 14-17 / 34-36
RU 18-21 / 34-36
NL 22-25 / 34-36
PT 26-29 / 34-36
IT 30-33 / 34-36
CT 160
CT 210
INSTRUCTIONS DE SÉCURITÉ


CONDITIONS DE GARANTIE
This manual includes guidelines on the operation of your device and the precautions to follow for your own safety.
Ensure it is read carefully before first use and keep it handy for future reference. These instructions should be read and understood before anyone operates the product. Any modifications or maintenance that are not specified in the manual should not be undertaken.
The manufacturer is not liable for any injury or damage due to non-compliance with the instruction manual. In case of problems or uncertainties, please consult a qualified person that is able to handle the device correctly. This device should only be used for charging and within the limits indicated on the device and in the manual. The safety instructions must be followed. In case of improper or unsafe use, the manufacturer cannot be held responsible.
Device suitable for indoor use only. Do not expose to rain or excessive moisture.
This device may be used by children from age 8 and by persons with reduced physical, sensory or mental capabilities or lack of experience and knowledge, provided that they are under supervision or have been told how to use the device safely and are aware of the potential risks. Children must not use the device as a plaything. Cleaning and servicing tasks may not be carried out by children unless they are supervised.
Do not use for charging non-rechargeable batteries.
Do not operate the device with a damaged power supply cord or a damaged mains plug.
Never charge a frozen or damaged battery.
Do not cover the device
Do not place the device near a fire or subject it to heat or to longterm temperatures exceeding 50°C
Do not obstruct the cooling vents. Refer to the installation section before operating the machine.


Risk of explosion and fire!
A battery being charged can emit explosive gas.
- During the charge, the battery must be placed in a well ventilated area.
- Avoid flames and sparks. Do not smoke.
- Protect the electrical contacts of the battery against short-circuiting.
Acid projection hazard!
- Wear safety goggles and protective gloves
- If your eyes or skin come into contact with battery acid, rinse the affected part of the body with plenty of water and seek immediate medical assistance.
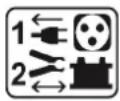
Connection / disconnection:
- Disconnect the power supply before connecting/disconnecting the device to/from the battery.
- The terminal of the battery that is not connected to the car frame must be connected first. The other connection must be made on the car frame, far from the battery and the fuel line. The battery charger must be connected to the power supply network.
- After the charging process, disconnect the battery charger from the power supply network and remove the connector from the car frame and then the connector from the battery, in this order.
Connection:
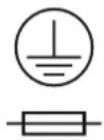
- This device must be connected to an earthed power supply.
• This machine is fuse-protected.

CT 210
CT 160
Maintenance:
- If the power supply cable is damaged, it must only be replaced by a cable specified or supplied by the manufacturer or its after-sales service.
- If the power supply cable is damaged, it must be replaced by the manufacturer, its service agent or an equally qualified person.
• Service should be performed by a qualified person. - Warning! Always remove the power plug from the wall socket before carrying out any work on the device.
- If the internal fuse is blown, it must be replaced by the manufacturer, its after-sales service or an equally qualified person.
- Regularly take off the cover and remove dust with an air gun. Take the opportunity to have a qualified person check the electrical connections with an insulated tool.
- Under no circumstances should solvents or other aggressive cleaning agents be used.
- Clean the device's surfaces with a soft, dry cloth.


Réglementation :
- The device complies with European Directive.
- The certificate of compliance is available on our website.
• EAC conformity mark (Eurasian Economic Commission)

Mise au rebut :
- This product should be disposed of at an appropriate recycling facility. Do not dispose of in domestic waste.
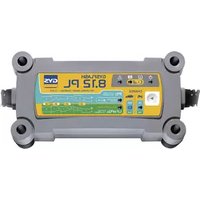
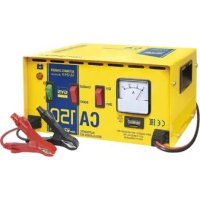
DESCRIPTION OF THE CHARGER (FIG I, PAGE 36)
The chargers CT 160 and CT 210 are designed to charge lead acid batteries with liquid electrolyte, nominal voltage from 12V, and with capacity according to the table II, page 41.
1 - Ammeter 5 - Fuse
2 - Battery voltage selector 6 - cables + clamps
3 – Battery capacity selector 7 – handle (CT 210 only)
4 - Main switch 8 - Power supply (CT160 : fixed / CT210 : removable)
CHARGER MODE
Preliminary precautions
- For indoor use, with good ventilation. Protect the charger from rain and moisture.
- Remove the battery caps if there is, and check the level of liquid. If it is not correct, filled up with distilled water. Clean well the battery terminals.
- Check if the battery capacity and voltage are compatible with your charger. Do not charge the battery when it is connected on the vehicle.
Connection and disconnection
- Disconnect from the battery all electronic system during the charge (do not charge the battery when it is connected on the car).
- Plug in your charger to 230 V 50/60 Hz mains supply.
- Connect the clamps (+ red, - black) to + and - battery terminals, making sure you get a good electric contact, respecting the following order:
- Connect first the battery terminal not connected to the chassis of the vehicle.
- Then connect the other connection to the chassis remote from the battery and any fuel line.
- Choose the charge voltage (12 / 24V) and the charge speed (normal or boost). The « Boost » function allows charging a battery quickly.
Control and end of the charge process
• These are traditional chargers; the charge process must be stopped manually.
- The ammeter is a charge indicator. When the current drops down to 0, the battery charge is ending. You can stop the charge process. In normal mode, it takes about 10 hrs to fully charge a battery. If the ammeter is not at the minimum after this period, check the charge mode and voltage or have the battery checked by a professional.
- Do not let the charger connected more than 24 Hours on a battery.
- After charging, disconnect the battery charger from main supply. Then remove the chassis connection and the battery connection, in this order.
PROTECTIONS
Your product has been developed with a maximum of protections:
- The clamps of the battery are isolated.
- The polarity reversal will not cause danger. The protection is insured by an automotive fuse, which must be changed in case of polarity error. Respect the rating of the fuse, which is indicated on the charger.
• This device is protected by an internal fuse to avoid any risk in case of damage to the charger. - (CT160 : 1,6A - CT210 : 2A)
- Thermal protection: the transformer of the product is protected by a thermal switch. If the charger is used intensively, it may switch in thermal protection mode (cooling time about 15min), and then resume the charge.
TROUBLESHOOTING
| Symptoms Causes Remedies | ||
| The ON/OFF button does not switch on when set to ON. | No mains voltage Check that the power cord is plugged to a 230V 50/60Hz socket. Check the power supply network. | |
| The machine's anmeter does not fluctuate . | Power supply problem. Check your mains power supply. | |
| Clamps in short circuit or polarity reversal. | Check that the fuses have not melted and that the circuit breaker is not tripped | |
| The battery that you are trying to charge is faulty. | Check the terminals' voltage with a voltmeter. If this voltage jumps instantaneously to 2.5V per element, the battery may be sulfated or damaged. | |
| Voltage error (12 -24V) Chck that the switch is on the right setting (12 or 24V) | ||
| Following intensive use, your device has entered thermal protection mode. | Wait 1/4h so the device can cool down. | |
| The charger is properly connected but it does not charge the battery | Blown fuse Replace the fuse by a new one. | |
| Bad clamp connections. Clean the terminal and the clamps. Check the state of the cables and clamps. | ||
| Wrong charge settings Check that the selected voltage matches the battery voltage. | ||
| Following intensive use, your device has entered thermal protection mode. | Wait 1/4h so the device can cool down. | |
| The anmeter's pin goes above the maximum marking while the device is set to minimum intensity. | The battery is deeply discharged. Keep charging using the minimum setting . | |
| Voltage error (12 -24V) Chck that the switch is on the right setting (12 or 24V) | ||
| Your battery has elements in short circuit. | Damaged battery Replace the battery. | |
| The fuse blows every time it is replaced | Polarity reversal Connect the + clamp to the battery's (+) and the - clamp to the battery's (-). | |
| Starting the vehicle Do not perform any starts when the charger is connected. | ||
| Wrong charge settings Check that the selected voltage matches the battery voltage. | ||
| Current overconsumption on the battery | Do not draw any of the battery's current during the charge | |
| The machine is charging a 12V battery in 24V mode | Set the switch to 12V. | |
WARRANTY
The warranty covers faulty workmanship for 2 years from the date of purchase (parts and labour).
The warranty does not cover:
- Transit damage.
- Normal wear of parts (eg. : cables, clamps, etc..).
- Damages due to misuse (power supply error, dropping of equipment, disassembling).
- Environment related failures (pollution, rust, dust).
In case of failure, return the unit to your distributor together with:
- The proof of purchase (receipt etc ...)
- A description of the fault reported