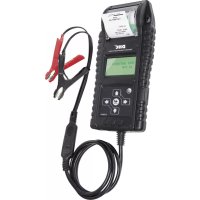
Tool It PBT 700 - Battery charger GYS - Free user manual and instructions
Find the device manual for free Tool It PBT 700 GYS in PDF.

| Product Type | 12V battery tester/analyzer and 12/24V charging system tester (12V start & stop battery) |
| Operating Voltage | 12V (battery), 12/24V (charging system) |
| Operating Temperature | From 0°C to 50°C |
| Battery Types Tested | Sealed lead-acid, plate AGM, spiral AGM, VRLA/GEL, START & STOP (AGM, EFB) |
| Supported Capacity Standards | CCA/SAE (40-2000), EN (40-1885), DIN (25-1120), IEC (30-1320), JIS, CA/MCA (50-2400) |
| Main Functions | Battery test, charging system test, in-vehicle test (combined), result printing, test counter, date/time setting, brightness, language |
| Displayed Results | Actual voltage, actual CCA, internal resistance, state of health (SOH), state of charge (SOC) |
| Battery Test Results | Battery OK, OK to recharge, Warning, Charge & test, Replace, Defective cell, Charge error |
| System Test Results | Normal/low/not detected voltage at startup, high/normal/low voltage while charging, normal/absent/excessive ripple |
| Power Supply | CR2032 battery (for clock and memory) |
| Built-in Printer | Yes, with replaceable thermal paper roll |
| Display | Backlit screen with brightness adjustment |
| Languages | Multilingual (selectable) |
| Return/Navigation Function | Long press ◀ to return to previous screen |
| Surface Charge Removal | User guidance (headlights on/off) |
| Safety | Cable check, reverse polarity protection, explosive gas warnings |
| Warranty | 2 years parts and labor (excluding transport, normal wear, misuse) |
| Supplied Accessories | Clamps (one black, one red), CR2032 battery, paper roll |
| Maintenance | Cleaning terminals with a brush, replacing paper and CR2032 battery |
Frequently Asked Questions - Tool It PBT 700 GYS
User questions about Tool It PBT 700 GYS
0 question about this device. Answer the ones you know or ask your own.
Ask a new question about this device
Download the instructions for your Battery charger in PDF format for free! Find your manual Tool It PBT 700 - GYS and take your electronic device back in hand. On this page are published all the documents necessary for the use of your device. Tool It PBT 700 by GYS.
USER MANUAL Tool It PBT 700 GYS
text_image
RAPPORT DE TEST =TEST BATTERIE= CHARGER & TESTER START/STOP PLAQUE PLATE TENSION: 12.71V BATTERY TESTER VOL: 12.71V CCA: 1.218DM IR: 3.77Ω Enter DCI DINCE 20 CEPBT 700
ANALYSEUR DE BATTERIE ET DE SYSTÈME ÉLECTRIQUE BATTERY & ELECTRICAL SYSTEM ANALYZER ANALYSEGERÄT FÜR DEN AKKU UND DIE ELEKTRISCHE ANLAGE BATERÍA & ANALIZADOR DEL SISTEMA ELÉCTRICO TESTER PER BATTERIE E SISTEMI ELETTRICI ANALISADOR DE BATERIA E SISTEMA ELÉTRICO

2-12

35-45

13-23

46-56

24-34

57-67
PROCÉDURES D'ESSAI / MODE D'EMPLOI
natural_image
Close-up of a handheld electronic device with black casing and metal bracket (no visible text or symbols)natural_image
Close-up of a handheld electronic device with a white cylindrical component inserted, showing internal components and a digital display (no visible text or symbols)natural_image
Close-up of a black handheld electronic device with a digital display and a 'TOOL' label (no readable text beyond branding)MENU PRINCIPAL:
ANALYSEUR DU SYSTÈME
ALT. IDLE VOLTS xx.xx V NORMAL
BASSE TENSION DE DÉMARRAGE LORSQUE LE TEST EST EFFECTUÉ AVEC MOTEUR AU RALENTI
ALT. IDLE VOLTS xx.xx V FAIBLE
- For testing 12 volt batteries, and for testing 12 and 24 volt charging systems.
- Suggested operation range 0°C (32°F) to 50°C (122°F) in ambient temperature.
- Working in the vicinity of a lead acid battery is dangerous. Batteries generate explosive gases during normal battery operation. For this reason, it is of utmost importance, if you have any doubt, that each time before using your tester, you read these instructions very carefully.
- To reduce risk of battery explosion, follow these instructions and those published by the battery manufacturer and manufacturer of any equipment you intend to use in the vicinity of the battery. Observe cautionary markings on these items.
- Do not expose the tester to rain or snow.
PERSONAL SAFETY PRECAUTIONS:
- Someone should be within range of your voice or close enough to come to your aid when you work near a lead acid battery.
- Have plenty of fresh water and soap nearby in case battery acid contacts skin, clothing or eyes.
- Wear safety glasses and protective clothing.
- If battery acid contacts skin or clothing, wash immediately with soap and water. If acid enters eye, immediately flood eye with running cold water for at least ten minutes and get medical attention immediately.
- NEVER smoke or allow a spark or flame in vicinity of battery or engine.
- Be extra cautious to reduce risk of dropping a metal tool onto the battery. It could spark or short-circuit the battery or other electrical parts and could cause an explosion.
- Remove personal metal items such as rings, bracelets, necklaces and watches when working with a lead acid battery. It can produce a short circuit current high enough to weld a ring or the like to metal causing a severe burn.
PREPARING TO TEST:
- Be sure area around battery is well ventilated while battery is being tested.
- Clean battery terminals. Be careful to keep corrosion from coming in contact with eyes.
- Inspect the battery for cracked or broken case or cover. If battery is damaged, do not use tester.
- If the battery is not sealed maintenance free, add distilled water in each cell until battery acid reaches level specified by the manufacturer. This helps purge excessive gas from cells. Do not overfill.
- If necessary to remove battery from vehicle to test, always remove ground terminal from battery first. Make sure all accessories in the vehicle are off to ensure you do not cause any arcing.
OPERATION & USE:
Note: Each time you connect the tester to a battery, the tester will run a quick cable verification to ensure a proper connection through the output cables to sensors in the clamp jaws. If the connection checks out OK, the tester will proceed to the Home Screen. If the connection is poor, the display will show "CHECK CABLE". In this case, check cable connections for visible signs of damage, as you may need to re-connect the clamps to the battery or replace the cable end.
BEFORE TESTING:
- Before you test a battery in a vehicle, turn off the ignition, all accessories and loads. Close all the vehicle doors and the trunk lid.
- Make sure you have put 1 pcs CR2032 battery into the battery chamber and set the date & time. Replace this battery if the date & time goes slowlier than it should be.
text_image
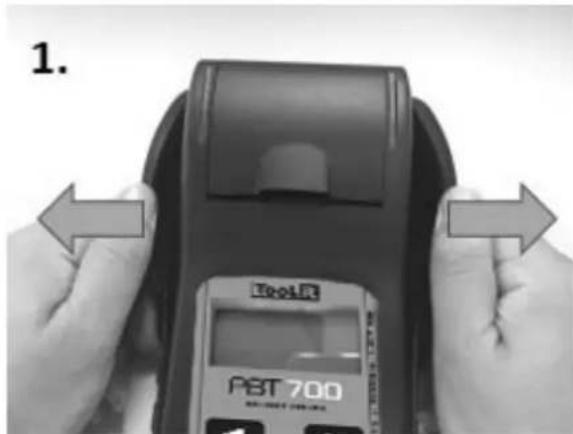
1. PBT 700
natural_image
Close-up of a mechanical component with an arrow indicating direction, no visible text or symbols
natural_image
Close-up of a mechanical component with a circular feature and arrow, no visible text or symbols
natural_image
Close-up of a mechanical component with a circular base and arrow indicator (no visible text or symbols)
natural_image
Close-up of a mechanical component with a metallic dial and arrow indicating a process (no visible text or symbols)
natural_image
Close-up of a mechanical component with a lever and directional arrow, no visible text or symbols- Make sure the battery terminals are clean. Wire brush them if necessary. Clamp the black load lead to the vehicle negative battery terminal. Clamp the red load lead to the vehicle positive battery terminal. Please clamp on the lead part of the terminal only. Clamping on the iron part of the terminal will lead to wrong test results.
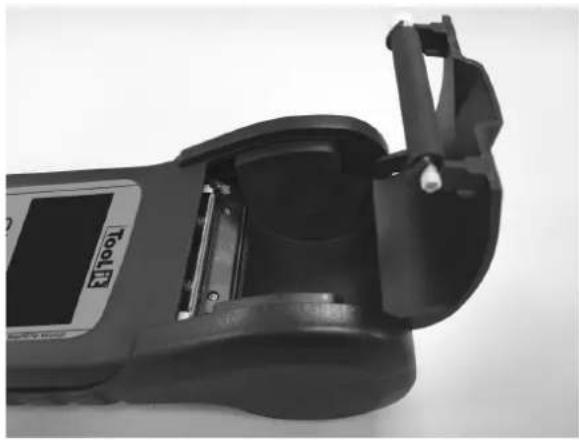
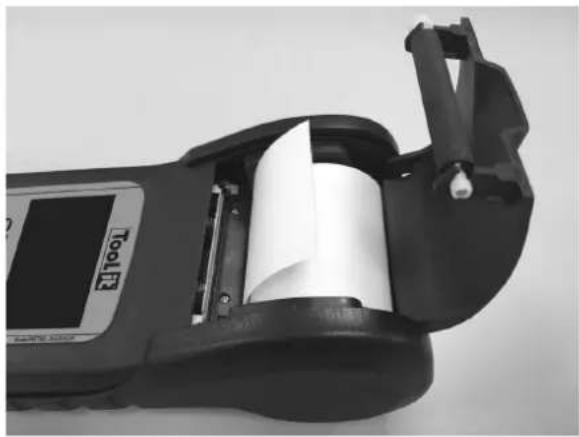
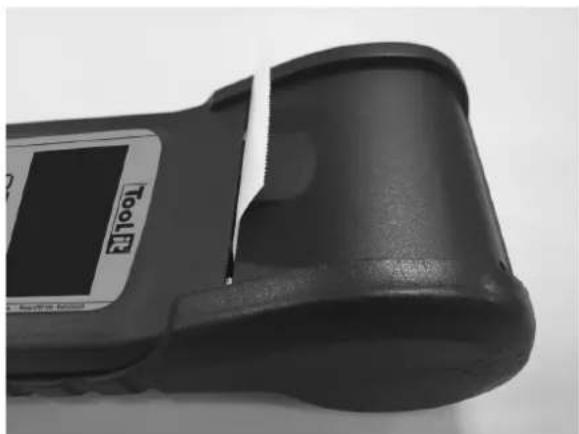
PAPER REPLACEMENT:
A. Open the clear cover.
natural_image
Close-up of a handheld electronic device with a digital display and mechanical bracket (no visible text or symbols)B. Place a new paper roll in the compartment.
natural_image
Close-up of a handheld electronic device with a white roller inside, showing mechanical components and a digital display (no visible text or symbols)C. Pull a short length of paper from the compartment and press down the clear cover to close.
natural_image
Close-up of a black electronic device with a display label and 'HOLT' branding (no readable text beyond branding)MAIN MENU:
SYSTEM ANALYZER
You will view the following screens by pressing ◀ to switch between all functions and settings.
BATTERY TEST XX.XX V
Press «ENTER» to do battery test.
SYSTEM TEST XX.XX V
Press «ENTER» to do system test.
IN-VEHICLE TEST XX.XX V
Press «ENTER» to do In-vehicle test.
PRINT LAST RESULT
Press «ENTER» to print last result.
LANGUAGE SELECT
Press «ENTER» to change language.
TEST COUNTER
Press «ENTER» to see how many times you tested in battery / system / in-vehicle test.
2018/02/05 13:25:00
Press «ENTER» to start Date & Time Setting. Then press ◄ to adjust "Year". Press «ENTER» to finish Year. Please follow previous step to finish Month, Day, Hour & Minute.
BRIGHTNESS
Press «ENTER» to start adjusting brightness of the screen.
CUSTOMIZE Press «ENTER» to edit customized info.
BATTERY TEST:
-
Select BATTERY TEST. Press «ENTER».
-
Press the ◀ to select REGULAR/STD or START/STOP battery.
* REGULAR/STD BATTERY:
FLOODED, AGM FLAT PLATE, AGM SPIRAL, VRLA/GEL
* START/STOP BATTERY:
AGM FLAT PLATE, EFB
-
Press the ◀▶ key to select the battery type:
-
Press «ENTER» to confirm choice.
-
Press the ◀▶ key to select the battery rating: CCA/SAE, EN, JIS, DIN, IEC, & CA/MCA.
-
Press «ENTER» to confirm choice.
-
Press the ◀▶ key to input the battery capacity.
CCA/SAE: 40\~2000
EN: 40\~1885
DIN: 25\~1120
IEC: 30\~1320
JIS: By Battery Type No.
CA/MCA: 50\~2400
-
Press the ◀▶ key to confirm temperature.
-
Press <
> to begin the test.
* Return Feature: Before the test is started, the user can always return to the previous setting page by pressing <
ANALYSEUR DU SYSTÈME
REGULAR/STD
START/STOP
BATTERY TYPE: AGM FLAT PLATE
SELECT RATING: CCA/SAE
SELECT CAPACITY: 560CCA/SAE
AU-DESSUS DE 32 °F / 0 °C ? OUI/NON
SURFACE CHARGE NOTICE:
The battery will hold a surface charge if the engine has been running or after the battery has been charged. The tester may prompt you to remove the surface charge.
A. Follow the instructions indicating when to turn the headlights on and off or apply a load into the battery.
IN VEHICLE:
SURFACE CHARGE IN VEHICLE? YES
TURN HEADLIGHTS ON FOR 15 SECS
OUT OF VEHICLE:
SURFACE CHARGE IN VEHICLE? NO
B. The tester will resume testing after it detects that the surface charge is removed.
10. Test the battery for few seconds.
11. Press the ◀▶ key to select battery fully charged or not if tester asks. Press «ENTER» to confirm choice.
12. When the test is completed, the display shows the actual volts and the actual CCA and internal resistance. {Press the ◀▶ key to read: SOH (STATE OF HEALTH) and SOC (STATE OF CHARGE)}.
13. One of the six test results will be displayed:
TESTING
IS BATTERY
CHARGED? YES/NO
GOOD & PASS
*The battery is good and capable of holding a charge.
GOOD & RECHARGE
*The battery is good but needs to be recharged.
CAUTION
*The battery may be serviced but decrease the capability of starting the engine gradually. The battery may fail under extreme climate conditions. There may be a poor connection between the vehicle and the battery affect the charging function. Please pay attention to the battery for replacement consideration and charging system checking.
TESTING
GOOD & PASS
VOL: xx.xx V
CCA: xxxx CCA/SAE
IR: xx.xx mΩ
GOOD & RECHARGE
VOL: xx.xx V
CCA: xxxx CCA/SAE
IR: xx.xx mΩ
CAUTION
VOL: xx.xx V
CCA: xxxx CCA/SAE
IR: xx.xx mΩ
RECHARGE & RETEST
*Battery is discharged, the battery condition cannot be determined until it is fully charged. Recharge & retest the battery.
BAD & REPLACE
*The battery will not hold a charge. It should be replaced immediately.
BAD CELL & REPLACE
*The battery has at least one cell short circuit. It should be replaced immediately.
LOAD ERROR
*The tested battery is bigger than 2000CCA/SAE or 200AH. Or the clamps are not connected properly. Please fully charge the battery and retest after excluding both previous reasons. If reading is the same, the battery should be replaced immediately.
SOC & SOH Display: Press directional keys to see SOC & SOH:
GOOD & PASS
SOC: xx.xx V
■■■■■■□ 90%
-
Press the ◀▶ key to select result printing: YES or NO. Press «ENTER» to confirm your choice.
-
Press «ENTER» return to MAIN MENU or remove the test clamps from the battery posts after completion of testing batteries to end test.
RECHARGE & RETEST
VOL: xx.xx V
CCA: xxxx CCA/SAE
IR: xx.xx mΩ
BAD & REPLACE
VOL: xx.xx V
CCA: xxxx CCA/SAE
IR: xx.xx mΩ
BAD CELL & REPLACE
VOL: xx.xx V
CCA: xxxx CCA/SAE
IR: xx.xx mΩ
LOAD ERROR
GOOD & PASS
SOC: xx.xx CCA/SAE
90%
IMPRIMER LES RÉ- SULTATS ?
OUI / NON
SYSTEM TEST:
- Select "SYSTEM TEST" from the main menu.
- Turn off all vehicle accessory loads such as light, air conditioning, radio, etc. Before starting the engine.
- When the engine is started, one of the three results will be displayed along with the actual reading measured.
xx.xx V
TURN OFF LOADS START ENGINE
CRANKING VOLTS NORMAL
The system is showing normal draw. Press «ENTER» to perform the charging system test.
VOLTS BEIM ANLASSEN LOW
The cranking voltage is below normal limits, troubleshoot the starter with manufacturers recommended procedure.
VOLTS BEIM ANLASSEN NOT DETECTED
The cranking voltage is not detected.
- Press «ENTER» to begin charging system test.
PRESS ENTER FOR CHARGING TEST
- Press the «ENTER» key, one of the three results will be displayed along with the actual reading measured.
HIGH CHARGING VOLTS WHEN TEST AT IDLE
The voltage output from the alternator to the battery exceeds the normal limits of a functioning regulator. Check to ensure there is no loose connection and the ground connection is normal.
SYSTEM TEST
CRANKING VOLTS xx.xx V NORMAL
CRANKING VOLTS xx.xx V LOW
CRANKING VOLTS NOT DETECTED
MAKE SURE ALL LOADS ARE OFF
ALT. IDLE VOLTS xx.xx V HIGH
If there is no connection issue, replace the regulator. Since most alternators have the regulator built-in, this will require you to replace the alternator. The normal high limit of a typical automotive regulator is 14.7 volts +/- 0.05. Check manufacturer specifications for the correct limit, as it will vary by vehicle type and manufacturer.
CHARGING SYSTEM NORMAL WHEN TEST AT IDLE
The system is showing normal output from the alternator. No problem is detected.
ALT. IDLE VOLTS xx.xx V NORMAL
LOW CHARGING VOLTS WHEN TEST AT IDLE
The alternator is not providing sufficient current to the battery. Check the belts to ensure the alternator is rotating with engine running. If the belts are slipping or broken, replace the belts and retest. Check the connections from the alternator to the battery.
ALT. IDLE VOLTS xx.xx V LOW
If the connection is loose or heavily corroded, clean or replace the cable and retest. If the belts and connections are in good condition, replace the alternator.
- Press «ENTER» for the charging system with accessory loads. Turn on the blower to high (heat), high beam headlights, and rear defogger. Do not use cyclical loads such as air conditioning or windshield wipers.
TURN ON LOADS PRESS ENTER
- When testing older model diesel engines, the users need to run up the engine to 2500 rpm for 15 secs.
RUN ENGINE UP TO 2500RPM 15 SEC
- Press «ENTER» to read the ripple from the charging system to the battery. One of the three testing results will be displayed along with the actual testing measured.
RIPPLE DETECTED NORMAL
Diodes function well in the alternator / starter.
RIPPLE DETECTED xx.xx V NORMAL
NO RIPPLE DETECT
Ripple is not detected.
NO RIPPLE DETECT
EXCESS RIPPLE DETECTED
One or more diodes in the alternator are not functioning or there is stator damage. Check to ensure the alternator mounting is sturdy and that the belts are in good shape and functioning properly. If the mounting and belts are good, replace the alternator.
RIPPLE DETECTED xx.xx V HIGH
- Press the «ENTER» key to continue the charging system with accessory loads. One of the three results will be displayed along with the actual testing measured.
CHARGING SYSTEM HIGH WHEN TEST WITH ACCESSORY LOADS
The voltage output from the alternator to the battery exceeds the normal limits of a functioning regulator. Check to ensure there are no loose connections and that the ground connection is normal. If there are no connection issues, replace the regulator.
ALT. LOAD VOLTS xx.xx V HIGH
Since most alternators have the regulator built-in, this will require you to replace the alternator.
CHARGING SYSTEM LOW WHEN TEST WITH ACCESSORY LOADS
The alternator is not providing sufficient current for the system's electrical loads and the charging current for the battery. Check the belts to ensure the alternator is rotating with the engine running. If the belts are slipping or broken, replace the belts and retest.
ALT. LOAD VOLTS xx.xx V LOW
Check the connections from the alternator to the battery. If the connection is loose or heavily corroded, clean or replace the cable and retest. If the belts and connections are in good working condition, replace the alternator.
CHARGING SYSTEM NORMAL WHEN TEST WITH ACCESSORY LOADS
The system is showing normal output from the alternator. No problem detected.
-
Press «ENTER» when charging system test is completed. Turn all accessory loads and engine off. Press «ENTER» to read the system test results.
-
Press "ENTER" to press result or not.
ALT. LOAD VOLTS xx.xx V NORMAL
TEST OVER. TURN OFF LOADS & ENGINE
ALT. LOAD VOLTS xx.xx V NORMAL RIPPLE VOLTAGE xx.xx V NORMAL
CRANKING VOLTAGE xx.xx V NORMAL ALT. IDLE VOLTS xx.xx V NORMAL
PRINT RESULT? YES/NO
IN-VEHICLE TEST
This is a combination test of both battery test & system test. Please refer to above testing procedures or follow the instructions on the display of the tester.
TERMS AND CONDITIONS OF WARRANTY
The warranty covers faulty workmanship for 2 years from the date of purchase (parts and labour).
The warranty does not cover:
- Transit damage.
- Normal wear of parts (eg. : cables, clamps, etc..).
- Damages due to misuse (power supply error, dropping of equipment, disassembling).
- Environment related failures (pollution, rust, dust).
In case of failure, return the unit to your distributor together with:
- The proof of purchase (receipt etc ...)
- A description of the fault reported
natural_image
Close-up of a black handheld electronic device with a digital display and mechanical bracket (no visible text or symbols)natural_image
Close-up of a handheld electronic device with a white roller inside, showing mechanical components and a digital display (no readable text or symbols)natural_image
Close-up of a black handheld electronic device with a display screen and a white clip, no visible text or symbols on the device itself.HAUPTMENÜ:
SESYSTEM ANALYSEGERÄT
DAS RATING WÄHLEN: CCA/SAE
DIE KAPAZITÄT WÄHLEN: 560CCA/SAE
ÜBER 32°F/0°C? JA/NEIN
natural_image
Close-up of a mechanical component with a directional arrow indicating movement, no visible text or symbols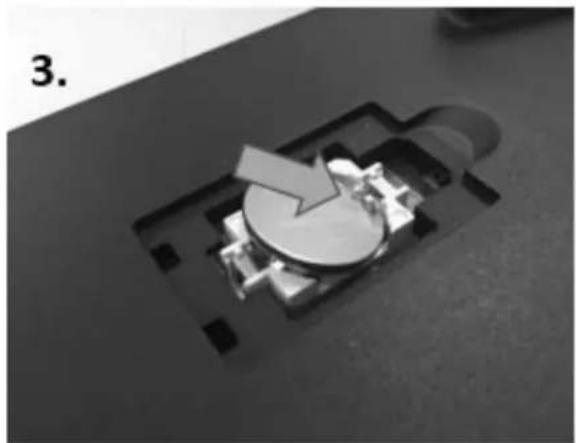
natural_image
Close-up of a mechanical component with a circular feature and arrow, no visible text or symbols
natural_image
Close-up of a mechanical component with a circular base and arrow indicator (no visible text or symbols)
natural_image
Close-up of a mechanical component with a circular feature and directional arrow, no visible text or symbols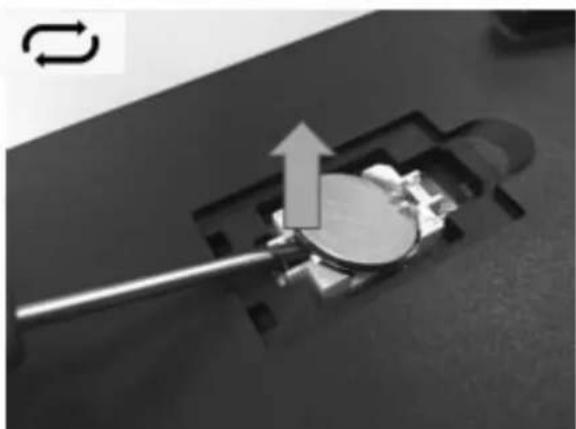
natural_image
Close-up of a mechanical component with an arrow indicating motion or force, no visible text or symbolsnatural_image
Close-up of a handheld electronic device with a display screen and mechanical bracket (no visible text or symbols)natural_image
Close-up of a handheld electronic device with a white roller inside, showing internal components and a digital display (no visible text or symbols)natural_image
Close-up of a black handheld electronic device with a display screen and a white clip, no visible text or symbols on the device itself.MENÚ PRINCIPAL:
CELL MALA & REEMPLAZAR
CELL MALA & REEMPLAZAR
VOL: xx.xx V
CCA: xxxx CCA/SAE
IR: xx.xx mΩ
ERROR DE CARGA
ALT. CARGA VOLTS xx.xx V NORMAL
natural_image
Close-up of a mechanical component with an arrow indicating direction, no visible text or symbols
natural_image
Close-up of a mechanical component with a circular feature and arrow, no visible text or symbols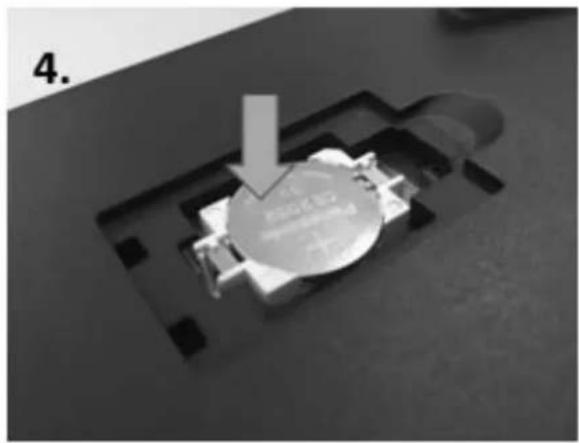
natural_image
Close-up of a mechanical component with a circular base and a downward arrow, no visible text or symbols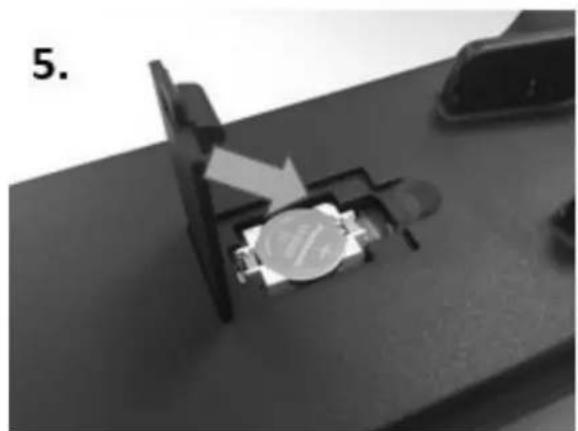
natural_image
Close-up of a mechanical component with a metallic circular component and an arrow indicating direction (no visible text or symbols)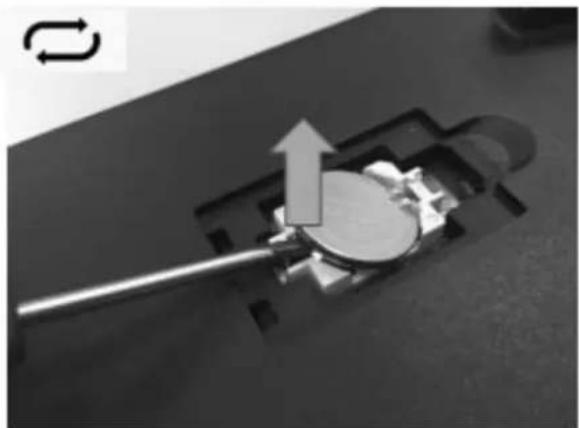
natural_image
Close-up of a mechanical component with a metallic rod inserted into a slot, showing a curved arrow indicating motion (no text or symbols present)natural_image
Close-up of a handheld electronic device with internal components and a display screen (no visible text or symbols)natural_image
Close-up of a handheld electronic device with a white roller inside, showing internal components and a digital display (no readable text or symbols)natural_image
Close-up of a black electronic device with a display and a small screen, no visible text or symbols on the body.MENÙ PRINCIPALE:
TESTER PER SISTEMI
TENS. MIN ALT. xx.xx V BASSA
TENS. ALT. CARCO xx.xx V ELEVATA
TENS. ALT. CARCO xx.xx V NORMALE
TEST COMPLETATO. SPEGNERE TUTTI GLI ACCESSORI E IL MOTORE
ALT. LOAD VOLTS xx.xx V NORMALE TENS. RIPPLE xx.xx V NORMALE
natural_image
Close-up of a mechanical device with a highlighted internal component and an arrow indicating direction (no text or symbols visible)
natural_image
Close-up of a mechanical component with a circular feature and arrow, no visible text or symbols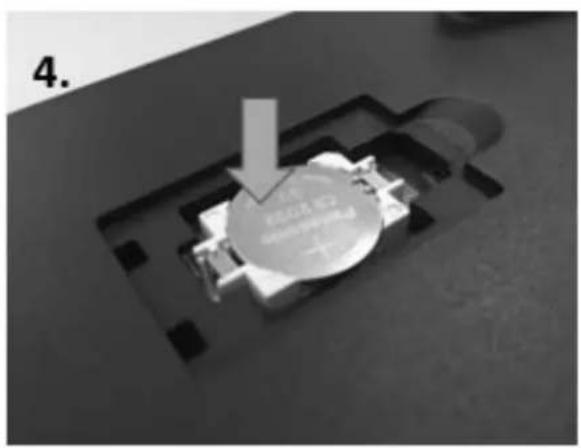
natural_image
Close-up of a mechanical component with a circular base and arrow indicator (no readable text or symbols)
natural_image
Close-up of a mechanical component with a metallic housing and a white arrow indicating a process (no visible text or symbols)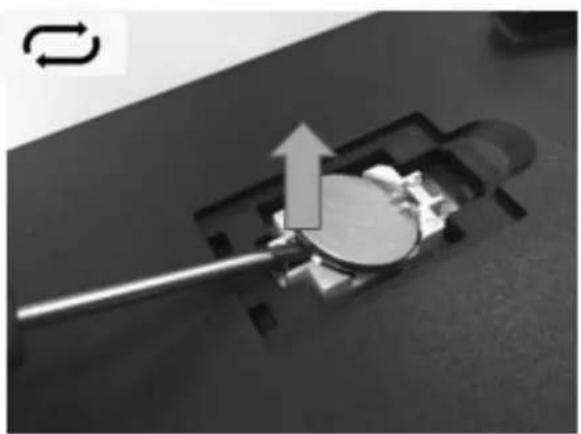
natural_image
Close-up of a mechanical component with a lever and arrow indicating motion (no text or symbols)natural_image
Close-up of a handheld electronic device with a display screen and mechanical bracket (no visible text or symbols)natural_image
Close-up of a handheld electronic device with a white cylindrical component inserted, showing internal components and a digital display (no visible text or symbols)natural_image
Close-up of a black handheld electronic device with a digital display and a 'TOOL' label (no readable text beyond branding)MENU PRINCIPAL:
COLOQUE O MOTOR A TRABALHAR ATÉ 2500RPM 15 SEC