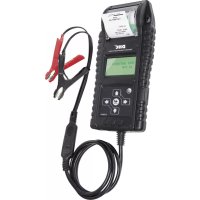
Gysflash 8.12 PL - Battery charger GYS - Free user manual and instructions
Find the device manual for free Gysflash 8.12 PL GYS in PDF.
| Product Type | Automatic Battery Charger |
| Brand | GYS |
| Model | Gysflash 8.12 PL |
| Nominal Voltage | 12 V (Lead and Lithium LFP) |
| Charge Current | 1 A / 4 A / 8 A depending on mode |
| Battery Types | Lead (Gel, AGM, Liquid) and Lithium (LFP / LiFePO4) |
| Battery Capacity (Lead) | 15 to 160 Ah (charge), up to 240 Ah (maintenance) |
| Battery Capacity (Lithium) | 1.2 to 160 Ah (charge), up to 240 Ah (maintenance) |
| Power Supply | 220-240 V AC, 50-60 Hz |
| Dimensions (estimated) | 20 x 10 x 5 cm |
| Weight (estimated) | 0.8 kg |
| Main Functions | 7 steps for Lead, 8 steps for Lithium, AGM mode, desulfation, recovery |
| Protections | Reverse polarity, short-circuit, spark-proof protection, thermal |
| Display | Selection LEDs (Pb/Lithium, current) and charge status |
| Operating Temperature | 0°C to 40°C (automatic adaptation) |
| Standards | CE, EAC, UKCA, CMIM (Morocco) |
| Warranty | 2 years (parts and labor) |
| Maintenance | Clean with a dry cloth; no solvents |
| Supplied Accessories | Clamps, terminals, cigarette lighter adapter (ref. 077331) optional |
| CAN-BUS Compatibility | Yes, via 12 V socket with adapter |
Frequently Asked Questions - Gysflash 8.12 PL GYS
User questions about Gysflash 8.12 PL GYS
0 question about this device. Answer the ones you know or ask your own.
Ask a new question about this device
Download the instructions for your Battery charger in PDF format for free! Find your manual Gysflash 8.12 PL - GYS and take your electronic device back in hand. On this page are published all the documents necessary for the use of your device. Gysflash 8.12 PL by GYS.
USER MANUAL Gysflash 8.12 PL GYS
natural_image
Technical line drawing of a mechanical housing or enclosure with cylindrical components and mounting holes (no text or symbols)| FR | 02-07 / 44-48 |
| EN | 08-13 / 44-48 |
| DE | 14-19 / 44-48 |
| ES | 20-25 / 44-48 |
| RU | 26-31 / 44-48 |
| NL | 32-37 / 44-48 |
| IT | 38-43 / 44-48 |
GYSFLASH 8.12 PL
INSTRUCTIONS DE SÉCURITÉ

ANOMALIES, CAUSES, REMÈDES
CONDITIONS DE GARANTIE
This user's manual includes operation instructions, and the safety precautions to be followed by the user. Please read it carefully before first use and keep it for future reference.
This machine should only be used for charging within the specifications indicated on the machine and in the instruction manual. The safety instructions must be followed. The manufacturer cannot be held responsible in the event of improper or dangerous use.
This unit can be used by children aged eight or over, by people with reduced physical, sensory or mental capabilities as well as by those with a lack of experience or knowledge. However, these aforementioned persons must be properly supervised and they must have read and understood the user instructions, alongside having been made aware of the risks. Children must not play with the product. Cleaning and maintenance should not be performed by an unsupervised child.
Do not use to charge domestic batteries or non rechargeable batteries.
Do not use the charger if the mains cable or plug is damaged.
In order to avoid short-circuiting the battery, do not use the appliance if the charging cable is damaged or has an assembly defect.
Never charge a frozen or damaged battery.
Do not cover the device.
The automatic operating mode and the relevant usage restrictions are explained later in this manual.

Fire and explosion risks!
A charging battery can emit explosive gases.
- During the charge, the battery must be placed in a well ventilated area.
- Avoid flames and sparks. Do not smoke near the device.
- Protect the electrical contact surfaces of the battery against short circuits.
Do not leave a charging battery unattended for a long time


Risk of acid dispersion!
- Wear protective goggles and gloves.
- In case of contact with the eyes or the skin, rinse with water abundantly and see a medical doctor as soon as possible.
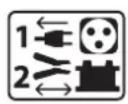
Connection / disconnection :
- Disconnect the power supply before plugging or unplugging the connections to/from the battery.
- Always ensure the Red clamp is connected to the «+» battery terminal first. If it is necessary to connect the black clamp to the vehicle chassis, make sure it is a safe distance from the battery and the fuel/exhaust pipe. The charger must be connected to the power supply.
- After charging, disconnect the charger from the mains, then disconnect the negative clamp from the car body and then disconnect the positive clamp from the battery, in this order.

Power supply:
• Class II équipement
- This equipment complies with standard IEC 61000-3-12.
- This equipment complies with standard IEC 61000-3-11.

Maintenance:
- If the power cable is damaged, it must be replaced by the manufacturer, its after-sales service, or an equally qualified person to prevent possible danger.
- Maintenance should only be carried out by a qualified person.
- Warning!
Always disconnect from the mains before carrying out maintenance on this machine. - If the internal fuse has blown, it must be replaced by the manufacturer, the service department or a similarly qualified person in order to avoid a safety hazard.
- Do not use solvents or any agressive cleaning products.
- Clean the surfaces of the unit with a dry cloth.


Regulations:
• Equipment complies with European directives
- The Declaration of Conformity is available on our website.
- The Eurasian Economic Community (EAEC) mark of conformity.
- This equipment conforms to UK requirements. The UK Declaration of Conformity is available on our website (see cover page).
• This device complies with Moroccan standards.
•TheC _o (CMIM) declaration of conformity is available on our website.


Disposal:
- This machine is subject to selective collection. Do not dispose of in domestic waste.
GENERAL DESCRIPTION
The GYSFLASH 8.12 PL is ideal for recharging most lead-acid (Gel, AGM, Liquid, ...) and Lithium Iron Phosphate (LFP / LiFePO4) batteries, commonly used for motorbikes, cars, utility vehicles and small agricultural machines..
This charger is ideally suited for:
- Charging of 12 V lead-acid batteries (6*2 V cells in series) from 15 Ah to 160 Ah, and up to 240 Ah for float charging.
- Recharging of 12V Lithium Iron Phosphate batteries (4*3V cells in series) from 1.2 Ah to 160 Ah, and up to 240 Ah for float charging.
START UP
- Connect the charger to the battery using the proper accessory (clamps, lugs, etc...).
- Plug the charger to the mains (single phase 220-240Vac 50-60Hz).
- Charger operation :
| Button Action Selection LED | ||||
 | long press (3 s) | Change mode. | Lead-acid | ● Pb |
| Lithium | ● Lithium | |||
| short press | Change the charging current and access the AGM option in Lead mode. | |||
| In Lead-acid mode: | 1 A | ^1A + ● Pb | ||
| 8 A | ^8A + ● Pb | |||
| 1A - AGM | ^1A + 0 Pb | |||
| 8A - AGM | ^8A + 0 Pb | |||
| In Lithium mode: | 4 A | ● 4A + ● Lithium | ||
| 8 A | ● 8A + ● Lithium | |||
- After about five seconds without pressing the button, charging starts automatically.
- During the charge, the device indicates the charge progress. When the light flashes, the battery is ready to start the engine. Once the indicator OK stays on, the battery is completely charged.
- Charging can be stopped at any time by unplugging the mains plug or by pressing the button
- After the charge is complete, disconnect the charger from the mains, then disconnect the clamps from the battery.
CHARGE MODES
- Description of Modes and Options:

CHARGE mode Lead (14.4V / 1A - 8A) :
Mode designed for lead-acid batteries, 12V from 15Ah to 160Ah and up to 240Ah for floating charge. Automatic seven step charge cycle.

COLD/AGM Option (14.7 V) :
Modifies the charging voltage at 14.7V to charge the battery during cold weather (Less than 5°C) or for some AGM batteries or batteries with caps.

Charge mode Lithium (14.4V / 4A - 8A) :
Mode designed for 12V Lithium batteries, from 1.2Ah to 160Ah and up to 240Ah for floating charge. Automatic charging cycle in eight steps.

Some Lithium batteries incorporate a UVP protection (Under Voltage Protection) which disconnects the battery in case of deep discharge. This protection prevents the charger from detecting the battery. In order for the Gysflash 8.12 PL to be able to charge the battery, the UVP protection must be deactivated. To do this, set the charger to Lithium charging mode and then unplug it. Press the button ▶ while plugging the Gysflash back in and hold it down for 5 seconds after the charger is turned on. The charger will then deactivate the UVP protection and automatically start charging.
Charging current:
● 1A ● 4A ● 8A Selection designed to choose the most suited charging current based on the type and size of the battery (lead-acid or lithium).
Charging current 1 A 4 A 8 A
| Battery capacity | Pb 15 | 50Ah - 50 | 160Ah | |
| LFP - 1.2 | 20Ah 20 | 160Ah | ||
| (36 60Ah EqPb*) (60 | 480A ^* ) |
*Lead-acid battery equivalent : Lithium batteries have better starting performance (CCA) than lead-acid batteries. This is why some lithium battery manufacturers indicate the lead battery equivalent (EqPb) corresponding to the capacity of a lead-acid battery with the same starting performance. For instance, a 10Ah LFP battery will have approximately the same starting performance as a 30 Ah lead-acid battery.
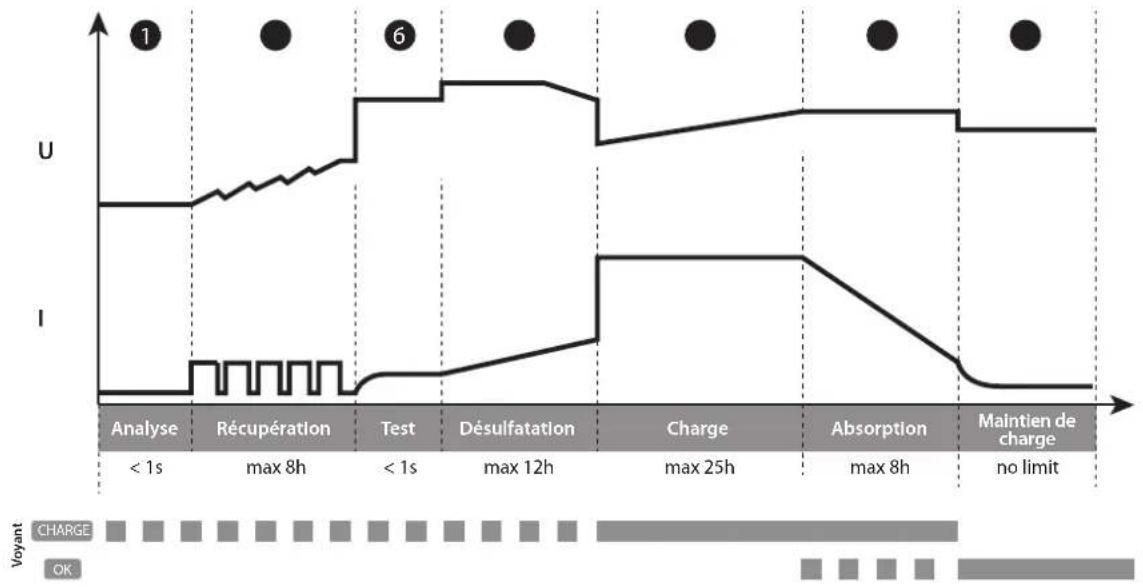
- Lead-acid charge curve:
The Gysflash 8.12 PL uses an advanced 7-step lead-acid charging curve that ensures optimal performance of your lead-acid battery.
line
| Event | U (Voyant) | I (Voyant) | |-------|------------|------------| | 1 | CHARGE | CHARGE | | 6 | CHARGE | CHARGE | | Charge | CHARGE | CHARGE | | Absorption | CHARGE | CHARGE | | Maintien de charge | CHARGE | CHARGE |Step 1: Analysis
Analysis of the battery status (level of charge, reverse polarity, incorrect battery connected...)
Step 5: Charge (1A - 8A)
Fast charge at maximum current to reach 80% charge level.
Step 2: Recovery (0.5A - 3A)
Recovering damaged elements following a prolonged deep discharge.
Step 6: Absorption (14.4V or 14.7V with AGM option)
Constant voltage load to bring the charge level to 100%.
Step ③: Test
Sulfated battery test
Step 7: Maintenance charge (13.6 V)
Maintaining the battery charge level at maximum.
Step 4: Desulphation (15.8V)
Battery desulphation process.
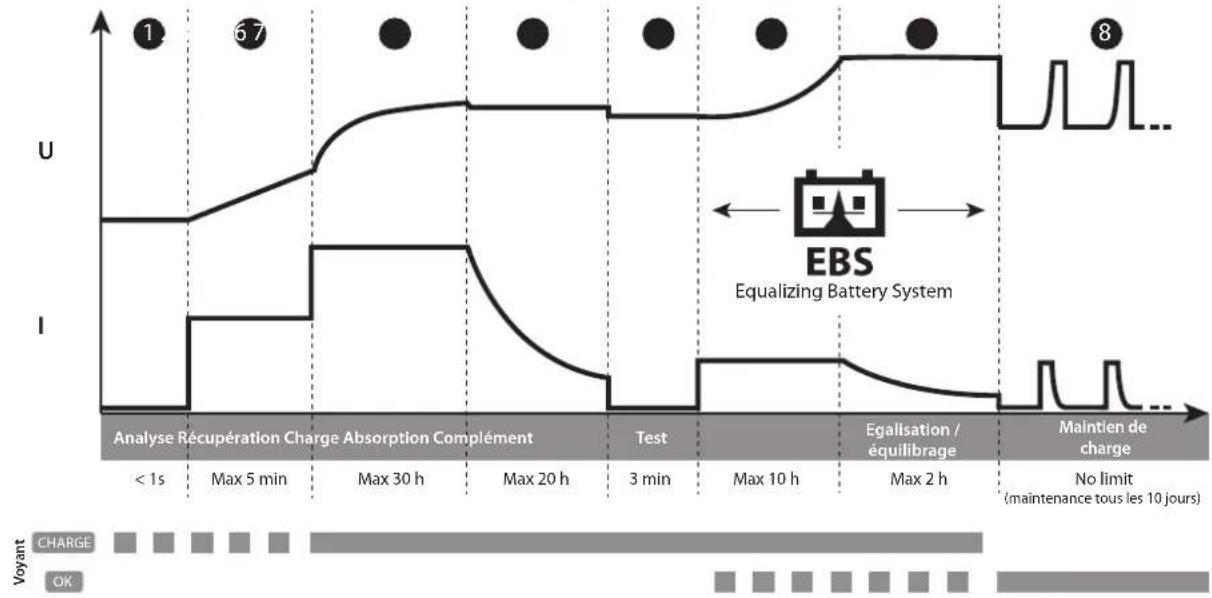
• Lithium charging curve:
The Gysflash 8.12 PL uses an advanced 8-stage Lithium charging curve that ensures optimal performance of your LFP battery.
line
| Time Interval | Voltage (U) | | ------------- | ----------- | | < 1s | U | | Max 5 min | I | | Max 30 h | I | | Max 20 h | I | | 3 min | I | | Max 10 h | I | | Max 2 h | I | | No limit (maintenance tous les 10 jours) | I |Step 1: Analysis
Analysis of the battery status (level of charge, reverse polarity, incorrect battery connected...)
Step⑤: Test
Charge retention test
Step 2: Recovery (0.2A - 1A)
Recovery process after deep discharge.
Step 6: Completion
Reduced current charging to reach 100% level of charge.
Step ③: Charge (4A - 8A)
Fast charge at maximum current to reach 90% charge level.
Step 7: Equalization / balancing (14.4V)
Balancing the battery cells
Step 4: Absorption (13.8V)
Constant voltage load to bring the charge level to 98%.
Step 8: Maintenance charge (13.8V)
Maintain the battery charge level at its maximum with maintenance charging every 10 days.
• Estimated charge time
| Lead-acid | Lithium | |||||||||||
| Battery capacity | 2Ah | 5Ah | 50 Ah | 100 Ah | 120 Ah | 160 Ah | 2Ah(6Ah EqPb*) | 15 Ah(45Ah EqPb*) | 50 Ah(150Ah EqPb*) | 70 Ah(210Ah EqPb*) | 125 Ah(375Ah EqPb*) | 160 Ah(480Ah EqPb*) |
| Charge time0% >> 90% | 2 h | 3 h | 5 h | 9 h | 11 h | 14 h | 1 h | 3 h | 5 h | 6 h | 11 h | 14 h |
*Lead acid battery equivalent: Lithium batteries have better starting performance (CCA) than lead-acid batteries. This is why some lithium battery manufacturers indicate the lead battery equivalent (EqPb) corresponding to the capacity of a lead-acid battery with the same starting performance. For instance, a 10Ah LFP battery will have approximately the same starting performance as a 30 Ah lead-acid battery.

If the motorcycle is equipped with a 12V socket, the GYSFLASH 8.12 PL is able to charge the battery via this socket with the CAN-BUS system, without having to switch on the dashboard. In this setup, connect the cigarette lighter adapter (ref. 077331) on the charger and the 12 V socket of the motorcycle and then follow the «Start-up» procedure detailed above. In some cases, charging may not start until 2 minutes after the connections have been made.
- Protections :

The GYSFLASH 8.12 PL has comprehensive safety features to protect it against short-circuits and polarity reversals. It has an anti-spark feature which prevents sparks whilst connecting the device to the battery. This charger has double insulation and is safe to use with the battery in situ as it will protect the vehicle's on-board electronics.
The GYSFLASH 8.12 PL is fitted with an integrated temperature sensor that ensures that the charging current is adapted to the ambient temperature to prevent internal the electronics from overheating.
DEFECTS: CAUSES & SOLUTIONS
| Troubleshooting Causes Solutions | |||
| 1 | The indicator ⚠ blinks rapidly. | · Polarity reversal· Battery voltage too high· Short-circuited clamps | · Check that the clamps are properly connected.· Check that it is a 12V battery. |
| 2 | The indicator ⚠ blinks slowly. | Battery out of order or very low voltage. | Change the battery. |
| 3 | The indicator ⚠ is on. | Failure during charging, battery not recoverable. | Change the battery and press ➤ to restart a charge. |
| 4 | The indicator ⚠ stays on even after pressing the button ➤ | Thermal protection | Ambient temperature is too high (>60°C), cool the room and let the charger cool down. |
| 5 | The indicator ⏻ flashes. | Charger in sleep mode. | Press the ➤ button or connect a battery to the charger to wake up from standby. |
| 6 | The light ⏻ stays on. | Charging interrupted by pressing the button ➤. | Press again ➤ to restart the charge. |
WARRANTY CONDITIONS
The warranty covers any defects or manufacturing faults for two years from the date of purchase (parts and labour).
The warranty does not cover:
- Any other damage caused by transport.
• The general wear and tear of parts (i.e.: clamps, etc.).
- Incidents caused by misuse (incorrect power supply, dropping or dismantling).
- Environment-related faults (such as pollution, rust and dust).
In the event of a breakdown, please return the appliance to your distributor, along with:
- a dated proof of purchase (receipt or invoice etc.).
a note explaining the malfunction.
SICHERHEITSHINWEISE

text_image
EAC UK CAline
| Event | U | I | | ------------------- | ------- | ------- | | Analyse < 1s | High | Low | | Récupération max 8h | Medium | Low | | Test < 1s | Low | Low | | Désulfation max 12h | High | Low | | Charge max 25h | High | Medium | | Absorption max 8h | High | Low | | Maintien de charge no limit | Low | Low |line
| Phase | Voltage (U) | |-------|-------------| | 1 | U | | 6 | U | | 7 | U | | Max 5 min | I | | Max 30 h | I | | Max 20 h | I | | 3 min | I | | Max 10 h | I | | Max 2 h | I | | No limit (maintenance tous les 10 jours) | I |Phase 1: Analyse
text_image
CE EAC UK CAРегламентация :
line
| Phase | U (voltage) | I (current) | |-------|-------------|-------------| | 1 | High | Low | | 6 | Medium | Low | | 7 | High | Low | | 8 | High | Low |Этап 1 : Анализ
line
| Event | U (Line) | I (Line) | | ------------------- | -------- | -------- | | Analyse < 1s | High | Low | | Récupération max 8h| Medium | Low | | Test < 1s | High | Low | | Désulfation max 12h| High | Low | | Charge max 25h | Medium | Low | | Absorption max 8h | High | Low | | Maintien de charge no limit | Low | Low |Stap 1 :Analyse
line
| Time (h) | Voltage (U) | Current (I) | |----------|-------------|-------------| | < 1s | High | Low | | Max 5 | Medium | Low | | 30 h | Low | Low | | Max 20 | Low | Low | | 3 min | Low | Low | | 10 h | Low | Low | | Max 2 h | Low | Low | | Test | Low | Low | | No limit | Low | Low | | Egalisation / équilibrage | High | Low | | Maintien de charge | High | Low | | (maintenance tous les 10 jours) | High | Low |Stap 1 :Analyse
Stap ③ :Laden (4 A - 8 A)
line
| Time Interval | Voltage (U) | | ------------- | ----------- | | < 1s | U | | Max 5 min | I | | Max 30 h | I | | Max 20 h | I | | 3 min | I | | Max 10 h | I | | Max 2 h | I | | No limit (maintenance tous les 10 jours) | I |Fase 1: Analisi
text_image
GYSFLASH 8.12 PL Pb/Lithium SMART CHARGER - □12V CHARGE Pb Lead acid 15.160Ah = AGM - Lithium LiFePO4 1.2.160Ah 3s = MODE 1s = (A) 1 6 7 8 9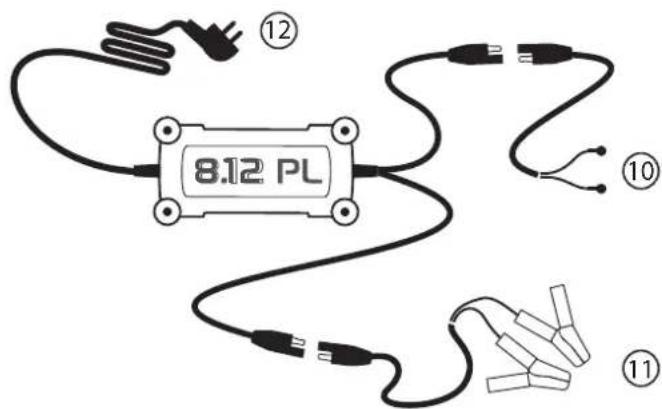
text_image
8.12 PL ⑫ ⑩ ⑪FR EN DE ES RU NL IT
| 1 | Boutonde sélection | Buttonde sélection | Auswahl-Taste | Botón deselección | Кнопка выбора | Keuzeknop | Pulsantede sélection |
| 2 | Veille | Sleep mode | Stand by | En espera | Режим ожидания | Stand-by | Attiva |
| 3 | Charge en cours | Charge inprogress | Ladefortschritt | En proceso decarga | Идет зарядка | Bezig metopladen | Carica in corso |
| 4 | Charge terminée | Chargecomplete | Aufladen beendet | Carga terminada | Зарядказакончена | Opladen voltooid | Carica terminata |
| 5 | Défaut | Fault | Fehler | Fallo | Ошибка | Storing | Errore |
| 6 | Courant de charge | Charging current | La [0W7Z] om | Corriente de carga[65ZX] | Ток нагрузки[0WZX] | Laadstroom[03Z3] | Corrente di carica[23A2] |
| 7 | Coura   | Char [03YZ][2H0A] Current |  La [5803] um La [5803] um | Corrie  [57ZZ] carga [57ZZ] carga | Ток [2KWVT][H0W3] 3ки | La [2X8W] Linnium Corrente d [2XCB] Linnium Corrente d [2XCB] | a |
| 8 | Mo# Charge[Littium | Cha  ModeLittium ModeLittium | La  PlusLittium PlusLittium | Mo  Liuo Liuo | Режи  Литии Литии | La [D003] Littium | Mo [245K] Liuo |
| 9 | Mo# Charge[CYOD]+  option AGM option AGM | Charge ModeLi [ASH7] id+ [X255]option AGM | LaudemodusBl [60AY] re+ [604G]AGM Option | Mouo Carga[2XT4]+  Opcion AGM Opcion AGM | Режим зарядки[SCWD] + +  опция AGM опция AGM | Laadmodule[0TBT]+  Optic AGM Optic AGM | Mouo carica[F (K3Z4)]option AGM |
| 10 | Oeillets de charge[0XAY] | Charge terminals | Ladeose | Terminal de carga[CBHT] | Ушки зарядки | Contact ringetjes | Carica di poli[6STX] |
| 11 | Pinces de charge | Batte [26X3] Chargingclamps | Ladoklomme | Pinzas de carga[2GY6] | Зажимья зарядки | Laau-Klemmen | Morsuta di carica[4CT6] |
| 12 | Prise scoteur[0732] | Mamio plug | Neizooker | Cl  lecorriente lecorriente | Сетевый вилка | Stopcontact | W27C]optin |
GYS France
Siège social / Headquarter