Multipic 4.1 - Projector Overmax - Free user manual and instructions
Find the device manual for free Multipic 4.1 Overmax in PDF.

User questions about Multipic 4.1 Overmax
0 question about this device. Answer the ones you know or ask your own.
Ask a new question about this device
Download the instructions for your Projector in PDF format for free! Find your manual Multipic 4.1 - Overmax and take your electronic device back in hand. On this page are published all the documents necessary for the use of your device. Multipic 4.1 by Overmax.
USER MANUAL Multipic 4.1 Overmax
EN: The product complies with requirements of EU directives.
Pursuant to the Directive 2012/19/EU, this product is subject to selective collection. The product must not be disposed of along with domestic waste as it may pose a threat to the environment and human health. The worn-out product must be handed over to the electrics and electronics recycling center.
Thank you for placing trust in us and choosing Overmax.
Thanks to the use of high-quality materials and modern solutions, we provide you with a product perfect for everyday use. We are convinced that the product will satisfy your requirements as it has been designed with utmost care. Before you start using the product, please read this manual carefully.
Should you have any remarks or questions concerning the product, please do not hesitate to contact us:
Before you start using the projector, please read and follow the guidelines included in this operating manual. A wrong use of the device may lead to electric shock and raise fire risk. When using and maintaining the projector, please follow the instructions below.
Note:
How to install
- To enjoy watching even more, use the projector in dark rooms or rooms in which curtains have been drawn.
- Use the projector carefully as dropping or failure may damage the parts or cause the image to get blurred and be displayed improperly
How to switch on
- Be careful when you use the feeding cable, make sure the cable does not bend extensively; damage to the feeding cable may lead to electric shock or fire.
- Disconnect the feeding cable after you have switched the power off
How to clean
- After switching the power off, disconnect the feeding cable.
Clean the casing with a wet cloth and natural cleaning agents on a regular basis.
EN
- To clean the projector lens, use the glasses tissue or soft fabric in order not to scratch the lens.
Clean ventilating holes and projector loudspeakers with a brush on a regular basis, otherwise the ventilation may get blocked
High temperature
- When the projector is active, make sure the ventilating holes of the device are not covered. For this reason do not place it on soft surfaces and do not cover with fabrics.
- Do not look into the lens when it operates.
Additional information
- Do not rub any liquids in and do not place heavy items on the projector.
- To guarantee stable heat dispersion, adjust the height of the project at the lower area before you activate it.
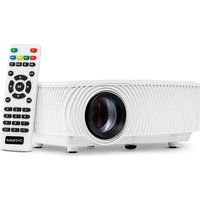
Description (fig. 1):
- Base adjustment
- Fan
- Infrared receiver
- Image sharpness knob
- Lens
- Image shape change knob
- VGA port
- Loudspeaker
- Main switch
- Volume adjustment
- Feeder port
- Projector assembly holes
- Loudspeaker
14.Label
1.Outlook
Upper panel (see: fig. 2)
- Confirm key.
- Direction keys - when you press these keys, you can choose menu with up/down keys and left/right keys.
- On/off switch - press the power key to switch the projector on or off. This function and power key on the remote control have the same function.
- Select the input signal source - AV / HDMI / VGA.
- Options menu - press this key to set menu with arrow keys.
Rear panel (see: fig. 3)
- IR signal receiver (remote signal)
-
VGA port
-
USB port
- HDMI/HDMI2 port
- Mini-Jack (audio input 3,5mm
- AV port
Note! To avoid damage, connect the input cable properly before you switch the projector on.
Remote control (see: fig. 4)
- LED light
- Volume down
- On/off key
- Mute
- Select source
- Projection screen rotation
- Direction keys
- Confirm key
- Options menu
- Exit
- Homepage
- Previous slide key
- Volume up
- Next slide key
2. How to install
Standard settings (front projection).
Please read the table below to adjust the image size and projector distance as well as pay attention to sample picture (see: fig. 6)
| Shape coefficient 16:9 | |
| Image size (inches) Distance (m) | |
| 50” 1.60 | |
| 70” 2.24 | |
| 100” 3.20 | |
| 120” 3.85 | |
If the distance between the projector and screen is lower than minimum distance or is considerably longer, the image may be blurred.
How to adjust the image shape
Please see the trapezoid adjustment diagram (see: fig. 5)
X - wrong installation
- correct installation
EN
Possible ways of installing the projector (see: fig. 6)
Contact the professional installer to assemble the projector below the ceiling. Follow the instructions below to assure proper positions of the projector.
- Ceiling assembly for front projection.
- Placing the projector on the platform for front projection.
- Ceiling assembly for rear projection.
- Placing the projector on the platform for rear projection.
Warning: The projector may get damaged and be irreparable if it has been wrongly assembled on the ceiling or other surface.
Use the projector in the environment in which the temperature does not exceed 5^ - 35^ In case you do not follow this range, the projector may fail.
The failure may occur if the projector is located in the dusty, wet, humid or smoky area.
- Poor ventilation may lead to overheating which leads to damage to the projector and may pose a threat to one's life.
3. How to use
How to switch on and off:
- When the projector is connected to source of power supply, it gets ready for work.
- To switch the projector on or off, set the power key at the back of the casing in on (-) position. Press the on/off key on the remote control or projector.
How to adjust sharpness and how to correct screen inclination:
- Place the projector so that the lens remains perpendicular to the wall or board on which the image is to be displayed.
To improve sharpness of the image, turn the sharpness knob (9) located at the side of the casing. - If the image is not displayed perpendicularly, it will be deformed.
- Deformed image in the shape of the trapezoid can be corrected with the use of a image shape change knob (10). See: fig. 7
How to connect to source of multimedia through cable (see: fig. 3)
The projector allows displaying the image from various devices. Depending on the device, please use the relevant input at the back of the casing.
a. USB input - for example pendrive, hard drives.
b. HDMI input - for example PC, laptop, console, satellite receiver, phone (supporting MHL technology and only through the dedicated MHL cable).
c. Video-In (AV) input - for example console, satellite receiver.
d. VGA input - for example PC, laptop, satellite receiver.
How to set source of video (see: fig. 8)
If more than one video signal is connected to the projector, please specify the device from which the projector is to broadcast the image.
a. Use direction keys on the remote control to select (Source) (3) and confirm with (OK) key on the remote control.
b. You will see a list of video sources to be selected (as described in a previous point).
c. Use direction keys on the remote control to select the source from which the image must be broadcast and confirm with (OK) key.
To return to video source list, select (MENU) on the remote control. In the video source selection section, you can also set parameters for image and sound:
Image: image mode, brightness, color, contrast, sharpness.
Sound: sound mode, bass, treble, balance, equalizer.
How to connect to Wi-Fi network (see: fig. 9)
a. Use direction keys on the remote control to select (Settings) and confirm with (OK) key on the remote control.
b. Select (Network) and confirm your choice.
c. Select (Wi-Fi) and confirm your choice.
d. Select (Scan) and confirm your choice. The projector will scan available Wi-Fi networks and show a list of options.
e. Select the name of Wi-Fi network which you wish to connect to and confirm with (OK) key on the remote control.
f. If the network is secured with password, you will be requested to enter it. Enter the field (Password) and confirm your choice.
g. The screen will show a virtual keyboard which you can use to enter the password. To navigate in the keyboard, use direction keys on the remote control, and confirm selection of letters and numbers with (OK) key. Upper case letters can be activated by selecting and choosing (ABC). After you have entered the correct password, press the exit key (12) on the remote control to close the keyboard. Confirm the password by selecting (Accept/Confirm) key and press (OK).
h. To return to main menu, double-click the exit key (12)
EN
How to connect to external disk (see: fig. 10)
To play multimedia from a pendrive or external disk, you need to do the following:
a. Insert the disk in USB-A port at the back of the casing.
b. Use direction keys on the remote control to select (Media) and confirm by pressing (OK) on the remote control.
How to connect video to mobile devices remotely
The projector is equipped with a wireless Wi-Fi connection module which allows displaying the image from a mobile device wirelessly. Only mobile devices compatible with MIRACAST technology can transmit image to the projector.
To start a wireless video transmission to the projector, please follow the steps below:
a. Use direction keys on the remote control to select (Miracast) if you use the device with Android system compatible with Miracast. If you use Apple device with iOS system, select (iOS Cast). After selecting, confirm with (OK) key on the remote control.
b. Activate Wi-Fi module in the mobile device.
c. Depending on the device, connecting through „Miracast" may vary.
Android devices: find settings described as Miracast, next screen duplication or screen connection. Next enable searching for active wireless screens. Then find the device called „ZYCast" and connect to it.
Apple devices with iOS system: Make sure the projector and device from which you wish to broadcast the image is connected to the same Wi-Fi network. Enter the control panel and select screen duplication, next find the device named „ZYCast" and connect to it.
In case of any connection issues, return to Wi-Fi network connection setup. Select (AUTO-IP) and confirm. Next go back to the connection screen (iOS Cast) and retake steps in the phone.
Advanced playing settings in iOS mode
a. Use direction keys on the remote control to select (Settings) and confirm with (OK) key.
b. Go to (Advanced) and confirm your choice with (OK) key.
c. Select (iOS Play Mode), and then select image duplication or screen shot.
| Problem Possible causes | |
| 1. The projector does not work when the power switch is on | Feeding cable has been improperly connected |
| Power switch is damaged | |
| 2. The projector does not work when using the remote control | Power switch is off |
| Remote control does not have batteries or batteries are flat | |
| Remote control is not directed at infrared receiver (2) | |
| Infrared receiver (2) is under strong illumination | |
| 3. No image Input source may be wrong | |
| No input signal | |
| Input cable is not connected | |
| In PC mode, PC output frequency is not 50-60Hz. Make sure the PC output is connected to the projector. | |
| If you use the laptop, make sure the output signal is VGA | |
| 4. Auto-shutdown Projector's ventilation | tion is blocked |
| Voltage is not stable | |
| The projector is overheated, make sure the fan (8) is not damaged. |
Einführung
YbIMKHeHHa Ta BmKHeHHa:
-Пися пдкюченя до джерета кИВлени поекторпесхову ржим ratobhocti.
ДяТOrO,и6yBIMKHyTn a6o BIMKHyTn npoeKTOp,пepeMKHITb KhoNkYЖINBLeHЯHa3aDiHni NaHeJI,No3uCiya yBIMKHeHHa(-). HaTnCHiTB KHOJky yBIMKHeHHa/BIMKHeHHa nylbTi a6o npoeKTopi.
PerylIOBaHHra p3KocTi Ta KopeKciHaXnLy ekpaHy:
- Po3micitb npoeKTop TaKIM YINOM, 06 o6'ekTnB 3HaxoDnBCa nepneHnkyIrpHo Do cTIHN a6o nlounHn, Ha KOTpy 6ynde TpaHcJIIOBaTncs3O6paJxehn.
Дяналаштуваимя pi3kocTi TpaHcIbObaHOro 3o6paJxehnЯ KpyTITb peryIaTOpom pi3kocTi (9) kOTpni 3naXoIHTbcr 360ky Ha Kopnyci,do MOMeHTy, nOKn 3o6paJxehnЯ He Habepe pi3kocTi. - YKsqo 306paXeHHraHcJIIOEbC8 He y nepneHdkyIapHOMy noLoXeHHi 306paXeHHa Byde MaTHn HeppaBnIbHy fOpMy.
3o6paXeHHa y φopMi Tpaneu II MoXHa BiDpeRyIHOBaTu 3a DOnOMOrOIO perYJrTopa 3mHn φopMn 3o6paXeHHa (10). DInB.: pnc 7