Multipic 5.1 - Projector Overmax - Free user manual and instructions
Find the device manual for free Multipic 5.1 Overmax in PDF.

| Product type | Projector |
| Brand | Overmax |
| Model | Multipic 5.1 |
| Power supply | AC power cable |
| Native resolution | Not specified in the manual (estimated: 1920x1080) |
| Connectivity | HDMI (x2), USB, AV, RJ45 (LAN), Bluetooth, Wi-Fi |
| Main features | Miracast, MaxhubShare, multimedia playback (USB/disk), system update, keystone correction, digital zoom |
| Supported video formats | 3GP, AVI, FLV, MP4, MPG, VOB, TS, M2TS, DAT, MKV |
| Supported audio formats | MP3, APE, AAC, FLAC, OGG, WAV, WMA, MID, DTS, M4A |
| Supported image formats | BMP, JPG, PNG, JPEG |
| Cleaning the casing | Clean with a damp cloth, unplug before cleaning |
| Cleaning the lens | Use a glasses wipe or soft cloth to avoid scratches |
| Cleaning vents and filters | Regularly clean the ventilation holes and dust filter with a soft brush |
| Safety - Operating temperature | 5°C to 35°C |
| Safety - Precautions | Do not obstruct vents, do not look at the lens while operating, do not disassemble yourself, avoid humidity and dust |
| Spare parts / accessories | Remote control with batteries, power cable, dust filter |
| Repairability | Do not disassemble yourself - contact a professional |
| General information | Manufactured by BrandLine Group Sp. z o.o., compliant with European directives (RED, EMC, LVD), separate collection according to WEEE |
Frequently Asked Questions - Multipic 5.1 Overmax
User questions about Multipic 5.1 Overmax
0 question about this device. Answer the ones you know or ask your own.
Ask a new question about this device
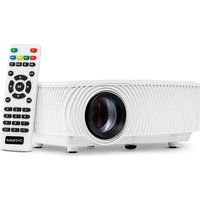
Download the instructions for your Projector in PDF format for free! Find your manual Multipic 5.1 - Overmax and take your electronic device back in hand. On this page are published all the documents necessary for the use of your device. Multipic 5.1 by Overmax.
USER MANUAL Multipic 5.1 Overmax
natural_image
Black OVERMAX projector with visible lens and ventilation grille (no text or symbols on device body)1
2
3
4

5
flowchart
graph LR
    A["Step 1: Dotted Pattern"] --> B["Step 2: Dash-Dash"]
    B --> C["Step 3: Dash-Dash"]
    C --> D["Step 4: Dash-Dash"]
    D --> E["End"]
6
7
8
9
10
11 12
13

14
15
16
17
18

Wprowadzenie
PL
Drogi Kliencie!
Thank you for placing trust in us and choosing Overmax.
Thanks to the use of high-quality materials and modern solutions, we provide you with a product perfect for everyday use. We are convinced that the product will satisfy your requirements as it has been manufactured with utmost care. Before you use the product, please read this operating manual carefully.
Should you have any remarks or questions concerning the product, please do not hesitate to contact us:
Before you start using the projector, please read and follow the guidelines included in this operating manual. Wrong use of the device may lead to electric shock or raise fire risk. When using and maintaining the projector, please adhere to the instructions below.
Note:
Installation
• To enjoy better image quality, use the projector in rooms with drawn curtains or in dark rooms.
- Use the projector carefully. Fall or failure may damage parts or cause the image to blur, and lead to incorrect display.
Switching on
- Be careful when using the power cord, make sure you do not bend the cable extensively; damage to power cord may lead to electric shock or fire.
Cleaning
- Before you start cleaning the device, disconnect the power cord.
- Clean the housing with a wet cloth on a regular basis.
-
To clean the projector lens, use the glasses tissue or soft fabric to avoid scratching.
-
Regularly clean air holes and loudspeakers of the projector with the use of a soft brush, otherwise ventilation may get blocked. Clean the dust filter on a regular basis.
- Clean the slot under the dust cover (2, fig. 2) on a regular basis to maintain good picture quality.
High temperature
- When the project is on, make sure the air holes of the device are not covered. For this reason do not place it on soft surfaces or cover with materials.
- Do not look into the lens when it is operating.
Additional information
- Do not place any liquids or heavy items on the projector.
- Do not disassemble the projector on your own – electric shock risk.
To assure stable dissipation of heat, before you start the projector, adjust its height in the lower part with the use of a base adjustment knob.

The product complies with requirements of EU directives.
Pursuant to the Directive 2012/19/EU, this product is subject to selective collection. The product must not be disposed of along with domestic waste as it may pose a threat to the environment and human health. Worn-out product must be handed over to the electrics and electronics recycling center.
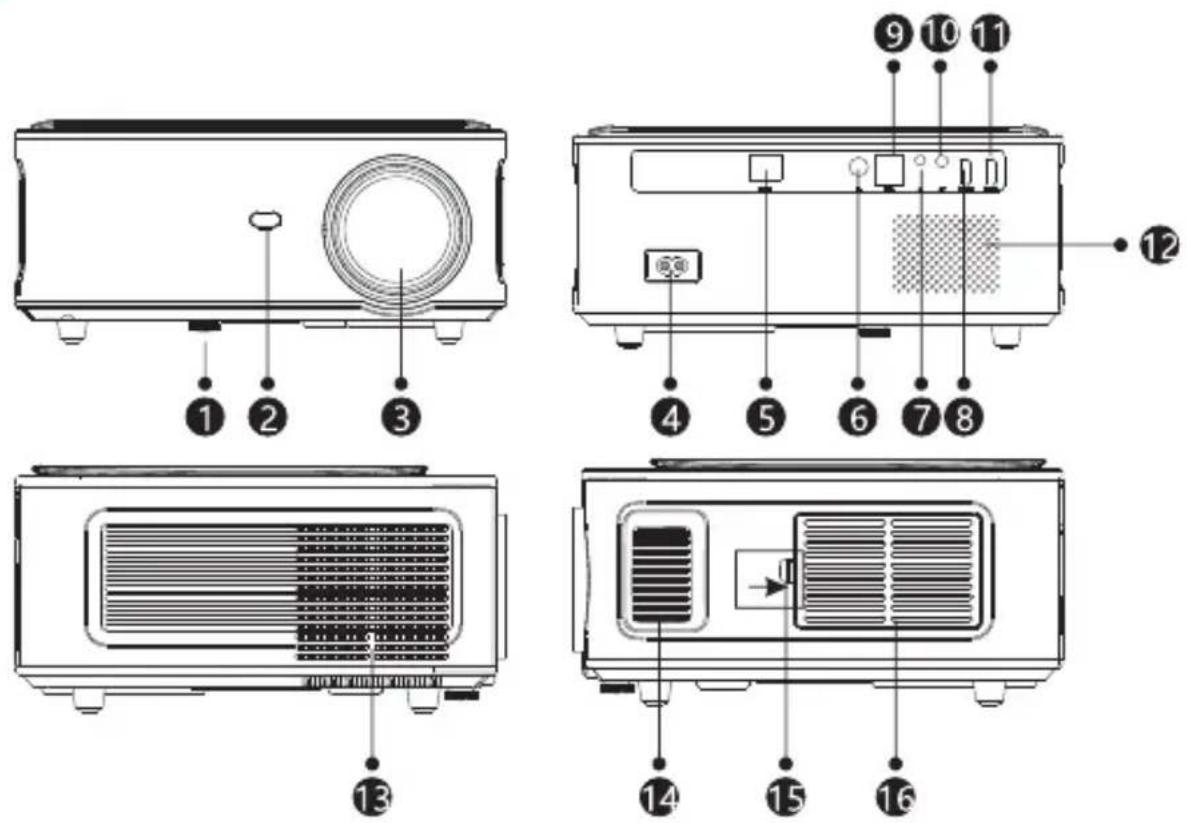
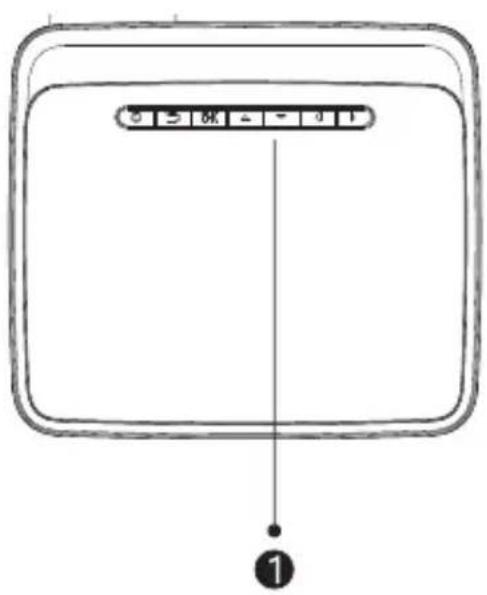
Description of projector parts (fig. 1)
- Base adjustment knob
- Infrared receiver
- Lens
- Power cord port
- Wireless network port
- Rear infrared receiver
- Audio output 3.5 mm
- HDMI 1 port
- USB ports
- AV input
- HDMI 2 port
- Loudspeaker
- Fan
- Image sharpness knob
- Dust filter cover
- Dust filter
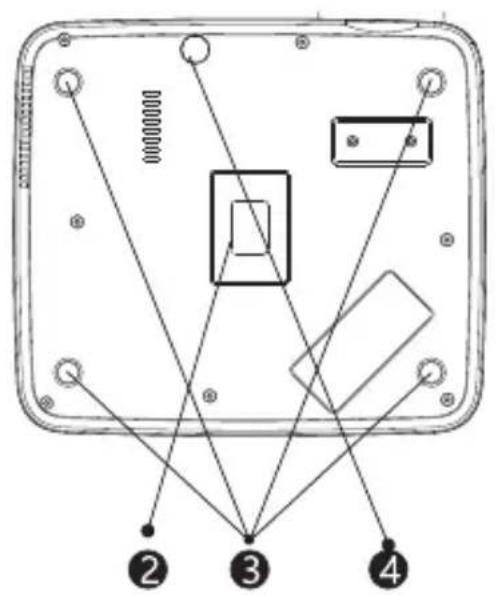
Upper and lower part of the projector (fig. 2)
-
Panel
-
Projector assembly holes
-
Dust cover (open the cover to clean the dust from the projector)
-
Base adjustment
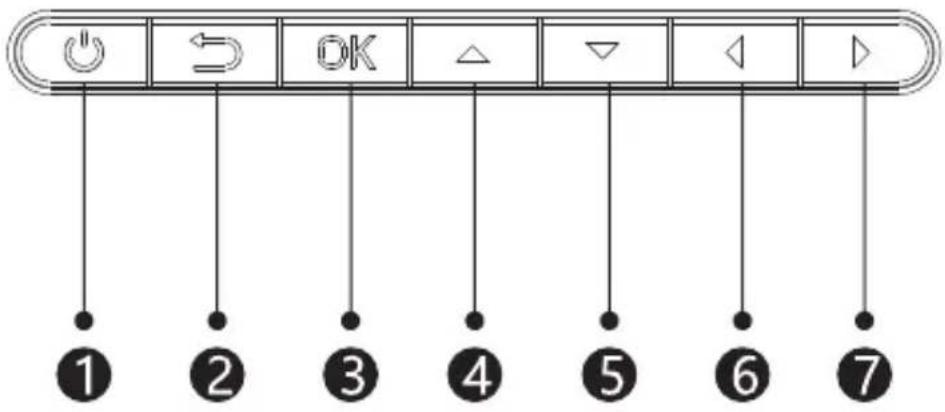
Panel (fig. 3)
-
ON/OFF switch
-
Direction key (down)
-
Exit key
-
Direction key (left)
-
OK key
-
Direction key (right)
-
Direction key (up)
Remote control (fig. 4)
- On/off key
- Mute
- Select source
- Rotate projection screen
- Direction keys
- Confirm key (Play/pause)
- Menu
- Exit
- Homepage
- Previous slide
- Volume up
- Next slide
- Volume down
How to install
Standard settings
Please see the table below to adjust size of image and distance of projector.
| Aspect ratio 16:9 | |
| Image size (inches) Distance (m) | |
| 50 1.70 | |
| 70 2.38 | |
| 100 3.30 | |
| 120 3.97 | |
If the distance between the projector and screen is lower than minimum or is too large, the image may be blurred.
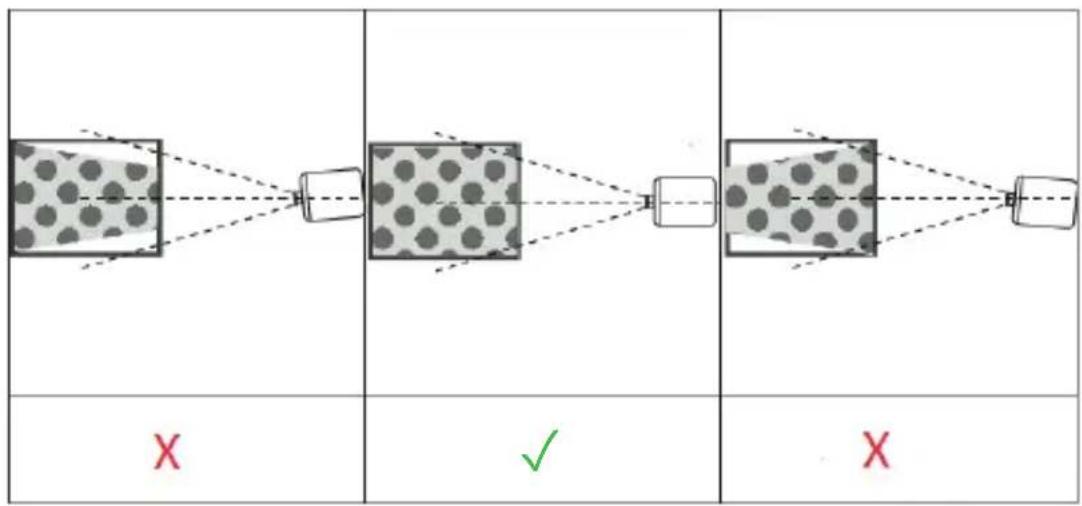
Image shape adjustment
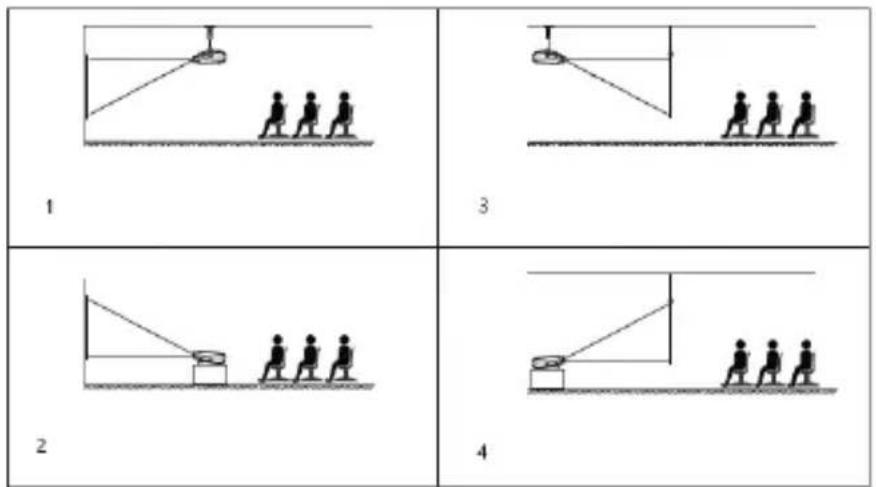
Check the trapezoid adjustment diagram (fig. 5)
X - wrong installation
√ - desired installation
Projector installation methods
Contact the professional assembler to fix the projector under the ceiling. Suitable positions of the projector (fig. 6):
- Ceiling assembly for frontal projection.
- Placing projector on platform for frontal projection.
- Ceiling assembly for rear projection.
- Placing projector on platform for rear projection.
Warning: The projector may be irreparably damaged in case of wrong installation on the ceiling or other surface.
• The projector must only be used in the place in which temperature ranges from 5 °C to 35 °C. If you do not stick to this rule, the projector may fail.
- The failure may occur if the projector is in the dusty, wet, humid or smoky area.
• Insufficient ventilation may lead to overheating, which in turn may result in damage to the projector or life-threatening situations.
How to use
Switching on and off
- When the projector is connected to source of power, it switches into standby mode. The indicator light glows in red.
• To switch the projector on or off, press the switch at the top of the housing or press on/off key on the remote control. If the indicator light glows in blue, it means the projector is ready for operation.
Sharpness adjustment
- Position the projector so that the lens is perpendicular to wall or screen the image is to be displayed on.
- To improve the sharpness of the image, turn the sharpness knob on the side of the housing to make the image sharp.
- If the image is not displayed perpendicularly, it will be distorted.
Connection to source of multimedia through cable
The projector allows you to display image from various devices. Depending on the device, you need to use a suitable input at the back of the housing.
- USB port – such devices as pendrive, hard drives.
- HDMI port – such devices as PC, laptop, console, satellite signal receiver, phone (supporting MHL technology and only through dedicated MHL cable).
- Video-In (AV) input – such devices as console, satellite signal receiver.
- RJ45 (LAN) port – input port for Internet connection.
Selection of source
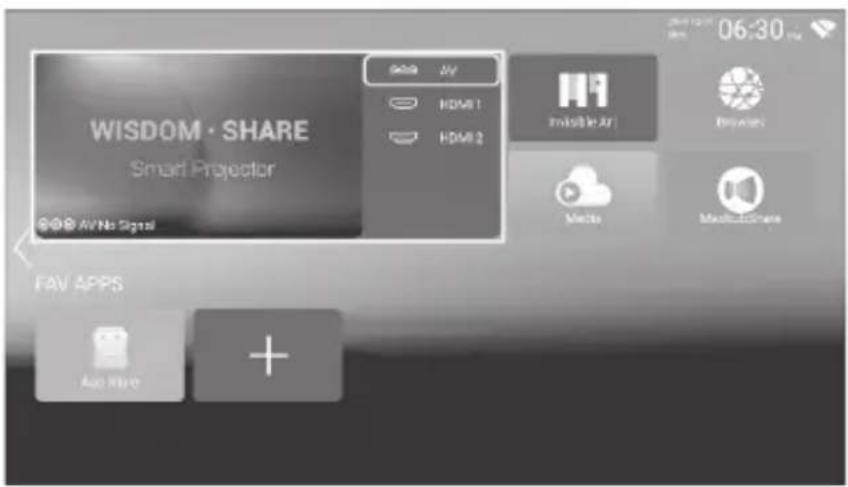
Step 1: Switch the projector on. You will see the main interface (fig. 7). Step 2: Select the source from the list of signal sources and confirm connection.
Connection via Bluetooth
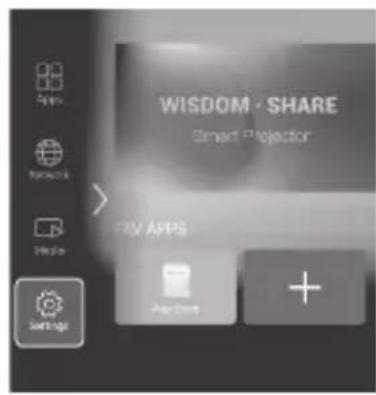
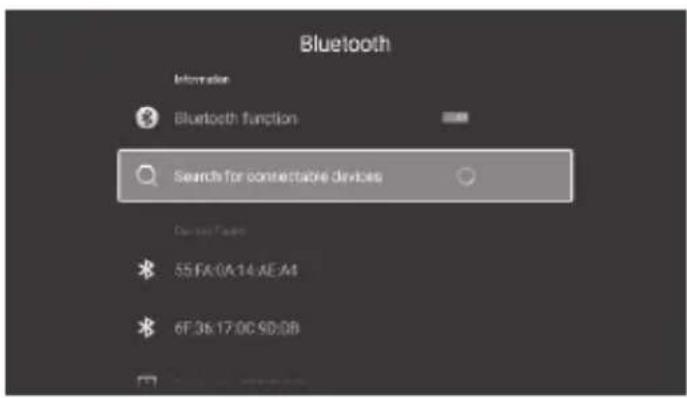
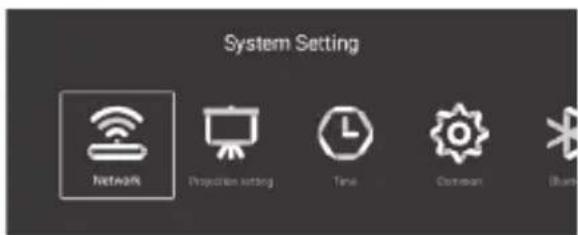
Step 1: Select „Settings” on the left side of the main interface (fig. 8). Step 2: Select „Bluetooth”, find available devices and select the device you wish to connect to (fig. 9).
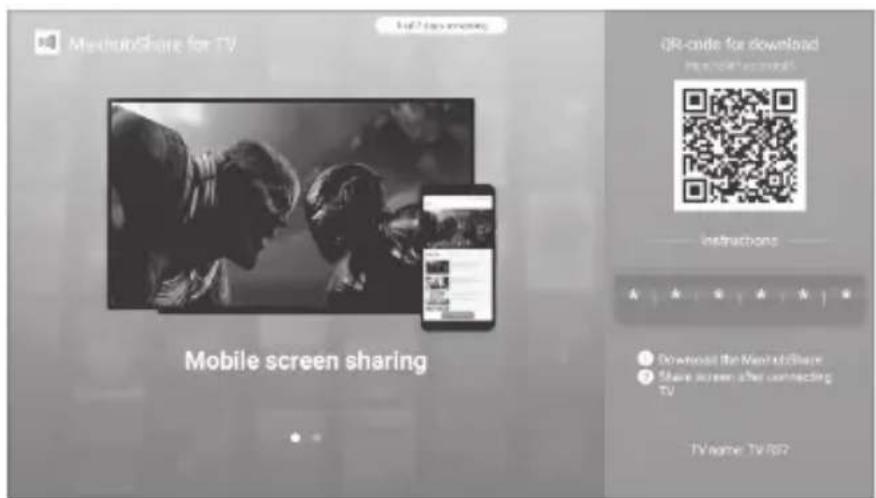
How to use MaxhubShare
Step 1: Select „MaxhubShare” in the main interface.
Step 2: Scan QR code to download MHShare TV application (fig. 10). Follow the instructions in the application.
Miracast
Connect the projector and mobile phone to the same Wi-Fi network. Run MHShare TV application and connect to TV set. Select „TV-R37“ and click „Connect“. When the connection is successful, select „Doubling“ and „Start now“.
Connection to Wi-Fi network
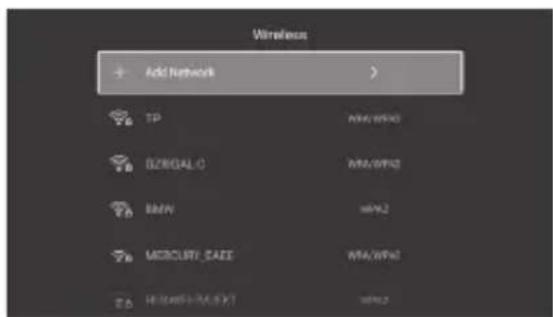
Step 1: Select „Wireless network” on the left side of the main interface (fig. 11). Step 2: Find Wi-Fi network which you wish to connect to, enter password and confirm (fig. 12).
Read files on external drive
In main interface select „Media“, select your drive, and then select file you wish to display.
Downloading applications
Select „Store” in the bottom left corner of the main interface. Download the selected application. You can add the application by clicking „+” (fig. 13).
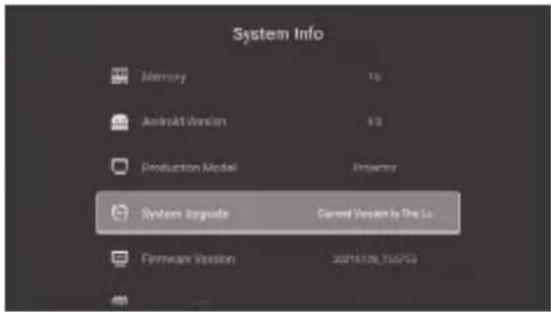
System update
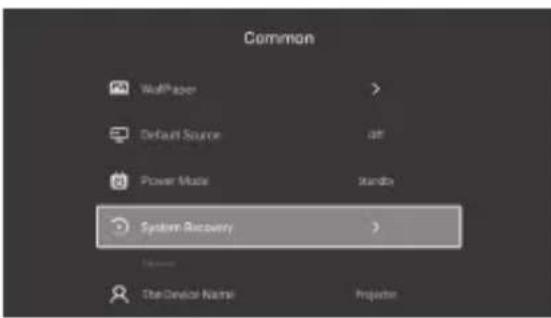
Restoring factory settings
Select „Settings“ > „Popular“ > „Factory settings“ (fig. 15).
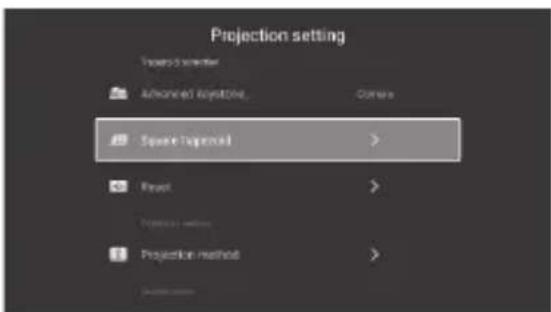
Keystone effect settings
If you position the projector non-parallel to the wall, the image will be displayed in the shape of trapezoid. The image may be adapted both vertically and horizontally by shortening and spreading sides and corners (fig. 16, 17).
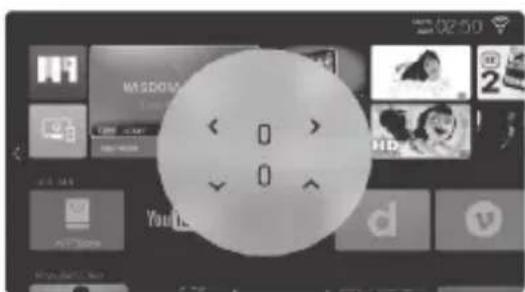
Zoom settings
It is possible to adapt the zoom effect to your preferences (fig. 18).
Supported formats
Video formats: 3GP/AVI/FLV/MP4/MPG/VOB/TS/M2TS/DAT/MKV Audio formats: MP3/APE/AAC/FLAC/OGG/WAV/WMA/MID/DTS/M4A Image formats: BMP/JPG/PNG/JPEG
Note: this device does not support sound coded in Dolby system due to copyrights protection.
Troubleshooting
| Problem Possible causes | |
| 1. The projector does not work when power is on | Power cord is not correctly connected |
| On/off switch is damaged | |
| 2. The projector does not work when you are using a remote control | Remote control has no batteries or batteries are flat |
| Remote control is pointed at infrared receiver (2) | |
| Infrared receiver (2) is highly illuminated | |
| Input source may be incorrect |
EN
| Problem Possible causes | |
| 3. No image No input signal | |
| Input cable is not connected | |
| In PC mode the PC output frequency is not 50-60 Hz. Make sure the PC output is connected to projector | |
| If you use laptop, check if output signal is HDMI1 or HDMI2 | |
| Projector ventilation is blocked | |
| 4. Automatic shut-down Voltage is not stable | |
The pictures are for reference only. The real design of the products may differ from the pictures presented.
Einführung
Applications downloaden
ETSI EN 301 489-17 V3.2.4:2020
PN-ETSI EN 301 489-17 V3.2.4:2021-05
ETSI EN 300 328 V2.2.2:2019
PN-ETSI EN 300 328 V2.2.2:2020-03
EN 62311:2008
PN-EN 62311:2010-05
EN IEC 62368-1:2020+A11:2020
PN-EN IEC 62368-1:2020-11
IEC 62321-2:2013
PN-EN 62321-2:2014-08
IEC 62321-3-1:2013
PN-EN 62321-3-1:2014-08
IEC 62321-4:2013+A1:2017
PN-EN 62321-4:2014-08+A1:2017-12
IEC 62321-5:2013
PN-EN 62321-5:2014-08
IEC 62321-6:2015
PN-EN 62321-6:2015-10
IEC 62321-7-1:2015
PN-EN 62321-7-1:2016-02
IEC 62321-7-2:2017
PN-EN 62321-7-2:2017-07
IEC 62321-8:2017
PN-EN 62321-8:2017-07
EU DECLARATION OF CONFORMITY
- BLACK: 5903771701228
- Name and address of the manufacturer or his authorized representative:
BrandLine Group Sp. z o. o.
- This declaration of conformity is issued under the sole responsibility of the manufacturer: BrandLine Group Sp. z o. o.
- Subject of declaration: Multipic 5.1
- The subject of this declaration mentioned above is in conformity with the relevant requirements of the EU harmonization legislation:
2014/53/EU - RED Directive
2014/30/EU - EMC Directive
2014/35/EU - LVD Directive
2011/65/EU - RoHS Directive
- References to the relevant harmonized standards used, or references to other technical specifications, for which compliance is declared:
ETSI EN 301 489-1 V2.2.3:2019
ETSI EN 301 489-17 V3.2.4:2020
ETSI EN 300 328 V2.2.2:2019
EN 62311:2008
EN IEC 62368-1:2020+A11:2020
IEC 62321-2:2013
IEC 62321-3-1:2013
IEC 62321-4:2013+A1:2017
IEC 62321-5:2013
IEC 62321-6:2015
IEC 62321-7-1:2015
IEC 62321-7-2:2017
IEC 62321-8:2017
- Additional information:
Signed on behalf of: BrandLine Group Sp. z o. o.
Poznań, 17.08.2022
(place and date of issue)
2011/65/EU - RoHS Directive
ETSI EN 301 489-17 V3.2.4:2020
ETSI EN 300 328 V2.2.2:2019
EN 62311:2008
EN IEC 62368-1:2020+A11:2020
IEC 62321-2:2013
IEC 62321-3-1:2013
IEC 62321-4:2013+A1:2017
IEC 62321-5:2013
IEC 62321-6:2015
IEC 62321-7-1:2015
IEC 62321-7-2:2017
IEC 62321-8:2017
2011/65/EU - RoHS Directive
ETSI EN 301 489-17 V3.2.4:2020
ETSI EN 300 328 V2.2.2:2019
EN 62311:2008
EN IEC 62368-1:2020+A11:2020
IEC 62321-2:2013
IEC 62321-3-1:2013
IEC 62321-4:2013+A1:2017
IEC 62321-5:2013
IEC 62321-6:2015
IEC 62321-7-1:2015
IEC 62321-7-2:2017
IEC 62321-8:2017
DÉCLARATION DE CONFORMITÉ UE
61-248 Poznań, POLOGNE
OVERMAX
2011/65/EU - RoHS Directive
ETSI EN 301 489-17 V3.2.4:2020
ETSI EN 300 328 V2.2.2:2019
EN 62311:2008
EN IEC 62368-1:2020+A11:2020
IEC 62321-2:2013
IEC 62321-3-1:2013
IEC 62321-4:2013+A1:2017
IEC 62321-5:2013
IEC 62321-6:2015
IEC 62321-7-1:2015
IEC 62321-7-2:2017
IEC 62321-8:2017
2011/65/EU - RoHS Directive
ETSI EN 301 489-17 V3.2.4:2020
ETSI EN 300 328 V2.2.2:2019
EN 62311:2008
EN IEC 62368-1:2020+A11:2020
IEC 62321-2:2013
IEC 62321-3-1:2013
IEC 62321-4:2013+A1:2017
IEC 62321-5:2013
IEC 62321-6:2015
IEC 62321-7-1:2015
IEC 62321-7-2:2017
IEC 62321-8:2017
2011/65/EU - RoHS Directive
ETSI EN 301 489-17 V3.2.4:2020
ETSI EN 300 328 V2.2.2:2019
EN 62311:2008
EN IEC 62368-1:2020+A11:2020
IEC 62321-2:2013
IEC 62321-3-1:2013
IEC 62321-4:2013+A1:2017
IEC 62321-5:2013
IEC 62321-6:2015
IEC 62321-7-1:2015
IEC 62321-7-2:2017
IEC 62321-8:2017
2011/65/EU - RoHS Directive
ETSI EN 301 489-17 V3.2.4:2020
ETSI EN 300 328 V2.2.2:2019
EN 62311:2008
EN IEC 62368-1:2020+A11:2020
IEC 62321-2:2013
IEC 62321-3-1:2013
IEC 62321-4:2013+A1:2017
IEC 62321-5:2013
IEC 62321-6:2015
IEC 62321-7-1:2015
IEC 62321-7-2:2017
IEC 62321-8:2017
2011/65/EU - RoHS Directive
ETSI EN 301 489-17 V3.2.4:2020
ETSI EN 300 328 V2.2.2:2019
EN 62311:2008
EN IEC 62368-1:2020+A11:2020
IEC 62321-2:2013
IEC 62321-3-1:2013
IEC 62321-4:2013+A1:2017
IEC 62321-5:2013
IEC 62321-6:2015
IEC 62321-7-1:2015
IEC 62321-7-2:2017
IEC 62321-8:2017
2011/65/EU - RoHS Directive
ETSI EN 301 489-17 V3.2.4:2020
ETSI EN 300 328 V2.2.2:2019
EN 62311:2008
EN IEC 62368-1:2020+A11:2020
IEC 62321-2:2013
IEC 62321-3-1:2013
IEC 62321-4:2013+A1:2017
IEC 62321-5:2013
IEC 62321-6:2015
IEC 62321-7-1:2015
IEC 62321-7-2:2017
IEC 62321-8:2017