
BH 1400 N - Cultivator ATIKA - Free user manual and instructions
Find the device manual for free BH 1400 N ATIKA in PDF.
User questions about BH 1400 N ATIKA
0 question about this device. Answer the ones you know or ask your own.
Ask a new question about this device
Download the instructions for your Cultivator in PDF format for free! Find your manual BH 1400 N - ATIKA and take your electronic device back in hand. On this page are published all the documents necessary for the use of your device. BH 1400 N by ATIKA.
USER MANUAL BH 1400 N ATIKA
89331 Burgau – Germany
Extent of delivery 13
EC Declaration of Conformity 13
Symbols original instructions 13
Symbols on the machine 14
Operating times 14
Proper use 14
Residual risks 14
Vibrations 15
Safety instructions 15
- Electrical safety 16
Description of device / spare parts 17
Assembly 17
- Handle hoop 17
- Hoeing spur 17
- Transport wheels 17
Start-up 17
- Electric supply 17
- Power system fuse protection 17
- Mounting of the extension cable 17
- Switching On/Off 17
Before start of work 18
Working with the tiller 18
- Transport wheels 18
- Working depth 18
- Work instructions 18
Maintenance and cleaning 19
- Maintenance 19
- Replacing the hoeing tools 19
- Lubricate the gearbox 19
- Cleaning 19
Transport 19
Storage 20
Possible faults 20
Technical data 21
Guarantee 21
Extent of delivery
After unpacking, check the contents of the box for
▶ completeness
▶ possible transport damage.
• 1 pre-assembled device unit
• 1 Lower handle hoop
• 1 Upper handle hoop
• 2 transport wheels
• 1 hoeing spur
- 1 screw bag
• 1 operating instructions
• 1 assembly and operating instruction sheet
• 1 warranty declaration
Report any damage or missing items to your dealer, supplier or the manufacturer immediately. Complaints made at a later date will not be acknowledged.
EC Declaration of Conformity
No. (S-No.): 14273
according to EC directive: 2006/42/EC
We,
ATIKA GmbH
89331 Burgau – Germany
herewith declare under our sole responsibility that the product
Bodenhacke (Tiller) type / model BH 1400 N
Serial number: 000001 - 020000
is conform with the above mentioned EC directive as well as with the provisions of the guidelines below:
2014/30/EU, 2000/14/EC and 2011/65/EU.
Following harmonized standards have been applied:
EN 60335-1:2012+A11; EN 709:1997+A4; EN 62233:2008;
EN 55014-1:2006+A1+A2; EN 55014-2:2015;
EN 61000-3-2:2014; EN 61000-3-3:2013
Conformity assessment procedures 2000/14/EC - Appendix V:
| measured sound power level L_WA | 90.79 dB (A) |
| guaranteed sound power level L_WA | 93 dB (A) |
Keeping of technical documents at:
text_image
i. A. f i.A. G. Koppenstein, Engineering design managementSymbols original instructions

Potential hazard or hazardous situation. Failure to observe these instructions may lead to injuries or cause damage to property.

Important information on proper handling. Failure to observe these instructions may lead to malfunction.

User information. This information helps you to use all the functions optimally.

Assembly, operation and servicing. Here you are explained exactly what to do.
A
Please refer to the attached assembly and operating instruction sheet for references to figure numbers in the text.
B
and operating instruction sheet for references to figure numbers in the text.
→ C
[Non-Text]
...
Symbols on the machine

Read and follow the operating instructions and safety advices before starting up the machine.

Wear eye and ear protection.

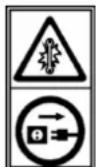
Protect against humidity.
Switch off the motor and disconnect the mains plug before performing cleaning, maintenance or repair work.


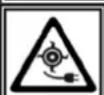

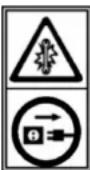
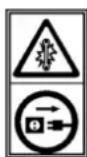
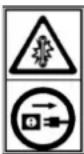
Beware of rotating blades or tines. Do not keep hands and feet near or under rotating parts while the machine is running. Caution: The hoeing tools stop delayed.

Danger – objects may be thrown out at high speed when motor is running. Keep bystanders as well as pets and domestic animals away from the danger zone.

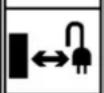
Keep the mains cable free from the tines or blades. Tines or blades may damage the cables and cause contact with live parts. When connecting cable is damaged or cut through immediately pull out the power plug.
Switch handle in UNLOCKED position
Switch handle in LOCKED position
This product complies with European regulations specifically applicable to it.
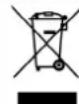
Electrical devices do not go into the domestic rubbish. Give devices, accessories and packaging to an ecofriendly recycling.
According to the European Directive 2012/19/EU on electrical and electronic scrap, electrical devices that are no longer serviceable must be separately collected and brought to a facility for an environmentally compatible recycling.
Operating times
Please observe as well the regional regulations for noise protection.
Proper use
- This device is suited for dig over and mix up of ground areas on private house and hobby gardens.
- This machine is only designed for outdoor use (garden) and must be held with both hands during operation.
- The device is not allowed to be used in public gardens, parks, sports centres or at roadsides as well as in agriculture and forestry.
This device may not be used: - on plastered or gravelled areas Otherwise, there is a risk of injury.
- Always use hoeing tools suited for the machine as designated in the operating instructions.
- The intended usage also includes compliance with the operating, servicing and repair conditions prescribed by the manufacturer and following the safety instructions included in the instructions.
- Follow the relevant accident prevention rules for operation and other generally recognised health and safety at work rules.
- Any other use is deemed not to be use as prescribed. The manufacturer is not liable for any type of damage resulting from this: the user bears the sole risk.
■ Unauthorised modifications on the device exclude a liability of the manufacturer for damages of any kind resulting from it.
- Only persons who are familiarised with the device and informed about possible risks are allowed to prepare, operate and service this device. Repair works may only be carried out by us or by a customer service agent nominated by us.
- Switch off the motor and disconnect the mains plug before performing cleaning, maintenance or repair work.
- This machine must not be used in an explosive environment or exposed to rain.
Residual risks
Even if used properly, residual risks can exist even if the relevant safety regulations are complied with due to the design determined by the intended purpose.
Residual risks can be minimised if the “Safety advices” and the “Intended usage” as well as the whole of the operating instructions are observed.
Observing these instructions, and taking proper care, will reduce the risk of personal injury or damage to the equipment.
- Risk injury of hands and feet if they come close to or under the rotating parts.
■ Stones and soil may be thrown off.
■ Injury by catapulted workpiece parts.
■ Inhalation of dust (soil) - Risk of injury by entangling and winding up roots, ropes, wires or pieces of clothing when contacting the hoeing tools.
- Risk of serious injuries when operating the machine without suited protective equipment.
- Risk of injury to the fingers and hands, when carrying out assembly work and cleaning on the hoeing tools.
-
Risk of injury to the hands and feet when transporting the unit.
-
Noncompliance with safety instructions may result in injuries of the operator or property damages.
- Risk from electricity when using improper electrical connections.
■ Touching live parts of opened electrical components. - Impairment of hearing when working on the machine for longer periods of time without ear protection.
In addition, in spite of all the precautionary measures taken, non-obvious residual risks can still exist.
Vibrations (Hand arm vibrations)
0,862 m/s ^2 ; K = 1,5 m/s ^2
Warning
The actual vibration emission level during the use of the machine may differ from that indicated in the operating instructions or indicated by the manufacturer. This may be caused by the following factors to be minded before and during the use:
- Proper use of the machine
- Correct operating of the machine
- Proper condition of the machine for use
- Sharpness and correct assembly of the hoeing tools
- Proper assembly of the operating handles on the machine body
When you feel uncomfortable or notice discoloration of skin on your hands during the use of the machine, stop working immediately. Observe sufficient break times to rest. Failure to have sufficient break times may result in a hand-arm vibration syndrome.
The extent of exposure depending on the type of work or machine use should be estimated and appropriate breaks taken. In this way, the extent of exposure can be considerably reduced over the entire work time. Minimise the risk caused by vibrations. Maintain this machine according to the instructions in the manual.
Avoid the use of this machine at temperatures under 10^ C. Create a work schedule in order to minimise vibration exposure.
Safety instructions
The device can be dangerous when used improperly. The use of electrical tools requires the observation of basic safety precautions to eliminate risk of fire, electrical shock and personal injuries.
Before starting this device, read and keep to the following advice. Also observe the preventive regulations of your professional association and the safety provisions applicable in the respective country, in order to protect yourself and others from possible injury.
Pass the safety instructions on to all persons who work with the machine.
i Keep these safety instructions in a safe place.
■ Make yourself familiar with the equipment before using it, by reading and understanding the operating instructions.
- Be attentive. Be careful what you do. Behave sensibly when working. Do not use a power tool while you are tired or under the influence of drugs, alcohol or medication. A moment of inattention while operating power tools may result in serious personal injury.
- Do not use the machine for unsuitable purposes (see 'Normal intended use').
- Familiarize yourself with your environment and pay attention to possible dangers which you may not be able to hear because of the motor noise.
- Within his area of work the operator is responsible for third parties.
■ Children and young persons under 16 years of age as well as persons who have not read the instruction manual are not allowed to operate this product.
- Physically, sensorially or mentally handicapped persons or persons who have no relevant experience and/or knowledge are not allowed to operate the device, unless a person responsible for their safety supervises them or instruct them on how to use the device.
- Children must be supervised to make sure that they do not play with the device.
- Keep bystanders and animals away from your working area.
- Do not allow other persons, especially children, to touch the tool or cable.
- Switch off the machine if persons, in particular children or pets, are close to you or if you change your working area.
■ Never leave the device unattended.
■ Wear protective clothing:
- safety goggles
- Ear protection (the noise level on the workplace may exceed 85 dB (A))
— Dust mask with work activities generating dust
■ Wear suitable work clothes:
- do not wear loose-fitting clothes or jewellery; they can catch in moving parts.
– Solid shoes or boots with a nonskid sole
– Trousers to protect the legs
— Hairnet in case of long hair
- Do not work with the device barfooted or only with thongs on your feet.
■ Take environmental influences into consideration:
- Do not use the device in moist or wet ambience.
— Do not use the device in rainy weather. - Do not work directly near swimming pools or garden ponds
- Do only work with sufficient visibility conditions Provide for good illumination.
- Do not operate the device when the ground is wet, if possible.
■ Before trimming, remove all foreign objects (e.g. stones, branches, wires, etc.). While working watch out for further foreign objects.
- If you come across to foreign objects, power off the device, disconnect the mains plug and remove those foreign objects. However before you restart the device, check it for possible damages and have it repaired if necessary.
- Do not force the power tool. You work better and safer in the given performance range. - Only operate the machine with complete and correctly attached safety equipment (e.g. blade guard) and do not alter anything on the machine that could impair the safety.
- Do not modify the device or parts of the device respectively.
■ Before turning on the motor, make sure that your feet are at a safe distance from the cutting tools.
- Never keep hands or feet close to or under rotating parts. Keep away from the ejection slot.
■ Work very careful on difficult soils (stony, hard, etc.). Reduce the working speed and firmly hold the machine.
- Pay attention to sure footing especially when working on slopes or on wet ground and keep your balance at all times. Guide the device only a walking speed.
■ Do not work on steep slopes.
- When working on slopes, always work perpendicular to the slope and never up and down.
- Be especially careful when changing the operating direction on a slope.
- Observe the safety distance given by the handle bar.
■ Always push the device forward while it is operating. Do not pull it to yourself or behind you.
■ While the motor is running, do not — lift or carry the device about
- Caution! The tool runs after. Do not try to slow down the tool by hand.
- Pay attention that the blade guard is attached.
- Turn off the device and wait until the drum has stopped when - tilting the device
- crossing hard ground
— transporting the device to and from the work area
- Switch the machine off and remove the mains plug from the socket when
- Carrying out repair work.
- Performing maintenance and cleaning work.
– removing malfunctions and blockages
- transporting or storing
– Leaving unattended (even during short interruptions).
— when the device begins to exhibit unusual vibrations
— when you have hit an obstacle with the device.
- Do not hose down the device with water. (origin of danger electric current).
- Store unused equipment in a dry, locked place out of the reach of children.
- Check the machine for possible damage:
- Before further use of the machine the safety devices must be checked carefully for their proper and intended function.
- Check whether movable parts function perfectly and do not stick or whether parts are damaged. All parts must be correctly installed and fulfill all conditions to ensure perfect operation of the machine.
- Damaged safety devices and parts must be properly repaired or exchanged by a recognized, specialist workshop; insofar as nothing else is stated in the instructions for use.
— Damaged or illegible safety labels have to be replaced.
■ Maintain the machine carefully:
– Ensure that all nuts, bolts and screws are tight.
— Make sure that the ventilation apertures are free.
- Keep the handles free of oil and grease.
– Follow the maintenance instructions.
Electrical safety
- Design of the connection cable according to IEC 60245 (H 07 RN-F) with a core cross-section of at least - 1.5mm^2 for cable lengths up to 25m - 2.5mm^2 for cable lengths over 25m
- Long and thin connection lines result in a voltage drop. The motor does not reach any longer its maximal power; the function of the device is reduced.
- Plugs and coupler outlets on connection cables must be made of rubber, non-rigid PVC or other thermoplastic material of same mechanical stability or be covered with this material.
■ The connector of the connection cable must be splash-proof.
- When running the connection line observe that it does not interfere, is not squeezed, bended and the plug connection does not get wet.
- Wind off completely the cable when using a cable drum.
- Do not drive the device across the extension cable. Make sure that it is behind you in a secure position. Place the cable on a path or area that has already been worked.
- Do not use the cable for purposes for which it is not meant. Protect the cable against heat, oil and sharp edges. Do not use the cable to pull the plug from the socket.
- Protect yourself against electric shocks. Avoid body contact with grounded parts (e.g. pipes, heating apparatus, cookers, fridges etc.)
- This device generates an electromagnetic field during operation. Such a field may affect active or passive medical implants under certain circumstances. To reduce the risk of serious injuries we recommend persons who carry medical implants to consult their doctor and the manufacturer of the medical implant before operating this device.
- Regularly check the extension cables and replace them if they are damaged.
- Do never connect a damaged cable to the mains. Do not touch a damaged cable before it is disconnected from the mains. A damaged cable may cause contact with live parts.
- Do not use any defective connection cables.
- When working outdoors, only use extension cables especially approved and appropriately labelled for outdoor use.
- Do not set up any provisional electrical connections.
■ Never bypass protective devices or deactivate them.
- Only hook up the machine by means of a fault-current circuit breaker (30 mA).
The electrical connection or repairs to electrical parts of the machine must be carried out by a certified electrician or one of our customer service points. Local regulations – especially regarding protective measures – must be observed.
Damaged mains leads must be replaced by the manufacturer or one of their service workshops or a similar qualified person to prevent dangers.
⚠️ Repairs to other parts of the machine must be carried out by the manufacturer or one of his customer service points.
Use only original spare parts, accessories and special accessory parts. Accidents can arise for the user through the use of other spare parts. The manufacturer is not liable for any damage or injury resulting from such action.
Description of device / spare parts
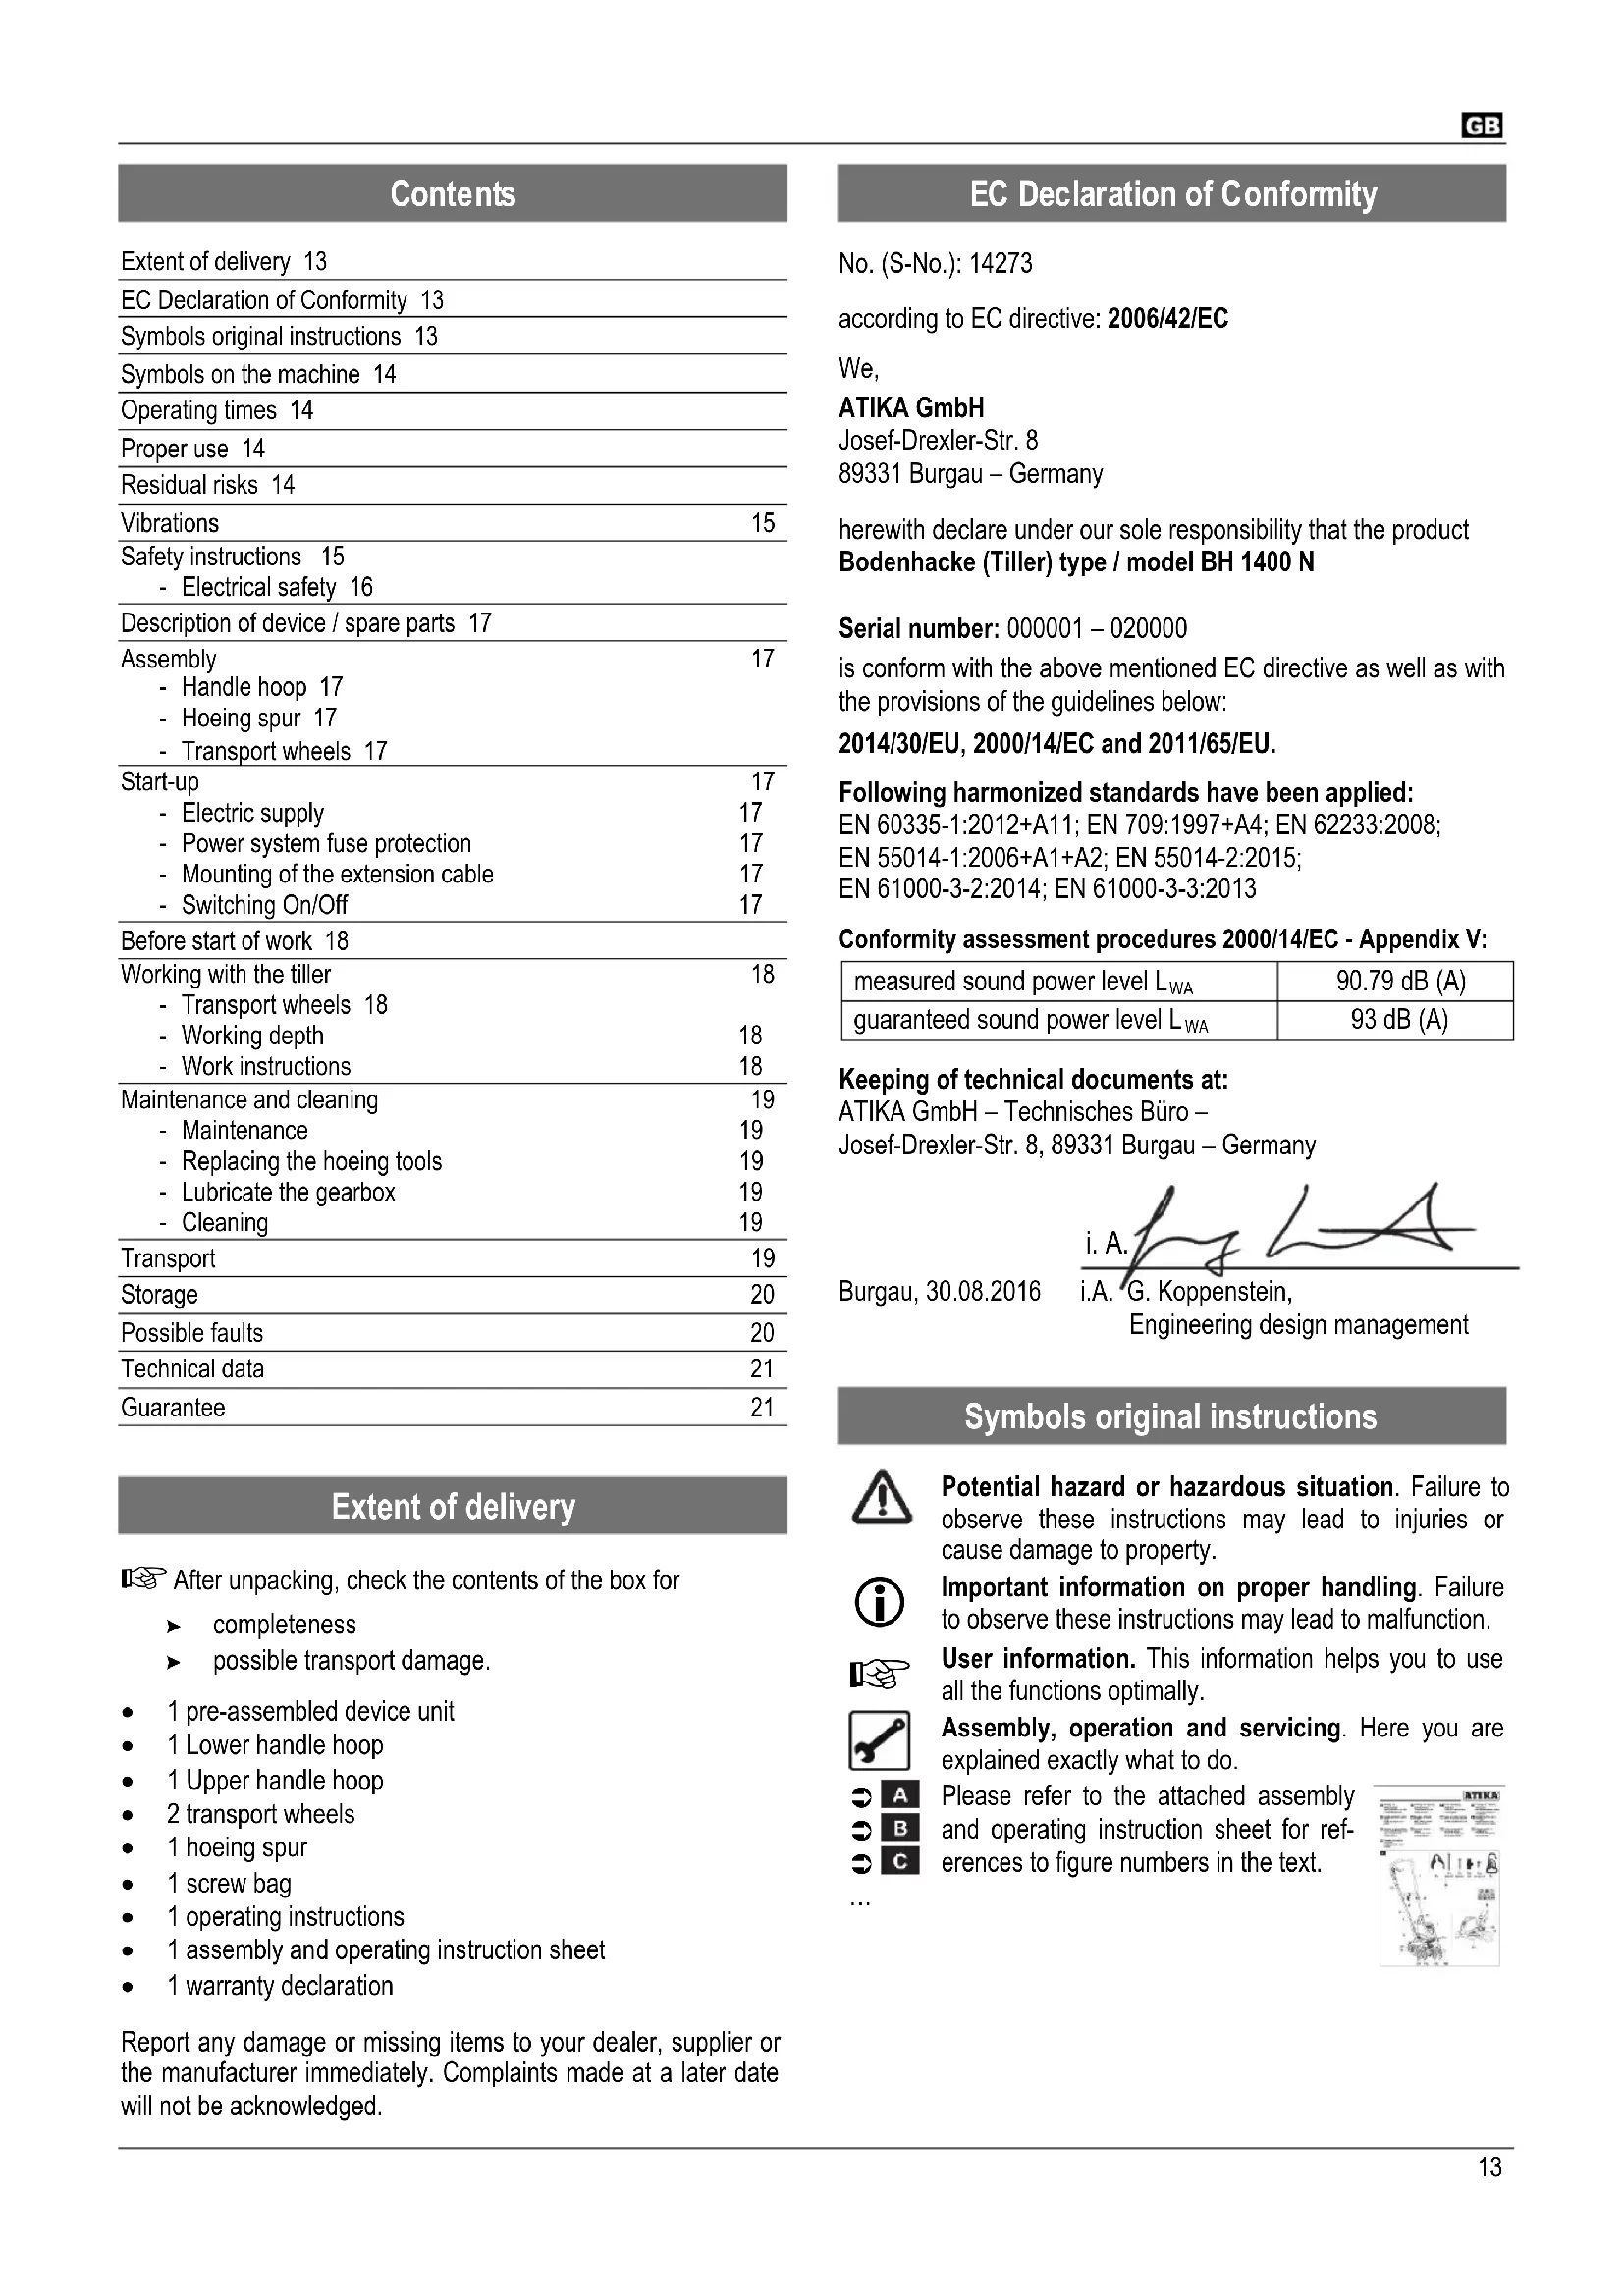
A Please refer to the attached assembly and operating instruction sheet.
| Pos. | Designation: Order number | |
| 1 | Upper handle hoop | 381883 |
| 2 | Switch handle 381886 | |
| 3 | Mains plug - | |
| 4 | Cable strain relief 381858 | |
| 5 | Cable clip 380953 | |
| 6 | Lower handle hoop | 381884 |
| 7 | Motor housing - | |
| 8 | Accessories bag 381906 | |
| 9 | Safety label 381854 | |
| 10 | Handle hoop holder | 381885 |
| 11 | Protective cover | 381887 |
| 12A | Hoeing tool (double) – RH | 381859 |
| 12b | Hoeing tool (single) – RH | 381896 |
| 13A | Hoeing tool (double) – LH | 381860 |
| 13b | Hoeing tool (single) – LH | 381897 |
| 14 | Transport wheel | 381888 |
| 15 | Hoeing spur | 381889 |
| 16 | Control cable | - |
| 17 | Power cable | - |
| 18 | Circlip | - |
| 19 | Frame for transport wheels - | |
| 20 | Hub cap | 381891 |
| 21 | Thumb nut | 380954 |
| 22 | Locking knob ➕ H | - |
| 23 | Drain plug ➕ K | 381910 |
| 24 | Sealing ring ➕ K | 381911 |

Assembly
Handle hoop
B Secure the lower handle hoop (6) on the hoop holders (10) on the motor housing. Use the supplied fasteners (2x screw M6x45, 2x wing nut M6).
B Fasten the upper handle hoop (1). Use the supplied fasteners (2x screw M6x45, 2x wing nut M6).
B Attach the cable strain relief (4) on the lower handle hoop (6).
C Secure the control cable (16) and the power cable (17) on the handle hoop using the cable clips (5). Make sure that the cables have enough free motion. Secure the cable clips using the supplied screws (2xSt 4.2 x 13).
Hoeing spur
H Pull out the circlip (18) and turn the axle upwards until the frame (19) engages audibly.
D Secure the hoeing spur (15) on the frame (19). For this, use the supplied fasteners (2x screw M6x25, 2x thumb nut M6).
Transport wheels
E Remove the screws (2x M5x12) and the washers (2x ∅ 5.4) from the wheel axle. Remove the hub cap (20) from the wheels. Slide the transport wheels (14) in the axle and secure them using the screws and washers. Re-attach the hub caps.
Start-up
Electric supply
Compare the voltage listed on the machine's type plate, e.g. 230 V, with the mains voltage and connect the machine to a suited and properly earthed electrical socket.
Only hook up the machine by means of a fault-current circuit breaker (30 mA).
- Use an extension cable in compliance with IEC 60245 (H 07 RN-F) having a core cross-section of at least:
- 1.5 mm ^2 for cable lengths up to 25 m
- 2.5 mm ^4 for cable lengths over 25 m
Power system fuse protection
10 A inert

Mounting of the extension cable
F Connect the connector of the extension cable to the mains plug (3). Thread the extension cable through the pull relief device as a loop and hang it up.
① Make sure that the extension cable has enough free motion.
Switching On/Off
Do not use any device where the switch can not be switched on and off. Damaged switches must be repaired or replaced immediately by the customer service.
The device is equipped with a safety circuitry preventing inadvertent switching on.

Only start the machine when it is placed on a flat ground area without obstacles.
Switching on:
Tilt the device slightly towards you.
G Turn the switch handle (2) clockwise to the front in the position 📋. Next, pull the switch lever (2) toward the handle (1). The device starts and the blade drum can rotate freely.
Switching off
When you release the switch lever (2) it returns automatically to its original position.
Motor protection
The motor is equipped with a safety switch and switches off automatically when overloaded. After a cooling-down break (approx. 15 min), the motor may be restarted.

Release the switch lever (2) because the device will otherwise restart immediately after it has cooled down. Risk of injury!
Before start of work

Before starting any work ensure the following:
- You may not start to operate the machine until you have read these original instructions, observed all the instructions given and installed the machine as described!
- Provide for a safe and cleaned workplace. Remove from the working area objects which might be thrown off.
■ Before starting your work make sure that: — the tools and bolts are not worn or damaged. To avoid any unbalance worn or damaged tools and bolts must only be replaced as a whole set.
– the hoeing tools are in a proper condition
– all screw connections are firmly tighten - no other persons, children or animals stay within the working area,
- you can always step back without any barriers,
– you have always a secure standing position.
Working with the tiller

This machine can be used to break up and aerate soil.

Risk of injury by flying around objects. Pay attention that the blade guard is attached.
- Place the device at the edge of the ground near the receptacle.
- Move the cable after each turn to the opposite already worked side. ➞ 1
- Make sure not to place excessive strain on the device.
In case of excessive strain, the motor speed drops and the motor noise changes.
- Move the device at an appropriate uniform speed in straight lines across the ground.
- Be especially careful when turning and pulling up the device device.
- When working on slopes, always position yourself perpendicular to the incline and ensure safe footing. Do not scarify on steep slopes.

In any case, adhere to all safety notes (see "Safe working").
Transport wheels
The tiller has transport wheels for a convenient transport. Before starting any work, turn the transport wheels from the transport position in the working position .
→ Pull out the circlip (18).
H Turn the frame (19) upwards until it engages audibly.
H Release the circlip (18) and make sure that the frame is safely secured.
H To return the transport wheels in the transport position
Ⓐ press the locking knob (22). Turn the frame downwards and secure it using the circlip.
Working depth
- The sense of rotation of the hoeing tools drives the device in forward direction. It is possible to increase the working depth (depending on the soil conditions) by deceleration of this forward movement.
- The hoeing spur decelerates the forward speed and controls the working depth of the hoeing tools.
i Adjust the working depth to the relevant soil conditions.
When working in very wet loamy and clayey soils it may happen that the soil is compacted and water draining is prevented.

Reduce the working depth when the motor is overloaded (motor speed drops and motor noise changes).
Work instructions

Always keep your hands and feet at a safe distance to the tool.
- Always hold the machine firmly with both hands when working.
- Push the device down using the handle until your desired working depth is reached. Then, exercise only the pressure that is needed to keep the working depth.
- Do not operate the machine directly along walls or pavers. Otherwise the toeing tools may be damaged.
- Move the device at an appropriate uniform speed in straight lines across the ground.
- To achieve a very loose and crumbly soil it is recommended to work the soil several times. Perform the 2nd pass either perpendicular to the 1st one © or parallel to it but offset D.
When working on slopes work only perpendicular to them D!
- Be careful when changing the direction or on obstacles. Führen Sie das Gerät vorsichtig herum.
- If the toeing tools are blocked or you feel too much vibration on the machine, immediately stop the engine and
wait until the toeing tools come to a dead stop. Check the machine:
- Clean the hoeing tools using suited aids. For this, place the machine on the ground with its rear side facing down.
- Replace any damaged toeing tools.
Electronic brake
The device is equipped with an electronic brake that stops the hoeing tools within 2 seconds from releasing the switch handle.
Maintenance and cleaning
Before each maintenance and cleaning work
- Switch off device.
— wait until the hoeing tools are stationary
— Pull out mains plug.
Maintenance and repair work other than those described in this chapter is only allowed to be carried out by service staff.
For maintaining and cleaning, removed security devices must unconditionally be mounted properly and proved again.
Only use genuine spare parts. Other than genuine parts may result in unpredictable damages and injury.
Maintenance
The tool will not come to a standstill immediately after cut-off. Before starting any service work wait until all parts are stationary.

Pull out mains plug.
To guarantee a long and reliable usage of the product carry out the following maintenance works regularly.
Check the device for obvious defects such as
- loose fastening elements
— worn or damaged components - correctly assembled and faultless covers and protective devices.
Necessary repair works or maintenance have to be carried out before using the machine.
Replacing the hoeing tools


Risk of injury! Wear protective gloves when working on the hoeing tools.
Worn blades reduce the performance of the device and put excessive strain on the motor. Therefore check the condition of the blades before each use.
Have the hoeing tools sharpened by your service workshop or replace them by new ones if required.
→ A / J Remove the hexagon screws (M8x40) and the hexagon nuts (M8). Pull then the hoeing tools (12a/12b/13a/13b) from the axle.

Pay attention to the correct position of the hoeing tools.
(The tool blades must show towards the working direction.)
Lubricate the gearbox
i Lubricate the gear after the first 20 operating hours, then every 40-50 operating hours.
→ J Put the device on its right side and remove the hoeing tools (13a/13b).
→ Clean the gear housing from dirt and foreign objects.
→ Remove the drain plugs (23).
Put the grease gun onto the grease filling plug (a).
→ Force some grease into the zerk fitting.
Do not fully fill the gearbox. Grease expands due to heat generated during operation There is the risk of damages to seals and grease leakage when the gearbox is fully filled with grease.
Use SHELL Albida Grease EP 2, for example, or an equivalent grease brand.
K Check the sealing rings (24) for damages and replace them if required.
→ Re-install the drain plugs and the hoeing tools.
Cleaning
Clean the machine thoroughly after each application so that the faultless function is kept.


Risk of injury! Wear protective gloves when working on the hoeing tools.
■ Remove the dirt with a cloth or brush.
- Clean the device immediately after finishing the work.
■ Clean the underside of the device and the hoeing tools.
- Clean the housing, especially the vent slots, from dirt stuck to it. Do not clean the machine with running water or high-pressure cleaners.
- Do not use solvents (gasoline, alcohol, etc.) for plastic parts, otherwise such parts may be damaged.
Transport
Before each transport
- Switch off device.
- wait until the hoeing tools are stationary
– Pull out mains plug.

The hoeing tools can be damaged during transport, e.g. on hard ground, even when the motor is switched off.
Before transporting, turn therefore the wheels downwards to the transport position or carry the device on the handle.
Storage
Pull out mains plug.
- Store unused equipment in a dry, locked place out of the reach of children.
- In case of extended storage (e.g. during winter) ensure that the device is protected against frost and corrosion.
Before a longer period of storage carry out the following to extend the machine's service life and ensure an easy operating:
– Thoroughly clean the device.
- Treat metal parts after each use against corrosion using an environmentally friendly biologically degradable spray oil.

F To store the device space-saving it is possible to fold down the upper handle hoop (1). For this, loosen the thumb nut (21) until you can fold down the handle hoop.
Possible faults

Before each fault elimination:
- Switch off device.
- wait until the hoeing tools are stationary
– Pull out mains plug.
After each fault clearance, put into operation and recheck all security installations.
| Fault code Possible cause | Corrective action | |
| Trimmer does not operate. | No powerExtension cable defective.Main plug, motor or switch defect | Check power supply, power outlet, fuse protectionCheck extension cable, exchange defect cable immediatelyHave main plug, motor or switch checked by an approved electrician or replaced by original spare parts |
| Trimmer does not operate. | Protective motor switch has tripped | Excessive working depth reduce the working depthHoeing tools blocked remove the blockageAllow the motor to cool down approx. 15 minutes before continuing to work |
| The device operates with interruptions | Extension cable defective.Internal faultON/OFF switch defective | Check extension cable, exchange defect cable immediatelyContact the customer serviceContact the customer service |
| Unusual sounds | Hoeing tools blockedLoose screws, nuts or other fastenersLack of lubricantLubricant emerges | Remove the blockageTighten all parts; contact customer service if the noises continue to occur.Refill lubricant.Contact the customer service |
| Unusual vibrations | Hoeing tools damaged or dullExcessive working depth | Contact the customer serviceReduce the working depth. |
| Unsatisfactory result | Dull hoeing toolsInsufficient working depth | Contact the customer serviceIncrease the working depth. |
Specifications
| Type / Model | BH 1400 N | |
| year of construction | see last page | |
| Motorrating P_1 |  | 1400 W |
| Mains voltage / Mains frequency |  | 230 V~ / 50 Hz |
| Main fuse |  | 10 A inert |
| No-load speed n_0 |  | 300 min ^-1 |
| Working width |  | 400 mm |
| Diameter of working tools |  | 200 mm |
| Number of blades |  | 24 |
| Hand arm vibrationMeasuring uncertainty | 0.862 m/s ^2 K = 1.5 m/s ^2 | |
| Sound levels at the work-place L_PA (according to 2000/14/EC)Measuring uncertainty | 78.8 dB (A) K_PA = 3.0 dB (A) | |
| Sound levels L_WA (according to 2000/14/EC)measured sound power level 90.79 dB (A)guaranteed sound power levelMeasuring uncertainty | 93 dB (A) K_WA = 1.75 dB (A) | |
| Dimensions | approx. 1130 x 408 x 1000 mm | |
| Weight | ### | approx. 13.5 kg |
| Protection class | ### | II - protective insulated |
| Protection class | ### | IPX4 |
Guarantee
Please note the attached guarantee declaration.
Sommaire
89331 Burgau – Germany
89331 Burgau – Germany
89331 Burgau – Germany
89331 Burgau – Germany
89331 Burgau – Germany
89331 Burgau – Germany
89331 Burgau – Germany
89331 Burgau – Germany
conform Directivei UE 2006/42/UE
Prin prezenta noi,
ATIKA GmbH
89331 Burgau – Germany
Conformity assessment procedure: 2000/14/UE – Appendix V.
89331 Burgau – Germany
89331 Burgau – Germany
Year of construction
NL
Bouvwjaar
F