BXRV500E - Hand vacuum cleaner BLACK & DECKER - Free user manual and instructions
Find the device manual for free BXRV500E BLACK & DECKER in PDF.
| Product type | Robot vacuum cleaner |
| Brand | Black & Decker |
| Model | BXRV500E |
| Power supply | Rechargeable battery, mains charger (100-240 V) |
| Battery life | Approximately 60 minutes (depending on mode) |
| Charging time | 4 hours for first charge |
| Dustbin capacity | Approximately 300 ml |
| Filtration | EPA filter, textile pre-filter, sponge filter |
| Cleaning modes | Automatic, perimeter, room, go home, water tank (mop) |
| Sensors | Anti-fall sensors, infrared impact sensors, floor detection |
| Brushes | Central rotating brush, side brushes (2), rubber brush |
| Remote control | Yes (2 AAA batteries not included) |
| Scheduling | Clock and cleaning schedule via remote control |
| Charging base | Included, with base detector |
| Noise level | Approximately 55 dB (estimated) |
| Dimensions (L x W x H) | Approximately 32 x 32 x 8 cm |
| Weight | Approximately 2.5 kg |
| Materials | ABS plastic, rubber |
| Safety | Anti-fall sensors, automatic stop in case of blockage, overload protection |
| Maintenance | Regular cleaning of dustbin, filters, brushes and sensors |
| Included accessories | Charging base, water tank, microfiber mop, remote control |
| Warranty | 2 years (according to legislation) |
| Use | Indoor, hard floors and short-pile carpets |
Frequently Asked Questions - BXRV500E BLACK & DECKER
User questions about BXRV500E BLACK & DECKER
0 question about this device. Answer the ones you know or ask your own.
Ask a new question about this device
Download the instructions for your Hand vacuum cleaner in PDF format for free! Find your manual BXRV500E - BLACK & DECKER and take your electronic device back in hand. On this page are published all the documents necessary for the use of your device. BXRV500E by BLACK & DECKER.
USER MANUAL BXRV500E BLACK & DECKER
text_image
BLACK+ DECKER™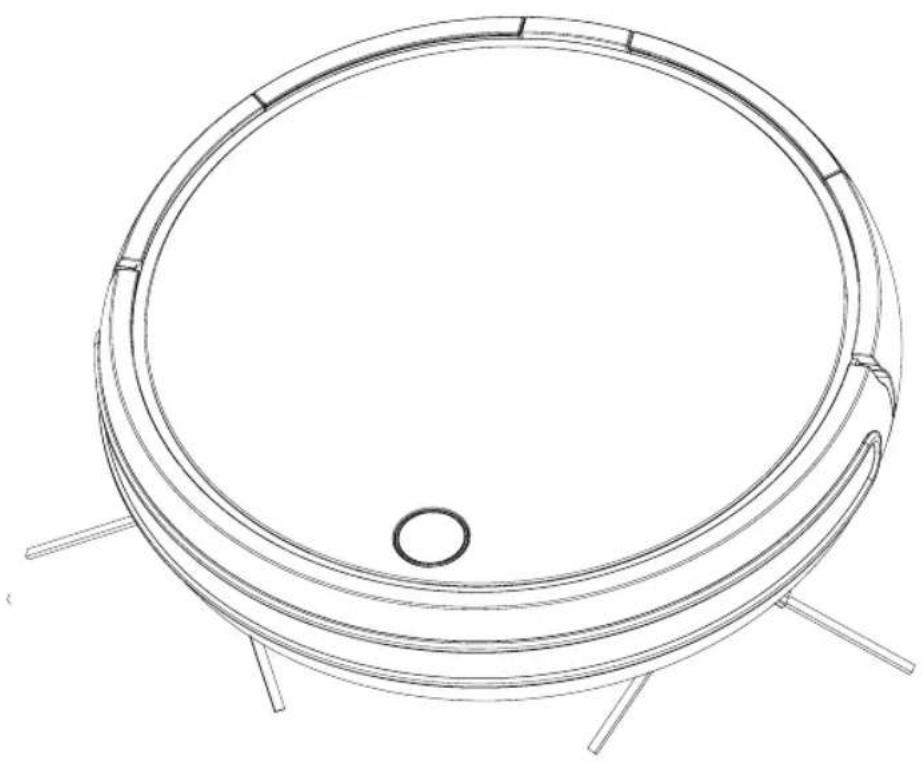
natural_image
Technical line drawing of a circular mechanical component with four legs and a central hole (no text or symbols)
text_image
A D C B H F, E, G B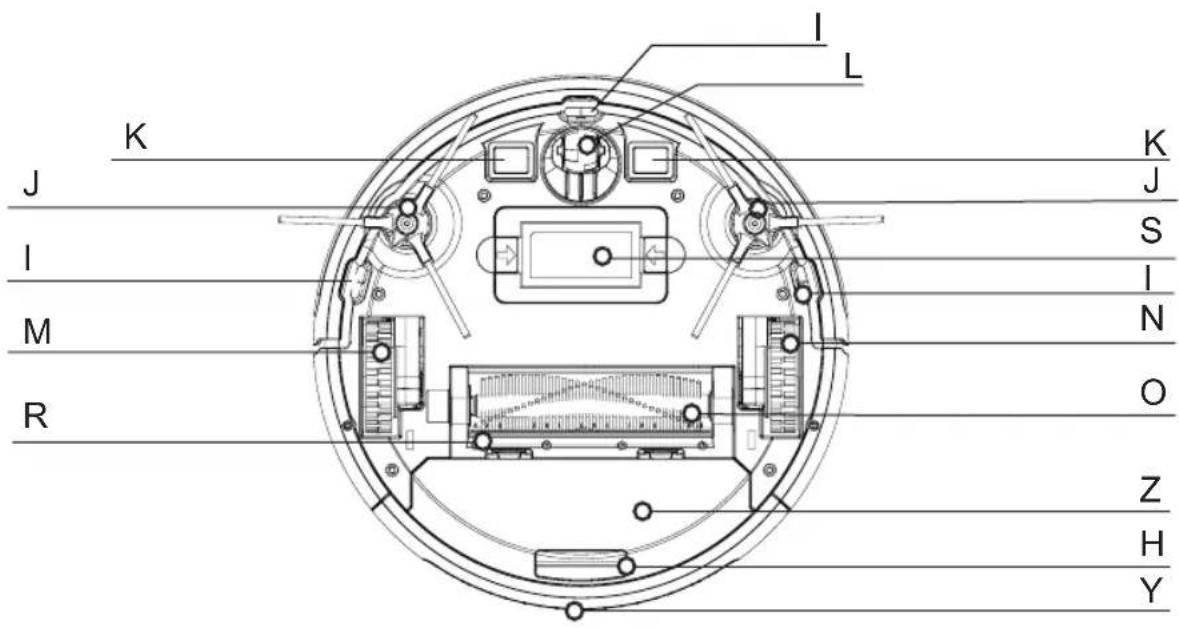
text_image
I L K J S I N M O R Z H Y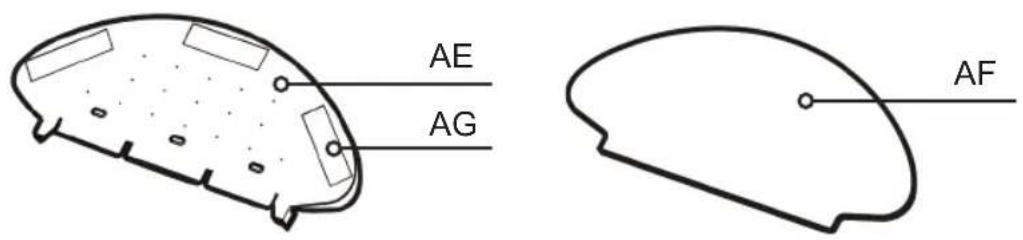
text_image
AE AG AF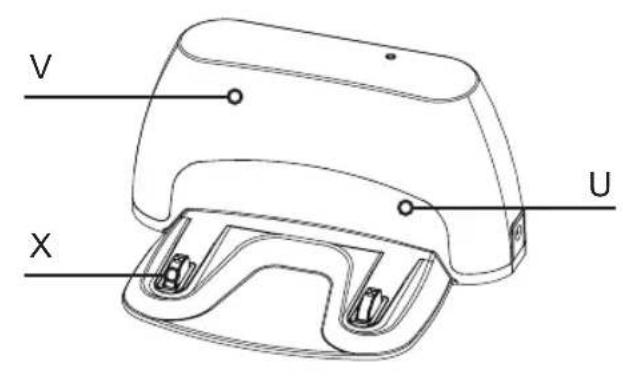
text_image
V U X
natural_image
Simple line drawing of a mechanical component with a string and cable, labeled 'W' (no text or symbols on the object itself)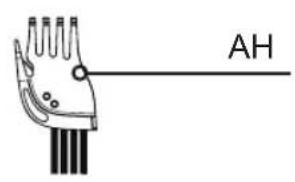
text_image
AH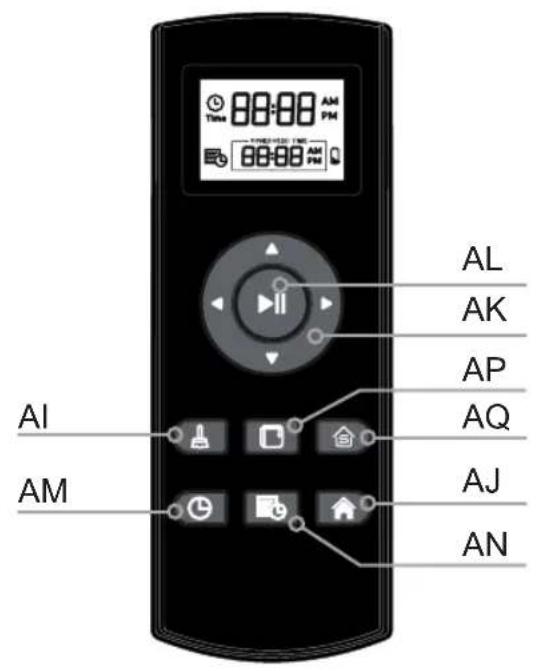
text_image
88:88 88:88 AL AK AP AQ AI AM AJ AN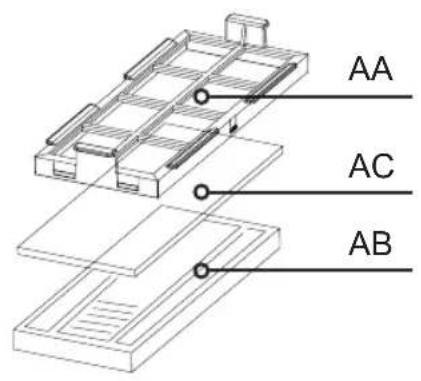
text_image
AA AC AB
ENGLISH
(Original instructions)
English
Robot Vacuum cleaner BXRV500E
Dear customer,
Many thanks for choosing to purchase a BLACK+DECKER brand product.
Thanks to its technology, design and operation and the fact that it exceeds the strictest quality standards, a fully satisfactory use and long product life can be assured.
Read these instructions carefully before switching on the appliance and keep them for future reference. Failure to follow and observe these instructions could lead to an accident.
Safety advice and warnings
- This appliance can be used by children aged from 8 years and above and persons with reduced physical, sensory or mental capabilities or lack of experience and knowledge if they have been given supervision or instruction concerning use of the appliance in a safe way and understand the hazards involved.
◆ Cleaning and user maintenance shall not be made by children without supervision - This appliance is not a toy. Children should be supervised to ensure that they do not play with the appliance.
◆ The battery must be removed from the appliance before it is scrapped.
◆ The appliance must be disconnected from the supply mains when removing the battery.
◆ The battery is to be disposed of safely.
◆ This appliance is for household use only, not professional, industrial use.
◆ Disconnect the battery charger from the mains when not in use and before undertaking any cleaning task.
This appliance contains accessories with rotary parts. Loose clothes, jewellery or long hair can be caught in moving parts. Dress properly. Do not wear baggy or loose-hanging clothes or accessories. Keep your hair, clothing and gloves away from moving parts.
- Only use the appliance with the specific power supply unit, provided with the appliance.
- Only connect the appliance to a safety extra low voltage corresponding to the marking on the appliance.
If the supply cord is damaged, it must be replaced by the manufacturer, its service agent or similar qualified person in order to avoid a hazard.
◆ Ensure that the voltage indicated on the charger rating label matches the mains voltage before plugging in the charger.
◆ Connect the appliance to a socket that can supply a minimum of 10 amperes.
◆ The charger's plug must fit correctly into the mains socket. Do not alter the plug. Do not use plug adaptors.
Do not force the power cord. Never use the power cord to lift up, carry or unplug the battery charger.
◆ Do not touch the plug with wet hands.
◆ Do not use the appliance if the cable or plug is damaged.
If any of the appliance casings breaks, immediately disconnect the appliance from the mains to prevent the possibility of an electric shock.
- Do not use the appliance if it has fallen on the floor, if there are visible signs of damage or if it has a leak.
Avoid all contact with the liquid that could be released from the battery. In case of contact with eyes, wash them thoroughly and seek medical advice. The liquid spilled from the battery may cause irritation or burns.
Use and care:
- Do not use the appliance if its accessories are not properly fitted.
- Do not use the appliance to gather up water or any other liquid.
- Do not use the appliance if the on/off switch does not work.
◆ Remove the batteries from the appliance if you are not going to use it for some time.
◆ Store this appliance out of reach of children and/or persons with physical, sensory or reduced mental or lack of experience and knowledge.
◆ Do not work on areas where there are metal objects, such as nails and/or screws.
◆ Never vacuum hot or sharp objects (cigarette butts, ashes, nails, etc.).
Do not use the appliance to pick up liquids, toxic substances, flammable or combustible liquids.
- Do not operate behind the fire or in the presence of explosives and/or flammable fumes or liquids.
◆ To prevent accidents, store vacuum after each sure.
- Do not open the battery/ies under any circumstances whatsoever.
When the battery/ies is not in use, keep it away from other metal objects like paper clips, coins, keys, screws ... that could connect a terminal to another.
- Do not short-circuit the battery terminals as this may cause an explosion or fire.
◆ The battery/ies should be stored at a temperature of below 40°C.
◆ Recharge the battery/ies only with the charger supplied by the manufacturer. A charger that is suitable for one type of battery may cause explosion or fire hazard when used with other battery/ies.
Use the device only with the battery/ies for which has been specifically designed. The use of any other battery/ies can cause an explosion or fire hazard.
◆ The appliance is for indoor use
Service:
Make sure that the appliance is serviced only by specialist personnel, and that only original spare parts or accessories are used to replace existing parts/accessories.
♦ CAUTION: There is a risk of fire if the appliance's cleaning is not done according to these instructions.
◆ Any misuse or failure to follow the instructions for use renders the guarantee and the manufacturer's liability null and void.
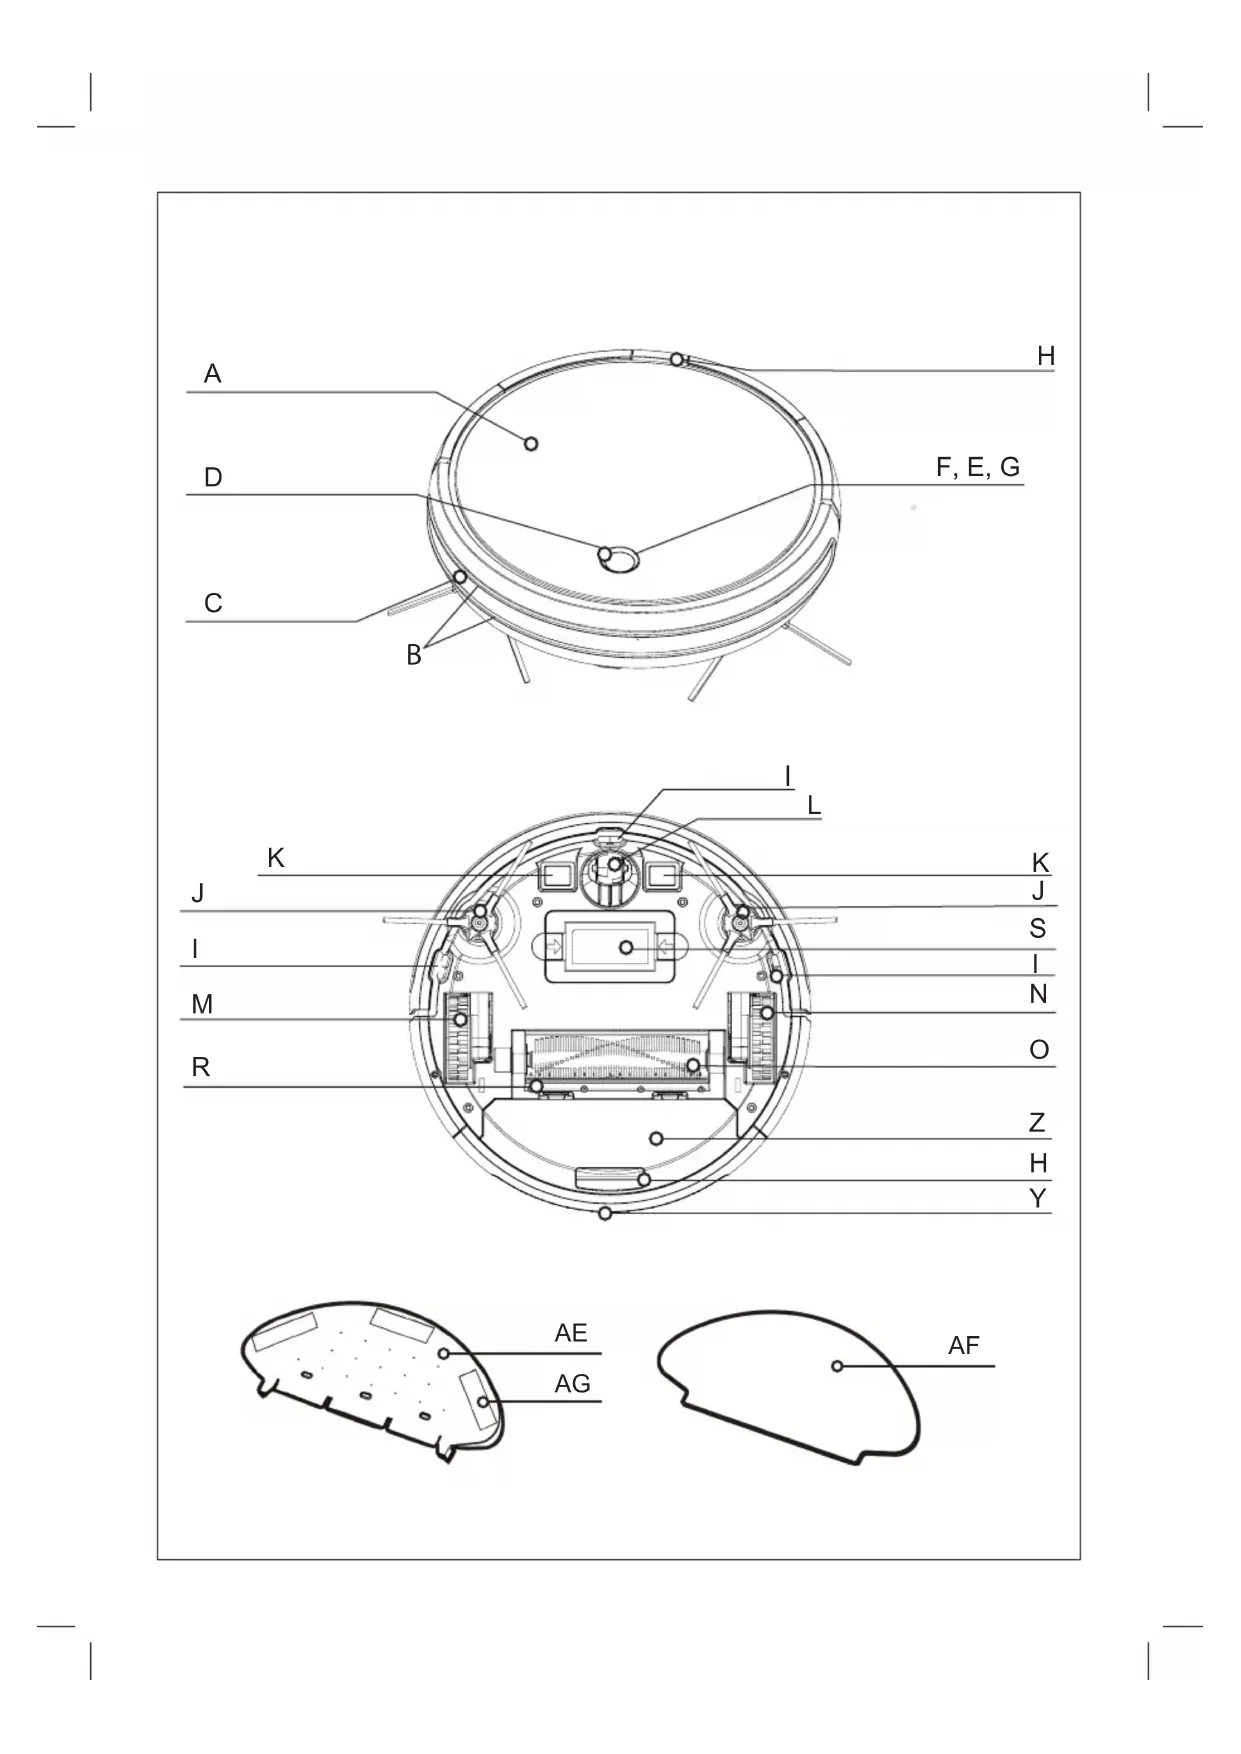
Description
TOP VIEW
A Robot vacuum cleaner top cover
B Anti-scratch band
C Front impact infrared sensor
D Operation button
E Red light fixed or blinking error
F Operating light
G Charge light indicator.
H Dust Box Button
BOTTOM VIEW
I Anti-fall sensors
J Side brushes
K Charge contact points
L Swivel wheels
M Right wheel
N Left wheel
O Main rotative brush
R Rubber brush
S Battery cover
CHARGING BASE
U Charging base
V Sensor base
W Charger
X Charge contact points
DUST TANK
Y Dust tank
Z Dust tank cover
AA Textile pre-filter
AB EPA Filter
AC Sponge Filter
H Dust container removal button
WATER TANK
AE Water tank
AF Microfiber mop
AG Hermetic water tank lid
AH Self-cleaning brush

ENGLISH
(Original instructions)
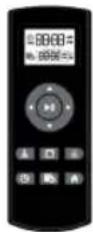
REMOTE CONTROL
 | (AI) AUTO cleaning mode button |
| [0D42] | (AJ) Button Cleaning mode Go Home (returns to the charging station automatically) |
 | (AK) Direction buttons (up / down / right / left) |
 | (AL) Start button or stop |
 | (AM) Button to select the time |
| [YHZK] | (AN) Button to select the schedule |
 | (AP) Edge Cleaning Mode button |
 | (AQ) Button Room cleaning mode |
NOTE: Insert 2 AAA batteries* before using the remote control for the first time. Make sure that the positive and negative poles are located in the correct direction in the battery compartment.
*batteries no included
If the model of your appliance does not have the accessories described above, they can also be bought separately from the Technical Assistance Service.
IMPORTANT:
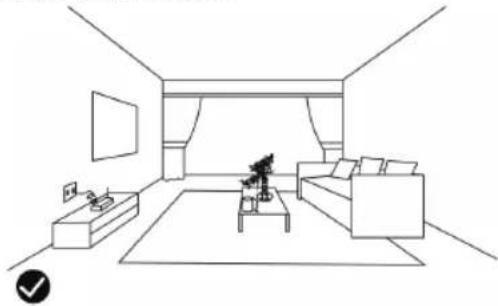
Cables or other objects on the ground can hinder the mobility of the robot. Remove these objects before using the robot vacuum cleaner.
natural_image
Line drawing of a modern living room interior with sofa, coffee table, and TV (no text or symbols)◆ Use the vacuum cleaner the robot only on short pile carpets.
◆ Furniture less than 8cm can block the robot. Lift the furniture if you need to clean this area.
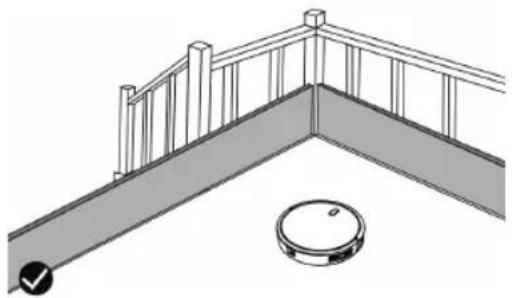
Put a safety barrier on the stairs to prevent it from falling in case the fall arrest sensors do not work properly.
natural_image
Architectural diagram of a balcony with railings and a circular object (no text or symbols)Installation
- Be sure to remove all packaging material from inside the appliance.
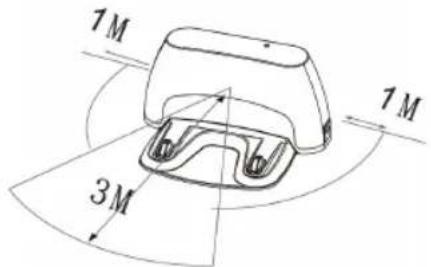
Charging base position:
◆ Connect the charger to the charging base.
◆ Place the charging base flat and next to the wall.
◆ To receive a good signal, you must leave a radius of 1m to the right and left and 3 meters forward of the base.
text_image
1M 3M 1M◆ Connect to adapter to the mains.

natural_image
Line drawing of a robotic vacuum cleaner with attached cable and sensor (no text or symbols)◆ If the charging base is removed when works, it will cause incapability of the appliance to recharge.
- Don't move the charging base artificially during the cleaning
BATTERY CHARGE:
◆ Warning: A new battery does not come with a full charge and must be fully charged before using the device for the first time.
◆ Charge the battery at room temperature between 4 and 40°C.
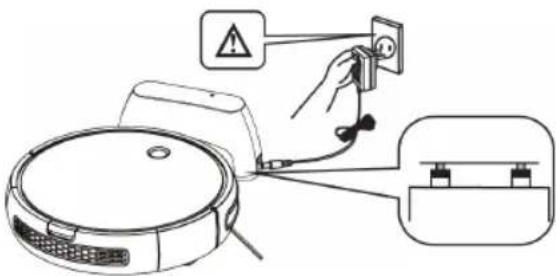
Manual charging
Put the robot in the charging base and ensure that the automatic charging poles are aligned correctly.
text_image
Diagram showing a robot connected to a wall-mounted electrical outlet with warning symbol and wiring connections◆ The blue LED (D) will light blinking. When the LED stops blinking and turns blue the robot is charged.
◆ Charge the robot for 4 hours before the first use.
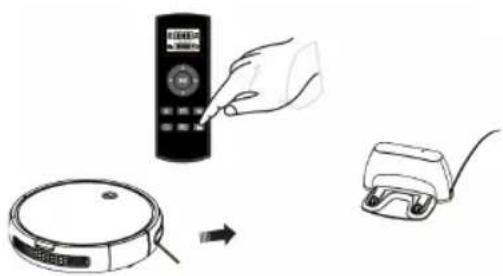
Manual charging via the remote control
- When the appliance is in standby mode or in a cleaning mode press the button to activate the recharge mode.
natural_image
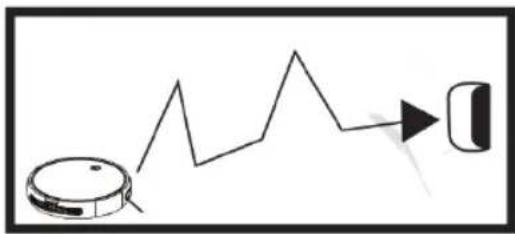
Illustration showing a hand inserting a remote control into a circular device, with a separate charger nearby (no text or symbols)Auto charging
◆ In a low battery condition the operation button (D) turns blue and blink entering into recharge mode.
NOTE: If the battery is about to run out, the robot will return to the charging base automatically to recharge.
NOTE: If the load base is inaccessible, the robot can not be recharged, it will return to the initial situation and the cleaning system will end. In this case, place the robot manually in the charging base so that it can be recharged correctly.
NOTE: The appliance may fail to return to the base either because of complex surrounding obstacles or running-out-of-batteries.
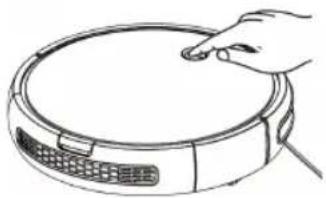
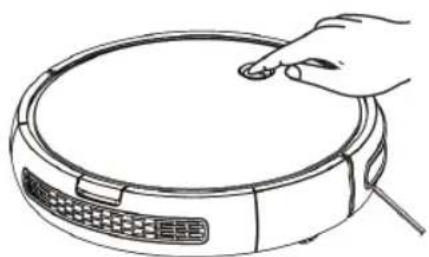
OPERATE THE ROBOT MANUALLY Turn on the vacuum cleaner
◆ Press the operation button (D) 2 seconds to awaken the robot. The red indicator will light (Stanby mode).
natural_image
Line drawing of a hand pressing down on a circular device with a keyboard and ventilation grilles (no text or symbols)Auto cleaning mode
◆ Press shortly the operation button (D) to start cleaning in AUTO mode. The indicator will turn blue and it will start cleaning automatically.
Auto Recharge mode
When the appliance is in standby mode or in a cleaning mode, double click the operation button (D) and then the indicator turns blue and blinks at the same time, which means it enters auto-recharging mode.
natural_image
Simple line drawing of a robotic vacuum cleaner emitting a jagged line, with a small icon on the right (no text or symbols)ENGLISH
(Original instructions)
Operation guideline indicators
| State Display | Operation | |
| Turn-off Light-off | Short-press to enter in standby mode and then, Long press 4S to enter in OFF state | |
| Turn-on Red Light-on | Long-press 2S to enter in Stanby state | |
| Cleaning Blue | Light-on | Short-press to enter in auto cleaning mode |
| Recharge Flash blue | Double click to enter in recharge mode | |
| Charging Flash Blue | ||
| Error | Flash red and beep | |
| Fully charged | Blue light on | |
OPERATE THE ROBOT VIA REMOTE CONTROL
| Function Guidelines | Function information | |
| ▶II | Start /Stop (button) | 1. When the appliance is in standby mode, press the button to enter the auto-cleaning mode.2. When the appliance is at any cleaning mode, press the button to shift it to standby mode.3. When setting the time, press this button to hold settings |
| ▲ | Forward button | Long-press the button and the appliance will forward; releasing, it stops moving. |
| ◀ | Left-turn button | Long-press the button and the appliance rotates counterclockwise; releasing, it stops |
| ▶ | Right-turn button | Long-press the button and the appliance rotates clockwise; releasing, it stops rotating. |
| ▼ | Back button | Long-press the button and the appliance rotates counter dockwise about 180^ ,then move forward ,relasing,it stops moving |
PAIRING PROCESS
If the remote control fails to respond, please check whether it's in low battery. If the problem is not the battery then pair the remote control and the vacuum cleaner. To do it follow the next procedure:
In standby mode, long-press 6S till blue ○ blinks, meanwhile press ▶ the remote control till beep sound heard
◆ An alternative solution is in off mode press ○ and ▶II at the same time for 3s. When you hear a beep sound the pairing process is completed.

natural_image
Line drawing of a robotic vacuum cleaner with a hand interacting with it, and a handheld device with a scroll (no text or symbols)PAUSE THE ROBOT
◆ To stop the robot press the operation button (D) or press the on / off button ▶dn the remote control.
To resume the cleaning cycle, press the operation button (D) or press the on / off button ▶ in the remote control again.
◆ For the robot to return to the charging base (U) press the Go Home button
POWER OFF THE ROBOT
◆ To turn off the robot press the operation button (D) until the operation indicator goes off.
natural_image
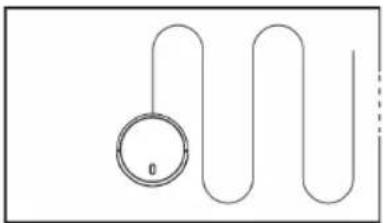
Line drawing of a hand pressing down on a circular device (no text or symbols)CLEANING MODES AUTO CLEANING MODE
The robot starts to vacuum automatically and combines the different cleaning modes in one optimizing the cleaning of your home to the maximum. To use the auto cleaning mode, press the button on the remote control.
natural_image
Simple line drawing of a loop with a circular component and curved lines (no text or symbols)- When the cleaning cycle ends or if the battery runs out, it returns to the charging base automatically.
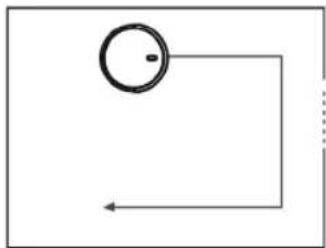
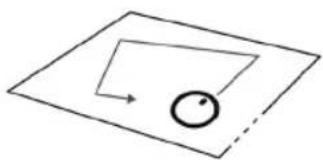
EDGE CLEANING MODES
Once the robot finishes cleaning the open areas of your floor, use the perimeter mode to make sure it has been cleaned along the walls and around the legs of the furniture.
natural_image
Simple diagram with a circle and arrow, no text or symbols present- If you prefer a faster cleaning of the edges, press the button on the remote control.
SMALL ROOM CLEANING MODE
When it is necessary to clean a specific room, press the room cleaning mode button on the remote control
natural_image
Simple geometric diagram showing a circle inside a parallelogram with an arrow indicating direction (no text or symbols)- When the cleaning is finished, the robot will stop.
◆ Make sure to close the doors of the room while using this mode.
Go home MODE
◆ Mode of return to the charging base automatically when the robot detects that only 30% of the battery is left.
◆ To activate the Go Home mode, press the 🔊 button on the remote control.
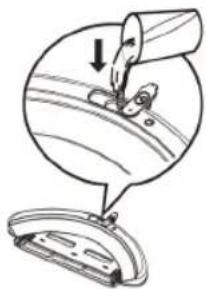
WATER TANK CLEANING MODE
- When the floor is clean you can attach the water tank (AE) into the vacuum cleaner. The water tank works by dripping so the mop will moisten and mop the floor.
◆ Open the sealed lid of the tank (AG) and introduce water into the tank.
natural_image
Diagram showing a sewing process with a needle inserted into a circular component and a separate view of the blade (no text or symbols)◆ Ensure that the mop is fastened securely.
natural_image
Line drawing of a hand holding a small object with an arrow indicating rotation (no text or symbols)◆ Attach the water tank to the vacuum cleaner and you can start the cleaning process selecting the cleaning mode you need.
natural_image
Diagram of a car dashboard with hands adjusting the top panel (no text or symbols present)IMPORTANT:
Do not use the mop outdoors.
Remove the carpets to avoid damaging them.

ENGLISH
(Original instructions)
Before charging the robot, remove the water tank and the mop.
CLEANING SCHEDULE
◆ The robot vacuum cleaner has cleaning schedule settings that allow you to customize when you clean your home.
◆ These settings can only be confirmed via the remote control.
IMPORTANT:
Make sure that the remote control is close to the robot while setting the clock or time.
Make sure that the power switch is in the ON position.
1) CONFIGURE THE CLOCK OF THE REMOTE CONTROL
◆ Press the ⏻ button on the remote control, the time selector starts blinking.
◆ Press the direction buttons ▲ or ▼ to select the desired time.
◆ Press the direction buttons ◀ or ▶ to select the minutes or hours.
◆ Press the ▶II button when the time setting is completed.
2) CONFIGURE THE CLEANING HOURS
◆ Press the 📋 button on the remote control, the time selector starts blinking.
◆ Press the direction buttons ▲ or ▼ to select the desired time.
◆ Press the direction buttons ◀ or ▶ to select the minutes or hours.
◆ Press the ▶|| button when the time setting is completed.
3) CANCEL THE SETTINGS OF THE CLEANING HOURS
◆ Press the (AN) button on the remote control for 4 seconds, the vacuum cleaner will emit a beep when the cleaning schedule confirmation is canceled.
MAINTENANCE
◆ Disconnect the battery charger from the mains and allow it to cool before undertaking any cleaning task.
- Clean the equipment with a damp cloth with a few drops of washing-up liquid and then dry.
Do not use solvents, or products with an acid or base pH such as bleach, or abrasive products, for cleaning the appliance.
Do not let water or any other liquid get into the air vents to avoid damage to the inner parts of the appliance.
- Never submerge the appliance in water or any other liquid or place it under running water.
- Never submerge the connector in water or any other liquid or place it under running water.
| BXRV500E Cleaning | Replacement frequency | |
| Dust Bin After each use | ||
| Filters | Once every week | Every 2 months |
| Rolling Brush | Once every week | Every 6-12 months |
| Side Brushes | Once every month | Every 3-6 months (or when visibly worn) |
| Sensors | Once every month | - |
| Charging Pins | Once every month | - |
| Swivel wheel | Once every month | - |
STORAGE:
◆ Empty the dust container after each use.
If do not use the vacuum cleaner for a long time fully charge the battery and soitre in in a dry place
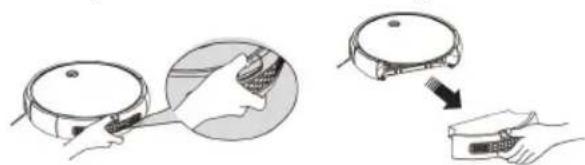
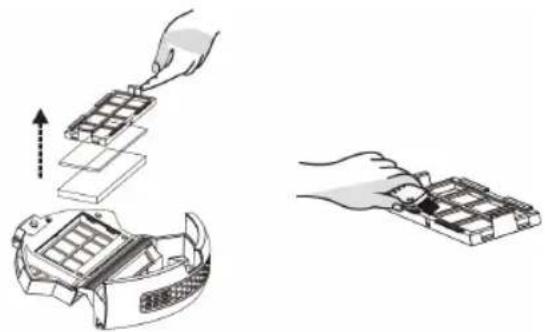
CLEAN THE DUSTBOX:
Emptying the powder tank
◆ Empty the dust container after each use.
◆ Uncouple the dust container from the appliance.
natural_image
Illustration showing a robotic vacuum cleaner performing a manual operation with a hand inserting a device (no text or symbols present)(Original instructions)
ENGLISH
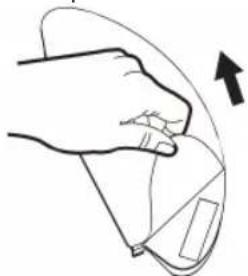
◆ Open the baffle first, and then pour out the dust.
natural_image
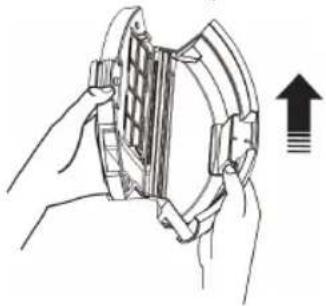
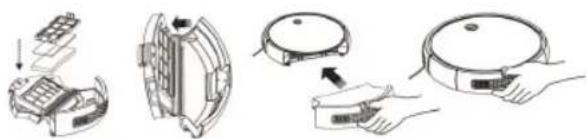
Illustration of hands holding a mechanical component with an upward arrow indicating direction (no text or symbols)Clean the filters and the dustbin
◆ Clean the dustbin with the cleaning brush:
natural_image
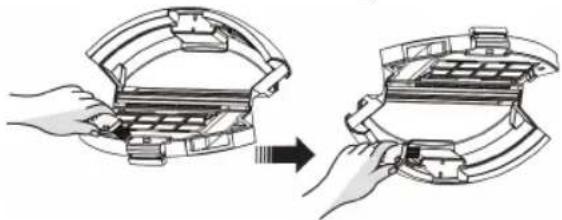
Diagram showing two hands assembling a mechanical component, one open and one closed, with no visible text or symbols.◆ Take out the filters, wipe off the dust with the cleaning brush
natural_image
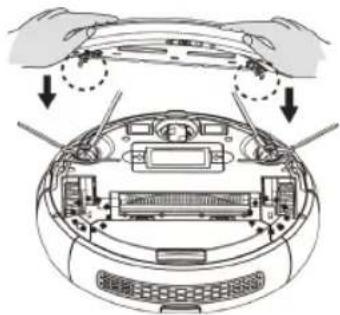
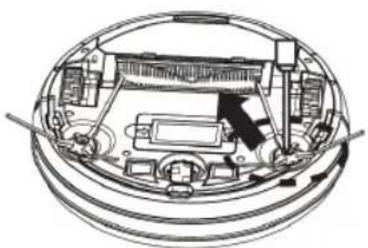
Illustration showing two steps of assembling electronic components, one being folded and the other assembled (no text or symbols present)◆ Re-assemble the filters in the dustbin
◆ Install the dustbin into the appliance.
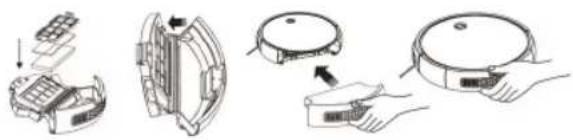
natural_image
Illustration of a robotic vacuum cleaner with open lid, showing internal components and assembly (no text or symbols)REPLACE THE BATTERY:
♦ CAUTION: It is important that the batteries are fully discharged prior to its withdrawal from the apparatus.
♦ CAUTION: the appliance must be disconnected from the supply mains when removing the batteries.
◆ To replace or remove the batteries, once the life of the appliance finished, proceed as follows
◆ Remove the battery pack and disconnect the terminal that connect the battery pack to the device.
Connect the terminal of new battery pack to the appliance; then press the battery pack downforward into the battery box.
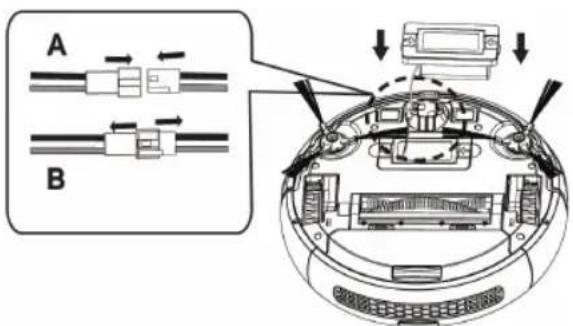
text_image
A BA - Aim the terminal and insert during wiring
B - Unplug it in the reverse direction during unwiring
Black Red
CLEANING MOP
◆ Wash the mop with water and let it dry.
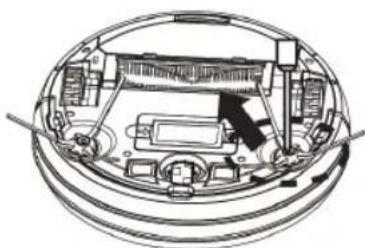
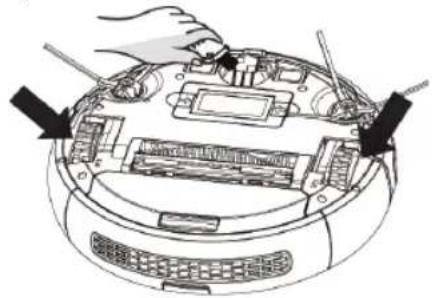
CLEANING ROBOT'S MAIN ROTATIVE BRUSH AND SIDE BRUSHES:
◆ Open the compartment lid, remove the brush and clean the compartment with a damp cloth.
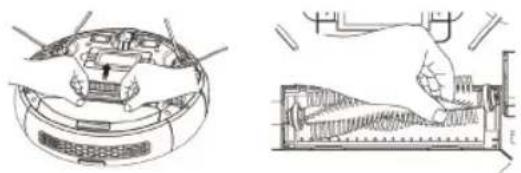
natural_image
Technical line drawings of a robotic vacuum cleaner and its internal component (no text or symbols)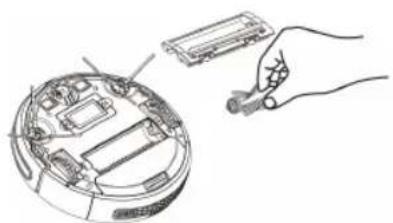
natural_image
Line drawing of a hand holding a flashlight next to an open circular device with internal components (no text or symbols)- Clean the central rotating brush. Cut the hair wrapped in the brush with the blade that includes the self-cleaning brush.

ENGLISH (Original instructions)
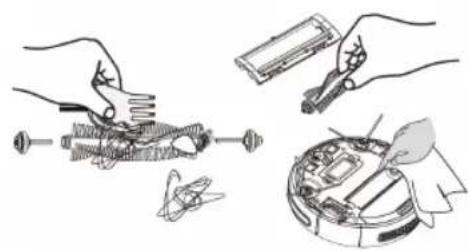
natural_image
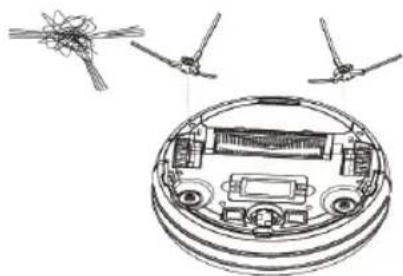
Illustration of hands assembling mechanical components with tools and a device (no text or symbols)◆ Unscrew the screws on the side brush with a screwdriver.
natural_image
Technical line drawing of a mechanical assembly inside a circular housing (no text or symbols)Take out the side brush, tidy the hair and trash on and inside the side brush base.
natural_image
Technical line drawing of a mechanical assembly with internal components and two separate views (no text or symbols)CLEANING ROBOT'S SWIVEL WHEEL:
◆ Clean the front, left and right wheels regularly with a cleaning brush.
natural_image
Diagram of a robotic device with hands operating the top panel and internal components (no text or symbols visible)CLEANING ROBOT'S ANTIFALLING SEN- SORS:
◆ For a good operation of the sensors remove the dust
often with the self-cleaning or dry cloth.
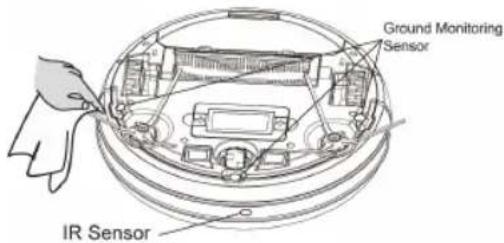
text_image
Ground Monitoring Sensor IR SensorCLEANING ROBOT'S LOAD CONTACT POINTS:
- Clean the automatic loading poles and load it with the cleaning cloth and a dry cloth.
Repair
Take the appliance to an authorised technical support service if product is damaged or other problems arise. Do not attempt to disassemble or repair the appliance yourself as this may be dangerous.
FOR EU product versions and/or in case that it is requested in your country: Ecology and recyclability of the product
The materials of which the packaging of this appliance consists are included in a collection, classification and recycling system. Should you wish to dispose of them, use the appropriate public recycling bins for each type of material.
◆ The product does not contain concentrations of substances that could be considered harmful to the environment.
This symbol means that in case you wish to dispose of the product once its working life has ended; take it to an authorised waste agent for the selective collection of Waste from Electric and Electronic Equipment (WEEE).
This symbol means that product may include a battery or batteries; user must to remove them before disposing of the product. Remember that batteries must be disposed of in duly authorised containers. Do not dispose of them in fire.
This appliance complies with Directive 2014/35/EU on Low Voltage, Directive 2014/30/EU on Electromagnetic Compatibility, Directive 2011/65/EU on the restrictions of the use of certain hazardous substances in electrical and electronic equipment and Directive 2009/125/EC on the ecodesign requirements for energy-related products
WARRANTY AND TECHNICAL
ASSISTANCE
This product enjoys the recognition and protection of the legal guarantee in accordance with current legislation. To enforce your rights or interests you must go to any of our official technical assistance services.
◆ You can find the closest one by accessing the following web link: http://www.2helpu.com/.
- You can also request related information, by contacting us (see the last page of the manual).
◆ You can download this instruction manual and its updates at http://www.2helpu.com/.
| Error-Flahs indicator Fault | name Fault forms Solutions | ||
| Flash red light twice with one sound | Failure of left wheel | The left wheel doesn't rotate and is overloaded | Check if there are twisters on the left wheel on the device |
| Flash red light three times with one sound | Failure of right wheel | The right wheel doesn't rotate and is overloaded | Check if there are twisters on the right wheel of the device |
| Flash red light four times with one sound | Failure of device taking off | The device takes off and stops in 1 second | Take the device back to the floor. Don't have it suspended in the air. |
| Flash red light five times with one sound | Failure of front wheel | The front wheel gets stuck and doesn't rotate. | Check if there are twisters on the small wheels of the front wheel. |
| Flash red light six times with one sound | Failure of ground inspection | There is a problem in the ground inspection | Check if the sensing window at the bottom of the device is abnormally shielded |
| Flash red light seven times with one sound | Low electricity of battery | Battery power has been extremely low (but not the critical point of recharge voltage). | Return the device to the docking station for charging |
| Flash red light eight times with one sound | Failure of front bumper | The impact switches on the left and right front shells can't be restored. | Check if the device impact buffer is normal or not |
| Flash red light nine times with one sound | Failure of main brush | The main brush wheel is overloaded or under loaded | Check if there are foreign matters on the main brush hairbrush of the appliance |
| Flash red light ten times with one sound | Failure of side brush | The side-sweeper wheel is overloaded or under loaded. | check if there are things like hair or cloth twine the side brush |
| Flash red light eleven times with one sound | Failure of wall inspection | There is a problem in the wall inspection | Check if the transparent window of the wall inspector is shielded or obstructed by hair and cloth |

ENGLISH
(Original instructions)
| Flash red light twelvetimes with one sound | Failure fan | The fan doesn't rotate with large current | Check if the blades of the fan are loose or wrapped by hair and cloth |
| Flash red light fourteen lve times with one sound | Failure of charging | The device can't be powe-red or show the charging state | Check if the device is connected with the dock station |
Français
Robot aspirateur
BXRV500E
Cher Client,
natural_image
Line drawing of a modern living room interior with sofa, coffee table, and TV (no text or symbols)natural_image
Architectural line drawing of a balcony with railing and circular drain (no text or symbols)Installation
natural_image
Line drawing of a robotic vacuum cleaner with attached power outlet (no text or symbols)text_image
Diagram showing a robot connected to a wall-mounted power outlet with warning symbol and cable connectionsnatural_image
Illustration showing a hand using a remote control device to interact with a robotic vacuum cleaner (no text or symbols present)FONCTIONNEMENT MANUEL DU ROBOT
natural_image
Line drawing of a hand pressing down on a circular device with a keyboard and grid (no text or symbols)natural_image
Simple line drawing of a robot with a gear and a gear icon, connected by a jagged line (no text or symbols)natural_image
Line drawing of a hand pressing down on a circular device with a keyboard and control panel (no text or symbols)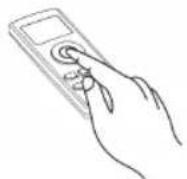
METTRE LE ROBOT EN PAUSE
natural_image
Line drawing of a hand pressing down on a circular device with a keyboard and scroll (no text or symbols)MODES DE NETTOYAGE MODE NETTOYAGE AUTO
natural_image
Simple line drawing of a looped cable with a circular component, no text or symbols presentnatural_image
Simple diagram with a circle and arrow, no text or symbols presentnatural_image
Simple geometric diagram showing a circle inside a parallelogram with an arrow indicating direction (no text or symbols)natural_image
Diagram showing a mechanical assembly with a downward arrow and a circular component below (no text or symbols)natural_image
Line drawing of a hand holding a device with an arrow indicating motion (no text or symbols)text_image
Diagram showing car interior components with arrows indicating movement or assembly, likely for vehicle maintenance or repair.IMPORTANT :
natural_image
Illustration showing two steps of a robotic vacuum cleaner's operation: adding a component to a device and adding a package (no text or symbols present)natural_image
Illustration of hands holding a mechanical component with an upward arrow indicating motion (no text or symbols)natural_image
Illustration of hands installing or adjusting a mechanical component, showing a step from opening to closing (no text or symbols present)natural_image
Illustration of a hand installing or adjusting a device component, showing top-down and side-view views (no text or symbols)natural_image
Illustration of a robotic device with open lid, showing internal components and a close-up of the lid (no text or symbols)REEMPLACEMENT DES PILES :
natural_image
Illustration of hands using pliers to adjust mechanical parts (no text or symbols present)natural_image
Technical line drawing of a mechanical assembly with no visible text or symbolsnatural_image
Diagram of a circular device with internal components and external wiring, no text or symbols presentNETTOYAGE DE LA SERPILLIÈRE
natural_image
Technical line drawings of a robotic device and its internal components (no text or symbols)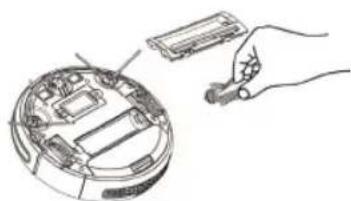
natural_image
Line drawing of a hand holding a tool interacting with an open circular device (no text or symbols visible)NETTOYAGE DE LA ROUE PIVOTANTE
natural_image
Diagram of a computer monitor with hands operating the top panel and buttons inserted (no text or symbols visible)FRANÇAIS
natural_image
Line drawing of a modern living room interior with sofa, coffee table, TV, and wall (no text or symbols)
natural_image
Line drawing of a balcony railing with a circular object underneath (no text or symbols)Installazione
natural_image
Line drawing of a robotic vacuum cleaner with attached power outlet (no text or symbols)text_image
Diagram showing a robot connected to a wall-mounted power outlet with warning symbol and cable connections, including a close-up of the device.natural_image
Illustration showing a hand inserting a remote control into a robotic vacuum cleaner, with no text or symbols present.Ricarica automatica
natural_image
Line drawing of a hand pressing down on a circular device (no text or symbols)natural_image
Simple line drawing of a robotic vacuum cleaner next to a rising trend line and a small object (no text or symbols)natural_image
Line drawing of a robotic vacuum cleaner and a handheld remote control (no text or symbols)METTERE IN PAUSA IL ROBOT
natural_image
Line drawing of a hand pressing down on a circular device (no text or symbols)MODALITÀ DI PULIZIA MODALITÀ PULIZIA AUTO
text_image
Diagram showing a remote control with a hand gesture and a connected audio waveform displaynatural_image
Simple line drawing of a circle with an arrow pointing inward, no text or symbols presentnatural_image
Simple line drawing of a rectangular shape with an arrow pointing to a circle inside, no text or symbols present.natural_image
Diagram showing a sewing machine needle stitching a car wheel, with no text or symbols present.natural_image
Illustration of a hand holding a curved object with an arrow indicating rotation (no text or symbols)text_image
Diagram showing car interior components with arrows indicating assembly or installation stepsIMPORTANTE:
natural_image
Illustration showing a kitchen appliance being processed with a tool, resulting in a close-up of the lid (no text or symbols present)natural_image
Illustration of hands holding a mechanical component with an upward arrow indicating motion (no text or symbols)natural_image
Diagram showing two steps of installing or adjusting a mechanical component, with no visible text or symbols.natural_image
Illustration of a hand assembling electronic components with an upward arrow indicating motion (no text or symbols present)natural_image
Illustration of a robotic vacuum cleaner's internal components and cleaning steps (no text or symbols)natural_image
Two technical line drawings showing hands operating a device with internal components (no text or symbols)
natural_image
Hand holding a tool interacting with an open electronic device (no text or symbols visible)natural_image
Illustration of hands using a tool to adjust mechanical components (no text or symbols present)natural_image
Technical line drawing of a circular mechanical or electrical component with internal components and no visible text or symbolsnatural_image
Diagram of a circular device with internal components and external wiring, no text or symbols presentPULIZIA DELLA RUOTA GIREVOLE
natural_image
Diagram of a computer monitor with hands operating the top panel (no text or symbols visible)natural_image
Line drawing of a modern living room interior with sofa, coffee table, TV, and wall (no text or symbols)natural_image
Architectural line drawing of a balcony with railing and circular base (no text or symbols)Instalación
natural_image
Line drawing of a robotic vacuum cleaner with attached power outlet (no text or symbols)text_image
Diagram showing a robot connected to a wall-mounted power outlet with warning symbol and cable connections, including a close-up of the device.natural_image
Illustration showing a hand inserting a remote control into a clean vacuum cleaner (no text or symbols present)Carga automática
natural_image
Line drawing of a hand pressing down on a circular device with a grid and control panel (no text or symbols)natural_image
Simple line drawing of a robot and a car with a jagged line indicating motion (no text or symbols)natural_image
Line drawing of a robotic device with a hand adjusting its lid, and a handheld remote control (no text or symbols)PAUSAR EL ROBOT
natural_image
Line drawing of a hand pointing at a circular device with a keyboard and display (no text or symbols)MODOS DE LIMPIEZA MODO DE LIMPIEZA AUTO
natural_image
Simple line drawing of a loop with a circular component and curved lines (no text or symbols)natural_image
Simple diagram with a circle and arrow, no text or symbols presentnatural_image
Simple line drawing of a circular arrow pointing toward a dashed rectangular plane (no text or symbols)natural_image
Diagram showing a mechanical assembly with a cylindrical component being inserted into a curved surface, and a separate view of a device (no text or symbols present)natural_image
Line drawing of a hand holding a curved object with an arrow indicating direction (no text or symbols)text_image
Diagram showing hands installing or adjusting a device's top panel with labeled components and directional arrows indicating assembly or repair.IMPORTANTE:
natural_image
Illustration showing a robotic vacuum cleaner performing a hand manipulation task (no text or symbols present)natural_image
Illustration of hands holding a mechanical component with an upward arrow indicating motion (no text or symbols)natural_image
Diagram showing two hands installing or adjusting a mechanical component, no text or symbols presentnatural_image
Illustration of a hand assembling electronic components with an upward arrow indicating motion (no text or symbols present)natural_image
Illustration of a robotic vacuum cleaner with open lid and hand holding a sensor (no text or symbols)natural_image
Technical line drawing showing two views of a robotic device with hands operating the component (no text or symbols present)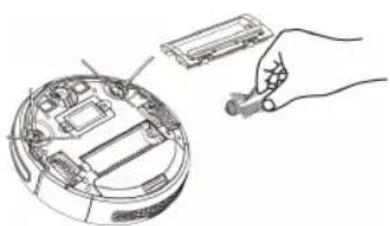
natural_image
Hand holding a small electronic device next to an open circular device with internal components (no text or symbols visible)natural_image
Illustration of hands using a tool to adjust mechanical components, including a battery and a device (no text or symbols present)natural_image
Technical diagram of a mechanical assembly with no visible text or symbolsnatural_image
Diagram of a vehicle interior with three components and a circular base, no text or symbols presentLIMPIEZA DE LAS RUEDAS
natural_image
Diagram of a computer monitor with hands operating the top panel and buttons inserted (no text or symbols visible)LIMPIEZA DE LOS SENSORES ANTICAIDA:
natural_image
Line drawing of a modern living room interior with sofa, coffee table, and TV (no text or symbols)natural_image
Architectural diagram of a balcony with railing and circular water feature (no text or symbols)Instalação
natural_image
Line drawing of a robotic vacuum cleaner with attached power outlet (no text or symbols)text_image
Diagram showing a robot connected to a wall-mounted power outlet with warning symbol and battery pack, illustrating electrical or safety installation.natural_image
Line drawing of a hand pointing at the lid of a robotic device (no text or symbols)natural_image
Simple line drawing of a robotic vacuum cleaner next to a stylized arrow pointing right (no text or symbols)Botões de operação
natural_image
Line drawing of a robotic vacuum cleaner with a hand adjusting the lid and a handheld remote control (no text or symbols)PARAR O ROBÔ
natural_image
Line drawing of a hand pressing down on a circular device (no text or symbols)MODOS DE LIMPEZA MODO DE LIMPEZA AUTOMÁTICA
natural_image
Simple line drawing of a looped cable with a circular component, no text or symbols presentnatural_image
Simple diagram with a circle and arrow, no text or symbols presentnatural_image
Simple line drawing of a rectangular shape with an arrow and a circle inside, no text or symbols present.natural_image
Diagram showing a mechanical assembly with a downward arrow and a circular component below (no text or symbols)natural_image
Line drawing of a hand holding a curved object with an arrow indicating rotation (no text or symbols)natural_image
Diagram of a car dashboard with hands adjusting parts, showing internal components and directional arrows (no text or symbols)IMPORTANTE:
natural_image
Illustration showing a robotic vacuum cleaner being processed with a hand using a device (no text or symbols present)natural_image
Illustration of hands holding a mechanical component with an upward arrow indicating motion (no text or symbols)natural_image
Diagram showing two hands installing or adjusting a mechanical component, with no visible text or symbols.natural_image
Illustration of a hand assembling electronic components with an upward arrow indicating motion (no text or symbols present)natural_image
Illustration of a robotic vacuum cleaner's internal components and assembly (no text or symbols)natural_image
Technical line drawings of a robotic device and a mechanical component (no text or symbols)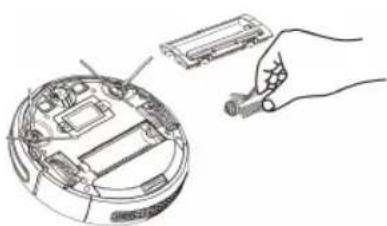
natural_image
Hand inserting a component into an open circular device (no text or symbols visible)natural_image
Illustration of hands assembling components with tools and a battery (no text or symbols)♦ Desaparafuse as escovas laterais.
natural_image
Technical diagram of a mechanical assembly with internal components and directional arrows (no text or labels)natural_image
Diagram of a circular device with internal components and external wiring, no text or symbols presentLIMPEZA DA RODA PIVÔ
natural_image
Diagram of a robotic device with hands operating the top panel and screwdriver (no text or symbols visible)PORTUGUÊS
natural_image
Line drawing of a modern living room interior with sofa, coffee table, TV, and wall (no text or symbols)natural_image
Architectural line drawing of a balcony with railing and circular base (no text or symbols)Installatie
natural_image
Line drawing of a robotic vacuum cleaner with attached power outlet (no text or symbols)text_image
Diagram showing a robotic vacuum cleaner connected to an electrical outlet, with warning symbol and wiring diagram present.natural_image
Line drawing of a hand pressing down on a circular device with a keyboard and scroll (no text or symbols)natural_image
Simple line drawing of a robot and a car with motion lines (no text or symbols)natural_image
Line drawing of a robotic vacuum cleaner with a hand adjusting the device (no text or symbols)DE ROBOT PAUZEREN
natural_image
Line drawing of a hand pressing down on a circular device (no text or symbols)REINIGINGSSTANDEN AUTOMATISCHE REINIGING
natural_image
Simple line drawing of a loop with a circular component and curved lines (no text or symbols)natural_image
Simple line drawing of a circle connected by a curved arrow, no text or symbols presentnatural_image
Simple line drawing of a circular object inside a tilted rectangular frame (no text or symbols)natural_image
Diagram showing a mechanical or fluidic process with an arrow indicating direction, no text or symbols presentnatural_image
Illustration of a hand holding a curved object with an arrow indicating upward motion (no text or symbols)natural_image
Diagram of a car dashboard with arrows indicating parts of the engine compartment (no text or symbols present)BELANGRIJK:
natural_image
Illustration showing two steps of a robotic vacuum cleaner's step, with no text or symbols present.natural_image
Illustration of hands holding a mechanical component with an upward arrow indicating motion (no text or symbols)natural_image
Diagram showing two steps of installing or adjusting a device component, with no visible text or symbols.natural_image
Illustration of a hand assembling electronic components with an upward arrow indicating assembly (no text or symbols present)natural_image
Illustration of a robotic vacuum cleaner with open lid, showing mechanical assembly and hand positioning (no text or symbols)
VERVANGING VAN DE BATTERIJ:
natural_image
Three technical line drawings showing robotic vacuum cleaner assembly, internal components, and a handheld device (no text or symbols)natural_image
Illustration of hands using a tool to adjust components in a mechanical assembly (no text or symbols present)natural_image
Technical diagram of a mechanical assembly with no visible text or symbolsnatural_image
Diagram of a circular device with internal components and external wiring, no text or symbols presentREINIGING VAN HET DRAAIWIEL
natural_image
Diagram of a robotic device with hands operating the top panel and buttons, showing internal components (no text or symbols)REINIGING VAN DE HORIZONTALE STAND SENSOREN:
natural_image
Line drawing of a modern living room with sofa, coffee table, and TV (no text or symbols)natural_image
Architectural diagram of a balcony with railing and circular drain (no text or symbols)
Instalacja
natural_image
Line drawing of a robotic vacuum cleaner with attached power outlet (no text or symbols)text_image
Diagram showing a robot connected to a wall-mounted electrical outlet with warning symbol and cable connectionsnatural_image
Illustration showing a hand interacting with a remote control unit, a circular vacuum cleaner, and a charging plug (no text or symbols)natural_image
Line drawing of a hand pressing down on a circular device with a keyboard and monitor (no text or symbols)natural_image
Simple line drawing of a robotic vacuum cleaner next to a stylized arrow pointing right (no text or symbols)natural_image
Line drawing of a hand pressing down on a circular device with a keyboard and monitor (no text or symbols)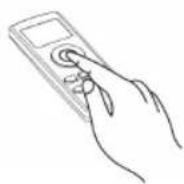
PAUZOWANIE PRACY ROBOTA
natural_image
Line drawing of a hand pressing down on a circular device (no text or symbols)TRYBY CZYSZCZENIA TRYB AUTOMATYCZNEGO CZYSZCZENIA
natural_image
Simple line drawing of a circular object connected to a curved line, no text or symbols presentnatural_image
Simple diagram with a circle and arrow, no text or symbols presentnatural_image
Simple line drawing of a rectangular shape with an arrow pointing to a circle inside, no text or symbols present.natural_image
Diagram showing a mechanical assembly with a downward arrow and a close-up of a component (no text or symbols)natural_image
Line drawing of a hand holding a curved object with an arrow indicating upward motion (no text or symbols)natural_image
Diagram of a car dashboard with hand placement arrows indicating movement or assembly (no text or symbols present)WAŻNE:
natural_image
Illustration showing a robotic vacuum cleaner performing a food cleaning or cleaning process (no text or symbols present)natural_image
Illustration of hands holding a mechanical component with an upward arrow indicating motion (no text or symbols)natural_image
Diagram showing two hands installing or adjusting a mechanical component, with no visible text or symbols.natural_image
Illustration showing a hand assembling electronic components with an upward arrow indicating motion (no text or symbols present)natural_image
Illustration of a robotic vacuum cleaner's open lid and base, showing mechanical assembly and hand positioning (no text or symbols)WYMIANA AKUMULATORA:
natural_image
Technical line drawings of a robotic device and its internal components (no text or symbols)
natural_image
Line drawing of a hand holding a small electronic device next to an open circular device (no text or symbols visible)natural_image
Illustration of hands using a tool to adjust mechanical parts (no text or symbols present)natural_image
Technical line drawing of a mechanical assembly inside a circular housing (no text or symbols)natural_image
Diagram of a vehicle interior with overhead suspension components (no text or labels)CZYSZCZENIE KÓŁKA OBROTOWEGO
natural_image
Diagram of a robotic device with hands operating the top panel and sensors on its head (no text or symbols visible)CZYSZCZENIE CZUJNIKÓW POZIOMU:
natural_image
Line drawing of a modern living room interior with sofa, coffee table, and TV (no text or symbols)natural_image
Line drawing of a balcony railing with a circular base and a circular object on the ground (no text or symbols)Εγκατάσταση
natural_image
Line drawing of a robotic vacuum cleaner with attached power outlet (no text or symbols)text_image
Diagram showing a robotic vacuum cleaner connected to an electrical outlet, with warning symbol and wiring diagram illustrating the process.text_image
Diagram showing a robotic vacuum cleaner with control panel, hand interacting with remote, and connected to a charging plug.Αυτόματη φόρτιση
natural_image
Line drawing of a hand pressing down on a circular device with a keyboard and grilles (no text or symbols)natural_image
Simple line drawing of a robot with a jagged path and a small object, no text or symbols presentΣτάδια λειτουργία
natural_image
Line drawing of a hand pressing down on a circular device with a keypad and control panel (no text or symbols)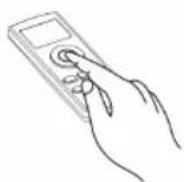
ΠΑΥΣΗ ΣΤΟ ΡΟΜΠΟΤ
natural_image
Line drawing of a hand pressing down on a circular device (no text or symbols)natural_image
Pure diagram of a curved pipe or tube with a circular component, no text or symbols presentnatural_image
Simple diagram with a circle and arrow, no text or symbols presentnatural_image
Simple line drawing of a circular object inside a tilted rectangular frame with an arrow indicating direction (no text or symbols)natural_image
Diagram showing a sewing machine needle stitching a garment, with a magnified view of the garment's back (no text or symbols)natural_image
Line drawing of a hand holding a small object with an arrow indicating rotation (no text or symbols)text_image
Diagram showing car interior components with arrows indicating movement or assembly, including a top-down view of the dashboard and internal compartments.ΣΗΜΑΝΤΙΚΟ:
natural_image
Illustration showing a robotic vacuum cleaner performing a manual step with a hand holding a small container (no text or symbols present)natural_image
Illustration of hands holding a mechanical component with an upward arrow indicating motion (no text or symbols)natural_image
Illustration of two hands installing or adjusting a mechanical component, showing internal structure and assembly (no text or symbols)natural_image
Illustration showing a hand assembling electronic components with an upward arrow indicating motion (no text or symbols present)natural_image
Illustration of a robotic vacuum cleaner with open lid, showing mechanical assembly and control panel (no text or symbols)natural_image
Technical line drawings of a robotic device and its internal components (no text or symbols)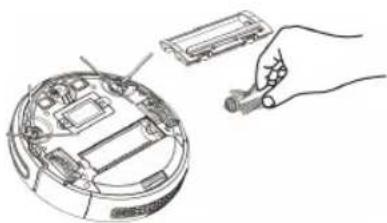
natural_image
Hand inserting a device into an open circular electronic device (no text or symbols visible)natural_image
Illustration of hands using pliers to adjust mechanical parts (no text or symbols present)natural_image
Technical diagram of a mechanical assembly with no visible text or symbolsnatural_image
Technical line drawing of a mechanical assembly with no visible text or symbolsnatural_image
Diagram of hands installing or adjusting electronic components on a device (no text or symbols visible)ΕΛΛΗΝΙΚΑ
natural_image
Line drawing of a modern living room interior with sofa, coffee table, and TV (no text or symbols)natural_image
Architectural line drawing of a balcony with railing and circular drain (no text or symbols)Монтаж
natural_image
Line drawing of a robotic vacuum cleaner with attached power outlet (no text or symbols)text_image
Diagram showing a robot connected to an electrical outlet with warning symbol and plug-in socket, illustrating electrical hazard.natural_image
Illustration showing a robotic vacuum cleaner, a hand inserting a sensor, and a separate device with a cable (no text or symbols)natural_image
Line drawing of a hand pressing down on a circular device with a keyboard and scroll (no text or symbols)natural_image
Simple line drawing of a robot with a jagged line and a circular base, no text or symbols presentНасоки за работа ○
natural_image
Line drawing of a robotic vacuum cleaner with a hand adjusting its screen (no text or symbols)ВРЕМЕННО СПИРАНЕ НА РОБОТА
natural_image
Line drawing of a hand pressing down on a circular device with a keyboard and scroll (no text or symbols)
РЕЖИМИ НА ПОЧИСТВАНЕ РЕЖИМ „АВТОМАТИЧНО ПОЧИСТВАНЕ“
natural_image
Simple line drawing of a looped cable with a circular component, no text or symbols presentnatural_image
Simple diagram with a circle and arrow, no text or symbols presentnatural_image
Simple line drawing of a circular object inside a tilted rectangular frame with an arrow indicating direction (no text or symbols)natural_image
Diagram showing a mechanical assembly with a cylindrical component and a base component, no text or symbols present.natural_image
Line drawing of a hand holding a device with an arrow indicating upward motion (no text or symbols)text_image
Diagram showing car interior components with arrows indicating assembly or repair stepsВАЖНО!
natural_image
Illustration showing a robotic vacuum cleaner performing a manual operation with a hand holding the device (no text or symbols present)natural_image
Illustration of hands holding a mechanical component with an upward arrow indicating motion (no text or symbols)natural_image
Illustration of two hands installing or adjusting a mechanical component, showing a curved panel assembly (no text or symbols present)natural_image
Illustration showing a hand assembling electronic components with an upward arrow indicating motion (no text or symbols present)♦ Отново поставете филтрите и контейнера за нечистотии.
♦ Поставете контейнера за нечистотии в уреда.
natural_image
Illustration of a robotic vacuum cleaner's internal components and assembly (no text or symbols)natural_image
Technical line drawing of a mechanical device with internal components and external wiring (no text or symbols)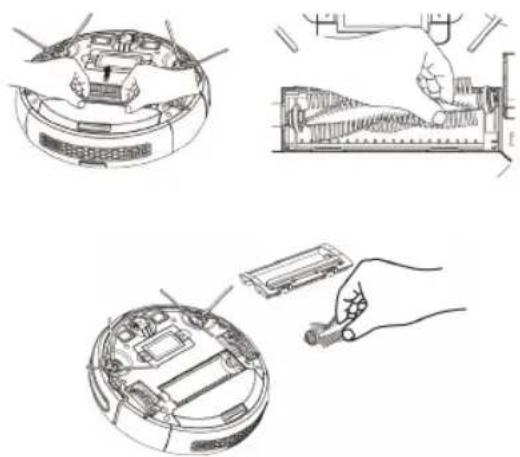
natural_image
Three technical line drawings showing a robotic vacuum cleaner, its internal components, and a handheld device (no text or symbols present)natural_image
Illustration of hands using a tool to adjust components on a device (no text or symbols present)natural_image
Technical line drawing of a car interior showing dashboard, steering wheel, and engine components (no text or labels)natural_image
Diagram of a computer monitor with hands operating the top panel (no text or symbols visible)ENGINEERING AND TECHNOLOGY FOR LIFE, S.L.
Avda. Barcelona s/n
Oliana, 25790, Spain