
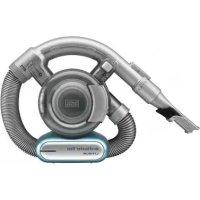
BHFEA640WG - Hand vacuum cleaner BLACK & DECKER - Free user manual and instructions
Find the device manual for free BHFEA640WG BLACK & DECKER in PDF.
| Product type | Handheld vacuum cleaner |
| Model | BHFEA640WG |
| Brand | Black+Decker |
| Intended use | Suction of household dry waste |
| Power supply | Built-in rechargeable lithium-ion battery pack |
| Included charger | Ref. S033GU3300100, input 120 V ~ 60 Hz |
| Charging mode | Direct charging or on wall station |
| Charging time | Approximately 4 hours for full charge |
| Charging indicator | 3 blue LED lights |
| Suction speeds | 2: hard floor (low) and carpet (high) |
| Rotating brush | Yes, removable for cleaning |
| Edge brush | Yes, removable with Phillips screw |
| Included accessories | Extension tube, floor brush, 2-in-1 brush, crevice tool, pet hair brush (WP), electric pet hair brush (WP), soft beater (WP) |
| Storage | Wall mount with accessory storage |
| Dust bin | Removable, capacity with MAX mark |
| Filters | Pre-filter + foam/felt filter + exhaust filter |
| Filter maintenance | Wash with warm soapy water, dry for 24 hours |
| Filter replacement | Every 6 to 9 months, ref. BHFEBF1 (pre-filter) and BHFEBF2 (exhaust filter) |
| Safety | Do not use for liquids, do not immerse, do not charge outside 4-40 °C |
| Certification | Household use only, double insulation |
| Warranty | 2 year limited |
| Customer service | 1-800-544-6986 (United States), www.blackanddecker.com |
Frequently Asked Questions - BHFEA640WG BLACK & DECKER
User questions about BHFEA640WG BLACK & DECKER
0 question about this device. Answer the ones you know or ask your own.
Ask a new question about this device
Download the instructions for your Hand vacuum cleaner in PDF format for free! Find your manual BHFEA640WG - BLACK & DECKER and take your electronic device back in hand. On this page are published all the documents necessary for the use of your device. BHFEA640WG by BLACK & DECKER.
USER MANUAL BHFEA640WG BLACK & DECKER
English (original instructions) 6
Components
1 ON/OFF button
2 Hard floor speed button
3 Carpet speed button
4 Battery charge indicator
5 Main handle
6 Exhaust filter
7 Vacuum inlet
8 Extension tube
9 Accessory release latch
10 Dust canister door
11 Dust canister door release button
12 Lift away dust canister
13 Dust canister release button
14 Floor head
15 Edge brush
16 2-in-1 brush
17 Crevice tool
18 Clip on accessory holder
19 Pet head (BHFEA640WP only)
20 Powered pet head (BHFEA640WP only)
21 Soft beater bar (Only for hard floors) (BHFEA640WP only)
22 Wall mounted accessory storage and charging station
23 Circular charge port
24 Charger
25 Magnetic charging contact
Composants
Fig. F Fig. G
natural_image
Technical line drawings of various mechanical components (no text or symbols)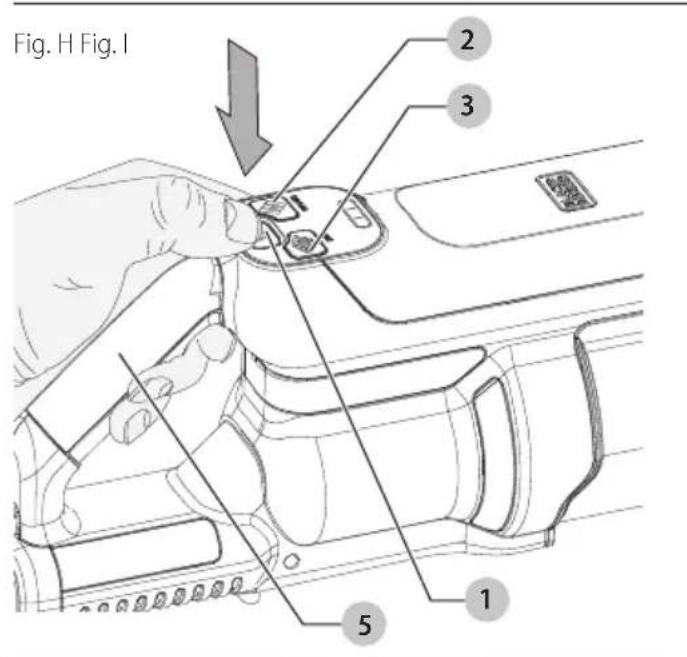


English
WARNING: Read all safety warnings
and all instructions. Failure to follow the warnings and instructions may result in electric shock, fire and/or serious injury.

WARNING: To reduce the risk of injury, read the instruction manual.
Intended Use
Your BLACK+DECKER vacuum has been designed for vacuuming everyday dry messes. This appliance is intended for household use only.
Definitions: Safety Alert Symbols and Words
This instruction manual uses the following safety alert symbols and words to alert you to hazardous situations and your risk of personal injury or property damage.
DANGER:
Indicates an imminently
hazardous situation which, if not avoided, will result in death or serious injury.
WARNING:
Indicates a potentially
hazardous situation which, if not avoided, could result in death or serious injury.
CAUTION:
Indicates a potentially hazardous
situation which, if not avoided, may result in minor or moderate injury.
NOTICE:
Indicates a practice not related to
personal injury which, if not avoided, may result in property damage.
(Used without word) Indicates a safety related message.
IMPORTANT SAFETY INSTRUCTIONS
When using an electrical appliances, basic precautions should always be followed, including the following:
READ ALL INSTRUCTIONS BEFORE USING THIS APPLIANCE.
WARNING:
Read all safety warnings
and all instructions. Failure to follow the warnings and instructions listed below may result in electric shock, fire and/or serious injury.
WARNING:
Some household dust
contains chemicals known to the State of California to
cause cancer, birth defects or other reproductive harm such as asbestos and lead in lead based paint.
WARNING:
Do not attempt to modify or
repair the appliance.
WARNING:
Do not charge the battery at
ambient temperatures below 39 °F (4 °C) or above 104 °F (40 °C). Follow all charging instructions and do not charge the appliance outside of the temperature range specified in the instructions. Charging improperly or at temperatures outside of the specified range may damage the battery and increase risk of fire.
WARNING:
To reduce the risk of fire,
electrical shock or injury:
- Shock Hazard. To protect against risk of electrical shock, do not put charging base in water or other liquid.
- Do not allow to be used as a toy. Close attention is necessary when used by or near children.
- Use only as described in this manual. Use only manufacturer's recommended attachments.
- If appliance is not working as it should, has been dropped, damaged, left outdoors, or dropped into water, return it to a service center.
- Do not handle charger, including charger plug, and charger terminals with wet hands.
- Do not put any object into openings. Do not use with any opening blocked; keep free of dust, lint, hair, and anything that may reduce air flow.
- Keep hair, loose clothing, fingers, and all parts of body away from openings and moving parts.
- Use extra care when cleaning on stairs.
- Do not use to pick up flammable or combustible liquids, such as gasoline, or use in areas where they may be present.
- Do not pick up anything that is burning or smoking, such as cigarettes, matches, or hot ashes.
- Do not use without dust bag and/or filters in place.
- Do not charge the unit outdoors.
- Use only the charger supplied by the manufacturer to recharge.
- Do not incinerate the appliance even if it is severely damaged. The batteries can explode in a fire.
- This appliance is intended for household use only and not for commercial or industrial use. The unit should be placed or mounted away from sinks and hot surfaces.
- Plug the charger directly into an electrical outlet.
- Use the charger only in a standard electrical outlet (120V/60Hz).
- Unplug the charger from outlet before any routine cleaning or maintenance.
- Do not look into the air vents when the unit is switched on, as sometimes there is a possibility of small debris being discharged from the air vents, especially after cleaning / replacement of the filters as debris inside the unit can be disturbed.
- Leaks from battery cells can occur under extreme conditions. If the liquid, which is a 20–35% solution of potassium hydroxide, gets on the skin (1) wash quickly with soap and water or (2) neutralize with a mild acid such as lemon juice or vinegar. If the liquid gets into the eyes, flush them immediately with clean water for a minimum of 10 minutes. Seek medical attention.
SAVE THESE INSTRUCTIONS
Additional Safety Warnings
a) Prevent unintentional starting. Ensure the switch is in the off-position before picking up or carrying the appliance. Carrying the appliance with your finger on the switch or energizing appliance that have the switch on invites accidents.
b) Recharge only with the charger specified by the manufacturer. A charger that is suitable for one type of battery pack may create a risk of fire when used with another battery pack.
c) Under abusive conditions, liquid may be ejected from the battery; avoid contact. If contact accidentally occurs, flush with water. If liquid contacts eyes, additionally seek medical help. Liquid ejected from the battery may cause irritation or burns.
d) Do not use a battery pack or appliance that is damaged or modified. Damaged or modified batteries may exhibit unpredictable behavior resulting in fire, explosion or risk of injury.
e) Do not expose a battery pack or appliance to fire or excessive temperature. Exposure to fire or temperature above 266 °F (130 °C) may cause explosion.
f) Follow all charging instructions and do not charge the battery pack or appliance outside of the temperature range specified in the instructions. Charging improperly or at temperatures outside of the specified range may damage the battery and increase the risk of fire.
g) Have servicing performed by a qualified repair person using only identical replacement parts. This will ensure that the safety of the product is maintained.
h) Do not modify or attempt to repair the appliance or the battery pack except as indicated in the instructions for use and care.
i) Only for use with S033GU3300100 charger.
Additional Safety Information
WARNING:
Never modify the appliance or
any part of it. Damage or personal injury could result.
WARNING:
Some household dust
contains chemicals known to the State of California to cause cancer, birth defects or other reproductive harm such as asbestos and lead in lead based paint.
WARNING:
Some dust created by
power sanding, sawing, grinding, drilling, and other construction activities contains chemicals known to the State of California to cause cancer, birth defects or other reproductive harm. Some examples of these chemicals are:
- lead from lead-based paints,
• crystalline silica from bricks and cement and other masonry products, and
• arsenic and chromium from chemically-treated lumber.
Your risk from these exposures varies, depending on how often you do this type of work. To reduce your exposure to these chemicals: work in a well ventilated area, and work with approved safety equipment, such as those dust masks that are specially designed to filter out microscopic particles.
- Wear protective clothing and wash exposed areas with soap and water. Allowing dust to get into your mouth, eyes, or lay on the skin may promote absorption of harmful chemicals. Direct particles away from face and body.
• Air vents often cover moving parts and should be avoided. Loose clothes, jewelry or long hair can be caught in moving parts.
The label on your tool may include the following symbols. The symbols and their definitions are as follows:
V....volts
Hz ..... hertz
min......minutes
- - - - or DC.....direct current
Class I Construction (grounded)
.../min.....per minute
BPM.....beats per minute
\~ or AC......alternating current
or AC/DC.... alternating or direct current
☐ Class II Construction (double insulated)
n_0 ......no load speed
n......rated speed
PSI.....pounds per square inch
earthing terminal
⚠️......safety alert symbol
▲......visible radiation—do not stare into the light
E....wearrespiratory protection
wear eye protection
○....wearhearing protection
read all documentation
do not expose to rain
The RBRC® Seal
Please take your spent battery packs to an authorized BLACK+DECKER service center or to your local retailer for recycling. In some areas, it is illegal to place spent

battery packs in the trash. You may also contact your local recycling center for information on where to drop off the spent battery pack. Do not place in curbside recycling. For more information visit www.call2recycle.org or call the toll-free number in the RBRC® Seal.
RBRC® is a registered trademark of Call 2 Recycle, Inc.
English
BATTERY AND CHARGER
The battery is not fully charged out of the carton. Before using the charger to charge the battery, read the safety instructions below and then follow charging procedures outlined.
READ ALL INSTRUCTIONS
Important Safety Instructions for All Integral Battery Tools
WARNING:
Read all safety warnings, instructions, and cautionary markings for the battery, charger and product. Failure to follow the warnings and instructions may result in electric shock, fire and/or serious injury.
- NEVER force a charger plug into the tool.
- DO NOT modify the charger plug of a non-compatible charger in any way to fit into the tool as the battery may rupture causing serious personal injury.
- DO NOT charge or use the battery in explosive atmospheres, such as in the presence of flammable liquids, gases or dust. Inserting or removing the charger plug from the tool may ignite the dust or fumes.
- Only charge the battery with the provided charger.
• DO NOT splash or immerse in water or other liquids.
• DO NOT allow water or any liquid to enter tool. - DO NOT store or use the tool in locations where the temperature may reach or exceed 104 °F (40 °C) (such as outside sheds or metal buildings in summer). For best life store tools in a cool, dry location. NOTE: Do not store the tool with the switch locked on. Never tape the switch in the ON position.
- DO NOT incinerate the tool even if it is severely damaged or is completely worn out. The battery can explode in a fire. Toxic fumes and materials are created when lithium-ion batteries are burned.
- If battery contents come into contact with the skin, immediately wash area with mild soap and water. If battery liquid gets into the eye, rinse water over the open eye for 15 minutes or until irritation ceases. If medical attention is needed, the battery electrolyte is composed of a mixture of liquid organic carbonates and lithium salts.
- Contents of opened battery cells may cause respiratory irritation. Provide fresh air. If symptoms persist, seek medical attention.
- Battery liquid may be flammable if exposed to spark or flame.
- Never attempt to open the tool for any reason. If the tool case is cracked or damaged, do not charge. Do not crush, drop or damage the tool. Do not use a tool or charger that has received a sharp blow, been dropped, run over or damaged in any way (e.g., pierced with a nail, hit with a hammer, stepped on). Damaged tools should be returned to the service center for recycling.
Storage Recommendations
The best storage place is one that is cool and dry, away from direct sunlight and excess heat or cold.
Transportation
nOTE: Integral Li-ion tools should not be put in checked baggage on airplanes.
Tool Disposal
This product uses a lithium-ion rechargeable and recyclable battery. When the battery no longer holds a charge, the tool should be recycled. The tool should not be incinerated or placed in the trash.
The tool can be taken for disposal to an Authorized Service Center. Some local retailers are also participating in a national recycling program (refer to RBRC®). Call your local retailer for details. If you bring the tool to an Authorized Service Center, the Center will arrange to recycle the tool and its battery. Or, contact your local municipality for proper disposal instructions in your city/town.
Charging the Battery (Fig. B—E)
WARNING:
For use only with
supplied charger.
WARNING:
Do not charge battery at ambient temperatures below 39 ^ ( 4 ^ ) or above 104 ^ ( 40 ^ ).
nOTE: From new, the rechargeable cells of the product need a minimum charge time of four hours to ensure full power.
The supplied charger offers two ways to charge your battery:
- Unit charging
• Unit wall mounted charging
Unit Charging (Fig. B, D)
- Locate the circular charge port 23 at the bottom of the unit.
- Align the circular magnetic charging contact 25 from the charger onto the circular charge port 23 at the bottom of the unit.
- Plug the charger into an appropriate outlet.
- The blue LED 27 on the battery charge indicator 4 will flash indicating that the battery is being charged.
- The blue LEDs will illuminate in segments, displaying the state of charge in the battery
- The completion of charge is indicated by the blue LEDs 27 turning off.
- The unit is fully charged and may be used at this time or left on the charger.
Unit wall mounted charging (Fig. C—E)
The product can be attached to a wall to provide a convenient charging location or accesory storage area. When mounting to a wall, make sure the mounting method is suitable for the wall type and is appropriate to the weight of the appliance.
- Mark the location of the charging station screw holes on the wall at a height that allows the unit to hang without hitting the floor and within reach of an electrical outlet for charging the vacuum while it is on the charging station 22.
- Fix the charging station 22 to the wall using appropriate screws and plugs for the type of wall, and weight of the appliance.
- Slide the circular magnetic charging contact 25 into the charging station 22 as shown in Fig C. To do this push the release button 26 down to allow the circular magnetic charging contact 25 to slide down into positon until the release button pushes back into place. Ensure it is locked into position before proceeding. NOTE: To remove the circular magnetic charging contact 25 from the charging station 22 press the release button 26 on the charging station 22 and slide the circular magnetic charging contact 25 up and away from the charging station.
- Plug the charger into an appropriate outlet.
- Place the vacuum storage slot 38 at the rear of the unit 28 onto the vacuum storage hook 29 of the charging station 22 as shown in Fig E. Ensure the unit 28 is secure on the vacuum storage hook 29 before proceeding.
- The blue LED 27 on the battery charge indicator 4 will flash indicating that the battery is being charged.
- The blue LEDs will illuminate in segments, displaying the state of charge in the battery
- The completion of charge is indicated by the blue LEDs 27 turning off.
- The unit is fully charged and may be used at this time or left on the charger.
ASSEMBLY AND ADJUSTMENTS
WARNING:
To reduce the risk of
serious personal injury, turn unit off before making any adjustments or removing/installing attachments or accessories. An accidental start-up can cause injury.
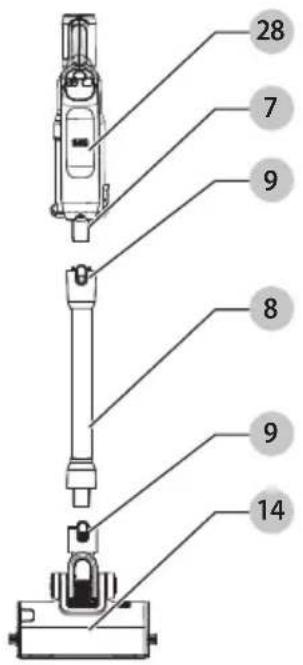
Assembly (Fig. F)
WARNING:
When not in use position the unit with the rear of the vacuum facing a wall so that any inadvertent fall of the unit would contact a wall and not people or pets.
- Align the top of the extension tube 8 with the vacuum inlet 7 as shown in Fig. F.
- Push the extension tube 8 onto the vacuum inlet 7 so it locks into position.
- Align the bottom of the extension tube 8 with the floor head 14 as shown in Fig. F.
-
Push the bottom of the extension tube 8 onto the floor head 14 so it locks into position.
-
To remove an accessory, press the extension pole release button 9 located on the vacuum inlet or the bottom of the extension tube and gently pull the connected accessory off.
OPERATION
WARNING:
To reduce the risk of
serious personal injury, turn unit off before making any adjustments or removing/installing attachments or accessories. An accidental start-up can cause injury.
State of Charge Indicator
This appliance includes a state of charge indicator which consists of three blue LED lights that indicate the level of charge remaining in the battery. This feature is only activated when the vacuum is powered on or during a charge cycle.
The state of charge indicator is an indication of approximate levels of charge remaining in the battery pack according to the following indicators:
The LED battery indicator displays the remaining charge and warns you when the battery is low. The final LED will flash continuously when there is approximately one minute of runtime remaining. All LEDs will flash when the unit is discharged.
NOTE: The state of charge indicator is only an indication of the charge left on the battery. It does not indicate tool functionality and is subject to variation based on product components, temperature and end-user application.
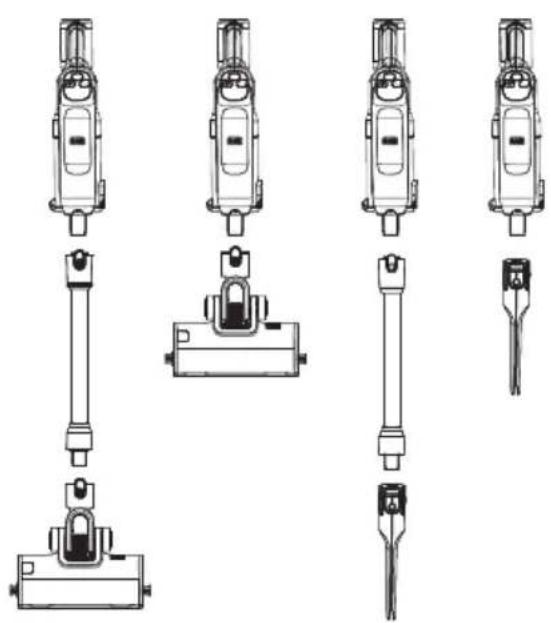
Use (Fig. G)
This vacuum can be used in one of four ways.
- With the extension tube 8 and the floor head 14.
- With the floor head 14.
The Ground Truth image displays a single, solid horizontal line. According to Rule 2 (UNDERSCORE & LINE RULES), this is a stylistic or background line, not a placeholder underscore. Therefore, the OCR result must ignore it. The provided OCR content is "____", which consists of four underscores. This is an incorrect interpretation of the line as a placeholder and violates the rule that stylistic lines must be ignored. The OCR has hallucinated text (underscores) where none should exist, violating the rule to ignore stylistic lines. Hence, the OCR result is inconsistent with the Ground Truth. - With the extension tube 8 and an accessory tool 16, 17, 19, 20.
- With an accessory tool 16, 17, 19, 20.
Switching ON and OFF (Fig. H)
- To switch ON, push the ON/OFF button 1. nOTE: The state of charge indicator LEDs will illuminate while the vacuum is ON.
- Press the hard floor button 2 for cleaning wood, vinyl or tile floors.
NOTE: The rotary brushes of the floor head 14 or the powered pet head 20 will turn on in both hard floor and carpet modes.
- Press the carpet button 3 for increased suction power for cleaning carpeted flooring.
- To switch OFF, press the ON/OFF button 1 a second time.
- Return the product to the charger immediately after use so that it will be fully charged and ready for the next use. nOTE: Ensure that the product is fully engaged with the charger plug.
English
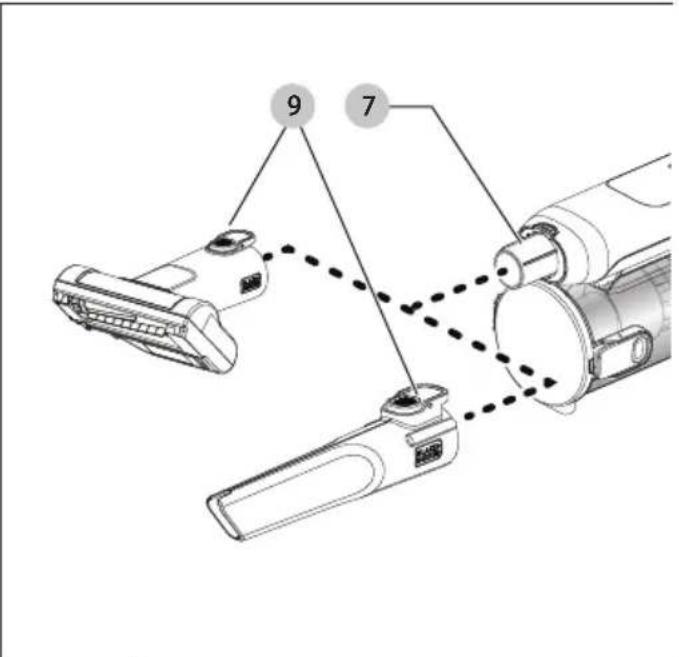
Using an Accessory Tool (Fig. I)
Your vacuum may come with some of the following tools.
- Crevice tool.
-2 in 1 brush - Pet head (BHFEA640WP only)
- Powered pet head (BHFEA640WP only).
• The accessories 16, 17, 19, 20 can be fitted either directly to the extension tube 8 or to the vacuum inlet 7 as shown in Fig. I.
- Align the top of the accessories 16, 17, 19, 20 with the vacuum inlet 7 or extension tube 8 and push into place until the accessory release latch 9 locks into position as shown in Fig. I.
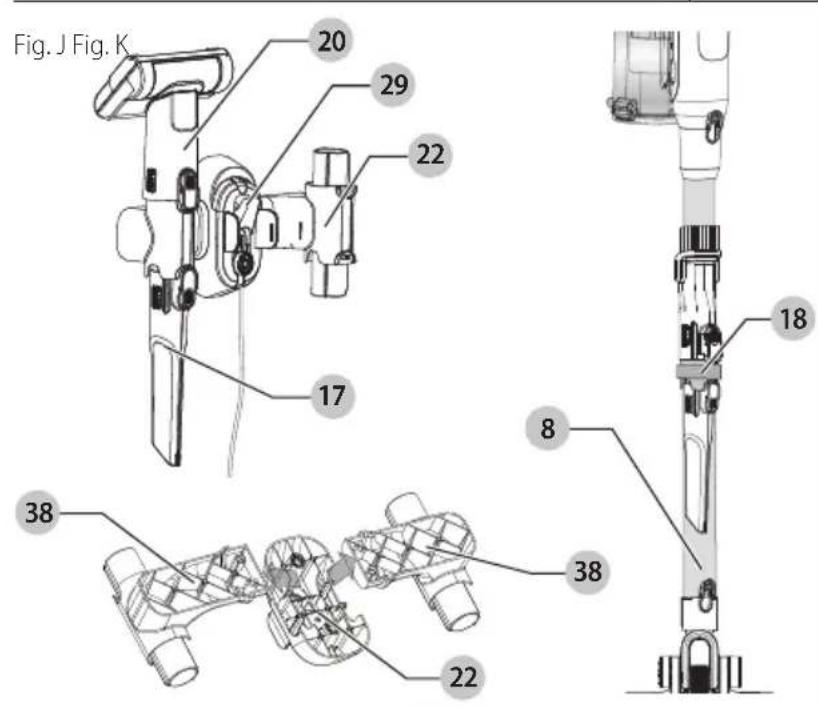
Extension Tube Accessory Storage (Fig. J)
Accessories 16, 17, 19 can be stored on the extension tube 8 using the on clip on accessory holder 18.
- Align the clip on accessory holder 18 onto the back of the extension tube 8.
- Push firmly so that the clip on accessory holder 18 is held firmly on position on the extension tube 8.
- Align the top of the accessories 16, 17, 19 with the clip on accessory holder 18 and slide it on until it locks into position.
Wall Mounted Accessory Storage (Fig. J)
- The accessories 16, 17, 19, 20 can be fitted directly to the wall mounted accessory storage and charging station 22.
- Align the top of the accessories 16, 17, 19, 20 with the wall mounted accessory storage arms and charging station 22 and slide it on until it locks into position. nOTE: The accessory storage side arms 38 can be removed from the charging station 22. This is possible for the user to do if they don't have enough space or only want to utilize one side arm 38.
- To remove the accessory storage side arms 38 from the charging station 22, pull the side arms 38 firmly upwards and away from the charging station 22.
- To reconnect, align the side arms 38 with the locking holes on the charging station 22 and press downward until they lock into position.
MAINTENANCE
WARNING: To reduce the risk of serious personal injury, turn unit off before making any adjustments or removing/installing attachments or accessories. An accidental start-up can cause injury.
Cleaning
WARNING: Blow dirt and dust out of all air vents with clean, dry air at least once a week. To minimize the risk of eye injury, always wear ANSI
Z87.1 approved eye protection when performing this procedure.
WARNING: Never use solvents or other harsh chemicals for cleaning the non-metallic parts of the tool. These chemicals may weaken the plastic materials used in these parts. Use a cloth dampened only with water and mild soap. Never let any liquid get inside the tool; never immerse any part of the tool into a liquid.
Cleaning and Emptying the Vacuum
WARNING: Projectile/Respiratory Hazard: never use the vac without its filter.
iIMPORTAnT: Maximum dust collection will only be obtained with clean filters and an empty dust canister. If dust begins to fall back out of the product after it is switched off, this indicates that the dust canister is full and requires emptying.
NOTE: There is a MAX line on the dust cannister. Do not allow the dust cannister to fill beyond this point.
NOTE: The filters are re-usable do not throw it away when the product is emptied.
NOTE: We recommend that you replace the filters 31, 6 every 6–9 months depending on frequency of use.
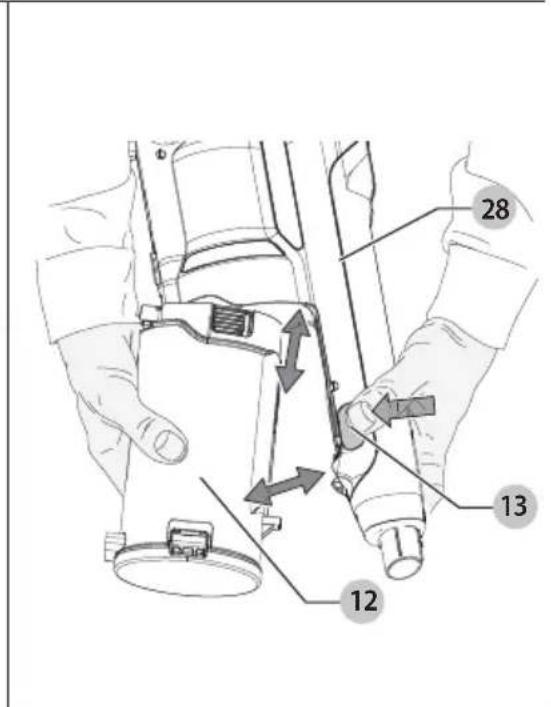
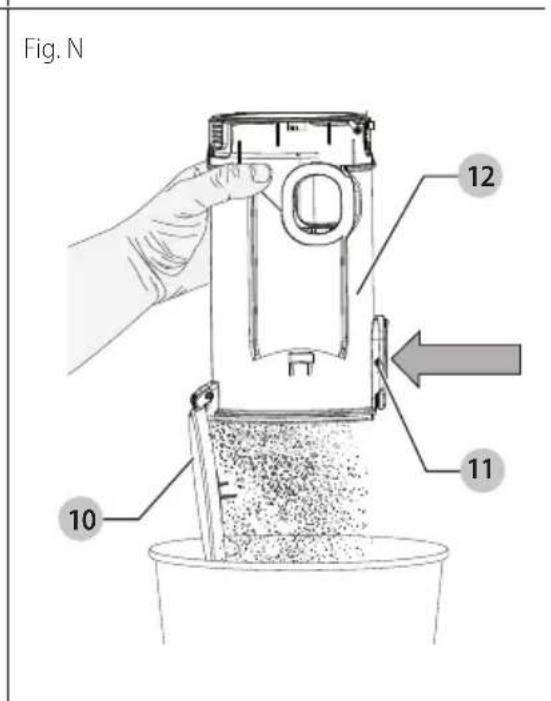
To Empty the Dust Canister (Fig. K, N)
- Press the dust canister release button 13 to release the lift away dust canister 12 from the unit 28 as shown in Fig. K.
- Lift and remove the lift away dust canister 12 from the unit 28 as shown in Fig. K.
- While over top of a trash can, press the dust canister door release button 11 to empty the lift away dust canister 12 as shown in Fig. N.
- Empty the contents of the lift away dust canister 12.
- Tap the lift away dust canister 12 as necessary to remove excessive dust and debris.
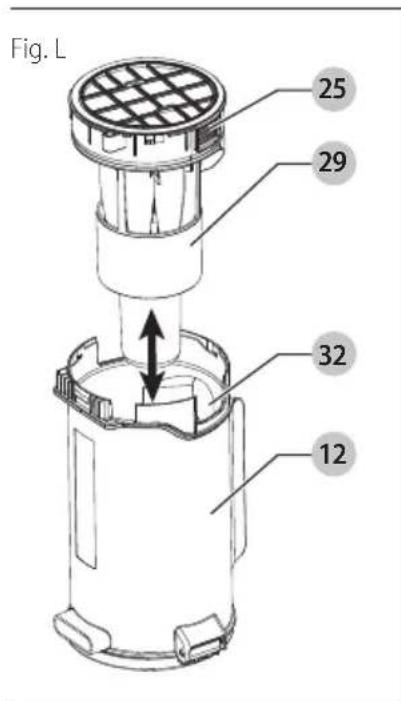
Removing and Installing the Pre-filter (Fig. K, L)
nOTE: The pre-filter fits snuggly in the dust canister and may be difficult to remove at first.
- Lift and remove the lift away dust canister 12 from the unit 28 as shown in Fig. K.
- While over top of a trash can, grip the recessed tabs 25 of the pre-filter 29 and pull upwards to remove the pre-filter with cyclones and filter housing 10.
- Shake off or lightly brush any loose dust.
- Install the pre-filter 29 into the dust canister 12 ensuring the dust canister slot 32 aligns with the recessed tabs 25 as shown in Fig. L.
- Install the dust canister 12 onto the unit 28, until it clicks firmly into position.
Removing and Installing the Filters (Fig. K—M)
NOTE: The filter housing fits snuggly in the pre-filter and may be difficult to remove at first.
- Lift and remove the lift away dust canister 12 from the unit 28 as shown in Fig. K.
- Pull the filter housing 30 from the top of the prefilter 29 as shown in Fig. L.
- Remove the foam/felt filter 31 from the filter housing 10 by pulling on the plastic loop 30 as shown in Fig. M.
- Shake off or lightly brush any loose dust.
- Install the foam/felt filter 31 into the filter housing 30
- Press the filter housing 30 into the top of the pre-filter 29 until it sits flush with the edge of the pre-filter seal.
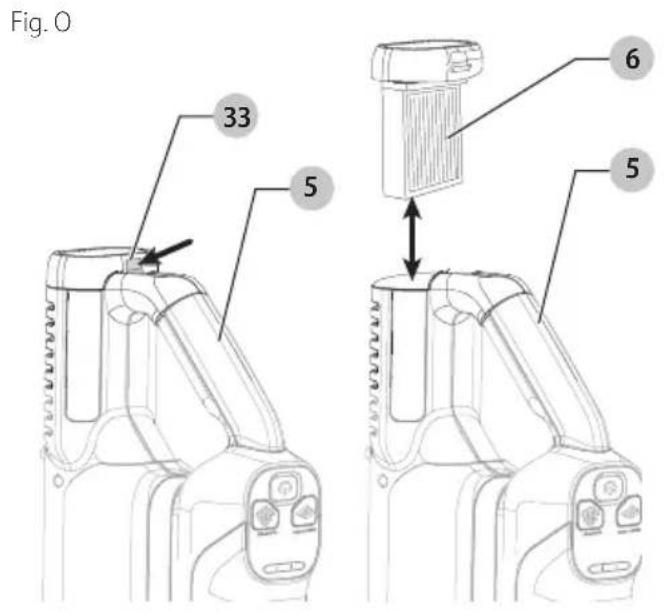
Removing and Installing the Exhaust Filter (Fig. O)
- To remove the exhaust filter 6 press the filter release tab 33 down and slide the exhaust filter 6 out and away from the main handle 5
- While over top of a trash can, shake off or lightly brush any loose dust from the filter.
- To install, slide the cleaned exhaust filter 6 into the filter cavity below the main handle 5 until it clicks firmly into position.
Cleaning the filters
Exhaust filter:
- With the exhaust filter 6 removed and while over top of a trash can, shake off or lightly brush any loose dust from the filter. You may also rinse it off with tap water for a deeper cleaning.
NOTE: Do not use soap to clean the filter. Allow 24 hours to fully dry. Ensure the exhaust filter 6 is completely dry before reinstalling into the unit. - Once the filter is clean and completely dry, insert filter into the filter cavity below the main handle 5 until it clicks firmly into position.
Canister filters:
- Once the filters and pre-filter are removed from the dust canister 12 shake off or lightly brush any loose dust from the pre-filter 29 and foam/felt filter 31.
- Rinse out the dust canister 12 with warm soapy water.
- Wash the foam/felt filter 31 with warm soapy water.
- Ensure the foam/felt filter 31 is completely dry before refitting the filter into the filter housing 30.
- Once the foam/felt filter is clean and completely dry, place it inside the filter housing 30 with the felt side first and then the foam side.
NOTE: The white felt side will be visible when looking at the top of the filter housing. - Press the filter housing 30 into the top of the pre-filter 29 until it sits flush with the edge of the pre-filter seal.
- The pre-filter 29 can now be inserted into the lift away dust canister 12 according to instructions in the Removing and Installing the Pre-Filter section.
- IMPORTANT:
- Wash the filters regularly using warm, soapy water and ensure that it is completely dry before using again. The cleaner the filter is, the better the product will perform.
- It is very important that the filters are completely dry and correctly in position before use.
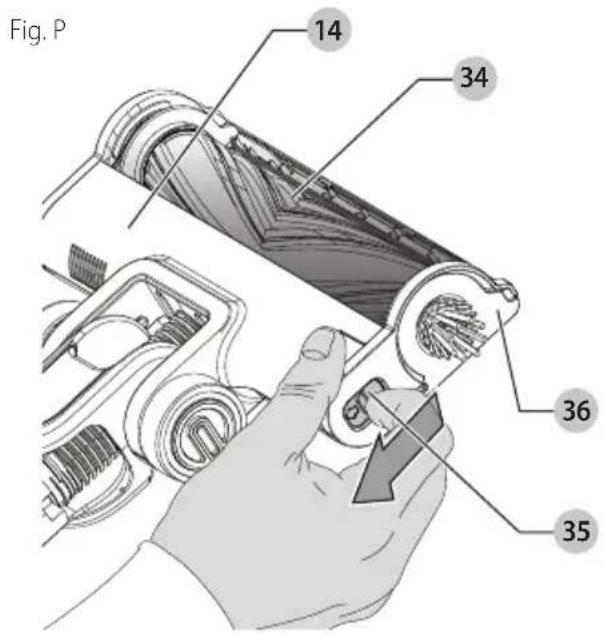
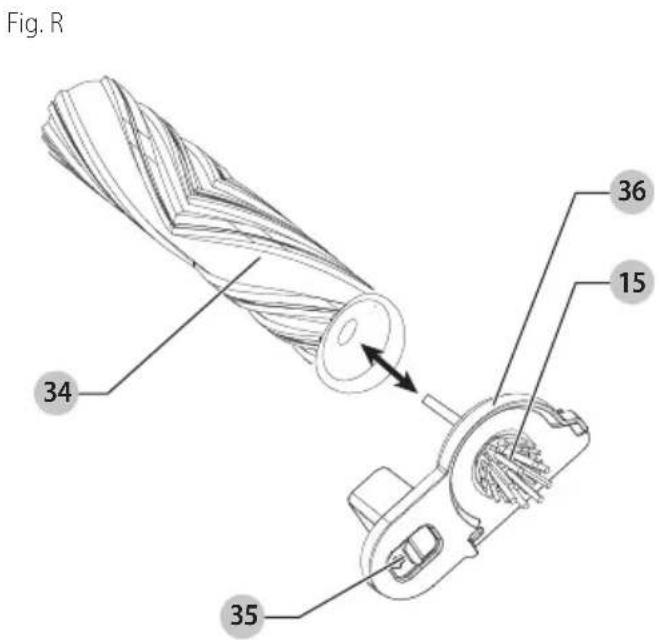
Removing and Cleaning the Rotary Brush (Fig. P—R)

To reduce the risk of injury from moving parts, disconnect the floor head and extension tube from the vacuum before cleaning or servicing.
- To remove the rotary brush 34 from the floor head 14 slide the release latch 35 towards the rear of the floor head 14.
- With the rotary brush assembly 36 released from the floor head 14, grab and lift the rotary brush assembly 36 completely out of the floor head 14.
- Wipe away any dust or debris on the rotary brush 34.
- Pull the rotary brush 34 away from the rotary brush assembly 36 and remove any debris or hair in this area.
- Align the D shaped slot on the rotary brush 34 with the D shaped shaft on the rotary brush assembly 36 and press firmly to ensure it is secured in position.
- Reinstall the rotary brush 34 into the floor head 14 by aligning the keyed end of the rotary brush 34 with the gear located in the floor head 14.
- Press firmly on the rotary brush assembly 36 to secure it into the floor head 14. Ensure you hear an audible click as the release latch 35 snaps into its locked position.
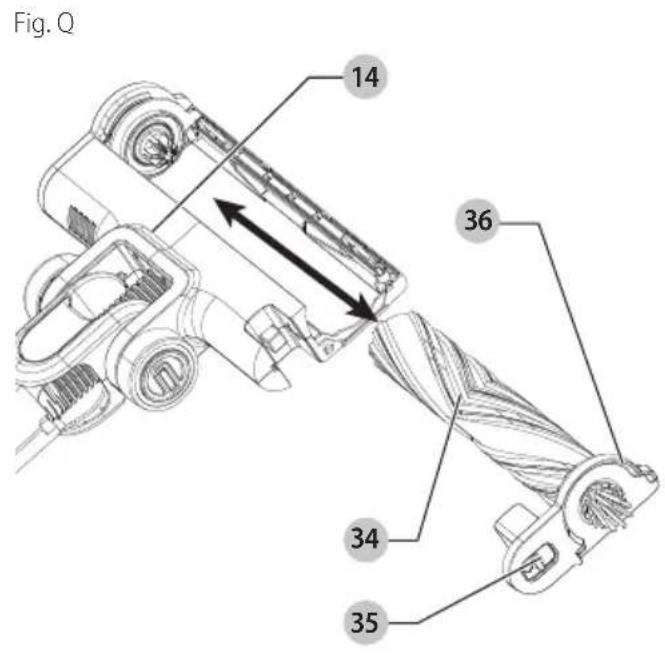
Changing the Rotary Brush or Soft Beater Bar (Fig. P—R)

To reduce the risk of injury from the floor head and extension fore cleaning or servicing.

Soft beater bar is for hard floors only. DO NOT USE soft beater bar on carpet or rugs.
- To remove the rotary brush 34 or soft beater bar 21 from the floor head 14 slide the release latch 35 towards the rear of the floor head 14.
- With the rotary brush assembly 36 released from the floor head 14, grab and lift the rotary brush assembly 36 completely out of the floor head 14.
- Pull the rotary brush 34 or soft beater bar 21 away from the rotary brush assembly 36.
- (BHFEA640WP only) The soft beater bar 21 can ONLY be used on hard floors. DO NOT USE soft beater bar on carpet or rugs. The soft beater bar 21 can be swapped with the rotary brush 34 as needed.
- Align the D shaped slot on the rotary brush 34 or soft beater bar 21 with the D shaped shaft on the rotary
ENGLISH
brush assembly 36 and press firmly to ensure it is secured in position.
- Reinstall the rotary brush 34 or soft beater bar 21 into the floor head 14 by aligning the keyed end of the rotary brush 34 or soft beater bar 21 with the gear located in the floor head 14.
- Align the squared end of the rotary brush assembly 36 with the square slot on the floor head 14.
- Press firmly in the position shown indicated by arrows on the squared end on the rotary brush assembly 36 to secure it into the floor head 14. Ensure you hear an audible click as the release latch 35 snaps into its locked position.
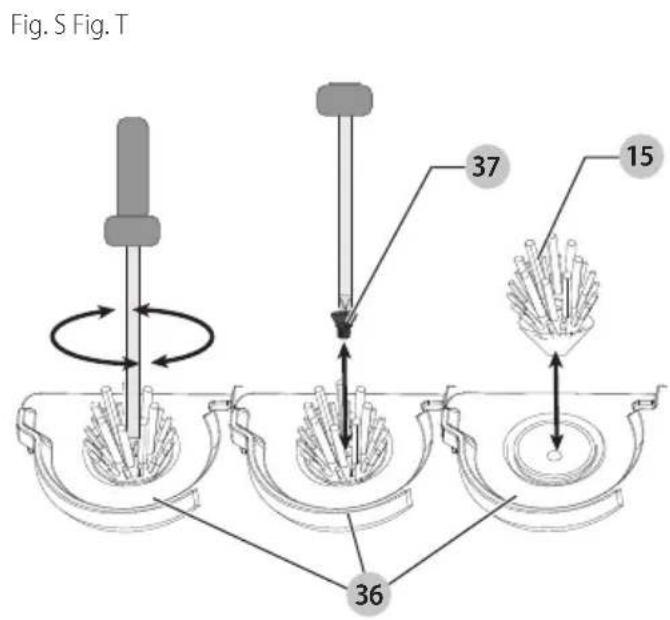
Removing and Installing the Edge Brushes (Fig. S)
- Locate the edge brush screw 37.
- Use a cross head screwdriver to remove the edge brush screw 37 to release the edge brush 15.
- Pull the edge brush 15 away from the floor head 14.
- Wipe away any dust of debris on the edge brush
- Reinstall the edge brush 15 by aligning the shaft into the slot on the side of the floor head 14.
- Press firmly into place and install the edge brush screw 37 and use a cross head screwdriver to tighten the screw into position.
- Gently tug on the edge brush 15 to ensure it is held securely in place before using.
Removing and Cleaning the Pet Head Beater Bar (Fig. T)
- To remove the beater bar 39 from the pet head 20, press the release button 38 as shown in Fig. T.
- The beater bar 39 can now be removed.
NOTE: The end pieces are also removable allowing you to clear the brushes from any hair or other debris that may have accumulated. - Wash the beater bar with warm soapy water.
- Once the beater bar 39 is clean and completely dry, insert the beater bar 39 into the pet head 20 until it clicks firmly into position.
Troubleshooting
If the product does not work, check the following:
Unit will not start
- Battery pack not charged.
- Check battery pack charging requirements.
Battery pack will not charge
- Charger not plugged in.
- Plug charger into a working outlet. Refer to Important Charging Notes for more details.
• Surrounding air temperature too hot or too cold. - Move charger and battery pack to an area above 39^ (4°C) or below 104^ (+40°C).
If vacuum performance is poor, check the following:
- Empty the dust bowl. (See Cleaning and Emptying the vacuum section.)
- Clean the filters. (See Cleaning and Emptying the vacuum section.)
- Clean the rotary brush. (See Removing and Cleaning the Rotary Brushes section.)
If rotator brush stops working, check the following:
- Obstruction - The unit is equipped with a rotary brush overload feature. (See Removing and Cleaning the Rotary Brushes section.)
- Rug or thick pile carpet - The unit is equipped with a rotary brush overload feature. Rugs and carpet with very thick and/or loose pile, can cause the overload feature to activate and the rotary brush will stop rotating. Try cleaning on the hard floor speed setting 2. If the problem persists, the surface is not suitable for cleaning with the rotary brush.
Safe Storage (Fig. E)
WARNING:
When not in use position the
unit with the rear of the vacuum facing a wall so that any inadvertent fall of the unit would contact a wall and not people or pets.
The unit can be safely stored, when not in use, by placing the catch on the rear of the motor unit onto the charging station 22 as shown in Fig. E.
Accessories
WARNING:
Since accessories, other than
those offered by BLACK+DECKER, have not been tested with this product, use of such accessories with this product could be hazardous. To reduce the risk of injury, only BLACK+DECKER recommended accessories should be used with this product.
Recommended accessories for use with your product are available at extra cost from your local dealer or authorized service center. If you need assistance in locating any accessory, please contact BLACK+DECKER. Call 1-800-544-6986.
Replacement Filter
The filter should be replaced every 6 to 9 months and whenever worn or damaged. Replacement filters are available from your BLACK+DECKER dealer.
Visit www.blackanddecker.com to locate dealers.
Replacement BLACK+DECKER filters: BHFEBF1 31 and BHFEBF2 6.
Repairs
WARNING:
To assure product SAFETY and RELIABILITY, repairs, maintenance and adjustment (including brush inspection and replacement, when applicable) should be performed by a factory service center or an authorized service center. Always use identical replacement parts.
Register Online
Thank you for your purchase. Register your product now for:
- WARRANTY SERVICE: Registering your product will help you obtain more efficient warranty service in case there is a problem with your product.
- CONFIRMATION OF OWNERSHIP: In case of an insurance loss, such as fire, flood or theft, your registration of ownership will serve as your proof of purchase.
- FOR YOUR SAFETY: Registering your product will allow us to contact you in the unlikely event a safety notification is required under the Federal Consumer Safety Act.
- Register online at www.BlackandDecker.com/NewOwner.
Two-Year Limited Warranty
For warranty terms, go to https://www.blackanddecker.com/support/warranty-policy.
To request a written copy of the warranty terms, contact: Customer Service at Black & Decker, 701 East Joppa Road, Towson, MD 21286 or call 1-800-544-6986.
LATIN AMERICA: This warranty does not apply to products sold in Latin America. For products sold in Latin America, check country-specific warranty information contained in the packaging, call the local company or see the website for such information.
Imported by: Black & Decker (U.S.) Inc.
701 E. Joppa Rd.
Towson, MD 21286

BlackandDecker.com
(1-800-544-6986)
portezdes protections auditives
..... lisez toute la documentation
Eje Central Lázaro Cárdenas No. 18 - Local (55) 5588 9377 D, Col. Obrera
MERIDA, YUC
Calle 63 #459-A - Col. Centro (999) 928 5038
MONTERREY, N.L.
Av. Francisco I. Madero 831 Poniente - Col. (818) 375 23 13 Centro
PUEBLA, PUE
17 Norte #205 - Col. Centro ( 222 ) 246 3714
QUERETARO, QRO
Av. San Roque 274 - Col. San Gregorio (442) 2 17 63 14
SAN LUIS POTOSI, SLP
Col. Santa Fe Alvaro Obregon,
Ciudad de Mexico, Mexico.
C.P 01210
TEL(52) 55 53267100
R.F.C.BDE8106261W7
Registro en Línea
blackanddecker.com/support/warranty-policy.


- Components
- Composants
- English
- WARNING: Read all safety warnings
- Intended Use
- Definitions: Safety Alert Symbols and Words
- DANGER:
- WARNING:
- CAUTION:
- NOTICE:
- IMPORTANT SAFETY INSTRUCTIONS
- READ ALL INSTRUCTIONS BEFORE USING THIS APPLIANCE.
- SAVE THESE INSTRUCTIONS
- Additional Safety Warnings
- Additional Safety Information
- The RBRC® Seal
- BATTERY AND CHARGER
- READ ALL INSTRUCTIONS
- Important Safety Instructions for All Integral Battery Tools
- Storage Recommendations
- Transportation
- Tool Disposal
- Charging the Battery (Fig. B—E)
- Unit Charging (Fig. B, D)
- Unit wall mounted charging (Fig. C—E)
- ASSEMBLY AND ADJUSTMENTS
- Assembly (Fig. F)
- OPERATION
- State of Charge Indicator
- Use (Fig. G)
- Switching ON and OFF (Fig. H)
- Using an Accessory Tool (Fig. I)
- Extension Tube Accessory Storage (Fig. J)
- Wall Mounted Accessory Storage (Fig. J)
- MAINTENANCE
- Cleaning
- Cleaning and Emptying the Vacuum
- To Empty the Dust Canister (Fig. K, N)
- Removing and Installing the Pre-filter (Fig. K, L)
- Removing and Installing the Filters (Fig. K—M)
- Removing and Installing the Exhaust Filter (Fig. O)
- Cleaning the filters
- Exhaust filter:
- Canister filters:
- - IMPORTANT:
- Removing and Cleaning the Rotary Brush (Fig. P—R)
- Changing the Rotary Brush or Soft Beater Bar (Fig. P—R)
- Removing and Installing the Edge Brushes (Fig. S)
- Removing and Cleaning the Pet Head Beater Bar (Fig. T)
- Troubleshooting
- If the product does not work, check the following:
- Unit will not start
- Battery pack will not charge
- If vacuum performance is poor, check the following:
- If rotator brush stops working, check the following:
- Safe Storage (Fig. E)
- Accessories
- Replacement Filter
- Repairs
- Register Online
- Two-Year Limited Warranty
- MERIDA, YUC
- MONTERREY, N.L.
- PUEBLA, PUE
- QUERETARO, QRO
- SAN LUIS POTOSI, SLP
- Registro en Línea
Brand : BLACK & DECKER
Model : BHFEA640WG
Category : Hand vacuum cleaner