55895 - Remote control Livarno Lux - Free user manual and instructions
Find the device manual for free 55895 Livarno Lux in PDF.

User questions about 55895 Livarno Lux
0 question about this device. Answer the ones you know or ask your own.
Ask a new question about this device
Download the instructions for your Remote control in PDF format for free! Find your manual 55895 - Livarno Lux and take your electronic device back in hand. On this page are published all the documents necessary for the use of your device. 55895 by Livarno Lux.
USER MANUAL 55895 Livarno Lux
text_image
ON OFF B+ WW CW B- 30MIN 100% 50% 25% M WW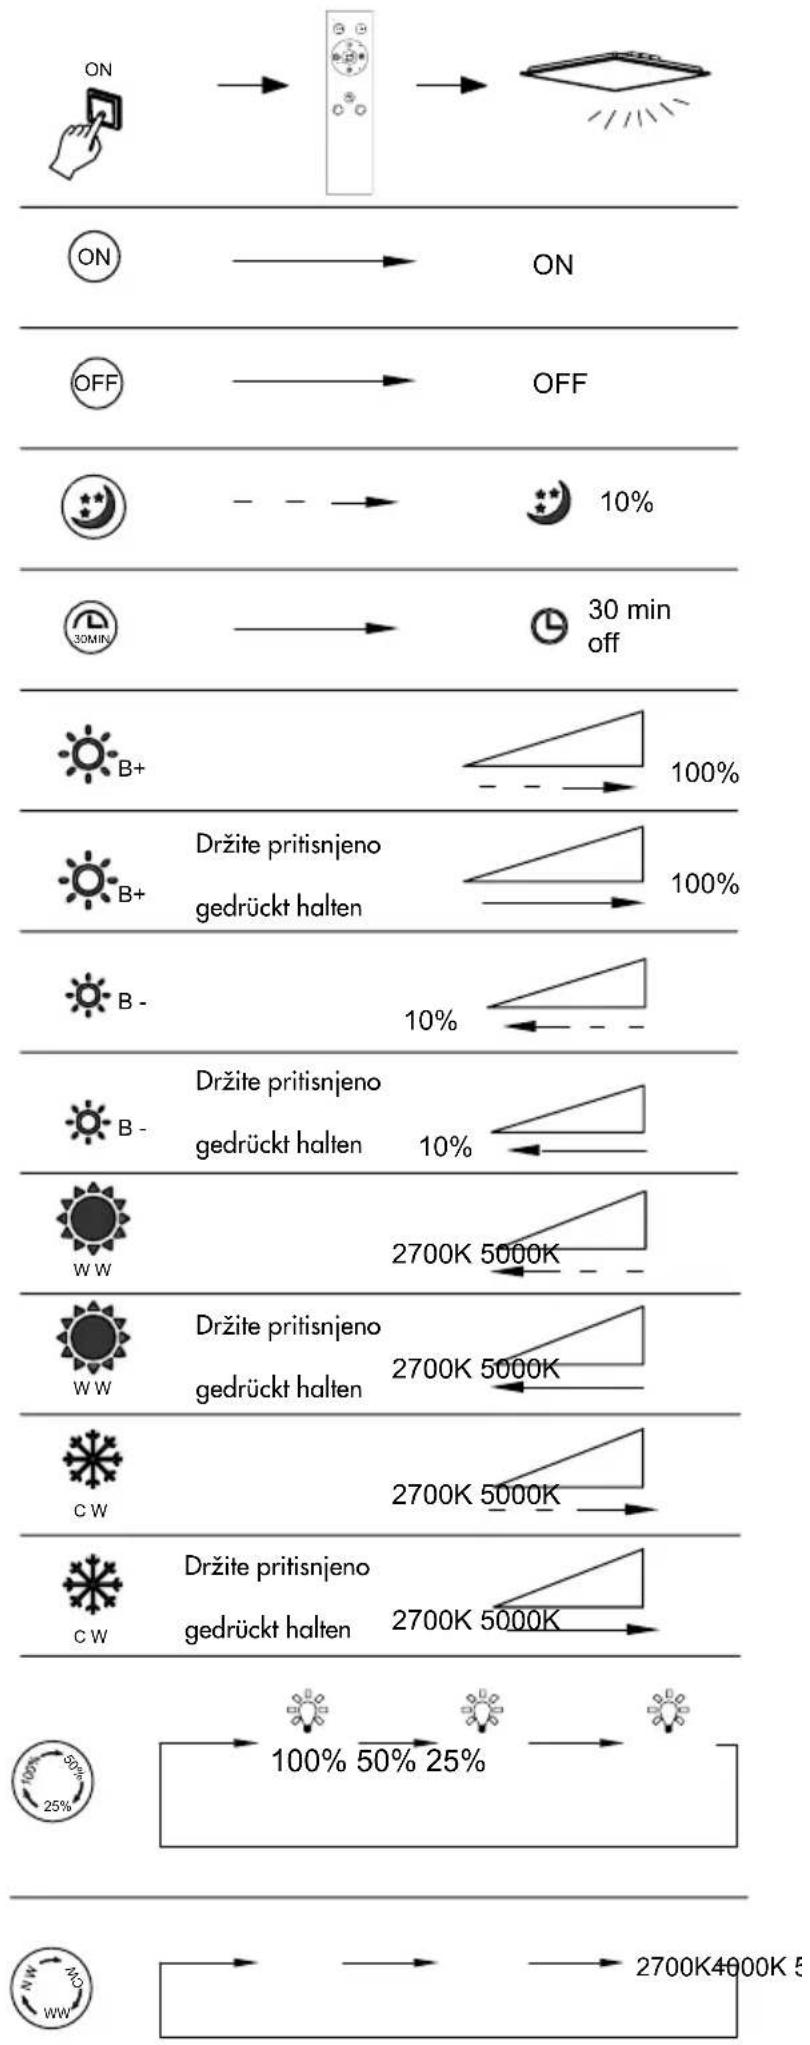
flowchart
graph TD
    A["ON"] --> B["ON"]
    C["OFF"] --> D["OFF"]
    E["30MIN"] --> F["30 min off"]
    G["B+"] --> H["100%"]
    I["B+"] --> J["100%"]
    K["B-"] --> L["10%"]
    M["B-"] --> N["10%"]
    O["WW"] --> P["2700K 5000K"]
    Q["WW"] --> R["2700K 5000K"]
    S["CW"] --> T["2700K 5000K"]
    U["CW"] --> V["2700K 5000K"]
    W["100% 50% 25%"] --> X["100% 50% 25%"]
    Y["NW"] --> Z["2700K4600K E"]
EDI Light GmbH
Heiligkreuz 22
6136 Pill
AUSTRIA
Stav Informácie · Status for oplysningerne
natural_image
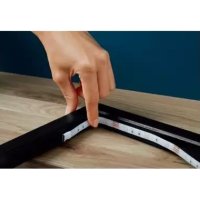
Black-and-white photo of a minimalist desk setup with a computer monitor, lamp, and wall-mounted remote control (no text or symbols visible)LED WALL/CEILING PANEL 620 x 620 mm/ LED WALL/CEILING PANEL 1000 x 250 mm

LED STĚNOVÝ/STROPNÍ PANEL 620 x 620 mm / LED STĚNOVÝ/STROPNÍ PANEL 1000 x 250 mm
Operating and safety instructions

LED FAL/ERNYÖ PANEL 620 x 620 mm / LED FAL/BERENDEZÖ PANEL 1000 x 250 mm
Before reading, unfold the two pages with the illustrations and then familiarise yourself with all the functions of the unit.
FR
text_image
Technical diagram of a mechanical assembly with numbered components and labeled parts including 6CM, ON, and ON indicators.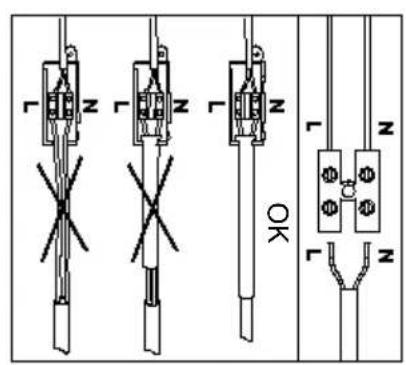
text_image
OK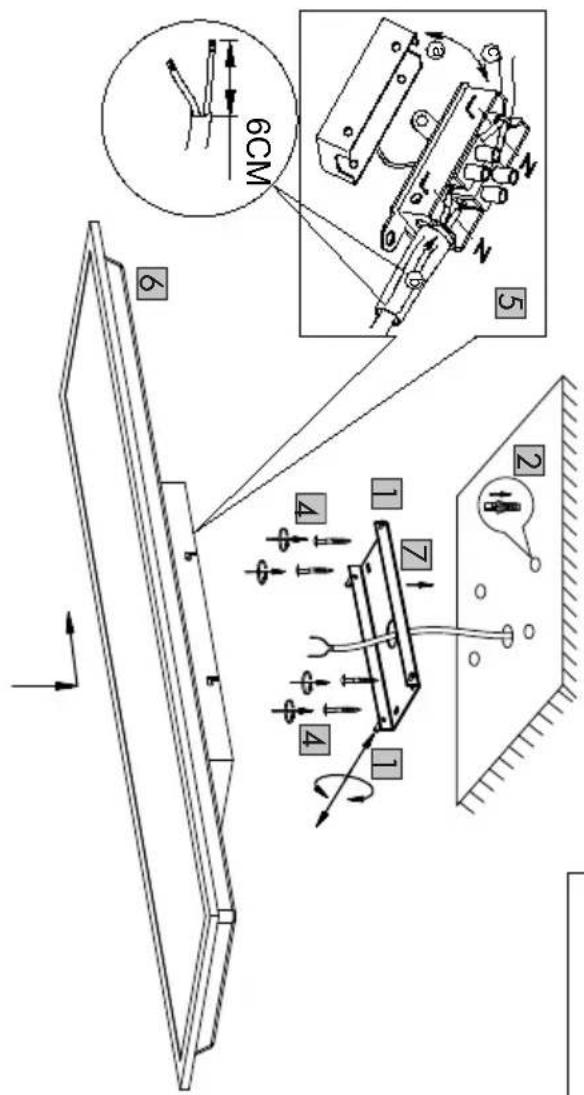
text_image
Technical diagram illustrating mechanical assembly with labeled components and motion indicators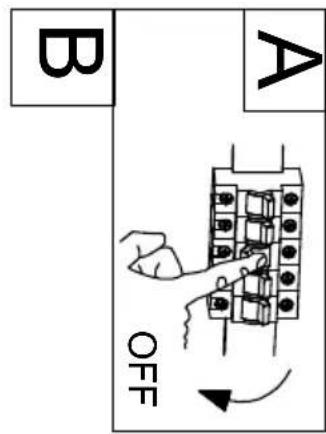
text_image
OFF B AArt. Nr.: 55896
text_image
Nicht enthalten(Not included) Ø66mm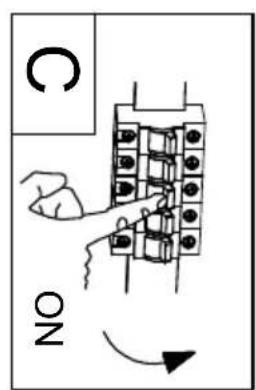
text_image
NO C
text_image
Technical diagram of a mechanical assembly with labeled parts and magnified detail view showing 6CM and 5 components.
text_image
8 XI 2X 10 2X 12 IX 7 IX 13 IX 4X 4X 2 4 6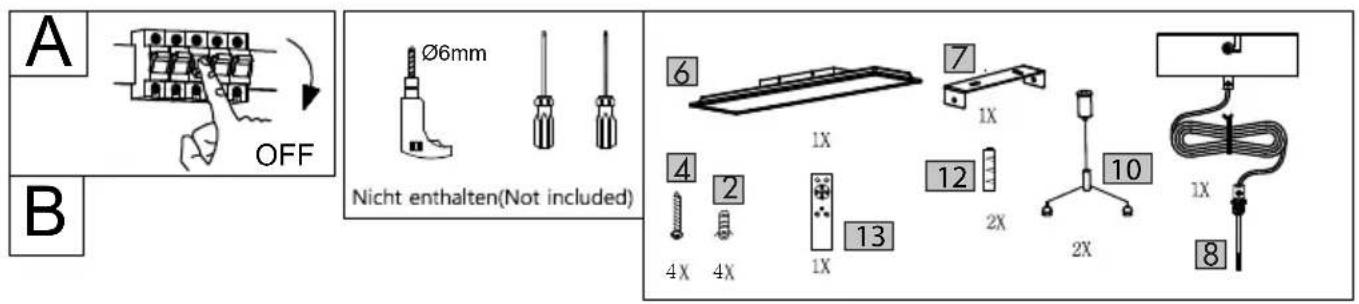
text_image
A OFF Ø6mm Nicht enthalten(Not included) B 6 1X 7 1X 4 2 13 12 2X 10 4X 4X 1X 2X 2X 8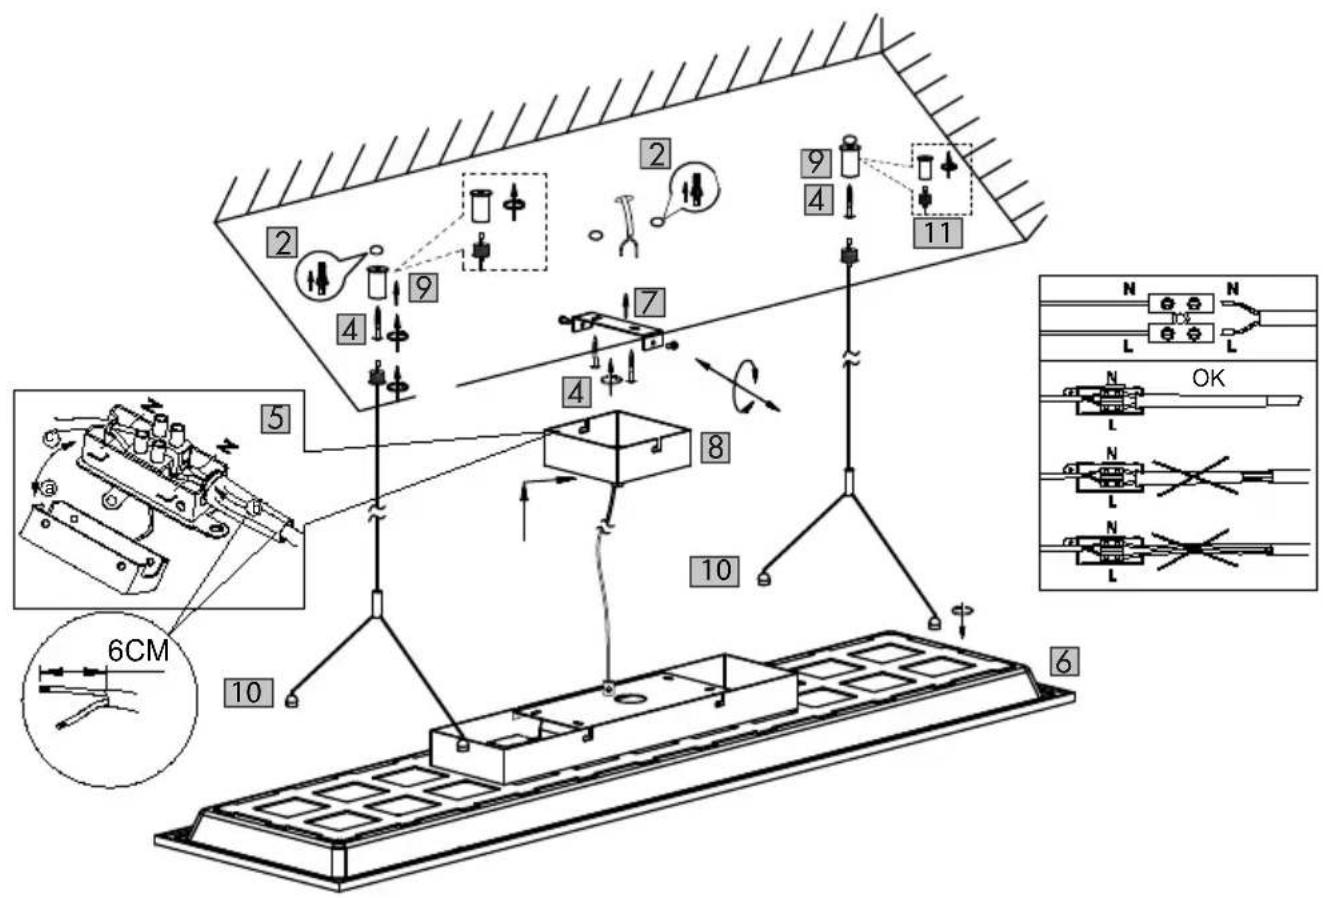
text_image
Technical diagram of a mechanical assembly with numbered components and a 6CM scale indicator for measurement.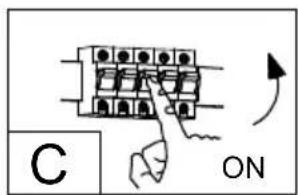
text_image
C ONNOSTE OCHRANNÉ RUKAVICE!

natural_image
Blank grid paper with uniform black lines on white background, no text or symbols present8362 Hørning, Denmark
T: +45 70 22 55 11
E: info-denmark@eglo.com
IAN 378855\_2101
natural_image
Blank grid paper with uniform black lines on white background, no text or symbols presentModelo A (55895): Panel LED 62 x 62x 7cm (Long. x Anch. x Alt.)
Modelo B (55896): Panel LED 100 x 25 x 7cm (Long. x Anch. x Alt.)
natural_image
Blank grid paper with uniform black lines on white background, no text or symbols present
natural_image
Blank grid paper with uniform black lines on white background, no text or symbols presentRISQUES D'EXPLOSION!
Country/Postcode/Town/Street address:
natural_image
Blank grid paper with uniform black lines on white background, no text or symbols present
natural_image
Blank grid paper with uniform black lines on white background, no text or symbols presentKey to pictograms...... Page 50
Introduction...... Page 50
Proper use...... Page 51
Contents included ...... Page 51
Description of parts Page 51
Technical details Page 51
Safety Page 52
Safety information Page 52
Safety information for batteries ...... Page 53
Preparation Page 53
Tools and materials needed...... Page 53
Installing the LED wall/ceiling panel Page 53
Inserting or replacing batteries (remote control)...... Page 54
First use ...... Page 55
Switching the LED wall/ceiling panel on and off and adjusting the light colour...... Page 55
Maintenance and cleaning...... Page 55
Disposal Page 55
Declaration of conformity ...... Page 56
Warranty and service......Page 56
Warranty Page 56
Service addresses ...... Page 57
Warranty card Page 57
| Key to pictograms* | |||
 | Read the instructions! | ta | Ambient temperature |
| Safety informationUsage instructions | tc | Casing temperature atthe specified point | |
 | This light is only suitable for use in indoor,dry and enclosed areas. | Appliance class II with electrical ballast | |
 | Alternating current/voltage | Light temperature in Kelvin | |
 | Hertz (frequency) | lm | Lumens |
 | Watt (power) | 25000h | Service life |
 | Direct current/voltage | Cannot be dimmed with external controller. | |
| Output polarity | IP20 | Only for indoor use | |
| Appliance class II | Wear protective gloves | ||
| Note warnings and safety information! | TÜV SÜD / Safety-certified | ||
| Warning:electric shock! | Disposing of batteries improperly candamage the environment. | ||
| Caution: risk of explosion! | Consider the environment when disposingof your packaging and device. | ||
| Danger to toddlers and children –risk of accident, injury or death | Colour rendering index for the LED lighting | ||
| Safety transformer | Independent control gear | ||
| SELV | Safety Extra Low Voltage | ||
| RoHSCONFORM | Restriction of Certain HazardousSubstances | • You can find more information, including explanations of addition-al symbols and other technical details, at www.edi-light.com | |
LED wall and ceiling panel
- Introduction
Congratulations on your purchase of an

LED wall/ceiling panel! (Sometimes referred to below as a light or "the
product"). You have chosen a high-quality product.
Please read this user manual right through carefully. Start by unfolding the page with the image. This manual constitutes part of the product and includes important information for getting the product ready to use and operating it. Read all the safety information carefully. Before you use the product for the first time, make sure that the voltage is correct and all parts are correctly installed. If you have any questions or are unsure about using the product, please contact your retailer or service centre.
Store this manual carefully and pass it on to third
parties if necessary.
Intended use
This light is only suitable for use in indoor, dry and closed areas.
This product is only intended for private
household use.
- Contents included
When you unpack the product, check straight away that no parts are missing or defective.
1 LED ceiling light
2 batteries (AAA; 1.5 V)
1 remote control
Installation material
• Description of parts
Ceiling installation
14 screws for securing the light
24 wall plugs
31 mounting bracket
44 screws for mounting bracket
Terminal block with connection box
AED ceiling light
Hanging installation
1 4 screws for securing the light
2 4 wall plugs
4 4 screws for mounting
5 Terminal block with connection box
6 LED ceiling light
7 1 mounting bracket
8 Ceiling mount including screws Suspension cable, comprising ceiling mounting sleeves and panel fastening screws.
9 Ceiling mounting sleeves
10 Screw thread
1 Adjustment sleeve
1 Batteries
1 Remote control
Technical details
Item number: 55895
Operating voltage: 220–240 V\~ 50/60 Hz
Total power: max. 30 watt
Appliance class: II / ☐
LED light source:2700K to 5000K Ra=83
Item number: 55896
Operating voltage: 220–240 V\~ 50/60 Hz
Total power: max. 28 watt
Appliance class: II / ☐
LED light source:2700K to 5000K
Ra=82
The LED light sources and the LED operating device may only be replaced by a professional.
Dimensions:
Model A (55895): LED panel 62 x 62x 7cm (L x W x H)
Model B (55896): LED panel 100 x 25 x 7cm (L x W x H)
IP code: IP20
Battery type
(remote control): 2 x AAA 1.5V
Marketed by:
EDI Light GmbH, Heiligkreuz 22, 6136 Pill,
AUSTRIA
www.edi-light.com
- Safety

Safety information
Damage caused by failure to follow this manual invalidates the warranty.
No liability is accepted for consequential damage. No liability is accepted for property damage or injury resulting from improper use or failure to observe the safety information.
DAN WARNING! TO TODDLERS AND CHILDREN - RISK OF ACCIDENTS AND DEATH
Never leave children unattended with the packaging material. They can suffocate themselves with this material. Children often underestimate the risks. The packaging material is not a toy.
This product can be used by children aged 8 years and over and by people with limited mental, sensory or intellectual capacities, or by people without relevant experience or knowledge, provided they understand or are briefed about safe use of the product and the associated risks. Children may not play with the product. Children may not carry out cleaning and maintenance activities without supervision. This product is not a toy.
If you notice anything unusual while using the product (e.g. unusual noises, odours or smoke), switch the product off immediately.
Do not use the product again until it has been checked by a professional.

Avoid death by electric shock
No liability is accepted for property damage or injury resulting from improper use or failure to observe the safety information.
- Arrange for a trained electrician or electrically
instructed person to carry out the electrical installation.
Before installation, remove the fuse or switch off the circuit breaker in the fuse box (0 position)
■ Never bring the light into contact with water or other liquids.
Before installing the light, make sure that the supply voltage matches the required operating voltage for the light (see "Technical details").
■ Ensure that no cables are damaged during installation.
The LED wall/ceiling panel cannot be dimmed with an external controller.
The light source for this light may only be replaced by the manufacturer, a service 'technician authorised by the manufacturer, or person with equivalent qualifications.

Avoid fire and injury
To avoid burns, make sure that the light is switched off and has cooled down before you touch it.
■ Do not affix the light to damp or conductive ground.
■ Do not leave the light or packaging lying around.
■ Plastic film, plastic bags, plastic parts, etc. can be dangerous if treated as toys by children.
Some people may suffer from epileptic fits or impaired consciousness when they are exposed to certain flashing lights or light effects.
If you experience epileptic symptoms, seek medical assistance immediately.
■ Install the light somewhere where it is protected from damp, dirt and strong heat sources.
Before starting to drill, make sure that there are no gas pipes, water pipes or electric cables at the location where you intend to drill. Installation only by professionals. Always ensure that the wall is suitable: the fastening material provided is not suitable for every type of wall.
- Ask your retailer for suitable screws and wall plugs for your wall type.
■ The manufacturer accepts no liability for im proper connections between the wall and wall plug or any resulting damage.
■Always be alert! Work carefully and think about what you are doing. Never use the light if you are not concentrating or feel unwell.
Check before installing that the installation location is suitable for the weight of the light.
Before using the light, make sure you are familiar with all the instructions and illustrations in this manual and with the light itself.

Safety information for batteries
RISK OF DEATH Keep all batteries out of reach of children. If a battery is swallowed, seek a doctor immediately.
■Swallowing batteries can cause burns, perforation of soft tissue and death. Severe burns can appear within two hours of swallowing.

EXPLOSION Never try to recharge non-rechargeable batteries.
Never short-circuit batteries and never open them. Doing so can lead to overheating, fire or bursting.
■ Never throw batteries into fire or water.
■ Never put batteries under mechanical load.
Risk of leaking battery fluid
Avoid extreme conditions and temperatures that could affect the batteries, e.g. never leave them on a heater or under direct sunlight.
If a battery has leaked, do not allow the chemicals to come into contact with skin, eyes, or mucous membranes.
- Clean any affected areas immediately with clear water and seek medical attention.

SAFETY GLOVES
Leaking or damaged batteries can cause chemical burns if they come into contact with skin.
Always wear suitable safety gloves to handle leaking or damaged batteries.
■ Remove any leaking batteries from the product immediately to avoid damage to the product.
■ Always use batteries of the same type. Do not mix old and new batteries!
■ Remove the batteries if the product is not being used for a long period of time.
Risk of damage to the product
■ Only use the specified type of battery.
Insert batteries according to the polarity markings (+) and (-) on the battery and the product. Clean the contacts on the battery and in the battery compartment with a dry, lint-free cloth or cotton bud before inserting the battery.
■ Remove dead batteries from the product immediately ("Technical details").
● Preparation
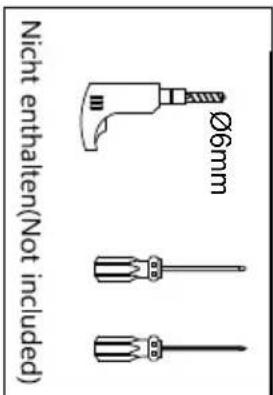
- Tools and materials needed
The tools and materials listed are not included with the contents. The specifications and values are provided as a guide and are not binding. The characteristics required of the materials depend on the particular situation at the location.
- Pencil/marking tool
- Two-pole voltage tester
– Philips screwdriver - Drill (diameter 6 mm approx.)
- Wire cutter
- Installing the LED light panel

WARNING!
ELECTRIC
SHOCK
Important: The electrical connection must be established by a trained electrician or electrically instructed person. This person must be familiar with the characteristics of the light and connection conditions.
Before installation, remove the fuse or switch off the circuit breaker in the fuse box (0 position) (see Fig. A).
You have two installation options:
Wall/ceiling installation
☐ Undo and remove the screws visible on the side of the installation bracket. 3
☐Mark the drill holes using the screw holes in 4 the installation bracket . 3
☐Drill the mounting holes to a depth of approximately 30 mm. Ensure that no cables are damaged.
☐ Insert the wall plugs into the holes (see Fig. B).
Secure the mounting bracket using the screws 4 supplied (see Fig. B).
Connect the LED panel connection cable to the power cable (external) via the terminal box (see Fig. B).
Make sure that the individual wires in the power cable (external) are all connected correctly: live wire, black or brown = symbol L, neutral wire, blue/white markings = symbol N. 5
☐ Make sure wires are seated properly.
Now fasten the LED light panel into the mounting bracket using the screws.
Note: Make sure that the screws engage properly.
☐ Re-insert the fuse or switch on the circuit breaker in the fuse box (1 position) (see Fig. C).
Your LED wall/ceiling panel is now ready to use.
Hanging installation
☐ Undo and remove the screws visible on the side of the installation bracket . 7
☐Mark the drill holes using the screw holes in the installation bracket. ④
Drill the mounting holes to a depth of approximately 30 mm. Ensure that no cables are damaged.
☐ Insert the wall plugs into the holes (see Fig. B).
☐ Secure the mounting bracket using the screws 4 supplied.
Now drill two more holes at each end of the mounting bracket for the ceiling mount, and insert wall plugs into the holes.
☐ Secure the ceiling fastening sleeves using the screws supplied.
☐ Connect the external power cable to the terminal block on the ceiling mount. 8
☐ Make sure that the individual wires are all connected correctly: live wire, black or brown = symbol L, neutral wire, blue/white markings = symbol N. 5
□Make sure wires are seated properly.
Now fasten the ceiling mount into the mounting bracket using the screws.
Note: Make sure that the screws engage properly.
□Next, screw the two suspension cables into the ceiling fastening sleeves and the ends of the suspension cables into the four screw holes 10 provided in the LED light panel.
☐ Connect the LED panel connection cable to the ceiling mount connection cable via the terminal box. 5
☐ Make sure that the individual wires in the connection cable are all connected correctly: live wire, black or brown = symbol L, neutral wire, blue/white markings = symbol N. 5
☐ Make sure wires are seated properly.
☐You can now adjust the lengths of the fastening cables by pushing the adjustment sleeves. 11
☐ Reinsert the fuse or switch on the circuit breaker in the fuse box (1 position) (see Fig. C). Your LED wall/ceiling panel is now ready to use.
- Inserting or changing batteries (Remote control)
Note: The batteries are included with the product and must be inserted before the product is first used.
□When the remote control range becomes weak, the batteries need changing. Pull the battery compartment cover out of the remote control in the direction of the arrow.
Take out the batteries and insert the new batteries Battery types are specified in the section "Technical details".
Note: The polarities are shown in the battery compartment.
☐Replace the cover on the battery compartment.
The remote control is now ready to use.
- First use
- Switching the light on and off/ Adjusting the light colour
☐Press the light switch (wall switch) to switch the LED light panel on 6 or off.
☐ If you activate the light switch repeatedly very quickly, the LED light panel switches between cold, warm and neutral white.
The following functions are available (see product image D)
●Maintenance and cleaning
WARNING! ELECTRIC
SHOCK!
Before cleaning the light, disconnect the power. To do this, remove the fuse or switch off the circuit breaker in the fuse box (0 position) (see Fig. A).
To avoid burns, make sure that the light is switched off and has cooled down before you touch it. Never use solvents, petrol, etc.
These can damage the light.
Use a dry, lint-free cloth to clean the LED wall/ceiling panel.
Re-insert the fuse or switch on the circuit breaker in the fuse box (1 position)
(see Fig. C).
- Disposal
The packaging consists of environmentally friendly materials that you can dispose of in your local recycling facilities.
Check the marking on the packaging when separating your waste. Packaging materials are marked with abbreviations (a) and numbers (b) as follows:
1–7: plastics/20–22: paper and cardboard /80–98: composites.
The product and packaging materials are recyclable. Please separate them so they can be processed properly by the waste disposal company. The Triman logo only applies in France.
Ask your local administrative council or waste disposal facility about how to dispose of the product at the end of its life.
When your product reaches the end of its life, please consider the environment and do not throw it into your general waste: instead, dispose of it properly. You can find out about disposal facilities and their opening times from your local council or administration.
Defective or used batteries must be recycled in accordance with EC Directive 2006/66/EC and changes to this directive.
Return batteries and/or the product via the collection facilities available.
Disposing of batteries improperly can damage the environment.
Batteries may not be disposed of with your household waste. They can contain toxic heavy metals and must be treated as hazardous waste. The chemical symbols for heavy metals are Cd =
Cadmium, Hg = Mercury, Pb = Lead. Return your used batteries to a communal collection facility.
●Declaration of conformity

This product complies with the requirements of the applicable national and European directives. Corresponding declarations and documentation are available with the manufacturer. The product complies with the requirements of German safety legislation for equipment and products.
We reserve the right to make technical changes and modifications to the appearance of the item in the course of our product improvement process. Typing errors and misprints reserved.
●Warranty and service
Warranty
We offer a three-year warranty from the date of purchase. Our products are manufactured according to the latest production techniques and undergo detailed quality checks.
We guarantee that the article is in perfect condition. During the warranty period, we will repair material or manufacturing defects free of charge. If, contrary to all expectations, the item exhibits any defects, please pack it up carefully and send it to the service address provided. The warranty excludes damage resulting from improper use and all wear parts or consumable materials. You can order replacement wear parts and consumables at your own cost by telephoning the number provided. You can likewise arrange repairs that are not included in the warranty (e.g. lamps) by contacting the service address provided; these will be billed to you at cost price.
The item will be repaired at the service address provided.
To ensure it can be handled and sent back to you promptly, please send it directly to this address.
If you require additional product information, want to order accessories, or have any questions about our service, please telephone our customer service line on the telephone number provided. Please include the item number when you submit your query (see "Technical details").
This product contains light sources of energy efficiency class E
Great Britain & Ireland
EGLO UK LTD.
Unit 12 Cirrus Park, Lower Farm Road,
Moulton Park
NORTHAMPTON NN3 6UR, GREAT BRITAIN
T: +44 1604 790 986
E: info-greatbritain@eglo.com
IAN 378855_2101
When you submit your query, please have the receipt and item number (e.g. IAN 123456_7890) ready as proof of purchase.
Warranty card
Sender:
Full name:
Country/Postcode/Town/Street address:
Telephone number:
Item number/item name:
Date and place of purchase:
Details of the defect:
Date/signature:
If the warranty does not apply:
Please return the unrepaired item at my own cost.
Please inform me of the cost and repair the item at my own cost.

natural_image
Blank grid paper with uniform black lines on white background, no text or symbols presentHungary - Production & Logistics
EGLO magyarorszag KFT
Fő út. 155
3060 Paszto, HUNGARY
T: +36 32 560 050
E: info-hungary@eglo.com
IAN 378855\_2101
natural_image
Blank grid paper with uniform black lines on white background (no text or symbols)
natural_image
Blank grid paper with uniform black lines on white background, no text or symbols presentnatural_image
Blank grid paper with uniform black lines on white background, no text or symbols presentWAARSCHUWING! LEVENSGEVAAR EN ONGEVALGEVAAR VOC
BABY'S EN KINDEREN!
natural_image
Blank grid paper with uniform black lines on white background (no text or symbols)
natural_image
Blank grid paper with uniform black lines on white background, no text or symbols presentLegenda uporabljenih piktogramov ....Stran 94
Uvod ....Stran 94
Predvidena uporaba .... Stran 95
Obseg dobave.... Stran 95
Opis delov .... Stran 95
Tehnični podatki .... Stran 95
Varnost Stran 96
Varnostni napotki ....Stran 96
Varnostna navodila za baterije/polnilne baterije .... Stran 97
Priprava .... Stran 98
Potrebno orodje in material .... Stran 98
/20–22: Papir in lepenka/80–98:
Kompozitni materiali.