ARV 4038 - Lawn mower Grizzly - Free user manual and instructions
Find the device manual for free ARV 4038 Grizzly in PDF.

User questions about ARV 4038 Grizzly
0 question about this device. Answer the ones you know or ask your own.
Ask a new question about this device
Download the instructions for your Lawn mower in PDF format for free! Find your manual ARV 4038 - Grizzly and take your electronic device back in hand. On this page are published all the documents necessary for the use of your device. ARV 4038 by Grizzly.
USER MANUAL ARV 4038 Grizzly
Cordless Scarifier / Aerator
Accu verticuteermachine en grasmatverluchter
natural_image
Red and black Grizzly lawn mower with visible brand logo (no text or symbols on the device itself)ARV 4038 Lion-Set

Translation of the original instructions for use
text_image
Labeled diagram of a lawn mower with numbered parts for identificationD
text_image
18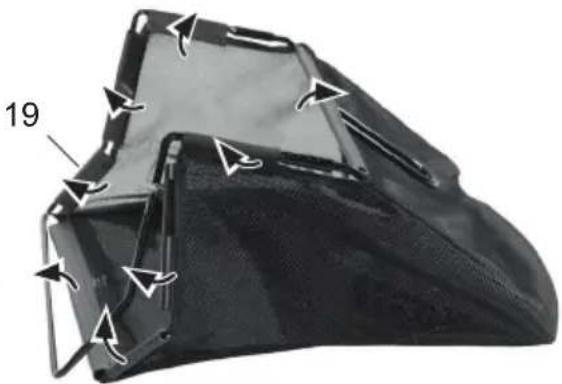
natural_image
Close-up of a black mechanical component with white arrows indicating features, no visible text or symbols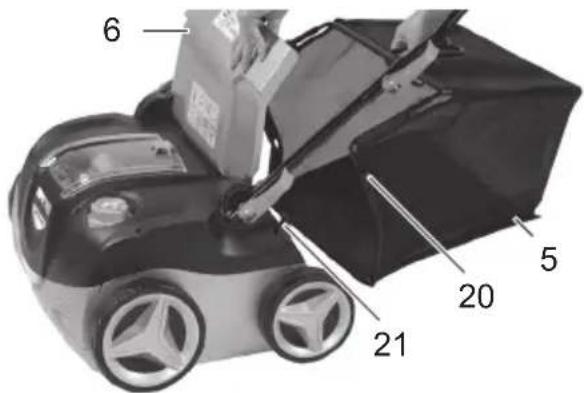
text_image
6 5 20 21E
text_image
13 13 40VACF
text_image
1 2 22 4 22 2 3 4G
text_image
1 14 13H
natural_image
Close-up of a black cylindrical electronic component with multiple pins and terminal connectors (no visible text or symbols)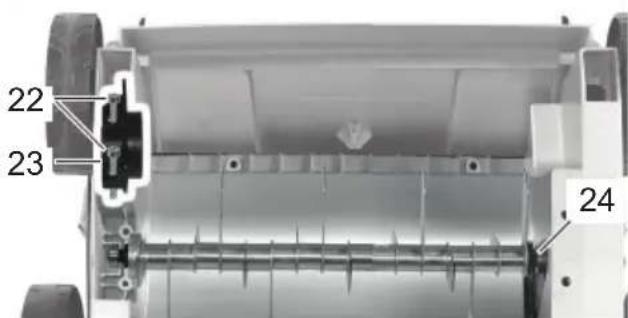
text_image
22 23 24
DE Originalbetriebsanleitung ....5
GB Translation of the original instructions for use .....21
NL Vertaling van de originele gebruiksaanwijzing......36
FR Traduction de la notice d'utilisation originale .....52
IT Traduzione delle istruzioni per l'uso in originale ...69
PL Tłumaczenie oryginalnej instrukcji obsługi......85
CZ Překlad originálního návodu k obsluze......102
LT Vertimas iš originalių eksploatavimo instrukcijoje....117
Inhalt
natural_image
Circular mechanical component diagram with numbered segments (no text or symbols)Safety instructions 22
Symbols / Instructions on the implement ....22 General Safety Information ....23
General Description ......27
Overview......27
Functional description......27
Extent of the delivery 27
Charging process....27
Insert/remove battery....28 Charge battery....28 Used batteries....29
Assembling instructions....29
Assembling the handle bar ....29 Mounting and emptying the collection bag....29
Operation....29
Setting the working positions....29 Switching on and off....30 Checking the charge status of the battery....30 Working with the implement....31 Exchanging the cylinder....31
Cleaning, maintenance, storage .....32
General cleaning and maintenance work....32 Storage ....32
Disposal and protection of the environment ....32
Guarantee....33
Repair Service....33
Technical data....33
Spare parts....34
Trouble Shooting 35
Translation of the original EC declaration of conformity ....133
Exploded Drawing 141
Grizzly Service-Center ....143
Before first using the machine, please read this instruction manual carefully, for your own safety and for the safety of others. Keep the manual in a safe place and pass it on to any subsequent owner to ensure that the information contained therein is available at all times.
Use
This implement is used:
- As a lawn aerator and to rake leaves, moss and weeds out of the lawn and to collect these leaves and plant residues.
- As a verticutor to cultivate the grass sward and thereby regenerate the lawn.
This appliance is not suitable for commercial use. Commercial use will void the warranty.
Any other use that is not specifically approved in these Instructions can result in damage to the implement and could be a serious danger to the user.
The implement must only be operated by adults. Children and people who are not familiar with these Instructions must not be allowed to use this implement. Never operate this implement while it is raining and in a wet environment.
The owner or operator is responsible for accidents or harm to people and their property.
The manufacturer cannot be held liable for damage caused by incorrect operation of the implement or if it is not used in conformity with its intended purpose.
GB
Safety instructions
This section covers the basic safety instructions when working with this implement.
Symbols / Instructions on the implement

WARNING!

These Instructions must be read!

Danger of injury due to fl ung-out material!

Keep bystanders well away from the implement

Caution – sharp cutting blade! Keep feet and hands away. Risk of injury

Switch off the motor and disconnect the ignition key before adjustment or repair work. The cutting cylinder continues to rotate briefly after the motor has been switched off!

Do not use on inclines.

Do not use the battery scarifi er / lawn rake in rain or wet grass. Electric shock hazard!
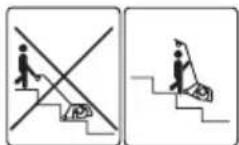
Caution with steps! Turn off the power when the imple- ment is to be car- ried across steps!

To stop the device, release the safety switch
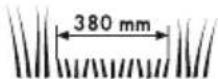
Working width

Noise level ratings L _WA in dB(A).
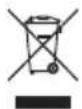
Electrically powered implements must not be disposed of with the domestic waste

Battery Indicator
Adjusting the g height
Symbols used in the instructions:

Hazard symbols with in- formation on prevention of personal injury and pro- perty damage.

Precaution symbol (explanation of precaution instead of exclamation mark) with information on prevention of harm / damage

Notice symbol with information on how to handle the device properly.
General Safety Information

This unit can cause serious injury if not used correctly. Before using the unit, carefully read through the instruction manual and familiarise yourself with all of its controls.
Operating the implement:

WARNING! The implement can cause serious injuries.
How to avoid accidents and injuries:
Preparations:
- Never allow children and people who are not familiar with these Operating Instructions to use the implement. Local regulations may stipulate a minimum age for operators.
- This device can be used by individuals with reduced physical, sensory or mental capabilities or a lack of experience or knowledge if they are supervised or have been instructed in how to use the device safely and understand the associated dangers. Children must not play with the device.
- Never start up the implement while other people, but especially children and domestic pets, are in the vicinity.
- Check the area on which the implement is to be used. Remove all stones, sticks, wire and other foreign bodies that could be caught up and flung out.
Never use the implement to level out uneven patches.
- Always wear appropriate protective work clothes and firm shoes with non-slip soles, strong long trousers, ear defenders and goggles. Never operate the implement while bare footed or when wearing open sandals.
- Never operate the implement if it is damaged, incomplete or has been modified without the consent of the manufacturer. Never work with damaged or missing protective devices (e.g. starting lever, unlocking knob, impact protector).
- Never disengage protective devices (e.g. by tying the starting lever).
• Children must be supervised in order to ensure that they do not play with the equipment.
- Before starting the equipment, ensure that no objects or branches are pushed into the blade opening, that the equipment is standing stably and that the workspace is tidy and not blocked.
Check the condition of your extension cable and the connecting cable of your equipment. Use the necessary protective equipment.
- If your equipment vibrates or emits unusual noises when switched on, disconnect the plug from the socket and check the cutting cylinder. Ensure that no remains of chopped matter are blocking the cutting cylinder or jammed between
GB
the blades. If you find no pro- blems, return the equipment to a customer service centre.
- If the blades no longer cut correctly or if the motor is overloaded, check all the parts of your equipment and replace the worn parts. If a more extensive repair is required, contact a customer service centre.
Use:
- CAUTION – A very sharp tool. Avoid cutting your fingers or toes. While working always keep your feet and fingers well away from the cutting cylinder and the ejector opening. There is the danger of serious injury! - Do not operate the implement while it is raining, in poor weather conditions and when the surrounding area and lawn are wet. Operate the implement only during daylight hours or with bright lighting.
- Do not operate the implement if you are tired or are lacking in concentration and after having drunk alcohol or taken medicine. Always take a work break in due time. Approach the work with common sense.
- Familiarize yourself with the terrain and remain focused on the potential hazards that you could miss on account of the motor noise.
- Always maintain a secure footing while working, especially on a sloping terrain. Always work across slopes - never up and down! Be particularly careful when changing the travel-
ling direction. Do not work on very steep slopes.
- Always guide the implement at a walking pace with both hands on the handle. Be especially careful when you turn the implement around or draw it towards you. Danger of stumbling!
- Start or actuate the starting lever with care and in conformity with the directions in these Instructions.
- Do not tilt the implement when starting, other than it has to be lifted. In this case tilt the implement only to the extent that is absolutely necessary and always lift the implement on the side that is opposite to the operator.
- Never operate the implement without the attached collection bag or impact protector. Danger of injury! Always keep well away from the ejector opening.
- Do not operate the implement in the vicinity of inflammable liquids or gases as this could give rise to the danger of a fire or explosion.
Work intervals:
- After the implement has been turned off, the cutting cylinder will continue to rotate for a few seconds. Keep hands and feet well away.
- Only remove plant parts when the implement is standing completely still. Ensure that the grass ejector opening is clean and free.
- Switch off the power when the implement is to be transported,
lifted or tilted and when traversing other surfaces than grass.
- Never leave the implement unattended at the place of work.
• Always switch off the implement and disconnect the power plug: - Whenever you leave the implement
- Before you clean the ejector opening or unblock or unclog the implement
- When the implement is not being used
- During all maintenance and cleaning work
- When the power cable is damaged or has become tangled
- When the implement hits an obstruction during work or when unusual vibrations arise. Establish the cause and see if the implement has been damaged. Do not repair it yourself! Have the implement repaired by an authorised workshop!
- Store the implement in a dry place well out of reach of children.

CAUTION! The following states how to avoid damage to the implement and any resulting harm to people:
Take care of your implement
- Switch off the power when the implement is to be carried across steps.
- Inspect the implement each time before it is to be used. Never operate the implement if safety devices (e.g. impact protector, parts of the cutting facility or bolts are missing,
worn out or damaged. Check especially the power cable and starting lever for damage. To avoid imbalance, all tools and bolts must be exchanged as complete sets.
- Only use spare parts and accessories that have been supplied or recommended by the manufacturer. The use of alien parts results in the immediate loss of all guarantee claims.
- Ensure that all nuts, bolts and screws are firmly tightened and that the implement is in a safe working state.
- Never try to repair the implement yourself, other than you have been trained accordingly. All work that has not been listed in these Instructions must only be carried out by authorised servicing agencies.
- Treat the implement with the greatest care. Always keep the tool clean for better and safer work. Follow the maintenance instructions.
- Never overload the implement. Always work within the specified capacity range. Do not use low-power machines for heavy-duty work. Do not operate the implement for purposes for which it is not intended.
Careful handling and use of battery devices
- Charge the batteries only in chargers that are recommended by the manufacturer. Risk of fire if a charger that is suitable for a specific type of battery is used with other batteries.
GB
- In the power tools, use only the batteries designed for the purpose. The use of other batteries may result in injuries and risk of fire.
- Keep the unused battery away from paper clips, coins, keys, nails, screws and other small metal objects, which could cause bridging of the contacts. A short circuit between the battery contacts may cause burns or fire.
- If used incorrectly, liquid may leak from the battery. Avoid contact with this. In the event of accidental contact, rinse off with water. If the liquid gets into eyes, seek medical assistance. Leaking battery fluid may cause skin irritations or burns.
Service
a) Only have qualified personnel repair your power tools and only use original spare parts. This ensures the safety of the device is maintained.
Special safety directions for battery-operated tools
- Ensure that the device is switched off before inserting the battery. Inserting a battery into a power tool that is switched on may result in accidents.
-
Recharge the batteries indoors only because the battery charger is designed for indoor use only. Risk of electric shock.
• To reduce the electric shock hazard, unplug the battery charger from the mains before cleaning the charger. -
Do not subject the battery to strong sunlight over long periods and do not leave it on a heater. Heat damages the battery and there is a risk of explosion.
- Allow a hot battery to cool before charging.
- Do not open up the battery and avoid mechanical damage to the battery. Risk of short circuit and fumes may be emitted that irritate the respiratory tract. Ensure fresh air and seek medical assistance in the event of discomfort.
- Do not use non-rechargeable batteries. This could damage the appliance.
Residual Risks
Even if properly operating and handling this electric tool, some residual risks will remain. Due to its construction and build, this electric tool may present the following hazards:
a) Cuts
b) Ear damage if working without ear protection.
c) Damage to your health caused by swinging your hands and arms when operating the appliance for longer periods of time or if the unit is not held or maintained properly.

Warning! During operation, this electric tool generates an electromagnetic field which, under certain circumstances, may impair the functionality of active or passive medical implants. To re-
duce the risk of serious or lethal injuries, we recommend that persons with medical implants consult their doctor and the manufacturer of their medical implant before operating the machine.
General Description

The illustration how to handle the appliance can be found on page 2 - 3.
Overview

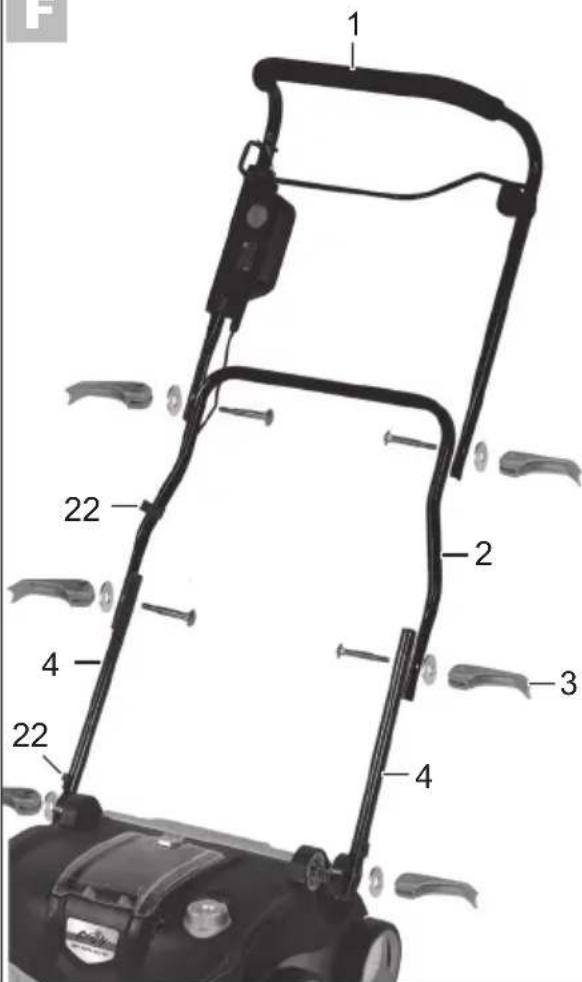
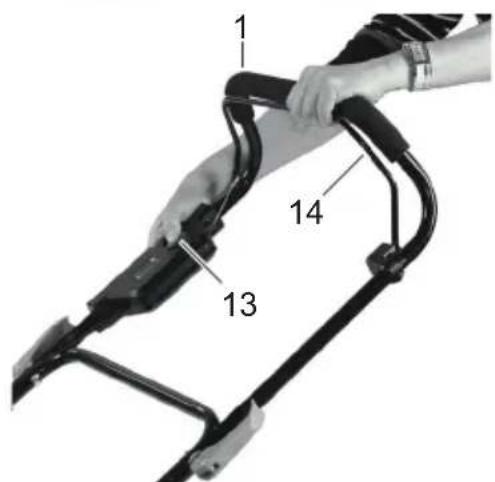
1 Upper handle bar
2 Centre bars
3 tightening levers with washers to fasten the bars
4 Lower bars
5 Collection bag (sold separately)
6 Impact protector
7 Battery cover
8 Setting wheel 9 Wheels
10 Device handle
11 Rechargeable battery (sold separately)
11a Release buttons
11b Battery charge level indicator
12 Charge level indicator on upper handlebar
13 On/Off switch, with contact chip
14 Safety bracket
15 Charger (sold separately)
16 Scarifying drum (already mounted)
17 Aerator drum (sold separately)
Functional description
The verticutor and lawn aerator has two easily exchangeable work cylinders:
An aerator cylinder made of hard plastic with vertically rotating sprung tines, and a verticutor cylinder with vertically mounted high-grade steel knives.
The implement features a high-quality plastic case with collection bag and a handle bar with a folding function. Please refer to the subsequent descriptions for the actual functions of the individual control elements.
Extent of the delivery
Carefully unpack the implement and check that all the subsequently listed parts are complete:
- Battery scarifier
- 2 Lower bars
- Centre bar
- Oberen Holm
- 6 fixing levers and washers, 4 Screw for bar attachment
- Instruction Manual
Charging process

If you purchased a device with the item no. 76007099, the battery and the charger are not included in the scope of delivery.
If you own another device from the Grizzly Battery 40 V range and the corresponding battery, you can use the same battery for this device.
The following devices are compatible:
- Cordless Hedge Trimmer AHS 4055 Lion
- Cordless Lawn Trimmerr ART 4032 Lion
- Battery-operated scythe AS 4026 Lion
GB
- Cordless chainsaw AKS 4035 Lion
- Cordless leaf blower ALS 4025 Lion
- Cordless lawnmower ARM 4046 A-Lion Set
- Cordless lawnmower ARM 4038 Lion Set
- Cordless lawnmower ARM 4051 A Lion Set
Otherwise, please contact the Service Centre (cf. Spare parts/accessories). You can order the rechargeable battery and the corresponding charger from them.

Do not expose the battery to extreme conditions such as heat or impact. Risk of injury from escaping electrolytic solution! After eye/skin contact, rinse the affected areas with water or a neutraliser and consult a doctor.

Charge the battery in a dry room only. Prior to attaching the charger, check that the battery's outer surface is clean and dry. There is a risk of injury due to electric shock.

Only use the charger from the package to charge the battery.
- The rechargeable battery reaches its full capacity only after it was charged several times.
- Charge the battery before the first time of use. Do not briefly charge the battery several time in a row.
- If a fully recharged battery lasts for considerably shorter operating times, the battery is used up and needs to
be replaced. Only use an OEM spare battery available from our Customer Service.
• Always take heed of the applicable safety instructions as well as the environmental protection regulations and information.
- The warranty excludes all defects caused by improper handling.
Insert/remove battery
B
-
To insert the battery (11) into the device, open the battery cover (7) and insert the battery (11) into the device. It locks into place audibly.
-
To remove the rechargeable battery from the device, open the battery cover (7), press the unlock button (11a) upward and pull out the rechargeable battery.
Charge battery

Allow a freshly charged battery (11) to cool down for approx. 15 minutes before inserting it into the battery charger (15).
- Remove the battery (11) from the appliance, as necessary.
- Insert the battery (11) in the charging compartment of the battery charger (15). It will audibly snap in.
- Plug the battery charger (15) into a mains outlet.
- When the battery is fully recharged unplug the battery charger (15) from the mains.
- Press the release button (B 11a) on the battery (11) and pull the battery out of the battery charger (15).
Used batteries
- If a fully recharged battery lasts for considerably shorter operating times, the battery is used up and needs to be replaced. Only use an OEM battery pack replacement available from our Customer Service.
- Always take heed of the applicable safety instructions as well as the environmental protection regulations and information (see “Waste Disposal and Environmental Protection”).
Assembling instructions

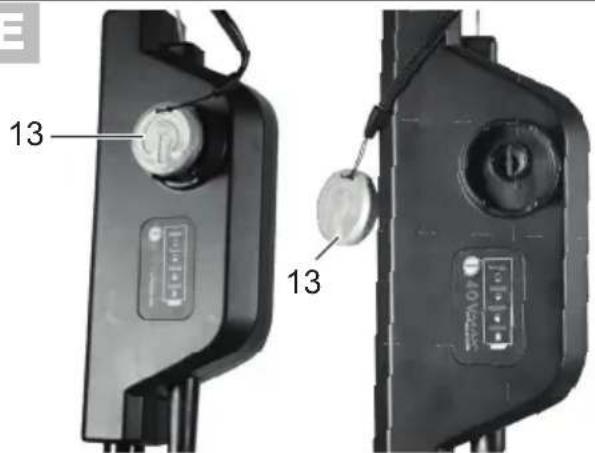
Before doing any work on the device, switch the device off and remove the safety key( E 13).
Assembling the handle bar

-
Attach the lower bars (4) to the device housing and screw them on, each with a locking lever (3) and a washer.
-
Screw the middle bars (2) each with a screw, a washer and a tightening lever (3) onto the lower locking lever (4).
-
Screw tight the upper handlebar (1) on each side with a screw, a washer and a locking lever (3) onto the middle bar (2).
-
Use the two cable clips (22) to attach the power cord to the bar.
Mounting and emptying the collection bag
(sold separately)

WARNING: Never operate the implement without the impact protector. Danger of Injury!
The collection bag is delivered in a folded state and must therefore be assembled before it is mounted on the implement.

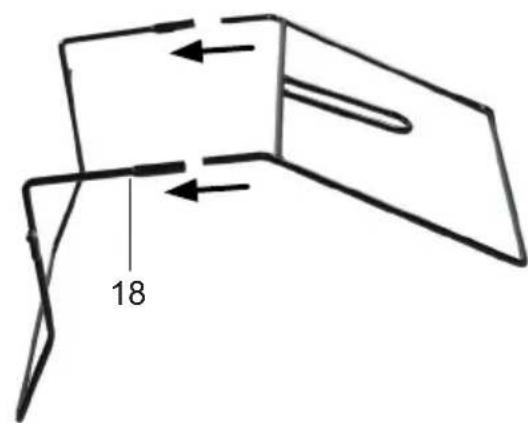
Assemble the collection bag:
- Assemble the collection bag rods (18).
- Pull the collecting bag over the bag rods.
- Slip the plastic straps (19) over the collection bag rods (18).
Mounting the collection bag on the implement:
- Lift the impact protector (6).
- Push the pins on the collection bag rods (20) into the socket in the implement case (18).
- Release the impact protector so that it holds the collection bag (5) in its position.
Removing and emptying the collection bag:
- Lift the impact protector (6) and take out the collection bag (5).
Operation

Please observe local regulations concerning noise protection.
Setting the working positions
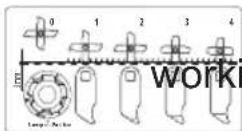
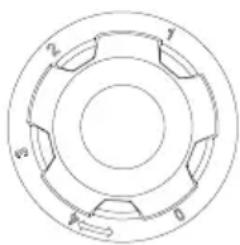
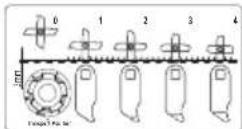
The implement has 5 principal position settings::
natural_image
Circular mechanical component diagram with numbered slots (0, 1, 2) and no visible text or symbolsThe position “0” corresponds to the Transport Position. This position sets the maximum safety spacing between the tool and the floor.
GB
Working position: 1
Set this position when working with a new implement.
The working position can be lowered with increased knife and sprung tine wear.
Wear can be identified from an increasingly poor result.

When the implement is delivered it is in the Transport Position setting
-
Check that the appliance is turned off before adjusting the working position.
-
Pull up the adjusting knob (see( A 8) Turn the knob as appropriate and push it down to snap in. Use your other hand to hold the appliance.

The setting button is not intended for height adjustment but rather to compensate for wear. Selection of a readjustment position without the corresponding wear can overload the motor and damage the cylinder.
Switching on and off

Before switching on the implement ensure that it is not in contact with any objects. Keep your feet and hands well away from the cylinder and the ejector opening. Danger of injury!
- Place the implement on a level lawn surface
- Ensure that the battery (A 11) is inserted (see „Removing/ inserting the battery“).

Switching on:
- Insert the contact chip in to the opening provided on the power switch (13).
- To switch on, press the power switch (13) and hold it down while pressing the safety bar (14) against the bow-type handle (1). Release the power switch (13) - the device starts.
Switching off:
- Release the safety bar ( A 14).

Overload protection: The motor is automatically switched off when the implement is overloaded. Release the starting lever and reset the implement after a cooling down period of approx. 1 minute.
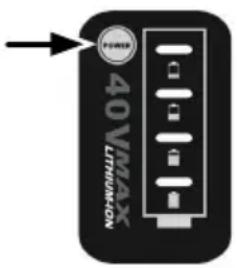
Checking the charge status of the battery
The state of charge display on the battery (A 11b) indicates the state of charge of the battery (A 15). While the battery is inserted in the device, the charge level of the battery can also be read from the charge level indicator (A 12) on the upper handlebar.

Press the button for the charge level indicator (11b) on the battery (11). The charge level of the battery is indicated by illumination of the corresponding LED light.

text_image
max. 40-V-Lithium-IonAlternatively when the batters is installed:
text_image
40VMAX LITNAM-IONPress the POWER button of the charge level indicator (12) on the upper handlebar. The charge level of the battery is indicated by illumination of the corresponding LED light.
Working with the implement
To maintain a well cared-for lawn it should be aerated every 4 to 6 weeks.
Verticuting is a more intensive intervention than aerating and should only be carried out once a year, the best time being in spring after the lawn has been mown for the first time.

When working on slopes always proceed across the slope. Be particularly careful when walking backwards and pulling the implement. Danger of stumbling!

The shorter the grass, the better the lawn can be treated. Furthermore, the implement is less stressed and the service life of the cylinder is prolonged.
- The implement can be operated with or without the collection bag.
Recommendation: Work with the collection bag for aerating and without the collection bag for verticuting. - To ensure that the collision guard fl ap closes properly, remove any earth that may have collected on the collision guard springs and/or the housing. When working without the bag, check that the collision guard fl ap is tightly closed.
- Mow the lawn to the required grass height.
- Do not use the scarifier in long grass. It may otherwise wind around the sca-
rifi er blade and result in damage to the equipment.
- Select the appropriate working or readjustment position (in the event of cylinder wear) so that the implement is not overloaded.
- Guide the implement at a walking pace down lanes that are as straight as possible. To ensure uninterrupted aerating or verticuting the individual lanes should always overlap by a few centimetres. Dwelling too long at the same place while the implement is running can damage the grass sward.

Switch off the device after doing any work and when transporting the device, pull the contact chip (E 13) and wait for the drum to come to a stop.
- Adjust the transport position 0 setting (see “Setting the Working Position”) when transporting the implement.
- Lift the implement to transport it over steps and sensitive surfaces (e.g. tiles).
- Always clean the implement after each use (see "Cleaning, Maintenance, Storage").
• After having treated lawns with dense moss growth, it is advisable to reseed the lawn so that it can regenerate itself quicker.
Exchanging the cylinder

Switch off the device, pull the contact chip (E 13) and wait for the drum to come to a stop.

Wear gloves when handling the cylinder.

-
Turn the implement over.
-
Release the fastening screw (22) and fold the bearing cover (23) away.
GB
- Tilt the cylinder upwards and pull the shaft (24) out of its seat.
- Insert the new cylinder by reversing the sequence.
Cleaning, maintenance, storage

Work that has not been described in these Instructions must be carried out by a servicing agency authorised by us. Only use original parts.

Wear gloves when handling the cylinder.

Before any maintenance or cleaning work, turn the device off, pull the safety key (E 13) and wait for the drum to stop.
General cleaning and maintenance work

Do not jet water onto the implement and do not clean it under flowing water. This would result in the danger of an electric shock and the implement could be damaged.
- When work has finished remove plant residues adhering to the wheels, inside the ventilation opening, the grass ejector opening and the cylinder. Doe not use hard or pointed objects for this purpose as they could damage the implement.
- To ensure that the collision guard flap closes properly, remove any earth that may have collected on the collision guard springs and/or the housing.
- Completely empty the collection bag.
• Always keep the implement clean. Do not use cleaning agents or solvents.
We cannot be held liable for damage caused by our implements if they were improperly repaired, if non-original parts have been used or if they were used not in keeping with their intended purpose.
Storage
- Remove the rechargeable battery from the device before storing the device (winter storage).
- Only store the batteries in the partially-charged state. The charge state should be 40-60% during a longer storage period (one of the two middle LED lights of the charge state indicator (A 11a, or. A 12) illuminates).
- Check the battery charge level approximately every 3 months during a lengthy storage period and recharge if necessary.
- Store the batteries between 10^ C and 25^ C. Avoid extreme cold or heat during storage, so that the batteries do not lose power.

To save space the top grip handle can be folded down after releasing all tightening levers (3).
Disposal and protection of the environment
Dispose of the implement, accessories and packaging in an environment-friendly manner.
Electrically-powered appliances must not be disposed of with the domestic waste.

Li-ion
Do not throw batteries into domestic waste, fire (risk of explosion) or into water. Damaged batteries can harm the environment and your health if poisonous fumes or liquids escape.
- Hand the device and the charger to a recycling point.
- Dispose of batteries in a discharged state. We recommend to cover the contacts with an adhesive strip to protect against short circuits. Do not open the battery.
- Dispose of the batteries according to local standards. Hand in the batteries at a used battery collection point where they are recycled in an environmentally friendly manner. For more information, please contact your local waste management provider or our service centre.
- Disposal of your sent in defective devices is carried out free of charge.
- Feed clippings to composting and do not throw them into the refuse bin.
Guarantee
- There is a 24-month warranty on this appliance. This non-transferable warranty applies to the original purchaser only.
- This appliance is not suitable for commercial use. Commercial use will void the warranty.
- This guarantee does not apply to natural wear, overloading or improper use. Certain parts are subject to normal wear and are excluded from the guarantee. This applies especially to the verticutor cylinders.
- To qualify for any warranty claims, you must also service the appliance at the intervals specified in the operating instructions and comply with the cleaning, maintenance and servicing information.
- Damage caused by material or manufacturer faults will be remedied free of
charge by replacement or repair.
- Claim for such damages by returning the non-dismantled unit together with its receipt slip and warranty card to your dealer.
Repair Service
- Repairs that are not subject to this guarantee can be carried out by our Service Center against a corresponding charge. Our Service Center will be happy to submit a cost estimate.
We can only deal with implements that have been adequately packed and carriage paid. - Implements dispatched by unpaid carriage – as bulky goods, by express or other special freight forms – will not be accepted.
• We will dispose of your implements free of charge
Technical data
Electric Scarifier / Aerator
Motor input.....max. 40 V==
Idling speed n_0 3200 min ^-1
Idle time....max. 48 min*
Working width.....ca. 380 mm
Protection Class .......□ III
Degree of protection....IPX1
Weight 11.8 kg
Acoustic pressure level (L_pA) ..... 77,6 dB (A), K_pA=3 dB
Sound power level ( L_WA )
guaranteed....92 dB(A)
measured......89 dB(A); K_WA=2,46 dB
Vibration (a_n)
at the handle .....0,98 m/s ^2 ; K=1,5 m/s ^2
Battery (Li-Ion)......DYMA81
Nominal voltage ....max. 40 V==
Capacity 2,5 Ah
Energy....90 Wh
Charging time......approx. 2,5 h
Recharger......DYMA82
Voltage
input......220-240 V\~; 50 Hz
Voltage/
Output 40 V==; 1 A
Protection class....□ II
Protection category ...... IP20
* The effective service life of a fully charged battery under load depends on the operation and the stress during cutting.
Noise and vibration values were determined according to the standards and stipulations mentioned in the declaration of conformity.
Technical and optical changes can be carried out in the course of further development without notice.
All dimensions, references and information of this instruction manual are therefore without guarantee. Legal claims, which are made on the basis of the instruction manual, cannot thus be considered as valid
The stated vibration emission value was measured in accordance with a standard testing procedure and may be used to compare one power tool to another. The stated vibration emission value may also be used for a preliminary exposure assessment.

Warning:
The vibration emission value may differ during actual use of the power tool from the stated value depending on the manner in which the power tool is used.
Safety precautions aimed at protecting the user should be based on estimated exposure under actual usage conditions (all parts of the operating cycle are to be considered, including, for example, times during which the power tool is turned off and times when the tool is turned on but is running idle).
Spare parts
Spare parts and accessories can be obtained at www.grizzly-service.eu
If you do not have internet access, please contact the Service Centre via telephone (see "Grizzly Service-Center"). Please have the order number mentioned below ready.
Battery 80001176
Battery charger 80001096
Quick charger 80001097
Collection bag....91097028
Aerator drum....91097020
Trouble Shooting
| Problem Possible | Cause Fault Fixing | |
| Strange noises, rattling or vibrations | Foreign bodies on the drum | Remove foreign bodies |
| Spring tines or drum blades are damaged | Change the drum | |
| Drum not correctly installed | Install the drum correctly (see Chapter “Replacing the spindle”) | |
| Slipping toothed belt Repair by customer services | ||
| Equipment does not start | Battery is empty | Check charge level, have repairs carried out by a qualified electrician, if necessary |
| Battery is not inserted Insert battery | ||
| Defective start lever | Repair by customer services | |
| Defective motor | ||
| Motor stops | Blockage by foreign object R | Remove the foreign object |
| Cut height too low Set a higher cut height | ||
| Blade area blocked Clean the equipment | ||
| Overload protection triggers Allow the device to cool for about 1 min | ||
| Internal loose contact Repair by customer services | ||
| Result unsatisfactory or motor labours | Spring times of the aerator drum is worn | Change the drum |
| Blade of the scarifying drum blunt or damaged | Change the drum | |
| Toothed belt defective Repair by customer services | ||
| Incorrect transport position of working position selected | Select the working position or the adjustment position (see chapter „Setting working positions“) | |
| Lawn too high Pre-mowing, see Chapter „Operation“ | ||
Inhoud
Switch off the motor and disconnect the ignition key before adjustment or repair work. The cutting cylinder continues to rotate briefly after the motor has been switched off!

Mounting the collection bag
on the implement:
natural_image
Circular mechanical component diagram with numbered segments (1, 2, 3) and no visible text or symbolstext_image
40VMAX LITHUSIONSymbols used in the instructions:

Hazard symbols with in- formation on prevention of personal injury and pro- perty damage.

Precaution symbol (explanation of precaution instead of exclamation mark) with information on prevention of harm / damage

Notice symbol with information on how to handle the device properly.
FR
natural_image
Circular mechanical component diagram with numbered segments (no text or symbols)Grizzly Service-Center ....143

Electrically powered implements must not be disposed of with the domestic waste

Indicazione carica
Grizzly Service-Center 143

natural_image
Circular mechanical component diagram with numbered segments (1, 2, 3, 4) and no visible text or symbolsDispose of the implement, accessories and packaging in an environment-friendly manner.
Electrically-powered appliances must not be disposed of with the domestic waste.

Akumulator (Li-Ion) ...... DYMA81
Grizzly Service-Center 143

natural_image
Circular mechanical component diagram with numbered slots (1, 2, 3, 4) and no visible text or symbolsGrizzly Service-Center 143

natural_image
Circular mechanical component diagram with numbered segments (no text or symbols)| GB Translation of the original CE declaration of conformity | |
| We confirm, that the Cordless Scarifier / Aerator Design Series ARV 4038 Lion Serial number 20171100001 - 20171100200 | |
| conforms with the following applicable relevant version of the EU guidelines: | |
| 2006/42/EC • 2014/30/EU • 2000/14/EC • 2011/65/EU* | |
| In order to guarantee consistency, the following harmonised standards as well as national standards and stipulations have been applied: | |
| EN 55014-1:2006/A2:2011 • EN 55014-2:2015 EN 50636-2-92:2014 • EN 60335-1:2012/A11:2014 EN ISO 12100:2010 | |
| The following are also confirmed as complying with Noise Emissions Directive 2000/14/EC: Guaranteed sound power level: 92 dB(A) Measured sound power level: 89 dB(A) The conformity evaluation procedure employed is compliant with appendix V of 2000/14/EC | |
| This declaration of conformity is issued under the sole responsibility of the manufacturer: | |
  Grizzly Tools GmbH & Co. KG Stockstädter Straße 20 D-63762 Großostheim, 30.11.2017 (Christian Frank, Documentation Representative) Grizzly Tools GmbH & Co. KG Stockstädter Straße 20 D-63762 Großostheim, 30.11.2017 (Christian Frank, Documentation Representative) |
* The object of the declaration described above satisfies the provisions of Directive 2011/65/EU of the European Parliament and the Council of 8 June 2011 on limiting the use of certain harmful substances in electrical and electronic appliances.
Grizzly Service-Center
Unit 3, Beldray Park
Beldray Road, Mount Pleasant
Bilston, West Midlands WV14 7NH
Tel.: 0845 683 2672
e-mail: care@novoserv.co.uk
CZ HECHT MOTORS s.r.o.
U Mototechny 131
251 62 Mukařov-Tehovec
Tel.: 323 661 347 linka 27
Fax: 323 661 348