
OCS 100BTB - Soundbar OK - Free user manual and instructions
Find the device manual for free OCS 100BTB OK in PDF.

| Product type | Soundbar |
| Brand | OK |
| Model | OCS 100BTB |
| Dimensions (L x H x D) | 950 x 93.5 x 51 mm |
| Power supply | 220-240 V ~, 50/60 Hz |
| Power consumption | 30 W |
| Output power | 15 W x 2 + 30 W |
| Speaker impedance | 4 Ω x 2 + 8 Ω |
| Frequency response | 40 Hz - 20 kHz |
| Signal-to-noise ratio (SNR) | 70 dB |
| Bluetooth | Version 3.0 + EDR, range ≤ 6 m |
| NFC functions | Yes (contact pairing) |
| Audio inputs | Optical, AUX (RCA), MP3 LINK (3.5 mm) |
| Remote control | Infrared, CR2025 battery included |
| Equalizer modes | Flat, Pop, Rock |
| Wall mounting | Integrated brackets, spacing 580 mm |
| Protection class | II |
| Cleaning | Slightly damp cloth, no solvents |
| Included accessories | RCA to 3.5mm cable, remote control, manual, warranty |
Frequently Asked Questions - OCS 100BTB OK
User questions about OCS 100BTB OK
0 question about this device. Answer the ones you know or ask your own.
Ask a new question about this device
Download the instructions for your Soundbar in PDF format for free! Find your manual OCS 100BTB - OK and take your electronic device back in hand. On this page are published all the documents necessary for the use of your device. OCS 100BTB by OK.
USER MANUAL OCS 100BTB OK
B_20511097.3_065(b) > 1378/17 1:40
Read this instruction manual carefully before using the appliance. Familiarise yourself with the operation, adjustments and functions of switches. Internalise and follow the safety and operation instructions in order to avoid possible risks and hazards.
Thanks for your purchase of this ok. product.
IMPORTANT SAFETY INSTRUCTIONS. READ CAREFULLY AND KEEP FOR FUTURE REFERENCE.

Read this instruction manual carefully before using the appliance. Familiarise yourself with the operation, adjustments and functions of switches. Internalise and follow the safety and operation instructions in order to avoid possible risks and hazards.
- Follow all safety instructions in order to prevent damage being caused by incorrect use!
- Keep the user manual for further use. If you pass this appliance on to third parties, you must also deliver this user manual with it.
- Before connecting the appliance to the mains power supply, check that the power supply voltage and current rating corresponds with the power supply details shown on the appliance rating label.
- Never use an appliance that is damaged! Disconnect the appliance from the mains and contact your supplier if it is damaged.
- Danger of electric shock! Never try to repair the appliance yourself. In the event of any malfunction, repairs are to be conducted by qualified personnel only.
- Warning! Never immerse electrical parts of the appliance in water or any other fluids when cleaning or during operation. Never hold the appliance under flowing water.
- The appliance should not be used near water – for example, near a bathtub, wash bowl, kitchen sink, laundry tub, in a wet basement, or near a swimming pool.
- Do not operate the appliance with wet hands or while standing on a wet floor. Never touch the mains plug with wet or moist hands.
- Do not open the appliance casing under any circumstances. Do not insert any foreign objects into the inside of the casing.
- Never use accessories which are not recommended by the manufacturer. They could pose a safety risk to the user and might damage the appliance. You must therefore use original accessories only.
- The appliance is only suitable for use at moderate degrees of latitude. Do not use in the tropics or in particularly humid climates.
- Keep the appliance away from any hot surfaces and open flames. Always operate the appliance on a level, stable, clean and dry surface. Protect the appliance against heat and cold, dust, direct sunlight, moisture, dripping and splashing water.
- Do not place objects with open flames, e.g. candles, on top or beside the appliance. Do not place objects filled with water, e.g. vases on or near the appliance.
- This appliance is not intended for use by persons (including children) with reduced physical, sensory, or mental capabilities, or by those who lack experience and knowledge, unless they have been given supervision and instruction concerning the use of the appliance by a person responsible for their safety.
- Children should be supervised to ensure that they do not play with the appliance.
- This appliance is classified as protection class II and must not be connected to a protective ground.
- Regularly check the power cord and plug for damage. A damaged power cord has to be replaced by the manufacturer, its customer service department, or a similarly qualified person in order to avoid danger of injury.
- Avoid damage to the power cord. Do not crush, squeeze, bend, or scour on sharp edges. Keep the power cord away from hot surfaces and naked flames.
- Lay the cables in such a way that nobody can inadvertently pull them or trip over them.
- Do not pull the plug out of the socket by the power cord, and do not wrap the power cord around the appliance.
- If an extension cord is used, its capacity needs to be suitable for the power consumed by the appliance.
- Connect the mains plug to a socket that is easy to reach so that you can disconnect it from the mains supply quickly in an emergency. The mains socket must remain accessible at all times. Pull the mains plug out of the socket to switch off the appliance completely. Use the mains socket as a disconnection device which should be accessible at all times.
- The appliance is powered when connected to the power supply.
- Unplug from the wall outlet when not in use and before cleaning.
- Always switch the appliance off before unplugging from the wall outlet.
- Attention! In the event of a malfunction as a result of electrostatic discharge and momentary electrical surges, unplug the appliance and plug it in again.
- Make sure that no electrical wires, water, gas or other lines are located around the installation location.
BATTERY SAFETY INSTRUCTIONS
- Do not expose batteries to extreme temperatures, like direct sunlight or fire. Do not place the remote control on any heat source. Leaking battery acid may cause harm.
- Always insert battery correctly with regard to the polarities (+ and -) marked on the battery and the battery compartment.
- Caution! Danger of explosion if battery is incorrectly replaced.
- Replace battery only with the same or equivalent type.
- If battery should leak, remove it with a cloth from the battery compartment. Dispose of batteries according to the regulations. If battery acid has leaked avoid contact to skin, eyes and mucous membranes. Rinse affected areas immediately after contact with the acid and wash with plenty of clean water. Visit a physician.
- Swallowed batteries are lethal. Keep batteries out of reach of children and pets. Immediately ask for medical assistance if a battery is swallowed.
- Do not allow children to replace batteries without adult supervision.
- Batteries shall be stored in well-ventilated, dry and cool conditions.
- Remove the battery if you will not be using the appliance for an extended period of time.
- Danger of explosion! The battery may not be disassembled, thrown into fire, or short-circuited.
INTENDED USE
- The product serves as an audio output device and features wireless or wired connection.
- No liability for any damage that occurs can be accepted in the event of improper use or incorrect handling.
- Use the appliance for the intended use only. The appliance is not suitable for commercial use. This appliance has been designed exclusively for household use. Do not use the appliance outdoors or in a bathroom.
COMPONENTS
Fold out front and rear page for product illustrations.
The product may be available in different colours.

- Wall brackets
- AUX L / R sockets
- OPTICAL socket
- Power cable with power plug
- / button
- VOL + / VOL- button
- NRI sensor
- MP3 LINK socket
- Display
- Infrared receiver
- Speakers
-
Infrared sender
-
SOURCE button
- button
- /BAIR button
- MUTE button
- EQ button
- DIMMER button
- VOL -button
- button
- VOL + button
- button
- RCA to 3.5 mm audio cable
ACCESSORIES
1x RCA to 3.5 mm audio cable
1x Remote control
1x User manual
1x Warranty card
EN
22
UNPACKING
- Remove all packaging.
- Check for the presence of all parts and for transport damage. In case of damage or incomplete delivery, please contact your dealer (Warranty card).
- Please keep the packaging. The appliance can be stored in it, if not used for a longer period of time.
WALL MOUNTING - PREPARATION
- The incorporated wall mount brackets (on the back) can be used to fix the soundbar to a wall. The wall mount brackets are designed for use on vertical walls constructed of solid concrete or bricks.
- When installing on a cinderblock wall, verify first that the blocks have a minimum of 2.5 cm of actual concrete wall thickness to be used for the wall plugs.
- If you are uncertain about the construction of your wall, please consult a qualified contractor or installer for assistance.
- Ensure that the screws you want to use are strong enough to support the weight of the soundbar and long enough to sufficiently grip the wall while still allowing 5mm between screw head and wall.
• Additional tools (not included) are required for the installation. - Do not overtighten screws.
- Use an electronic stud finder to check the wall type before drilling and mounting.
• During mounting, keep away children and pets. - Make sure the soundbar is mounted in reach to the next wall outlet.
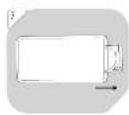
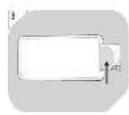
MOUNTING SOUNDBAR ON THE WALL
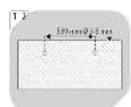
1 Drill 2 parallel holes (∅ 3-8 mm each according to wall type) in the wall. The distance between the holes should be 580 mm.
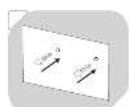
2 Insert 2 wall plugs (not supplied) into the drilled holes. Use a hammer if necessary.
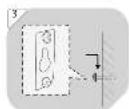
3 Insert 2 screws (not supplied) into the holes and tighten. Take care to leave 5 mm between the screw heads and the wall.
Hook the soundbar into the screws. Ensure that the screw heads slide firmly into the narrow part of the brackets.
- Now the appliance is mounted in place.
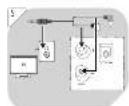
CONNECTIONS - USE THE OPTICAL SOCKET
- Use an optical cable (not included) to create a digital connection to a TV, DVD, Blu-Ray player or other suitable devices.

Connecting an optical cable (not included):
One end to the TV's optical out socket. The other end to the OPTICAL socket on the soundbar.
Notes:
- In order to receive digital signals, you need to activate PCM (Downmix) in the settings menu of your source device.
- The digital optical cable or connector might be labelled as SPDIF OUT or OPTICAL OUT.
USE THE AUX SOCKETS
Note:
To connect to the AUX sockets, you can use either a RCA to 3.5 mm audio cable (included), or a RCA to RCA audio cable (not included).
5 Connecting a RCA to 3.5 mm audio cable: One end to the TV's headphone socket. The other end to the AUX L / R sockets on the soundbar.
6 Connecting a RCA to RCA audio cable: One end to the TV's audio output socket. The other end to the AUX L / R sockets on the soundbar.
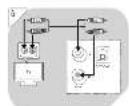
REMOTE CONTROL – INSERTING/REPLACING BATTERY
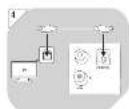
7 Note:
For operation of the remote control, 1x 3 V lithium button cell (type CR2025) is needed (supplied). To insert a battery, pull out the battery holder first.
8 Insert the battery according to the polarity markings. The positive pole (marked with +) should be facing up.
9 Push the battery holder fully back into the remote control. Make sure it locks into place.
CAUTION!
• Always insert a battery according to the polarity markings.
- If the remote control does not work properly, replace the battery.
- Use batteries of high quality only. Batteries of low quality might leak and cause damage.
- Remove the battery, if the remote control is not to be used for a longer period of time, as it might be damaged by leaking batteries.
- The remote control may be less effective if:
- There are obstacles between the remote control and the infrared receiver.
- Other remote controls are operated at the same time.
- The battery is low.
BASIC FUNCTIONS
- Make sure all the source connections are made properly.
- Connect the power plug to a suitable electrical outlet. The display flashes --:--. The appliance is now in standby.
Note:
Whenever possible, functions are described using the remote control. Some functions are also available by using the controls on the soundbar.
SWITCHING APPLIANCE ON/OFF
- Switching appliance on: Press ⏻ / ⏻ button on the soundbar or ⏻ button on the remote control.
- Switching appliance off: Press and hold ⏻/∅ button on the soundbar, or press ⏻ button on the remote control. The appliance enters standby again.
- Switching appliance off completely: Disconnect the power plug from the electrical outlet.
- If the appliance is idle for about 15 minutes, it automatically switches to standby.
EN
SETTING VOLUME
- Set the volume with VOL + / VOL- (Range: 00 - 32).
- Press repeatedly or press and hold for fast adjustment.
- The number indicating the volume level appears briefly on the display.
- Muting sound: Press MUTE once.
- Cancelling mute:
- Press MUTE again, or
- press VOL+ / VOL-.
SETTING EQUALIZER
- Press EQ to choose a preset equalizer mode. Available settings: FLAT/POP/ROCK
- The selected equalizer mode appears briefly on the display.
- The selected equalizer mode is saved in the memory even after the appliance is set to standby mode.
SETTING DISPLAY BRIGHTNESS
- Press DIMMER repeatedly to set the desired brightness for the display.
OPERATION - SELECTING A SOURCE
- You can have several external devices connected permanently to the appliance and select a desired source to be activated.
- Press repeatedly SOURCE on the remote control, or ⏻ button on the soundbar to toggle between the sources.
• Available sources are: AUX / MP3 LINK / OPTICAL / BLUETOOTH - The display shows the connected source:
| Source Display | Description | |
| AUX | L1n1 | Connection with a RCA to RCA audio cable. |
| MP3 LINK | L1n2 | Connection with a RCA to 3.5 mm audio cable. |
| OPTICAL OPt Connection with an optical cable. | ||
| BLUETOOTH bt Connection to a Bluetooth device via Bluetooth connection. | ||
Note:
The source selection is saved in the memory even after the appliance is set to standby mode.
- Use the volume and equalizer controls of the soundbar to regulate the audio settings (Basic functions).
- Use the controls of the connected external device to regulate the playback. Alternatively, use the playback controls of the soundbar (→Playback functions).
Note:
The audio output of this appliance is effected by the settings of the connected source. If necessary, adjust the settings of the source device to improve the audio output.
PLAYBACK FUNCTIONS
- All playback functions can be managed through the controls of the connected external device.
• Alternatively, use the remote control in Bluetooth mode.
| Key Function | |
| ▶//PAIR During | playback:Press 1x: Pause playback.Press 2x: Resume playback.Press and hold a few seconds: Activate the pairing mode. |
| ▶▶ Press 1x: Skip | to the beginning of the next title |
| ◀◀ Press 1x: Skip | to the beginning of the previous title. |
BLUETOOTH MODE
- External Bluetooth devices can be connected to the appliance via Bluetooth connection.
- Press repeatedly SOURCE to activate the Bluetooth function. The display shows bt, then no bt.
- Activate the Bluetooth function of the external device and search for Bluetooth devices.
- Select OCS 100BT-B from the Bluetooth device list.
- Follow the instructions shown on your device's screen. Specific pairing procedures may vary with different Bluetooth devices. Refer to your device's manual for further information.
- When the Bluetooth connection is established, bt shows on the display.
- Files from your connected Bluetooth device are played through the soundbar now.
-
Disconnecting from the Bluetooth device:
-
press and hold ▶PAIR for a few seconds,
- choose a different source, or
- disconnect using your Bluetooth device.
Note:
Bluetooth works best within a range of up to 6 metres.
- The music streaming may be interrupted by obstacles between the device and speaker, such as walls, metallic casing that covers the device, or other devices nearby that operate in the same frequency.
- If the connected device goes out of Bluetooth range, the appliance will reconnect automatically when the device comes back into range.
NFC FUNCTIONS
Note:
Near field communication (NFC) is a set of standards for smartphones and similar devices to establish radio communication with each other by touching them together or bringing them into proximity, usually no more than a few centimetres.
- Pre-requisite: In order to use the function, your mobile device needs to be NFC capable.
- Preparation: Enable NFC function on your mobile device. Disconnect any active Bluetooth connection from your mobile device.

- Connecting:
- Tap the mobile device on the Ncon of the soundbar.
- Pairing is done automatically. Follow the instructions shown on your mobile device's screen, if any.
- Operate your mobile device directly for playback features.
- Disconnecting:
- Tap the mobile device on the Ncon, or
- Disable NFC from your mobile device.
EN
26
TROUBLESHOOTING
| Problem Possible cause Solution | ||
| Appliance does not work. | Power plug not connected properly. Check if the power plug is properly connected to an electrical outlet. | |
| No sound. Volume is set too low. Increase the volume level. | ||
| Sound is muted. Restore sound by pressing MUTE. | ||
| Settings at the source device are not correct. | Ensure that the external source has correct volume settings and is playing a track. | |
| Bad audio quality. | Bad Bluetooth reception. Shorten the distance between the Bluetooth device and the appliance and make sure that no obstacles are disturbing the connection. | |
| Connecting cables are not inserted correctly. | Ensure that the connector cables to the source device are correctly plugged in and plugs fully inserted. | |
| Remote control does not work. | Battery empty or not correctly inserted. | Check that the battery is correctly inserted or, if necessary, replace. |
| Distance between appliance and remote control is too big. | Reduce the distance between the remote control and the soundbar and make sure there are no obstacles between them.Aim the remote directly at the Infrared receiver on the soundbar. | |
| Appliance does not react to pressed buttons. | Malfunction due to electrostatic discharge. | Disconnect the appliance from the power supply.Connect the power plugs again to an electrical outlet. |
CLEANING AND CARE
- Pull the power plug from the electrical outlets before cleaning.
- Clean the exterior with a lightly damp cloth.
- Do not use petrol, alcohol or other abrasive cleansers to clean the exterior.
- Do not allow liquids to spill into any openings
- Use the original packaging if it is necessary to transport the unit.
TECHNICAL DATA
Power supply
Power supply: Protection, clean, &
220-240V-,50/60Hz
Protection class. If Remote control:
3 V = 1 x 3 V Lithium button cell, type CR2025 (supplied)
Soundbar
Output power: 15 W x 2 + 30 W
Speaker impedance (total): 4 Ω × 2 + 8 Ω
Power consumption: 30 W
Frequency response: 40 Hz - 20 kHz
Signal to noise ratio: 70 dB
Dimensions (W x H x D): 950 x 93.5 x 51 mm
Bluetooth
Bluetooth version: Bluetooth version 3.0 + EDR
Operating range: ≤ 6 metres
Bluetooth is a registered trademark of Bluetooth SIG, Inc.
DISPOSAL
The crossed-out wheeled bin logo requires the separate collection of waste electric and electronic equipment (WEEE). Electric and electronic equipment may contain dangerous and hazardous substances. Do not dispose of this appliance as unsorted municipal waste. Return it to a designated collection point for the recycling of WEEE. By doing so, you will help to conserve resources and protect the environment. Contact your retailer or local authorities for more information.
DECLARATION OF CONFORMITY
Imtron GmbH hereby declares that this product conforms to the relevant safety regulations of EU Directive 1999/5/EC or 2014/53/EU. The full Declaration of Conformity can be requested via our website at www.imtron.eu.
ES
iENHORABUENA!
Read this instruction manual carefully before using the appliance. Familiarise yourself with the operation, adjustments and functions of switches. Internalise and follow the safety and operation instructions in order to avoid possible risks and hazards.
DÉCLARATION DE CONFORMITÉ
3 V = 1 x 3 V Lithium button cell, type CR2025 (supplied)
Telecomando:
IT
60
Soundbar
SWITCHING APPLIANCE ON/OFF
Zakres pracy: ≤ 6 metres

- IMPORTANT SAFETY INSTRUCTIONS. READ CAREFULLY AND KEEP FOR FUTURE REFERENCE.
- BATTERY SAFETY INSTRUCTIONS
- INTENDED USE
- COMPONENTS
- ACCESSORIES
- EN
- UNPACKING
- WALL MOUNTING - PREPARATION
- MOUNTING SOUNDBAR ON THE WALL
- CONNECTIONS - USE THE OPTICAL SOCKET
- Connecting an optical cable (not included):
- Notes:
- USE THE AUX SOCKETS
- Note:
- REMOTE CONTROL – INSERTING/REPLACING BATTERY
- CAUTION!
- BASIC FUNCTIONS
- SWITCHING APPLIANCE ON/OFF
- SETTING VOLUME
- SETTING EQUALIZER
- SETTING DISPLAY BRIGHTNESS
- OPERATION - SELECTING A SOURCE
- PLAYBACK FUNCTIONS
- BLUETOOTH MODE
- NFC FUNCTIONS
- - Connecting:
- - Disconnecting:
- CLEANING AND CARE
- TECHNICAL DATA
- Power supply
- Soundbar
- Bluetooth
- DISPOSAL
- DECLARATION OF CONFORMITY
- ES
- iENHORABUENA!
- DÉCLARATION DE CONFORMITÉ
- IT
Brand : OK
Model : OCS 100BTB
Category : Soundbar