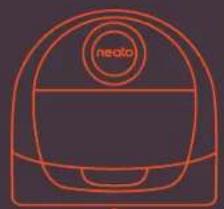
Botvac D5 Connected Plus - Vacuum Cleaner Neato Robotics - Free user manual and instructions
Find the device manual for free Botvac D5 Connected Plus Neato Robotics in PDF.

User questions about Botvac D5 Connected Plus Neato Robotics
0 question about this device. Answer the ones you know or ask your own.
Ask a new question about this device
Download the instructions for your Vacuum Cleaner in PDF format for free! Find your manual Botvac D5 Connected Plus - Neato Robotics and take your electronic device back in hand. On this page are published all the documents necessary for the use of your device. Botvac D5 Connected Plus by Neato Robotics.
USER MANUAL Botvac D5 Connected Plus Neato Robotics
botvacD3 connected botvacD5connected
EN 01
FR 17
ES 33
IT 49
DE 65
NL 81
DA 97
NO 113
SV 129
F1 145

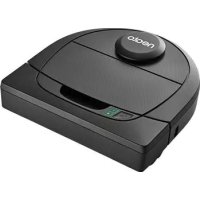
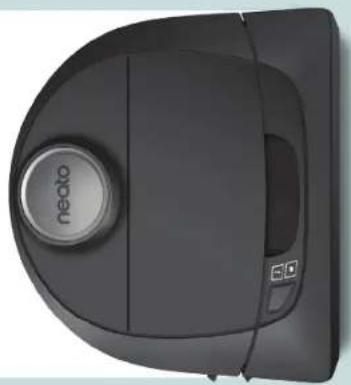
Meet Your Neato Robot
Congratulations on your new home robot - now "connected" in your smart home so you can manage your floor cleaning from a smartphone or tablet.
This guide will help get your robot set up and connected via the Neato app. You'll also find some important information on operating and maintaining your robot for best performance. Then relax. Your robot will let you know when your floors are clean.
Any problems? Just let us know. We are here to help. www.neatorobotics.com/support
Important: Read Before Continuing with Setup
In order to ensure the best possible experience with your Neato robot, please note the following to minimize any risk of damage to household furnishings or belongings.
Please observe your Neato robot during the first few cleaning runs and make any adjustments to the cleaning environment to optimize navigation.
-
While Neato robots have a smart navigation system that avoids obstacles, the robot may occasionally bump into furniture, objects, pets and people. Therefore, if you have special objects that could potentially be damaged by the bumping, remove these objects from the room or use boundary markers.
-
Similarly, the Neato robot's rotating brush operates like a regular upright vacuum cleaner, so do not use the Neato robot on floors or rugs (e.g., with fringes) that you would not use a regular upright vacuum on.
Neato Robotics is not responsible for any damage to furniture, objects, rugs, or flooring.
Table of Contents
Overview 3
Important Items and Tips 4
Preparation and Set Up. 6
Setting Up Your Robot With Wi-Fi and the Neato App 7
Using Your Robot With the Neato App 9
How Neato Cleans. 11
Maintaining Your Neato Robot 12
More Info 13
You and Your Neato Robot 16
Want to see how it's done?
Go to www.NeatoRobotics.com/support for installation videos and tips.
Overview
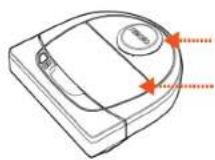
INFO LED is used for:

Wi-Fi connection status
- Clearing status
- Errors
BATTERY LED is used to show:

Charge state
Battery Errors
NOTE: LED light details are described later in this user guide.
Requirements: You need Wi-Fi, an iOS or Android phone or tablet, and a Neato account (free) in order to use some features.
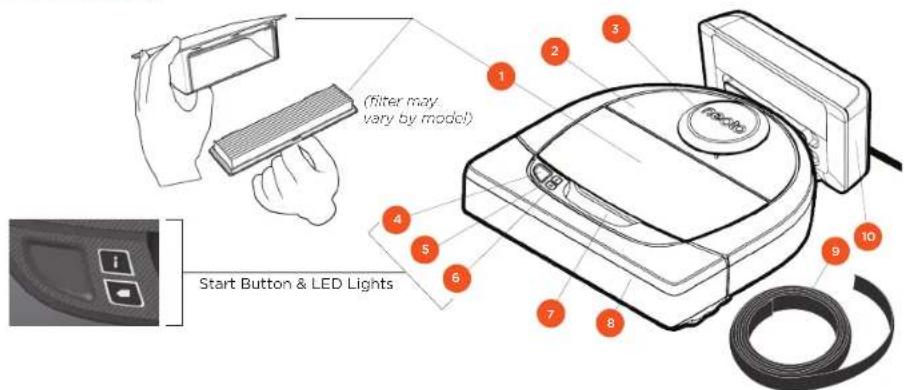
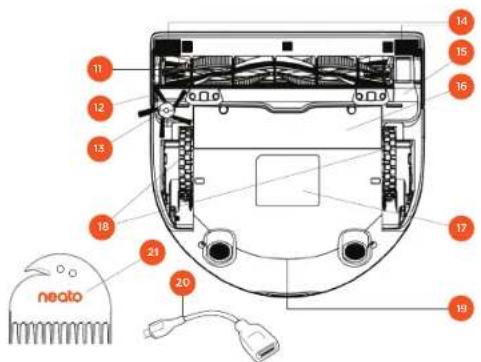
1Dirt Bin and Filter
2 Top
3 Laser Cover
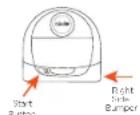
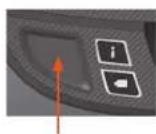
4.Start Button
5 Info LED
6 Battery LED
7 Handle
8 Front Bumper
9 Boundary Marker (included in some models)
10 Charge Base
11 Brush
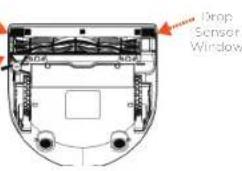
12 Wall Following Sensor Window
13 Side Brush (available on specific models only)
14 Drop Sensor Window
15 Brush Guard
16 Battery Door
17 Robot Label
18 Wheels
19 Charging Contacts
20 Upgrade Cable (included in some models)
21 Cleaning Tool (included in some models)
Important Items and Tips
IMPORTANT ITEMS
Keep your robot away from liquids and wet areas. Move or cover pet bowls and plant trays.
Clear the area of small items such as toys and clothing.
Tie up wires, curtains and other low-hanging items.
Thick carpet on top stair may affect the ability of the robot's navigation system to prevent falls (top stair with low pile carpet is OK). To make sure your robot sees the drop, place boundary markers 6 inches/15cm from the edge of the stair.
Keep your Neato inside the house. It was not designed for outdoor cleaning or freezing temperatures.
TIPS
To keep your robot out of places you don't want it to go, set down boundary markers (included in specific models, however Neato Boundary Markers are compatible with all Neato robots).
You can use scissors to cut boundary markers to a shorter length.
You can use removable tape to keep boundary markers flat on the floor.
To do a Reset of the Neato robot, press and hold the button for 10 seconds and all the lights will turn off. Press Start button once more to turn the robot back on.
The combo brush offers superior pick-up of pet hair, reduced noise during operation, and is ideal for homes with multiple types of flooring.
The spiral blade brush (sold separately) offers deep cleaning performance across all floor surfaces.
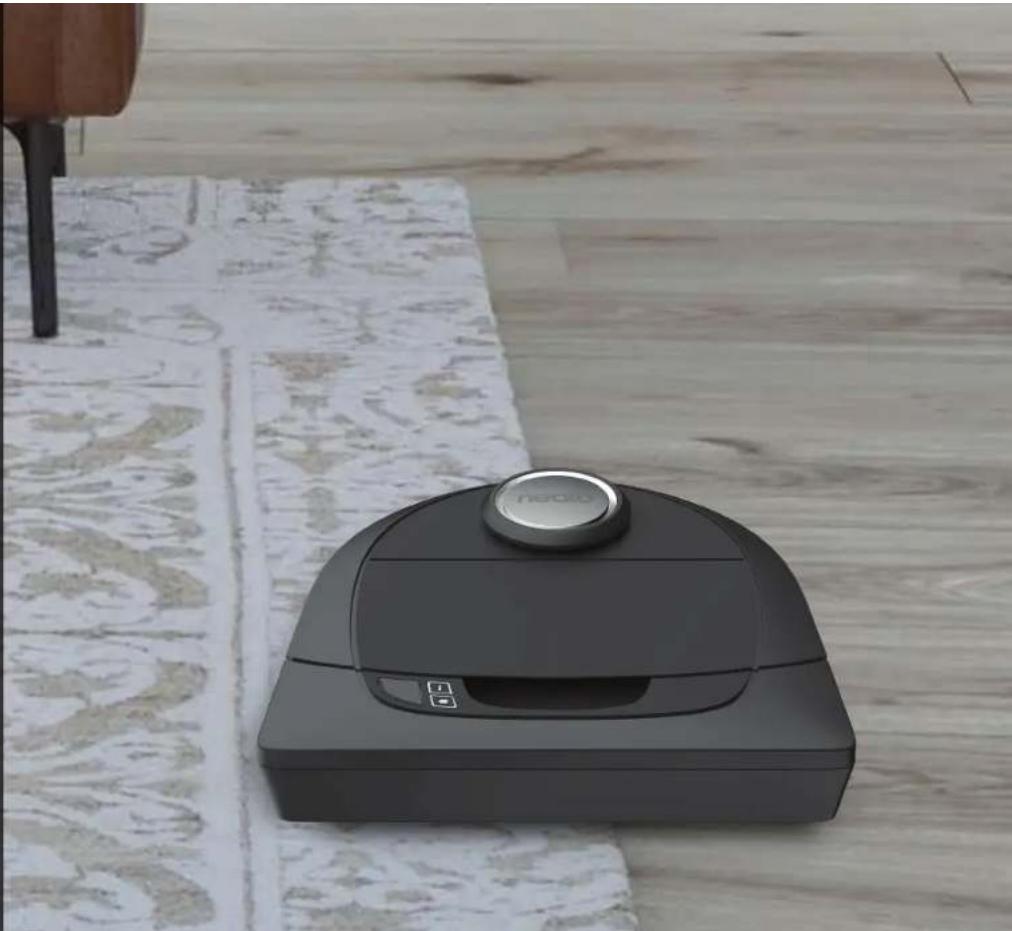
Shiny surfaces and black floors might cause navigation issues.
Before connecting your robot to your Neato account, view the How-To Video online at www.NeatoRobotics.com/Support
t
Start Button & LED Lights

INFOLED
| ACTION INFO LED | i | |
| Start Cleaning Press Start Button 1x for house cleaning Solid BluePress Start Button 2x for spot cleaning Solid White | ||
| Pause/Resume Cleaning | Press Start Button during cleaning to pause robot. LED pulses during pausePress Start Button again to resume cleaning. | |
| Cancel Cleaning Press & hold Start Button for 5 seconds Robot & LEDs turn | off & robot plays a tone. | |
NOTE: if the INFO LED light is blinking red or solid red, your robot needs robot maintenance or your robot has a navigation issue. Please check the troubleshooting section of this guide.

BATTERY LED
| ROBOT IS: LED COLOR WHAT IT MEANS | ||
| Cleaning | Solid Green | Battery level is normal |
| Solid Amber | Battery level is low. Battery must be charged before a new cleaning can be started | |
| Charging | Pulsing Green | Battery is charging and robot can start cleaning |
| Pulsing Amber | Robot is fast-charging the battery and must complete before cleaning can start | |
- If Blinking Red, please check the troubleshooting section of this guide.
Preparation and Set Up

I REMOVE FILMS AND STICKERS INITIAL ROBOT CHARGING
IMPORTANT
Remove all protective films and shipping material from the robot and charge base.
If they are not removed, your Neato robot will not operate correctly.

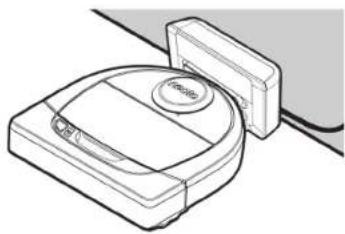
SETUPCHARGEBASE
Plug the power cord securely into the charge base.
Adjust the length of the cord by wrapping it as shown.


Choose a wall outlet that has a 3^ (1 m) clearance on both sides and in front of the charge base. This helps your robot find the charge base.
Plug in the power cord and push the charge base against the wall.
TIP Locate the charge base on a hard floor surface.
TIP Make sure the power outlet is not controlled by a switch.

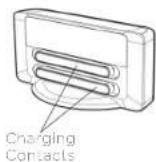
Place the rounded side of your Neato robot against the metal charging contacts on the charge base until the contacts are pushed all of the way in. For best results, charge the robot fully before your first cleaning cycle to experience a full high performance cleaning.
NOTE During bootup, the robot will alternately blink green and blue.
NOTE Your robot is only compatible with the included charge base.
Setting Up Your Robot With Wi-Fi Connection and the Neato App
It is recommended that you setup your robot to work with the Neato app to get the best experience and access to all of the features. The Neato app is the optimal way to control your robot and receive notifications via your smartphone or tablet.
Benefits of using the Neato app:
- Easy access & control
- Start your robot when you are not home
- Easily pause cleaning from the app
- Instant notifications (cleaning complete, alerts, etc.)
- Battery status
- Maintenance alerts and context sensitive help to keep your robot in top form
- Dashboard (some features available on specific models only)
It is also possible to start and stop the robot using the Start Button on the robot.
APP SET-UP
Download the Neato app from the Apple App Store or Google Play.

Follow the directions within the Neato app. You will be prompted to:
- Create an account
- Verify your account via email
- Add/Connect your robot
NOTE
Before you begin, you will need:
- Your home Wi-Fi password
Fully charged robot
ROBOT FEEDBACK DURING INITIAL PAIRING
Follow the instructions on the Neato app to pair your robot. Your robot is in pairing mode for the first 60 minutes after you turn on your robot for the first time.

During pairing the INFO LED will
change based on the connection status:
| LED COLOR WHAT IT MEANS | |
| Slow Blinking Blue Robot is in Pairing Mode | |
| Fast Blinking Blue Pairing to Neato app/account | |
| Solid Blue Pairing successful (shows for 5 seconds) | |
| Solid Red Pairing unsuccessful (shows for 5 seconds) |
PAIRING ISSUES
If you are not able to connect your robot within the first 60 minutes (or if the robot does not connect the first time), you will need to return the robot to pairing mode. Follow these steps: (Continued on next page)
Robot Wi-Fi Set-Up
PAIRING ISSUES (CONTINUED)
- Press and hold the Start button and right bumper for 10 seconds to turn robot off. The robot will turn off and revert to factory settings (and original software install)
- Press the Start button once more to turn the robot on. The LED will be slow blinking blue showing that the robot is now in pairing mode.
- Follow steps in the Neato app to CONNECT YOUR ROBOT.
OPERATING THE ROBOT FROM MULTIPLE SMARTPHONES & TABLETS
The Neato app can be used by multiple devices in a household to operate the same robot. Just download the Neato app to other smartphones or tablets and sign in to the same My Neato account using the email and password used to setup the robot.
NOTE
Only 2.4GHz Wi-Fi networks are supported and will display in the list of available options during robot set-up.
WEP EAP is not supported at this time.
The FCC requires all wireless devices in the US to operate on wireless spectrum channels 1-11.
If you are still having issues connecting your robot, certain Wi-Fi router firewall and port settings can prevent a connection with the Neato servers.
Please reference troubleshooting information at www.NeatoRobotics.com/support.
CONNECTING YOUR ROBOT TO ADDITIONAL NETWORKS
If you would like to add additional networks, see instructions on the Neato website support center at www.neatorobotics.com/support.
Using Your Robot With the Neato App
HOUSE CLEANING
Selecting House Cleaning sets your Neato robot to clean the entire floor on one level automatically moving from room to room.
From the app you can Start, Pause, Resume, Stop, and Return to Start/Base.
Note: When canceled mid-cleaning, your robot will stop in place. You can ask your robot to return to its base station using the Neato app. If the robot has detected the base, it will attempt to return to base and dock.
SPOT CLEANING
Selecting Clean Spot sets your Neato robot to clean a 7× 7^ area and you can also select 2-pass cleaning (available only on specific models).
Place your robot centered and facing the area to be cleaned.
SCHEDULING YOUR NEATO ROBOT
Set up a schedule for regular vacuuming. You can set your preferences based on cleaning days and times.
NOTE If you are going away, you can turn OFF Enable Schedule to put the schedule on hold.
PUSH NOTIFICATIONS
By turning on push notifications in the app, your robot can notify you about its status. Your phone/tablet will display messages such as cleaning complete, alerts, etc.
ROBOT SOFTWARE UPDATES
Keep the software on your robot current. You can initiate a robot software update using the Neato app. Or, you can manually update the software directly on your robot.
SMART WATCH CAPABLE
If you have an Apple Watch or Android Wear smart watch, you can access some features on your watch such as start, stop, and receiving notifications. Your watch needs to be in the vicinity of your smartphone for these features to be accessible. After you have paired your smart watch with your smartphone, go to the watch app on your smartphone and turn access on to the Neato app to view features on your watch.
TROUBLESHOOTING YOUR DEVICE
When an error occurs during operation of the robot, you can click the error link in the Neato app to see what it means and what to do.
For additional information on troubleshooting your device, please see Help in the app.
Using Your Neato Robot Without the Neato App
HOUsE CLEANING
You can initiate House Cleaning by pressing the Start Button once. Your Neato robot will clean the entire floor on one level automatically moving from room to room.

Initiate House Cleaning by pressing the Start Button I time.
SPOT CLEANING
You can initiate Spot Cleaning by pressing the Start Button twice. During Spot Cleaning, if you press the Start Button, the robot will pause. If you press it again, it will resume. To cancel the Spot Cleaning, press the Start Button and hold it down for 5 seconds.
Place your robot centered and facing the area to be cleaned.
FEATURES ONLY AVAILABLE VIA THE NEATO APP
Some features are only available if you connect your robot to the Neato app on your smartphone or tablet. These features include scheduling, push notifications, context sensitive help, and cleaning statistics (specific models only).
INFOLED

| ACTION INFO LED | i | |
| Start Cleaning Press Start Button 1x for house cleaning Solid BluePress Start Button 2x for spot cleaning Solid White | ||
| Pause/Resume Cleaning | Press Start Button during cleaning to pause robot. Press Start Button again to resume cleaning. | LED pulses during pause |
| Cancel Cleaning | Press & hold Start Button for 5 seconds | Robot & LEDs turn off & robot plays a tone. |
NOTE: If the INFO LED light is blinding red or sold red, your robot needs robot maintenance or your robot has a navigation issue. Please check the troubleshooting section of this guide.
BATTERY LED

| ROBOT IS: LED COLOR WHAT IT MEANS | ||
| Cleaning | Solid Green | Battery level is normal |
| Solid Amber | Battery level is low. Battery must be charged before a new cleaning can be started | |
| Charging | Pulsing Green | Battery is charging and robot can start cleaning |
| Pulsing Amber | Robot is fast-charging the battery and must complete before cleaning can start | |
- If Blinking Red, please check the troubleshooting section of this guide.
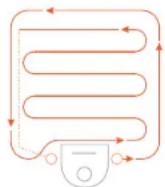
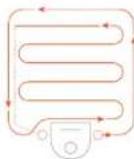
How Neato Works
HOUSE CLEANING
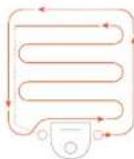
In normal operation, Neato comes off of its base, explores its surroundings and starts cleaning. It starts cleaning in sections approximately 15^ × 15^ depending on layout and furniture in the room. It will continue to clean section by section until the entire area is cleaned.
Your Neato robot will also try to clean one room fully before moving on to the next, assuming it can detect your doorways. If it cleans a partial room, your Neato robot will come back to finish the room before finishing the complete job.
AUTO CHARGE AND RESUME
If the area the Neato robot is attempting to clean is very large, the robot will return to its base mid-cleaning to recharge. Once recharged, it will return to finish where it left off. A complete cleaning cycle includes 3 cleanings and 2 recharges so that Neato can clean very large areas on one level.
SINGLE ROOM CLEANING
If you just want to clean a single room, you can manually place your robot in the room, press the start button, and close the door. Your Neato robot will clean the room, and return to where you originally placed it in the room. When the robot has finished cleaning, please put the robot back on its charge base.
RETURNING TO BASE
For best results, we recommend you start your robot from its charge base. When started from its charge base, it has a better result in returning to base when it is complete.
MOVING A ROBOT MID-CLEANING
It is not recommended to pick up your robot and move it mid-cleaning. It can become disoriented, not follow its normal smart behavior, and have difficulty finding its charge base. If you pick up your robot, put it back down within 1 foot of where you picked it up for best results.
Maintaining Your Neato Robot
IMPORTANT
Your robot needs regular maintenance to operate reliably. This means checking/ cleaning the brushes and emptying the dirt bin after every use or as needed, depending on your environment. Failure to do this may cause problems with your robot and impact your robot's performance and void your warranty coverage.
DIRT BIN AND FILTERS
After each use, empty the dirt bin, clean the airways/openings and filter. To remove the filter, pinch the handle and pull out.
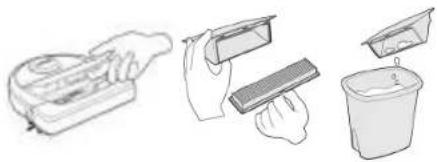
Use the cleaning tool comb to clean the filter.
Replace the filter every 1 to 2 months or more frequently as needed.
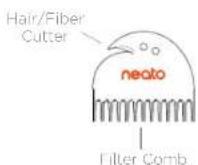
BRUSHES
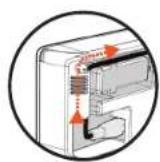
If your robot has a side brush, remove the side brush and set aside. Then, remove the brush guard by pulling up on both sides.
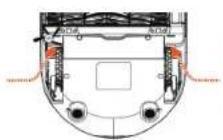
PULL UP ON BOTH SIDES SIMULTANEOUSLY
Use the hair/fiber blade to cut and remove hair from the brush. Remove any debris from the brush ends and inside the brush cavity where the brush sits. Re-insert the brush and replace the brush guard.
ROBOTTOP
Clean the top of the robot and the area around the laser top with a soft cotton cloth.
SENSORS
Use a dry cotton swab wall to clean the sensor two drop sensor windows on the bottom of the robot.
NOTE
View the Neato How-To videos online at www.NeatoRobotics.com/support to see how to maintain your robot.
More Info
ACCESSIONS
You can find information about accessories and replacement parts for your Neato robot at NeatoRobotics.com.
Always purchase Neato Genuine accessories and parts:
Batteries
- Filters
Brushes
- Boundary Markers
- Cleaning Tool
- Dirt Bin
- Charge Base
Using unauthorized or 3rd party accessories (non-Neato Genuine) can damage your robot and will void your warranty.
Recommended replacement schedule depends on use.
- Filters - every 1 to 2 months
- Batteries - every 12 to 18 months
REGISTER YOUR NEATO
Even if you are not using the Neato app, you can stay up to date on software releases and special offers by registering your robot. Go to NeatoRobotics.com/My-Neato to create an account and register your Neato robot.
GETTING HELP
Find more helpful information, including how-to videos, frequently asked questions, and tips & tricks for optimal operation.
Go to:
NeatoRobotics.com/Support
YouTube.com/NeatoRobotics
WARRANTY
Neato Robotics, Inc. warrants to the original purchaser that the Neato Robotics hardware product, excluding batteries, shall be free from defects in material and workmanship for 1 year from the original date of purchase.
In the case of batteries, a Warranty Period of six (6) months applies.
See complete Warranty terms at NeatoRobotics.com/Limited-Warranty. All warranties beyond those expressly stated are disclaimed to the maximum extent permissible by applicable law.
IMPORTANT INFORMATION
See separate document included with your Neato robot.
Troubleshooting

Battery LED What it means
What to do
| Blinking Red | The robot battery has experienced an error. | Please contact Customer Care. For local contact information: www.NeatoRobotics.com/Contact-Us |

Info LED What it means
What to do
| Blinking Red Your robot needs to be cleaned to operate at best performance. | Follow these steps to make sure your robot is well-maintained before running it again: 1 - Ensure that both the filter and dirt bin are clean and properly inserted. 2 - Make sure the dirt bin is in the robot and properly seated in position. The top of the dirt bin should be level with the top of the robot if inserted correctly. 3 - Make sure the brush and end caps are clear of debris and remove any hair or debris that is wrapped around it. 4 - Make sure wheel wells aren't blocked with debris Press the Start Button to start the robot. If it still has issues, follow the next 2 steps: 5 - Using a dry cotton swab, please spin the laser housing under the laser cover 5 times in each direction being careful to avoid the openings in the housing. 6 - Use a dry cotton swab to clean the two drop sensor windows on the bottom of the robot. Press the Start Button to start the robot. 7 - Press and hold the Start Button for 10 seconds to reset your robot. All of the lights on the robot will turn off. Press the Start Button to turn the robot back on. Go to the support center to watch how-to videos on these maintenance items. |
Troubleshooting (continued)
i Info LED What it means
What to do
| Solid Red | The Neato robot is having difficulty navigating the environment. Possible reasons for this: • The laser is blocked. • It is having difficulty navigating the floor. • The sensors are dirty or not working properly. • The wheels or brush are dirty. | Follow these steps to troubleshoot. Make sure: 1 - Nothing in the environment has changed since the robot started cleaning (e.g., furniture moved, robot moved to different room) 2 - Wheel wells aren't blocked with debris. 3 - The battery is charged. 4 - If the robot still has issues, reset the robot by pressing and holding the button for 10 seconds. The robot will turn off. Press the Start Button to turn it back on. Try running the robot again. Press the button to start the robot. If it still has issues, 5 - Make sure the robot's laser freely rotates: Use a dry cotton swab to rotate the laser 5 times to the left and 5 times to the right, making sure NOT to put the cotton swab in either hole. 6 - Using compressed air, use short bursts of compressed air about 6" away. Let the robot fully charge. Try running the robot again. If issue persists, click on Chat icon for assistance at www.NeatoRobotics.com/support, or visit our Customer Care contact page for more options. |
Neato app robot status What it means
What to do
| "Robot Offline" message in the Neato app | The robot has disconnected from its Wi-Fi connection - OR - your phone/tablet is not connected to a 3G or 4G service. | Check or try the following items in the order provided. 1 - Make sure your phone/tablet is connected to 3G or 4G service. If your phone is not connected, your Neato app will say your robot is OFFLINE. 2 - Reset your Neato robot by taking it off of its base, press and hold the start button for 10 seconds to turn it off, and then press Start button one more time to turn it on. Wait a few minutes and then check the Neato app to see if it now says READY TO CLEAN. 3 - If #1 or #2 do not fix the issue: Delete your robot from the Neato app and go through the steps to Connect your Robot again. It should then say READY TO CLEAN. |
If issue persists, please contact Neato Customer Care www.NeatoRobotics.com/support
NOTE Context Sensitive help is also provided in the Neato app to help you troubleshoot items. Go to www.NeatoRobotics.com/support for more troubleshooting tips.
You and Your Neato Robot
Congratulations on your new Neato robot. You will soon experience the joy of having clean floors without ever pushing a vacuum.
Observe your robot during the first few cleaning runs. You may find that a few small adjustments in your home (moving a chair or lamp a few inches, picking up cords) will make a big difference in your experience /results.
Help your robot and your robot will help you.
MISES A JOUR DU LOGICIEL DU ROBOT
NeatoRobotics.com/Support
YouTube.com/NeatoRobotics
GARANTIE
COMPATIBLE CON SUSTWATCH
COMPATIBLE CON SMART WATCH
NeatoRobotics.com/Support
YouTube.com/NeatoRobotics
GARANZIA
visitare www.NeatoRobotics.com/support.
II robot Neato
NeatoRobotics.com/Support
YouTube.com/NeatoRobotics
GARANTIE
PRODUKTINFORMATIONEN
NeatoRobotics.com/Support
YouTube.com/NeatoRobotics
GARANTIE
PARRINGSPROBLEM (FORTSAT)
Tryk og hold Start knappen og hajre kofanger i 10 sekunder for at slukke robotten. Roboten slukker og vender tilbage til fabriksindstilling (og original software-installatio
Tryk pa startknappenigen for at taende robototten. LED 1 langsomt blinkende blat viser at robototten nu er i parringsfungtion.
Folg instruktionerne pa Neato appor for PARRING AF DIN ROBOT.
BETJENING AF ROBOT FRA FLERE SMARTPHONES OG TABLETS
Start restringed trykpa startknappen 1 going
ROBOTFUNKTION
Du kan starte pletrensing ved at trykke pa startknappen to gange. Under pletrensing vil robotten g i pause hvis du trykker pa startknappen Den vil genoptage hvis du trykker igen. For at annullere pletrenseningen trykkes pa startknappen og den holds i 5 sekunder.
Anbring clin robot centreret og vendit mod amrader der skal rengpores.
FUNKTIONER KUN TILGA/ENGELIGE VIA NEATO APP
Visse functiorer er kun tilgaengelige hvis du har tilsluttet din robot til Neato app pa din smartphone ellert tablet. Disse functiorer inkluderer push meddeleser, kontekstfalsom hjaelp og rengoringsstistik (kun specifikke modeller).
INFOLED

| HANDLING INFO LED | i | |
| Start rengöring | Tryk Start knap 1x for fuld rengöring Fast blåTryk Start knap 2x for pletrensning Fast hvid | |
| Pause/ genoptage støvsugning | Tryk Start knap under støvsugning for at pause robotten. LED blinker under pauseTryk Start knap igen for at genoptage støvsugningen. | |
| Slet rengöring | Tryk og hold Start knappen i 5 sekunder Robot og LEDs slukkerog robotten afgiver et lydsignal. |
BEMARK: HwS NFO LED slncer rodr eller lyser fest red, har din robot drug for vedyighde se erer din robot her et navigationsproblem. Se vengist feij findingsaf smite. Idenne guide.
BATTERI LED

NeatoRobotics.com/Support
YouTube.com/NeatoRobotics
GARANTI
Neato Robotics, Inc. garanter over for den oprindelige kober ("du"/"dig" erler "din"/"dil"/"dine"), at Neato Robotics-hardwareproduktet ("produktet), eksklusive batterier, er fri for materialeog productionsfj i op til et (1) ar fra den oprindelige kobsdato.
Der er seks (6) maneders garanti pa batterierne.
Fejlfinding (fortsat)
NeatoRobotics.com/Support
YouTube.com/NeatoRobotics
GARANTI
INFO-LED-LAMPA anvands for:

Wi-Fi-ansluttingens status
Rengoringsstatus
Felsituationer
BATTERI-LED-LAMPA anvands for att visa:

Laddningstillstand
- Batteriferel
OBS: Information on LED-lamp for beskriys scenario handbook.
Krav, Visssa Neato-funktioner kräver Wi-Fi, an surfolatta aller telecom den iOS erwerf Andro Roh ach ents gratis Neato-konto.
PROBLEM MED SAMMANKOPPLING
PROBLEM MED SAMMANKOPPLING (FORTSÄTTNING)
NeatoRobotics.com/Support
YouTube.com/NeatoRobotics
GARANTI
TOIMINNAN MERKKIVALO
VAIN NEATO-SOVELLUKSELLA KAYTETTAVAT TOIMINNOT
TOIMINNAN MERKKIVALO
NeatoRobotics.com/Support
YouTube.com/NeatoRobotics
TAKUU
Neato Robotics, Inc. 8100 Jarvis Avenue Newark, CA 94560 U NeatoRobotics.com
P/N 515-0046 Rev.1