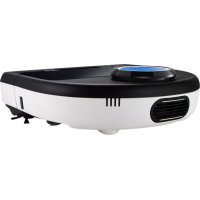
Botvac D4 Connected - Vacuum Cleaner Neato Robotics - Free user manual and instructions
Find the device manual for free Botvac D4 Connected Neato Robotics in PDF.

| Technical Specifications | Connected robot vacuum, LaserSmart navigation technology, suction power of 2000 Pa, compatible with voice assistants. |
|---|---|
| Dimensions and Weight | Dimensions: 32.5 x 32.5 x 10 cm; Weight: 2.7 kg. |
| Dustbin Capacity | 0.7 L dustbin. |
| Battery Life | 75 minutes of runtime per charge. |
| Charging Time | Charging time of about 2 hours. |
| Usage | Control via mobile app, cleaning scheduling, room mapping. |
| Maintenance | Filters and brushes to be replaced every 6 months, regular sensor cleaning. |
| Safety | Obstacle detection system, fall protection. |
| General Information | 2-year warranty, customer service available, compatible with hard floors and carpets. |
Frequently Asked Questions - Botvac D4 Connected Neato Robotics
User questions about Botvac D4 Connected Neato Robotics
0 question about this device. Answer the ones you know or ask your own.
Ask a new question about this device
Download the instructions for your Vacuum Cleaner in PDF format for free! Find your manual Botvac D4 Connected - Neato Robotics and take your electronic device back in hand. On this page are published all the documents necessary for the use of your device. Botvac D4 Connected by Neato Robotics.
USER MANUAL Botvac D4 Connected Neato Robotics
Connecting Your Robot
1 BEFORE BEGINNING
To operate correctly, remove all protective films and shipping material from the robot and charge base.
Have your smartphone / tablet available.
You will need your wifi network name and password.
TIP:Locate your router in a central location where it can deliver a strong signal throughout the house.
2 SET UP CHARGE BASE
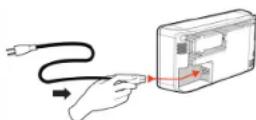
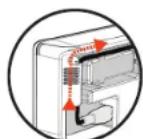
Plug the power cord securely into the charge base.
Adjust the length of the cord by wrapping it as shown.
Choose a wall outlet that has a 3^ (1 m) clearance on both sides and in front of the charge base. This helps your robot find the charge base.
Plug in the power cord and push the charge base against the wall.
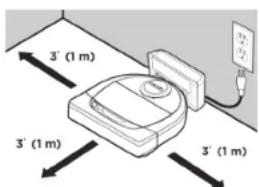
TIP:Locate the charge base on a hard floor surface.
TIP: Make sure the power outlet is not controlled by a switch.
3 INITIAL ROBOT CHARGING
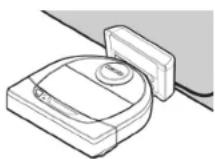
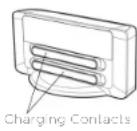
Place the rounded side of your Neato robot against the metal charging contacts on the charge base until the contacts are pushed all of the way in.
For best results, charge the robot fully before your first cleaning cycle.
NOTE: During bootup, the robot LEDs next to the Start Button will alternately blink blue. You will need to wait for an audible tone before performing additional functions.
NOTE: Your robot is only compatible with the included charge base.
4 ACCESSING THE NEATO APP


Download the Neato app on your smartphone / tablet
- Open the Neato app and create a Neato account
TIP: If you have an existing Neato account, you can just sign in
- Upon setting up your account, you will be sent a verification email. You must go to your email and verify it before proceeding to the next step.
Sign in to the Neato app - Follow steps in the Neato app to CONNECT YOUR ROBOT
TIP: Your robot is in pairing mode for the first 60 minutes after you turn on your robot for the first time.
Troubleshooting Pairing Issues Start Using Your Robot
If you are not able to connect your robot, you may need to restart the pairing mode. Follow these steps:
Press and hold the Start Button and Right Side Bumper for 10 seconds to turn robot off.
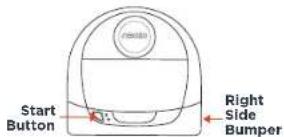
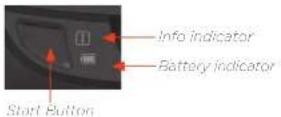
- Press the Start Button again to turn robot on. The Info indicator will be slow blinking blue showing the robot is in pairing mode.
- Follow steps in the Neato app to CONNECT YOUR ROBOT.

During pairing the Info indicator will change based on the connection status:
| INDICATOR COLOR WHAT IT MEANS |
| Very Slow Blinking Blue Robot is in Pairing Mode |
| Fast Blinking Blue Pairing to Neato app/account |
| Solid Blue Pairing successful (shows for 5 seconds) |
| Solid Red Pairing unsuccessful (shows for 5 seconds) |
NOTE: If you've already paired, Fest Blinking Blue means the robot has lost connection. The robot could be cut out of range, your Wi-Fi network may be down, or another Wi-Fi issue may have occurred. If out of range, the robot will automatically reconnect when it comes back within range. Otherwise, check your router to make sure it's operating normally.
Use the Neato app to start using your robot, or press the Start Button on the robot.
TIP: Before the robot starts to vacuum, pick up items that could become tangled, such as cables, socks, and shoelaces. Tuck fringes under rugs
| ACTION INFO INDICATOR | ||
| Start Cleaning | Press start button one time for a full house cleaning | Solid Blue |
| Press start button two times for a spot cleaning Solid White | ||
| Pause/Resume Cleaning | Press Start Button during cleaning to pause robot. | It will blink |
| Press Start Button again to resume cleaning. | It will blink | |
| Cancel Cleaning | Press & hold Start Button for 5 seconds Robot and lights turn off and robot plays a tone. | |
NOTE: Spot cleanings lots you obtain a small 7 foot by 7 foot area.

Place your robot centered and facing the error to be cleaned.
NOTE: If the rights are blinking red or are solid red, your robot may need maintenance. Please refer to the online user guide or call the customer service number.
FloorPlanner" with No-Go Lines
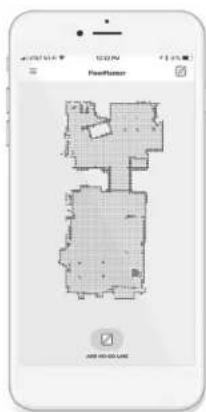
Use the Neato app and the FloorPlanner map of your home to set up virtual boundaries called No-Go Lines so you can tell the robot where not to go.
To set up virtual No-Go Lines, please be sure that the Neato App is installed on your selected device, then follow the next steps:

Launch the Neato App and tap the "Tri-Bar" symbol in the left upper corner.
Select the "MY FLOOR PLAN" option.

MY FLOOR PLAN Edit floor plan
Tap the "Get Started" button and follow the instructions to allow the robot to do a special cleaning run to create a floor map.

Once the cleaning is complete, you'll be notified that the robot has created your new floor plan. Give the new floor plan a name and save.
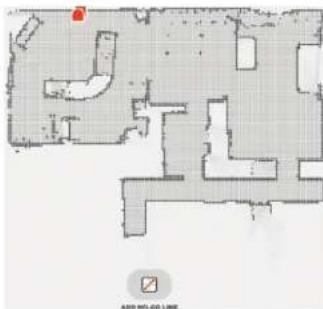
Tap the "ADD NO-GO LINE" icon and draw your boundary line directly on the map.
Continue tapping the "ADD NO-GO LINE" button to create multiple boundary lines.
TIP: Draw No-Go Lines more accurately by zooming into the floor plan. Double tap or use the pinch gesture to zoom. Ensure there are no gaps in the boundaries created with the No-Go Lines.


When finished setting your boundaries, tap the "Save" icon to store your floor plan with virtual No-Go Lines added
No-Go Lines Seven
To clean with No-Go lines, only use the app to start your robot.
DK
A confirmation prompt will appear, letting you know that "No-Go" lines have been saved.
Once saved, your new floor plan with virtual No-Go Lines will become your default map, and be utilized for future cleaning events.
NOTE: Botvac D4 can only store one floor plan at a time and accompanying virtual No-Go Lines.
NOTE: Botvac D6 can store more than one floor plan and accompanying virtual No-Go Lines. To clean with No-Go Lines, the robot must be started from a charge base on each floor. It is recommended to have additional charge bases (sold separately) for each floor plan.
Cleaning with No-Go Lines
To clean with No-Go Lines enabled, the robot must start from the charge base and the cleaning must be initiated from the Neato app. Press the Start button on the app, or schedule a cleaning on the app.
NOTE:
After each cleaning, tap the to see a Cleaning Summary which shows where the robot has cleaned on the coverage map.
- To use No-Go Lines, the charge base must stay in the original location where the floor plan was created.
- If cleaning is initiated using the Start button on the robot, Amazon Alexa, Google Home, Chatbots, or IFTTT, it will not adhere to the No-Go Lines boundaries.
Accessories
You can find information about accessories and replacement parts for your Neato robot at NeatoRobotics.com.
Always purchase Neato Genuine accessories and parts:
- Batteries
- Filters
Brushes - Boundary Markers
- Cleaning Tool
- Dirt Bin
- Charge Base
Using unauthorized or 3rd party accessories (non-Neato Genuine) can damage your robot and will void your warranty.
Recommended replacement schedule depends on use.
- Filters - every 1 to 2 months
- Batteries - every 12 to 18 months
Need Assistance?
User guide can be found at www.NeatoRobotics.com/UG
Watch How-To Video here www.NeatoRobotics.com/support
Go to www.NeatoRobotics.com/support
for a contact phone number in your area
Email CustomerCare@NeatoRobotics.com
Favours variant: robot arm centre, and face a zoon at netting.
www.NeatoRobotics.com/UG
Cultivated is a robust and versatile species in diverse populations.
www.NeatoRobotics.com/support.
Fluctuate the motif in his badmokers en percent ce t'heir génétique dont? dont weren't grommatik.
MY FLOOR PLAN Edit floor plan
MY FLOOR PLAN Edit floor plan
www.NeatoRobotics.com/UG
Se Sadan-ger-du Videoen her
www.NeatoRobotics.com/support
Gà til www.NeatoRobotics.com/support
hvör du kan &, et Telefonnummer du kan, ringe til i dit oráme.
E-mail CustomerCare@NeatoRobotics.com
Tilkobling av robot
1 FORDU BEGYNNER
MY FLOOR PLAN Edit floor plan
E-post CustomerCare@NeatoRobotics.com
MY FLOOR PLAN Edit floor plan
LED-LAMPANS FARG.VAD DET BETYDER
www.NeatoRobotics.com/UG
Titta paa instruktionsvideo har www.NeatoRobotics.com/support
Besok www.NeatoRobotics.com/support
forettkontakttelefonnummeridittomrade.
E-post CustomerCare@NeatoRobotics.com

Neato Robotics, Inc.
8100 Jarvis Avenue, Newark, CA 94560 USA
NeatoRobotics.com
515-0064 Rev1