EM 26 - Pain therapy device BEURER - Free user manual and instructions
Find the device manual for free EM 26 BEURER in PDF.

| Product Type | TENS device for shoulders (transcutaneous electrical nerve stimulation) |
| Brand | Beurer |
| Model | EM 26 |
| Programs | 4 programs (A, B, C, D) with Acupuncture, Burst, Conventional modes |
| Intensity Levels | 20 adjustable levels |
| Output Frequency | 2 – 110 Hz |
| Pulse Duration | 60 to 220 µs per phase |
| Max Output Voltage | 50 Vpp / 5.5 V rms |
| Max Output Current | 100 mA pp / 11 mA rms |
| Power Supply | 3 AAA 1.5 V batteries (LR03) |
| Weight (unit only) | approx. 90 g with batteries |
| Weight (full set) | approx. 165 g with batteries |
| Max Body Circumference | up to 120 cm |
| Electrode Size | approx. 87 cm² |
| Integrated Timer | Yes (duration according to program: 25 or 30 min) |
| Key Lock | Yes (P button) |
| Contact Detection | Yes, intensity automatically reduced if no contact |
| Pause Function | Yes (On/Off button) |
| Cleaning | Unit: soft damp cloth; cuff: lukewarm soapy water |
| Warranty | 5 years |
| Package Contents | Control unit, shoulder cuff, strap, connection cable, 2 electrode covers, 3 AAA batteries, instructions |
Frequently Asked Questions - EM 26 BEURER
User questions about EM 26 BEURER
0 question about this device. Answer the ones you know or ask your own.
Ask a new question about this device
Download the instructions for your Pain therapy device in PDF format for free! Find your manual EM 26 - BEURER and take your electronic device back in hand. On this page are published all the documents necessary for the use of your device. EM 26 by BEURER.
USER MANUAL EM 26 BEURER
natural_image
Product photo of a black and gray fitness tracker with a small device attached (no visible text or symbols)CE 0483
EN Shoulder TENS Instructions for use....21
natural_image
Illustration of a medical device with a cap and cable (no text or symbols visible)i Hinweis
natural_image
Illustration of a person wearing a high-visibility vest and belt, arms crossed (no text or symbols)
natural_image
Illustration of a smart device with sensors and connectivity icons (no text or symbols)Batteriewechsel
Read these instructions for use carefully and keep them for later use, be sure to make them accessible to other users and observe the information they contain.
Contents
- Getting to know your device ....21
- Signs and symbols....22
- Important notes....23
- Device description.....28
- Initial use ....28
- Operation....30
Included in delivery
Check that the device packaging has not been tampered with and make sure that all contents are present. Before use, ensure that there is no visible damage to the device or accessories and that all packaging material has been removed. If you have any doubts, do not use the device and contact your retailer or the specified Customer Services address.
- 1x shoulder cuff
- 1x belt
-
1x control unit
-
Cleaning and storage ....33
- Disposal....33
- Troubleshooting....34
- Technical specifications ....35
-
Warranty/service....36
-
1x connection cable
- Batteries, 3 x 1.5 V AAA (LR03, Micro)
• 2x self-adhesive electrode covers
• These instructions for use
1. Getting to know your device Dear customer,
Thank you for choosing a product from our range. Our name stands for high-quality, thoroughly tested products for applications in the areas of heat, weight, blood pres-
sure, body temperature, pulse, gentle therapy, massage and air.
With kind regards,
Your Beurer team
Pain relief with the EM 26 stimulation device How does electrical muscle stimulation work?
The TENS device works on the basis of electrical nerve stimulation (TENS). TENS, or transcutaneous electrical nerve stimulation, relates to the electrical stimulation of the nerves through the skin. TENS is an effective non-pharmacological method of treating different types of pain that have a variety of causes. It has no side-effects if administered correctly. The method has been clinically tested and approved and can be used for simple self-treatment. The pain-relieving or pain-suppressing effect is achieved by inhibiting the transfer of pain to nerve fibres (caused mainly by high-frequency pulses) and by increasing the secretion of endorphins in the body. Their effect on the central nervous system reduces the sensation of pain. This method is clinically tested and approved. Any symptoms that could be relieved using TENS must be checked by your GP. Your GP will also give you instructions on how to carry out a TENS self-treatment regime.
2. Signs and symbols
The following symbols appear in these instructions for use.
 | Warning | Warning notice indicating a risk of injury or damage to health. |
 | Important | Safety note indicating possible damage to the device/accessory. |
 | Note Note on important information. | |
 | The device may not be used by people with medical implants (e.g. pacemakers), as this may affect their functionality. | |
The following symbols are used on the type plate.
 | Application part, type BF |
 | Observe the instructions for use |
 | The device can emit effective output values above 10 mA, averaged over every 5-second interval. |
 | Manufacturer |
 | Protect from moisture |
| SN | Serial number |
 0483 0483 | The CE labelling certifies that the product complies with the essential requirements of Directive 93/42/EEC on medical devices. |
 | Disposal in accordance with the Waste Electrical and Electronic Equipment EC Directive – WEEE |
Storage / Transport | Permissible storage and transport temperature and humidity |
Operating | Permissible operating temperature and humidity |
 | Certification symbol for products that are exported to the Russian Federation and CIS countries |
  PAP PAP | Dispose of packaging in an environmentally friendly manner |
3. Important notes
Safety notes

Warning
- Only use the shoulder TENS:
-on humans, - externally,
- for the intended purpose and as specified in these instructions for use.
- Any form of improper use can be dangerous.
- In the event of an acute emergency, the provision of first aid has top priority.
- This device is not intended for commercial or clinical use; it is designed exclusively for self-treatment in a private home.
- The device is suitable for use in all environments listed in these instructions for use, including domestic environments.
- Before use, ensure that there is no visible damage to the device or accessories. If you have any doubts, do not use the device and contact your retailer or the specified Customer Services address.
- If you have health concerns of any kind, consult your GP!
- The shoulder TENS is to only be used externally on human shoulders. Using the device on other parts of the body can lead to serious health problems.
- Slight reddening of the skin after use is normal and will subside after a short period.
Do not use the device again until the reddening has disappeared.
- If the skin becomes irritated over longer treatment times, select a shorter application time instead.
- If more serious skin irritation occurs, stop the treatment and seek medical assistance.
- This device is not intended for use by children or people with restricted physical, sensory (e.g. reduced sensitivity to pain) or mental skills or a lack of experience and/or a lack of knowledge, unless they are supervised by a person who is responsible for their safety or are instructed by such a person on how to use the device.
- Keep packaging material away from children (risk of suffocation!).
- Do not use any additional parts that are not recommended by the manufacturer.
- Do not move the cuff or put it on if the control unit is switched on.
- Only connect the connection cable for the electrode plug to the intended control unit and the cuff that is included.
- Do not pull on the connection cables during treatment.
- Do not bend or pull on the end of the connection cable.
- Do not wear any electronic devices, such as watches, while using the device.
Precautions

Warning
- During the initial few minutes, use the device while sitting or lying down to minimise the risk of injuries as a result of isolated cases of vagal responses (feeling of faintness). If you feel faint, switch off the device immediately, lie down and support the legs in an elevated position (approx. 5 – 10 min).
- The treatment should be comfortable. If the device does not work properly, or you feel unwell or experience pain, stop using it immediately.
- Only remove the cuff once the device has been switched off.
- Do not use the device near ( 1 m) shortwave or microwave devices (such as mobile phones) as these may cause fluctuations in the output values of the device.
- The use of the device may be limited in the presence of electromagnetic disturbances. This could result in issues such as error messages or the failure of the display/device.
- Avoid using this device directly next to other devices or stacked on top of other devices, as this could lead to faulty operation. If, however, it is necessary to use the device in the manner stated, this device as well as the other devices must be monitored to ensure they are working properly.
- The use of accessories other than those specified or provided by the manufacturer of this device can lead to
an increase in electromagnetic emissions or a decrease in the device's electromagnetic immunity; this can result in faulty operation.
- Failure to comply with the above can impair the performance of the device.
- Never immerse the device in water or other liquids.
- Do not use in the vicinity of highly flammable substances, gases or explosives.
- Never place the belt around your neck. There is a risk of strangulation.
Notes on the electrodes

Important
- The electrodes must not be attached to areas of broken skin.
- Max. recommended output value for electrodes is 5mA/cm^2 .
- Effective current densities over 2 mA/ cm ^2 require increased attentiveness from the user.

Warning
To avoid damage to health, we strongly advise against using the device in the following situations:
- Do not use the device if you have a pacemaker or other implants, such as an insulin pump or metal implants.
- If you have a high temperature (e.g. >39^ ).

- If you have a known or acute cardiac arrhythmia (arrhythmia), or disorders of the heart's impulse and conduction system.
- If you suffer from a seizure disorder (e.g. epilepsy).
- If you are pregnant.
- If you have cancer.
- After an operation, if strong muscle contractions could affect the healing process.
- On acutely or chronically affected (injured or irritated) skin, e.g. inflamed skin, whether painful or not, or reddened skin.
- On rashes (e.g. allergies), burns, bruises, swellings, as well as open and healing wounds.
- On surgical scars that are still healing.
- If you are connected to a high-frequency surgical device. This may lead to burns under the electrical muscle stimulation areas.
- When under the influence of pain-relieving medication, alcohol or sleeping tablets.
- While undertaking any activity where an unexpected reaction (e.g. strong muscle contractions even at low intensity) could be dangerous, e.g. while driving or operating/driving machinery.
- On a sleeping person.
- Do not use the device whilst using other devices that transmit electrical impulses to your body.
- The device is suitable for self-treatment.
-
For hygiene reasons, the cuff may only be used on one person.
-
Ensure that no metallic objects come into contact with the electrodes during stimulation. Failure to do so could result in spot burns.
- In the case of acute or chronic diseases of the gastrointestinal tract.
• In the case of metallic implants. - If you use an insulin pump.
- In areas with high humidity such as in the bathroom or when bathing or showering.
The electrodes must not be used:
- In the head area: this can trigger seizures.
- In the neck/carotid artery area: this can cause a cardiac arrest.
- In the throat and larynx area: this can trigger muscular cramps, which may cause suffocation.
- In the ribcage area: this can increase the risk of ventricular fibrillation and induce cardiac arrest.
Consult your GP before use:
- If you suffer from a serious illness, in particular if you suspect or have been diagnosed with a blood coagulation disorder, propensity to thromboembolic conditions or recurrent malignant growths.
- If you suffer from diabetes or other health conditions.
- If you have unexplained chronic pain in any part of the body.
-
If you have any sensory impairment that reduces the feeling of pain (e.g. metabolic disorders).
-
If you are receiving medical treatment.
- In the event of complaints linked to stimulation treatment.
- If you suffer from persistently irritated skin under the electrodes.

Warning
The device is not a substitute for medical consultation and treatment. Consult your doctor first if you are experiencing any pain or are suffering from an illness.
Prior to initial use

Important
- Remove all packaging material before using the device.
- Switch the device off immediately if it is faulty or not working properly.
- Never put the shoulder cuff on if it has bare metal electrodes. Using the shoulder cuff without electrode covers can cause injury.
- If the self-adhesive covers for the electrode connection are missing or become detached, we strongly recommend affixing the enclosed electrode covers.

Important
- The manufacturer is not liable for damage resulting from improper or incorrect use.
- Protect the device from dust, dirt and humidity.
- If the device has been dropped or exposed to high levels of humidity or has suffered any other damage, it must no longer be used. The device must not be exposed to high temperatures or direct sunlight.
- Under no circumstances should you open or repair the device yourself, as faultless functionality can no longer be guaranteed thereafter. Failure to comply with this instruction will void the warranty.
- For repairs, please contact Customer Services or an authorised retailer.

Notes on handling batteries
- If your skin or eyes come into contact with battery fluid, rinse the affected areas with water and seek medical assistance.
- Choking hazard! Small children may swallow and choke on batteries. Store batteries out of the reach of small children.
- Observe the plus (+) and minus (-) polarity signs.
- If a battery has leaked, put on protective gloves and clean the battery compartment with a dry cloth.
- Protect the batteries from excessive heat.
-
Risk of explosion! Do not throw batteries into a fire.
-
Do not charge or short-circuit batteries.
- If the device is not to be used for a relatively long period, take the batteries out of the battery compartment.
- Use identical or equivalent battery types only.
• Always replace all batteries at the same time. - Do not use rechargeable batteries!
- Do not disassemble, open or crush the batteries.
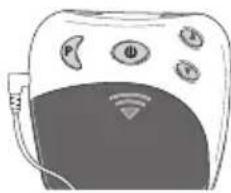
4. Device description Overview of the control unit
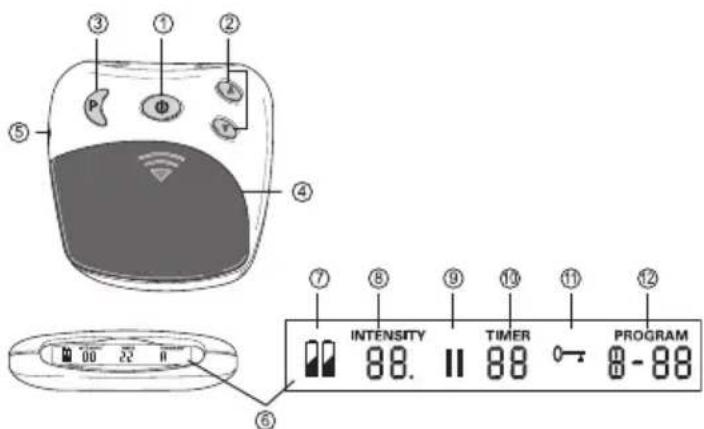
| No. Designation | |
| 1 On/Off/Pause button | |
| 2 Intensity setting▲ Increase▼ Decrease | |
| 3 Program/lock button | |
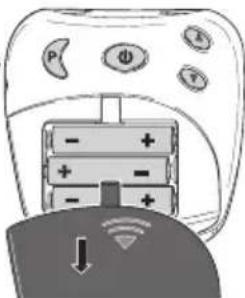
| 4 Battery compartment | |
| 5 Connector socket | |
| 6 Screen with LCD display |
| No. Designation | |
| 7 Battery status, appears when batteries are dead | |
| 8 Intensity, level 0 – 20 | |
| 9 Pause symbol, flashes when activated | |
| 10 TIMER: Remaining time in the active program in minutes | |
| 11 Button lock active | |
| 12 Active program |
5. Initial use
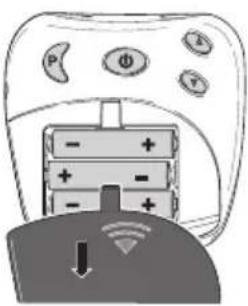
Inserting the batteries
Open the battery compartment [4] by pushing the cover in the area marked with an arrow and sliding downwards.
Insert the 3 alkaline AAA 1.5 V batteries. When inserting the batteries, ensure that the correct polarity is observed.
Then close the battery compartment lid until you hear and feel it click into place.
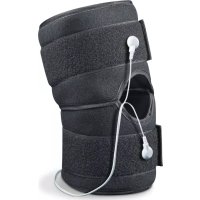
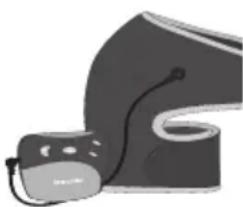
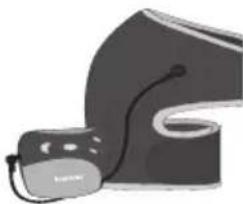
Connecting the connection cable and positioning the shoulder cuff
- Connect the connection cable to the metallic connection clips on the shoulder cuff.
natural_image
Illustration of a computer mouse with a cable, shown in grayscale (no text or symbols)
Note
Before positioning the shoulder cuff, first clean the body parts to be treated.
Before positioning the shoulder cuff, first moisten the water contact electrodes and the shoulder with water.

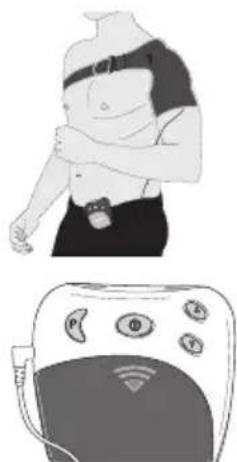
Note
The shoulder cuff can be used for both the left and right shoulder. Important: When putting the belt on, it must always first go round your back so that you can tighten the belt at the front.
-
To fit the cuff more easily, first of all fix the bottom end of the cuff using the hook-and-loop fastener provided, and slip your arm through the opening in the cuff. Then use your healthy arm to pull the cuff over your painful shoulder. You can tighten the hook-and-loop fastener later once you have closed the belt.
-
Now use your healthy arm to grab the belt behind your back, pull it to the front, and through the buckle provided on the shoulder cuff. After this you can fix the end of the belt directly to the belt itself using the hook-and-loop fastener.
-
If required, you can now fix the hook-and-loop fastener on your upper arm more firmly.
-
Fix the cuff in the desired position using the hook-and-loop fasteners. Ensure that the cuff is not too tight but that the water contact electrodes still have sufficient contact with the skin.
-
Insert the plug for the connection cable into the connector socket [5] on the control unit.
natural_image
Illustration of a person with an ECG device and a medical device (no text or symbols visible)
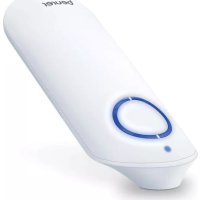
Replacing the battery
Please replace the batteries when the battery status symbol appears in the display [7].
- Open the battery compartment [4] by pushing the cover in the area marked with an arrow and sliding downwards.
natural_image
Diagram of a handheld device with battery and power indicators, showing a switch and download icon (no text or symbols)- 3 x 1.5 V batteries, type AAA (LR 03 Micro) should be inserted for operation. Ensure the polarity is correct. Observe the graphic in the battery compartment.
- Do not use rechargeable batteries.
6. Operation
General notes on use

Do not switch on the device until the cuff is correctly positioned. See chapter 5.
The shoulder TENS is intended for individual treatment of pain in the shoulder.
Switching on
Hold down the On/Off button [1] until a short signal sounds and the LCD display [6] switches on. When the device is
switched on for the first time, program A is automatically activated.
Selecting a program
The device provides 4 programs, each with 20 pulse intensities. You can find a detailed description in the following table:
| Prog. | Dura-tion | TENS mode | Fre-quency | Pulse length | Mode |
| A 30 min. | |||||
| 0-10 min. | Acu-punc-ture | 4 Hz 220 | μs Continu-ous | ||
| 10-20 min. | Burst 2 Hz | 110 Hz per pulse) | 220 μs Interrupt-ed | ||
| 20-30 min. | Con-ven-tional | 110 Hz 60 | μs Continu-ous | ||
| B 25 min. Acu- | punc-ture | 4 Hz 220 | μs Continu-ous | ||
| C 25 min. Burst 2 Hz | 110 Hz per pulse) | 220 μs Interrupt-ed | |||
| D 25 m | n. Con- | ven-tional | 110 Hz 60 | s Continuous | |
| Prog. | Description & treatment suggestions |
| A Treatment suggestions*: recurring acute shoulder pain, chronic shoulder pain.Combines the advantages of programs B, C & D. | |
| B Treatment suggestions*: chronic shoulder painDue to the low frequency, the intensity can be increased, leading to a deeper stimulation in conjunction with micro contractions of the muscles.In comparison to the other programs, has the strongest pain-relieving effect.Promotes the production of endorphins, which provide natural pain relief.Long-lasting pain relief. | |
| C Treatment suggestions*: chronic shoulder painBurst mode is an alternative to acupuncture mode. The stimulation is more pleasant.Promotes the production of endorphins, which provide natural pain relief.Long-lasting pain relief. | |
| Prog. | Description & treatment suggestions |
| D Treatment suggestions*: acute shoulder pain,acute flare-up of pain & preventionIt is perhaps best to start with this program.The pain relief is caused by the “gate control” theory. According to the gate control theory, a non-painful pulse closes the “gates” for painful pulses, meaning that the perception of pain is not forwarded to the central nervous system.The effect is felt relatively quickly, but the duration of the relief generally only lasts a few hours following treatment. | |
*Feeling and effect depend on the individual user: consult your doctor beforehand and try each program so that you are sure you are using the program that provides you with the best pain relief.

Note:
With program A, you will feel the effect become stronger when the program changes from phase 1 to phase 2 (after approx. 10 minutes). This is normal and intentional. If the intensity seems too high, you can lower it by simply pressing the intensity button ▼[2].

Note:
If the program is changed during stimulation (for example from A to B), the output intensity will increase
gradually in the new program until it reaches the intensity that was previously set. This can be stopped if required by pressing the intensity button ▼ [2] or by switching off the device by pressing and holding the On/Off button [1] for two seconds.
Stopping pulses that are too strong
You can lower the intensity at any time or turn the device off by pressing and holding the On/Off button [1] (\~ 2 seconds).
Adjusting the intensity
Press the intensity button ▲ [2] to gradually increase the intensity or the intensity button ▼ [2] to lower the intensity. There are 20 levels of intensity that can be selected. Depending on the intensity level, you will start to feel tingling, which may increase up to muscle contractions.

Select a setting that is comfortable for you during use.
Preventing unwanted pulse changes
To prevent unintentional increases in intensity during a treatment, simply switch the button lock on. To do this, press and hold the program selection button P [3] for approx. 2 seconds. An acoustic signal sounds and the symbol “0” appears in the display [6]. To release the button lock, press and hold the P button [3] for approx. 2 seconds.
Reacting to unpleasant sensations
If you feel a twinge or itching on your skin, you should switch the device off and proceed as follows:
- Check that the electrodes are OK and do not show any signs of damage.
- Check that the round cover is still on the electrode connections.
- Remove the cuff and moisten it again completely.
- When you put it back on, ensure that there is good contact with the skin and that the skin is damp.
Pausing a program
If you want to pause a program while it is running, briefly press the Pause button [1]. An acoustic signal sounds and the pause symbol "II" flashes in the display [6]. The program can be continued by pressing the button [1] again.
Contact detection
If the electrodes are not in contact with the body, the intensity will automatically be set to zero. This prevents unwanted electrical stimulation. The intensity cannot be increased if the electrodes are not in contact with the body.
Memory function
The device saves the last program that was set.
After replacing the battery, the device starts again with the first program.
7. Cleaning and storage
Cleaning the control unit

Important
Before beginning the cleaning process, disconnect the connection cable from the control unit and the shoulder cuff and remove the batteries.
Clean the control unit after use with a soft, slightly damp cloth. If it is very dirty, you can also moisten the cloth with a mild soapy solution. Do not use any chemical or abrasive cleaning agents for cleaning. Ensure that no water gets inside the control unit.
Cleaning the shoulder cuff

Important
- Before beginning the cleaning process, disconnect the connection cable from the cuff.
- Clean the cuff carefully in lukewarm, soapy water. Do not use hot water. Afterwards, rinse it well with water so that no soap remains on the cuff.
- Then carefully pat the cuff dry with a towel and leave it to dry.

Warning
- If the cuff is damaged, it must be replaced.
- Before putting on the cuff again, first clean the body parts to be treated.
Storage
- Switch off the control unit and disconnect the connection cable.
- Remove the cuff.
- Disconnect the connection cable from the shoulder cuff.
- Put the control unit, the shoulder cuff and the connection cable in their original packaging.
- Store the original packaging in a cool, dry place inaccessible to children.
- Remove the batteries from the device if you will not be using it for a prolonged period of time. Leaking batteries may damage the device.
8. Disposal
For environmental reasons, do not dispose of the device in the household waste at the end of its service life.

Dispose of the device at a suitable local collection or recycling point in your country. Dispose of the device in accordance with EC Directive – WEEE (Waste Electrical and Electronic Equipment).
If you have any questions, please contact the local authorities responsible for waste disposal.
Empty, completely flat batteries must be disposed of through specially designated collection boxes, recycling points or electronics retailers. You are legally required to dispose of the batteries.
The codes below are printed on batteries containing harm-
ful substances:
Pb = Battery contains lead
Cd = Battery contains cadmium
Hg = Battery contains mercury
- Troubleshooting
| Problem Possible cause Solution | ||
| The device does not switch on. | The batteries are empty. | Replace the batteries. |
| The batteries are not inserted correctly. | Reinsert the batteries. | |
| Stimulation is too weak. | Cuff is not in sufficient contact with the skin. | Reposition the cuff. Ensure there is sufficient contact with the skin. |
| Water contact electrodes are not sufficiently moist. | Switch off the device. Moisten electrodes. | |
| Problem Possible cause Solution | ||
| Stimulation is uncomfortable. | The intensity on the device is set too high. | Lower the intensity on the device. |
| Water contact electrodes are not sufficiently moist. | Switch off the device. Moisten electrodes. | |
| Connection cable is worn/faulty. | Replace the connection cable. | |
| Water contact electrodes are worn/faulty. | Replace the cuff. | |
| Irregular stimulation. | Connection cable faulty. | Reduce the intensity and rotate the connection cable at the socket by 90°. If additional power failures occur, replace the connection cable. |
| Stimulation is ineffective. | Water contact electrodes are not positioned correctly on the skin. | Remove water contact electrodes and reposition on the skin. Ensure there is sufficient contact with the skin. |
| The skin turns red and/or a stabbing pain occurs. | The cuff is not positioned correctly on the skin. | Ensure that the cuff sits securely on the skin and cannot move. |
| The cuff is dirty. | Clean the cuff as described in these instructions for use. | |
| One of the water contact electrodes has a scratch. | Replace the cuff. | |
| Water contact electrodes are not sufficiently moist. | Switch off the device. Moisten electrodes. | |
| Stimulation stops during use. | The cuff has come loose from the skin. | Stop the application and reposition the cuff. |
| The connection cable has worked itself loose. | Stop the application and reinsert the connection cable. | |
| The batteries are empty. | Replace the batteries on the control unit. | |
If you cannot find a solution to your problem here, contact our Customer Services.
- Technical specifications
| Diagonal upper body circumference | Up to 120 cm |
| Type EM 29 | |
| Model EM 26 | |
| Weight- Device- Device, cuff and cable | - Approx. 90 g incl. batteries- Approx. 165 g incl. batteries |
| Electrode size Approx. 87 cm^2 | |
| Parameters(500 ohm load) | Output voltage:max. 50 Vpp / 5.5 V rmsOutput current:max. 100 mApp / 11 mArmsOutput frequency:2 – 110 Hz |
| Pulse length 60 – 220 μs per phase | |
| Waveform Symmetric, biphasic rectangular pulse | |
| Voltage supply 4.5 V | (3 x 1.5 V AAA, type LR03) |
| Operating conditions 0 | °C to 40 °C, 20 to 65% relative humidity |
| Storage 0 °C to 55 °C, | 10 to 90% relative humidity |
The serial number is located on the device or in the battery compartment.
We reserve the right to make technical changes to improve and develop the product. If the device is not used according to the instructions specified, perfect functionality cannot be guaranteed! This device complies with European standards EN60601-1 and EN60601-1-2 (in compliance with CISPR 11, 61000-4-2, 61000-4-3, 61000-4-8) and is subject to special precautionary measures with regard to electromagnetic compatibility. Please note that portable and mobile HF communication systems may interfere with this device. More details can be requested from the stated Customer Service address or found at the end of the instructions for use.
This device meets the requirements of European Directive 93/42/EC for medical devices, as well as those of the Medizinproduktegesetz (German Medical Devices Act). For this device, a functional test and instruction in accordance with Section 5 of the Medical Devices Operator Ordinance (MPBetreibV) is not required. It is also not necessary to carry out safety checks in accordance with Section 6 of the Medical Devices Operator Ordinance (MPBetreibV).
11. Warranty/service
Beurer GmbH, Söflinger Straße 218, 89077 Ulm, Germany (hereinafter referred to as "Beurer") provides a warranty for this product, subject to the requirements below and to the extent described as follows.
The warranty conditions below shall not affect the seller's statutory warranty obligations which ensue from the sales agreement with the buyer.
The warranty shall apply without prejudice to any mandatory statutory provisions on liability.
Beurer guarantees the perfect functionality and completeness of this product.
The worldwide warranty period is 5 years, commencing from the purchase of the new, unused product from the seller.
The warranty only applies to products purchased by the buyer as a consumer and used exclusively for personal purposes in the context of domestic use.
German law shall apply.
During the warranty period, should this product prove to be incomplete or defective in functionality in accordance
with the following provisions, Beurer shall carry out a repair or a replacement delivery free of charge, in accordance with these warranty conditions.
If the buyer wishes to make a warranty claim, they should approach their local retailer in the first instance: see the attached “International Service” list of service addresses.
The buyer will then receive further information about the processing of the warranty claim, e.g. where they can send the product and what documentation is required.
A warranty claim shall only be considered if the buyer can provide Beurer, or an authorised Beurer partner, with
- a copy of the invoice/purchase receipt, and
- the original product.
The following are explicitly excluded from this warranty:
- deterioration due to normal use or consumption of the product;
- accessories supplied with this product which are worn out or used up through proper use (e.g. batteries, rechargeable batteries, cuffs, seals, electrodes, light sources, attachments and nebuliser accessories);
- products that are used, cleaned, stored or maintained improperly and/or contrary to the provisions of the instructions for use, as well as products that have been
opened, repaired or modified by the buyer or by a service centre not authorised by Beurer;
- damage that arises during transport between manufacturer and customer, or between service centre and customer;
- products purchased as seconds or as used goods;
- consequential damage arising from a fault in this product (however, in this case, claims may exist arising from product liability or other compulsory statutory liability provisions).
Repairs or an exchange in full do not extend the warranty period under any circumstances.
FRANÇAIS

natural_image
Illustration of a medical or electronic device with a curved body and attached accessories (no text or symbols visible)i Remarque
natural_image
Illustration of a person wearing a high-visibility vest and belt, arms crossed (no text or symbols)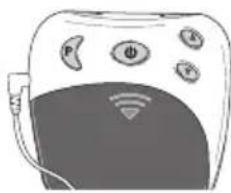
natural_image
Illustration of a smart device with sensors and connectivity icons (no text or symbols)natural_image
Illustration of a black and white VR headset with a cable, no visible text or symbols
Nota
natural_image
Illustration of a person wearing a high-collared vest and belt, arms crossed (no text or symbols)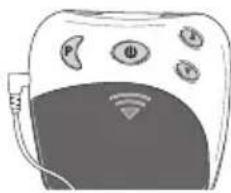
natural_image
Illustration of a smart device with sensors and connectivity icons (no text or symbols)Cambio de las pilas
6. Manejo
natural_image
Illustration of a computer mouse with a strap, shown in grayscale (no text or symbols)
Nota
natural_image
Illustration of a person with an ECG device and a medical device (no text or symbols visible)
natural_image
Close-up of a computer controller with battery and power indicators, showing a switch and signal icon (no readable text or symbols)natural_image
Diagram of a remote control with battery and power interface (no text or symbols)natural_image
Illustration of a computer mouse with a cable, shown in grayscale (no text or symbols)
Not
natural_image
Illustration of a person with a bandaged chest and a medical device with sensors (no text or symbols)
Pil değişimi
natural_image
Illustration of a computer mouse with a cable, shown in grayscale (no text or symbols)
Указание
natural_image
Illustration of a person with an arm and a medical device (no text or symbols visible)
Замена батареек
natural_image
Diagram of a handheld device with battery and power connections, showing a switch and signal icon (no text or symbols)
natural_image
Illustration of a medical device with a labeled grip and cable (no text or symbols visible)natural_image
Illustration of a person wearing a high-hipbolic vest and belt, arms crossed (no text or symbols)