
3223 - Thermometer Leifheit - Free user manual and instructions
Find the device manual for free 3223 Leifheit in PDF.
| Product type | Digital thermometer for oven and barbecue |
| Brand | Leifheit |
| Model | 3223 |
| Dimensions (L x W x H) | 76 x 76 x 25 mm |
| Power supply | 2 LR03 (AAA) batteries / 1.5 V |
| Display type | Digital display with backlight (not specified) |
| Time measurement | Up to 99 minutes 59 seconds |
| Meat selection | Predefined meat types (pork, beef, poultry, etc.) and custom PGM mode |
| Doneness level | Predefined levels (rare, medium, well-done) according to meat type |
| Audible alarm | Alarm when target temperature is reached or at the end of the timer |
| Temperature units | °C or °F (switchable) |
| Built-in magnets | 2 magnets on the back for attachment to metal surfaces |
| Support stand | Folding stand on the back for placing the device |
| Temperature probe | With cable and protective cap |
| Probe length | Approximately 1.5 cm minimum insertion depth |
| Care and cleaning | Clean with a soft damp cloth. Do not immerse, do not wash in dishwasher. |
| Safety and precautions | Do not use near magnetic cards; do not immerse in water; do not leave in the oven; keep out of reach of children. |
| Package contents | 1 thermometer, 1 temperature probe with cable, 2 LR03 batteries, 1 protective cap, 1 instruction manual |
| Warranty | 2 years from purchase date |
| Manufacturer | Leifheit AG |
Frequently Asked Questions - 3223 Leifheit
User questions about 3223 Leifheit
0 question about this device. Answer the ones you know or ask your own.
Ask a new question about this device
Download the instructions for your Thermometer in PDF format for free! Find your manual 3223 - Leifheit and take your electronic device back in hand. On this page are published all the documents necessary for the use of your device. 3223 by Leifheit.
USER MANUAL 3223 Leifheit
With the purchase of this roasting thermometer you have acquired a quality product from LEIFHEIT.

read the operating instructions carefully before using the appliance and keep them in a safe place.
Please pay particular attention to the safety instructions!
Table of contents
Picture pages 2-5
A Product description 22
B Scope of supply 23
C Technical data 23
D Intended use 24
Safety instructions 24
F Commissioning and use 26
Functions of the roasting thermometer . 26
Temperature measurement 28
Time measurement 30
G Cleaning 32
Disposal 33
Warranty 33
Please contact the Leifheit team if you have any questions and suggestions:
International call number
(Mo - Fr: 07:00 am - 05:00 pm)
Tel.: +49 (0) 2604 977 0 (subject to charge)
E-Mail: info@leifheit.com
www.leifheit.com
Legend

WARNING
Information on a potentially dangerous situation that may lead to serious injuries or death.

CAUTION
Information on a potentially dangerous situation that may lead to minor injuries.
NOTE
Information on a potentially dangerous situation that may lead to property damage.
Illustrations for the operating instructions, see pages 2 - 5.

Product description
[1] Display of the meat type selected
[2] Display of the cooking degree selected
[3] Temperature and time display
[4] Button with 2 functions:
- Start / Stop of the timing
- Change of the temperature unit (^ or ^ F)
[5] Button with 2 functions:
- Cooking degree selection
- Setting the seconds
[6] Button with 2 functions:
Selection of the meat type
- Setting the minutes
[7] ON / OFF and function selector switch
[8] Connecting socket for temperature sensor cable
[9] Battery compartment
[10] Stand (folding)
[11] Magnet (2x)
[12] Temperature sensor with cable and protective cap

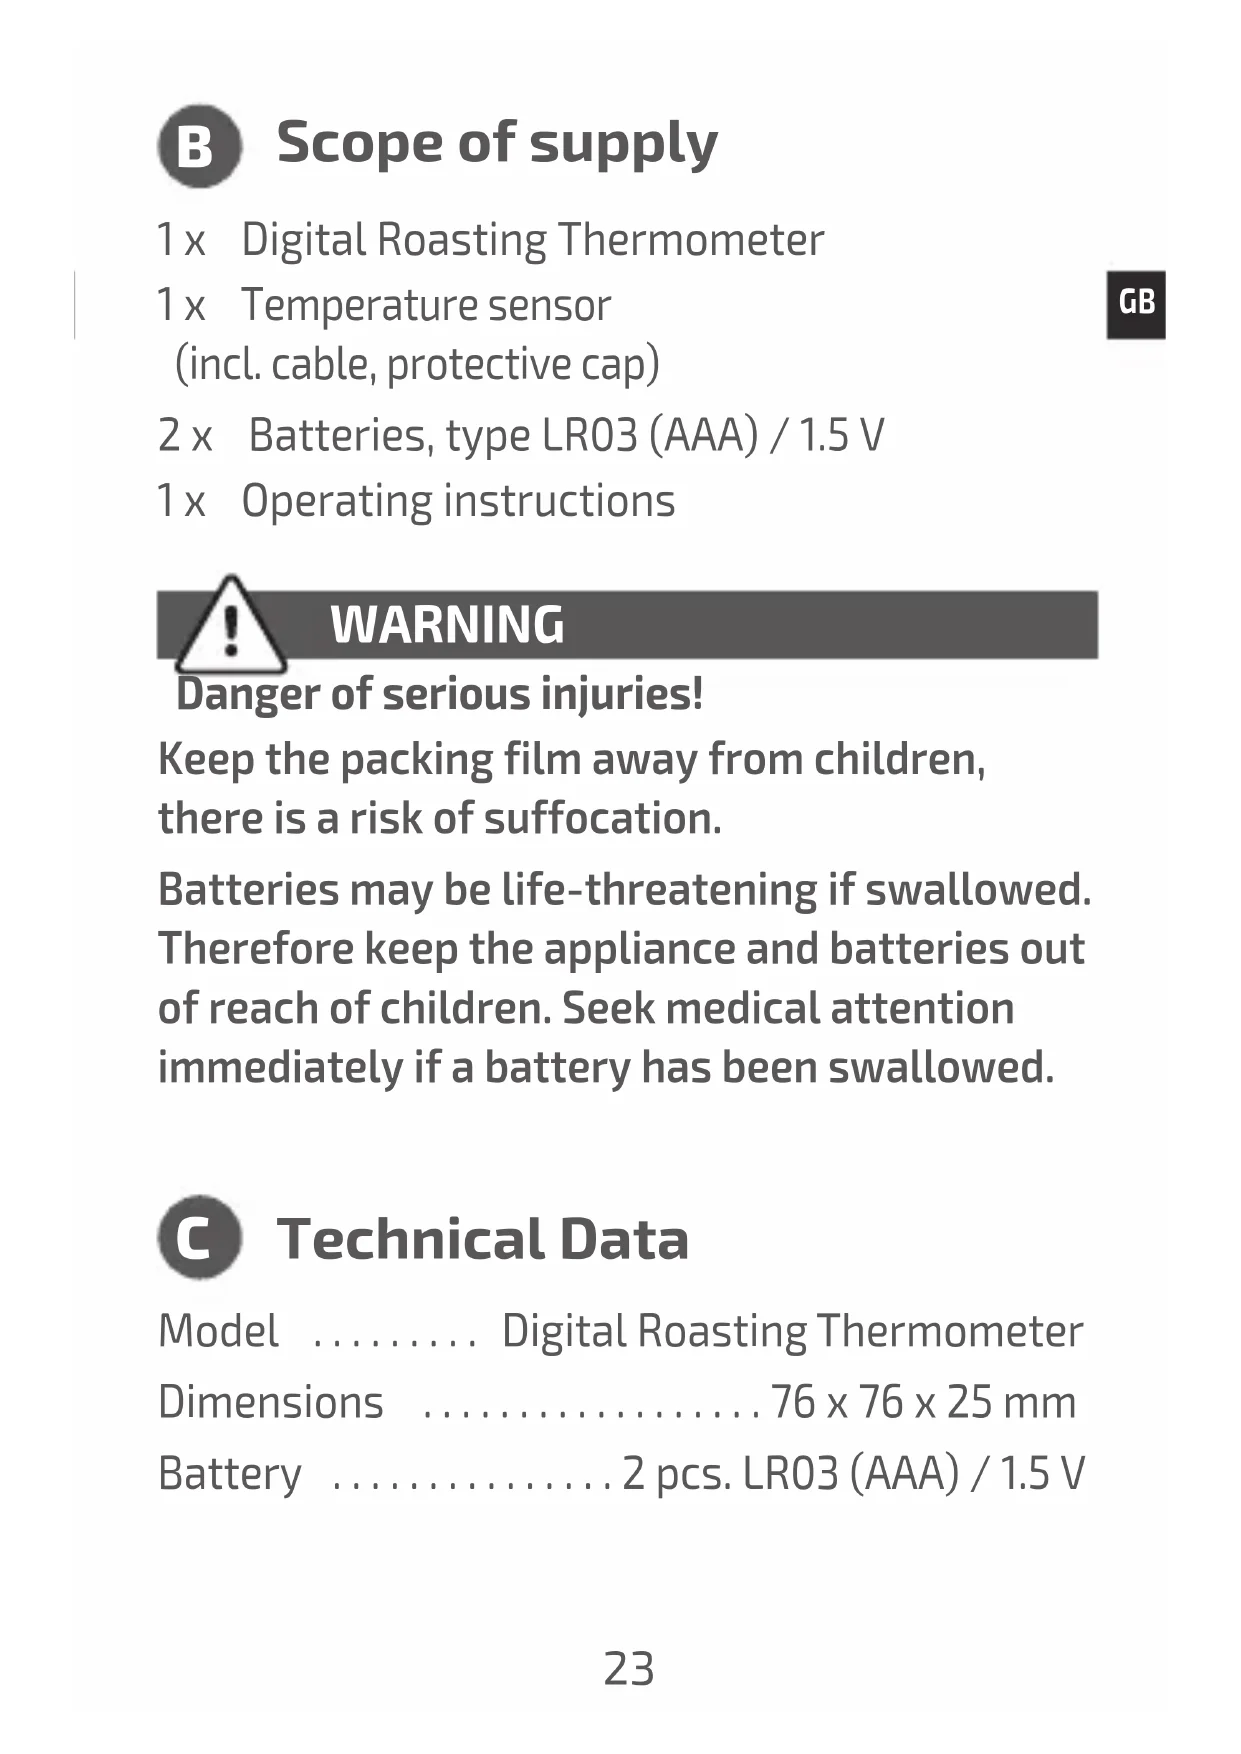
Scope of supply
1x Digital Roasting Thermometer
1 x Temperature sensor
(incl. cable, protective cap)
2 x Batteries, type LR03 (AAA) / 1.5 V
1x Operating instructions

WARNING
Danger of serious injuries!
Keep the packing film away from children, there is a risk of suffocation.
Batteries may be life-threatening if swallowed. Therefore keep the appliance and batteries out of reach of children. Seek medical attention immediately if a battery has been swallowed.

Technical Data
Model Digital Roasting Thermometer
Dimensions 76 x 76 x 25 mm
Battery 2 pcs. LR03 (AAA) / 1.5 V

Intended use
This roasting thermometer is intended for measuring the temperature or the cooking degree of food products when roasting.
Other possible uses: thermometer function for hot or cold beverages and dishes (soups, baby food, grilled products, etc.)
The appliance is not suitable for measuring your body temperature. The manufacturer or dealer assume no liability whatsoever for damage that has resulted from non-intended use or incorrect use.

Safety instructions
This appliance can be used by persons with limited physical, sensory or mental abilities or with lack of experience and / or knowledge if they are supervised appropriately or have been instructed in the safe use of the appliance and have understood the dangers resulting from it.
Children must not play with the appliance!
Do not leave children unsupervised to make
sure they do not play with the appliance.
Do not use the appliance if it has visible damage.
Do not make any modifications on the appli
ance. Have repairs only carried out by a special-
ist. Incorrect repairs may lead to significant
risks to the user and render any claims under
guarantee void.
There are two magnets on the back side of the
appliance. Thus, do not store it in the vicinity
of cards with magnetic strips (credit cards,
access ID cards, etc.). The data stored there
may be damaged.
Do not immerse the thermometer in water or
other fluids. Do not clean the appliance in the
dishwasher.
The operating panel is not heat-resistant. Make
sure that it does not make contact with the hot
barbecue or the hot side walls of the oven.

Commissioning and use
F1 Preparation
- Two batteries of type LR03 (AAA) are already inserted in the battery compartment [9]. Remove the protective film so that the appliance is functional.
- Insert the connector of the temperature sensor cable [12] into the connecting socket [8].
- Put the thermometer in position: Fold out the stand [10] on the back side and position, or engage on a metallic surface using the magnets [11].
Functions of the roasting thermometer
F2 Select the meat type degree of roasting
(Indicator on the display [1], [2], [3])
- Set the function selector switch [7] to "COOK".
-
Keep pressing the () button to select the meat type.
-
Select "PGM" if the desired meat type is not available or if you want to set an individual temperature.
- Keep pressing the button to select the cooking degree (different cooking degrees are available depending on the meat type).
- The cooking degree temperature is displayed under "ALERT TEMP".
F3 Determine the temperature range individually
- Keep pressing the button until the "PGM" display appears.
- Keep the S/S button pressed until the temperature display flashes under "ALERT TEMP".
- Setting the desired temperature: button = increase temperature and button decrease temperature.
- Then press the ( / ) button.
Temperature measurement

WARNING
Risk of burns!
Foodstuffs, the oven and other parts may be very hot. Protect yourself by, e.g. using a pot holder.

CAUTION
Risk of injury!
There is a risk of injury from the temperature sensor tip. After use, always put the protective cap on the tip.
NOTE
Take care to avoid damage!
Do not leave the thermometer lying in the oven; it is not heat-resistant.
F4 Information on measuring:
-
Insert the tip of the temperature sensor [12] at least 1.5 ~cm deep into the thickest part of the meat (1.5 cm corresponds with the length of the smaller diameter on the sensor tip).
-
Do not measure directly on the bone.
If the set (or a higher) temperature is measured, a signal tone sounds repeatedly. The meat is then cooked according to the setting selected.
If the temperature drops again, the signal tone goes out.
F5Permanenttemperature measurement (oven mode)
- Set the function selector switch [7] to "COOK".
- Select the meat type and cooking degree (see F2).
- Insert temperature sensor [12] into the meat.
- Push the food product into the oven and set the oven temperature.
- Guide the cable to the outside and close the oven door. The cable adapts to the oven door seal.
- Always position the thermometer outside the oven. The temperature is measured and displayed continuously.
Temperature measurement
F6 Measure the temperature selectively
- Set the function selector switch [7] to "COOK".
- Select the meat type and cooking degree (see F2).
- Take the food product out of the oven and insert the temperature sensor into the meat. After a few seconds, the temperature can be read from the display under "COOK TEMP".
F7 Change the temperature unit
- Set the function selector switch [7] to "COOK".
- Change the temperature unit with the (s/s) button: degrees Celsius (^) or degrees Fahrenheit (^) .
F8 Decommissioning
- Remove the temperature sensor [12], clean with a moist cloth and put on the protective cap.
- Set the function selector switch [7] to "OFF".
Time measurement
F9 Single time measurement
Note: The time is shown on the display [3].
The measuring range is maximum 99 minutes and 59 seconds.
If necessary, press button and at the same time to reset the indicator in the display to 00:00.
- Set the function selector switch [7] to "TIMER".
- Pressthe (s/s) button thus starting the time measurement.
Pressing again interrupts the time measurement and resumes it again.
F10 Timer function
- Pressthe (Min.) and (Sec.) button to set the duration of the short-time measurement. If you keep both buttons pressed, the course of the values displayed runs quicker.
- Pressthe (s / s) button to start, interrupt or start the timer again.
After the set time has elapsed, signal tones sound for approx. 30 seconds.
Any button must be pressed to interrupt the signal tones.

Cleaning
Clean the temperature sensor and the thermometer using a moist soft cloth.
Then wipe the thermometer dry.
NOTE
Take care to avoid damage!
Do not clean the thermometer in the dishwasher.
The appliance is not water-tight.
Remove the batteries from the appliance when these are exhausted or if the appliance is no
longer required. This avoids damage from leaking batteries.

Disposal
- If the appliance is discarded, it must be rendered unusable and disposed of in accordance with the current provisions in the country of use. You local county will provide information about this.
- Dispose of the packaging sorted correctly!
- The appliance and the batteries must not be disposed of in domestic waste.


Warranty
Leifheit AG guarantees this roasting thermometer for 2 years from the date of purchase (or for orders from the date of receipt of the goods).
You can find additional information about the warranty policy on our website:
www.leifheit.com
Chere cliente, cher client,
Quality and Design by Leifheit AG
Leifheitsstraße 1
56377 Nassau, Germany
Tel.: +49 (0) 2604 977 0
Fax: +49 (0) 2604 977 300
E-Mail: info@leifheit.com
www.leifheit.com
LEIFHET
Tnne nnnnne nee eannnne nee nee nee nee nee nee nee nee nee nee nee nee nee nee nee nee nee nee nee nee nee nee nee nee nee nee nee nee nee nee nee nee nee nee nee nee nee nee nee nee nee nee nee nee nee nee nee nee nee nee ne eee
6102/80

- Table of contents
- Legend
- WARNING
- CAUTION
- NOTE
- Product description
- Scope of supply
- Technical Data
- Intended use
- Safety instructions
- Commissioning and use
- F1 Preparation
- Functions of the roasting thermometer
- F2 Select the meat type degree of roasting
- F3 Determine the temperature range individually
- Temperature measurement
- Risk of burns!
- Risk of injury!
- Take care to avoid damage!
- F4 Information on measuring:
- F5Permanenttemperature measurement (oven mode)
- F6 Measure the temperature selectively
- F7 Change the temperature unit
- F8 Decommissioning
- Time measurement
- F9 Single time measurement
- F10 Timer function
- Cleaning
- Disposal
- Warranty
- Chere cliente, cher client,
- Quality and Design by Leifheit AG
Brand : Leifheit
Model : 3223
Category : Thermometer