
Quantum Easy - Cooker FALMEC - Free user manual and instructions
Find the device manual for free Quantum Easy FALMEC in PDF.
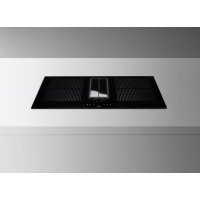



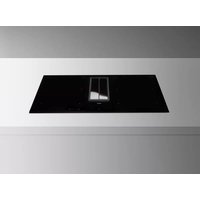
| Product type | Induction hob with integrated hood |
| Brand | Falmec |
| Model | Quantum Easy |
| Number of cooking zones | 4 (induction) |
| Total power | 2800 - 7400 W |
| Power supply | 220-240 V~ / 380-415 V~, 50/60 Hz |
| Dimensions (W x D x H) | Approx. 60 x 52 x 5 cm (standard built-in) |
| Weight | Approx. 20 kg |
| Main functions | Booster, Bridge, Timer, Automatic shut-off, Keep warm (42°C), Control lock |
| Power levels | 9 levels + Booster (P) |
| Hood type | Internal recirculation (filtering) |
| Anti-grease metal filters | Washable (dishwasher safe), alert after 30 hours of use |
| Charcoal/zeolite filter | Optional, regeneration every 9 months, replacement every 18 months |
| Hood speeds | 9 speeds + speed P (boost), Timer 15 min |
| Safety | Automatic shut-off, pan detection, residual heat, child lock, overheating |
| Maintenance | Cleaning with specific ceramic glass detergent, scraper for residues |
| Included accessories | Metal filters, power cable, initial cleaning cloths |
| Spare parts | Original required, contact authorized service |
| Warranty | Standard manufacturer warranty (not specified) |
Frequently Asked Questions - Quantum Easy FALMEC
User questions about Quantum Easy FALMEC
0 question about this device. Answer the ones you know or ask your own.
Ask a new question about this device
Download the instructions for your Cooker in PDF format for free! Find your manual Quantum Easy - FALMEC and take your electronic device back in hand. On this page are published all the documents necessary for the use of your device. Quantum Easy by FALMEC.
USER MANUAL Quantum Easy FALMEC
INSTRUCTIONS BOOKLET
INSTRUCTION BOOKLET
These warnings have been drawn up for your personal safety and the safety of others. You are therefore kindly asked to read the booklet carefully in its entirety before using the equipment.
The Manufacturer declines all responsibility for any damage caused directly or indirectly to persons, things, and pets as a consequence of failing to comply with the safety warnings indicated in this booklet.
It is imperative that this instruction booklet is kept together with the equipment for any future consultation.
If the equipment is sold or transferred to another person, make sure that the booklet is also supplied so that the new user can be made aware of the hood's operation and relative warnings.
Insist on original spare parts.

Intended use
- This cooker is intended to be used in domestic environments to prepare and keep dishes warm.
- Do not install the cooker outdoors and do not expose it to outdoor environment (rain, wind, etc.).
- Any other use is not admitted.
- The equipment can be used by children over the age of 8 and by persons with reduced physical, sensory, and mental abilities, or with no experience or knowledge, as long as they do so under supervision or after having received relative instructions regarding safe use of the equipment and understanding of the dangers connected to it. Children are not to play with the equipment. Cleaning and maintenance by the user must not be carried out by children without supervision.
- Do not leave the cooktop unattended while it is working.
The equipment is solely intended to be used to extract fumes generated from cooking food in non-professional domestic kitchens: any other use is improper. Improper use can cause damage to persons, things, and pets and exempts the Manufacturer from any liability.

Danger of burns
- Use the control lock to prevent unauthorized persons from switching on the appliance.
- Position frying pan and saucepan handles so that children cannot touch them.
- Switch off the cooking zones after use.
- Do not place any metal objects on cooking zones that are switched on.

Technical safety
- Installation must be carried out by skilled and qualified installers in accordance with the instructions in this booklet and in compliance with current regulations. If the power cable or other components are damaged, the cooktop must not be used: disconnect the appliance from the power supply and contact the dealer or an authorized service center for repairs.
Do not modify the electrical, mechanical, or functional structure of the appliance.
Do not attempt to carry out repairs or replacements yourself. Interventions by incompetent and unauthorized persons can cause serious damage to the appliance or physical injury, and are not covered by the manufacturer's warranty.
- Before installing the cooktop, check the integrity and function of each part. If any anomalies are noted, do not proceed with installation and contact the dealer.

The electrical system to which the appliance is connected must comply with local standards and be equipped with an earth connection in accordance with safety regulations in the country of use. It must also comply with European standards regarding electromagnetic compatibility.
The connection data (voltage and frequency) shown on the rating plate of the cooktop must match those of the electrical supply.
Compare these data before connection.
If in doubt, consult an electrician.
- Do not use the cooktop before it is installed. It is forbidden to use the cooktop on moving equipment.
- Never open the casing of the appliance.
- Falmec assures compliance with safety standards only when original spare parts are used.
- The appliance is not intended for use with an external timer or remote control.
Before installing the hood, check that the electrical mains power supply corresponds to what is reported on the identification plate located inside the hood.
The socket used to connect the installed equipment to the electrical power supply must be within reach; otherwise, install a mains switch to disconnect the hood when required.
Any changes to the electrical system must be carried out by a qualified electrician.
Do not attempt to solve the problem yourself in the event of equipment malfunction; contact the Dealer or an authorized Servicing Department for repairs.

When installing the device, disconnect the equipment by removing the plug or switching off the main switch.
USE WARNINGS

- Before powering the appliance for the first time, remove any protective films and adhesives.
While using, saucepans and kitchenware can cause noise that may depend on: - a high power level. - different materials of the bottom of saucepans. - Never use water to put out a fire. Deactivate the cooking area. Choke flames with a cover, a fireproofing blanket, or something similar. - Do not keep inflammable objects in the drawers below the cooker. The cutlery tray shall be made of fire-resistant material. - Do not heat empty saucepans or frying pans and always check that saucepans have a minimum quantity of liquids inside. - Switch off the cooker after use. - Continuously check the cooking when greases and oils are used, as they can easily catch fire. - Heat greases and oils at maximum for one minute and never use the Booster function. - Pay attention not to burn yourself during and after using the device. - Make sure that no fixed or mobile power cable of the device is in contact with the glass or a hot frying pan. - Do not use the cooker to heat pots. - Do not apply any type of cover on the cooktop. - Electrical cables are not to be in contact with the cooker. - It is recommended to protect hands from heat using pot holders. Only use dry gloves or pot holders. - Only use cookware with smooth and magnetic bottoms suitable for induction hobs. - Avoid that sugar, synthetic materials, or aluminium films come into contact with the hot areas. During cooling, those substances can cause cracks or other alterations on the pyroceram surface: switch off the device and immediately remove from the cooking area that is still hot. - When moving saucepans, make sure to lift them rather than slide them over the surface. - Saucepans and cooker are to be perfectly clean before being in contact. - Do not drop objects on the hobs!

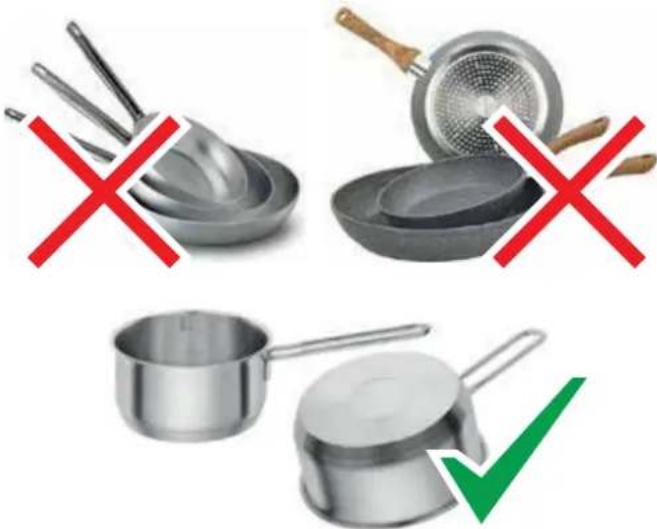
Only use saucepans with magnetic bottoms. Other materials are not admitted.
Kitchenware have different types of bottoms.
The bottoms can be completely ferrous, non-ferrous, or a blend of both materials.
- Bottoms with non-ferrous material (aluminium, copper, ...) cannot be used with induction hobs.
- Bottoms with blended material might not heat evenly or reach high temperatures. If bottoms mainly consist of non-ferrous material, the hob might not recognise the pan and the cooking zone does not switch on. Furthermore some of these materials tend to release material that bonds with the screen-printing of the glass, ruining it beyond repair.
- Fully ferrous flat bottoms are the most suitable and the heat is distributed evenly.
- Use saucepans of appropriate size to the desired cooking area.
- Always use a saucepan or frying pan on each cooking area, even with the BRIDGE function.
- Do not place hot saucepans on the sensor keys or the LEDs, as this could cause damage to the electronic components underneath.
- Keep controls and lamps always clean.
- Do not keep metal objects directly below the cooker.
- Possibly use always covers to avoid heat dispersion. Cook with little water.
- After starting grilling or cooking dishes bring the power level to a lower one.
Safety and warning indications
Warning for people wearing pacemakers:
Keep in mind that when the appliance is being used an electromagnetic field forms in the immediate proximity. There is therefore a remote possibility that the operation of the pacemaker might be affected.
If in doubt, contact the pacemaker manufacturer or your GP.
The electromagnetic field of the hob during operation can affect the operation of magnetisable objects. Credit cards, life-saving devices, pocket calculators etc. should not be in the proximity of a hob when in operation.
Metal objects stored in the drawer underneath the appliance may become hot in case of prolonged use. Do not store metal objects in a drawer immediately underneath the hob.
The appliance is equipped with cooling fans. If there is a drawer under a built-in appliance, a separation must be ensured between the drawer and the bottom of the appliance, for appropriate hob ventilation and to make sure the fans are not obstructed.
Never use two saucepans or pans on the same cooking zone, or a rectangular cooking zone, or a PowerFlex cooking area.

Before cleaning or carrying out maintenance operations, disconnect the equipment by removing the plug or switching off the main switch.
Do not use the hood with wet hands or bare feet.
Always check that all electrical parts (lights, extractor fan) are off when the equipment is not being used.

Do not rest objects on top of the motorised fins.
The maximum overall weight of any objects placed or hung (if applicable) on the hood must not exceed 1.5 kg.
Always supervise the cooking process during the use of deep-fryers: Overheated oil can catch fire.
Never use the hood without the metal anti-grease filters: in this case, grease and dirt will deposit in the equipment and compromise its operation.
Accessible parts of the hood can be hot when used at the same time as the
cooking appliances.
Do not carry out any cleaning operations when parts of the hood are still hot.
There can be a risk of fire if cleaning is not carried out according to the instructions and products indicated in this booklet.
Disconnect the main switch when the equipment is not used for long periods of time.

If other appliances that use gas or other fuels are being used at the same time (boiler, stove, fireplaces, etc.), make sure the room where the fumes are discharged is well-ventilated, in compliance with the local regulations.
INSTALLATION
only intended for qualified personnel

Before installing the hood, carefully read the chapter 'SAFETY INSTRUCTIONS AND WARNINGS'.
TECHNICAL FEATURES
The technical specifications are exhibited on the labels located inside the hood.
POSITIONING
Do not install the hood outdoors and do not expose it to outdoor environment (rain, wind, etc.).
COOKER
ELECTRICAL CONNECTION
(only intended for qualified personnel)

Disconnect the equipment from mains power network before carrying out any operation on the cooker.
Make sure that electric wires inside the cooker are not disconnected
or cut:
In the event of damage, contact your nearest Servicing Department.
Refer to qualified personnel for electrical connections.
Connection must be carried out in compliance with the provisions of the law in force.
Before connecting the cooker to the mains power network, check that:
- The mains voltage corresponds with the voltage indicated on the data plate located inside the cooker;
- The electrical system is compliant and can withstand the load (see the technical specifications located inside the cooker);
- The power supply plug and cable do not come into contact with temperatures exceeding 70°C;
- The power supply system is effectively and properly connected to earth in compliance with regulations in force.
- The socket used to connect the cooker is within reach.
In case of:
- Devices fitted with cables without a plug: the type of plug to use is a "standardised" one. The wires must be connected as follows: yellow-green for earthing, blue for neutral, and brown for the phase. The plug must be connected to an adequate safety socket.
- Fixed equipment not provided with a power supply cable and plug, or any other device that ensures disconnection from the electrical mains, with an opening gap of the contacts that enables total disconnection in overvoltage category III conditions.
- Said disconnection devices must be provided in the mains power supply in compliance with installation regulations.
The yellow/green earth cable must not be cut off by the switch.
The Manufacturer declines all responsibility for failure to comply with the safety regulations.
SAFETY DEVICES ON THE COOKER
Safety shutdown
If a cooking area exceeds the maximum time for operation at the same power, it is automatically switched off and the indication of the residual heat is shown.
To reset the cooking area, touch the necessary keys.
| Power level | low | 1 | 2 | 3 | 4 | 5 | 6 | 7 | 8 | 9 | P |
| Maximum duration of operation in hours | 8.7 | 2.0 | 8.7 | 6.7 | 5.3 | 4.3 | 3.5 | 2.8 | 2.3 | 1.9 | 1.5 |
The cooker switches off automatically if one or more controls stay covered for more than 10 seconds.
To restore the proper operation:
- remove all objects from the control panel.
- clean the control panel.
- restart the cooker and the concerned area.
Overheating device
Before items of the cooker can overheat, the control reduces the used power by following this procedure for protection measures:
- Deactivation of booster and power booster if turned on. Reduction of the power level set.
- Shutdown of the cooking area concerned. On the display of the cooking area the message "E2" is displayed.
It is possible to restore the cooking area when the default message is off.
SAFETY INSTRUCTIONS
FOR ASSEMBLY
Install the cooker after installing kitchen cabinets and base.
Make sure that worktops have been veneered with thermoresistant glue in order not to suffer deflections or detachments.

It is forbidden to install the appliance on fridges or freezers, washing machines, dishwashers, or tumble driers.
Connection of the cooker
| network Conne ction Cable sec- | tion | Power cable | Switch gauge |
| 220V - 240V~50/60Hz | 1P+N / 2P 3 x 2 | 5 mm² | H 05 VV - F H 05 RR - F |
| 380V - 415V~50/60Hz | 2P+N 4 x 1.5 | mm² | H 05 VV - F H 05 RR - F |
| 380V - 415V~50/60Hz | 3P+N 5 x 1.5 | mm² | H 05 VV - F H 05 RR - F |
- calculated with the contemporary factor in compliance with EN 60 335-2-6.
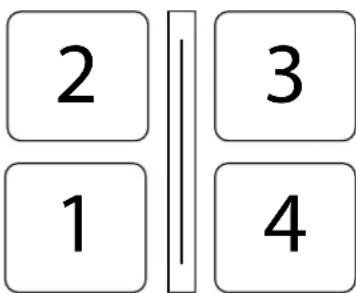
POWER:
| Feature | |
| Total power 2800-7400W | |
| Position 1 | |
| Rated power 1600W | |
| Booster power 1850W | |
| Position 2 | |
| Rated power 2100W | |
| Booster power (1/2) 3000W | |
| Position 3 | |
| Rated power 2100W | |
| Booster power (1/2) 3000W | |
| Position 4 | |
| Rated power 1600W | |
| Booster power 1850W |
| □ | ■ | - | + | ① | □ |
| Control description | |
| ① | Cooker top ON/OFF. In case no other control is enabled, the cooker switches off automatically after a few seconds |
| □ | Selection of the front cooking area. If pressed together with it enables the BRIDGE function. |
| □ | Selection of the back cooking area. If pressed together with it enables the BRIDGE function. |
| □ | Control block: pressed for more than 2 seconds it inhibits all controls. To release controls, repeat the operation. |
| + | Increase of the power level for cooking and booster selection, or increase of cooking time of the TIMER function. |
| - | Decrease of the power level for cooking and booster selection, or decrease of cooking time of the TIMER function. |
| Display display | description |
| 8 | Cooking area in stand-by |
| 1......9 | Levels of power from the lowest to the highest one, which can be selected pressing the keys + and - . |
| 8 | Power boost : maximum cooking power. |
| 8 | Indication of the residual heat |
| 8 | level of power between 0 and 1 , suitable to keep dishes warm |
| 8 | bridge function enabled. (minimum saucepan diameter: Ø230 mm) |
| 8 | Saucepan not on the cooker or not suitable for material and size. (minimum saucepan diameter: Ø 120 mm) |
| + on central screen) | Control block function enabled. |
OPERATION AND USE OF THE COOKTOP
ONLY USE COOKWARE SUITABLE FOR INDUCTION HOBS.
When a cooking area is turned on, the bottom of the saucepan heats.
The cooking area only heats thanks to the heat given by the saucepan.
The cooktop automatically detects the size of the saucepan.
The cooktop automatically detects the size of the saucepan.
The heating power is to be chosen based on what shall be cooked.
Please find below a short table:
SETTING AREAS
| 1 - 2 | Melt Heat | Sauces, butter, chocolate, gelatine Precooked dishes |
| 2 - 3 | Whisk Defrost | Rice, pudding and cooked dishes Vegetables,fish,frozen food |
| 3 - 4 | Steam | Vegetables,fish,meat |
| 4 - 5 | Boil | Boiled potatoes,soups,pasta Fresh vegetables |
| 6 - 7 | Cook over a low heat | Meat,liver,eggs,sausages Goulash,rolate,tripe |
| 7 - 8 Cook Fry | Potatoes,donuts,cakes | |
| 9 | Fry,bring to the boil | Steaks, omelettes Boil |
| P | Fry,bring to the boil | Bring to the boil big quantities of water |
Remark: heating time of cooktops is shorter than the gas cookers.
BASIC FUNCTIONS
See table of the corresponding model in the previous page.
BRIDGE FUNCTION
This function allows having cooking areas 1-2 and/or 3-4 working at the same time.
To enable:
- Enable the cooktop;
press simultaneously the symbols


- the symbol will be displayed on the screen of the front cooking area;
- Push the keys + and - to set power.
Note: this function can only be activated between the 2 right or the 2 left plates (not the two centre plates).
DEACTIVATION of the BRIDGE function:
press simultaneously the symbols


BOOSTER FUNCTION
The Booster strengthens power, so that big quantities can be heated (e.g. water to cook pasta).
This power increase is enabled for max. 10 minutes.
- Turn on the cooker;
- select the cooking area;
- touch (+) until on the screen is displayed on the back cooking area.
Note: it is not possible to only set to one right or one left plate at the time (and no more than 2 in total).
If the 1 (4) is set to P ,the one near 2(3) cannot be set to exceed the B level.
If the 2(3) plate is set to P , the 1(4) one switches off.
KEEP WARM FUNCTION
42°C - Keeping temperature of cooked dishes:
Turn on the cooker;
Select the cooking area;
Touch (+) and then (-) : the symbol will appear.
Shutdown of the cooker
To shutdown the cooking area:
Touch the key (-) until 0 is displayed on the screen of the cooking area.
If the cooking area is still too hot, the residual heat is specified H.
Turn off the cooker
Touch the key ① : all cooking areas are deactivated.
On the display of the cooking areas that are still too hot, the symbol is displayed.

Do not touch the cooking areas until the lamp is on.
TIMER FUNCTION AND AUTOMATIC SHUTDOWN FOR THE COOKER
The timer has two functions:
1-TIMER;
2 - AUTOMATIC SHUTDOWN of one or more cooking areas.
It is possible to set a duration up to 99 minutes.
Once the set time is over, the display shows 00 and a sound warning is activated, which can be deactivated by pressing the (+) or (-) keys.
TIMER
To set:
- If off, turn the hob on using the key and touch (+) and (-) at the same time.
- Set the desired time by touching the (+) and (-) keys.
The timer starts counting.
To modify the time, repeat the procedure from point 1.
To cancel the timer:
- If off, turn the hob on and touch (+) and (-) at the same time. (On the Plus version, the lamp is on)
- Touch the (-) key to bring the time to 00.
AUTOMATIC SHUTDOWN
For the automatic shutdown function:
1 - Turn on the cooker; 2 - Select the cooking area; 3 - Select the level; 4 - Set the timer as described above.
To set the automatic shutdown for another cooking area, repeat the procedure from point 2.
TIMER and AUTOMATIC SHUTDOWN can be used simultaneously.
WHAT TO DO IN CASE OF COOKER PROBLEMS
The cooker or cooking areas do not turn on:
- The cooker is not connected to the electric network. The protection fuse is released.
- Check if the block is not active.
- Keys are covered with water or grease. An object is placed on the keys.

The symbol is displayed
- There is no saucepan on the cooking area. The container used is not compatible with cooktops.
- The diameter of the saucepan bottom is too small compared to the cooking area.
The symbol [E] is displayed:
- Disconnect and connect the cooker.
- Contact the after-sales centre.
One of the areas or the entire cooker turns off:
The safety overheating system is active; The cooker or one cooking area remains on for too long; - one or more keys are covered; - one of the saucepans is empty and the bottom overheated.
The fan keeps on working after the cooker shutdown:
- This is not a malfunction: the fan keeps on protecting the electronic power unit of the device. The fan stops automatically.
COOKERS ERROR CODES
For supporting a service technician in case of error, the UI displays error codes.
In combination with the provided document "error codes Basic 2" which includes detailed information a complete error matrix description is available. E.G.O's standard error codes are listed following, customized UI can be different. In the standard general UI errors (Er xx) and cooking zone errors (E/x) differ. In case of cooking zone errors the display of the incorrect cooking zone blinks alternative "E" and a hexcode "X".
| Error code | Description possibl e causes | Remedy | |
| 01 | The cooking zone can be configu- red if a static "C" is shown | No error, the user is in the service menu. | A suitably pan must be placed on the relevant cooking zone |
| 0- | The cooking will be configured if a flashing "C" is shown. After a successful configuration the relevant display shows "-". If "-" is not displayed check the pos-sible causes of the E/S | User is in the service menu, no error | Wait for the symbol "-" or abort the configu- guration activities by pressing the select key and the "C" will not flash anymore. |
| E1 | A flashing "E" on each cooking zone indicates that all configis will be deleted | User is in service menu, no error | Manual configura- tion |
| E2 | Temperature limi- ts are exceeded | Pt or glass temperature is too high NTC -> electro- nic temperature too high | System must cool down |
| E3 | Unsuitable pot, e.g. loss of the magnetic cha- racteristics becau- se of temperature in the bottom | On the module a pot creates an improper operatioing point which can destroy devices, e.g IGBTs. | 1. The error is auto- matically cancelled after 8 s and the cooking zone can be used again. In case of further upcoming errors the pot has to be replaced. 2. The module has to be changed if the error comes without a pot on the cooking zone. |
| E4 | Unconfigured induction module (all induction mo- dule answer to UI, but any element is related to the effected cooking zone.) | induction module is not configured | Delete the hob configuration and activate the manual configuration. Start the UI service menu to configure the induction module if the listed points are not successful repla- ce the module. |
| ES | No communication between UI and induction module | No power supply of induction module. Bad cabling or defect | Check power and LIN connections. If connection is OK, replace the module |
| ES | Main power disturbance | 1. Failure in main power frequency detection2. Overvoltage | Check main power voltage and frequency, if ok replace the module |
| ET | Non assignable failure | Replace module or User interface | |
| EB | Fan failure Fan or control electronic is defect | Replace the module | |
| EG | Defect ive temperature probe on inductor | Sensor signal out of valid range; sensor or electronic is defect | Replace the module |
| EA | Hardware defect of induction module | Defect hardware device detected by the self-check of the module | Replace the module |
| EC | Configuration failure | 2 cooking zones are dedicated to the same element of the UI | Delete the actual configuration manual configura-tion with service menu |
| EH | Fixed sensor value (test function for T probe on inductor) | Not enough temperature change (10 K) within 5 min after switch on the hob | System must cool down |
| No functionality and no displaying | Overvoltage on the switch mode power supply (no functionality) | 400 V con- nection | Disconnect and correct the power line connection |
Note:
Not each failure can be detected automatically by the system, e.g. in case of defect of the User interface power supply.
COOKER HOOD
HOOD WITH INTERNAL RECIRCULATION (FILTERING)

In this model, the air passes through the Carbon-Zeo filters to be purified and recycled in the environment.
Ensure that the Carbon-Zeo filters are assembled into the hood, if not, install them as indicated in the assembly instructions.
ASSEMBLY INSTRUCTIONS
only intended for qualified personnel

The hood can be installed in various configurations. The generic assembly steps apply to all installations; for each case, follow the specific steps provided for the required installation.
OPERATION
WHEN TO TURN ON THE HOOD?
Switch on the hood at least one minute before starting to cook to direct fumes and vapours towards the suction surface.
After cooking, leave the hood operating until complete extraction of all vapours and odours. By means of the Timer function, it is possible to set auto switch-off function which will allow the hood to turn off automatically after 15 minutes of operation.
WHICH SPEED IS TO BE SELECTED?
speed (1-3): maintains the circulation of clean air with low electricity consumption.
speed (4-5): normal conditions of use.
speed (6-7): presence of strong odours and vapours.
speed (8-P): rapid disposal of odours and vapours.
WHEN SHOULD THE FILTERS BE WASHED OR REPLACED?
The metal filters must be cleaned every 30 hours of operation.
The active carbon filters must be regenerated every 9 months and replaced every 18 months.
For further details see the "MAINTENANCE" chap.
| ①A - 9 + ⑤A ② | ON/OFF Short pulse: Hood switch ON/OFF Long pulse: Hood operation automatic cycle activation (A) accor- ding to plate power. |
| + | Speed increase from 1 to...9 (up to "P"). Speed "P": active only for a few minutes, then speed 9. |
| - | Speed decrease from P to 1. |
| L | With hood active (short pulse): TIMER (flashing red LED) Automatic switch-off after 15 min. The function is disabled (red LED OFF) if: - The motor is switched off (button ①A). - Press the TIMER button ② again. With the hood OFF (long pulse 4s): opening the fins for hood and metal filter maintenance |
| FAT METAL FILTER ALARM Maintenance after about 30 hours' use. Press button ③ for 5 seconds to reset the counter. | |
| CARBON.ZEO FILTER ALARM Maintenance after about 2000 hours' use. Press button ④ seconds to reset the counter. To activate the alarm: With the hood OFF, press the buttons + and for 3 se- conds. The LED lights up. Confirm with button + |

If the pushbutton panel is completely inactive, before contacting the Technical assistance service, disconnect power temporarily to the appliance (about 5 seconds), possibly by acting on the main switch, to
restore normal operation. If this measure has no effect, contact the Technical assistance service.
CLEANING AND MAINTENANCE

ATTENTION!
For cleaning, never use a steam equipment.
Before cleaning the cooker, make sure that it is at room temperature. Always clean the cooker after each use with a specific cleanser for pyroceram.
Do not use products containing: - corrosive agents (soda, acids, ammoniac). - abrasive agents (dusts or paste).

Do not wash the flaps in a dishwasher.
Do not use pointed or abrasive objects.
After cleaning, dry the appliance with a soft cloth.
USEFUL CARE TIPS
Clean your glassceramic cooktop regularly, preferably every time you use it. Avoid using abrasive sponges or scouring agents. Harsh chemical cleaners like oven sprays or stain removers are also unsuitable, as are bathroom or household cleaners.
Accidents happen ...
Do not allow the hot hob to come into contact with plastic, tin foil, sugar or sugary food that has fallen on the hot glass-ceramic cooktop. Please scrape it off the hot surface as quickly as possible. If these substances melt, they can damage the glass-ceramic cooktop.
Sparkling results in only three steps:
To thoroughly clean your glass-ceramic cooktop, first remove dirt and food with a suitable metal scraper.
Once the glass-ceramic cooktop has cooled, put a few drops of a suitable cleaner on it and rub it on with a paper towel or a clean cloth.
Then wipe the glass-ceramic cooktop with a damp cloth and dry it with a clean cloth.
How do I identify a suitable glass-ceramic scraper?
- Scraper made of metal (won't melt or catch fire)
- Scraper easy to lock / to unlock
- Blade is fixed precisely, it does not shift
- Blade is unbroken, clean and stainless
- Scraper certified by testing institute, if procurable (e.g. TUV-GS seal)
- User manual and safety instructions available
CLEANING OF INTERNAL SURFACES

Do not clean electrical parts, or parts related to the motor inside the hood, with liquids or solvents.
For the internal metal parts, see the previous paragraph.
METAL ANTI-GREASE FILTERS
It is advised to frequently wash the metal filters (F) (at least once a month) leaving them to soak in boiling water and cleaning solution for 1 hour, taking care not to bend them.
Do not use corrosive, acid or alkaline detergents.
Rinse them well and wait for them to be completely dry before reassembling them.
Washing in a dishwasher is permitted.
To extract and insert the metal anti-grease filters see the assembly instructions.
CARBON AND ZEOLITE FILTERS (OPTIONAL) KACL.963
In normal use conditions, we recommend regenerating the zeolite-carbon filter every 9 months and replacing it after 18 months. Simply place it in a domestic oven at a temperature of 200°C for approximately 1 hour to regenerate it. Wait until the filter cools before reassembling it.
GREASE DRIP TRAY
It is advisable to clean the tray every 1 month.
Do not use corrosive, acid or alkaline detergents.
For more thorough cleaning, remove the oil collection tray (see figure) and wash it with water and washing up liquid. Rinse it well and wait for it to be completely dry before reassembling it.
DISPOSAL AFTER END OF USEFUL LIFE

The crossed-out wheeled bin symbol on the appliance means that the product is WEEE, i.e. "Waste electrical and electronic equipment", accordingly it must not be disposed of with unsorted waste (i.e. with
"mixed household waste"), but it must be disposed of separately so that it can undergo specific operations for its re-use, or a specific treatment, to remove and safely dispose of any substances that may be harmful to the environment and remove the raw materials that can be recycled. Proper disposal of these products contributes to saving valuable resources and avoid potential negative effects on personal health and the environment, which may be caused by inappropriate disposal of waste.
You are kindly asked to contact your local authorities for further information regarding the designated waste collection points nearest to you. Penalties for improper disposal of such waste can be applied in compliance with national regulations.
INFORMATION ON DISPOSAL IN EUROPEAN UNION COUNTRIES
The EU WEEE Directive was implemented differently in each country, accordingly, if you wish to dispose of this appliance we suggest contacting your local authorities or dealer to find out what the correct method of disposal is.
INFORMATION ON DISPOSAL IN NON-EUROPEAN UNION COUNTRIES
The crossed-out trash or refuse bin symbol is only valid in the European Union: if you wish to dispose of this appliance in other countries, we suggest contacting your local authorities or dealer to find out what the correct method of disposal is.

WARNING!
The Manufacturer reserves the right to make changes to the equipment at any time and without prior notice. Printing, translation and reproduction, even partial, of this manual are bound by the Manufacturer's authorisation.
Technical information, graphic representations and specifications in this manual are for information purposes and cannot be divulged.
This manual is written in Italian. The Manufacturer is not responsible for any transcription or translation errors.
We recommend keeping this manual together with the appliance for future reference.
In case of sale or transfer of the appliance to another person, make sure that the manual is also transferred, so that the new user can become familiar with the operation of the appliance and the relevant warnings.
Spare parts required.

Intended use
The warming drawer is intended for preparing, reheating and keeping food warm in domestic environments. The warming drawer must not be installed outdoors or in places where it may be exposed to atmospheric agents (rain, wind, etc.). - Any use other than those indicated above is not permitted. - The appliance can be used by children aged 8 years and above and by persons with reduced physical, sensory or mental capabilities or lack of experience and knowledge, provided they have been given supervision or instruction concerning use of the appliance in a safe way and understand the hazards involved.
Children must not play with the appliance. Cleaning and user maintenance must not be carried out by children without supervision.
Do not leave the warming drawer on without supervision.
The appliance is intended exclusively for domestic use, for cooking and reheating food in domestic environments, not in professional environments. Any other use, different from that intended, is considered improper and could cause damage to persons, property and domestic animals, and relieves the manufacturer of any liability.

Risk of burns
- Use the command lock key to prevent the appliance from being switched on by unauthorized persons.
- Do not allow children to touch the control panel or the cooking zones to prevent burns.
- Switch off the heating zones after use. Do not place metal objects on the heating zones.

Safety instructions
- Installation must be carried out by qualified and experienced installers in accordance with the manufacturer's instructions and current safety standards.
In case of damage to the cord or other components, do not use the appliance: disconnect it from the mains and contact your local dealer or an authorized service center.
Do not make any electrical, mechanical, or functional modifications to the appliance.
Do not attempt to repair the appliance or replace its parts yourself. Work performed by unqualified or unauthorized personnel may cause damage, including serious damage, to property and/or persons, and will void the manufacturer's warranty.
Use only cookware with a ferromagnetic base. The use of other materials is not permitted.
Kitchen utensils can be made of different materials.
They can be made entirely of iron, of an alloy containing iron, or of a material that does not contain it.
If the cookware is not made of a ferromagnetic alloy (aluminum, copper, etc.), it cannot be used on the induction hob. The bottom of such material may heat up unevenly and not reach high temperatures. If the cookware is made mainly of non-ferromagnetic material, the hob cannot detect it and the heating zone is not activated. Also, some of these materials release substances that react with the material from which the glass-ceramic hob is made, causing irreparable damage. Flat-bottomed cookware made entirely of ferromagnetic material is the most recommended and distributes heat evenly.
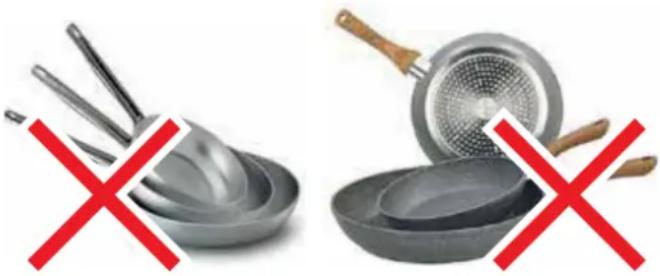
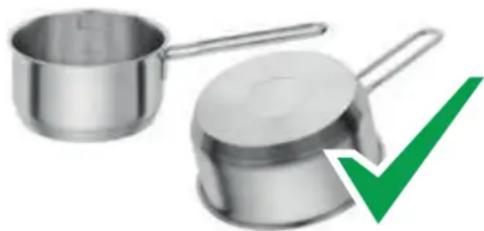
Use cookware with a diameter matching the diameter of the heating zone used. - Place only one pan or pot on each heating zone, even when the BRIDGE function is activated. Do not place hot cookware on the sensor keys or on the indicator lights, as this may damage the electronics located underneath.
Keep the keys and indicators clean.
Do not store metal objects directly under the hob. - Whenever possible, always use the cookware lid to reduce heat loss. - Cook dishes with a small amount of water. - After cooking (frying or boiling), switch the appliance to a lower power level.
Safety instructions and warnings
IpeynpexkdeHn IJI Nc KAPdNocTmnyIaTOPom:
yunbBAute, yTO B HENOCpeCTBeHHoB 6n3OcTH oT pa6oTaUero obopyoBaHnra rehepnpyeTc 3neKtpomarHnTHoe none. CyuectByeT BO3MOxHOCTb TORO, yTO KAPINOCHTMMyIaTOp erO BocPmET daXe Ha daNbHEmpacCTOAHN.
B cnyae comHennn obaaatae b K n3rotobTeIO KapnoocmyIaTopa nn K neauemy Bpaay.
3IeKtpomarHHTHOne NOLE BkIIOUeHHoBapOuHoi NaHEN MoKeT CO3daBaTb NOMEXI DnA pa60tbi HAMaHRmHBaIOUeROcO6OBOpYOBaHN. KpeINTHbe KapTbI, YCTpoIcTBa IINXpaHEHN INΦOpMaUN, KaMPaHHBe KaJIbKyNAITOpBI I T.D, He DOJNKBHbHXoDInBcB HENOpceDCTBEHHO 6IN3OCTOn OT BkIIOUeHHoBAPoOH NAnEH.
Metanlneckn npedMeTb, xpaHnueceBrauke, paonnoKeHHom noPnpbOpom, Moryt packaIbC B cnyae npdoJnKHeBHoro nCNoJIb3OBaHm np60pa. He xpaHnTe Metanlneckn npedMeTb Brauke, paonnoKeHHom HnOcpeCTBeHHo noD bapouHOn naHebIO.
Pnp6op cah6keh BEHTnIATOpOM oxnaJdeHn. Ecn nod BCTpoEHhbIM np6bopom HaxoNDTc RAuHK, Heo6xOaMm POPOXKtB MeKdy AunKOM m HuxkHe qactbIO np6bopa pa3dEnITeNbHyIO neperopokky, T06bl 06ceuNTb Heo6xOaMmB Bo3dyXoo6MeH dA BaroHoi NaHn I He donyctntb 3aropaxmbAHn BEHTNIATOpOB.
HnKorJa He nCnOJb3yIte OJHOBpeMeHHo DBe KaCTpIOJI nn DBe CKOBopoDb Ha OJHO BapOuHoi 30He nn Ha npAMoyroJbHO BapOuHoi 30He, IIn6o B BapOuHoi 30He PowerFlex.

Ipeep BbINONHeHem IIO60I onepaunno uCTke nI IN texo6CnyKBAHHIO OTCOeHNHTb annapat OT 3NeKTPonTuHa, BByHBBnky n3 PO3ETKNI C NOMOsbIO rnaBHO BO BIKIOaTeN.
He npikacatbca K BbTTKKe MOKpSiIM pyKAMn H He noIb3OBatbc8 eN, cT0A 6O- CNKOM.
Korda npnbop He mncnblbtycBcerda npoepeaTe,TO Bce aektpueckne KOMnoHETbCBET,acnpatOp) BBkIOHeHb.

3anpeaetc Kaactb KaKne-1n6o npedMeTbHa MexaHn3npoBaHHbe pe6pa.
O6wnBecnpemetOB,pameeHHbIXnINnIOBeWeHHbIXKbTTJXKE(rne30 npenycMOtpHo)HeonKeHnpBbIaTb1,5Kt.
Ha6nIpaTb 3a opntopHnam BO BpMa nCnonbObaHn: pa3orpeoe Macno MOxET BOCnPaMeHTbCR.
Hikorda He noIb3oBaTcB BtTAAKoi 6e3 MetaIIuueCKx XnpoynadNBAIOUxH fNtBPOB; B ATOM CUyae XnP IN 3arPnHEHH OceAIO T npDope,OTpuiatelbHO BnnaHa erO paobTy.
DocyHbte Hacn BttTMMOryHarpeBaBcN npn nCnoJIb3OBaHN BmecTe C bapouHbMnp6opam.
If cleaning is performed in accordance with the means specified in these instructions, there is a risk of fire.
When the hood is not used for a long period of time, it is necessary to turn off the main switch.

In case of simultaneous use of other devices (boilers, stoves, fireplaces, etc.) operating on gas or other fuel, provide appropriate ventilation in the room where smoke is exhausted, according to current standards.
regulatory requirements.
INSTALLATION
This section is intended only for qualified personnel.

Before proceeding with the installation of the hood, you should carefully read the safety techniques and precautionary measures.
TECHNICAL CHARACTERISTICS
The technical data of the appliance are given on the labels located inside the hood.
PLANNING
Do not install the hood outdoors or in places where it would be exposed to atmospheric agents (rain, wind, etc.).
BUSHING
CONNECTION TO THE ELECTRICAL NETWORK
This section is intended only for qualified personnel.

Before performing any work on the appliance, disconnect it from the power supply.
Make sure that the internal cables of the appliance are not disconnected.
deleted
Otherwise, contact the nearest service center.
Connection of the appliance to the electrical network must be carried out by qualified personnel.
Connection must be carried out in compliance with the requirements of current legislation.
Before connecting the appliance to the electrical network, check the following:
The voltage of the power supply corresponds to the voltage indicated on the rating plate installed inside the appliance; the electrical system complies with the requirements of current standards and can withstand the expected load (see technical characteristics of the appliance); the plug and socket must not be exposed to temperatures above 70°C; the appliance is equipped with an effective grounding system that meets the requirements of current standards; the accessibility of the socket used for powering the appliance.
In the following cases:
- If the plug is damaged: the use of the plug must be properly organized. The wires must be connected in the following way: green-yellow for grounding, blue for neutral, brown for phase. The plug must be connected to a safe socket. - Fixed plug of the power cord of the device, ensuring disconnection from the network with a contact separation distance that allows complete disconnection under overvoltage category conditions.
Protective devices must be provided in the electrical installation in accordance with the installation rules.
The green-yellow wire must be connected to the terminal marked with the letter E or the earth symbol, or colored green or green-yellow.
The manufacturer is not responsible in case of non-compliance with safety rules.
Safety devices of the appliance
Thermal cutout
If the heating zone is switched on for a long time at maximum power, it automatically switches off and the residual heat indicator lights up.
For repeated switching on of this heating zone, refer to the relevant chapters.
- Deactivation of the intensive heating function (booster, power booster), if they are switched on.
- Reduction of the set power level. - Switching off the heating zone.
On the display of the heating zone, the error message "E2" appears.
The heating zone can be switched on again after the error message disappears.
SAFETY INSTRUCTIONS FOR INSTALLATION
The installation of the steam oven must only be carried out after the completion of the installation of the kitchen units and hanging cabinets.
Make sure that the steam oven was used with a thermal cut-out, otherwise deformation or detachment may occur.

It is forbidden to install the appliance above a refrigerator or freezer, dishwasher, washing machine or clothes dryer.
Electrical connections:
Switch on the steam oven;
Select the heating zone;
Press the (+) key, then the (-) key: the symbol appears
Switch off the steam oven
He touched the heating zones while the indicator is still on.
TIMER FUNCTION AND AUTOMATIC SHUTDOWN BUSHING
The timer performs two functions:
1-READING TIME;
2-AUTOMATIC SHUTDOWN OF ONE OR SOME HEATING ZONES.
You can set the duration up to 99 minutes.
After the set time, the display lights up and a sound signal turns on, which turns off by pressing (+) or (-).
TIME SETTING FUNCTION
Setting the timer:
1.Turn on the panel (if it is off) using the power button, then simultaneously press the (+) and (-) buttons.
- Adjust the time as desired using the (+) and (-) buttons.
The timer starts counting time.
To change the duration, repeat the operation in point 1.
Resetting the timer:
1.Turn on the panel (if it is off) and simultaneously press the (+) and (-) buttons.
2. Set the cooking time to 00.
FUNCTION OF AUTOMATIC SHUTDOWN
ACTIVATING THE AUTOMATIC SHUTDOWN FUNCTION:
1-Turn on the hob;
2-Select the heating zone;
3-Set the heating power;
4-Set the timer as described above.
To activate the automatic shutdown function for another heating zone, repeat the above operations starting from point 2.
The timer and automatic shutdown functions can be used simultaneously.
PROBLEMS AND THEIR SOLUTIONS HOB
The hob or heating zone does not turn on:
The hob is not connected to the electrical network. - Check the fuse. The control lock key is pressed. Water or liquid on the surface of the keys. - Foreign object on the keys.

Symbol appears
- Absence of cookware in the heating zone. The cookware material is not suitable for induction hob. The diameter of the cookware is too small relative to the heating zone.
Symbol [E] appears:
Turn off the heating zone. - Contact the service center.
They are turned off from the heating zone for the heating.
- The overheating protection system has been activated; the pan was previously left on for too long in the ON state.
- Some keys are covered; let the appliance cool down.
The fan continues to work after turning off the heating.
This is normal: the fan protects the electronic control unit from high temperatures. - The fan stops automatically.
ERROR CODES
To help the service engineer, in case of errors, error codes are displayed on the user interface. In accordance with the provided document, the error codes table includes detailed information, providing a complete description of the error matrix. Standard E.G.O. errors are listed below; the specific user interface may differ. In the standard version, errors of the general user interface (Er xx) and errors of the heating zone (E/x) are distinguished. In case of heating zone errors, the incorrectly operating heating zone flashes, alternately showing the symbol 已 and the error code.
The activated carbon filter should be replaced every 18 months.
Additional information is provided in the chapter "SERVICE".
SENSOR PANEL CONTROL
| ①A - 9 + √ | |
| ①A | ВКЛ./ВыКЛ. КорOTКИ ИМПУьС: ВКПОЧЕНЕ ВБКПОЧЕНЕ ВБТЯЖК ДлиINнБИй ИМПУьС: ВКПОЧЕНЕ ABТOMATИССКORO ZIMКla (A) pa60Ты ВыТЯЖКВ 3abVicMоCTN OT MOшHOCTN KOHФОРOK. |
| + | Повышени SCКОPOCTи c 1 до ...9 (do "P"). СКОPOCTь "P": ВБПОЧАЕСТС TОЛБКИ НЕ HECKОЛБК O MИHYT, 3aTeM ВБПОЧАЕСТС SCKОPOCTь 9. |
| - | Понижени SCKОPOCTи c P do 1. |
| ↓ | С ВКПОЧENHI BвТяЖКоI (КорOTКИ ИМПУьс): TIMER (kpac- Нь мпгалочи ИнДИКATOP) АВТOMATИССКOE ВБКПОЧЕНICE счYSTЯ 15 МИHYT. Зта Функция OТКПОЧАЕСТС (kpacнь ИнДИКATOP ВБКПОЧЕH), ecли: - ВБПОЧАЕСТС DBIVATIEL (KNONKA ①A). - НжмITE KHNKу TIMER euple pa3 ②F. При ВБПОCHENHI BвТяЖКe (ДлиннIH I MПУьс 4s): OTKPBПЕ pe6ep ДЯг ТЕSOБСЛУЖВАИВ YBТЯЖК I METAПИССКHX ΦИЛТРОВ II |
| СИГHAЛ TPEBOГИ METAJIИССКORO XИЮВОTOФИЛТPA TEXOBSCNYKBAHAHIE NOSEnpi6blnITelbNo 30 chosob pa6OTbI HaxmITE Na 5 ceKYHd KNONKY ①ДЯ C6poca CyeTNUKA. | |
| СИГHAЛ TPEBOГИ YFGOLBHOTOGEOLINTHOROФИЛТPA TEXOBSCNYKBAHAHIE NOSEnpi6blnITelbNo 2000 chosob pa6OTbI HaxmITE Na 5 ceKYHd KNONKY ①ДЯ C6poca CyeTNUKA. ДЯ podKПОЧЕНI CBHANA TPEBOH: При ВБПОCHENHI BвТяЖKE HAXMITE KHNKI ④ - | |

If the control panel is completely inactive, before contacting technical support, temporarily disconnect (for about 5 minutes) the appliance's power supply,
carefully using the main switch, to restore normal operation. If this measure is ineffective, contact technical support.
CLEANING AND CARE

WARNING!
Do not use steam machines for cleaning.
Before cleaning the steam iron, make sure it has cooled down to room temperature.
Always empty the steam iron after each use when using cleaning agents for glass ceramics.
Do not use cleaning agents containing:
- Corrosive substances (acids, alkalis, ammonia). - Abrasive substances (scouring powders).

Do not wash the lid in the dishwasher.
Do not use sharp or abrasive instruments.
After cleaning, wipe the surface of the appliance with a soft cloth.
USEFUL CARE TIPS
Regularly clean the hob, preferably after each cooking session. Try to avoid using abrasive sponges or abrasive cleaning agents. For cleaning glass ceramic surfaces, do not use strong cleaning agents such as aerosol oven cleaners or universal cleaning agents.
If you do not have time...
Do not allow contact of hot pans with the glass ceramic surface, aluminum foil, aluminum foil, sugar or
sugar-containing products. Remove any spills as quickly as possible with a cleaning scraper. If these items remain on the surface, they may
damage the glass ceramic surface. Therefore, apply a special cleaning agent to it.
Check before preparing products containing large amounts of sugar.
Insert the results of all simple operations:
Thoroughly clean the surface first, remove greasy stains and dirt with a suitable scraper.
Then apply a few drops of suitable cleaning agent to the cooled hob surface and spread with a paper towel or clean cloth. Finally, wipe the surface dry with a damp cloth. Done!
How to determine the correct scraper for cleaning glass ceramic?
The scraper is made of metal (not plastic or ceramic). The scraper is equipped with a protective guard that is easy to use - the blade is level and securely fixed in the housing, does not shift - the blade is straight, without signs of damage or rust. Check the serial number (e.g., TUV mark) - see the user manual for safety instructions.
CLEANING OF INTERIOR SURFACES

It is forbidden to use electrical components or parts of motors inside the device with liquids or solvents.
Cleaning of internal metal parts is described in the following
paragraph.
METALLIC GREASE FILTERS
It is recommended to wash the metal filters (not dishwasher safe) in hot water with detergent or in a solution of water and vinegar, at least once a month, or more often if used frequently.
Do not use corrosive, acidic, or alkaline cleaning agents.
Rinse thoroughly and let them dry completely before reinstalling or placing them back.
It is allowed to wash the filters in a dishwasher.
Installation and mounting of metal strainers is described in the installation instructions.
FILTER CARTRIDGE WITH ACTIVATED CARBON (ADDITIONAL) KACL.963
Under normal operating conditions, it is recommended to regenerate the carbon filter every 9 months and replace it after 18 months.
Regeneration: place the cartridge in a container with hot water at a temperature of about 200°C for approximately 1 hour.
Before installing the filter, wait until it is completely dry.
GREASE COLLECTION TRAY
It is recommended to clean the tray every 1 month.
Do not use corrosive, acidic, or alkaline cleaning agents.
For more thorough cleaning, remove the oil collection tray (see figure) and wash it with hot water and dishwashing detergent.
Rinse thoroughly and dry completely before reinstalling it in place.
DISPOSAL AT END OF SERVICE LIFE

The crossed-out wheeled bin symbol on the product indicates that it belongs to the category WEEE, i.e., "waste electrical and electronic equipment", and therefore it must not be disposed of with unsorted municipal waste.
It must be disposed of separately so that the operations necessary for its recycling or special treatment can be carried out, in accordance with the waste management regulations, to minimize possible harmful effects on the environment and human health from hazardous substances contained in the equipment, and to promote the reuse of materials. Proper disposal will help conserve natural resources and avoid potential negative impacts on human health and the environment, which could result from incorrect disposal. For more detailed information about the nearest collection point for recycling, please contact your local authorities. In accordance with national legislation, penalties may be imposed for incorrect disposal of this waste.
INFORMATION ON DISPOSAL IN EUROPEAN UNION COUNTRIES.
The European Union directives on electrical and electronic equipment (WEEE) have been implemented differently in each country, so if you wish to dispose of this appliance, we recommend contacting your local authorities or the retailer for information on proper disposal.
The check mark for the waste bin is only valid in the countries of the European Union. If you intend to dispose of this product in other countries, we advise you to contact the local authorities or the distributor for information on the correct disposal method.

ATTENTION!
The manufacturer reserves the right to make changes to the device at any time without prior notice. Reprinting, translation, including partial, of this manual is only possible after obtaining prior written permission from the manufacturer.
The technical information, illustrations, and specifications provided in this manual are for orientation purposes and are not binding.
This manual was compiled in Italian. The manufacturer is not responsible for possible typos or translation errors.
SAFETY INSTRUCTIONS AND WARNINGS

SAFETY FOR THE COOKTOP
Safety shutdown
ERROR CODES FOR THE COOKTOP
HOOD WITH INTERNAL RECIRCULATION (FILTERING)

WHEN SHOULD THE HOOD BE TURNED ON?
SAFETY INSTRUCTIONS AND WARNINGS

- INTENDED USE
- DANGER OF BURNS
- TECHNICAL SAFETY
- USE WARNINGS
- KITCHENWARE HAVE DIFFERENT TYPES OF BOTTOMS
- SAFETY AND WARNING INDICATIONS
- WARNING FOR PEOPLE WEARING PACEMAKERS
- INSTALLATION
- TECHNICAL FEATURES
- POSITIONING
- COOKER
- ELECTRICAL CONNECTION
- IN CASE OF
- SAFETY DEVICES ON THE COOKER
- SAFETY SHUTDOWN
- OVERHEATING DEVICE
- SAFETY INSTRUCTIONS
- FOR ASSEMBLY
- OPERATION AND USE OF THE COOKTOP
- ONLY USE COOKWARE SUITABLE FOR INDUCTION HOBS
- WHEN A COOKING AREA IS TURNED ON, THE BOTTOM OF THE SAUCEPAN HEATS
- BASIC FUNCTIONS
- BRIDGE FUNCTION
- DEACTIVATION OF THE BRIDGE FUNCTION
- BOOSTER FUNCTION
- KEEP WARM FUNCTION
- SHUTDOWN OF THE COOKER
- TO SHUTDOWN THE COOKING AREA
- TURN OFF THE COOKER
- TIMER FUNCTION AND AUTOMATIC SHUTDOWN FOR THE COOKER
- TIMER
- AUTOMATIC SHUTDOWN
- WHAT TO DO IN CASE OF COOKER PROBLEMS
- THE COOKER OR COOKING AREAS DO NOT TURN ON
- THE SYMBOL IS DISPLAYED
- THE SYMBOL [E] IS DISPLAYED
- ONE OF THE AREAS OR THE ENTIRE COOKER TURNS OFF
- THE FAN KEEPS ON WORKING AFTER THE COOKER SHUTDOWN
- COOKERS ERROR CODES
- NOTE
- COOKER HOOD
- HOOD WITH INTERNAL RECIRCULATION (FILTERING)
- ASSEMBLY INSTRUCTIONS
- OPERATION
- WHEN TO TURN ON THE HOOD
- WHICH SPEED IS TO BE SELECTED
- WHEN SHOULD THE FILTERS BE WASHED OR REPLACED
- CLEANING AND MAINTENANCE
- ATTENTION
- USEFUL CARE TIPS
- ACCIDENTS HAPPEN
- SPARKLING RESULTS IN ONLY THREE STEPS
- HOW DO I IDENTIFY A SUITABLE GLASS-CERAMIC SCRAPER
- CLEANING OF INTERNAL SURFACES
- METAL ANTI-GREASE FILTERS
- CARBON AND ZEOLITE FILTERS (OPTIONAL) KACL
- GREASE DRIP TRAY
- DISPOSAL AFTER END OF USEFUL LIFE
- INFORMATION ON DISPOSAL IN EUROPEAN UNION COUNTRIES
- INFORMATION ON DISPOSAL IN NON-EUROPEAN UNION COUNTRIES
- WARNING
- RISK OF BURNS
- KITCHEN UTENSILS CAN BE MADE OF DIFFERENT MATERIALS
- SAFETY INSTRUCTIONS AND WARNINGS
- IPEYNPEXKDEHN IJI NC KAPDNOCTMNYIATOPOM
- TECHNICAL CHARACTERISTICS
- PLANNING
- BUSHING
- CONNECTION TO THE ELECTRICAL NETWORK
- SAFETY DEVICES OF THE APPLIANCE
- THERMAL CUTOUT
- SAFETY INSTRUCTIONS FOR INSTALLATION
- SWITCH OFF THE STEAM OVEN
- TIMER FUNCTION AND AUTOMATIC SHUTDOWN BUSHING
- READING TIME
- TIME SETTING FUNCTION
- SETTING THE TIMER
- RESETTING THE TIMER
- FUNCTION OF AUTOMATIC SHUTDOWN
- PROBLEMS AND THEIR SOLUTIONS HOB
- THE HOB OR HEATING ZONE DOES NOT TURN ON
- SYMBOL APPEARS
- SYMBOL [E] APPEARS
- THEY ARE TURNED OFF FROM THE HEATING ZONE FOR THE HEATING
- THE FAN CONTINUES TO WORK AFTER TURNING OFF THE HEATING
- ERROR CODES
- SENSOR PANEL CONTROL
- CLEANING AND CARE
- IF YOU DO NOT HAVE TIME
- INSERT THE RESULTS OF ALL SIMPLE OPERATIONS
- HOW TO DETERMINE THE CORRECT SCRAPER FOR CLEANING GLASS CERAMIC
- CLEANING OF INTERIOR SURFACES
- METALLIC GREASE FILTERS
- FILTER CARTRIDGE WITH ACTIVATED CARBON (ADDITIONAL) KACL
- GREASE COLLECTION TRAY
- DISPOSAL AT END OF SERVICE LIFE
- SAFETY FOR THE COOKTOP
- ERROR CODES FOR THE COOKTOP
- WHEN SHOULD THE HOOD BE TURNED ON
Brand : FALMEC
Model : Quantum Easy
Category : Cooker