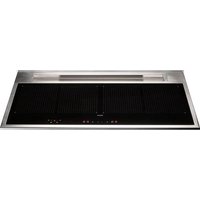
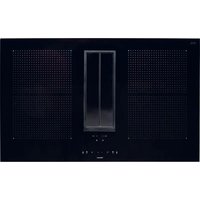
Induction Hob 78 cm - Cooker FALMEC - Free user manual and instructions
Find the device manual for free Induction Hob 78 cm FALMEC in PDF.

| Product type | Induction hob |
| Brand | Falmec |
| Model | Induction Hob 78 cm |
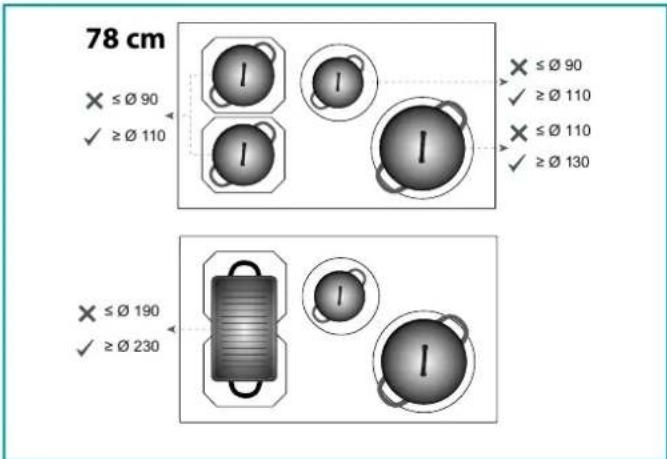
| Dimensions (width) | 78 cm |
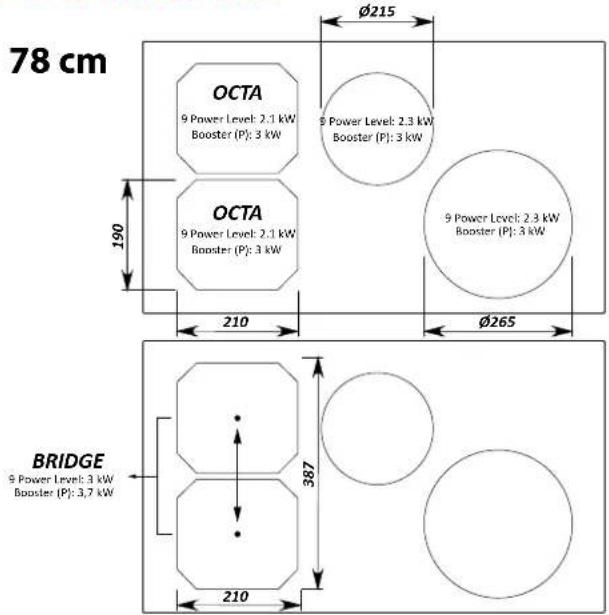
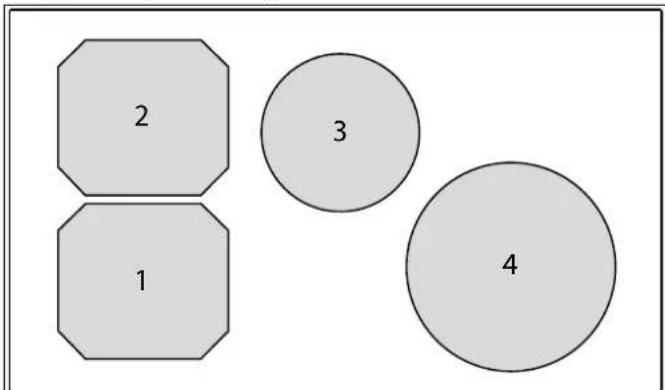
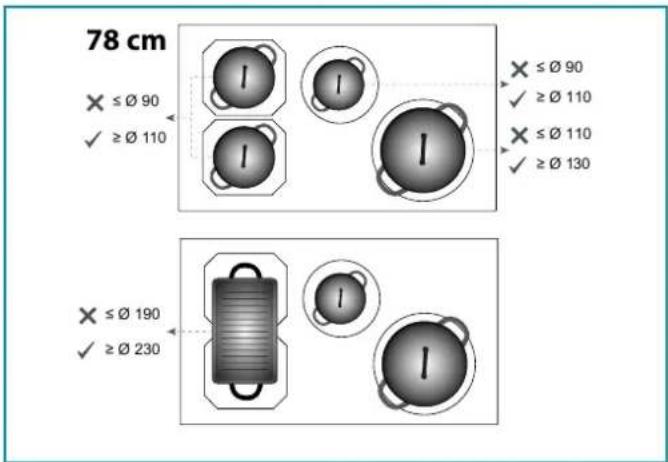
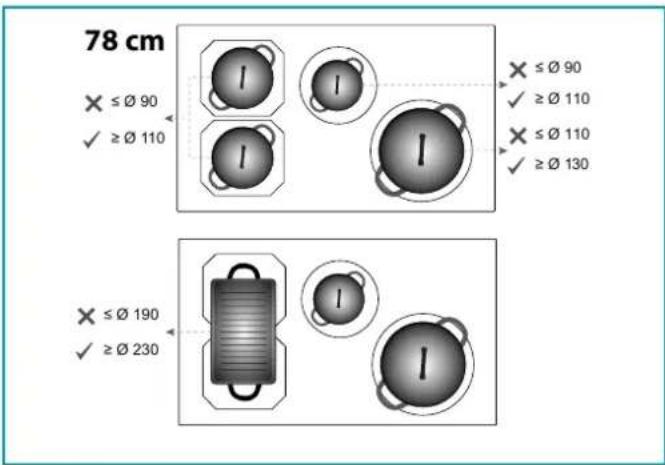
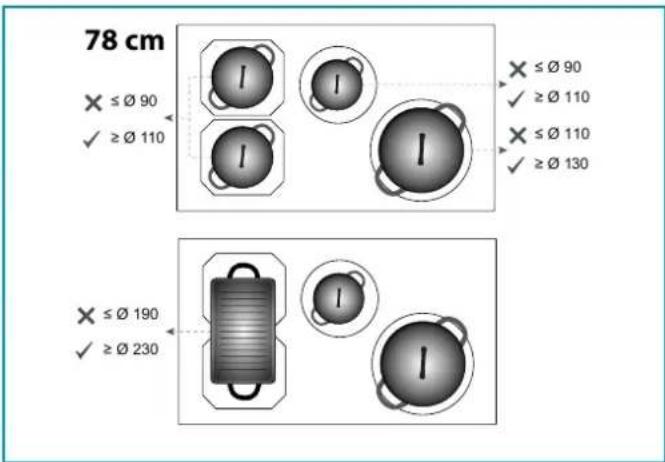
| Number of cooking zones | 4 zones (2 OCTA 21x19 cm, 1 Ø20 cm, 1 Ø25 cm) |
| Zone type | Induction |
| Power supply | 220-240 V~50/60 Hz (single-phase) or 380-415 V~50/60 Hz (three-phase) |
| Total power | 2.8 - 7.4 kW (adjustable) |
| Energy consumption | 183.5 Wh/kg (according to EN 60350-2) |
| Main functions | Booster, Bridge, Keep Warm, Chef Cook, Pause, Lock, Child Safety, Timer, Automatic Heating, Recall |
| Bridge function | Allows pairing two OCTA zones for rectangular pans |
| Chef Cook function | Activates 3 zones with predefined powers |
| Keep Warm function | Maintains food at low temperature (level 0-1) |
| Pause function | Suspends cooking for max 10 minutes |
| Child Safety function | Locks all keys |
| Timer function | Timer up to 9h59 min with audible alarm |
| Automatic Heating function | Heats at max power for a set time then returns to set level |
| Maintenance and cleaning | Clean with a specific ceramic glass cleaner after each use. Avoid abrasive products and sharp objects. Use a metal scraper for stuck residues. |
| Safety | Automatic emergency shutdown, overheat protection, control lock, child safety, residual heat indicator |
| Spare parts and repairability | Use only original spare parts. Contact an authorized technical assistance center for any repairs. |
| General information | User manual of 116 pages available in several languages. Keep the manual with the appliance. |
Frequently Asked Questions - Induction Hob 78 cm FALMEC
User questions about Induction Hob 78 cm FALMEC
0 question about this device. Answer the ones you know or ask your own.
Ask a new question about this device
Download the instructions for your Cooker in PDF format for free! Find your manual Induction Hob 78 cm - FALMEC and take your electronic device back in hand. On this page are published all the documents necessary for the use of your device. Induction Hob 78 cm by FALMEC.
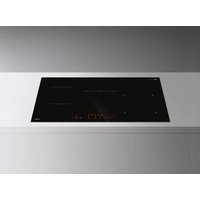
USER MANUAL Induction Hob 78 cm FALMEC
Piano Induzione
58 cm
78 cm
INSTRUCTIONS BOOKLET
LIBRETTO ISTRUZIONI ^1T
INSTRUCTIONS BOOKLET EN
natural_image
Isometric line drawing of a rectangular plate with internal lines and mounting holes (no text or symbols)
9,1 kg
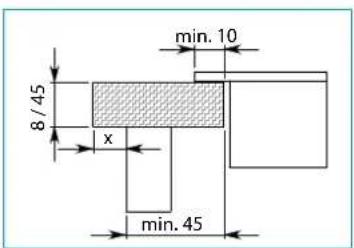
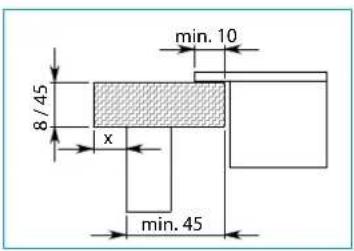
IT - Misure foro per incasso.
EN - Hole measurements for installation.
DE - Lochabmessungen für Einbau.
FR - Mesures du trou pour encastrement.
ES - Medidas del orificio para empotrado.
INSTALLAZIONE
IN APPOGGIO
TOP-MOUNTED
INSTALLATION
natural_image
Isometric view of a rectangular electronic device with internal lines and mounting holes (no text or symbols)
10,7 kg
IT - Misure foro per incasso.
EN - Hole measurements for installation.
DE - Lochabmessungen für Einbau.
FR - Mesures du trou pour encastrement.
ES - Medidas del orificio para empotrado.
INSTALLAZIONE
IN APPOGGIO
TOP-MOUNTED
INSTALLATION
natural_image
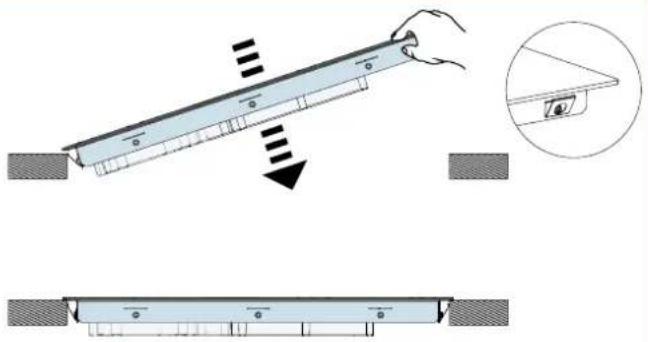
Diagram showing a mechanical assembly with a lever and a close-up view of a component (no text or symbols present)EN - Electrical connections (5).
natural_image
Four identical circular objects with I symbols, arranged in a 2x2 grid (no text or labels)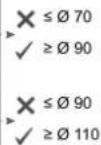
natural_image
Simple diagram with a rectangular object and two empty circles, no text or symbols present.78 cm


chemical
Molecular orbital diagrams showing electron density distribution in a solenoid structure- Pentole in terracotta
natural_image
Two kitchen utensils with red X marks, one holding a pan and the other a pan (no text or symbols)POTENZA TOTALE: 2,8 - 7,4 kW
CONSUMO ENERGETICO (Wh / Kg)
SAFETY INSTRUCTIONS AND WARNINGS

These warnings have been drawn up for your personal safety and those of others. You are therefore kindly asked to read the booklet carefully in its entirety before us-cleaning the equipment.
The Manufacturer declines all responsibility for any damage caused directly, or indirectly, to persons, things and pets as a consequence of failing to comply with the safety warnings indicated in this booklet.
It is imperative that this instructions booklet is kept together with the equipment for any future consultation.
If the equipment is sold or transferred to another person, make sure that the booklet is also supplied so that the new user can be made aware of the hood's operation and relative warnings.
Insist on original spare parts.
If the power cable is damaged, it must be replaced by the manufacturer or its technical service department or a similarly qualified person, so as to prevent any risk

Intended use
- This cooker is intended to be used in domestic environments to prepare and keep dishes warm.
- Do not install the cooker outdoors and do not expose it to outdoor environment (rain, wind, etc.).
- It is forbidden to use the cooktop on moving equipment.
- Any other use is not admitted.
- Do not use the cooker before installing it.
- Never open the case of the appliance.
- Falmec assures the compliance with the safety standards with original spare parts only.
- The appliance is not intended for use with external timer or remote control.
- The equipment can be used by children over the age of 8 and by persons with reduced physical, sensory and mental abilities, or with no experience or knowledge, as long as they do so under supervision or after having received relative instructions regarding safe use of the equipment and understanding of the dangers connected to it.
• Children are not to play with the equipment. Cleaning and maintenance by the user must not be carried out by children without supervision.
- Do not leave the cook top unmanned while it is working.

Danger of burns
- Use the control lock to avoid that unauthorised people can switch on the appliance by themselves.
- place handles of frying pans and saucepans in a way that children cannot touch them.
- Switch off the cooking areas after use.
• After use, switch off the hob elements via thei-control without relying on the pan detector - Do not place any metal object on cooking areas that are on.
- Metal objects such as knives, forks, spoons or lids should not be placed on the hob surface because they can get hot

Technical safety
• Installation operations are to be carried out by skilled and qualified installers in accordance with the instructions in this booklet and in compliance with the regulations in force.
If the power cable or other components are damaged, the cook top shall NOT be used: disconnect the cooker from the power supply and contact the Dealer or an authorised Servicing Department for repairs.
- Do not modify the electrical, mechanical or functional structure of the equipment.
- WARNING: failure to install screws or fasteners in accordance with these instructions may lead to electrical hazards
- Do not personally try to carry out repairs or replacements. Interventions carried out by incompetent and unauthorised persons can cause serious damage to the unit or physical and personal harm, not covered by the Manufacturer's warranty.
- Before installing the cooker, check the integrity and function of each part. Should anomalies be noted, do not proceed with installation and contact the Dealer.

Electrical safety
The electrical system to which the device is to be connected must be in accordance with local standards and supplied with earthed connection in compliance with safety regulations in the country of use. It must also comply with European standards regarding radio antistatic properties.
The connection data (voltage and frequency) shown on the data plate of the cooker must match with those of the electric network.
Compare these data before connection. In case of doubts, refer to an electrician.
Any changes to the electrical system must be carried out by a qualified electrician.
Do not try to solve the problem yourself in the event of equipment malfunction, but contact the Dealer or an authorised Servicing Department for repairs.
WARNING: If the surface is cracked, switch off the appliance to avoid the possibility of electric shock

When installing the device, disconnect the equipment by removing the plug or pining off the main switch.
Exception for Australia and New Zealand: For stationary appliances permanently connected to the fixed wiring, compliance with this requirement is considered to be met if the instruction concerning disconnection incorporated in the fixed wiring is in accordance with AS/NZS 3000
USE WARNINGS

- Before powering the appliance for the first time, remove any protective films and adhesives.
- While using, saucepans and kitchenware can cause noise that can depend on:
- a high power level.
- different materials of the bottom of saucepans.
• WARNING: Fire hazard: do not store objects on cooking surfaces - WARNING: The cooking process must take place under control. A short-cooking process must be constantly monitored
- WARNING: automatic cooking on the hob with grease or oil can be dangerous and can cause fires. Do not try to extinguish a fire with water, but turn off the appliance and then cover the flame with a lid or fire blanket.
- Never use water to put fire out. Deactivate the cooking area. Choke flames with a cover, a fireproofing blanket or something similar to it.
- Do not keep inflammable objects in the drawers below the cooker. The cutlery tray shall be made up of fire-resistant material.
- Do not heat empty saucepans or frying pans and always check that saucepans have a minimum quantity of liquids inside.
- Switch off the cooker after use.
- Continuously check the cooking in case of greases and oils used, as they can easily catch fire.
- Heat greases and oils at maximum for one minute and never use the Booster function.
- Pay attention not to burn yourself during and after using the device.
• Make sure that no fixed or mobile power cable of the device is in contact with the glass or a hot frying pan. - Do not use the cooker to heat pots.
- Do not apply any type of cover on the cooktop.
• Electrical cables are not to be in contact with the cooker. - It is recommended to protect hands from heat using pot holders. Only use dry gloves or pot holders.
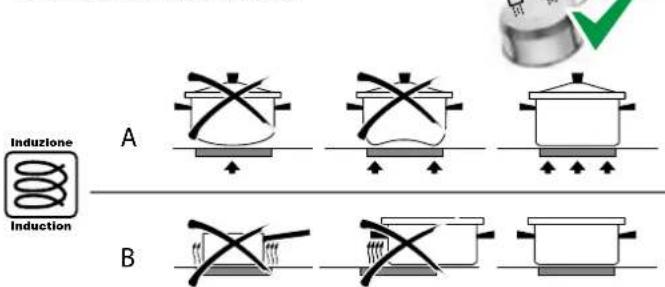
- Only use cookware with smooth and magnetic bottom suitable for induction hobs.
- Avoid that sugar, synthetic materials of aluminium, films are in contact with the hot areas. During cooling, those substances can cause cracks or other alterations on the pyroceram surface: switch off the device and immediately remove from the cooking area that is still hot
- When moving saucepans, make sure to lift them rather than slide them over the surface.
- Saucepans and cooker are to be perfectly cleaned before being in contact.
- Do not drop objects on the hob!

Only use saucepans with magnetic bottom. Other materials are not admitted.
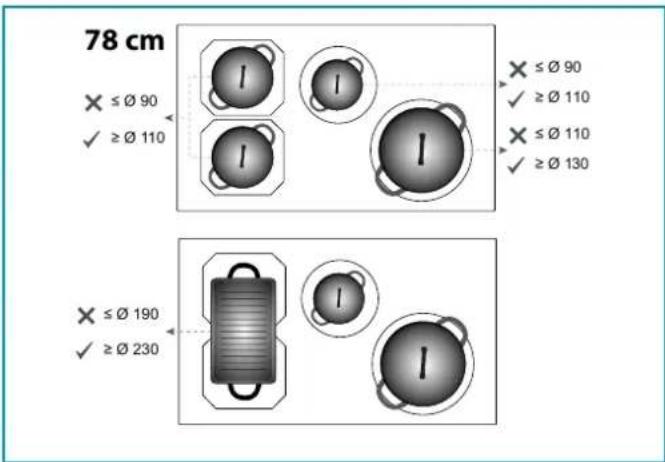
SAUCEPAN SELECTION
Saucepans suitable for induction hobs:
Only saucepans with a fully magnetic, sufficiently wide and perfectly flat bottom are suitable for use on induction hobs.
The bottom is magnetic if a magnet sticks to every point on the bottom of the saucepan.
Using saucepans with uneven bottoms can make it difficult to detect the saucepan and heat it up.
Suitable saucepans (examples):
- Thick-bottomed enamelled steel saucepans
- Cast iron saucepans with enamelled bottom
- Multi-ply stainless steel saucepans
- Ferritic stainless steel saucepans
Suitable saucepans (examples): - Thick-bottomed enamelled steel saucepans - Cast iron saucepans with enamelled bottom - Multi-ply stainless steel saucepans - Ferritic stainless steel saucepans
- Cast iron saucepans with enamelled bottom - Multi-ply stainless steel saucepans - Ferritic stainless steel saucepans
Saucepans not suitable for induction hobs:
Saucepans with non-magnetic or partially magnetic bottoms, with a size smaller than the indicated minimum and not perfectly flat are not suitable for use on induction hobs.
Unsuitable saucepans (examples):
- Copper saucepans
- Aluminium saucepans
- Ceramic saucepans
- Terracotta saucepans
- Stainless steel saucepans
- Copper saucepans - Aluminium saucepans - Ceramic saucepans - Terracotta saucepans - Stainless steel saucepans

natural_image
Two kitchen utensils, one with a fork and the other with a pan, both crossed out by red X marks (no text or symbols)Noise during cooking
Saucepans may generate noise during cooking: this is not a malfunction and does not affect the operation of the product.
The noise depends on the type of saucepan and the type of bottom; If it is particularly unpleasant, it is recommended to replace the saucepan.
Humming, hissing, crackling sounds and vibrations are due to the transfer of energy to the bottom of the saucepan, and are generated by the various materials it is composed of. This noise is produced when cooking on a high power level and decreases as the set power level decreases.
Internal ventilation noise: the appliance is equipped with a ventilation module to adjust the internal temperature of the induction hob. Ventilation can remain on even after switching off the appliance.
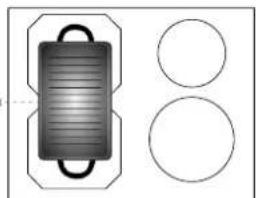
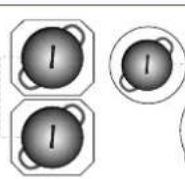
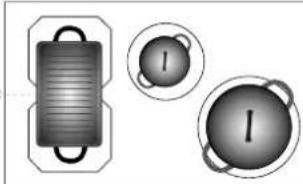
- Use saucepans of appropriate size to the desired cooking area. Always use a saucepan or frying pan on each cooking area, even with the BRIDGE function.
- Do not place hot saucepans on the sensor keys or the LEDs, as this could cause damage to the electronic components underneath.
- Keep controls and lamps always clean.
- Do no keep metal objects directly below the cooker.
- Possibly use always covers to avoid heat dispersion.
• Cook with little water.
• After starting grilling or cooking dishes bring the power level to a lower one.
SAFETY AND WARNING INDICATIONS
Warning for people wearing pacemakers:
Keep in mind that when the appliance is being used an electromagnetic field forms in the immediate proximity. There is therefore a remote possibility that the operation of the pacemaker might be affected. If in doubt, contact the pacemaker manufacturer or your GP.
The electromagnetic field of the hob during operation can affect the operation of magnetisable objects. Credit cards, life-saving devices, pocket calculators etc. should not be in the proximity of a hob when in operation.
Metal objects stored in the drawer underneath the appliance may become hot in case of prolonged use. Do not store metal objects in a drawer immediately underneath the hob.
The appliance is equipped with cooling fans. If there is a drawer under a built-in appliance, a separation must be ensured between the drawer and the bottom of the appliance, for appropriate hob ventilation and to make sure the fans are not be obstructed.
Never use two saucepans or pans on the same cooking zone, or a rectangular cooking zone, or a Bridge cooking area.

Before cleaning or carrying out maintenance operations, disconnect the equipment by removing the plug or switching off the main switch.
Disconnect the main switch when the equipment is not used for long periods of time.
PRODUCT DATA SHEET INDUCTION HOB 58
Product information according to Regulation (EU) Nr. 66/2014
Calculation method: EN 60350-2:2018+ A1:2021
| Manufacturer Falmec S.p.a. | |
| Model identification Induction hob 58 | |
| Type of hob Glass ceramic cooktop | |
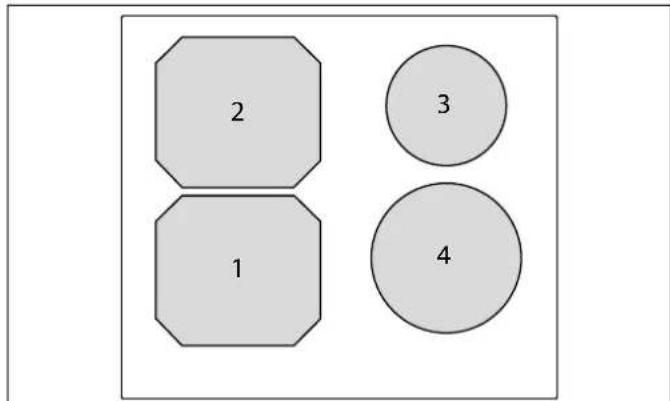
| Number of cooking zones / cooking areas | 4 |
| Heating technology | Induction cooking zones and cooking surfaces |
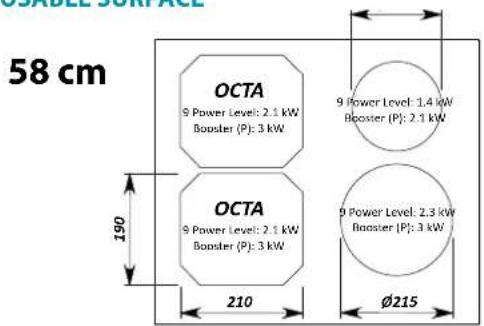
| Useful surface area | 2x(21,0x19,0 cm) + 1x(∅16,0 cm) + 1x(∅20,0 cm) |
SIZE OF USABLE SURFACE
![BRIDGE 9 Power Level: 3 kW Booster [P]: 3.7 kW 387 210](/content/2026/04/667193/images/0d3dbcf2d9009ddffc3f8fee3db75595886234830667d8c21b2b6453a21e87b6.jpg)
TOTAL POWER: 2,8 - 7,4 kW
ENERGY CONSUMPTION (Wh / Kg)
Energy consumption cooking zones:
| 1: 182,9 Wh/Kg |
| 2: 182,9 Wh/Kg |
| 3: 187,2 Wh/Kg |
| 4: 188,8 Wh/Kg |
Energy consumption of the hob: 185,4 Wh/Kg
PRODUCT DATA SHEET INDUCTION HOB 78
Product information according to Regulation (EU) Nr. 66/2014 Calculation method: EN 60350-2:2018+ A1:2021
| Manufacturer Falmec S.p.a. | |
| Model identification Induction hob 78 | |
| Type of hob Glass ceramic cooktop | |
| Number of cooking zones / cooking areas | 4 |
| Heating technology | Induction cooking zones and cooking surfaces |
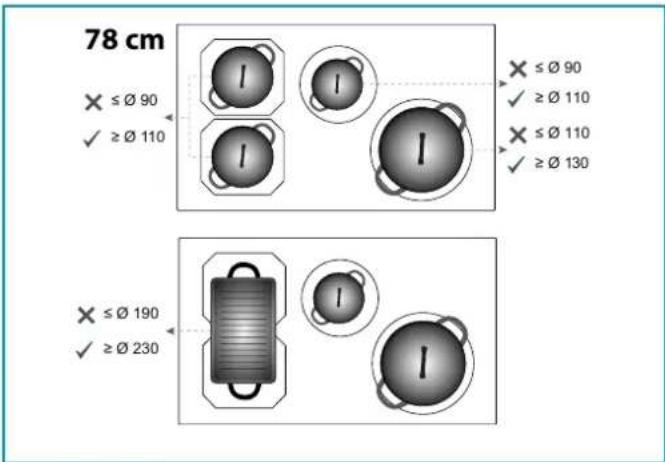
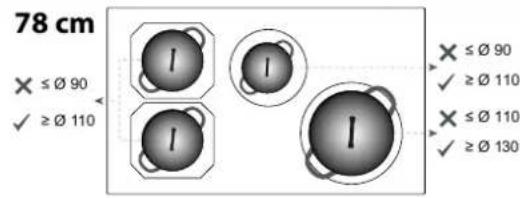
| Useful surface area | 2x(21,0x19,0 cm) + 1x(∅20,0 cm) + 1x(∅25,0 cm) |
SIZE OF USABLE SURFACE
TOTAL POWER: 2,8 - 7,4 kW
ENERGY CONSUMPTION (Wh / Kg)
Energy consumption cooking zones:
| 1: 182,9 Wh/Kg |
| 2: 182,9 Wh/Kg |
| 3: 188,8 Wh/Kg |
| 4: 179,6 Wh/Kg |
Energy consumption of the hob: 183,5 Wh/Kg
INSTALLATION
only intended for qualified personnel

Before installing the hood, carefully read the chapter 'SAFETY INSTRUCTIONS AND WARNINGS'.
TECHNICAL FEATURES
The technical specifications are exhibited on the labels located inside the hood.
SAFETY INSTRUCTIONS FOR ASSEMBLY
Install the cooker after installing kitchen cabinets and basis.
Make sure that worktops have been veneered with thermoresistant glue in order not to suffer deflections or detachments.
POSITIONING
Do not install the hood outdoors and do not expose it to outdoor environment (rain, wind, etc.).

It is forbidden to install the appliance on fridges or freezers, washing machines, dishwashers, or tumble driers.
COOKER
ELECTRICAL CONNECTION
(only intended for qualified personnel)

Disconnect the equipment from mains power network before carrying out any operation on the cooker.
Make sure that electric wires inside the cooker are not disconnect-
ed or cut:
in the event of damage, contact your nearest Servicing Department.
Refer to qualified personnel for electrical connections.
Connection must be carried out in compliance with the provisions of law in force.
Before connecting the cooker to the mains power network, check that:
- the mains voltage corresponds with the voltage indicated on the data plate located inside the cooker;
- the electrical system is compliant and can withstand the load (see the technical specifications located inside the cooker);
- the power supply plug and cable do not come into contact with temperatures exceeding 70°C;
- the power supply system is effectively and properly connected to earth in compliance with regulations in force.
• the socket used to connect the cooker is within reach.
In case of:
- devices fitted with cables without a plug: the type of plug to use is a "standardised" one. The wires must be connected as follows: yellow-green for earthing, blue for neutral and brown for the phase. The plug must be connected to an adequate safety socket.
- fixed equipment not provided with a power supply cable and plug; use a device that ensures disconnection from the electrical mains, with an opening gap of the contacts that enables total disconnection in overvoltage category III conditions.
- Said disconnection devices must be provided in the mains power supply in compliance with installation regulations.
The yellow/green earth cable must not be cut off by the switch.
The Manufacturer declines all responsibility for failure to comply with the safety regulations.
Connection of the cooker
| network Connection Cable section Power cable | |||
| 220V - 240V~50/60Hz | 1P+N / 2P 3 x | 4 mm ^2 | H 05 VV - FH 05 RR - F |
| 380V - 415V~50/60Hz | 2P+N 4 x 1 | .5 mm ^2 | H 05 VV - FH 05 RR - F |
| 380V - 415V~50/60Hz | 3P+N 5 x 1 | .5 mm ^2 | H 05 VV - FH 05 RR - F |
OPERATION AND
USE OF THE COOKTOP
ONLY USE COOKWARE SUITABLE FOR INDUCTION HOBS.
When a cooking are is turned on, the bottom of the saucepan heats.
The cooking area only heats thanks to the heat given by the saucepan.
The cooktop automatically detects the size of the saucepan.
The heating power is to be chosen based on what shall be cooked.
With a view to reducing environmental impact, it is suggested to always set the minimum power level suitable for the required cooking.
Please find below a short table:
SETTING AREAS
| 1 - 2 | Melt Heat | Sauces, butter, chocolate, gelatine Precooked dishes |
| 2 - 3 | Whisk Defrost | Rice, pudding and cooked dishes Vegetables, fish, frozen food |
| 3 - 4 | Steam | Vegetables, fish, meat |
| 4 - 5 | Boil | Boiled potatoes, soups, pasta Fresh vegetables |
| 6 - 7 | Cook over a low heat | Meat, liver, eggs, sausages Goulash, rolate, tripe |
| 7 - 8 Cook Fry | Potatoes, donuts, cakes | |
| 9 | Fry, bring to the boil | Steaks, omelettes Boil |
| P | Fry, bring to the boil | Bring to the boil big quantities of water |
Remark: heating time of cooktops is shorter than the gas cookers.
PUSH-BUTTON PANEL
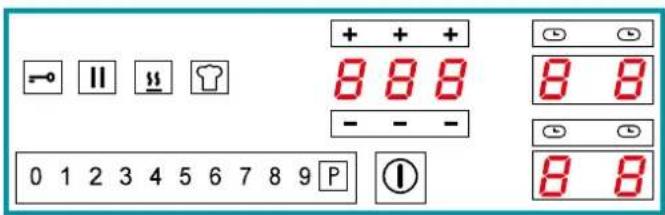
| Control description | |
| Cooker top ON/OFF. In case no other control is enabled, the cooker switches off automatically after a few seconds | |
| Control block key. Keyboard lock to prevent accidental controls | |
| Pause key. It suspends cooking. See PAUSE function | |
| KEEP WARM function key. keeps food warm | |
| CHEF COOK key. Enables 3 cooking areas with different heating powers. | |
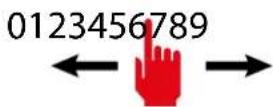
| 0 1 2 3 4 5 6 7 8 9 | Power level selector switch Sets the power of the selected cooking area on a scale of 0 to 9 |
| P | Booster key. Sets the power of the selected cooking area to the maximum available |
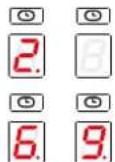
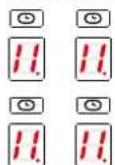
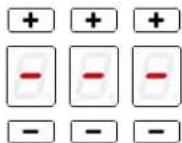
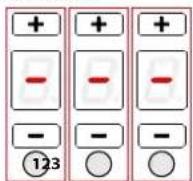
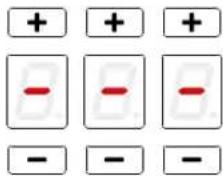
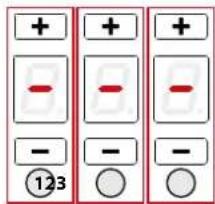
| Timer area. Displays the set timer. The and keys increase or decrease the value shown on the corresponding display. The figures correspond from left to right: Hours, tens of minutes, minutes. | |
| Cooking area. Displays and selects the corresponding cooking area: - Front left - Rear left - Front right - Rear right | |
| Cooking area timer. Displays the activation of the timer linked to the corresponding cooking area |
| Display description | |
| Cooking area in stand-by | |
| Selected cooking area |
| Selected power level | |
| Power boost : maximum cooking power | |
| Residual heat indicator | |
| Keep warm function enabled | |
| Bridge function enabled | |
| Saucepan not present on the cooker top or not detected. | |
| Pause function enabled | |
| Child lock function enabled | |
| Automatic heating function enabled |
POWER CHANGE PROCEDURE

CAUTION: reducing power results in a limitation of the power levels that can be set in individual areas. These limitations are automatically managed by the device.
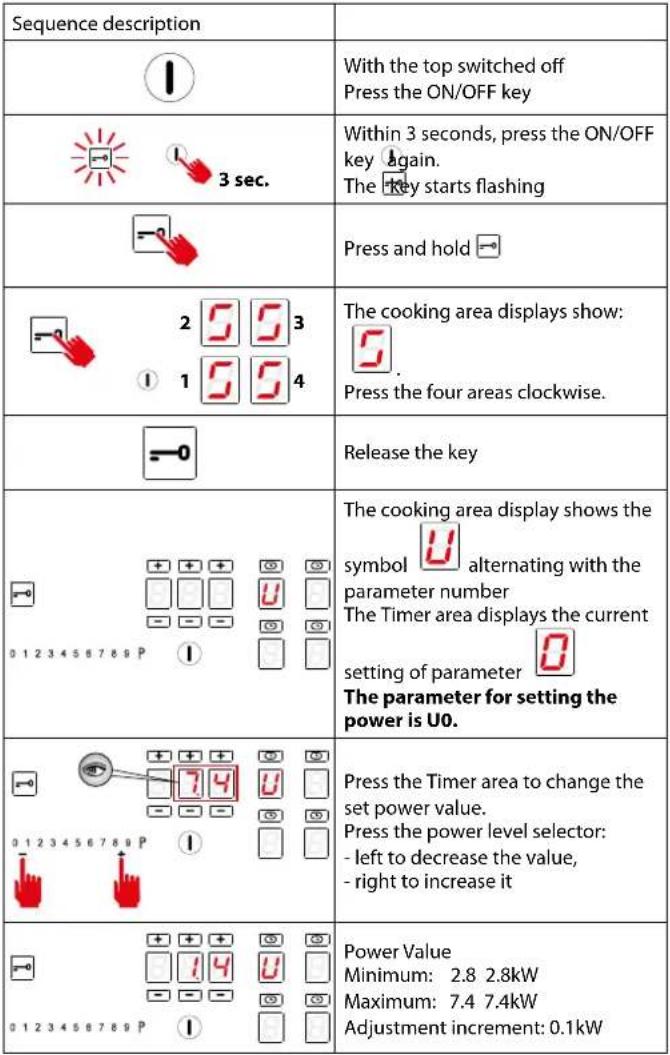 |
| Sequence description | |
| 0 1 2 3 4 5 6 7 8 9 P | Pressto exit parametersetting |
| 0 1 2 3 4 5 6 7 8 9 P | To save changes and exit the menu:- press the ON/OFF key1for 2 seconds.To exit the menu without savingchanges:- press thekey |
AUTOMATIC SWITCH-ON OF THE COOKING AREA
- Turn on the cooker top ①
- Place the saucepan, not empty, on the cooking area
- The key corresponding to the area is automatically switched on
- The power level selector switch is activated by illuminating level 0
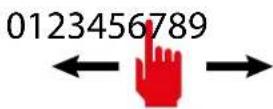
0123456789
- Press the key of the cooking area to be set. The bottom right-hand dot
lights up 0.
- Adjust the desired power level.
POWER LEVEL ADJUSTMENT:
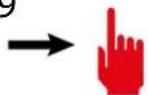
- Slide your finger to the right in the power level selector switch and stop at the desired level.
- The display of the selected cooking area shows the set power level:

- Press the P key to activate the booster level.

The display of the selected cooking area shows . The booster level is maintained for a maximum of 5 minutes, after which the power level is raised to 9.
SWITCHING OFF THE COOKING AREA:
- Slide your finger to the left in the power level selector switch and stop at level 0.

- The display of the selected cooking area shows the power level 0:

NOTE: all cooking areas can be switched off at the same time: press key for 2 seconds..
On the display of the cooking areas that are still too hot, the symbol is
displayed. Do not touch the cooking areas as long as the lamp

is on.
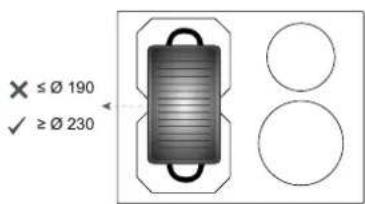
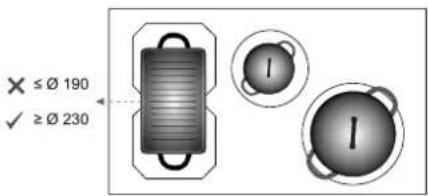
BRIDGE FUNCTION:
- This function allows for the simultaneous operation of the cooking areas: OCTA; for the use of fish kettles or large rectangular saucepans.

- Press the keys of the two cooking areas to be paired simultaneously.
CAUTION only the OCTA cooking areas can be coupled
- An acoustic signal warns of the activation of the function, the displays show:

- Adjust the desired power level.
To disable the BRIDGE function:
- Press the buttons of the two paired cooking zones at the same time.
KEEP WARM FUNCTION
keeps food warm
The power level is between 0 and 1
- Press the key of the cooking area to be set.

The bottom right-hand dot lights up
- Press the Keep Warm Key. - The cooking area display indicates the acti-
vation of the function

To deactivate the KEEP WARM function:
- Press the cooking area key with the Keep Warm function active

- Press the Keep Warm

CHEF COOK FUNCTION::
enables 3 cooking areas with three different powers, from left to right
- Press the Chef Cook key 📋 The cooking area display indicates the activation of the area and the power level.
To deactivate the CHEF COOK function:
- Press the Chef Cook key

PAUSE FUNCTION
suspends the operation of all cooking areas.
- Press the pause key □□
- The cooking area displays indicate the activation of the pause function
The Pause function can only be activated for 10 minutes, after which the device switches off.
To deactivate the PAUSE function:
- Press the pause key □. The key starts flashing Press any key except the Pause key.
- The function is disabled and the cooking areas will resume operation prior to activation of the Pause function.
NOTE: Interruption and restoration of the power supply deactivates the PAUSE function.
CONTROL BLOCK FUNCTION:
disables all device keys to prevent accidental activation when cleaning the cooker top.
-Press the Control block key for 1 second
All keys except the Control block and ON/OFF keys are disabled.
To deactivate the CONTROL BLOCK function:
- Press the Control block key for 1 second
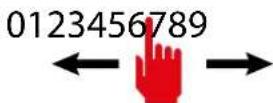
CHILD LOCK FUNCTION:
deactivates operation of all keys
- IMPORTANT: perform the entire procedure within 10 seconds

- Press a cooking area key for 3 seconds
- Release the key and slide your finger to the right in the power level selector switch from 0 to 9
0123456789

- The cooking area display indicates the activation of the function
To deactivate the CHILD LOCK function:
- IMPORTANT: perform the entire procedure within 10 seconds

- Press a cooking area key for 3 seconds
- Release the key and slide your finger to the left in the power level selector switch from 9 to 0

TIMER FUNCTION
allows you to set a time after which an acoustic alarm will sound.
- Press Timer area
- The Timer area is activated:
- Press the and keys to set the timer.
Area 1: hours
Area 2: tens of minutes
Area 3: minutes
Maximum setting time: 9 hours 59 minutes
- After 10 seconds the timer will start the countdown.
- At the end of the countdown, an acoustic signal will sound.
- Press any key to deactivate the acoustic signal.
COOKING AREA TIMER FUNCTION:
allows a cooking area to be switched off after a set time
-Press the key of the cooking area to be set.
- Press the corresponding symbol.
- The timer area is activated:
- Press the + and keys to set the timer.
Area 1: hours
Area 2: tens of minutes
Area 3: minutes
Maximum setting time: 9 hours 59 minutes
- After 5 seconds the timer will start the countdown.
- At the end of the countdown, the relevant cooking area will be switched off and an acoustic signal will sound.
- Press any key to deactivate the acoustic signal.
AUTOMATIC HEATING FUNCTION:
sets the maximum power for a preset time and returns to the previous power level.
-Press the key of the cooking area to be set. The bottom right-hand dot

lights up
- Slide your finger to the right in the power level selector switch and stop at the desired level. The function can only be activated for levels 1 to 8.
- Press and hold the selected level for 3 seconds
3 sec
This will also be the level to which the cooking zone will be returned at the end of the preset time, during which the cooking zone will run at maximum power.
- The cooking area display indicates the activation of the function

Function duration table:
| Power level | Automatic heating function time (seconds) |
| 1 | 48 |
| 2 144 | |
| 3 230 | |
| 4 312 | |
| 5 408 | |
| 6 120 | |
| 7 168 | |
| 8 210 | |
| 9 Function not available | |
| P Function not available | |
- When the time elapses, the function ends and the cooking area is reset to the previously set power level.
To deactivate the AUTOMATIC HEATING function:
1 - Wait for the end of the function time
or

2 - Press the cooking area key for 3 seconds
- the function ends and the cooking area is reset to the previously set power level.
or
3- If a lower power level is set than before the automatic heating function, the function is deactivated.
RECALL FUNCTION:
enables the recovery of cooking settings prior to an accidental cooker top switch-off.
- Perform the following steps within 6 seconds of an accidental switch-off
- Turn on the cooker top ①
- The pause key flashes
- Press the pause key □□
The RECALL function resets the operation of the cooking areas, timer functions and quick heating. Other functions will not be restored.
SAFETY DEVICES ON THE COOKER
Safety shutdown
If a cooking area exceeds the maximum time for operation at the same power, it is automatically switched off and the indication of the residual heat is shown.
To reset the cooking area, touch the necessary keys.
| Power level | 1 2 | 3 4 5 | 6 7 8 9 | P | ||||||
| Maximum duration of operation in hours | 6 6 5 | 5 4 1 | 5 1,5 | 1,5 1,5 | 5 min |
The cooker switches off automatically if one or more controls stay covered for more than 10 seconds.
To restore the proper operation:
- remove all objects from the control panel.
- clean the control panel.
- restart the cooker and the concerned area.
Overheating device
Before items of the cooker can overheat, the control reduces the used power by following this procedure for protection measures:
- Deactivation of booster and power booster if turned on.
- Reduction of the power level set.
- Shutdown of the cooking area concerned.
On the display of the cooking area the message "E2" is displayed.
It is possible to restore the cooking area when the default message is off.
OPERATION
WHEN TO TURN ON THE HOOD?
Switch on the hood at least one minute before starting to cook to direct fumes and vapours towards the suction surface.
After cooking, leave the hood operating until complete extraction of all vapours and odours. By means of the Timer function, it is possible to set auto switch-off function which will allow the hood to turn off automatically after 15 minutes of operation.
WHICH SPEED IS TO BE SELECTED?
speed (1): maintains the circulation of clean air with low electricity consumption.
speed (2): normal conditions of use.
speed (3): presence of strong odours and vapours.
speed (4): rapid disposal of odours and vapours.
With a view to reducing environmental impact, it is suggested to always set the minimum speed suitable for the required suction level.
| 1A | ON/OFFShort pulse: Hood switch ON/OFFLong pulse: Hood operation automatic cycle activation (A) according to plate power. | |
| + | Increase speed from 1 to 4Speed 4 is only active for a few minutes | The speeds are indicated by the LEDs on the keys:Speed 1Speed 2Speed 3Speed 4(“+”LED flashing) |
| - | Reduce speed from 4 to 1 | |
| Light on/offShort impulse: turn on and offLong impulse: see hood manual | ||
| TIMER(red LED flashing)Auto switch-off after 15 min.The function deactivates (red LED off) if:- The TIMER key (💡) is pressed again.- The ON/OFF key (♣) is pressed. | ||

If the pushbutton panel is completely inactive, before contacting the Technical assistance service, disconnect power temporarily to the appliance (about 5"), possibly by acting on the main switch, to
restore normal operation. If this measure has no effect, contact the Technical assistance service.
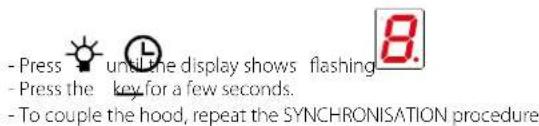
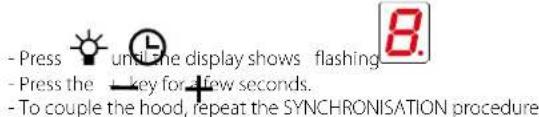
TOP-HOOD SYNCHRONISATION:
- WITHOUT REMOTE CONTROL
- Press the association key in the hood (see hood manual)
- Immediately press the 🎨 button on the hob
- WITH REMOTE CONTROL
- Assign the radio control to the hood as per the hood instructions
With push button panel switched off:
- Press the Ⓛ key on the cooker top until the digital dot on the display starts

- Press any key on the remote control. The cooker top stores the same code as the remote control.
- The hood can be controlled from both the remote control and the cooker top.
CREATE A NEW CODE
- The procedure must be carried out on the cooker top
With push button panel switched off:
RESTORING DEFAULT CODE
- The procedure must be carried out on the cooker top
With push button panel switched off:
CLEANING AND MAINTENANCE

ATTENTION!
For cleaning, never use a steam equipment.
Before cleaning the cooker, make sure that it is at room temperature.
Always clean the cooker after each use with a specific cleanser for pyroceram. Do not use products containing:
- corrosive agents (soda, acids, ammoniac).
- abrasive agents (dusts or paste).
Do not use pointed or abrasive objects.
After cleaning, dry the appliance with a soft cloth.
USEFUL CARE TIPS
Clean your glassceramic cooktop regularly, preferably every time you use it. Avoid using abrasive sponges or scouring agents.
Harsh chemical cleaners like oven sprays or stain removers are also unsuitable, as are bathroom or household cleaners.
Accidents happen ...
Do not allow the hot hob to come into contact with plastic, tin foil, sugar or sugary food have fallen on the hot glass-ceramic cooktop. Please scrape it off the hot surface as quickly as possible. If these substances melt, they can damage the glass-ceramic cooktop.
Sparkling results in only three steps:
To thoroughly clean your glass-ceramic cooktop, first remove dirt and food with a suitable metal scraper.
Once the glass-ceramic cooktop has cooled, put a few drops of a suitable cleaner on it and rub it on with a paper towel or a clean cloth.
Then wipe the glass-ceramic cooktop with a damp cloth and dry it with a clean cloth.
How do I identify a suitable glass-ceramic scraper?
- Scraper made of metal (won't melt or catch fire)
- Scraper easy to lock / to unlock
- Blade is fixed precisely, it does not shift
- Blade is unbroken, clean and stainless
- Scraper certified by testing institute, if procurable (e.g. TÜV-GS seal)
- User manual and safety instructions available
WHAT TO DO IN CASE OF COOKERS PROBLEMS
The cooker or cooking areas do not turn on:
• The cooker is not connected to the electric network.
• The protection fuse is released.
- Check if the block is not active.
- Keys are covered with water or grease.
• An object is placed on the keys.

The symbol is displayed
• There is no saucepan on the cooking area.
• The container used is not compatible with cooktops.
- The diameter of the saucepan bottom is too small compared to the cooking area.
The symbol [E] is displayed:
- Disconnect and connect the cooker.
- Contact the after-sales centre.
One of the area or the entire cooker turns off:
• The safety overheating system is active;
• The cooker or one cooking area remains on for too long;
• one or more keys are covered;
- one of the saucepans is empty and the bottom overheated.
The fan keeps on working after the cooker shutdown:
- This is not a malfunction: the fan keeps on protecting the electronic power unit of the device.
• The fan stops automatically.
COOKERS ERROR CODES
In case of error, the device displays error codes for support purposes.
The display of the cooking area shows the error code alternating 'E' with other symbols and numbers.
| Error code | Description Possible causes | Solution |
| E_+ + 0 + 3 | Continuous activation of a key | - Metal objects above the keyboard - water over the keyboard |
| E_+ + 2 + 1 | Internal temperature above 85°C | - covered or insufficient ventilation areas |
| E_+ + 3 + 1 | Incorrect configuration | - configuration error |
| E_+ + 4 + 2 | Internal supply voltages too high or low | Overcharging due to atmospheric discharge, electrical system failure or incorrect power connection |
| E_+ + 4 + 7 | No communication between keyboard and inductor modules | - Communication cable damaged or disconnected - Damaged inductor module |
| E_+ + 2 + 0 E_+ + 2 + 2 E_+ + 3 + 5 E_+ + 3 + 6 | Control keyboard internal error | |
| E_+ + 2 | Temperature limits were exceeded in the cooking area | - Empty saucepan - unsuitable saucepan type - saucepan or glass too hot |
| E_+ + 3 | Unsuitable saucepan | - The saucepan has little ferritic material - The saucepan caused an error in the inductor module - Inductor failure |
| E_+ + 4 | Incorrect configuration | - inductor configuration error |
| E+5 | No communication between keyboard and generator | - Faulty or disconnected LIN cable- Incorrect electrical connection- Internal fault- Configuration error | - Contact Technical Support- Check terminal board electrical connection- Contact Technical Support- Contact Technical Support |
| E+6 | Incorrect power supply | - Out-of-range supply voltage- Incorrect supply voltage frequency- Inductor failure | - Check that the supply voltage is correct: voltage and frequency.- Contact Technical Support |
| E+7 | Internal inductor failure | - Contact Technical Support | |
| E+8 | Cooling fan not working | - Dirty fan- Fan Failure | - Clean the air vents- Contact Technical Support |
| E+9 | Faulty inductor temperature probe | - Faulty inductor temperature probe | - Contact Technical Support |
| E+A | Internal inductor failure | - Contact Technical Support | |
| E+H | Inductor temperature probe has a fixed value | - glass too hot- faulty probe | - Cool the glass- Contact Technical Support |
Note:
Not each failure can be detected automatically by the system, e.g. in case of defect of the User interface power supply.
DISPOSAL AFTER END OF USEFUL LIFE

The crossed-out wheeled bin symbol on the appliance means that the product is WEEE, i.e. "Waste electrical and electronic equipment", accordingly it must not be disposed of with unsorted waste (i.e. with
"mixed household waste"), but it must be disposed of separately so that it can undergo specific operations for its re-use, or a specific treatment, to remove and safely dispose of any substances that may be harmful to the environment and remove the raw materials that can be recycled. Proper disposal of these products contributes to saving valuable resources and avoid potential negative effects on personal health and the environment, which may be caused by inappropriate disposal of waste.
You are kindly asked to contact your local authorities for further information regarding the designated waste collection points nearest to you. Penalties for improper disposal of such waste can be applied in compliance with national regulations.
INFORMATION ON DISPOSAL IN EUROPEAN UNION COUNTRIES
The EU WEEE Directive was implemented differently in each country, accordingly, if you wish to dispose of this appliance we suggest contacting your local authorities or dealer to find out what the correct method of disposal is.
INFORMATION ON DISPOSAL IN NON-EUROPEAN UNION COUNTRIES
The crossed-out trash or refuse bin symbol is only valid in the European Union: if you wish to dispose of this appliance in other countries, we suggest contacting your local authorities or dealer to find out what the correct method of disposal is.

WARNING!
The Manufacturer reserves the right to make changes to the equipment at any time and without prior notice. Printing, translation and reproduction, even partial, of this manual are bound by the Manufacturer's authorisation.
Technical information, graphic representations and specifications in this manual are for information purposes and cannot be divulged.
This manual is written in Italian. The Manufacturer is not responsible for any transcription or translation errors.
natural_image
Two kitchen utensils with cutlery and a pan, each marked with red X (no text or symbols)PRODUKTDATENBLATT INDUKTIONSKOCHFELD 58
PRODUKTDATENBLATT INDUKTIONSKOCHFELD 78
natural_image
Two kitchen utensils with red X marks, one holding a spoon and the other holding a pan (no text or symbols)Dispositif anti-surchauffe
natural_image
Two kitchen utensils with crossed handles and a pan, both marked with red X (no text or symbols)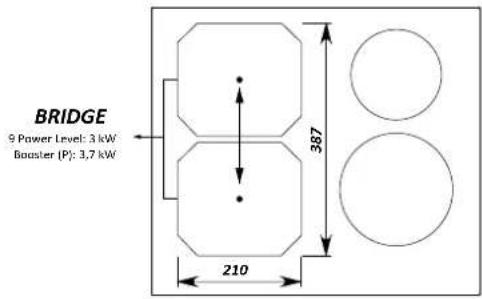
ОБЩАЯ МОЩНОСТЬ: 2,8 - 7,4 kW
natural_image
Two kitchen utensils, one with a spoon and the other with a pan and lid, both marked with red X symbols (no text or labels present)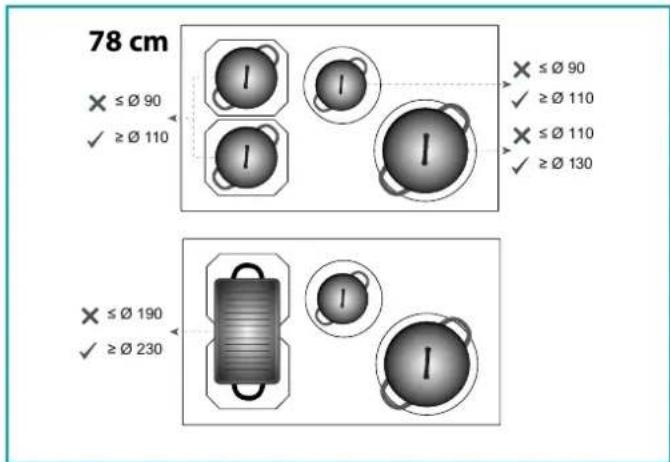
natural_image
Two kitchen utensils, one with a pan and three cutlery, the other with a pan and wooden handle crossed out (no text or symbols)Larm under kogning
SIKKERHED FOR KOGEPLADEN
Sikkerhedsslukning
HVILKEN HASTIGHED SKAL MAN VÄLGE?
FEJLKODER PÅ KOGEPLADEN
VEILIGHEIDSINSTRUCTIES EN WAARSCHUWINGEN

PRODUCTINFORMATIEBLAD INDUCTIEKOOKPLAAT 58
Productinformatie conform verordening (EU) nr. 66/2014
Berekeningsmethode: EN 60350-2:2018+ A1:2021
![BRIDGE 9 Power Level: 3 kW Booster [P]: 3.7 kW 387 210](/content/2026/04/667193/images/c89efeccc09c455689047d497b97f0457aa8340b5be4c1c86f4051aa966b806d.jpg)
TOTAAL VERMOGEN: 2,8 - 7,4 kW
ENERGIEVERBRUIK (Wh / Kg)
PRODUCTINFORMATIEBLAD INDUCTIEKOOKPLAAT 78
Productinformatie conform verordening (EU) nr. 66/2014 Berekeningsmethode: EN 60350-2:2018+ A1:2021

FOUTCODES VAN DE KOOKPLAAT

Induktioliedelle soveltumattomat kattilat:
natural_image
Two kitchen utensils with red X marks, one holding a spoon and the other a pan (no text or symbols)KOKONAISTEHO: 2,8 - 7,4 kW