
VCP 4130 - Vacuum Cleaner GRUNDIG - Free user manual and instructions
Find the device manual for free VCP 4130 GRUNDIG in PDF.
| Product type | Rechargeable bagless vacuum cleaner |
| Brand | Grundig |
| Model | VCP 4130 |
| Power supply | Rechargeable battery, mains charger 100-240V~ 50-60Hz, output 27V 0.5A |
| Nominal power | 110 W |
| Charging time | 4 to 6 hours |
| Maximum runtime | 17 minutes at maximum power, 45 minutes at minimum power |
| Battery type | Lithium-ion (built-in, not user-removable) |
| Charge indicators | White LED lights (charging) and red (low battery) |
| Speed adjustment | Two speeds: minimum and maximum |
| Filtration system | EPA E10 filter and plastic filter |
| Dust container capacity | Not specified (estimated: approx. 0.5 L) |
| Included accessories | Electric turbo brush, crevice tool, dusting brush, wall charging station |
| Intended use | Hard floors and carpets, domestic use |
| Maintenance | Clean the container after each use; do not wash filters with water; replace EPA filter if deformed |
| Safety | Do not vacuum liquids, flammable materials, hot ashes; do not use without filter |
| Dimensions (approx.) | Height: approx. 112 cm (with tube), body diameter: approx. 25 cm |
| Weight (approx.) | Approximately 2.5 kg |
| Spare parts available | EPA filter, brush, battery (replacement by a professional) |
| Repairability | Battery replaceable only by a qualified technician; other parts accessible |
Frequently Asked Questions - VCP 4130 GRUNDIG
User questions about VCP 4130 GRUNDIG
0 question about this device. Answer the ones you know or ask your own.
Ask a new question about this device
Download the instructions for your Vacuum Cleaner in PDF format for free! Find your manual VCP 4130 - GRUNDIG and take your electronic device back in hand. On this page are published all the documents necessary for the use of your device. VCP 4130 by GRUNDIG.
USER MANUAL VCP 4130 GRUNDIG
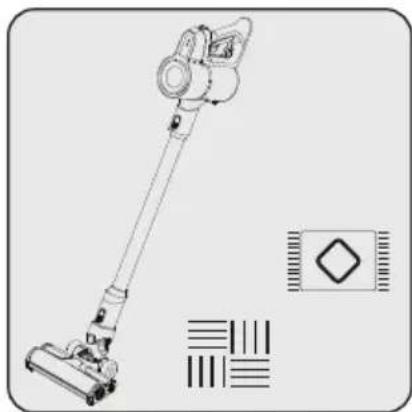
2 In 1 Cordless Stick Vacuum Cleaner
User Manual

VCP 4130 - VCP 4230
DE-EN-TR-FR-HR-SV-NO-FI-DA-RU
CONTENTS
| DEUTSCH | 4-20 |
| ENGLISH | 21-33 |
| TÜRKUAGE 34-51 | |
| FRANÇAIS | 52-65 |
| HRVATSKI | 66-78 |
| SVENSKA 79-91 | |
| NORSK 92-104 | |
| SUOMI 105-117 | |
| DANISH 118-130 | |
| RUSSIAN 131-155 |
Please read this guide first!
Dear Customer,
Thank you for choosing a Grundig product. We would like you to achieve the optimal efficiency from this high quality product which has been manufactured with state of art technology. Please make sure you read and understand this guide and supplementary documentation fully before use and keep it as a reference. Include this guide with the unit if you hand it over to someone else. Observe all warnings and information herein and follow the instructions.
Symbols and their meanings
These symbols are used throughout this guide:

Important information and useful hints about usage.

WARNING: Warnings against dangerous situations concerning the security of life and property.

Electric shock protection rating
1 Important safety and environmental instructions
This section contains safety instructions to prevent hazards that can result in injury or property damage.
Any warranty is void if these instructions are not followed.
1.1 General safety
- This appliance complies with international safety standards.
- This device can be used by children over 8 years of age, people with physical, sensory or mental challenges or people with lack of experience or knowledge; as long as control is ensured or information is provided regarding the hazards. Children must not play with the appliance. Cleaning and user maintenance shall not be carried out by unattended children.
- Do not use the appliance if the power cord or the appliance is damaged. Contact authorized service.
-
Your mains power supply shall match the information shown on the rating plate label of the appliance.
-
Do not use the appliance with an extension cord.
- To prevent damage to the power cord, prevent it from being pinched, crimped or rubbed against sharp edges.
- Do not touch the plug of the appliance with damp or wet hands while the appliance is plugged in.
- Do not pull on the cord while unplugging the appliance.
- Do not vacuum flammable materials and ensure that the cigarette ashes are cooled down before vacuuming them.
- Do not vacuum water and other fluids.
- Protect the appliance against precipitation, humidity and heat sources.
- Do not use the appliance in or near explosive or flammable environments and substances.
- Unplug the appliance before cleaning and maintenance.
- Do not immerse the appliance or its power cord in water for cleaning.
- Do not disassemble the appliance.
1 Important safety and environmental instructions
- Use only original parts or parts recommended by the manufacturer.
- To prevent blockage of the filter or damage to the motor, do not vacuum cement, plaster or fragments of compressed paper.
- Use the appliance with the adapter delivered with the appliance only.
- Do not use the appliance without filters, it may get damaged.
- If you keep the packaging materials, keep them out of the reach of children.
-
This appliance is not intended to be used by persons, including children, with physical, sensory and mental disabilities or those who have not adequate experience and knowledge regarding its use, unless they are under the supervision of a person responsible for their safety or they are informed about the operation of the appliance.
Children shall be supervised to prevent them from playing with the appliance. -
Unplug the adaptor and remove the battery pack before any cleaning or maintenance procedure.
- To avoid any risk of hazard, a damaged adaptor shall be replaced by the manufacturer, the authorized representative of the manufacturer or a similarly qualified technician.
- Keep your fingers, hair and loose clothes away from moving parts or clearances while vacuuming.
- Batteries shall be removed from the appliance before discarding the appliance.
- Disconnect the appliance from power supply before removing the battery.
- Please discard used batteries in accordance with local laws and regulations.
- The batteries included in this appliance may only be replaced with qualified persons.
- Appliance is not intended to be operated for commercial purposes. This appliance is not designed for commercial use, it is intended for home use and in applications as follows:
1 Important safety and environmental instructions
- In the staff kitchens of t stores, offices and other working environments
-In farm houses; - By customers in hotels, motels or other accommodation facilities
-
In hostels or similar environments.
-
WARNING: Use the HCX1501-3200450E (VCP 4230), HCX1501-2700500E (VCP 4130) removable supply unit delivered with the appliance to charge to the battery.
- This appliance shall not be operated by children and people with limited physical, sensory and cognitive skills or people with lack of experience and knowledge unless they are under supervision or they are provided with the relevant instructions.
Children shall be supervised to prevent them from playing with the appliance.
1.2 Compliance with the WEEE Regulations and Waste Disposal
This product complies with EU WEEE Directive (2012/19/EU). This product bears a classification symbol for waste electrical and electronic equipment (WEEE). This symbol indicates that this
product shall not be disposed with other household wastes at the end of its service life. Used device must be returned to official collection point for recycling of electrical and electronic devices. To find these collection systems please contact to your local authorities or retailer where the product was purchased. Each household performs important role in recovering and recycling of old appliance. Appropriate disposal of used appliance helps prevent potential negative consequences for the environment and human health.
1.3 Packaging information

Packaging materials of the product are manufactured from recyclable materials in accordance with our National Environment Regulations. Do not dispose of the packaging materials together
with the domestic or other wastes. Take them to the packaging material collection points designated by the local authorities.
Information on Waste Batteries
This symbol on rechargeable batteries/batteries or on the packaging indicates that the rechargeable battery/battery may not be disposed of with regular house hold rubbish. For certain rechargeable batteries/batteries, this symbol may be supplemented by a chemical symbol.
Symbols for mercury (Hg) or lead (Pb) are provided if the rechargeable batteries/batteries contain more than 0,0005 % mercury or more than 0,004% lead.
Rechargeable batteries/batteries, including those which do not contain heavy metal, may not be disposed of with household waste. Always dispose of used batteries in accordance with local environmental regulations. Make enquiries about the applicable disposal regulations where you live.
1.5 What to do for energy saving
- When using your appliance, adjust the speed settings according to the surface, in order to save energy.
- Normally, lower speeds are used when cleaning hard surfaces, curtains and sofas, while high speeds are used in for cleaning carpets.

2 Overview
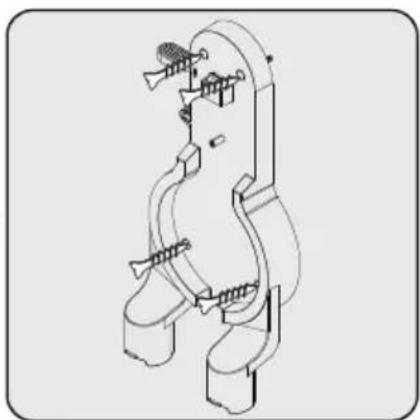
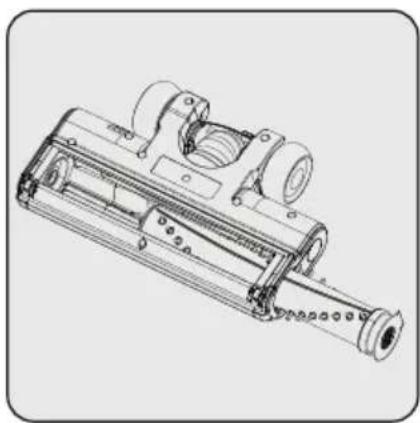
2.1 Controls and components
- Charge indicator LED lights
- Power Adjustment button
- On/off button
- Emptying dust container ring
- Dust container
- Tube release button
- Appliance release button
- Charging Dock
- Accessory attachment parts
- Tube
- Brush release button
- Electric turbo brush
- Charging adaptor
- Dust brush
- Crevice attachment
- Screw (4 pcs)
- Dowel (4 pcs)
2.2 Technical data
| VCP 4230 VCP | 4130 | |
| Nominal input power 150 W | 110 W | |
| Input 100 - 240 V~ 50-60 Hz 0,5 A | ||
| Output | 32 V -0.45 A 27 V | 0.5 A-- |
| Charging time 4-6 hours | ||
| Runtime at max. power 17 | mins | |
| Runtime at min. power 45 | mins | |
The rights to make technical and design changes are reserved.
The values provided with the appliance or its accompanying documents are laboratory readings in accordance with the respective standards. These values may differ depending on the use and ambient conditions.
External Power Supply Parameter
| VCP 4230 VCP 4130 | ||
| Manufacturer: Guangdong Huachuangxing Power Supply Co.,Ltd | ||
| Model ID: HCX1501-3200450E | HCX1501-2700500E | |
| Input Voltage: 100-240V~ | ||
| Input Frequency: 50-60Hz | ||
| Input Current: 0.5A | ||
| Output Voltage 32.0V 27.0V | ||
| Output Current 0.45A 0.5A | ||
| Output Power: 14.4W 13.5W | ||
| Average active efficiency: 85.5% 84.39% | ||
| Efficiency at low load (10%): | 83.33% | 70.65% |
| Power consumption under no load: | 0.041W | 0.071W |
3 Installation
3.1 Intended use
This appliance is intended for household use and it is not suitable for industrial use.
3.2 Installation of the charging dock
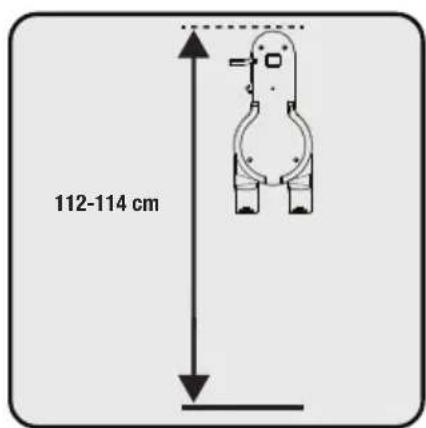
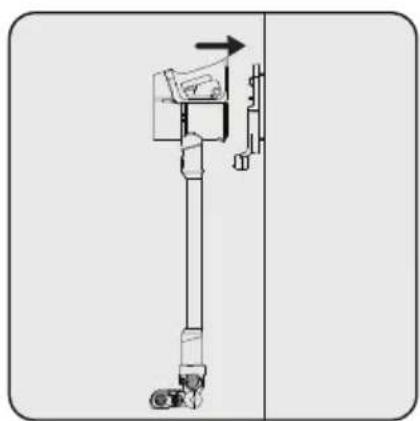
Position the charging dock (8) at a height of 112-114 cm from the ground.
1- Fix four dowels (17) on the wall 2- Place four screws (16) into their locations on the charging dock (8) and mount on the dowels on the wall.

Plug the charging adaptor (13) to the socket.
3.3 Installation of the body and the brush
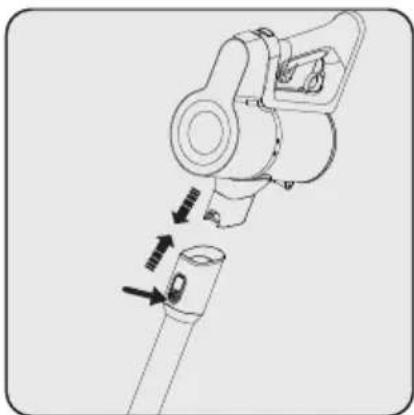
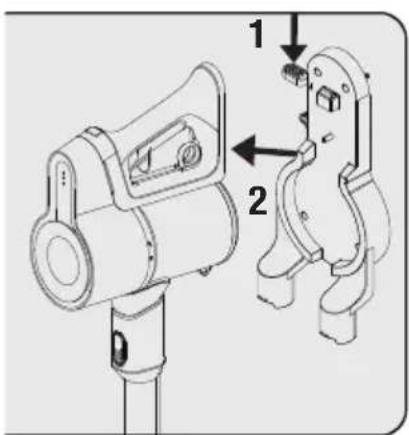
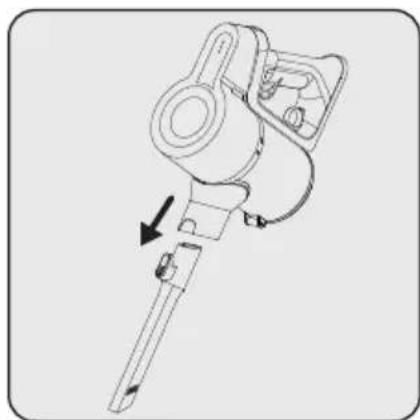
Push the tube (10) in the direction of arrow towards the body by pushing on the tube release button (6).
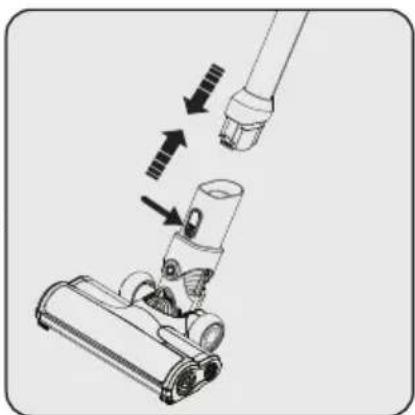
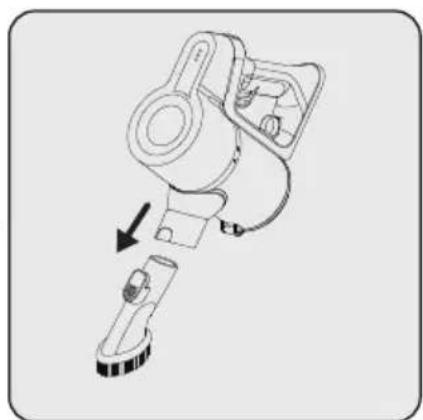
Press the electric turbo brush release button (11) on the electric turbo brush (12) and push it in the direction of arrow towards the tube.
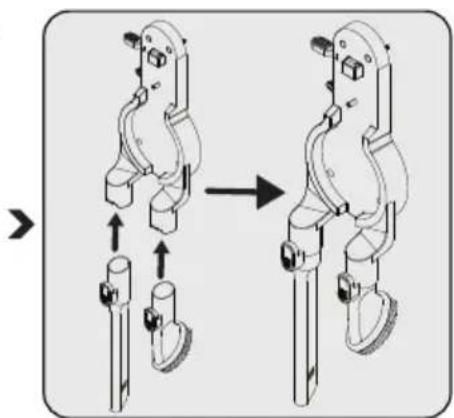
Attach crevice attachment (15) and dust brush (15) to the charging dock (8).
4 Operation
4.1 Charging the appliance
Place the appliance on the charging dock (8).
After placing dust container (5) on the charging dock (8), push the appliance towards the charging dock.
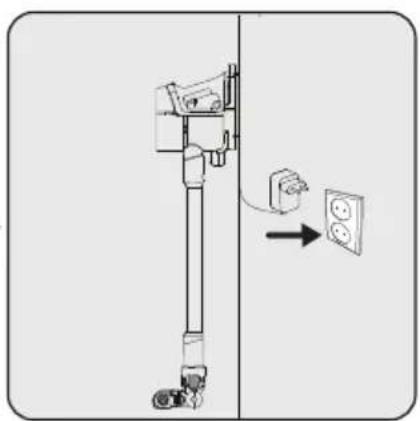
Plug the charging adaptor (13) to the socket.

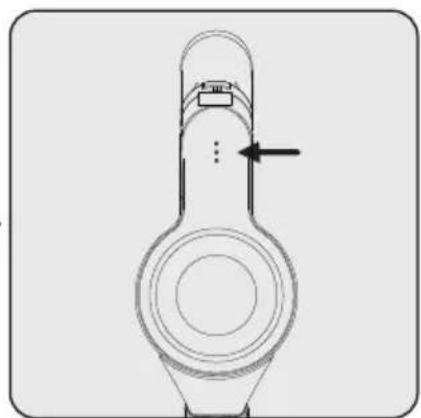
Flashing of the charge indicator LEDs (1) in white colour indicates that the appliance is being charged.
- When all levels of the charge indicator LEDs (1) are illuminated, this indicates that the charging of the appliance is completed.

It takes up to 4 to 6 hours to charge the appliance completely. The appliance shall not be operated while charging.

If the appliance is placed on the charging dock (8) while it is being operated, it shall be stopped automatically.
4.2 Usage
1- Push the appliance release button (7) on the charging dock (8) downward and pull the appliance towards yourself at the same time.
2- Remove the appliance from the charging dock (8).

Press the on/off button (3) to operate the appliance. The appliance starts operating with the minimum power when the on/off button is pressed.

To switch to the maximum power when operating in the minimum power, push the power adjustment button (2).
To switch to the minimum power when operating in the maximum power, push the power adjustment button (2) again.
4 Operation

The appliance may be placed for charging before the complete discharging of the battery. The appliance may be kept continuously as charging on the charging dock (8) until the next operation.
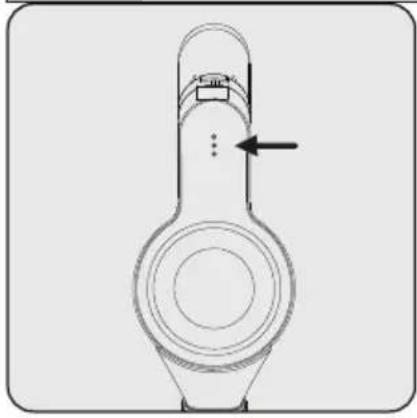

Pay attention to the power indicator LEDs (1) during operation. These indicators gradually turn off as the charge level is reduced, and when all indicators are turned off and only one indicator illuminates in red, then the charge of the appliance is about to run out. The appliance stops operating automatically after a short while when the red LED illuminates.
This appliance is suitable for use on carpets and hard floors.
4.3 Accessories

Crevice (15): Suitable for vacuuming the rear of the furnitures, hard to reach areas and narrow areas.
Dust brush (14): Suitable for vacuuming curtains, waxed furniture and delicate and fragile objects.
5 Cleaning and maintenance
Turn off and unplug the appliance before cleaning.

WARNING: Never use gasoline, solvent, abrasive cleaners, metal objects or hard brushes to clean the appliance.

WARNING: Deformation may occur on the filters within time as a result of usage. It shall be replaced with a new one to prevent loss of performance. Contact with the customer services to buy a new one.
5.1 Cleaning the Dust container and Filters

WARNING: Do not wash the filters.

We recommend you to clean the dustbin (5) after each operation.


Wipe the surface of the body with a wet cloth.
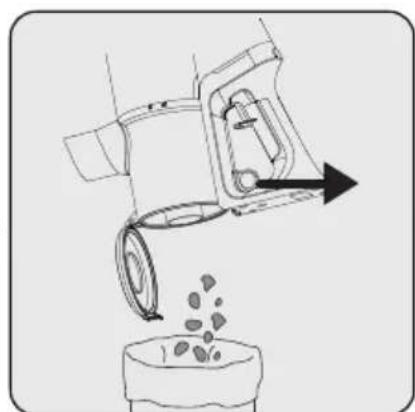
Pull the emptying dust container ring (4) to the last point. Dust container lid will be opened. Empty all the dust it contains.
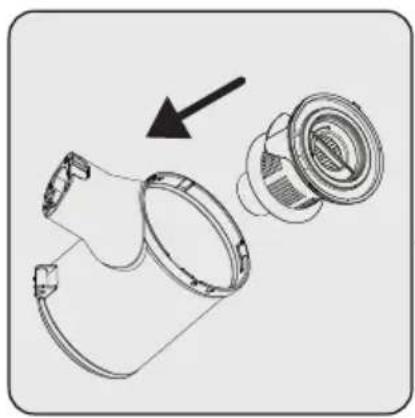
For a detailed cleaning of filters, remove the dust container by turning it clockwise while pulling dust container ring (4) lightly.
5 Cleaning and maintenance
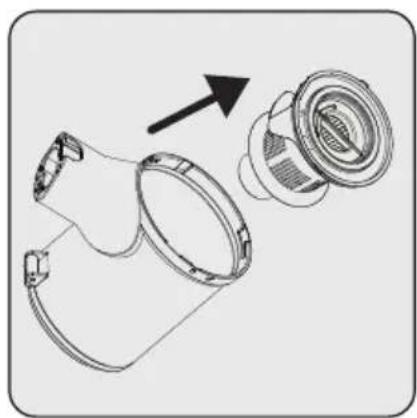
Pull EPA E10 and plastic filter holding from the EPA E10 handle.

Seperate EPA E10 and plastic filter from each other.
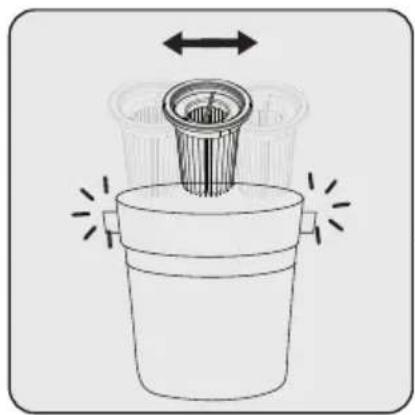
Remove the dust on the EPA E10 filter by tapping it on a hard surface such as a waste bin or by using a brush.
Remove the dust on the plastic filter by tapping it on a hard surface such as a waste bin or by using a brush.
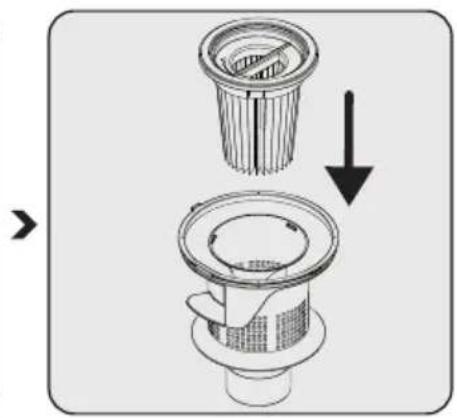
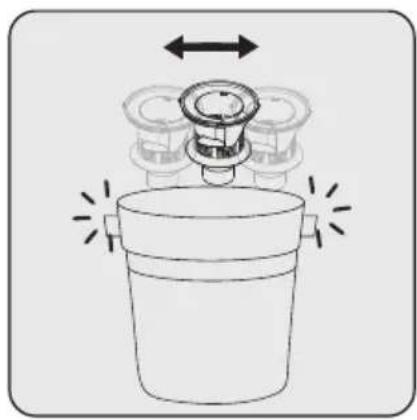
Attach EPA E10 filter to the plastic filter back.
Attach plastic filter on the dustbin ring (5).
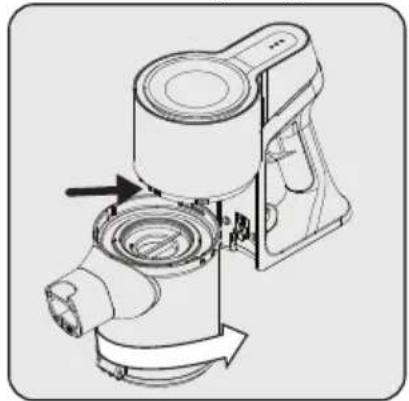
Fix the connector of dustbin to the holes on the body, then fix the dustbin by turning counterclockwise until you hear the click sound.
5 Cleaning and maintenance
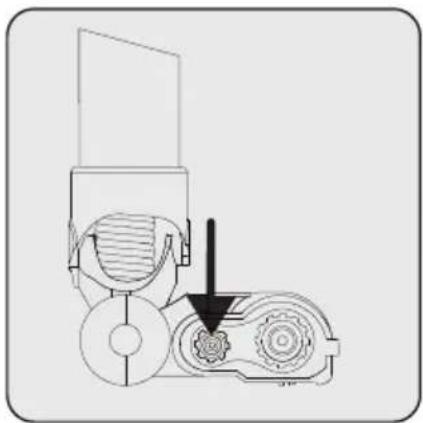
5.2 Cleaning of the brush

WARNING: Do not wash the turbo brush (8) and the main roller.
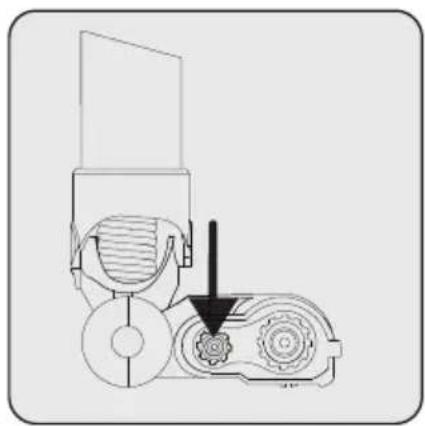

Press on the roller release button. Remove the dust on it by tapping it lightly to a hard surface or remove the dust with a brush. If any hair, etc. is tangled, remove it by cutting it off.
Fix the roller back to its place by pushing.
5.3 Storage
- If you do not intend to use the appliance for a long time, store it carefully.
- Unplug the appliance.
- Ensure that the appliance is kept out of reach of children.
- If you shall not be using the battery for a long period of time, please keep it in a cool and dry place at half charged condition. Do not charge or discharge completely.
- Store the battery on a non-conducting material, and do not allow the battery to contact metal directly. This shall damage the battery.
5.3 Transport and shipping
- During transport and shipping, carry the appliance with its original packaging. The packaging of the appliance will protect the appliance against physical damage.
- Do not put heavy objects on the appliance or its packaging. Otherwise the appliance may be damaged.
- If the appliance is dropped, the appliance may not operate or permanent damage may occur.
6 Troubleshooting
| Common problem Possible | le reason Solution | |
| Can't charge | 1. The main unit is installed in the charging base and does not snap in place; 2. The battery life has expired, the battery is damaged or the battery pack program is wrong; 3. The correct charger is not used; 4. The charger is damaged. | 1. Reinstall the host into the charging base; 2. Replace the battery pack with a new one; 3. Check whether the charger is used incorrectly, and use the correct matching charger; 4. Replace with a new charger. |
| Vacuum cleaner does not start | 1. The power switch of the vacuum cleaner is not turned on; 2. The internal lead wire is loose; 3. The motor is burnt out; 4. The battery indicator light is off and the battery is dead. | 1. Press the power switch again; 2. Reconnect the internal leads; 3. Repair or replace the new motor; 4. Connect the charging stand to charge. |
| less suction | 1. Each suction head channel is blocked; 2. There is a problem with the motor; 3. The dust cup is full of dust; 4. The HEPA filter is blocked. | 1. Clean the suction head channel; 2. Repair or replace the new motor; 3. Clean the dust in the dust cup; 4. Clean or replace the HEPA filter. |
| Electric floor brush does not turn | 1. The connection of the floor brush and the body are not in place; 2. The roller brush of the floor brush is entangled and blocked by debris; 3. The dust cup is not fully buckled into the host when it is installed; 4. The protection device has been activated. | 1. Insert the body into the floor brush connector until the buckle of the floor brush connector is firmly engaged; 2. Refer to the manual for cleaning the roller brush; 3. Remove the dust cup, re-install the dust cup, and rotate the dust cup to install 4. Restart the power switch after turning off the power. |
| The machine works normally, but suddenly the LED light of the battery pack flashes, the ground brush does not work, and the handset still works normally. | Floor brush lock protection | Clean up the hair and rubbish entangled and adhered to the roller brush before continuing to use it. |
6 Troubleshooting
| After the machine is turned on, the sub-machine works normally, but the floor brush assembly does not work | The internal wiring of the aluminum tube or the internal wiring of the floor brush assembly is damaged | Please contact customer service |
| When charging, the battery pack LED light flashes for 10 seconds and then turns off. | The battery pack overheats, triggering the overheat protection mechanism | Cancel charging and let the battery pack cool down before continuing to charge. |
| When discharging, the battery pack LED light flashes for 10 seconds, and the machine automatically shuts down. | The battery pack overheats, triggering the overheat protection mechanism | It is necessary to interrupt the operation of the machine, and leave the machine to wait for the battery pack to cool before continuing to use it. |
| The battery pack LED flashes 3 times and then turns off when charging | The charger is wrong and cannot match this model of vacuum cleaner. | Check whether the charger is used incorrectly, and use the correct matching charger. |
| The machine does not respond after pressing the power button | The battery pack or the internal wiring and parts of the vacuum cleaner are damaged, resulting in functional failure. | After excluding the above situation, please contact customer service. |
The rights to make technical and design changes are reserved.
1.4 Batteries usages
Ybaxaemblnokynatelb,
Благорам Bac 3a To, чTO Вьбрали пpoукг Grundig. Мыхетл 6bl, чTOбы Вы дocглп ONТIMальнОД 3ФФeКТИВHOCTHN OT 3TOrOBICOKOKaueCTBeHHORO npoукta, кOTOPbI 6bl IN3ROTOBJIeH C nCNoЛьЗOBaHNeM HOBeiXx TexHOJOrn. Перд ИсПОЛьЗOBaHNeM y6eIITecb, ChTO Bbl IONHOCTbIO IIPOuHTaII N IOHJIIN 3TO ryKOBoDCTBO IN DOПОЛНTeЛьнHyI O DOKUMeHTaCIuH, IN COxpaHNTe INx ДЯ сравки. ПprINOЖITE 3TO ryKOBoDCTBO K yCTpoIcTBy, ecIIпepedanTe erO kOMy-TO dpyromy. Co6lnoDAaTe BCE prPBEdENHbIe 3deCb PpeDynpexKdEHHa INHΦopMaцIH O cIeDyIte INHCTpyKcIqM.
Симboл nx 3haueHne
3TN CnMBOJI INCNOJIb3yIOCTB B 3TOM pyKOBoIDCTBE:

Baxnay nHopmaun noJe3- HbIe COBeTbI NO IcNoJIb3OBAHnIO.

Cnmbon Ha akymytope n ynaKOBke yka3bIbaet Ha To, YTO akymyTop, NOCTaBnemblcN3dJIneM, He
CneNyET paccMaTpnbTb KaK 6bITOBbie OTXOdbI. B HeKOTOpbIX pernoHax 3TOT CnMBoN MoXe TNCNoJIb3OBaTbCSB COUeTaHnC XnMnueCKIM CnMBoNOM. EcIN B 6aTapeJx CoepKNTcB 60nee 0,0005% pTuTn N 60nee 0,004%CBNuCA, B KaYeCTBe pTuTn Do6abJYeTcR XnMNueCKoe BeIeCTBO Hg, a B KaYeCTBe CBNuCAdo6abJYeTcR XmMNueCKoe BeIeCTBO C CnMBoNOM Pb. ObecneuBa npaBnblHyu yTuIn3aUIO aKKymyIaTOPOB, Bbl BHocnte CBOB BKJaD B npedOTBpaAeeHne NotEHuaJIbHO rO upe6aOkpykaIoUe cpeDe n 3dOpOBbIO IIODe N3-3aHe npaBnIbHOYTuIN3aUIN aKKymyIaTOPOB.
I P E D U N P E X K D E H N E: He Moi Te T y p 6 o u c k y (8) n O C H O B H y I O P O N I K O B Y I O U t k y.
Haxmte Ha KhoNky pa36JIOKINPOBKn POJIKOBOI 5eTKn.

ydaIte c Hee nbInb, Cnerka nocTyab O TBepdyo NOBepxHocTb, nn ydaIte nbInb uetko. Ecn KaKeJn60 BONocbl N T. n. 3anyTaInCb, ydaIte nx, OTpe3ab.

Choba 3aФнксypиTe poNkoByo UeKy Ha MeCTe nyTem Haxatna.
5.3 XpaHeHne
- Ecni Bbl He co6npaTeCb nCNoIb3OBaTb npi6op B TeueHne dIInTeJbHoro BpeMeHn, XpaHnTe erO octOpOxHo.
- BbIKIIOUHTe n3dJIeNe n3 po3eTKn.
XpaHnTe np6op B HeoctynHom dIa dete MeCTe. - Ecni Bbl He co6npaTeCb nCNoIb3OBAb aKKyMylrTop B TeueHne dIInTeIbHOro BpeMeHn, XpaHnte erO B npoxlanHom n cyXOM MeCTe B HanoIobHy 3apJxKeHHom coCToHn. He 3apJxKaiTe n He pa3pJaTe NOnHOCTbIO.
XpaHnTe aKKymyIaTOp Ha HEnpOBoJzEm MaTePnaJIe N He DOnyCKaIe TnpMOro KOHTaKa aKKymyIaTopa C MeTaNlOM. B npOTnBHom cIyuae 6ydt MeTb MeTo NOBpeKdEHe aKKymyIaTopa.
5.3 TpaHcnpTnpOBka
Bo BpeMra TpaHcnpTnpoBKn nepeHocnte npnbop B opnHaJIbHOJ ynaKOBKe. YnaKOBka yCTPOIcTBa 3aunITe erO OT n3UeCKNX NOBpeKdEHN.
He knaIte TjXeIbIe npEMeTbI Ha np6Op nIe erO yNaKOBky. IHaue n3dJIne 6ydet noCToHNO NOBepraTbcr NOBpeJdeHIO.
- Ecni npnbop ypoHntb, OH MOKeT nepeCTaTb pa6oTaTb, INI MoKeT npOn3OHTn Heo6paTumoe NOBpeXdEHe.
6 IcnpaBJIeHne npo6JIeMbI
| Ов Ocяп探测омьВозможнаяПрочина | Рушины | Решения |
| Зарядka He paBOTaET | 1. Осовноь相关内容Установл end B 3apяднунДOKSTANUCILO, HoNe Do KOнца И He3aшелкнUrlСry; 2.Истекspok clyжбbl 6batapei,6batapei NOBPEJDEHAnII INI INPGRAMMaakKymylantOPHOn6batapei HeBepHa;3.Исторы.TSHTCnHApRbILHoe3apЯнhoe uCTPOIcTBO;4.Зapядhoe uCTPOIcTBONOBPEJdeHo. | 1. Перусятановпес Oсовноь相关内容B 3apяднунБa3y; 2.Заменite akKymулгТОр6batapei Na HOВь;3.YбeДNTecb,чTo ИСПОЛБ3уETСЯправильноe3apядhoe uCTPOIcTBO,IscnoJIb3yIteIpondxodяшee 3apядhoe uCTPOIcTBO;4.ЗаменITE NOBPEJdeHNoE3apядhoe uCTPryOCTBO Na HOBOe. |
| Пылесoc He paBOTaET | 1. Пылесoc He bInBkLIOUeH; 2. ПюверьTe,coeINHeHne co shHypomNITAHNIA; 3. ПоврддeHemOTop nbIeSCoCA; 4.NHdNKATOp 6batapeiHe rOPIr, И 6batapei pashpexHa. | 1.НадмITE NaKNOHky BkL\YbIKIПитаня opposite;2.ПODCoEdINHte BceЧASTIи ShHyp pIITaHnIeHse Pa3;3.HeobxodimPemONT MOTOPa IINI3amENITE Na HOВь;4.ПОДКЛЮчTE 3apяднунSTANCSIOДЯЗAPdKN. |
| Слобая мошноctbВсасыВань | 1. KaHajВсасыВань3abLOKIPovBaH;2.ПюбLEMa C MOTOPOM;3.ПылесборнikNOLHOCTBu 3aONHNeH;4.FinlbyTp HEPA 3acopen. | 1.Oчstпte kaHaNBy,чepe3 KOTOPbI npoxODINTOPTOK BCASbIBaHnia;2.Heobxodim pemontMotopa IIIN 3aMeHa NaHOВь;3.OчstпteПылесборнik OTпыл;4.OчstпteIи 3amEnite HEPA-ФИьТ. |
