WS 8100 - Clock TECHNOLINE - Free user manual and instructions
Find the device manual for free WS 8100 TECHNOLINE in PDF.
| Product type | Radio-controlled wall clock with timer and indoor temperature display |
| Brand | TECHNOLINE |
| Model | WS 8100 |
| Dimensions (L x W x H) | 310 x 29.5 x 204 mm |
| Power supply | 1 AA battery IEC LR6 1.5 V (alkaline recommended) |
| Time display | Radio-controlled DCF-77, manual setting possible, 12/24 h format, hours, minutes, seconds |
| Alarm | Adjustable with 10-minute snooze function, duration 90 seconds |
| Timer | Countdown from 0 to 99 min 59 s, alarm 30 s, memory up to 8 timers |
| Calendar | Display of day, date, month, year (2010-2029), day in 4 languages (DE, US, FR, ES) |
| Indoor temperature | Range: -9.9 °C to +59.9 °C / 14.1 °F to 99.9 °F, resolution 0.1 °C / 0.2 °F |
| DCF reception | Automatic, attempts at 3:00 and 5:00, tower icon indicates reception |
| Low battery indicator | Displayed on LCD |
| Mounting | On table (foldable feet) or wall (3 screws, spacing 40 mm) |
| Care | Clean with a soft, damp cloth, no solvents, do not immerse |
| Safety | Do not open, do not repair yourself, keep out of reach of children |
| Consumption and battery life | AA battery, battery life approximately 24 months |
| General information | Complies with R&TTE directive 1999/5/EC, recycling of batteries and WEEE mandatory |
Frequently Asked Questions - WS 8100 TECHNOLINE
User questions about WS 8100 TECHNOLINE
0 question about this device. Answer the ones you know or ask your own.
Ask a new question about this device
Download the instructions for your Clock in PDF format for free! Find your manual WS 8100 - TECHNOLINE and take your electronic device back in hand. On this page are published all the documents necessary for the use of your device. WS 8100 by TECHNOLINE.
USER MANUAL WS 8100 TECHNOLINE
text_image
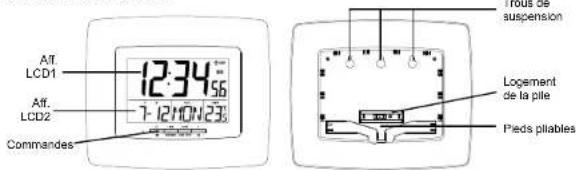
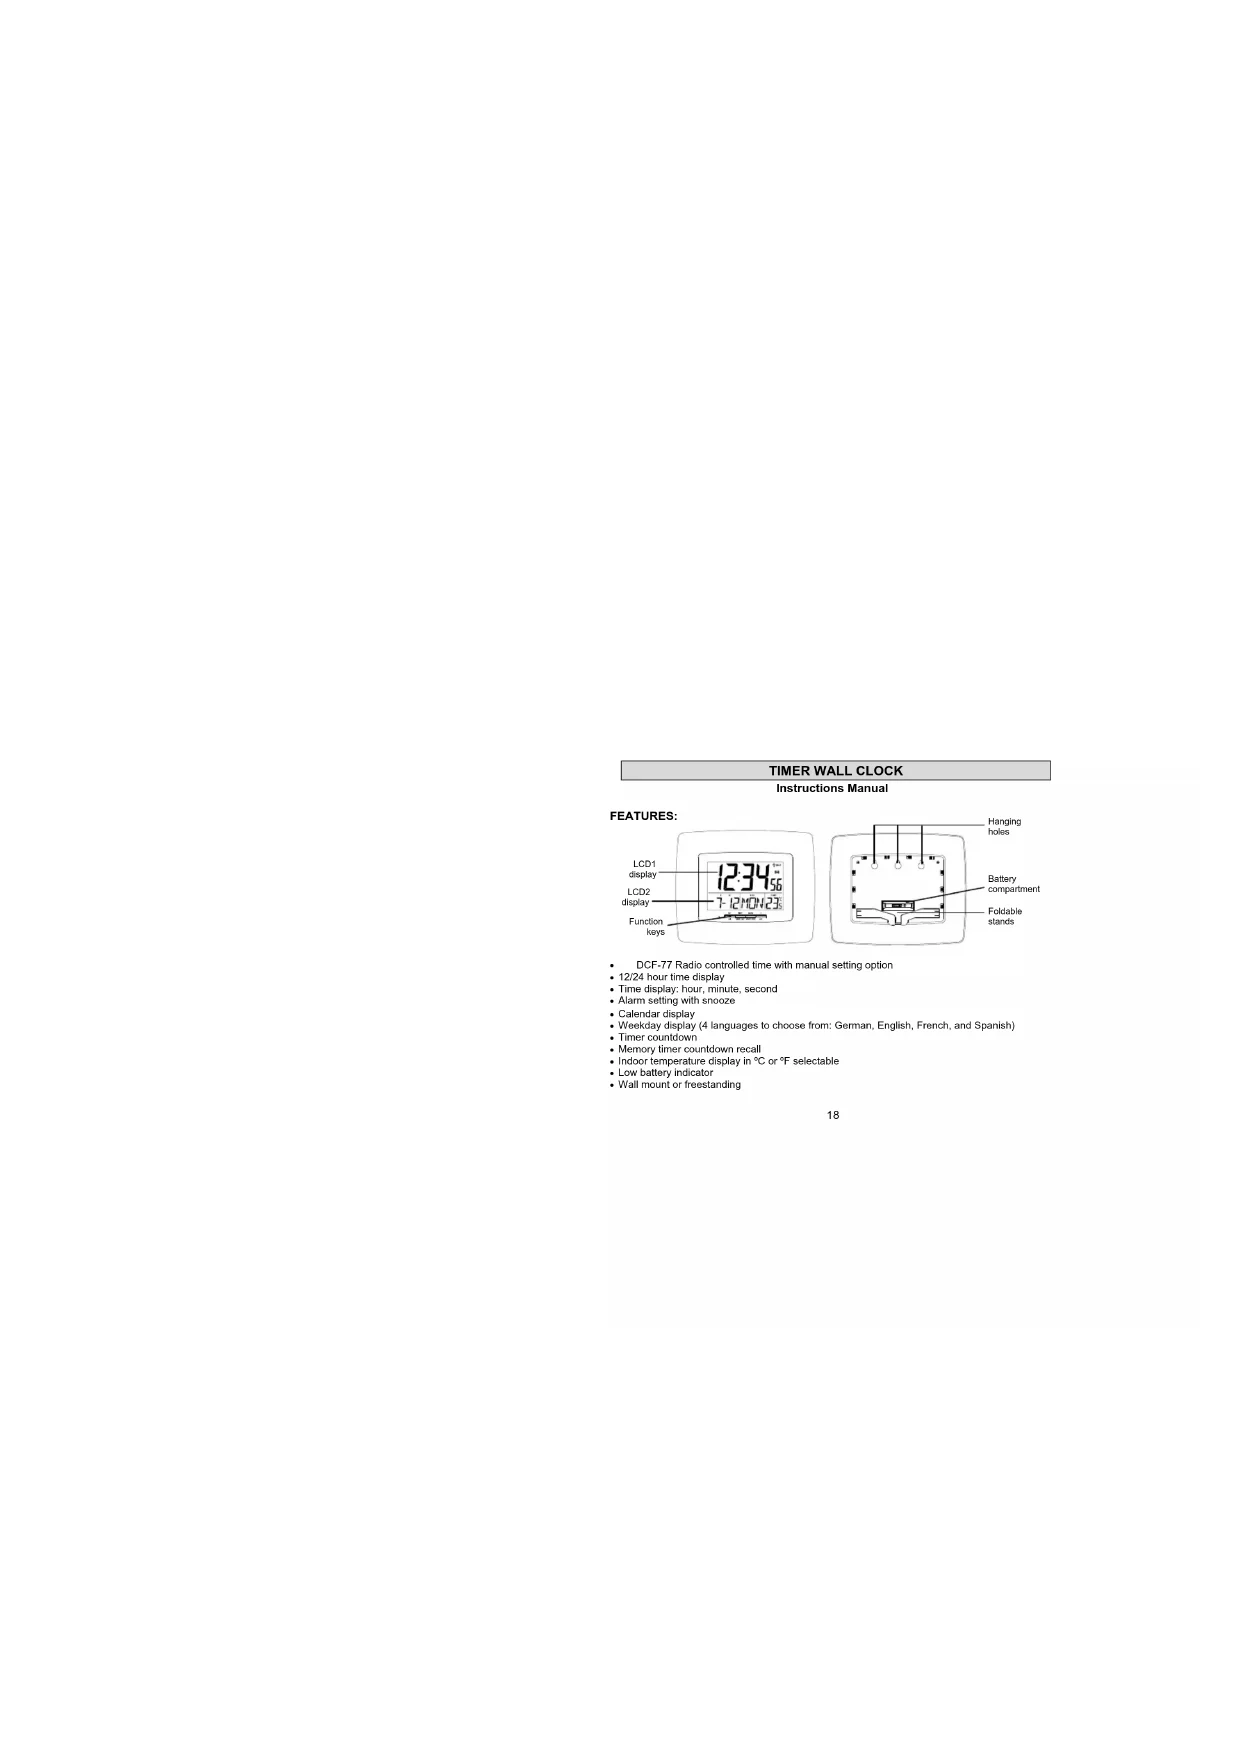
LCD1 display LCD2 display Function keys 12:34'56" 7:12H04'23' Battery compartment Foldable stands• DCF-77 Radio controlled time with manual setting option
• 12/24 hour time display
• Time display: hour, minute, second
- Alarm setting with snooze
- Calendar display
- Weekday display (4 languages to choose from: German, English, French, and Spanish)
- Timer countdown
- Memory timer countdown recall
- Indoor temperature display in °C or °F selectable
- Low battery indicator
- Wall mount or freestanding
SETTING UP:
- Insert 1 x AA, IEC LR6, 1.5V batteries into the timer wall clock. Make sure that the polarity of the battery is correct (see markings), and ensure that it doesn't spring free from the contacts.
- Once the battery is in place, all segments of the LCD will light up briefly and a brief beep sound will be hear. Then the indoor temperature, the time as 0:00, the date as 1-1, and weekday will be displayed. Do not press any keys for 10 minutes or until the DCF time code has been received.
- The DCF time code reception will automatically start. This takes typically between 3 - 5 minutes in good conditions.
- If after 10 minutes the DCF time has not been received, use the SET / MIN key to enter into the set mode and change either the time or date in order to activate the DCF reception. The clock will then automatically attempt to receive the DCF time. When this is successful, the received time will override the manually set time. The date is also updated with the received time (Please refers to notes on 'DCF Radio controlled time' and "Manual time setting").
Note:
In the event of changing the battery of the unit, ensure that it does not spring free from the contacts. Always wait at least 3 minutes after removing the battery before reinserting, otherwise start up and transmission problems may occur.
BATTERY CHANGE:
For best performance, battery should be replaced at least once a year to maintain the best running accuracy. Ensure that the battery used is new and the correct size.

Please help in the preservation of the environment and return used batteries to an authorized depot.
RADIO CONTROLLED TIME:
The time base for the radio-controlled time is a Cesium wall clock operated by the Physikalisch Technische Bundesanstalt Braunschweig, which has a time deviation of less than one second in one million years. The time is coded and transmitted from Mainflingen near Frankfurt via frequency signal DCF-77 (77.5 kHz) and has a transmitting range of approximately 1,500 km. Your radio-controlled Timer clock receives this signal and converts it to show the precise time in summer or wintertime.
The quality of the reception depends greatly on the geographic location. In normal cases, there should be no reception problems within a 1500km radius of Frankfurt.
Once the indoor temperature is displayed on the timer wall clock, the DCF tower icon in the clock display will start flashing in the upper right corner. This indicates that the clock has detected that there is a radio signal present and is trying to receive it. When the time code is received, the DCF tower becomes permanently lit and the time will be displayed.
Daily DCF reception is done at and 03:00 and 05:00 every day. If the reception at 03:00 is not successful, then another reception starts at 05:00. If the reception at 05:00 is still not successful, then the next try takes place at 03:00 next day.
If the tower icon flashes, but does not set the time or the DCF tower does not appear at all, then please take note of the following:
- Recommended distance to any interfering sources like computer monitors or TV sets is a minimum of 1.5 - 2 meters.
- Within ferro-concrete rooms (basements, superstructures), the received signal is naturally weakened. In extreme cases, please place the unit close to a window and/or point its front or back towards the Frankfurt transmitter.
- During nighttime, the atmospheric disturbances are usually less severe and reception is possible in most cases. A single daily reception is adequate to keep the accuracy deviation below 1 second.
FUNCTION KEYS
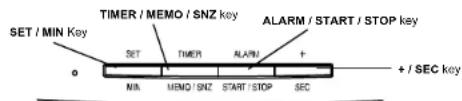
The timer wall clock has four easy to use keys:
text_image
SET / MIN Key TIMER / MEMO / SNZ key ALARM / START / STOP key SET TIMER ALARM + MIN MEMO / SNZ START / STOP SEC + / SEC keySET / MIN key : To enter into the set mode for the following settings: 12/24 hour
time format, year, month, day, °C or °F temperature display.
and language
To set the minutes in timer mode
To stop the timer countdown
To stop the time alarm
TIMER / MEMO / SNZ key : To enter into the set mode of the timer setting
To recall the timer set time
To toggle between the date/month display and the timer display
To active the snooze function
To stop the timer countdown
To exit the alarm setting mode
To exit the timer mode when held for 3 seconds
To exit the manual setting modes
ALARM / START / STOP key : To enter the alarm set mode
To set the alarm ON/OFF
To exit the alarm setting mode
To start and stop the timer countdown
To record the timer set time
To exit the timer mode when held for 3 seconds
To stop the time alarm
+ / SEC key : To change the values in manual set mode
To set the values in alarm mode
To set the seconds in timer mode
To stop the timer countdown
To stop the time alarm
TIMER WALL CLOCK LCD SCREEN DESCRIPTIONS
The timer wall clock's LCD is divided into 2 sections and once the battery is inserted, all the segments will light up briefly before displaying the information for time, date, indoor temperature.
text_image
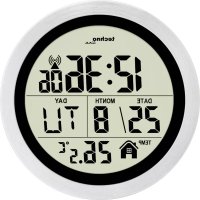
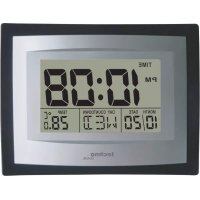
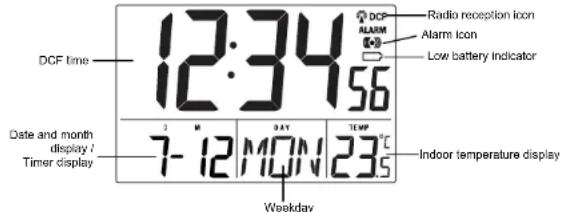
DCF time 12:34 56 Radio reception icon Alarm icon Low battery indicator Date and month display / Timer display 7-12 MON 23.5 Weekday Indoor temperature displayMANUAL SETTINGS
Note:
If the timer wall clock has already successfully received the DCF time signal and displays the correct time and date, then the Manual settings can be skipped.
After completion of the above described procedures in "Setting up", the manual setting modes can be entered by pressing the SET / MIN key. The following settings can now be programmed:
• 12/24 time format setting
• Manual time setting
• Year setting
• Month setting
- Day setting
• °C or °F temperature setting
• Language display setting
12/24 HOURS TIME FORMAT SETTING
- The "12" or "24" will start flashing in LCD1 (Default setting 24h). Select the desired time display mode by use of the + / SEC key.
- Press and release the SET / MIN key to enter the "Manual time setting".
MANUAL TIME SETTING
In case the timer wall clock is not able to detect the DCF-signal (disturbances, transmitting distance, etc.), the time can be manually set. The clock will then work as a normal Quartz clock.
1. The hour digits will start flashing on LCD1.
2. Set the desired hours by pressing and releasing the + / SEC key followed by pressing the SET / MIN key.
3. Now the minute digits will start flashing. Set the desired minutes by pressing and releasing the +/SEC key. If the +/SEC key is held, the units will increase by 5.
4. Press and release the SET / MIN key to move to the "Year Setting".
YEAR SETTING
The year can be selected sequentially from 2010 to 2029 and will then start over again (default setting 2010). The last 2 digits of the year will be visible on LCD2.
- The year digits will start flashing on LCD2. Select the desired year by use of the + / SEC key.
- Press and release the SET / MIN key to switch to the 'Month Setting'.
Note: the year will only be shown in setting mode.
MONTH SETTING
- The month digits on LCD2 will start flashing (Default setting 1). Set the desired month by use of the + / SEC key.
- Press and release the SET / MIN key to move to the mode "Date Setting".
DATE SETTING
- The digits for the day will start flashing on LCD2 (Default setting 1). Set the desired day by use of the +/SEC key.
Note: The data can only be set in conjunction with the selected month. For example, it is not possible to set the data 30 if the months of February is selected. - Press and release the SET / MIN key to enter the "C/F temperature setting".
°C OR °F TEMPERATURE SETTING
The temperature can be set to display Celsius (°C) or Fahrenheit (°F):
- The characters "°C" or "°F" will start flashing on LCD1 (Default setting "C"). By use of the +/SEC key select "°C" for temperature display in degrees Celsius or "°F" for degrees Fahrenheit.
- Press and release the SET / MIN key to enter the "Language setting".
LANGUAGE SETTING
The weekday can be displayed in LCD2 with the pre-set languages: German (d), US English (US), French (F), and Spanish (E). (Default language: German):
- Set the desired language for the weekday display in LCD1 by use of the + / SEC key.
- Press and release the SET / MIN key to exit the setting mode and switch back to the normal display mode.
EXIT THE MANUAL SETTING MODES
- To return to the normal display mode from anywhere in manual setting mode, simply press
the TIMER / MEMO / SNZ key anytime. - If no keys are pressed for about 15 seconds in setting mode, the timer wall clock will
TIME ALARM SETTING
To enter into the time alarm setting mode:
- Hold the ALARM / START / STOP key for 2 seconds. The hour digits start flashing.
- Press the SET/MIN key to set the hour.
- Press the ALARM / START / STOP key to set the minutes. The minute digits start flashing.
- Press and release the +/SEC key to set the minutes. If the +/SEC key is held, the unit will
increase by 5. - Press again the ALARM / START / STOP key to exit the alarm setting mode or wait for 15 seconds automatic timeout.
Note:
The alarm duration is 90 seconds. To stop the alarm, press any key, except the TIMER / MEMO /
SNZ key
The time alarm can only be set if the LCD is in normal mode (not in timer mode).
SNOOZE
The snooze function can be activated while the time alarm is ringing. To active the snooze, simply press the TIMER / MEMO / SNZ key. The snooze duration is 10 minutes.
TO DEACTIVATE THE ALARM:

text_image
6:00 Alarm icon ((•)) (ON) 6:00 Alarm icon (OFF)The alarm will be automatically ON when the alarm time is set. To deactivate the alarm (OFF), press and release once the ALARM / START / STOP key in normal mode display. The alarm icon will disappear, the alarm is now off.
TIMER SETTINGS
The timer can be set between 0 and 99 minutes, and 0 to 59 seconds. The maximum countdown is 99 minutes and 59 seconds.
text_image
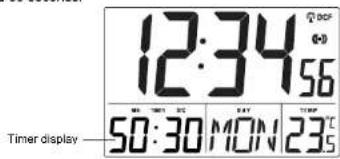
12:34 56 50:30 MON 23°C Timer displayTO ENTER AND SET THE TIMER
- Press the TIMER / MEMO / SNZ key. Default setting "0:00".
- Set the timer with the SET / MIN keys for the minutes, and the + / SEC keys for the seconds. If the + / SEC or the SET / MIN key is held, the seconds or the minutes will increase by 2.
TO START / STOP THE TIMER COUNDOWN
- After the timer has been set, press the ALARM / START / STOP key to start the countdown.
- Press the ALARM / START / STOP key to stop the countdown anytime
- When the countdown reach "0:00", an alarm sound will be heard. It will keep ringing for 30 seconds. The timer will also starts counting up. Press any key to stop the count up.
Note:
• If the count up is stopped while the alarm is ringing, the LCD will show the timer set time.
- If the count up is stopped after the alarm finished ringing (after 30s), the timer will show the stop time.
TO RESET THE TIMER
Press and hold the SET / MIN and the + / SEC keys at the same time to reset the timer to "0:00"
MULTIPLE TIMER SETTINGS
A maximum of 8 timers countdown can be stored and recalled.
To set multiple timer:
- Press the TIMER / MEMO / SNZ key to enter the timer setting mode.
- Set the timer with the SET / MIN (minutes) and + / SEC (seconds) keys.
- Press the ALARM / START / STOP key to record the timer.
- Press again the ALARM / START / STOP key to stop the countdown and set a new time.
- Use the SET / MIN and + / SEC keys respectively to set a new time.
- Keep repeating the same steps from 2 - 4 for additional setting of the timer.
Note:
If the maximum recorded time for the timer has been reached, and a new timer is set, the first recorded timer will be deleted, and so on. The recorded timer will be deleted sequentially as new entries of timer countdown are set.
TO RECALL STORE TIMER COUNTDOWN
- Press the TIMER / MEMO / SNZ key until the desired timer countdown is displayed on the
LCD.
- Press the ALARM / START / STOP key to start / stop the countdown.
TO EXIT THE TIMER SETTING MODE
If a countdown is still occurring, it must be stopped before the display can return to normal display.
-
Press the ALARM / START / STOP to stop the countdown.
-
Then press and hold the TIMER / MEMO / SNZ or the ALARM / START / STOP key for 3 seconds to return to normal display.
POSITIONING
Before permanently mounting ensure that the timer wall clock is able to receive DCF signals from the desired location. Also, extreme and sudden changes in temperature will decrease the accuracy of the timer wall clock.
There are two possible ways to mount the timer wall clock:
- use of the foldout table stands, or
- wall mounting
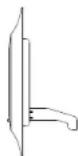
FOLDOUT TABLE STANDS
The foldout table stand legs are located on the backside. Pull the stands out from the bottom center edge of the timer wall clock, below the battery compartment. Once the foldout table stands are extended, place the timer wall clock in an appropriate location.
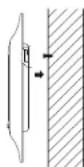
WALL MOUNTING
- Using a straightedge, horizontally space at 40 mm three screw positions on a wall
- Install three mounting screws (not included) into a wall within transmission range—leaving approximately 5mm extended from the wall
- Place the timer wall clock onto the screws, using the hanging holes on the backside. Gently pull the timer wall clock down to lock the screws into place.
Note: Always ensure that the timer wall clock locks onto the screws before releasing.
CARE AND MAINTENANCE:
- Avoid placing the unit in areas prone to vibration and shock as these may cause damage.
-
Avoid areas where the unit can be exposed to sudden changes in temperature, i.e. direct sunlight, extreme cold and wet/moist conditions as these will lead to rapid changes which reduces the accuracy of readings.
-
When cleaning the LCD and casing, use a soft damp cloth only. Do not use solvents or scouring agents
- Do not submerge the unit into water.
- Immediately remove all low powered batteries to avoid leakage and damage. Replace only with new battery of the recommended size.
- Do not make any repairs to the unit. Please return it to the original point of purchase. Opening and tampering with the unit may invalidate its warranty.
SPECIFICATIONS:
Temperature measuring range
Indoor : -9.9°C to +59.9°C with 0.1°C resolution
14.1°F to 99.9°F with 0.2°F resolution
("OFL" displayed if outside this range)
Temperature checking interval : every 60 seconds
Power consumption : 1 x AA, IEC LR6, 1.5V battery
(Alkaline battery recommended)
Battery life : about 24 months
Dimensions (L x W x H) : 310 x 29.5 x 204mm
LIABILITY DISCLAIMER
• The electrical and electronic wastes contain hazardous substances. Disposal of electronic waste in wild country and/or in unauthorized grounds strongly damages the environment
- Please contact your local or/and regional authorities to retrieve the addresses of legal dumping grounds with selective collection.
-
All electronic instruments must from now on be recycled. User shall take an active part in the reuse, recycling and recovery of the electrical and electronic waste.
-
The unrestricted disposal of electronic waste may do harm on public health and the quality of environment.
- This product must however not be thrown in general rubbish collection points.
- As stated on the gift box and labeled on the product, reading the "User manual" is highly recommended for the benefit of the user.
- The manufacturer and supplier cannot accept any responsibility for any incorrect readings and any consequences that occur should an inaccurate reading take place.
- This product is not to be used for medical purposes or for public information.
- This product is only designed to be used in the home as indication of the future weather and is not 100% accurate. Weather forecasts given by this product should be taken only as an indication and not as being totally accurate.
- The specifications of this product may change without prior notice.
• This product is not a toy. Keep out of the reach of children. - No part of this manual may be reproduced without written consent of the manufacturer.


R&TTE DIRECTIVE 1999/5/EC
Summary of the Declaration of Conformity: We hereby declare that this wireless transmission device does comply with the essential requirements of R&TTE Directive 1999/5/EC.
PENDULE MINUTEUR MURALE
Mode d'emploi
CARACTERISTIQUES: