
KG 2102 - Other kitchen appliances ADE - Free user manual and instructions
Find the device manual for free KG 2102 ADE in PDF.
| Product Type | Manual Pasta Machine |
| Brand | ADE |
| Model | KG 2102 |
| Machine Dimensions | 200 x 198 x 158 mm |
| Weight (estimated) | Approximately 2 kg |
| Material | Stainless steel and plastic |
| Type of pasta possible | Spaghetti and fettuccine |
| Included accessories | Cutting blades (2 sizes), crank handle, clamp, pasta drying rack, cleaning brush |
| Number of thickness settings | 7 positions (1 to 7, 1 being the thinnest) |
| Clamping device | Yes, for worktop |
| Pasta drying rack | Included, foldable, for hanging pasta |
| Usage | Domestic use only |
| Power | Manual (by crank) |
| Cleaning | Brush and dry cloth; do not wash with water or in dishwasher |
| Recommended lubrication | Food oil (olive or sunflower) in case of squeaking |
| Safety | Supervision from age 8; do not allow children to use without supervision |
| Warranty | 2 years (material and manufacturing defects) |
| Distributor | Waagen-Schmitt GmbH, Neuer Höltigbaum 15, 22143 Hamburg, Germany |
Frequently Asked Questions - KG 2102 ADE
User questions about KG 2102 ADE
0 question about this device. Answer the ones you know or ask your own.
Ask a new question about this device
Download the instructions for your Other kitchen appliances in PDF format for free! Find your manual KG 2102 - ADE and take your electronic device back in hand. On this page are published all the documents necessary for the use of your device. KG 2102 by ADE.
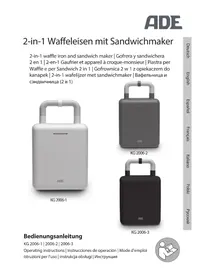
USER MANUAL KG 2102 ADE
natural_image
Two modern kitchen utensils: a flat-screen lathe with flowing liquid and a metal rack with hanging blades (no text or symbols visible)Bedienungsanleitung
KG 2102
Operating instructions | Instrucciones de operación | Mode d'emploi Istruzioni per l'uso | Instrukcja obsługi | Руководство по эксплуатации

natural_image
Icon of a person reading a book inside a circle (no text or symbols)natural_image
Technical line drawing of a mechanical device with a handle and base mount (no text or symbols)natural_image
Isometric line drawing of a mechanical structure with multiple rods and supports (no text or symbols)natural_image
Line drawing of a manual machine and a tool (no text or symbols present)natural_image
Technical line drawing of a mechanical device with an inset showing a rotating component (no text or symbols)natural_image
Diagram of a mechanical presser with directional arrows indicating motion (no text or symbols)natural_image
Illustration of two fabric pieces with a curved arrow indicating a process or transformation (no text or symbols)natural_image
Line drawing of a manual presser machine with a clamping tool and rotating blade (no text or symbols)natural_image
Technical line drawing of a mechanical device with mounting base and internal components (no text or symbols)natural_image
Diagram of a lathe machine with directional arrows indicating motion or force (no text or symbols present)natural_image
Isometric line drawing of a traditional loom with hanging sheets and rods (no text or symbols)natural_image
Technical line drawing of a mechanical device with directional arrows indicating movement or force (no text or symbols present)natural_image
Line drawing of a mechanical device with a brush resting on it (no text or symbols)natural_image
Line drawing of a mechanical device with a dropper inserted into the top part (no text or symbols)22143 Hamburg, Germany
You have chosen to purchase a high-quality ADE brand product, which combines intelligent functions with an exceptional design.
The wealth of experience of the ADE brand ensures a high technical standard and proven quality for more freshness in your kitchen.
We wish you delightful moments.
Your ADE Team
General information
About this operating manual

This operating manual describes how to operate and maintain your product safely. Keep this operating manual in a safe place for future reference. If you pass this product on to someone else, pass on this operating manual as well.
Failure to observe this operating manual may result in injuries or damage to your product.
Explanation of symbols

This symbol combined with the word DANGER warns of serious injuries.

This symbol combined with the word WARNING warns of moderate and mild injuries.

This symbol combined with the word NOTE warns of material damage.

This symbol indicates additional information and general notes.
Table of Contents
General information....14
Scope of delivery 15
Safety 16
Intended use 16
Overview 17
Before first use 18
Check scope of supply 18
Setting up the pasta machine....18
Setting up the pasta dryer....19
Preparing dough....19
Making pasta....20
Processing dough....20
Shaping dough into dough sheets....20
Making pasta....22
Cleaning and storage....23
Fault/Remedy....25
Technical data....25
Warranty 25
Disposal....25
Scope of delivery
- Pasta machine with accessories
- Pasta dryer
- Cleaning brush
- Operating Manual
Safety
- This product may be used by children aged 8 and above, as well as by persons with reduced physical, sensory, or mental capacities or lacking experience and knowledge if they are supervised or have been instructed in the safe use of the product and understand the risks that may arise.
- Children must not play with the device.
- Keep wrapping and packaging material away from children. There is a choking hazard. Also pay attention that children do not pull the packaging material over their heads.
BEWARE of material damage
- Do not modify the device in any manner. Have repairs carried out only by a specialist workshop and observe the warranty conditions. Repairing the device incorrectly could damage it.
- Place the device on a robust, smooth and easy-to-clean worktop. When processing foods, occasional splashes are unavoidable.
- The device has support feet at the bottom. Since surfaces are made from various materials and are treated with diverse care products, it cannot be completely excluded that some of these substances contain ingredients that attack and soften the feet of the device. If necessary, place a non-slip pad underneath the device.
- The device should be placed on a sturdy work surface such as a kitchen worktop. During use, the device and the worktop secured together with the table clamp are exposed to various forces.
- Use only original accessories.
Intended use
This device is used to make pasta and is intended exclusively for household use.
The device is not suitable for commercial or household like use in professional kitchens, by employees in shops, offices and other commercial premises, in agricultural facilities, by customers in hotels, motels or other residential facilities, or in bed and breakfasts.
Use the device only as described in this operating manual. Any other use is considered improper and may result in damage to property or even personal injury.
The manufacturer or dealer assumes no liability for damage caused by improper or incorrect use.
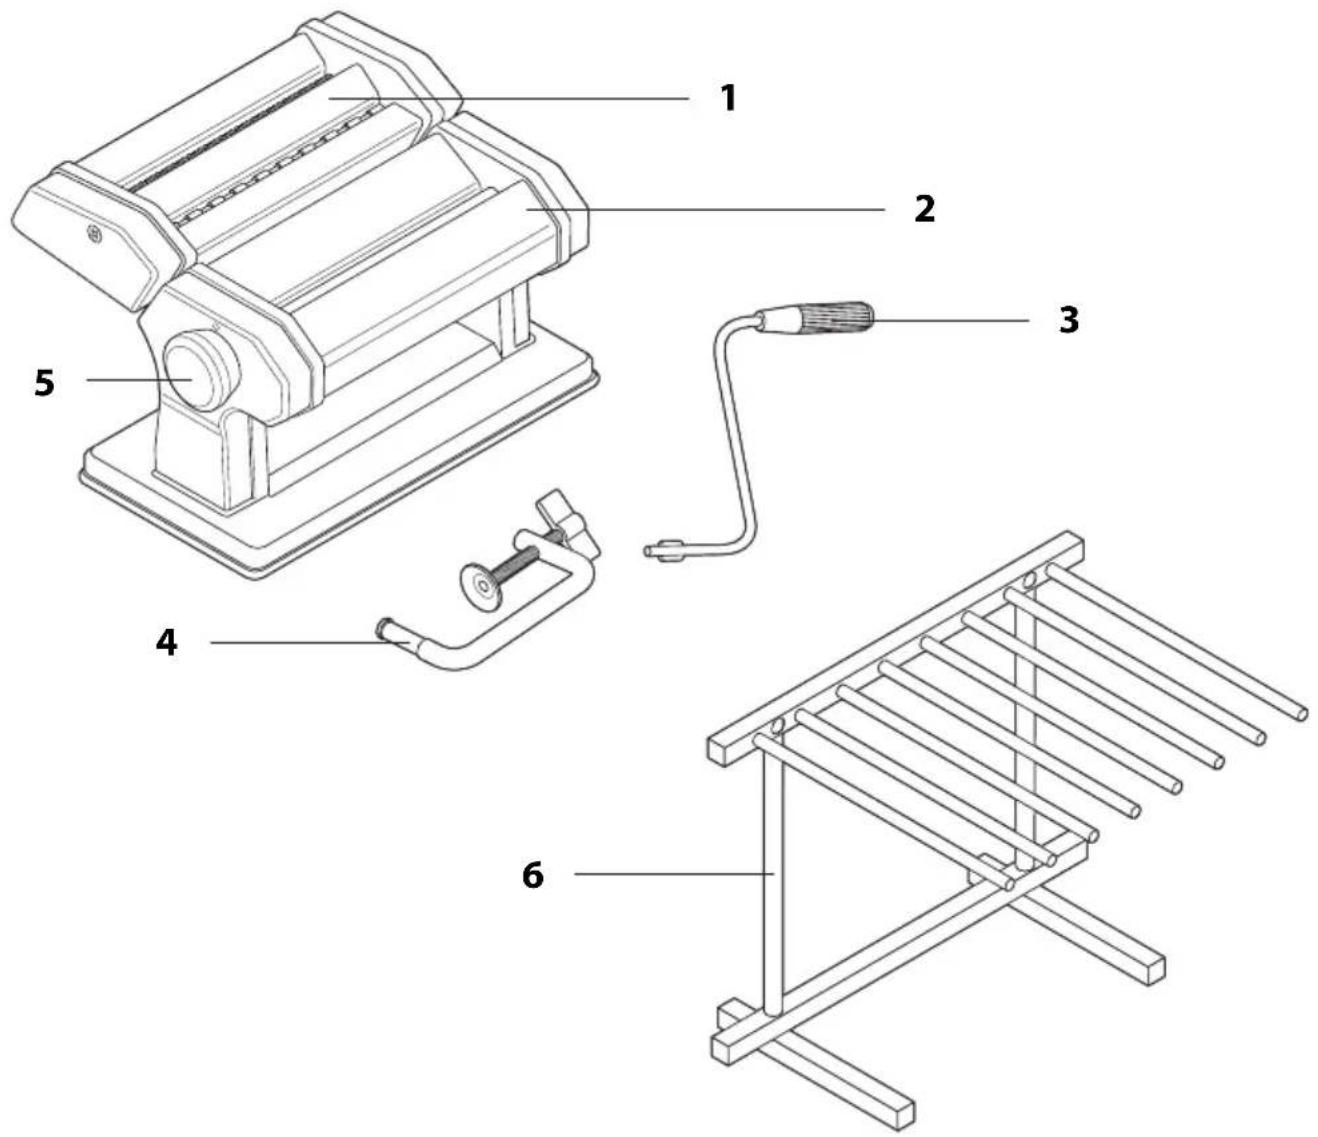
1 Cutting attachment
2 Pasta machine
3 Crank
4 Table clamp
5 Dial
6 Pasta dryer
Not depicted: Cleaning brush
Check scope of supply
- Remove all parts from the packaging and carefully remove all the packaging material.
- Check that the delivery is complete.
- Check that the device and its individual parts show no visible damage. If this is the case, do not use the device. In this case, contact the dealer where you bought the device.
- Clean the device and the pasta dryer before using them for the first time:
Pasta machine:
-Clean the device with a dry cloth or the included cleaning brush.
- Run some pasta dough through the pasta rollers and the cutting rollers to remove any dust deposits (see "Making pasta"). This pasta dough should subsequently be disposed of and should not be consumed.
Pasta dryer:
-Wipe the pasta dryer and its parts with a slightly damp cloth.
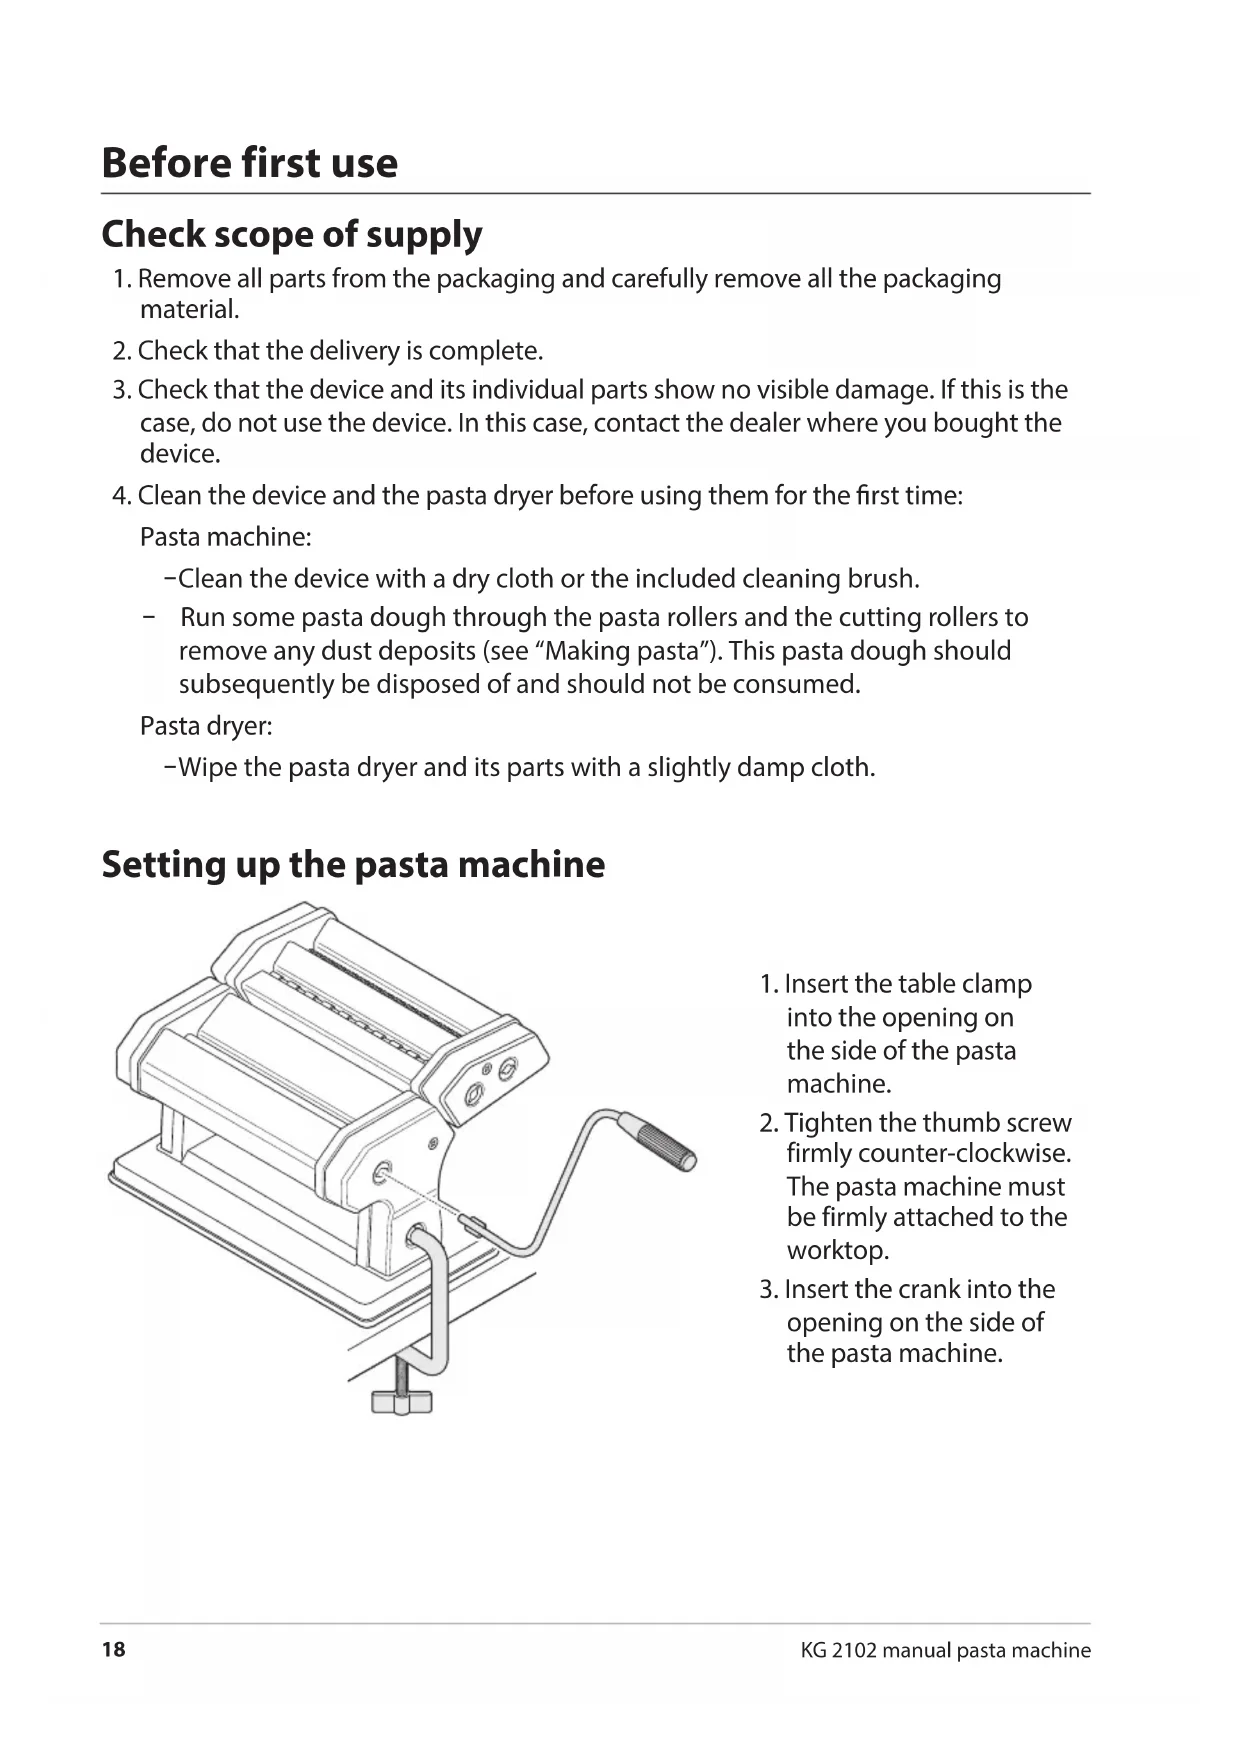
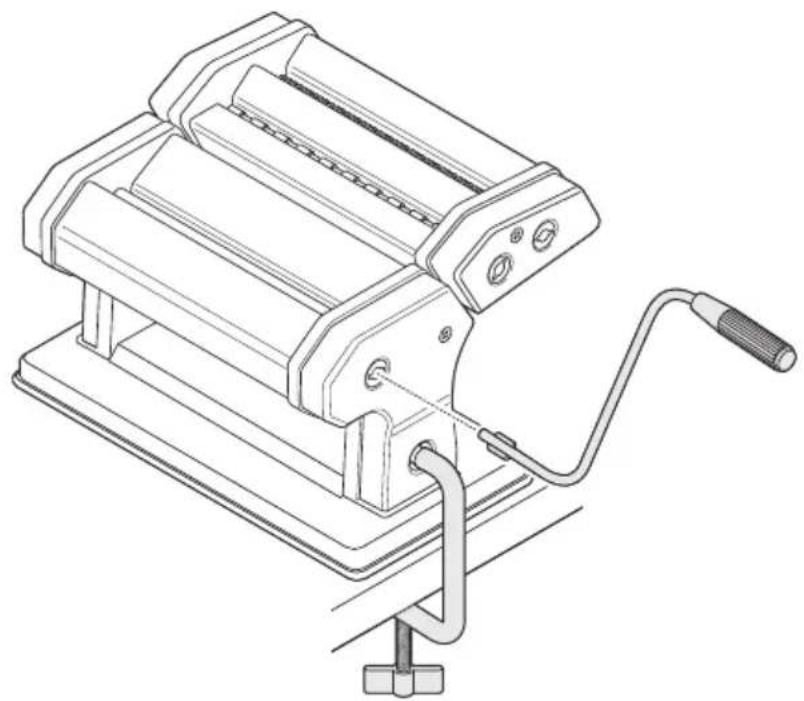
Setting up the pasta machine
natural_image
Technical line drawing of a mechanical device with a cable and handle, no text or symbols present- Insert the table clamp into the opening on the side of the pasta machine.
- Tighten the thumb screw firmly counter-clockwise. The pasta machine must be firmly attached to the worktop.
- Insert the crank into the opening on the side of the pasta machine.
Setting up the pasta dryer

natural_image
Isometric line drawing of a mechanical rack structure with multiple rods (no text or symbols)-Place the firmly assembled pasta dryer on a stable, level surface.
Preparing dough
Basic recipe for six people:
- 500 g of flour (or 250 g of plain flour and 250 g of durum wheat flour)
- 5 eggs
- 1 pinch of salt
- 1 teaspoon of olive or sunflower oil (optional)
- 1-2 tablespoons of water
-
Pour the flour into a bowl and make a well in the centre.
-
Put the eggs in the well and mix the ingredients with a fork.
-
Knead the dough thoroughly with both hands until smooth.
-
Ideally, put the freshly-made pasta dough in a cool place for at least an hour.
Pay attention to the following:
- Pasta dough can also be prepared without eggs. In this case, use approx. 180 to 200 ml of water and add 2 teaspoons of olive or sunflower oil.
- It is recommended to avoid using eggs straight from the fridge.
- If the dough is too dry, add a small amount of water to make it smoother. If the dough is too soft, add a little flour to it. The consistency of the dough is optimal if it doesn't stick to your hands.

Experience and practice are quite important when it comes to making your own pasta. Beginners should take their time and not despair if it doesn't work out right away.
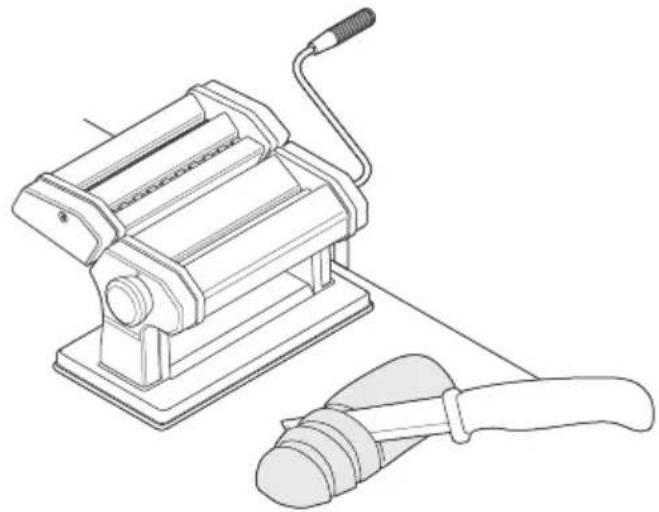
Processing dough
natural_image
Line drawing of a manual milling machine and a tool (no text or symbols)-
Take the pasta dough out of the container and place it on a lightly floured work surface.
-
Knead the dough thoroughly once again and then cut it into small pieces.
-
Make sure everything is within reach in front of you.
Shaping dough into dough sheets

natural_image
Technical line drawing of a manual pump mechanism with a close-up inset showing the internal mechanism (no text or symbols)- Pull out the dial a bit and set it to position 7. This fully opens the two rollers.
natural_image
Diagram of a manual presser machine with directional arrows indicating motion (no text or symbols)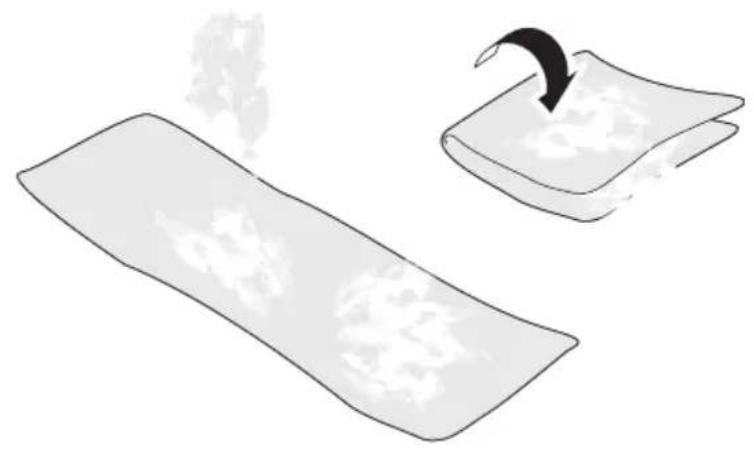
natural_image
Illustration of two fabric pieces with a curved arrow indicating a process or transformation (no text or symbols)
natural_image
Line drawing of a manual presser machine with a curved blade and handle, showing rotational motion (no text or symbols)-
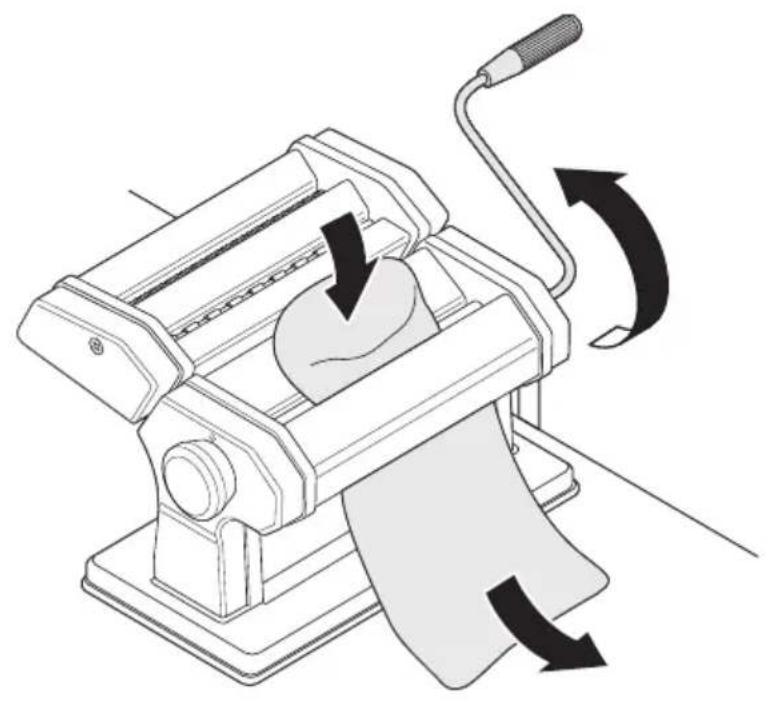
Take a piece of dough and flatten it a little bit with both hands. Put the dough into the rollers and turn the crank handle clockwise to force the dough through the rollers.
-
Fold the dough sheet and sprinkle it with a little flour if necessary. Then run the dough sheet through the rollers once again.
-
Repeat this process five to six times until an evenly flat dough sheet is obtained.
-
Set the dial to position 6 and run the pasta dough through the rollers once again.
-
Repeat the process by setting the dial to the next lower position after each run until the desired thickness of the pasta dough is obtained.
-
Cut the dough sheet into approx. 25 cm long pieces using a sharp knife.

- Position 1 produces a very thin dough sheet. Try running the dough through at another position to check if it is more suitable.
- If processing of long pasta seems cumbersome, you can cut the dough sheets into shorter pieces.
Making pasta
You can use the two attachments to make spaghetti or fettuccine.

natural_image
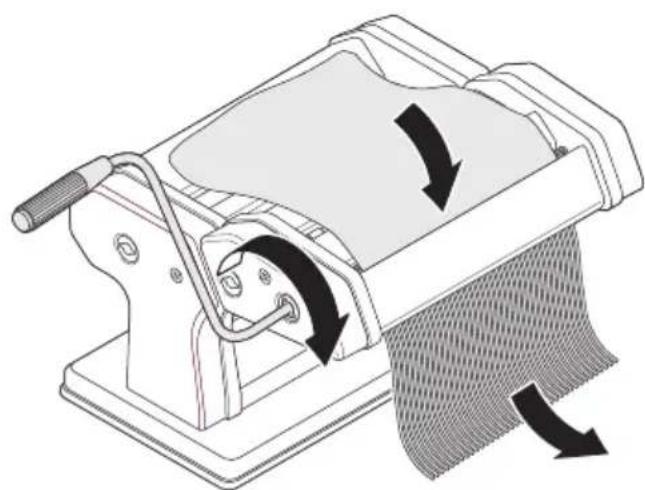
Technical line drawing of a mechanical device with mounting base and internal components (no text or symbols)- If not yet done, push the cutting attachment sideways onto the pasta machine. It must be pushed on at an angle from above. Note the notches on the sides of the cutting attachment and pasta machine.
natural_image
Diagram of a mechanical device with directional arrows indicating motion or force, no text or symbols present- Put the crank into the respective roller of the cutting attachment depending on whether you want to make spaghetti or fettuccine. Use the crank to run the dough sheet through the cutting roller.

natural_image
Isometric line drawing of a traditional loom with hanging sheets and rods (no text or symbols)-
Hang the pasta on the pasta dryer or lay it on a dry, clean cloth. Let the pasta air dry for at least an hour.
-
Cook the pasta in lightly salted water as usual. Stir the pasta gently during cooking.
- The cooking process takes 2 to 5 minutes depending on dough thickness.
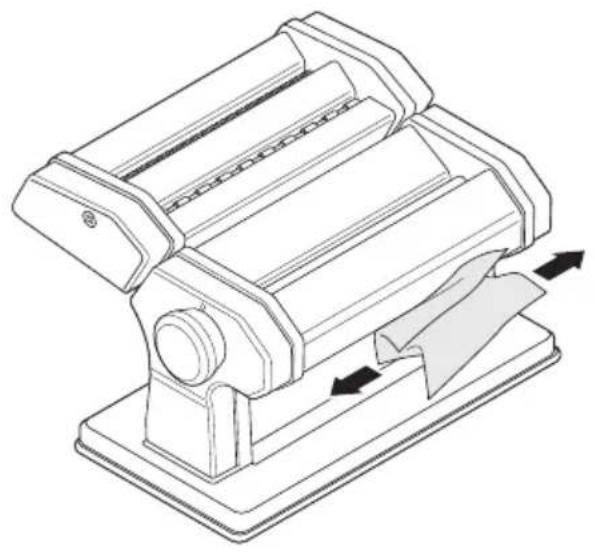
- Remove the cutting attachment from the pasta machine by lifting it and pulling it up along the guide rails.
Cleaning and storage

WARNING: Risk of injury!
- Some edges of the rollers and plates are sharp. Use caution when cleaning the machine.

NOTE on material damage
- Never wash the device with water, detergents or washing-up liquids and do not clean the device or its accessories in the dishwasher.
- Never use harsh, scouring or abrasive cleaning agents or the like to clean the device. Otherwise, the surface could be scratched.
- Never clean the device by running textiles through the rollers or cutting rollers.
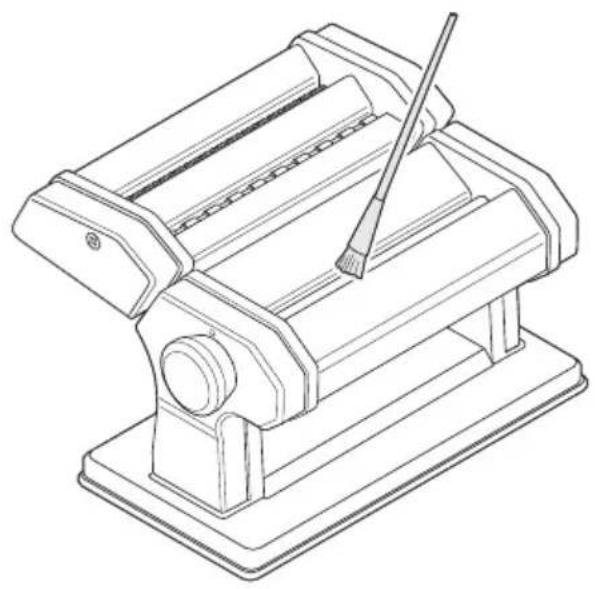
natural_image
Technical line drawing of a mechanical device with directional arrows indicating movement or force (no text or symbols present)-Use some kitchen paper to wipe the scraper underneath the rollers from time to time, even while making pasta (in large quantities).
natural_image
Line drawing of a mechanical device with a brush and base plate (no text or symbols)-Clean the device with a brush and a small wooden stick. Make sure it is absolutely clean.

natural_image
Line drawing of a mechanical device with a dropper inserted into a slot (no text or symbols)-Should the rollers become squeaky over time, grease them with a little olive or cooking oil so that they turn smoothly.
- The device and accessories must be clean and completely dry before putting them into storage.
- It is recommended that you store all parts in their original packaging in a frost-free and dry place.
Fault/Remedy
| Fault Possible cause | |
| The rollers of the cutting attachment do not cut the pasta dough. | · The dough is too soft. Add a little flour to the pasta dough and knead it again. |
| The rollers of the cutting attachment do not pull in the dough. | · The dough is too dry. Add a little water to the pasta dough and knead it again. |
Technical data
Model: KG 2102
Pasta machine dimensions: 200 x 198 x 158 mm
Distributor (no service address): Waagen-Schmitt GmbH
Neuer Höltigbaum 15
22143 Hamburg, Germany
Our products are constantly being developed and improved.
For this reason, design and technical modifications are possible at any time.
Warranty
Waagen-Schmitt GmbH warrants for 2 years from the purchase date the cost-free rectification of defects in material and workmanship through repair or exchange. In the event of a warranty claim, please return the product with the proof of purchase (specifying the reason for claim) to your dealer.
Hamburg, April 2021
Waagen-Schmitt GmbH
Disposal
Disposing of the packaging

Dispose of the packaging according to type. Dispose of cardboard with waste paper and of films with recyclable materials.
Disposing of the product
Dispose of the product in accordance with the regulations that apply in your country.
natural_image
Technical line drawing of a mechanical device with a handle and base mount (no text or symbols)natural_image
Isometric line drawing of a mechanical structure with multiple rods and supports (no text or symbols)natural_image
Line drawing of a manual press machine and a tool (no text or symbols)natural_image
Technical line drawing of a manual pump mechanism with a close-up inset showing the internal mechanism (no text or symbols)natural_image
Diagram of a mechanical presser with directional arrows indicating motion (no text or symbols)
natural_image
Illustration of two fabric pieces with a curved arrow indicating a process or transformation (no text or symbols)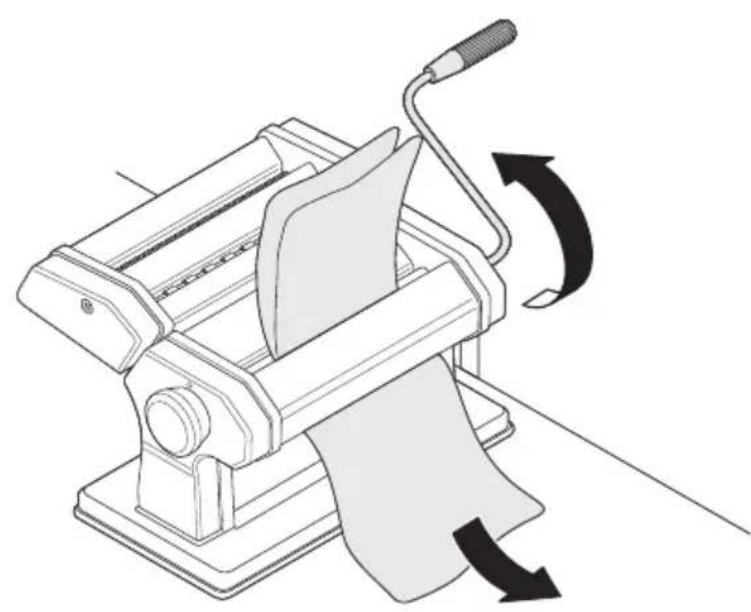
natural_image
Illustration of a manual presser machine with a curved arrow indicating rotation (no text or symbols)natural_image
Technical line drawing of a mechanical device with mounting base and internal components (no text or symbols)natural_image
Diagram of a mechanical device with directional arrows indicating motion or force, no text or symbols presentnatural_image
Isometric line drawing of a traditional loom with hanging sheets and rods (no text or symbols)natural_image
Technical line drawing of a mechanical device with directional arrows indicating movement or force (no text or symbols)natural_image
Technical line drawing of a mechanical device with a tool inserted, no text or symbols presentnatural_image
Line drawing of a mechanical device with a dropper inserted, no text or symbols presentnatural_image
Technical line drawing of a mechanical device with a handle and base mount (no text or symbols)natural_image
Isometric line drawing of a mechanical rack structure with multiple rods (no text or symbols)natural_image
Line drawing of a manual press machine and a tool (no text or symbols present)natural_image
Technical line drawing of a manual pump mechanism with a close-up inset showing the internal mechanism (no text or symbols)natural_image
Line drawing of a manual press machine with directional arrows indicating motion (no text or symbols)natural_image
Illustration of two fabric pieces with a curved arrow indicating a process or transformation (no text or symbols)natural_image
Line drawing of a manual presser machine with a scroll and handle, showing rotational motion (no text or symbols)natural_image
Technical line drawing of a mechanical device with mounting base and internal components (no text or symbols)natural_image
Diagram of a mechanical device with directional arrows indicating motion or force, no text or symbols presentnatural_image
Isometric line drawing of a traditional loom with hanging sheets and rods (no text or symbols)natural_image
Technical line drawing of a mechanical device with directional arrows indicating movement or force (no text or symbols present)natural_image
Line drawing of a mechanical device with a brush and screwdriver (no text or symbols)natural_image
Line drawing of a mechanical device with a handle and base plate (no text or symbols)natural_image
Technical line drawing of a mechanical device with a handle and base mount (no text or symbols)natural_image
Isometric line drawing of a mechanical rack structure with multiple rods (no text or symbols)natural_image
Line drawing of a manual milling machine and a tool (no text or symbols)natural_image
Technical line drawing of a manual pump mechanism with a close-up inset showing the internal mechanism (no text or symbols)natural_image
Diagram of a manual presser machine with directional arrows indicating motion (no text or symbols)
natural_image
Illustration of two folded paper sheets with a curved arrow indicating a folding or rotation process (no text or symbols)
natural_image
Line drawing of a manual presser machine with a clamping tool and rotating blade (no text or symbols)natural_image
Technical line drawing of a mechanical device with mounting base and internal components (no text or symbols)natural_image
Diagram of a mechanical device with rotating arrows indicating motion, no text or symbols presentnatural_image
Isometric line drawing of a traditional loom with hanging sheets and rods (no text or symbols)natural_image
Technical line drawing of a mechanical device with directional arrows indicating movement or force (no text or symbols present)natural_image
Line drawing of a mechanical device with a brush and base plate (no text or symbols)natural_image
Line drawing of a mechanical device with a handle and base plate (no text or symbols)natural_image
Technical line drawing of a mechanical device with a cable and handle, no text or symbols presentnatural_image
Isometric line drawing of a mechanical rack structure with multiple rods (no text or symbols)natural_image
Line drawing of a manual presser with a tool and base, no text or symbols presentnatural_image
Technical line drawing of a mechanical device with a close-up inset showing a rotating component (no text or symbols)natural_image
Three-step illustration of a lathe machine tool, showing blade deformation and fabric rolling process (no text or symbols)natural_image
Technical line drawing of a mechanical device with mounting base and internal components (no text or symbols)natural_image
Diagram of a mechanical device with directional arrows indicating motion or force, no text or symbols presentnatural_image
Isometric line drawing of a traditional loom with hanging sheets and rods (no text or symbols)natural_image
Technical line drawing of a mechanical device with directional arrows indicating movement or force (no text or symbols present)natural_image
Line drawing of a mechanical device with a brush resting on it (no text or symbols)natural_image
Line drawing of a mechanical device with a handle and base plate (no text or symbols)natural_image
Technical line drawing of a mechanical device with a cable and mounting base (no text or symbols)natural_image
Isometric line drawing of a mechanical rack structure with multiple rods (no text or symbols)natural_image
Line drawing of a manual press machine and a tool (no text or symbols present)natural_image
Technical line drawing of a manual pump mechanism with a close-up inset showing the internal mechanism (no text or symbols)natural_image
Diagram of a mechanical presser with directional arrows indicating motion (no text or symbols)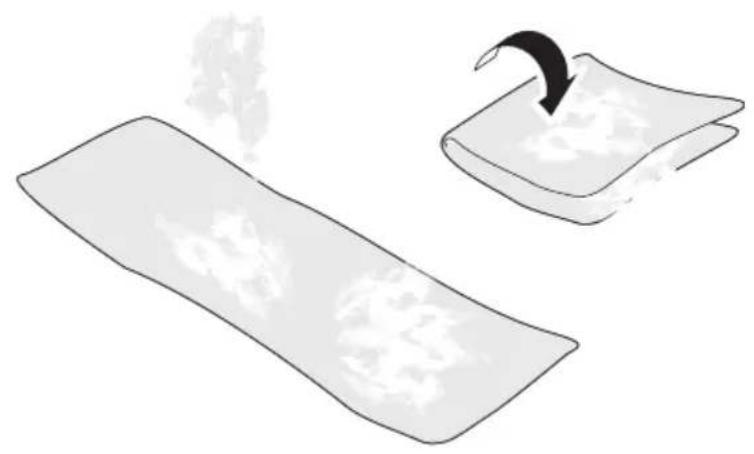
natural_image
Illustration of two folded paper sheets with a curved arrow indicating rotation (no text or symbols)
natural_image
Line drawing of a manual presser machine with a clamping tool and directional arrows indicating motion (no text or symbols)natural_image
Technical line drawing of a mechanical device with mounting base and internal components (no text or symbols)natural_image
Diagram of a mechanical device with directional arrows indicating motion or force, no text or symbols presentnatural_image
Isometric line drawing of a wooden rack with hanging sheets of material (no text or symbols)natural_image
Technical line drawing of a mechanical device with directional arrows indicating movement or force (no text or symbols present)natural_image
Line drawing of a mechanical device with a brush and screwdriver (no text or symbols)natural_image
Line drawing of a mechanical device with a dropper inserted into a slot (no text or symbols)


- Bedienungsanleitung
- General information
- About this operating manual
- Explanation of symbols
- Table of Contents
- Scope of delivery
- Safety
- BEWARE of material damage
- Intended use
- Check scope of supply
- Setting up the pasta machine
- Setting up the pasta dryer
- Preparing dough
- Processing dough
- Shaping dough into dough sheets
- Making pasta
- Cleaning and storage
- WARNING: Risk of injury!
- NOTE on material damage
- Technical data
- Warranty
- Disposal
- Disposing of the packaging
- Disposing of the product
Brand : ADE
Model : KG 2102
Category : Other kitchen appliances