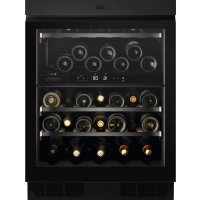
AWUD040B8B - Refrigerator AEG - Free user manual and instructions
Find the device manual for free AWUD040B8B AEG in PDF.



| Brand | AEG |
| Model | AWUD040B8B |
| Product type | Wine cellar (wine refrigerator) |
| Dimensions (H x W x D) | 818 x 595 x 577 mm (excluding handle) |
| Storage capacity | Up to 40 bottles of 0.75 L (Bordeaux format) |
| Adjustable temperature range | +5 °C to +20 °C |
| Number of compartments | 2 (upper and lower) |
| Number of shelves | 5 (including 4 full shelves) |
| Lighting type | Adjustable LED (behavior and brightness) |
| Air filter | Activated carbon filter (to be replaced every 6 months) |
| Temperature alarm | Yes (high and low temperature) |
| Open door alarm | Yes (triggers after approximately 5 minutes) |
| Child lock | Yes (key lock) |
| Cellaring mode | Yes (preset to 12 °C for both compartments) |
| Door reversibility | Yes (separate document provided) |
| Defrosting | Automatic |
| Refrigerant | R600a (isobutane) |
| Voltage / Frequency | 220-240 V / 50 Hz |
| Climate class | 10 °C to 38 °C (ambient temperature) |
| Maintenance and cleaning | Warm water and baking soda; do not use abrasive detergents |
| Availability of spare parts | 7 years after model discontinuation (10 years for door seals) |
| Weight (estimated) | Approximately 38 kg |
Frequently Asked Questions - AWUD040B8B AEG
User questions about AWUD040B8B AEG
0 question about this device. Answer the ones you know or ask your own.
Ask a new question about this device
Download the instructions for your Refrigerator in PDF format for free! Find your manual AWUD040B8B - AEG and take your electronic device back in hand. On this page are published all the documents necessary for the use of your device. AWUD040B8B by AEG.
USER MANUAL AWUD040B8B AEG
He cxbxpaHraBaIte ekCpIIO3NBn cy6CTaHcN, KaTo KyTIN aepo30J CbC 3aIaIIMO rOpIBO B To3N ypei.
Ako 3axpaHbauT Ka6e n e NobpeDeH, ToT Tp8Ba da ce 3aMeHN OT npOn3BOdnteJIa, OT yIbJHOMOueH cepBn3eH ZeHTbp IJIu OT IINca Cbc CXoDHa KBaIIΦnKauzna, 3a Da Ce n36eRhe pNcK.
2.ИHCTPYKUN 3A BE3OJACHOCT
2.1Инстацnia

BHIMAHHE!
Camo KBaIIuΦnIpuH YOBek MOKe Da N3BbPm MOHTaKa Ha ypeHa.
MaxheTe BCnUKN ONaKOBKn.
He mONTpaTne n He n3non3BaTe NOBpeDen ypeI.
He n3noI3BaIte ypeia, npeIa ro HnHCTaIInpate BbB BrpaIeHaT a KOHCTpyKUra 3apaIu 6eONaChocTTa.
CneBaiTe HNCTpyKunTe 3a HnHctaJInpaHe, npINIOKeHN KbM ypeDa.
BnHaBn BnHmBaAte, KOraTo MeCTnte ypeDa, TbN KaTO e TeKbK. BnHaRn n3NoJ3BaIte npEJa3HN pKabuCn n 3aTBopeHn O6yBKn.
- YBepete ce, ye nMa CBO6oHa Unpkyna Ha Bb3dyxa OkoNo ypeDa.
- Пи пьрв Инста的答案 Илсед реверсане на вразчкataичakайтпоне 4 уаса,пpeди дсьржte урда Кьм 3axpaHbaHeTo.Тoba ce habara,зд може macnoToд поточе obpathoВ komпесopa.
-Предддддддддддддддддддддддддддддддддддддддддддддддддддддддддддддддддддддддддддддддддддддддддддддддддддд徴а(Hanp. peверсиранеHaBpaTata),ИЗВадеTe 申EncelaOTKoHTaKaTa.
He moHTnpaIte ypeDa 6n3o do paIaTOPn, neKn, cyprHn nn KOTIOHn.
He n3naarTe ypeDa Ha IbXd.
He MoHTnpaTe ypeHa Ha MeCTa, KbDeTo mMa npKa CJIbHueBa CBETJINHa.
He nHcTaJInpaIe To3n ypeId Ha MeCTa, KOnTO ca IpeKaJIeHO BJaXHN NII CTyDeHIN.
Korato npemectbaTe ypeda, NOBdHHeTe rO OTkbM npeHnra p6, 3a da n36eHHeTe HaDpaCKBaHe Ha noDa.
2.2 EneKtpnuecko CBbp3BaHe

BHIMAHHE!
PnCK OT nOxap NJI TOKOB yIap.

BHIMAHNE!
Pn no3nIOHnpaHe naypeda ce yBepTe,ye 3axpaHbAsnT Ka6eI He e 3aKaueH nII NOpeDeH.

BHIMAHNE!
He n3noJ3BaIte pa3KIOHITeJI NJIa aIaNTepn C MHO BOxOIOBe.
- YpeT Tp8Ba Da e 3a3MeH.
- YBepTe ce, Ye napaMeTpnte Ha TaBeIkata C TexHnueCKn DaHHn ca CbBMECTUMN C eNeKTPnueCKnTe DaHHN Ha 3axpaHbAaTa MpeXa.
BnHaHn n3NoJ3BaIte npaBnHO MOHTnpaH KOHTaKT CbC 3aUNTa OT TOKOB yIap. - YBepete ce, che He HapaHbATE en. KOMnoHEtN (HaNP. OCHOBeH KOHTaKT 3a 3axpaHbAHe, 3axpaHbAu Ka6en, KOMnpecOp). CbByKeTe ce c OTOpn3nPaHnCepBn3eH ZeHTbp NIIeNEKtpoTEXnK, 3a Da CMeHN eNEKtpnueCKnTe KOMnoHEtN.
3axpaHbauT Ka6e Tp86Ba da e IoN HIBOTO Ha OCHOBnKoHTaKT 3a 3axpaHbAhe.
CbpxkeTKe6eNa3a3axpaHbaHeTo KbM KOHTaKTa eINHCTBeHO B KpaHa INHCTaJaTAt. YBepTe ce, ye 1enCeIbT 3a 3axpaHbaHe e DOCTbNeH cIeN HCTaIInpaHeto.
He n3bPnBaIte 3axpaHbaun Ka6en, 3a da n3knIOuHTe ypeHa. BInarn n3bPnBaIte uenceJa ha 3axpaHbaHTo.
2.3ИЗноЛЗВанe

BHIMAHNE!
PnCK OT KOHTy3Hn, n3rapaHn, eJekTpnueckn ydap nn noxap.

YpeBbTcbDbpxa3anaIIMra3,
n306yTaH (R600a), npnpoJeH ra3 c BnCOKO HnBO Ha ekOJOnuHa CbBMeCTmOcT. BHIMaBaIte Da He npNHNTE NOpeHa Ha XJaDnHHaTa Bepura Cbc CbDbpxKaHne Ha n306yTaH.
He npomeHnTe npedHa3NaueHneTo Ha ypeDa.
Bcya ynoTpe6a Ha Brpaednna npoaykT KaTO CBObOndHO cTOnu e cTporo 3a6paHeHa.
He nocTaBnTe eNeKtpnueckn ypei (Hanp.Maunn 3a cnaOJeD) Bypeda,OCBeH aKO TOBa He e IIOCOUeHO OT pON3BOIDTeJI.
AkoBb3HnKHe NOBpeHa Ha XlaIINHaTa Bepura, yBepTe ce,Ye HrMa IaMbun Nn3ToUHnHa Bb3PnAmEHaBe B NOMeueHneTO. PpOBeTpTe cTajTa.
He no3BOJBAaTe Ha ropeu npedMeTn Da DOKOCBaT nlaCTMaOBtE qactn Ha ypeDa.
He cxbxpanhaBte 3anaIIM ra3 n TeuHOCT B ypeDa.
He nocTabaIte 3anaIIMn npOdyKTN nnnpedMeTn, KOINTo ca HAMOKpeHn CbC 3anaIIMn npOdyKTN, B 6JIn3OCT Do ypeDa nnBbpxy Hero.
He DoKocBaIte KOMnpecopa IIN KOHDeH3aTopa. Te ca ropeu.
2.4 Bbtpeusho ocBetJeHne

BHIMAHNE!
OnachocOT TOKOB yap.
To3n npOdyKT cbDbpxa eDINH nnn NOBueye N3TOUHNi Ha CBETNIHa OT KnaC Ha eHeprnHa epeKTHBHOCT E.
OTHOCHO JAMnata(HTe) BbTpE B TO3n npOdyKT n pe3epBnTe JAmnn, npOdaBaHn OTdEnHo: Te3n JAmnn ca npedHa3NaYeHn Da n3Dbpxkat Ha ekCTpeMnH pN3nueckn ycNoBn B DOMaKnHcN ypeN, KaTO TempePaTpa, BN6paun, BlaJxHocT nn Ca npedHa3NaYeHn Da cNHaJIIN3npaT INΦOpMaun 3a pa6oTHOTO cbCToRnHe Ha ypeDa. Te He ca npedHa3NaYeHn 3a n3POn3BaHe B dpyr n npINOJKeHn n He ca NODXODAUN 3a OCBETBAHe Ha NOMeUeHn B DOMaKNHCTBOTO.
2.5 Гпжи поочтванe

BHIMAHNE!
Onachoct ot hapaHyaHe nnnoBpeHa Ha ypeDa.
- Ppei n oDpBxka N3KIOUeTe ypea n N3BaIeTe UeNceHa Ha 3axpaHbAHeto OT KOHTaKTa Ha eJ. Mpeka.
To3n ypei cblbpka BbrIeBOOpOuB OxnaJdaunia 6Iok. Camo KBaJIHΦNcIpaHO Nlue MoKe daNoDlbpKa n ppe3apeKda ypeHa. - PeIOBHO npOBepaIte KaHala 3a OTcExKaIHe Ha ypeHa n aKO e Heo6XoIMo, ro NouchTe. Ako KaHaJIbT 3a OTcExJaHe ce 3anyu, pa3Mpa3eHaTa BODa Ie ce cb6epe Ha DbHOTo Ha ypeHa.
2.6 O6cnyXbaHe
3a nonpaBka Ha ypeDa ce CbpxKeTe c OTOpn3npaHnCePBn3eH ueHTbp. N3noJ3BaIte camo opuHaJIHn pe3epBHN qactn.
Molna, mMaTe npeBnD, ye co6CTBeHOpbUHaTaNoprabKa nIIN nonpaBka, KOrTo He e N3BbPseHa OT cNeuaNt, MoKe Da IMa PocneDuNc, CBbp3aHn C 6e3oNaChOcTTa, n Da anyInpa rapaHcYra.
CneHnTe pe3epBnHuactnIe6bdaT HaJIuHN B npOdbJxKeHne Ha 7 TOnHH CNeK KaTO MoJeIbTe cnpaH OT pON3BOdCTBO: TepMOcTaTH, TeMnepaTyprH CeH3OpN, neaTHN PLaTKN, CBETNIHH N3TOUHNi, DpbXKn Ha BpaTN, NaHTN Ha BpaTN, TaBN N KOuHNu. MoJr, mMaHTe PpeBDnD, Ye HAKoN OT Te3n pe3epBnHuactn Ca HaJIuHN CamO 3a PpocceNoHaJIH N TexHnNi He BCNUK Pe3epBHN uactn Ca NOxOJaN 3a BCNUKN MOJIIN.
- YIITBTHENrTa 3a Bpatn ue ca HJIuHn B pAMKInTe Ha 10 roINH CJIeK KaTO MoJeTbTe cnpRn OT PON3BOIDCTBO.
2.7 N3xBbpyne

BHIMAHHE!
PnCK OT HapaHЯBaHe nJIu 3aDyUbaVe.
- I3KJIIOUeTe ypeDa oTeJekTpO3axpaHbaHeTo.
- OTPeKeTe 3axpaHbAunKa6eI nTo n3xBpNeTe.
OTCTpaHHe BpaTnUkKaTa,3a Da He MORaT Deuca N DomauHN IIObMUn Da ce 3akNIOuAT BVypeDa.
XlaHnHaTaBepra n 30JaauHOHHTe MaTePnaHn Ha To3uypeed ca 6IarOpnpaTHN 3a O3oHa.
-Ⅰэлационнотяпа CBдьржа
Вбзпламеим ra3. CBьркete ce c
ObHcTe Bnactn 3a HOpMaun 3a TOBa KaK Da N3XBpNITe ypeDa npaBnIHO.
He noBpeKdaiTe yacTtHa oxJaXdaun 6Jok, KOITo e 6n30 do TOnJIoo6MeHHnka.
3.ИHCTAJALAUN

BHIMAHHE!
BuxTe rnaBa
"Be3onacnoct".
3.1 Pa3mepn
T6apnHpa3mepn
H1 MM 818
W1 MM 595
D1 MM 577
1 BncoOnHaTa, u npHaTa n Dbl6oOnHaTa Ha ypea 6e3 dpbXkata
Heo6xOIMO npoctpaHCTBO 3a ek-cnloatauia
H2 MM 820
Heobxodmo npoctpaHCTBO 3a ekcnloatauia
W2MM600
D2 MM 580
2 BncouHaTa, u npHaTa n
IbJIoOuHaTa Ha XlaAnHnKa,
BKnIOHTeJIHO dpXkATo Ha BpaTAta,
IIIOc IpocTpaHCTBOTo, Heo6xOIMo 3a
CBo6oHa cnpKyaun Ha OxJaDaun
Bb3DyX
| Овци постранстvo, Нeoобховимо за екплοатуся 3 |
| H2 MM 820 |
| W3 MM 600 |
| D3 MM 1162 |
3 BncoounHaTa, u npHaTa n
IbIbOoHnHa Ta Ha XlaAnJHnKa,
BKnIOHTeJIHO DpbXkKaTa Ha BpaTata,
IIIOc IPOCTpAHCTBOTO, Heo6xOIMo 3a
CBO6OJaHa CnpKyaun Ha OxJaDaun
Bb3dUx, IIIOc IPOCTpAHCTBOTO,
Heo6xOIMo 3a OTBaPareHe Ha BpTaTa Do
MInHMaJIHn bIbI, N03BOJRAu
N3BaJdaHe Ha BCnUKN BbTpEShn
Iprncnoc6JeHn
3.2 Pa3nojarahe
3a Bb3MOxHO Ha-Do6po
fYHKUOHNpaHe Ha ypeHa, He ce
IpenOpbUBa Toi Da Ce IHCTaJInpa B
6N3OcT Do n3TOHnCu Ha TOnnHa
(ypHn, neuKn, paNaTopn.
MJTNUKbPn Nn KOTNoH) Nn Ha
MaCTO C npRA CaBHyEBA CBETnHa.
YBepTe Ce, Ye nMa CBO6oHa
CIPKyJaHn Ha Bb3DyX OKoJ0 3aHaTa
CaCT Ha Kopnyca.
YpeBbT Tp6Ba Da ce HcTaInpa Ha cyxo n npOBETpBO MAcTO, Ha 3akpnto.
YpeIbTe npedHa3NaueH 3a pa6oTa B OKJIHa cpeJa c TempepaTpya ot 10^ do 38^

IpaBnHaTa pa6Ota Ha ypeDa e rapaHTnpaHa cAmo npEeKnloatauB nocouHnTeMnepaTypeH dnaNa3OH.

Ako mATE cBmHeHna 3a
MRCTOHa HnCTaInpaHe Ha
ypeDa,ce ObPHeTe KbM
DOCTaBvNka,KbM HaUN
OTDeJ 3a ObCnJyKBaHe Ha
KJIeHTN NIN KbM Ha-
6IIIN3KnO TOpN3npaH
cepBn3eH ueHTbp.

Tp6Ba Da e Bb3MOxHo ypeBt Da Ce N3KlIOyBa OT MpeXOBOTo 3aXpaHBAHe. Toba O3HaYaba, Ye cIeN HCTaIIpaHTo Tp6Ba Da IMa JIceH DoCTbN Do UcenCeJa.
3.3ЕнктпческocBbрзBaHe
- PpeiBkIIOUbaHe KbMeJIeKTPo3aXpaHbauTa MpeKa IpoBepTe DaIIHn HAppeKeHneTo I YecToTata Ha TaBeIkaTc DaHHN OTROBaprT Ha Te3n OT DomauHaTa Bn EJIeKTPo3axpaHbaua MpeKa.
- UpebT Tp6Ba Da e 3a3EmeH. 3a целТа UcenCeIbT Ha 3axpaHbaun ka6eI nMa CneuAneH KOHTA.KO domaunr KOHTHa eNEKtpo3axpaHbaHeTo He e 3a3EmeH, CBpbKeTe ypeDa KbM OTdelen 3a3emraBau Ka6eB B CbOTBcTCTBnE C deNCTBaUnTe HOpMaTINBn pa3npoe6n CJeD KOHCyJtauCnKBAInΦnUpanH TexHnK.
- PpOu3BODHTeJIaT He HOCN OTROBOPHOCT, aKO rOpEnOCoHITe MePKn 3a 6e3OnaCHOCT He ca Cna3EHN.
-ypeTcBOTBeTCTBaHa DnpeKtNBITE Ha ENO.
3.4 Hubejnapahe
Ipn HnctanipaHTo Ha ypea Toi Tp6Ba da ce HnBeJnpa. ToBa MoKe da ce NoCTnRhe qpe3 YeTnp perynpyEm KpaTeA B DoHATA Yact Ha ypea.
3.5 06pbuaneHaBpata
MOnIa, BnXTe OTdEHNHa DOKymeHT C HnCTpyKuH N OTHOCHO MOtaxKa n 06pbuaHeTo Ha BpaTata.

PPEyPPEKDEHNE!
Ha Bcekn ean ot
obpbuaHTo Ha BpaTaTa
nazete nda ot
OdpackBaHnC n3dpbXJNB
MaTePnaJI.
4.ОПИСAHNEHAПОДУКТА
i CBeTJnHaTa He BInRe OTPncaTeJIHO Bbpxy KaueCTBOTO Ha BnHOT.
Mokete da perylnpate noBeHeHneTo n npKoCTTa Ha CBetnHaT.
IobedeHHe Ha CBeTInHaTa (A):
1A OTBOpeHa Bpata-CBeTbHa Ha HnBnCOKOTO HnBO Ha dIMnPaHe,3aTBopeHa Bpata-CBeTInHnTe ceN3KJIIOyBaT
2A OTBOpeHa BpTa - CBeTbHa Ha HnBnBCOKOTO HnBO Ha DmMnpaHe, 3aTBopeHa BpTa - CBeTbHa Ha N36paHOTo HnBO Ha DmMnpaHe
3A OTBOpeHa 3aTBopeHa BpaTa-CBETBa Ha N36paHOTo HNBO Ha DnMnpaHe
4A OTBOpHa BpTa-CBeTbHa Ha36paHTo HnBO HaДIMnPaHe, 3aTBoPeHa BpTuKa-CBeTbHa Ha-NBCOKOTO HnBO HaДIMnpaHe RaPKoCT ppe3 HoUta (L):
- 9L e Ha-ЯрkaTa HacTpOka,doKaTo 1LeHaH-TbMHaTa.
3a da hactponTe NOBeDeHneTo Ha CBetTnHaTa IIN npKocCTTa:
1.ДOKOCHTeи 3aApbXte6yToHa 3a OCBetJIeHHeTO 3a 3ceKHyDN,3aJa BNe3eTe B MeHIO T C HAcTPOiKaTa Ha CBETIiHaTA.NHdNKaTOPbT Ha TropHOTo OTdeJIeHne Mnra N NOKa3Ba NOBeJeHHeTO Ha CBETIIHaTA A, INHdNKaTOPbT Ha DOJHOTO OTdeJIeHne Mnra N NOKa3Ba JRPKOCTTa Ha CBETIiHaTA L.
2.Дokochete perynaTopuTe Ha TemnepaTypaHa BCaKO OTDeJeHne HeKoJIKOKpaTHO,3a Da n36epeTe KeJaHaTa HacTpoiKa.
5.6 Cellaring
B To3n pexnM OTdJeHnra Ta Ha ypeDa ce npeBKnUoyBaT Ha npEaBapnteJHo 3aJaHeHaTa TemnepaTypa no NoDpa3bnpaHe ot 12^
3a da akTbupaTe pexima Cellaring, DOKOCHete npoDbJxKITeHNO 6yToHa Cellar Mode. CE ce noBBA u Mnra NocJeDoBaTeJIHO 3a rOpHOTo, DOHOTO n DBete OTDeIeHnA. N3uKaaiTe 5 ceKyni.PexmbTe aakTBeH, KOraTO CE cnpe Da mRa u CBETn HanoIOBHa.
3a Da DeaKTHBnPaTe peXnMa Cellaring, DOKoCHeTe Cellar Mode HeKoJIKKpaTHO, DOKaTO ce NOBRT uΦpnte 3a Tempepatyata.
5.7 Pexim Child Lock
AKTINBnpaTepeXmTaChildLock,3aDa 3aKIOUHTe6yTOHITcpeuY HeymnJIeHa pa6ota.
3a da akTbupate Child Lock,doKocheTe n 3aDpBxTe Cellar Mode 6yToHa 3a 3 ceKyni. KoraTo peXIMbT e BKNIOUeH, INDNkATOpbT 3a 3aKIOUBAHe CBETBa npn PbIHa JRPoCT. CneJ 3 ceKyni INDNkATOpbT 3a 3aKIOUBAHe HaMaIraBa HANOIOBnHa JRPoCTTa cn.

AkoHaTnchTe 6yToH, pa3nueH ot Cellar Mode, INdkaTopbT 3a 3aKnUoyBaHe Mrra Tpr nTn.
3a da deaktnbupate Child Lock pexuma, HATNCHETe OTHOBO CbOTBeTHn8 6yTOH.

PexmT Child Lock ce
DeakTNBnpa Cnei
npeKbcBaHe Ha
eKeKtpo3axpaHbHeTo NNI
N3KNIOUBAHe Ha ypeHa.
5.8 HynipaHe Ha Bb3dUshnnaΦnTbp
3a da hynpate anapmata ha Bb3dUshnA qnTbp:
- CmeHe Te BbIneOpHnB b3DyWeH 6nTbp.BnxTe pa3eJ ,CMHa Ha Bb3DyUHnA FInTbp".
2.ДokocheTeи 3aДрьжTe 6yToHnTe 3a yBeIuHaBaHe Ha TeMnepaTypaTa n 3a OCBETJIeHnETo eHOBpeMeHHO 3a 5ceKHyDn.
3.ИндикаTopbT Ha ФиNTbpa ce ИЗКЛЮЧВа 3a СпЕДВацHTe 6 Meceua.

Cne6 Mececa ekpaHbT Noka3Ba INdNkaTopa Ha 4nIbpa, 3a Da Bn HApOMHn da CMeHnte 4nITbpa.
5.9 3arnyuShaBe nIIn nyckaHe Ha 3BykoBn CnRHaJIi
3ByKOBInTe CnHaJInc ca aKTINBnpaHn no nOpa3bnpaHe.
3a 3arnyuBaHaHe Ha 3ByKOBn CnHaHn:
1.Дokocheteи 3aДрьхte 6byToHnTeCellarMode n 6byToHnTe 3ayBeJIuHaBaHe Ha TempeAtypaTaeHNOBpeMeHHO 3a5ceKyHn.
2. EkpaHbT NOKa3Ba Of 3a 2 cekyHdN, KOraTO 3ByKOBnTe CnHaN Ca 3arLyWeH, Nn On 3a 2 cekyHdN, KOraTO 3ByKOBnTe CnHaN He ca 3arLyWeH.
- NopapbHeTe BOaunTe OTnped.
- HatncheTe 3aHaTa qacT ha paФTa 3dpaBO HaOny, 3a Da npOBepnte, daN e NocTaBEN n 3axBaHaT npABnHbBpXy peCnTe, n ro 6yThete o6paTHo B ypeDa.

PPEyYPEXKDEHNE!
IpeNi Da noctabnte 6yTnIKN 3a BInHO Bbpxy paTOBTe, yBepTe ce, ye Te ca npabnH0 3akpenen H bpxy peNCITE.
IpoBepete 3a Bb3MOxHo HnPaBnHNO3uOHHpaHe Ha paTa:

H3no3BaIte DbPBeHInTe paTOBe cMo 3a cbXpaHeHne Ha 6yTnIKn.
6.3 CmHa Ha Bb3dUshnnaΦnTbp
Baunrypee cnaebn C bTnepeH B3dyweh pnnTbp,pa3noJoxen do KOMaHdHTo Ta6No.BnxTe rnaBa "OnncAHHe Ha npOyKta".
HnIITbpbT npeuNCTBa Bb3dyxa OT HeKeHaH MmPn3Mn B uKaa 3a BnHO, KATO NOO6pRa KaueCTBOTO Ha CbXpaHeHne.
7. NOJE3HN CbBETN
7.1 CbBeten 3a eHeprocneTBAHe
Bbtpewhata KOHcHpyaunHa ypea e Ta3n, KOrTo OcnHypraBa HaueEeKTHBHO 3nOJ3BaHe Ha eHeprna.
He OTbaprTe BpaTaTa YecTo n He a octabrTe OTBopeHa NO-DbJIro OT Heo6xOdMOTO.
3a da cMeHnTe Bb3dUyHnA fHnTbp:
- HamepeTe ФиNTbpa n ro n3BaJeTe ot ypeDa. OTrpaHete Kanaka My.
- OTrpaHete cTapnA NITbp.
3.ИЗВадеTe HOBЯФДТБРOTПОЛNETUNEHOBЯПИК. - NocTaBeTe HOBnIHTbp, KaTO BHIMaBaTe CtpaHaTc TEKCTa Da COuHaRope.
-
NocTabete o6paTHO KanaKa Ha ФИТьра И Го nocTabete O6paTHO B ураз.
-
OTnndeTe Ha KOHTpOJIHnI NaHeI n HynpaIte qnITbpa, 3a Da DeakTnBnpate anapMaTa. BnxTe pa3Den ,HynpaHe Ha Bb3dUshnI qnITbp".
3a da ce noDbpxkHaH-do6pa eΦeKTHBHOCT,ΦnITbPbT Tp6Ba Da ce CMeHBeHNbX Ha BCEKn 6 Meceua.HOB AKTNBEHΦnITbP MoKeTe Da 3aKyNtTe OT Baunr MeCTeH DoCTaBvNK nIu Ype3 ye6caIra.Homept Ha qactTa e OTneuTaH BbpxY NoJIeTUNeHOBn IINK.
- YBepTe ce, Ye BeHTnlaucnraTa e do6pa. He nokpnbaiTe BEHTnlaucnOHnTe peWetkn I OTBOpN.
8. Глижам поочьбан.

BHIMAHNE!
BnKTe rnaBa ,E3OnacHocT
PnHaJnEJXHOCTNeIuactnteHa ypeDa He caNoDxOJaUN3a MneHe BCbDOMNJIHa MaunHa.
8.2 Почистван ha Bьтpeшноctta
Ipei Da I3NoJI3BaTe ypea 3a nbpBn
IbT, Tpa6Ba Da Nouchntte
BbTpewHOCTTa N BCNUK BbTpewHn
PnHaJNeXHoCTN C XJaKa canyHeHa
BOda n MaIKo HeyTpapaneH canyH, 3a da
OTcPaHnTe TINNuHaTa 3a HOBInTe
I3JeJnMaMpn3Ma, a CJeD TOBa
NoCDcyWeTe HaNbIHO.

PPEyPPEKDEHNE!
He n3noJI3BaIte npenapatn, abpa3nBn nydpn, xJOp nnn nouchTbaun npenapatn Ha macJeHa OCHOBA, TbN KaTo ige NOBpeT NOKPNTNeTo.
8.3Перноюноистванe
ObopydBaHeTo Tp6Ba Da ce nouCTBa peoBHO:
1.ПоунICTeTe OTbTpE c XlaJa Ka Boda n pa3TbOp Ha XNe6Ha coJa. Pa3TbOpbT Tp86Ba Da 6bIe OkONo 2 cyneHn
IbXnCn Xne6Ha cOda, pa3TBopeHn B eINH IITbp BOda.
2.ИЗТССКАЛТЕИЗЛПИSHAТAВODAOT Ib6aTaNINKbpnata,KORATO NOUHCTBaTe3OHaTaHaKOHTpONITE INIENJIeKTPnueCKNTEYACTN.
3.Почисте ВьншонctТа Ha урета с TОпla BODa И HeутpaJIeH canyH.
4. PeIOBHO npOBepraBaiTe yIbTHHeHnTa Ha BpaTaTa n Iu 3a6bpcBaIte, 3a Da CTe CNrpyHn, Che ca YnCTn N 6e3 3ambpcBaHn.
5.ИЗпнakнелу посушete doбpe.
Korato ypeT He ce n3non3Ba, npaDi cnipaHe Ha ToKa:
-ПовецTo npeKbCbaHnHa eNeKTpo3aXpaHbAHeTo ce OTCTpaHЯВaT B pAMKInTe Ha HЯKOJIko Yaca N He BnIraT BbpxY TempepatypaTa Ha ypeDa, aKO CBeDeTe Do MmHmym OTBapJrHeTo Ha BpaTaTa.
Ako eIeKtpo3aXpaHbAHeTo ige 6bde n3KnUoyeHO 3a NO-dbJrO BpeMe, Tp6Ba Da npednpneMeTe npabuINHTe CTbKN, ONncaHn No-rope.
9. OTCTPAHЯBAHE HA HEN3ПРABHOCTN

BHIMAHHE!
BuxTe rnaBa
"Be30nachocT".
9.1 KaKa Da NoctbNITE, ako...
| ПюбLEM Вьзможна рripsуна Peшениe | ||
| Хладиникьт He paBOTи. Xладиникьт e ИЗКЛЮЧЕN. ВкIJЮЧETe урEDA. | ||
| Шелсельт He e CBp3an | правилио В контакta Na 3axpaHbAaTa МрЕжa. | Свържete правилио сепес-ла в Контакta Na 3axpaHbAa-цаТа МрЕжa. |
| В koNTakta Няма наpane-Жениe. | БкIJЮчete дуг[elektroуpeдКьМ KoNTakta, за поевеляTe далу Има ТOK. Ако Няма,повская Te KBaJIuФицеран[elektroTEXИК. | |
| Пюкьсвачьт e ИЗКЛЮчIN | Или Има ИЗгорай п体现在а-ЗИтEL. | ВкIJЮчete пекьсвача Илисмене п体现在а-ЗИтEL. |
| Компесорьт paBOTи He-пюкьсано. | Temпетатура差别 e Ha-стpoeha Ненравилио. | Вижte пава „Равota“. |
| Temпетатура差别Вnome- | ШелNETO e TBьрдe ВИСКa. | Вижte пава „Инстация“. |
| Вразата ce OTВаря TBьр- | Дe чecTo. | He Дрьхte Вразата OTВорегаПО-ДьЛIGО OT HeOBxODIMOTO. |
| ПюбLEM Вьзможна почениance | ||
| Вразата не edoespe 3a-TBорега. | Вижte раздел „3аТварянe на вразата". | |
| ОсвetedенеTo He pa6otn. Пампункata Na He CBETN. | Вижte раздel „Hасторka Na CBETПИНATA". | |
| УрedingТ He e ВКлочen B KOHTAKTa. | Свьржete уредa. | |
| П配电ьсвачт e ИЗКлочип Или Има ИЗгоргл празда- ЗИТЕЛ. | Вижочete пекьсвача Или Сmenete пекльизentions. | |
| Пампункata e Heизправ- Нa. | Свьржete ce сбс сервизa. | |
| Бутонт 3a OсвetedенеTo He pa6otn. | Свьржete ce сбс сервизa. | |
| Тьрide Mного Вибраци. Xладиункыт e Hectabи- пeн. | Уberete ce, Que xладиункыт СтOn CTaБиLNo Ha ПОДa. | |
| Xладиункыт рботи Шу- нo. | Уberete ce, Que xладиункыт СтOn CTaБиLNo Ha ПОДa. | |
| По занatable сてпа Na upeda Teue ВODa. | При позеса Na АВТOMa- ТИЧNO размразявае Лe- Дыт NO занatable сてпа ce СТОПЯВa. | Тoba He e Heизпразовост. |
| Вшkaфа 3a Вино Teue Bo- Дa. | Каналite Na upeda ca 3a- пушени | Почисте OTВорITE 3a OTTH- Чанe Na upeda Вижte раздel _ "Почисте Na KaHа". |
| Вшkaфа 3a Вино Teue Bo- Дa. | Пробухтite пsezOTВрая- Ват ИЗтуанeto Na ВODaТа В сьда 3a сьбиранe. | Уberete ce, Que пождите He сe допат До 3aДинaТа Ст- нa. |
| TemператураТа вшkaфа 3a Вино e Тьрде НSCA Или Тьрдe ВИСОКa. | PerugalotbT Na Temпера- Тура Na e Naactpoeh правлino. | Задайтпо-NИСКа Или ПО-BИ- СОКa Temпераура. |
| Вразата He edoespe 3a- | Тьорега. | Вижte раздel „3aТварянe Na Вразата". |

Ako cBbTe He IOBeaT Do XeHaHnpe3yIaT, 6aTe Ce Hn-6n3Kn qnpMeH cepBn3.
9.2Смяна налампаТa
UpeIbTe cHa6DeH cIbIroTpauHa INHTepnOpHa LED lamna.
Camo cepBn3eH ueHTbp MOKe da cMeHr oCBeTnteHOTo TJINo. CbPKeTe ce c Baunr OToPi3npaH cepBn3eH ueHTbp.
9.3 3aTbapЯHe Ha BpaTaTa
11. TEXHnueCKn DAHHN
TexnueckaTaNHOpMaunCeHaMnpa Ha TaBeIkaTc DaHHN OT BbTpewHaTa cTpaHa Ha ypeDa N Ha etuKeTa 3a eHeprnHa KaTEROpn.
QR KoIbT Bbpxy etnkeTa 3a eheprnHa KaTeOpN, npedocTabeH c ypeDa, CbIbPka ye6 Bp3Ka,Boedea do INHOpMaun, CBbp3aHa C cyHKUHOHaHnocTTa Ha ypeDa B 6a3ata DaHHN EPREL Ha EC. 3ana3ete etnKeTa 3a eheprnHa KaTeOpN 3a cnpaBka, KaKTo n pkoBOcTBOTO 3a NOTpeBnten N BCNUk DpyrN DOkymeHTN, npedocTabeHc ypeDa.
Bb3MOxHo e da otKpneTe cbuata
HhOpMaun B EPREL, KaTo
n3NoJ3BaTe Bpb3KaTa
https://eprel.ec.europa.eu N BbBeJeTe
mETO Ha MOdeJa HOMepa Ha
npOdykTa, KOITO ce HAMpat Bbpxy
TabeIkKaTc DaHHHa ypeJa.
BuxTe IINka www.theenergylabel.eu 3a noDpo6Ha INΦopMaζη 3a etιkeTa 3a eHeprɪnHaT a Kateropn.
12. INHΦOPMAÇNЯ 3A IN3ΠNTBAÇN JIABOPATOPN
MoTajkT N NOIROTOBkata Ha ypea 3a BcraKa BepnФkaCua 3a ekOu3aH Tp6Ba Da CbOTBeTCTBaH Na EN 62552. YcnoBnaTa 3a BeHTnlaCua, pa3MePnte Ha HnAta N MInHMaJIHnTe OTCToRnHa OT 3aAnHata CTeHa Tpr6Ba Da 6bDat
CbIaCHO NOCOeHOTOBraBa 3Ha ToBa PbKOBOcTBo Ha Notpe6nteJ.3a DOnbJIHNTeJHa HOpopMaucn, BKIOUHTeJHo CXeMn 3a 3apeXdane, Ce CBbPxTe C npOn3BOdnteJ.
13.ОПАЗВАЕHAOKOLHATA CРEDA
PeuKnpaTe MaepnaIte cbc CMBOJa PocTabrYe ONaKOKBnTe B CbOTBeTHnTe KOHTeHepn 3a peuKnnpaHeTo m. IomOrHeTe 3a ONa3BaHeTo Ha OKoJHaTa CpeDa N OOBsKOTO 3dpaBe, KaKTo n 3a peuKnnpaHeTo Ha OTnaDbuN OT
eJektpnueckn n eJekTpOHH nupeHn. He 3XbBpIyIte ypeInte, O3HaueHn Cbc CMBOJal 3aeDHO C 6NtOBaTa CMeT. BbpHeTe ypeDa B MeCTHnI pyHKT 3a peuKnpaHe IIN Ce 06bpHeTe KbM BaWata 06UHcKa cnyk6a.
OBSAH
- BEZPEČNOSTNI INFORMACE 21
- BEZPEČNOSTNI POKNY 23
- INSTALACE 25
- POPIS VYROBKU 27
5.PROVOZ 28
6.DENNIPOUZIVANI 31 - TIPY A RADY 33
8.CISTENIA UDRZBA 33 - ODSTRANOVÁNÍ ZAVAD 34
- HUK. 36
- TECHNICKE UDAJE 37
- INFORMACE PRO ZKUSEBNY 37
- POZNÁMKY K OCHRANE ZIVOTNIHO PROSTREDI 37
PRO DOKONALÉ VÍSLEDKY
6.3 Udskifting at luftfilter
4.PRODUCTBESCHRIJVING
4.1 Productverzicht
1 Bedieningspaneel
2 ReK
3 Voet
4 Decoratief frame
5Geharde glazen deur
6 Handgreep
7 Pakking
8 Luchtfilter
5. BEDIENING

WAARSCHUWING!
9. PROBLEEMOPLOSSING

WAARSCHUWING!
Thank you for choosing this AEG product. We have created it to give you impeccable performance for many years, with innovative technologies that help make life simpler – features you might not find on ordinary appliances. Please spend a few minutes reading to get the very best from it.
Visit our website to:

Get usage advice, brochures, trouble shooter, service and repair information: www.aeg.com/support

Register your product for better service: www.registeraeg.com

Buy Accessories, Consumables and Original spare parts for your appliance: www.aeg.com/shop
CUSTOMER CARE AND SERVICE
Always use original spare parts.
When contacting our Authorised Service Centre, ensure that you have the following data available: Model, PNC, Serial Number.
The information can be found on the rating plate.
Warning / Caution-Safety information
General information and tips
Environmental information
Subject to change without notice.
1. SAFETY INFORMATION
Before the installation and use of the appliance, carefully read the supplied instructions. The manufacturer is not responsible for any injuries or damage that are the result
of incorrect installation or usage. Always keep the instructions in a safe and accessible location for future reference.
1.1 Children and vulnerable people safety
- This appliance can be used by children aged from 8 years and above and persons with reduced physical, sensory or mental capabilities or lack of experience and knowledge if they have been given supervision or instruction concerning the use of the appliance in a safe way and understand the hazards involved.
Children aged from 3 to 8 years are allowed to load and unload the appliance provided that they have been properly instructed.
-
This appliance may be used by persons with very extensive and complex disabilities provided that they have been properly instructed.
-
Children of less than 3 years of age should be kept away from the appliance unless continuously supervised.
-
Children should be supervised to ensure that they do not play with the appliance.
-
Children shall not carry out cleaning and user maintenance of the appliance without supervision.
-
Keep all packaging away from children and dispose of it appropriately.
1.2 General Safety
-
This appliance is for storing wine only.
-
This appliance is designed for single household domestic use in an indoor environment.
-
This appliance may be used in, offices, hotel guest rooms, bed & breakfast guest rooms, farm guest houses and other similar accommodation where such use does not exceed (average) domestic usage levels.
-
WARNING: Keep ventilation openings, in the appliance enclosure or in the built-in structure, clear of obstruction.
-
WARNING: Do not use mechanical devices or other means to accelerate the defrosting process, other than those recommended by the manufacturer.
- WARNING: Do not damage the refrigerant circuit.
- WARNING: Do not use electrical appliances inside the food storage compartments of the appliance, unless they are of the type recommended by the manufacturer.
- Do not use water spray and steam to clean the appliance.
- Clean the appliance with a moist soft cloth. Only use neutral detergents. Do not use abrasive products, abrasive cleaning pads, solvents or metal objects.
- When the appliance is empty for long period, switch it off, defrost, clean, dry and leave the door open to prevent mould from developing within the appliance.
- Do not store explosive substances such as aerosol cans with a flammable propellant in this appliance.
- If the supply cord is damaged, it must be replaced by the manufacturer, its Authorised Service Centre or similarly qualified persons in order to avoid a hazard.
2. SAFETY INSTRUCTIONS
2.1 Installation

WARNING!
Only a qualified person must install this appliance.
- Remove all the packaging.
- Do not install or use a damaged appliance.
- Do not use the appliance before installing it in the built-in structure due to safety manner.
- Follow the installation instructions supplied with the appliance.
Always take care when moving the appliance as it is heavy. Always use safety gloves and enclosed footwear.
Make sure the air can circulate around the appliance. - At first installation or after reversing the door wait at least 4 hours before connecting the appliance to the power
supply. This is to allow the oil to flow back in the compressor.
- Before carrying out any operations on the appliance (e.g. reversing the door), remove the plug from the power socket.
- Do not install the appliance close to radiators or cookers, ovens or hobs.
- Do not expose the appliance to the rain.
- Do not install the appliance where there is direct sunlight.
- Do not install this appliance in areas that are too humid or too cold.
- When you move the appliance, lift it by the front edge to avoid scratching the floor.
2.2 Electrical connection

WARNING!
Risk of fire and electric shock.

WARNING!
When positioning the appliance, ensure the supply cord is not trapped or damaged.

WARNING!
Do not use multi-plug adapters and extension cables.
- The appliance must be earthed.
- Make sure that the parameters on the rating plate are compatible with the electrical ratings of the mains power supply.
Always use a correctly installed shockproof socket. - Make sure not to cause damage to the electrical components (e.g. mains plug, mains cable, compressor). Contact the Authorised Service Centre or an electrician to change the electrical components.
- The mains cable must stay below the level of the mains plug.
- Connect the mains plug to the mains socket only at the end of the installation. Make sure that there is access to the mains plug after the installation.
- Do not pull the mains cable to disconnect the appliance. Always pull the mains plug.
2.3 Use

WARNING!
Risk of injury, burns, electric shock or fire.

The appliance contains flammable
gas, isobutane (R600a), a natural gas with a high level of environmental compatibility. Be careful not to cause damage to the refrigerant circuit containing isobutane.
- Do not change the specification of this appliance.
- Any use of the built-in product as freestanding is strictly prohibited.
- Do not put electrical appliances (e.g. ice cream makers) in the appliance unless they are stated applicable by the manufacturer.
- If damage occurs to the refrigerant circuit, make sure that there are no flames and sources of ignition in the room. Ventilate the room.
- Do not let hot items to touch the plastic parts of the appliance.
- Do not store flammable gas and liquid in the appliance.
- Do not put flammable products or items that are wet with flammable products in, near or on the appliance.
- Do not touch the compressor or the condenser. They are hot.
2.4 Internal lighting

WARNING!
Risk of electric shock.
- This product contains one or more light sources of energy efficiency class E.
- Concerning the lamp(s) inside this product and spare part lamps sold separately: These lamps are intended to withstand extreme physical conditions in household appliances, such as temperature, vibration, humidity, or are intended to signal information about the operational status of the appliance. They are not intended to be used in other applications and are not suitable for household room illumination.
2.5 Care and cleaning

WARNING!
Risk of injury or damage to the appliance.
- Before maintenance, deactivate the appliance and disconnect the mains plug from the mains socket.
-
This appliance contains hydrocarbons in the cooling unit. Only a qualified person must do the maintenance and the recharging of the unit.
-
Regularly examine the drain of the appliance and if necessary, clean it. If the drain is blocked, defrosted water collects in the bottom of the appliance.
2.6 Service
To repair the appliance contact the Authorised Service Centre. Use original spare parts only.
- Please note that self-repair or non-professional repair can have safety consequences and might void the guarantee.
- The following spare parts will be available for 7 years after the model has been discontinued: thermostats, temperature sensors, printed circuit boards, light sources, door handles, door hinges, trays and baskets. Please note that some of these spare parts are only available to professional repairers, and that not all spare parts are relevant for all models.
- Door gaskets will be available for 10 years after the model has been discontinued.
2.7 Disposal

WARNING!
Risk of injury or suffocation.
- Disconnect the appliance from the mains supply.
- Cut off the mains cable and discard it.
- Remove the door to prevent children and pets to be closed inside of the appliance.
- The refrigerant circuit and the insulation materials of this appliance are ozone-friendly.
- The insulation foam contains flammable gas. Contact your municipal authority for information on how to discard the appliance correctly.
- Do not cause damage to the part of the cooling unit that is near the heat exchanger.
3. INSTALLATION

WARNING!
Refer to Safety chapters.
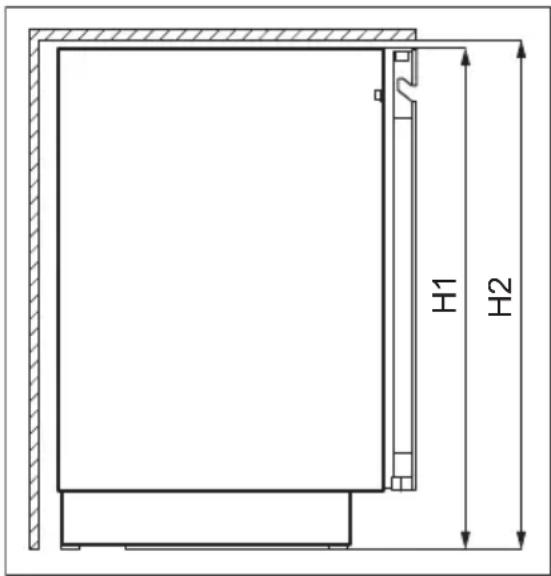
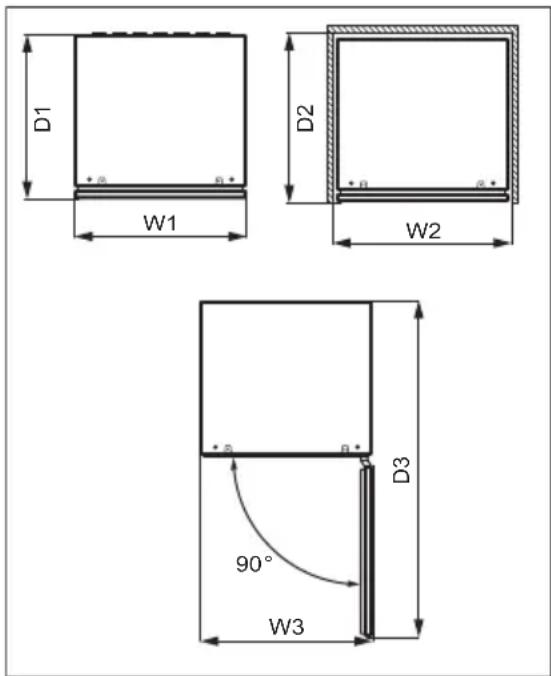
3.1 Dimensions
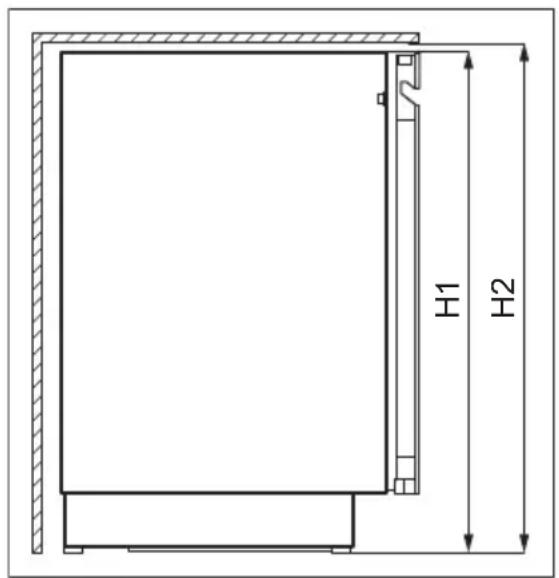
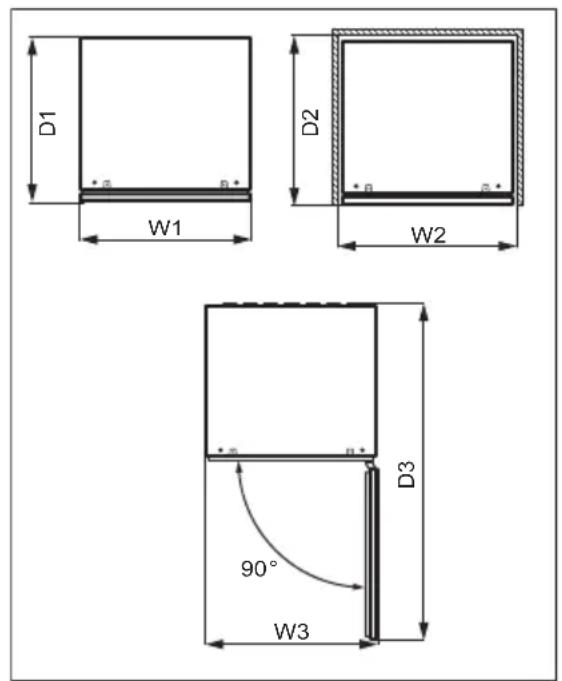
| Overall dimensions1 |
| H1 mm 818 |
| W1 mm 595 |
| D1 mm 577 |
1 the height, width and depth of the appliance without the handle
| Space required in use2 |
| H2 mm 820 |
| W2 mm 600 |
| D2 mm 580 |
the height, width and depth of the appliance including the handle, plus the space necessary for free circulation of the cooling air
| Overall space required in use3 |
| H2 mm 820 |
| W3 mm 600 |
| D3 mm 1162 |
3 the height, width and depth of the appliance including the handle, plus the space necessary for free circulation of the cooling air, plus the space necessary to allow door opening to the minimum angle permitting removal of all internal equipment
3.2 Location
To ensure appliance's best functionality, you should not install the appliance in the nearby of the heat source (oven, stoves, radiators, cookers or hobs) or in a place with direct sunlight. Make sure that air can circulate freely around the back of the cabinet.
This appliance should be installed in a dry, well ventilated indoor position.
This appliance is intended to be used at ambient temperature ranging from 10^ to 38^ .
The correct operation of the appliance can only be guaranteed within the specified temperature range.
i If you have any doubts regarding where to install the appliance, please turn to the vendor, to our customer service or to the nearest Authorised Service Centre.
i It must be possible to disconnect the appliance from the mains power supply. The plug must therefore be easily accessible after installation.
3.3 Electrical connection
- Before plugging in, ensure that the voltage and frequency shown on the rating plate correspond to your domestic power supply.
- The appliance must be earthed. The power supply cable plug is provided with a contact for this purpose. If the domestic power supply socket is not earthed, connect the appliance to a separate earth in compliance with current regulations, consulting a qualified electrician.
The manufacturer declines all responsibility if the above safety precautions are not observed. - This appliance complies with the E.E.C. Directives.
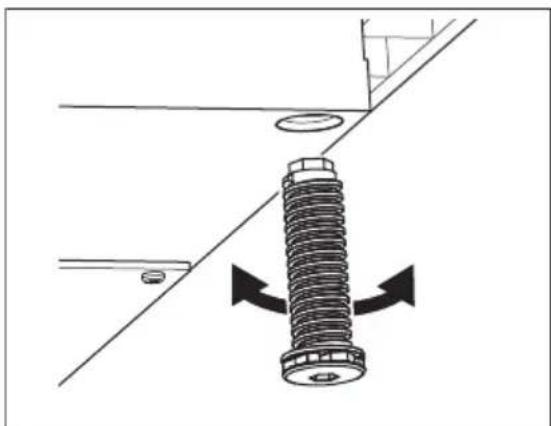
3.4 Levelling
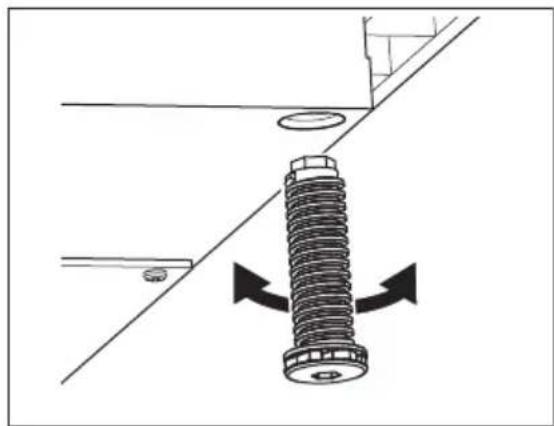
When placing the appliance make sure that it stands level. This can be achieved by four adjustable feet at the bottom of the appliance.
3.5 Door reversibility
Please refer to the separate document with instructions on installation and door reversal.

CAUTION!
At every stage of reversing the door protect the floor from scratching with a durable material.
4. PRODUCT DESCRIPTION
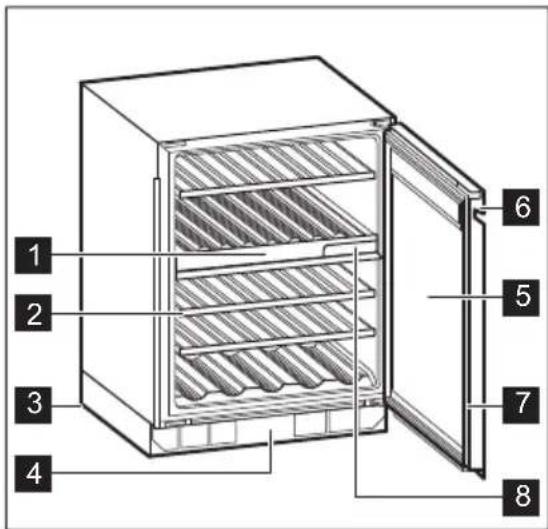
4.1 Product overview
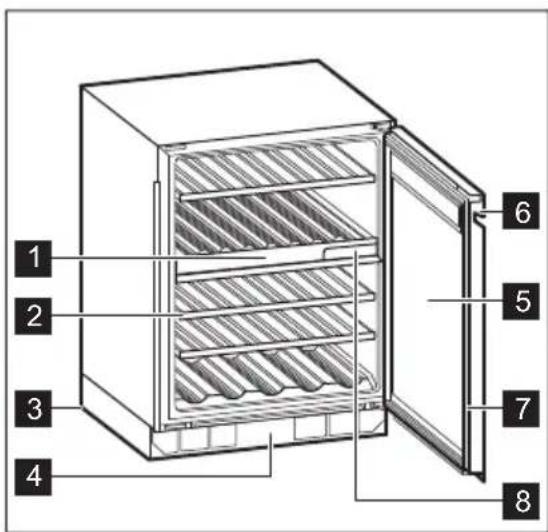
1 Control panel
2 Shelf
3 Foot
4 Decorative frame
5 Tempered glass door
6 Handle
7 Gasket
8 Air filter
5. OPERATION

WARNING!
Do not spill any liquids on the control panel. This may damage the equipment and increase the risk of electric shock.
5.1 Control panel
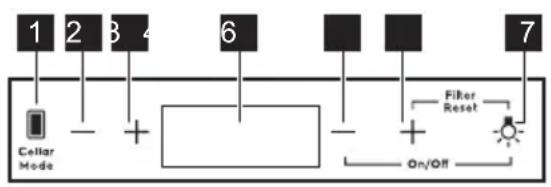
1 Cellar Mode key
2 Temperature decrease key for top compartment
3 Temperature increase key for top compartment
4 Display
5 Temperature decrease key for bottom compartment
6 Temperature increase key for bottom compartment
7 Light key
5.2 Display
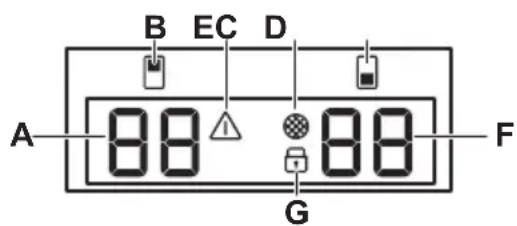
A. Temperature indicator for top compartment
B. Top compartment indicator
C. Alarm indicator
D. Filter reset indicator
E. Bottom compartment indicator
F. Temperature indicator for bottom compartment
G. Child lock indicator
5.3 Switching on and off
To switch on the appliance:
- Insert the plug into the wall socket.
- Go to the right side of the control panel.
- Tap and hold the Temperature decrease key and Light key for 3 seconds if the display is off.
- The display shows the default set temperature (12^)
To switch off the appliance, repeat the above procedure in reverse order.
To select a different temperature, refer to the "Temperature regulation" section.
5.4 Temperature regulation
The default set temperature for the wine cabinet is 12^
The temperature can be adjusted between +5 and +20^
To set the temperature, tap the temperature increase or decrease key for the compartment:
- Single tap shows the current set temperature.
Second tap increases or decreases the temperature by one degree. - To speed up the selection, tap and hold the temperature increase or
decrease key until you reach the desired temperature.

By default, the temperature digits show the current temperature at half brightness. When you tap once or start selecting a new setting, the displayed digits blink. After 3 seconds without tapping the keys, the digits stop blinking and the current temperature is displayed.
To set the right temperature for each type of wine, refer to the "Daily use" chapter.
5.5 Light setup
Tap the Light key once to turn the light on or off. The default light setting is 1A for the light behaviour and 9L for the light brightness.

The light has no negative effect on the quality of wine.
You may adjust behaviour and brightness of the light.
Light behaviour (A):
- 1A door open - lights on at the highest dimming level, door closed - lights turn off
- 2A door open - lights on at the highest dimming level, door closed - lights on at the selected dimming level
- 3A door open and closed - lights on at the selected dimming level
- 4A door open - lights on at the selected dimming level, door closed - lights on at the highest dimming level Light brightness (L):
- 9L is the brightest setting while 1L is the dimmest one.
To set the light behaviour or brightness:
-
Tap and hold the Light key for 3 seconds to enter the light setting menu.Top compartment indicator blinks showing the light behaviour A, bottom compartment indicator blinks showing the light brightness L.
-
Tap the temperature regulators of each compartment repeatedly to choose the desired setting.
5.6 Cellaring
In this mode, the appliance's compartments switch to the preset default temperature of 12^ .
To activate the Cellaring mode, tap repeatedly the Cellar Mode key. CE appears and blinks in sequence for top, bottom and both compartments. Wait 5 seconds. The mode is active when CE stops blinking and is lit at half brightness.
To deactivate the Cellaring mode, tap Cellar Mode repeatedly until the temperature digits appear.
5.7 Child Lock mode
Activate the Child Lock mode to lock the keys from an unintentional operation.
To activate the Child Lock, tap and hold the Cellar Mode key for 3 seconds. When the mode is on, the lock indicator lights up at full brightness. After 3 seconds, the lock indicator dims to half brightness.

If you press any key other than Cellar Mode, the lock indicator blinks three times.
To deactivate the Child Lock mode, tap the corresponding key again.

The Child Lock mode deactivates after electricity interruption or unplugging the appliance.
5.8 Reset air filter
To reset the air filter alarm:
- Change the carbon air filter. Refer to the "Replacing air filter" section.
- Tap and hold the Temperature increase and Light keys simultaneously for 5 seconds.
- The filter indicator turns off for the next 6 months.

After 6 months, the display shows the filter indicator to remind you to replace filter.
5.9 Mute or unmute sounds
The sounds are enabled by default.
To mute or unmute the sounds:
- Tap and hold the Cellar Mode and Temperature increase keys simultaneously for 5 seconds.
- The display shows Of for 2 seconds when the sounds are muted, or On for 2 seconds when the sounds are unmuted.
5.10 Changing temperature units
To switch the temperature units between ^ C and ^ ..
- Tap simultaneously the Cellar Mode and Temperature decrease keys.
- Once you set your preferable unit, °C or °F blinks on the display for 5 seconds.
5.11 Demo mode
Activate the Demo mode to demonstrate the appliance's features.
To activate the Demo mode, tap and hold the Light and Cellar Mode keys simultaneously for 10 seconds.
Once the mode is on, the display shows dE On blinking for 5 seconds.
The above message is displayed every 5 minutes to remind you that the appliance is in the Demo mode.
To deactivate the Demo mode, repeat the above procedure.
Once you deactivate the mode, the display shows dE Of blinking for 5 seconds.
5.12 High and low temperature alarm
High temperature alarm
The alarm goes off when the compartment's temperature is 5^ higher than the set temperature for more than 60 minutes.
During the alarm:
- the display shows H^
- the alarm indicator flashes
Low temperature alarm
The alarm goes off when the compartment's temperature is 2^ lower than the set temperature for more than 60 minutes.
During the alarm:
- the display shows L^
the alarm indicator flashes

Each compartment separately manages the temperature alarm.
Press any key on the control panel to turn off the alarm.
- If the appliance adjusted the temperature automatically, the normal display restores. Check if the wine inside is not spoiled.
- If the temperature is still too high or too low, the alarm goes off again after 60 minutes.

The alarm does not go off within the first 90 minutes after switching on the appliance.
5.13 Door open alarm
If the door is left open for approximately 5 minutes, the lights start to flash and display shows a blinking dr OP. After 2 more minutes the sound is on.
The alarm stops after closing the door or after pressing any key on the control panel.

The alarm goes off again after 5 minutes if the door is still open.
6. DAILY USE
6.1 Wine storage
This appliance is intended to be used exclusively for the storage of wine.
Wine storage compartment is the one marked (on the rating plate) with
The storage time for wine depends on age, alcoholic content, type of grapes and level of fructose and tannin in it. At the time of purchase, check if the wine is already aged or if it will improve over time.
Recommended storage temperatures:
- For champagne and sparkling wines, between +6^ and +8^ .
For white wines, between +10^ and +12^
For rose and light red wines, between +12^ and +16^
Aged red wines, between +14^ and +18^
The appliance is designed to store up to 40 bordeaux bottles (0.75 l) by placing:
- 5 bottles on level 1.
- 7 bottles on level 2.3.5.
14 bottles on level 4 Shelf levels
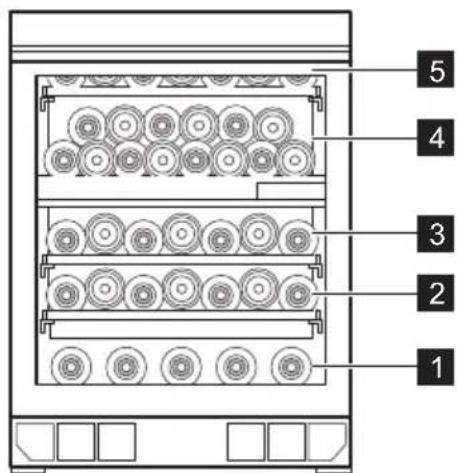
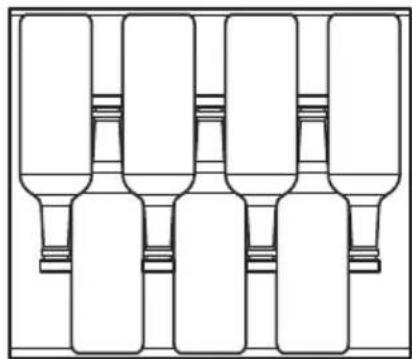
Full shelf levels 2,3,5
6.2 Removing and installing shelves
Removing shelves
To remove the shelf:
- Open the wine cabinet door completely.
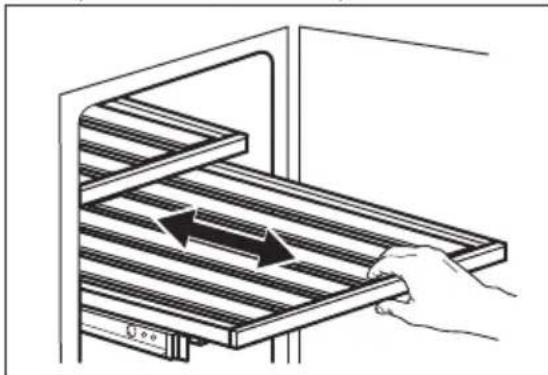
- Pull the shelf out.
- Grab the shelf in the middle, lift it up slightly and take it out of the wine cabinet.
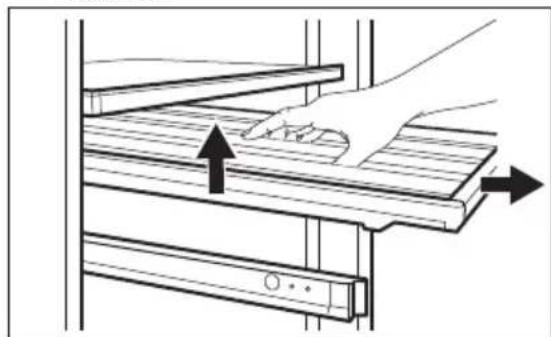
Installing shelves
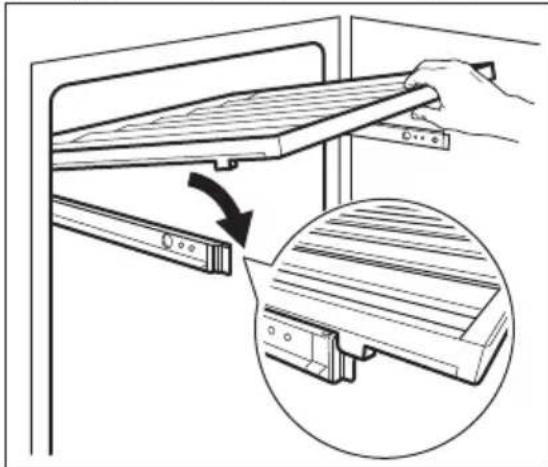
To put the shelf back into its initial position:
- Pull out the shelf's rails completely.
- Position the shelf's rear mounts on the rails, so they are engaged on both sides.
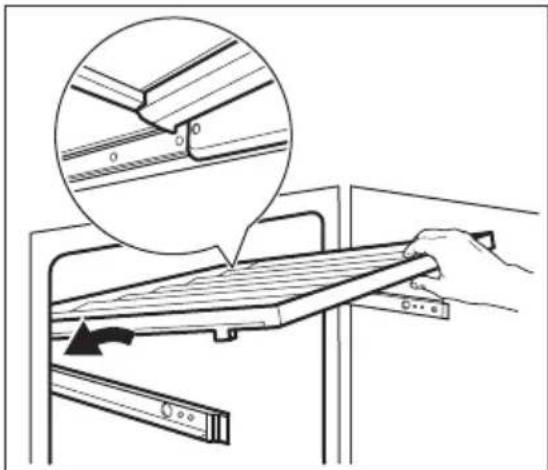
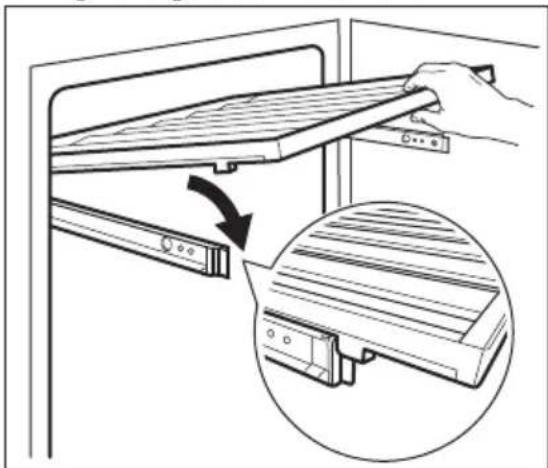
3. Align the guides in the front.
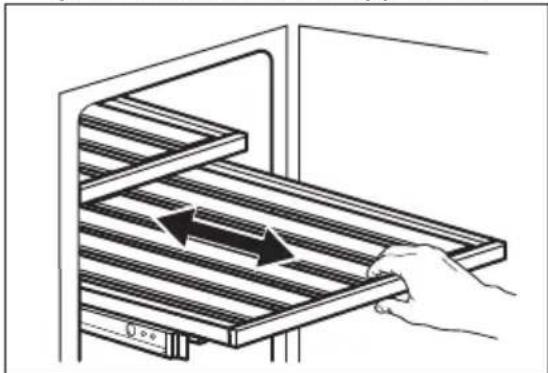
4. Press the back of the shelf down firmly to check if it is placed and engaged correctly on the rails and push it back into the appliance.

CAUTION!
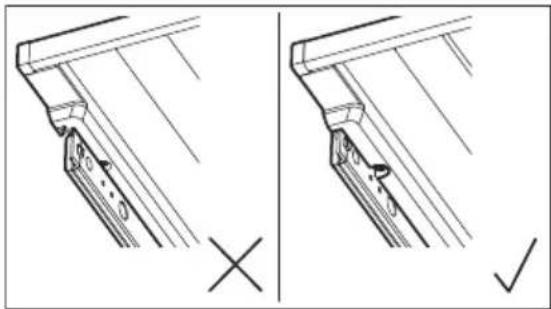
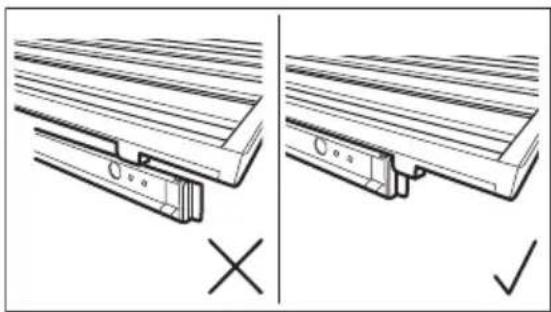
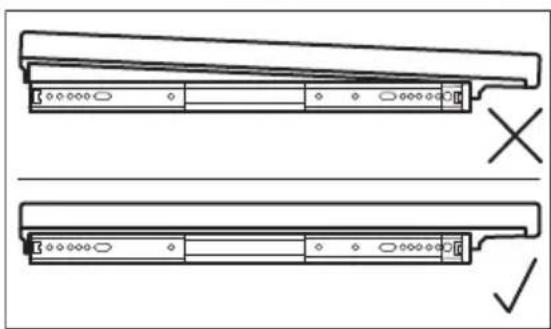
Before placing any wine bottles on the shelves, make sure they are properly engaged on the rails.
Check for the possible wrong shelf positioning:
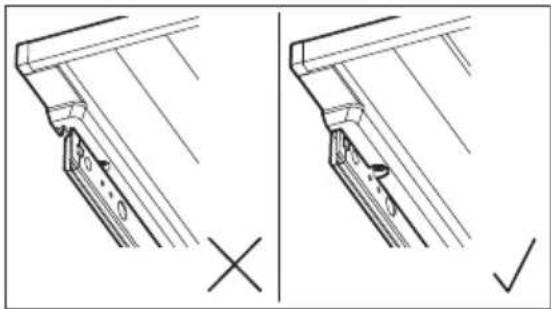
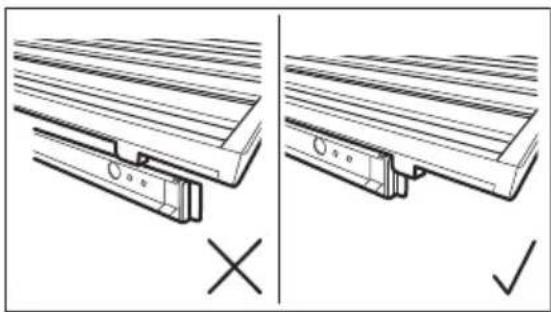
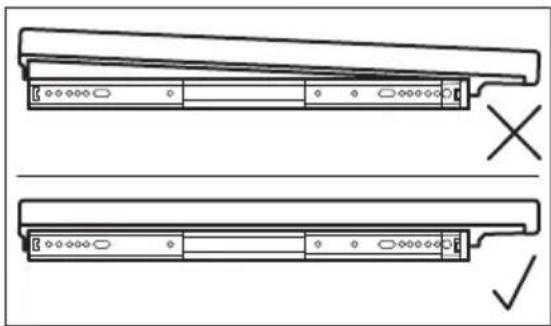

Use the wooden shelves only to store bottles.
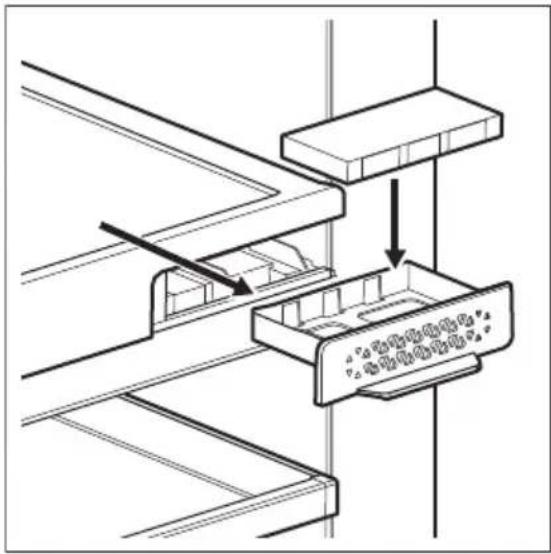
6.3 Replacing air filter
Your appliance is equipped with the air carbon filter located next to the control panel. Refer to the "Product description" chapter.
The filter purifies air from unwanted odours in the wine cabinet, improving the storage quality.
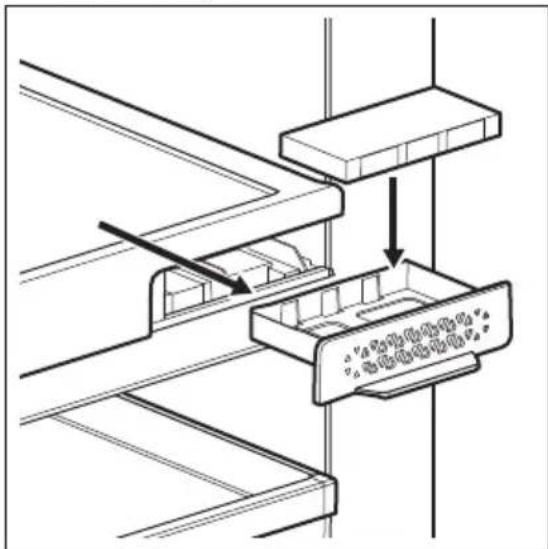
To replace the air filter:
- Locate the filter and detach it from the appliance. Remove its cover.
- Remove the old filter.
- Take out the new filter from the plastic bag.
- Insert the new filter ensuring the side with the text is facing upward.
7. HINTS AND TIPS
7.1 Hints for energy saving
- The internal configuration of the appliance is the one that ensures the most efficient use of energy.
8. CARE AND CLEANING

WARNING! Refer to Safety chapters.
8.1 General warnings

CAUTION! Unplug the appliance before carrying out any maintenance operation.

This appliance contains hydrocarbons in its cooling unit; maintenance and recharging must therefore only be carried out by authorized technicians.

The accessories and parts of the appliance are not suitable for washing in a dishwasher.
8.2 Cleaning the interior
Before using the appliance for the first time, the interior and all internal accessories should be washed with
- Put the filter cover back and install it back into the appliance.
-
Go to the control panel and reset the filter to deactivate the alarm. Refer to the "Reset air filter" section. To get the best performance, the filter should be changed every 6 months. New active filter can be purchased from your local dealer or through the website. The part number is printed on the plastic bag.
-
Do not open the door frequently or leave it open longer than necessary.
- Ensure a good ventilation. Do not cover the ventilation grilles or holes.
lukewarm water and some neutral soap to remove the typical smell of a brand-new product, then dried thoroughly.

CAUTION!
Do not use detergents, abrasive powders, chlorine or oil-based cleaners as they will damage the finish.
8.3 Periodic cleaning
The equipment has to be cleaned regularly:
- Clean the inside with lukewarm water and baking soda solution. The solution should be about 2 tablespoons of baking soda to a litre of water.
- Wring excess water out of sponge or cloth when cleaning the area of the controls, or any electrical parts.
- Clean the outside of the appliance with warm water and some neutral soap.
-
Regularly check the door seals and wipe them clean to ensure they are clean and free from debris.
-
Rinse and dry thoroughly.
8.4 Cleaning the drain
Periodically clean the drain hole to prevent water from overflowing and dripping onto the stored bottles. The drain hole is located on the rear wall in the lower left and upper middle part of the appliance. To reach it more easily, slightly press the covering grid.
For this purpose, use a thin, plastic, nonsharp stick.
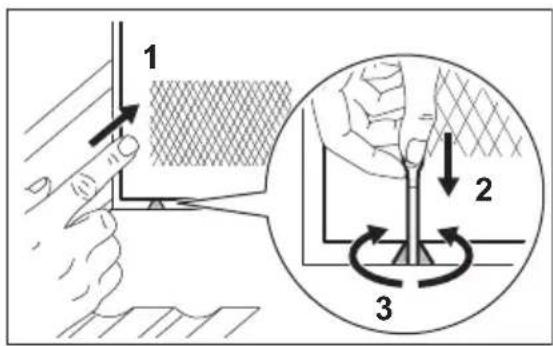
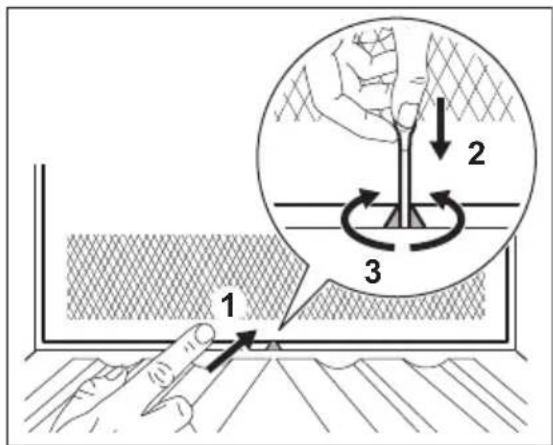
8.5 Periods of non-operation
When the appliance is not in use for long periods, take the following precautions:
- Disconnect the appliance from electricity supply.
- Remove all items.
- Clean the appliance and all accessories.
- Leave the door open to prevent unpleasant smells.
When the appliance is not in use due to power failure:
- Most power failures are corrected within a few hours and don't affect the temperature of your appliance if you minimize the door opening.
- If the power is going to be off for a longer time, you need to take the proper steps described above.
9. TROUBLESHOOTING

WARNING! Refer to Safety chapters.
9.1 What to do if...
| Problem Possible cause Solution | ||
| The appliance does not operate. | The appliance is switched off. | Switch on the appliance. |
| The mains plug is not connected to the mains socket correctly. | Connect the mains plug to the mains socket correctly. | |
| There is no voltage in the mains socket. | Connect a different electrical appliance to the mains socket, to check if electricity is flowing. If not, contact a qualified electrician. | |
| The circuit breaker tripped or a blown fuse. | Turn on the circuit breaker or change the fuse. | |
| The compressor operates continually. | Temperature is set incorrectly. | Refer to the "Operation" chapter. |
| The room temperature is too high. | Refer to the "Installation" chapter. | |
| The door is opened too of-ten. | Do not keep the door open longer than necessary. | |
| The door is not closed correctly. | Refer to the "Closing the door" section. | |
| The light does not work. The light is turned off. Turn on the light. Refer to the "Light setup" section. | ||
| The appliance is not plugged in. | Connect the appliance. | |
| The circuit breaker tripped or a blown fuse. | Turn on the circuit breaker or change the fuse. | |
| The lamp is defective. Contact the service. | ||
| The light button is not operating. | Contact the service. | |
| Too much vibration. The appliance is not supported properly. | Check if the appliance stands stable. | |
| The appliance is noisy. The appliance is not supported properly. | Check if the appliance stands stable. | |
| Water flows on the rear plate of the appliance. | During the automatic de-frosting process, frost melts on the rear plate. | This is correct. |
| Water flows inside the wine cabinet. | The appliance drains are clogged | Clean the appliance drain holes Refer to the "Cleaning the drain" section. |
| Water flows inside the wine cabinet. | Products prevent that water flows into the water collector. | Make sure that products do not touch the rear plate. |
| The temperature in the wine cabinet is too low or too high. | The temperature regulator is not set correctly. | Set a higher or lower tempera-ture. |
| The door is not closed cor-rectly. | Refer to the "Closing the door" section. | |

If the advice does not lead to the desired result, call the nearest brand-mark service.
9.2 Replacing the lamp
The appliance is equipped with a longlife LED interior light.
Only service is allowed to replace the lighting device. Contact your Authorised Service Centre.
9.3 Closing the door
- Clean the door gaskets.
- If necessary, adjust the door. Refer to the "Installation" chapter.
- If necessary, replace the defective door gaskets. Contact the Authorised Service Centre.
10. NOISES
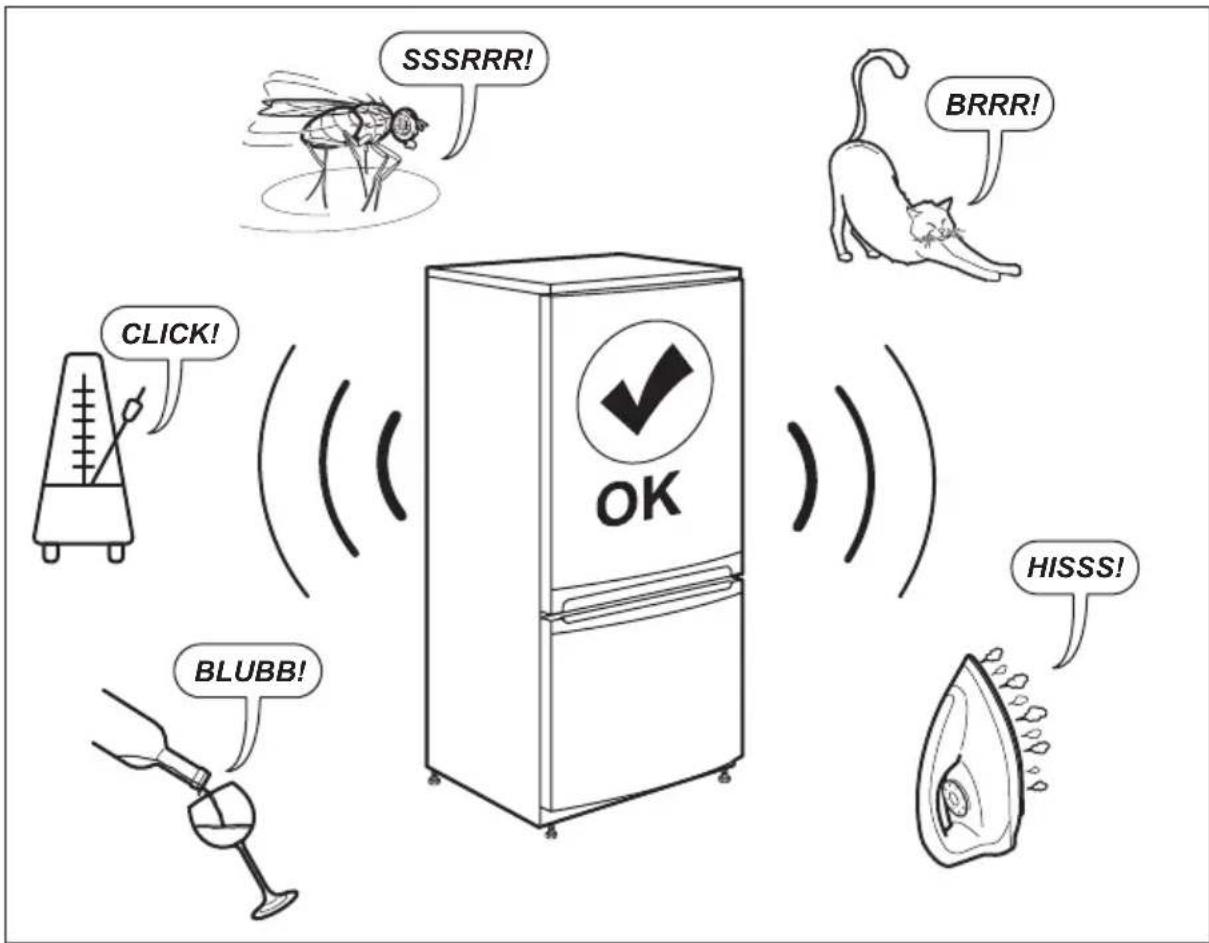
11. TECHNICAL DATA
The technical information is situated in the rating plate on the internal side of the appliance and on the energy label.
The QR code on the energy label supplied with the appliance provides a web link to the information related to the performance of the appliance in the EU EPREL database. Keep the energy label for reference together with the user manual and all other documents provided with this appliance.
It is also possible to find the same information in EPREL using the link https://eprel.ec.europa.eu and the model name and product number that you find on the rating plate of the appliance.
See the link www.theenergylabel.eu for detailed information about the energy label.
12. INFORMATION FOR TEST INSTITUTES
Installation and preparation of the appliance for any EcoDesign verification shall be compliant with EN 62552. Ventilation requirements, recess dimensions and minimum rear
clearances shall be as stated in this User Manual at Chapter 3. Please contact the manufacturer for any other further information, including loading plans.
13. ENVIRONMENTAL CONCERNS
Recycle materials with the symbol Put the packaging in relevant containers to recycle it. Help protect the environment and human health by recycling waste of electrical and electronic appliances. Do not dispose of
appliances marked with the symbol with the household waste. Return the product to your local recycling facility or contact your municipal office.
SISUKORD
- OHUTUSINFO 92
- OHUTUSJUHISED. 94
- PAIGALDAMINE 96
4.TOOTE KIRJELDUS. 98 - TOOTAMINE 98
- IGAPÄEVANE KASUTUS 102
- VIHJED JA NAPUNAITED 104
- PUHASTUS JA HOOLDUS. 104
9.TORKEOTSING. 105 - HELID. 107
- TEHNILISED ANDMED. 107
- TEAVE KATSEASUTUSTELE 108
13.JAATMEKAIITLUS. 108
PARIMATE TULEMUSTE SAAVUTAMISEKS
4. PRODUKTA APRAKSTS
4.1 Produktaparskats
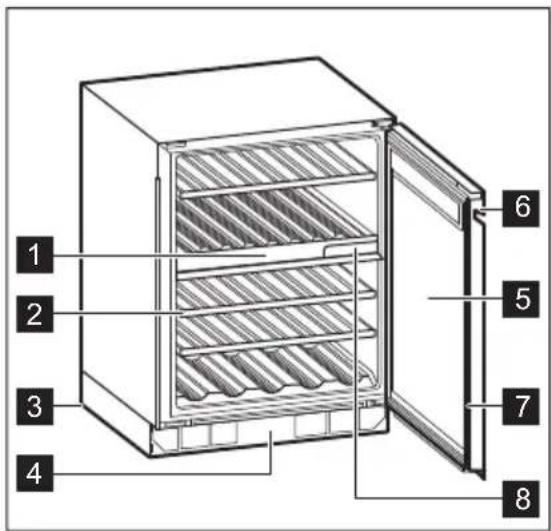
1 Vadibas panelis
2 Plaukts
3 Pamatne
4 Dekorativais ramis
5 Rudita stikla durvis
6 Rokturis
7 Blive
8 Gaisa filtrs
5. DARBIBA

BRIDINAJUMS!
Izvairieties no jebkadu skidrumu izslakstiisanas uz vadibas panela. Tas var sabojat aprikojumu un palielinat elektrosoka risku.
5.1 Vadības panelis

7.1 Tips for strømsparing
9. RIESENIE PROBLEMOV

VAROVANIE!
reparationsinformation:
www.aeg.com/support
Registrar a din produkt for bättre service:
www.registeraeg.com

5.13 Larm for oppen dorr
- 2.ИHCTPYKUN 3A BE3OJACHOCT
- 2.1Инстацnia
- BHIMAHHE!
- EneKtpnuecko CBbp3BaHe
- BHIMAHNE!
- 2.3ИЗноЛЗВанe
- Bbtpeusho ocBetJeHne
- Гпжи поочтванe
- O6cnyXbaHe
- N3xBbpyne
- 3.ИHCTAJALAUN
- Pa3mepn
- T6apnHpa3mepn
- Heo6xOIMO npoctpaHCTBO 3a ek-cnloatauia
- Heobxodmo npoctpaHCTBO 3a ekcnloatauia
- Pa3nojarahe
- 3.3ЕнктпческocBbрзBaHe
- Hubejnapahe
- 06pbuaneHaBpata
- PPEyPPEKDEHNE!
- 4.ОПИСAHNEHAПОДУКТА
- Cellaring
- Pexim Child Lock
- HynipaHe Ha Bb3dUshnnaΦnTbp
- 3arnyuShaBe nIIn nyckaHe Ha 3BykoBn CnRHaJIi
- PPEyYPEXKDEHNE!
- CmHa Ha Bb3dUshnnaΦnTbp
- NOJE3HN CbBETN
- CbBeten 3a eHeprocneTBAHe
- Глижам поочьбан.
- Почистван ha Bьтpeшноctta
- 8.3Перноюноистванe
- OTCTPAHЯBAHE HA HEN3ПРABHOCTN
- KaKa Da NoctbNITE, ako...
- 9.2Смяна налампаТa
- 3aTbapЯHe Ha BpaTaTa
- TEXHnueCKn DAHHN
- INHΦOPMAÇNЯ 3A IN3ΠNTBAÇN JIABOPATOPN
- 13.ОПАЗВАЕHAOKOLHATA CРEDA
- OBSAH
- PRO DOKONALÉ VÍSLEDKY
- Udskifting at luftfilter
- 4.PRODUCTBESCHRIJVING
- Productverzicht
- BEDIENING
- WAARSCHUWING!
- PROBLEEMOPLOSSING
- CUSTOMER CARE AND SERVICE
- SAFETY INFORMATION
- Children and vulnerable people safety
- General Safety
- SAFETY INSTRUCTIONS
- Installation
- WARNING!
- Electrical connection
- Use
- Internal lighting
- Care and cleaning
- Service
- Disposal
- INSTALLATION
- Dimensions
- Location
- Electrical connection
- Levelling
- Door reversibility
- CAUTION!
- PRODUCT DESCRIPTION
- Product overview
- OPERATION
- Control panel
- Display
- Switching on and off
- Temperature regulation
- Light setup
- Child Lock mode
- Reset air filter
- Mute or unmute sounds
- Changing temperature units
- Demo mode
- High and low temperature alarm
- Door open alarm
- DAILY USE
- Wine storage
- Recommended storage temperatures:
- Removing and installing shelves
- Removing shelves
- Installing shelves
- Replacing air filter
- HINTS AND TIPS
- Hints for energy saving
- CARE AND CLEANING
- General warnings
- Cleaning the interior
- Periodic cleaning
- Cleaning the drain
- Periods of non-operation
- TROUBLESHOOTING
- What to do if...
- Replacing the lamp
- Closing the door
- NOISES
- TECHNICAL DATA
- INFORMATION FOR TEST INSTITUTES
- ENVIRONMENTAL CONCERNS
- SISUKORD
- PARIMATE TULEMUSTE SAAVUTAMISEKS
- PRODUKTA APRAKSTS
- Produktaparskats
- DARBIBA
- BRIDINAJUMS!
- Vadības panelis
- Tips for strømsparing
- RIESENIE PROBLEMOV
- VAROVANIE!
- Larm for oppen dorr
Brand : AEG
Model : AWUD040B8B
Category : Refrigerator