IAN 305842 - Lighting Livarno Lux - Free user manual and instructions
Find the device manual for free IAN 305842 Livarno Lux in PDF.

User questions about IAN 305842 Livarno Lux
0 question about this device. Answer the ones you know or ask your own.
Ask a new question about this device
Download the instructions for your Lighting in PDF format for free! Find your manual IAN 305842 - Livarno Lux and take your electronic device back in hand. On this page are published all the documents necessary for the use of your device. IAN 305842 by Livarno Lux.
USER MANUAL IAN 305842 Livarno Lux
Ultrasonication of sordarinico
Ultima schaltzagbe do cantiwde:
06/2018-0347No
DE Bredierungspalteitung und Schaeheithinwirse
08) Spering inductors and safety inductors
②
()
()Hendleidng en veigheidiaotwzigen
()
B) Mencal de InstruetiOnes e Indicoiones de segun
P Monal de inuusies e inuusoes de segnurca
IAN 305842
IAN 305842
()
()

Deutsch. 2
English 19
Francais 36
Nederlands 56
Čeştinga 73
Espanol. 90
Portugues. 107
Inhalt
- Intended use 20
- Package contents 20
- Technical specifications 21
- Safety instructions 22
5.Copyright 24
6.Before you start. 24
6.1 The right place for mounting 24
6.2 Tools required 24
6.3 Before mounting 25
6.4 Mounting 26
- Getting started 29
7.1 Movement sensor (5) 29
7.2 Positioning the LED emitter 30
7.3 Operating modes 31
- Maintenance/cleaning 32
9.Troubleshooting 32 - Environmental regulations and disposal information 33
- Conformity notice 33
- Warranty and service information 34
Congratulations!
By purchasing the LED emitter with movement function LIVARNO LUX LSLR 16 A1, hereinafter referred to as the LED emitter, you have opted for a quality product.
The User Manual forms part of this product. It contains important information on safety, usage and disposal. Before using the product, please familiarise yourself with all operating and safety instructions. Only use the product as described and for the applications given. If you pass the product on to someone else, make sure to give them all the relevant documents with it.
1. Intended use
This LED emitter is not intended for commercial use. It is suitable for inside and outside use. The device fulfils all relevant norms and standards relating to CE conformity. Any modifications to the LED emitter other than recommended changes by the manufacturer may result in these standards no longer being met.
2. Package contents
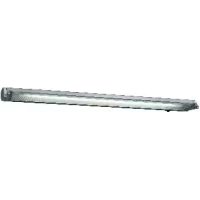
LED emitter LIVARNO LUX LSLR 16 A1
- Fitting materials (2 x screws and 2 x rawlplugs)
- Operating instructions with safety instructions
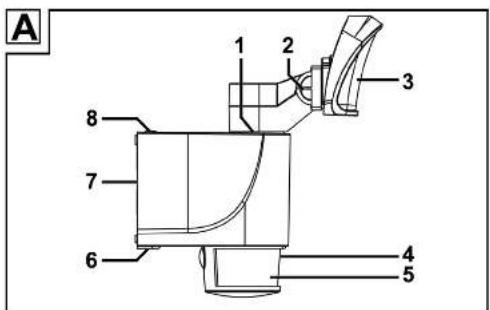
These operating instructions have a fold-out cover. On the inside of the cover is a diagram of the LED emitter with the components numbered (figures A to C). The meanings of the numbers are as follows:
Twist joint
2 Pitch joint
3 Reflector
4 Operating mode LED (covered)
5 Movement sensor
6 Screw
7 Mounting plate
8 Unlock button
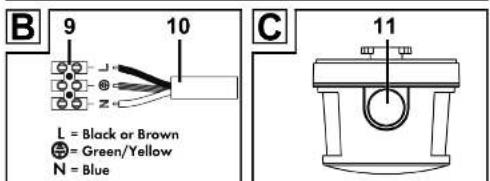
9 Screw terminal
10 Power cable (not included in the package / domestic power lines)
11 Operating mode pushbutton
12 Screw (2 units, for wall-mounting) - no picture -
13 Rawlplug (2 units, for wall-mounting) - no picture -
3. Technical specifications
Emitter:
| Brand: | LIVARNO LUX |
| Model name: LSLR 16 A1 | |
| Operating voltage: 220 - 240 V | ~ (AC), 50 Hz |
| Power consumption for whole LED emitter: | approx. 18 W (+/- 8%) |
| Safety class: I (with ground wire connection) | |
| Motor-driven rotation of light head: approx. 180° H | |
| Degree of protection: IP44 (splashproof) | |
| Lights: 16 x 0.9 W Osram LED | |
| Total luminous flux: approx. 1200 lm | +/-5% (with cover) |
| Colour temperature: approx. 4,000 K (neutral white) | |
| Light beam aperture: approx. 120° | |
| CRI (colour rendering index): > 80 | |
| Light time: approx. 3 minutes (after last sensor detection) | |
| LED lifetime: ≥ 60.000 hours | |
| Operating position: vertical - emitter at the top, movement sensor (5) at the bottom | |
| Max. lighting area covered: approx. | 30m² if mounted at height of approx. 2m |
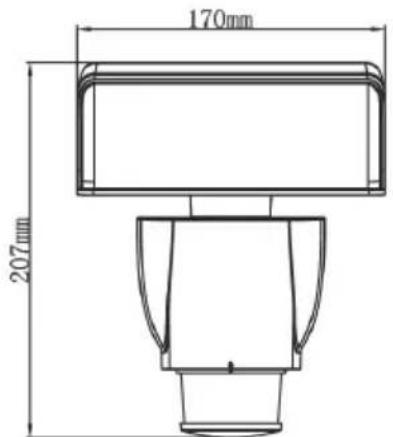
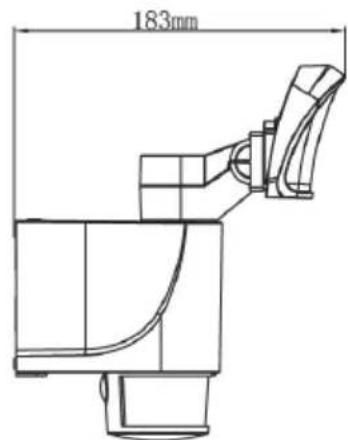
| Dimensions (W x H x D): | approx. 17.0 x 20.7 x 18.3 cm |
| Weight: | approx. 737 g |
Movement sensor (5):
| Sensor detection angle: | max. 270° H, 90°V |
| Sensor range: | max. 10 m |
The technical data and design may be changed without prior notice.
4. Safety instructions
Before you use this LED emitter for the first time, please read the following instructions and heed all warnings, even if you are familiar with handling electronic devices. Keep these operating instructions in a safe place for future reference. If you sell the device or pass it on, it is essential that you also hand over this manual.
Any safety covers which come off must be replaced.

The LED emitter has a ground conductor connection. The ground wire (yellow/green) must be connected to the labelled terminal (9).

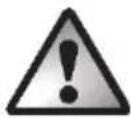
DANGER! This symbol and the word "Danger" denote a potentially dangerous situation. Ignoring it can lead to severe injury or even death.

WARNING! This symbol and the word "Warning" denote important information required for the safe operation of the product and for the safety of its users.
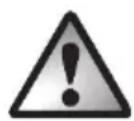
CAUTION! This symbol and the word "Caution" indicates important instructions to protect against damage to property.
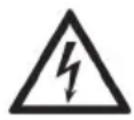
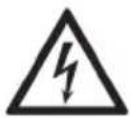
DANGER! This symbol denotes harmful electric voltage.

This symbol denotes further information on the topic.
DANGER! Electrical devices are not suitable for children. Never allow children to use electrical devices unsupervised. Children may not understand that they can be dangerous. Keep the packaging materials out of the reach of children. There is a risk of suffocation.
DANGER! If you notice any smoke, unusual noises or strange smells, switch the LED emitter off immediately. If this occurs, do not continue to use the device and have it checked out by an expert. Never inhale smoke from a possible device fire. If you do inadvertently inhale smoke, seek medical attention. Smoke inhalation can be damaging to your health.
DANGER! The casing of the LED emitter must not be damaged. If the housing is damaged, there is a risk of electric shock.
DANGER! Never open the casing of the LED emitter as there are no components inside which require maintenance. If the casing is opened, there is a risk of electric shock.
DANGER! There can be dangerous electrical voltages in the light and light source which represent an acute danger.
WARNING! Never use optical instruments such as a magnifying glass to look directly into the beam. This could damage your eyes. If you suspect you have damaged your eyes, seek medical attention.
CAUTION! Do not hang anything from the LED emitter. The housing is not designed to support weights. This could damage the LED emitter.
5. Copyright
All the contents of this user manual are protected by copyright and provided to the reader for information only. Copying data and information without the prior explicit written consent of the author is strictly forbidden. This also applies to any commercial use of the contents and information. All texts and diagrams are up-to-date as of the date of printing. Subject to change without notice.
6. Before you start
Remove the LED emitter and fitting materials from the packaging.
Check the LED emitter for damage. If the LED emitter is damaged, do not use it.
If the delivery is damaged or incomplete, please contact the manufacturer's customer services.
6.1 The right place for mounting
Select a location carefully and prepare well before mounting.
Arrange all the individual parts, tools required and fittings tidily so everything is ready to hand.
The LED emitter must only be mounted on stable surfaces such as walls.
The power supply must be via the building's electrical circuit.
Do not mount the LED emitter above a heat source or in the immediate vicinity of other light sources. When choosing the right place for mounting, please also note the illustrations [D and E] on the cover page.
Select the location so that the LED emitter is protected against wind, rain and dirt.
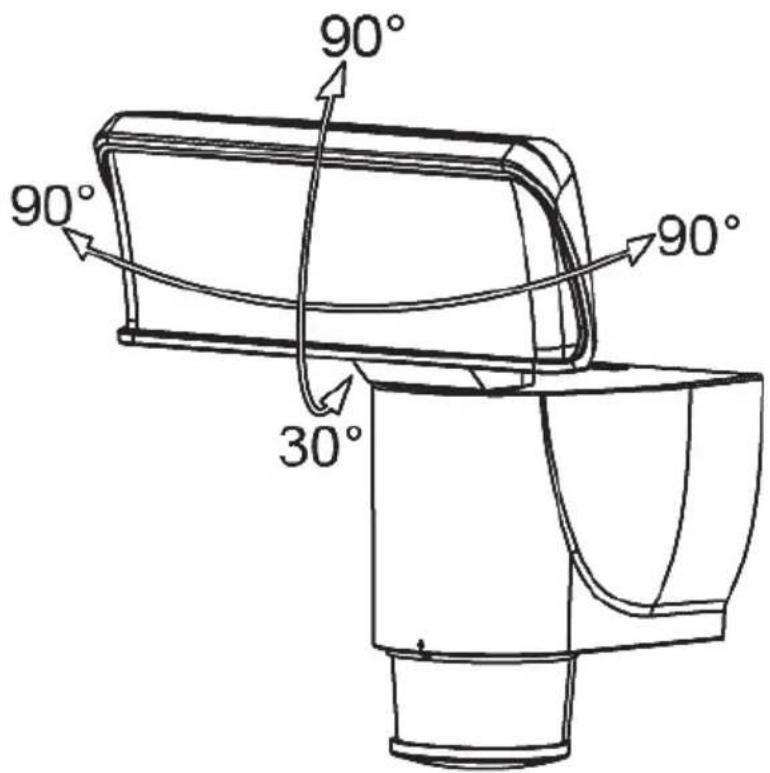
Make sure that the 180^ rotation range of the light head is completely clear.
Find out in advance what fittings are suitable for the location you have chosen. Suitable fittings for mounting on concrete are provided.
6.2 Tools required
The following tools are not supplied. This list is a guide only. The actual tools you will require depend on the individual location.
Ladder
Voltage tester
Spirit level, folding rule, pencil
Drill and drill bits
Phillips screwdriver, flat screwdriver
Open-jawed spanner, combination pliers, wire cutters
6.3 Before mounting

DANGER! The unit must only be mounted by an authorised electrical engineer! The power supply must be via the building's electrical circuit.
DANGER! The power must be switched off during the mounting process!
DANGER! When drilling holes, make sure there are no cables in the walls.
Before mounting the LED emitter, make sure you are familiar with all its individual parts and read and observe the instructions and diagrams in these operating instructions.
In particular, note the dimensions of the LED emitter:
Make sure that the cable to which the LED emitter is to be connected is not live. To do this, remove the fuse for the relevant power circuit or switch the circuit breaker to the "0" position in your fusebox.
Make sure that you also test that the cable is not live using a voltage tester!
6.4 Mounting
The LED emitter must be wall-mounted.
| Disconnect the power supply. | ON OFF | |
| Undo the mounting plate (7) from the LED emitter by removing the screw (6) using a Phillips screwdriver. | ||
| Now press the unlock button (8) on the mounting plate (7) and pull the mounting plate (7) on the strap out of the housing of the LED emitter. | B 8 7 | |
| Drill through the pre-punched mounting holes and then draw the position of the drill holes on the wall in order to drill holes in the wall. Fit the rawlplugs (13) into the drilled holes. | 7 1.8 - 2.5m | |
| Punch the rubber seal on the cable feed (e.g. with a screwdriver) and then push the prepared power cable through from behind. | 7 8 9 10 11 12 | |
| Now screw in the screws (12) to fix the mounting plate (7) securely to the wall. | 13 | |
| Remove the 2 screws and then remove the strain relief. | 14 | |
| Now properly wire the power cable to the screw terminal (9) on the mounting plate (7). Note the labelling of the individual terminals. Please also note the illustration [B] on the cover page. | 9 10 11 12 | |
| Symbol | Wire | |
| L | black or brown | |
| yellow/green | ||
| N | blue | |
| Then fix the power cable (10) by fitting the strain relief with the 2 screws. | ||
| Place the LED emitter straight onto the mounting plate (7). Press the unlock button (8) down and push the LED emitter towards the wall until the unlock button (8) slots into the recess in the LED emitter housing. Finally, use the Phillips screwdriver to turn the screw (6) from underneath through the LED emitter housing into the mounting plate (7). | ||
| Switch the power supply back on again. | ||
7. Getting started
7.1 Movement sensor (5)

Make sure there are no movements which are not to be detected within the detection range of the movement sensor (5) (e.g. pavements, roads). The view of the area to be monitored must not be blocked by objects or similar.
If there are multiple people in the recording area of the movement sensor (5), the emitter always reacts to the last movement detected.
The movement sensor (5) consists of three sensors which together cover a detection range of 270^ .
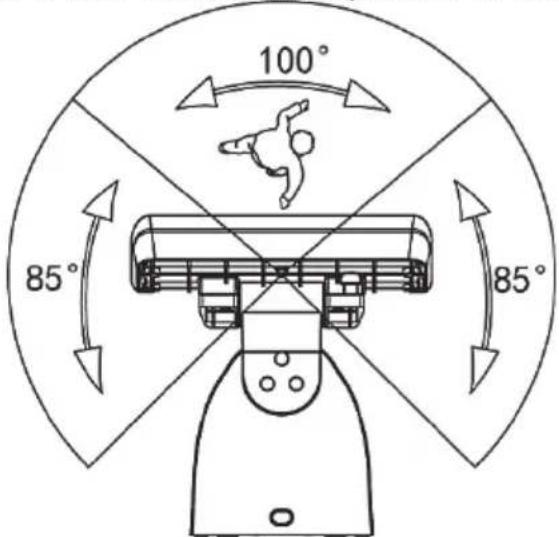
If you wish to mount the LED emitter to, for example, the corner of a house, the potential 270^ detection range can be covered in full.

7.2 Positioning the LED emitter
The LED emitter automatically twists in a range of approx. 180^ via the twist joint (1).
Please do not attempt to align the LED emitter horizontally by hand. The motorised rotation device synchronises automatically.
The pitch joint (2) allows the LED emitter to be swivelled in a range of around 90^ upwards and 30^ downwards. You can adjust this setting to your requirements.
7.3 Operating modes
The LED emitter has the following 4 modes:
| 1 | Night mode with light and rotation function |
| 2 | Day and night mode with light and rotation function |
| 3 | Night mode with light and without rotation function |
| 4 | Day and night mode with light and without rotation function |
Selecting the operating mode
| The mode is selected using the mode button (11). If you press the button once, the mode indicator LED (4) starts to flash. You can then press the mode button (11) again to switch to the next mode. | |
| Every time you press the mode button (11), the mode indicator LED (4) indicates what mode has been selected: | |
| Mode 1 Flashes once | |
| Mode 2 Flashes twice | |
| Mode 3* Flashes 3 times | |
| Mode 4* Flashes 4 times | |
| *Please note that if you select modes 3 or 4, the confirmation only flashes after the LED emitter has moved to the central position. | |
8. Maintenance/cleaning
Maintenance
The LED emitter does not contain any parts that require maintenance. The LED lamp cannot be replaced.
Cleaning
DANGER! The mains power must be switched off for all work on the LED emitter, even cleaning! Otherwise there is a risk of electric shock!
DANGER! Make sure that no liquid gets into the housing of the LED emitter. Otherwise there is a risk of electric shock.
To clean the LED emitter, use a soft, dry cloth. Never use any solvents or cleaners that may damage the plastic housing. For more stubborn dirt, use a slightly damp cloth.
9. Troubleshooting
The light does not come on
The electrical connection is faulty. Get the electrical connection checked by an electrician.
The light switches on and off quickly
There is interference to the sensor from other light sources or bright reflective surfaces. Remove the external light source or reflective surface.
The light does not switch off
There are people or moving objects in the detection range of the movement sensor (5). Remove them.
The LED emitter is moving in the wind, which is constantly triggering the movement sensor (5). Always secure the LED emitter to a stable mounting point.
10. Environmental regulations and disposal information
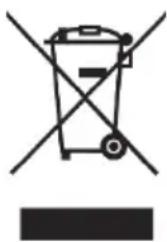
Devices marked with one of these symbols are subject to the European Directive 2012/19/EU. All electrical and electronic devices must be disposed of separately from household waste at official disposal centres.
Do not dispose of the device in household waste or bulky waste collections. Information on collection points and pick-up times can be obtained from your local council or waste disposal company.

Dispose of all packaging in an environmentally friendly manner. Cardboard packaging can be taken to paper recycling centres or public collection points for recycling. Any film or plastic contained in the packaging should be taken to your public collection points for disposal.

Please note the markings on the packaging material when disposing of it, it is labelled with abbreviations (a) and numbers (b), the meanings of which are as follows:
1-7: plastic / 20-22: paper and cardboard / 80-98: composite materials.
11. Conformity notice
CE
The product complies with the requirements of the applicable European and national directives. Evidence of conformity has been provided. The manufacturer has the relevant declarations and documentation.
The complete EU Declaration of Conformity is available for download from this link:
www.targa.de/downloads/conformity/305842.pdf
12. Warranty and service information
Warranty of TARGA GmbH
Dear Customer,
This device is sold with three years warranty from the date of purchase. In the event of product defects, you have legal rights towards the seller. These statutory rights are not restricted by our warranty as described below.
Warranty conditions
The warranty period commences upon the date of purchase. Please keep the original receipt in a safe place as it is required as proof of purchase. If any material or manufacturing faults occur within three years of purchase of this product, we will repair or replace the product free of charge as we deem appropriate.
Warranty period and legal warranty rights
The warranty period is not extended in the event of a warranty claim. This also applies to replaced and repaired parts. Any damage or defects discovered upon purchase must be reported immediately when the product has been unpacked. Any repairs required after the warranty period will be subject to charge.
Scope of warranty
The device was carefully manufactured in compliance with stringent quality guidelines and subjected to thorough testing before it left the works. The warranty applies to material and manufacturing faults. This warranty does not cover product components which are subject to normal wear and which can therefore be regarded as wearing parts, or damage to fragile components such as switches, rechargeable batteries or components made of glass. This warranty is void if the product is damaged, incorrectly used or serviced. To ensure correct use of the product, always comply fully with all instructions contained in the user manual. The warnings and recommendations in the user manual regarding correct and incorrect use and handling of the product must always be observed and complied with. The product is solely designed for private use and is not suitable for commercial applications. The warranty is rendered void in the event of incorrect handling and misuse, if it is subjected to force, and also if any person other than our authorised service technicians interfere with the device. No new warranty period commences if the product is repaired or replaced.
Submitting warranty claims
To ensure speedy handling of your complaint, please note the following:
Before using your product for the first time, please read the enclosed documentation carefully. Should any problems arise which cannot be solved in this way, please call our hotline.
- Always have your receipt, the product article number as well as the serial number (if available) to hand as proof of purchase.
- If it is not possible to solve the problem on the phone, our hotline support staff will initiate further servicing procedures depending on the fault.

Service

Phone: 0800 404 7657
E-Mail: targa@lidl.co.uk

Phone: 1890 930 034
E-Mail: targa@lidl.ie

Phone: 800 62230
E-Mail: targa@lidl.com.mt

Phone: 8009 4409
E-Mail: targa@lidl.com.cy
IAN:305842

Manufacturer
Please note that the following address is not a service address. First contact the service point stated above.
TARGA GmbH
Coesterweg 45
DE-59494 Soest
GERMANY
Table des matieres
Cher client, chere clientele,
Cher client, chere clientele,