USER MANUAL UBXa MINI BEHRINGER
Analog Polyphonic Synthesizer with 3 VCOs, Classic DUAL VCF, Ring Modulator, and 16-Step Motion Sequencer
23CtllxStalnguide

EN) Safety Instruction
- Please read and follow all instructions.

- Keep the apparatus away from water, except for outdoor products.

-
Clean only with a dry cloth.
-
Do not block any ventilation openings. Install in accordance with the manufacturer's instructions.
- Do not install near any heat sources such as radiators, heat registers, stoves or other apparatus (including amplifiers) that produce heat.
- Use only attachments/ accessories specified by the manufacturer.

7.Use only specified carts, stands,tripods, brackets,
or tables. Use caution to prevent tip-over when moving the cart/ apparatus combination.
8. Avoid installing in confined spaces like bookcases.
9. Do not place near naked flame sources, such as lighted candles.
- Operating temperature range 5^ to 45^ (41^ to 113^)
LEGAL DISCLAIMER
Music Tribe accepts no liability for any loss which may be suffered by any person who relies either wholly or in part upon any description, photograph, or statement contained herein. Technical specifications, appearances and other information are subject to change without notice. All trademarks are the property of their respective owners. Midas, Klark Teknik, Lab Gruppen, Lake, Tannoy, Turbosound, TC Electronic, TC Helicon, Behringer, Bugera, Aston Microphones and Coolaudio are trademarks or registered trademarks of Music Tribe Global Brands Ltd. © Music Tribe Global Brands Ltd. 2024 All rights reserved.
LIMITED WARRANTY
For the applicable warranty terms and conditions and additional information regarding Music Tribe's
Limited Warranty, please see complete details online at community. musictribe.com/support.
BESCHRANKTE GARANTIE
detalles na integra atraves do website community. musictribe.com/support
Band/Practice System
- Three VCOs with saw and square waveforms
- Saw and square can sound simultaneously
VCO detuning for a richer sound
- Ring modulator available for metallic effects
- Three waveform LFO with optional trigger sync
- Motion sequencer for recording automation
- Switchable two/four pole VCF based on the legendary OB-Xa VCF
- All analog signal path
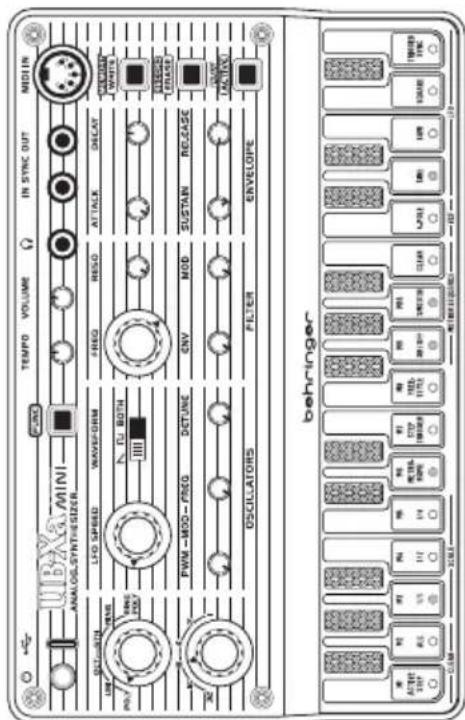
- USB-C PORT - use this port to power the UB-Xa Mini from a suitable USB power source, to update the firmware when necessary and to control the UB-Xa Mini with USB MIDI.
-
FUNCTION BUTTON - use this button to access the alternative functions on other buttons and keys and menu options.
-
TEMPO - use this control to adjust the tempo of the sequencer from 10 bpm to 600 bpm depending on menu settings; the default being 56 bpm to 200 bpm. The internal LED flashes to indicate the selected tempo. Tempo settings can be adjusted in the relevant menu.
- VOLUME - use this control to adjust the output level of the headphone socket (6).
- HEADPHONE SOCKET-use this 3.5mm jack socket to listen to the UB-Xa Mini on a suitable pair of headphones.Not suitable for feeding balanced line level inputs on mixing desks.
- SYNCIN - use this socket to synchronize the UB-Xa Mini's sequencer to an external analog sync source.
- SYNCOUT - use this socket to synchronize external analog equipment to the UB-Xa Mini's tempo (4).
-
MIDIN - use this socket to control the UB-Xa Mini using DIN MIDI.
-
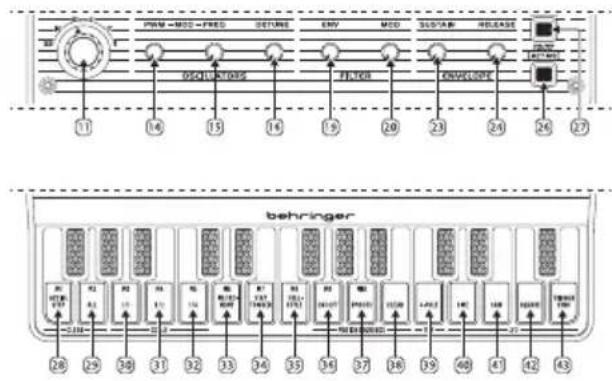
MODE SELECT - use this control to set the UB-Xa Mini's mode: Polyphonic, Unison, Octave, Fifth, Ring Modulation or Polyphonic Ring Modulation. The Ring Modulation options only output square waves, so waveform selection by control 13 is ignored.
- SCALE - use this control to set the UB-Xa Mini's scale from 32^ to 1^ .
- LFO SPEED - use this control to set the LFO speed from 0.2Hz to 20Hz .
- WAVEFORM - use this switch to select the VCO waveform: sawtooth, square or both.
- PWM MOD - use this control to set the depth of Pulse Width Modulation when square wave or both are selected. If the LFO is off then the control adjusts pulse width manually.
-
FREQ MOD - use this control to set the depth of frequency modulation of the VCOs by the LFO.
-
DETUNE - use this control to detune the VCOs against each other for a richer sound.
- FREQ - use this control to set the cutoff frequency of the VCF.
- RES(ONANCE) - use this control to set the resonance of the VCF, which will emphasize the frequencies around the cutoff. The filter does not self-oscillate at higher resonance settings.
- ENV - use this control to set the depth of VCF modulation by the envelope generator.
- MOD - use this control to set the depth of VCF modulation by the LFO.
- ATTACK - use this control to set the envelope generator attack time, from 1 ms to 5 s.
- DECAY - use this control to set the envelope generator decay time, from 4 ms to 30 s.
- SUSTAIN - use this control to set the envelope generator sustain level.
- RELEASE - use this control to set the envelope generator release time, from 4 ms to 20 s.
16 17GnK4HtGuie
UB-Xa MINI Controls
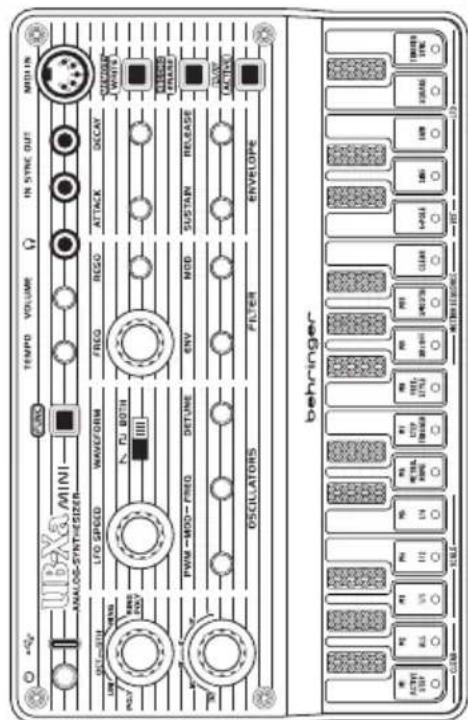
- MEMORY/WRITE - hold this button to select a new sequence memory, in conjunction with keys 28 - 37; or with FUNC (3) to write the sequence.
- RECORD/ERASE - use this button to set the sequencer recording; or with FUNC (3) to erase the current sequence. If the sequence is not saved then the buffer will be erased. Sequencer has to be running to erase.
- PLAY/ACTIVE - use this button to play the selected sequence; or with FUNC (3) to activate or deactivate steps from the sequence. The active steps are indicated by the LEDs in the keyboard keys.
- CLEAR ACTIVE STEP - use this key to undo the Active Step select by button 27 and revert the sequence to its original form. Also used to select memory 1.
-
CLEAR ALL - use this button to clear all sequencer buffer. Also used to select memory 2.
-
SCALE 1/1 - Sequencer and Arpeggiator will run at selected tempo. Also used to select memory 3.
- SCALE 1/2 - Sequencer and Arpeggiator will run at half selected tempo. Also used to select memory 4.
- SCALE 1/4 - Sequencer and Arpeggiator will run at quarter selected tempo. Also used to select memory 5.
- METRONOME - use this key to switch the metronome on or off when recording sequences. Also used to select memory 6.
- STEP TRIGGER - forces an envelope re-trigger with each new sequence step. Does not function when in Freestyle mode. Also used to select memory 7.
-
FREESTYLE - use this key to put the sequencer into real time recording mode. Also used to select memory 8.
-
MOTION SEQUENCE ON/OFF - use this key to allow the real-time recording of control changes into a sequence once the notes have been recorded. Please note that VCF Resonance, Tempo and VCO waveform cannot be recorded into a motion sequence. Also used to select memory 9.
- MOTION SEQUENCE SMOOTH - use this key to smooth out control changes recorded into a motion sequence. When Smooth is off then the motion sequence will jump between steps. Also used to select memory 10.
- MOTION SEQUENCE CLEAR - use this key to clear a motion sequence that has been recorded.
- 4 POLE - use this key to select 4 pole slope for the VCF. If the LED is not lit then the VCF will have a 2 pole slope.
- LFO SINE - use this key to select a sine wave for the LFO.
-
LFO SAW - use this key to select a sawtooth wave for the LFO.
-
LFO SQUARE - use this key to select a square wave for the LFO.
- LFO TRIGGER SYNC - use this key to select LFO Trigger Sync, which resets the LFO with each new key played when operational.
18 19 Quick Start Guide
USING THE SEQUENCES
- Use control 10 to select Polyphonic or Unison
- Hold down the FUNC button (3) and PLAY/ACTIVE button (27) and use the white keys to select the number of steps in the pattern by moving a finger from the first to the last. Note that you can start and finish on any key, so long as the last key is higher than the first.
If you want to use the metronome then select it by pressing FUNC followed by Metronome (Key 33)
- There are two ways of starting your sequence: if you want to define your first note then press RECORD (26) and play the first note. The sequencer will start running and the metronome (if selected) will play on the quarter notes. Alternatively press PLAY (27) and RECORD (26) together and the sequence will run immediately.
- Once the sequencer is running you can play the notes as required. They will automatically quantize to the nearest step.
-
In PLAY mode you can erase the current sequence by holding FUNC and pressing ERASE (26).
-
When you have finished recording press PLAY (27) to stop the sequencer. Hold the FUNC button and press WRITE (25) followed by a key between 28 and 37 to write to memories 1 - 10. Note that control settings are not saved.
USING FREESTYLE IN THE SEQUENCES
At any point while programming a sequence you can hold the FUNC button and press key 35 to enter Freestyle mode. In this mode the quantization is turned off, and the sequencer will effectively record your input in real time. Repeating FUNC and 35 reverts to quantized programming, and any notes falling between steps will be lost, unless you switch Freestyle back on.
USING MOTION SEQUENCING IN THE SEQUENCES
While recording a sequence holding the FUNC button and pressing Motion Sequence On /Off (Key 36) allows you to record the movement of any of the UB-Xa Mini's controls (except Scale, Mode, Waveform and Resonance) as part of the sequence. Note that base control settings are not stored. Pressing FUNC and Smooth (Key 37) interpolates values to smooth out your adjustments, otherwise they will change suddenly with the sequence steps. To clear your motion sequence press FUNC and CLEAR (Key 38).
The UB-Xa Mini has menu functions that are accessed by powering up while holding different buttons:
MEMORY/WRITE (26) & FUNC
(3) -Restore factory parameters. Press Record (27) to restore, Play (28) to cancel.
RECORD (27) & FUNC (3) - Initiate manual VCO calibration.
MEMORY/WRITE (26) & RECORD (27) & PLAY (28) & FUNC (3) - initiate firmware update from SynthTribe app.
MEMORY/WRITE (26) & KEYBOARD -select MIDI Rx channel from 1-16. Press RECORD (27) to save and exit.
RECORD (27) & KEYBOARD - select
MIDI Tx channel from 1 - 16.
Press RECORD (27) to save and exit.
20 21Qikknt Guide
FUNC (3) & KEYS
Pressing FUNC while powering up the UB-Xa MINI allows the following parameters to be set:
| Key No. Action |
| 1 | Auto power off, UB-Xa MINI will power down after two hours with no activity (LED on). |
| 2 | Sync out clock polarity. Toggle between rising and falling. LED on indicates falling; off indicates rising. |
| 3 | Sync in clock polarity. Toggle between rising and falling. LED on indicates falling; off indicates rising. |
| 4 | Tempo Band. Toggle between wide (10 - 600 bpm, LED off) and narrow (56 - 240 bpm, LED on). |
| 5 Clock Source Internal. |
| 6 Clock Source DIN MIDI. |
| 7Clock Source USB MIDI. |
| 8Clock Source External Sync. |
| 91 pps. | |
| 102 ppqn. | |
| 1124 ppqh. |
| 1248 ppqnh. |
| 13 | MIDI Rx On/Off - when MIDI Rx is ON the UB-Xa MINI will receive MIDI note on/off messages from an external MIDI device, even if the sequencer is running. When it is OFF these messages will not be received. |
EN
| Key No. Action |
| 14 | Envelope Trigger. Toggle between multi-trigger (LED on) or retrigger (LED off). |
| 15 Note Insert Type: Low Priority (LED on) |
| 16 Note Insert Type: High Priority (LED on) |
| 15/16 (F#) | Note Insert Type: Nearest (both LEDs off) or Last (both LEDs on) |
Selecting Retrigger will cause the envelope to retrigger from zero point with each new key press; Multi-trigger will start a new envelope cycle from the point where the old one has reached when a new key is pressed.
22 2366kwttnt Guide
UB-Xa MINI Getting Started
EN Step 3:Getting Started
OVERVIEW
This getting started guide will help you set up your UB-Xa Mini and briefly introduce its capabilities.
CONNECTION
To connect the UB-Xa Mini to your system, please consult the connection guide earlier in this document.
SOFTWARE SETUP
The UB-Xa Mini is a USB Class Compliant MIDI device, and so no driver installation is required. The UB-Xa Mini does not require any additional drivers to work with Windows and MacOS.
HARDWARE SETUP
Make all the connections in your system. Keep the UB-Xa Mini power turned off when making any connections.
Ensure your amplification is turned down.
Turn on the UB-Xa Mini before turning on any power amplifiers and turn it off last. This will help prevent damage to your speakers.
WARM UP TIME
We recommend leaving 15 minutes or more for the UB-Xa Mini to warm up before recording or live performance. (Longer if it has been brought in from the cold.) This will allow the precision analog circuits time to reach their normal operating temperature and tuned performance.
FIRMWARE UPDATE
Please check the behringer.com website regularly for any updates to the Behringer SYNTHTRIBE app.
The app looks for the latest firmware and can update the UB-Xa Mini; as well as allowing access to additional functions where they are available.
24 25868kWlttR Gullce
UB-Xa MINI Controles
Paso 2: Controles

26 278a9b9rt Guide
UB-Xa MINI Controles
Paso 2: Controles
MEMORY/WRITE (26) & FUNC (3)
MEMORY/WRITE (26) & FUNC
MEMORY/WRITE (26) & FUNC
MEMORY/WRITE (26) & FUNC (3)
- Restuarar parametros de fabrica.
Pressione Record (27) para restaurant,
Play (28) para cancelar.
RECORD (27) & FUNC (3) - Iniciar calibracao manual do VCO.
MEMORY/WRITE (26) & FUNC (3)
MEMORY/WRITE (26) & FUNC (3) -
Herstel fabrieksinstellingen. Druk op Record (27) om te herstellen, Play (28) om te annuleren.
RECORD (27) & FUNC (3) -
StarthandmatigeVCO-calibratie.
MEMORY/WRITE (26) & RECORD (27) & PLAY (28) & FUNC (3) - start firmware-update vanuit de SynthTribe-app.
MEMORY/WRITE (26) &
MEMORY/WRITE (26) & FUNC (3)
RECORD (27) & KLAWIATURA -
UB-Xa Mini to the new series is here, 2019. The new series will be published in 2020 and will be available for download at www.xa-mini.com.
omegaapp5
MIDI Continuous Controllers
EN The UB-Xa Mini will respond to the following MIDI CCs
ES EI UB-Xa Mini respondera a los siguientes CC MIDI
FRLe UB-Xa Mini repondra aux CC MIDI suivants
DE Der UB-Xa Mini reagiert auf die folgenden MIDI-CCs
P0UB-Xa Mini respondera aos segunte MIDI CCs
II UB-Xa Mini risponderà ai seguenti MIDI CCs
NL De UB-Xa Mini reageert op de volgende MIDI CC's
SE UB-Xa Mini kommt att svara pa foljande MIDI CCs
PL UB-Xa Mini bedzie reagowac na nastepujace MIDI CCs
IPUB-XaMiniは次のMIDICCsに応答いたします
CNUB-XaMini将响应以下MIDICCs
| Controller Value Controls | |
| 10-127 | Modulation | |
| 360-127 | Pulse Width Modulation | |
| 380-127 | Filter Resonance | |
| 390-127 | Envelope Release | |
| 40 | 0-12 Voice Mode - Poly |
| 13-37 Voice Mode - Unison |
| 38-62 Voice Mode - Octave |
| 63-87 Voice Mode - Fifth |
| 88-112 | Voice Mode - Unison Ring Modulation |
| 113-127 | Voice Mode - Poly Ring Modulation |
| Controller Value Controls | |
| 41 | 0-21 Scale 32' | |
| 22-43 | Scale 16' |
| 44-65 Scale 8' | |
| 66-87 Scale 4' | |
| 88-109 | Scale 2' |
| 110-127 | Scale 1' |
| 42 0-127 | | Detune |
| 44 0-127 | Filter Frequency |
| 45 0-127 | Filter Envelope |
| 46 0-127 | LFO Speed |
| 47 0-127 | Frequency Modulation |
| 48 0-127 | Filter Modulation |
| 49 0-127 | Envelope Attack |
| 50 0-127 | Envelope Decay |
| 51 0-127 | Envelope Sustain |
144 145 Start Guide
Specifications
| Synthesizer Architecture |
| Number of voices Monophonic | |
| Type Analog | |
| Oscillators 3 VCO | |
| LFO 1 LFO | |
| VCF LPF 12/24 dB/octave | |
| Envelopes 1 ADSR | |
| Connectivity |
| Power switch Push button on/off | |
| MIDI In 5-pin DIN / 16 channels | |
| USB (MIDI) USB-C | |
| Headphones 3.5 mm TRS, stereo, 5 | mW 32 Ω |
| Sync Input and Output | |
| USB |
| Type Class compliant USB C | |
| Supported Operating Systems | Windows 7 or higher |
| Mac OS X 10.10 or higher |
| Volume |
| Control Volume: 0 to 10 | |
| Control Section |
| Switches | Footage Select - 32', 16', 8', 4', 2', 1' |
| Poly, Uni, Oct, 5th, Ring, Ring Poly Function |
| LFO Section |
| Controls LFO Speed | |
| Switches (keyboard) Waveform: Saw, Square, Sine |
| Oscillator Section |
| Controls | Pitch Mod |
| PWM Mod |
| Detune |
| Switches | Waveform select: Sawtooth, Square, Both |
| Analog Filter Section |
| Controls | Frequency |
| Resonance |
| LFO Mod |
| Env Mod |
| Sequencer Section |
| Capacity | 16 steps, 10 patterns |
| Control Tempo | |
| Switches | Memory write |
| Play/active |
| Record/erase |
146 147Start Guide
EN
Scale (Keyboard): 14, 12, 14
Metronome On/Of (Keyboard)
Step Trigger (Keyboard)
Freestyle (Keyboard)
Motion Sequence On/Off (Keyboard)
Motion Sequence Smooth (Keyboard)
Motion Sequence Clear (Keyboard)
Envelope Section
| Controls | A(tack) |
| D(ecay) |
| S(ustain) |
| R(lease) |
| Keyboard and Controls |
| Keyboard 27, capacitive touch | |
| Power Requirements |
| Mains connector Micro USB | |
| Indicator Power LED | |
| Physical |
| Standard operating temperature range | 5°C – 45°C (41°F – 113°F) |
| Dimensions (H x W x D) 40 x 124 x 193 mm (1.58 x 4.88 x 7.60") |
| Weight 0.36 kg (0.79 lbs) | |
技术参数
behringer

UB-Xa MINI Default Patch Sheet
behringer
152153CaA6R8start Guide

Important information

Informations important
1. Register online.
Please register your new Music Tribe equipment right after you purchase it by visiting musctribe. com. Registering your purchase using our simple online form helps us to process your repair claims more quickly and efficiently. Also, read the terms and conditions of our warranty, if applicable.
- Malfunction. Should your Music Tribe Authorized Reseller not be located in your vicinity, you may contact the Music Tribe Authorized Fulfiller for your country listed under "Support" at musicrobe.com. Should your country not be listed, please check if your problem can be dealt with by our "Online Support" which may also be found under "Support" at musicrobe.com. Alternatively, please submit an online warranty claim at musicrobe.com BEFORE returning the product.
3. Power Connections
Before plugging the unit into a power socket, please make sure you are using the correct mains voltage for your particular model. Faulty fuses must be replaced with fuses of the same type and rating without exception.
1. Registro online.

Responsible Party Name: Music Tribe Commercial NV Inc.
Address: 122 E. 42nd St.1, 8th Floor NY, NY 10168, United States
Email Address: legal@musictribe.com
UB-Xa MINI
This equipment has been tested and found to comply with the limits for a Class B digital device, pursuant to part 15 of the FCC Rules. These limits are designed to provide reasonable protection against harmful interference in a residential installation. This equipment generates, uses and can radiate radio frequency energy and, if not installed and used in accordance with the instructions, may cause harmful interference to radio communications. However, there is no guarantee that interference will not occur in a particular installation. If this equipment does cause harmful interference to radio or television reception, which can be determined by turning the equipment off and on, the user is encouraged to try to correct the interference by one or more of the following measures:
Reorient or relocate the receiving antenna.
- Increase the separation between the equipment and receiver.
- Connect the equipment into an outlet on a circuit different from that to which the receiver is connected.
- Consult the dealer or an experienced radio/TV technician for help. This equipment complies with Part 15 of the FCC rules. Operation is subject to the following two conditions:
(1) this device may not cause harmful interference, and
(2) this device must accept any interference received, including interference that may cause undesired operation.
Important information:
Changes or modifications to the equipment not expressly approved by Music Tribe can void the user's authority to use the equipment.
C
Hereby, Music Tribe declares that this product is in compliance with Directive 2014/30/EU, Directive 2011/65/EU and Amendment 2015/863/EU, Directive 2012/19/EU, Regulation 519/2012 REACH SVHC and Directive 1907/2006/EC.
Full text of EU DoC is available at https://community.musictribe.com/
EU Representative: Music Tribe Brands DK A/S Address: Gammel Strand 44, DK-1202 Kobenhavn K, Denmark
UK Representative: Music Tribe Brands UK Ltd.
Address: 8th Floor, 20 Farringdon Street
London EC4A 4AB, United Kingdom
Correct disposal of this product: This symbol indicates that this product must not be disposed of with household waste, according to the WEEE Directive (2012/19/EU) and
your national law. This product should be taken to a collection center licensed for the recycling of waste electrical and electronic equipment (EEE). The mishandling of this type of waste could have a possible negative impact on the environment and human health due to potentially hazardous substances that are generally associated with EEE. At the same time, your cooperation in the correct disposal of this product will contribute to the efficient use of natural resources. For more information about where you can take your waste equipment for recycling, please contact your local city office, or your household waste collection service.
We Hear You

