Royal BLS 3200 - Garden vacuum EINHELL - Free user manual and instructions
Find the device manual for free Royal BLS 3200 EINHELL in PDF.

| Product Type | Thermal garden vacuum and blower |
| Brand | Einhell |
| Model | Royal BLS 3200 |
| Fuel | Unleaded petrol mixed with 2-stroke oil (ratio 40:1) |
| Displacement | 24 cm³ |
| Maximum engine power | 0.8 kW |
| Maximum engine speed | 11,500 rpm |
| Maximum air speed | Approximately 40 m/s |
| Maximum air flow rate | 240 m³/h |
| Collector bag capacity | 55 liters |
| Mulching ratio | 10:1 |
| Fuel tank capacity | 700 ml |
| Weight | 6.4 kg |
| Sound pressure level | 108 dB(A) |
| Vibration | 13.7 m/s² |
| Operating mode | Blowing and vacuuming with shredding |
| Spark plug electrode gap | 0.6 mm |
| Air filter type | Washable foam filter |
| Routine maintenance | Regular cleaning of air filter, collector bag, and spark plug |
| Safety | Mandatory wearing of goggles, gloves, dust mask, and hearing protection |
| Warranty | 2 years |
Frequently Asked Questions - Royal BLS 3200 EINHELL
User questions about Royal BLS 3200 EINHELL
0 question about this device. Answer the ones you know or ask your own.
Ask a new question about this device
Download the instructions for your Garden vacuum in PDF format for free! Find your manual Royal BLS 3200 - EINHELL and take your electronic device back in hand. On this page are published all the documents necessary for the use of your device. Royal BLS 3200 by EINHELL.
USER MANUAL Royal BLS 3200 EINHELL
Meaning of symbols marked on the product
| Read the user manual before using the machine | Wear dust mask to protect against dust | ||
| Wear safety goggles to protect your eyes | Wear glove to protect your hands | ||
| Wear ear protector to protect against noise | Wear safety boots to protect against electric shock |
3
natural_image
Close-up of a pipe with wet pavement and debris, no visible text or symbolsFig. 5
natural_image
Person using a handheld tool to clean or spray green onions on a tiled floor (no visible text or symbols)Fig. 6
• VERSTOPFETES SAUGROHR
- WEAR CLOSE FITTING, TOUGH WORK CLOTHING that will provide protection/without restricting your movements, such as long slacks or trousers, safety work shoes, heavy duty work gloves, hard hat, a safety face shield, or safety glasses for eye protection and a good grade of ear plugs or other sound barriers for hearing protection.
- REFUEL IN A SAFE PLACE. Open fuel cap slowly to release any pressure which may have formed in fuel tank. Always wipe unit of fuel or oil spills before starting. To prevent a fire hazard, move at least 10 feet (3 meters) from fueling area before starting.
- TURN UNIT OFF before setting it down, and also before installing or removing attachments.
- KEEP ALL SCREWS AND FASTENERS TIGHT and the unit in good operating condition. Never operate this equipment if it is improperly adjusted or not completely and securely assembled.
- KEEP HANDLES DRY, clean and free of fuel mixture.
- STORE EQUIPMENT AWAY FROM POSSIBLE IGNITION SOURCES, such as gas-powered water heaters, clothes dryers, or oil-fired furnaces, portable heaters, etc.
- ALWAYS KEEP the engine free of debris build-up.
- OPERATION OF EQUIPMENT should always be restricted to mature and properly instructed individuals.
- ALL PERSONS WITH RESPIRATORY PROBLEMS and persons operating blower in very dusty environments, should wear a dust particle mask at all times. Paper dust masks are available at most paint and hardware stores.
WHAT NOT TO DO
WARNING: DO NOT USE ANY OTHER FUEL than that recommended in your manual. Always follow instructions in the Fuel and Lubrication section of this manual. Never use gasoline unless it is properly mixed with 2-cycle engine lubricant. Permanent damage to engine will result, voiding manufacturer's warranty.
- DO NOT SMOKE while refueling or operating equipment.
- DO NOT OPERATE UNIT WITHOUT A MUFFLER and properly installed muffler shield.
- DO NOT TOUCH or let your hands or body come in contact with a hot muffler or spark plug wire.
-
DUE TO THE DANGER of exhaust fumes, never operate blower in a confined or poorly ventilated area.
-
NEVER POINT BLOWER in the direction of people, animals, buildings, automobiles, or windows, etc.
- DO NOT operate unit without inlet cover installed to prevent contact with impeller.
- DO NOT set a hot engine down where flammable material is present.
- DO NOT OPERATE UNIT FOR PROLONGED PERIODS. Rest periodically.
- DO NOT OPERATE UNIT WHILE UNDER THE INFLUENCE OF ALCOHOL OR DRUGS.
WARNING: DO NOT ADD, REMOVE OR ALTER ANY COMPONENTS OF THIS PRODUCT. Doing so could cause personal injury and/or damage the unit voiding the manufacturer's warranty.
- DO NOT operate your unit near or around flammable liquids or gases whether in or out of doors. An explosion and/or fire may result.
- DO NOT WEAR loose clothing, scarfs, neck chains, unconfined long hair, and the like. Doing so could cause injury associated with objects being drawn into the rotating parts. Tie up long hair and fasten it, for example with a head scarf, cap, helmet, etc.
- DO NOT refuel a running engine or an engine that is hot
Layout (Fig. 1)
- Rear Handle
- Throttle Trigger
- Throttle Lock
- On/Off Switch
- Front Handle
- Muffler Cover
-
Fuel Tank Window
-
Fuel Cap
-
Starter Handle
-
Air Filter Cover
-
Vacuum/Blower Tube
-
Choke Lever
-
Spark Plug Wire / Spark Plug
-
Vacuum/Blower Slide
-
Primer Bulb
-
Harness
-
Vacuum Bag
-
Speed Cleaner Head

- Technical data
| Engine | 24 cm3 |
| Max. Air Velocity | ca. 40 m/s |
| Max. Air Volume | 240 m3/h |
| Max. Engine Speed | 11,500 min-1 |
| Collection Bag | 55 Litre |
| Mulching Ratio | 10:1 |
| Fuel Capacity | 700 ml |
| Weight | 6.4 kg |
| Maximum Enquine Performance | 0.8 kW |
| Noise | 108 dB(A) |
| Vibration | 13.7 m/s2 |
3. BLOWER ATTACHMENT ASSEMBLY INSTRUCTIONS
- Release the screws (A) and remove the screw (B). Insert blower tube (C) into the blower housing and replace screw (B). Tighten screws (A). (Fig. 1A)
- Insert speed cleaner head (D) to the tube (C). (Fig. 1B)
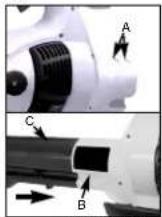
Fig. 1A Fig. 1B
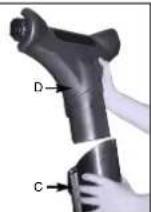
Fig. 2
- HARNESS INSTALLATION Attach the 2 harness clips to the 2 links in the blower handle. (Fig. 2)

• VACUUM ATTACHMENT ASSEMBLY INSTRUCTIONS

natural_image
Two-panel image showing hands holding a camera and a bag, with arrows indicating motion direction (no text or symbols)Fig. 3
To install vacuum bag:
Pull the slide (A) forward and fit bag (B) into the vacuum housing. (See Fig. 3)
FUEL AND LUBRICATION
• FUEL
Use regular grade unleaded gasoline mixed with 40:1 custom 2-cycle engine oil for best results.
WARNING: Never use straight gasoline in your unit. This will cause permanent engine damage and void the manufacturer's warranty for that product. Never use a fuel mixture that has been stored for over 90 days.
WARNING: Use only Class I 2-stroke oil suitable for air-cooled engines.
• MIXING FUEL
Mix the fuel with 2-cycle oil in a suitable container. Shake the container to ensure that it is properly mixed.
• FUEL AND LUBRICATION

• RECOMMENDED FUELS
Some conventional gasolines are being blended with oxygenates such as alcohol or an ether compound to meet clean air standards. Your Talon engine is designed to operate satisfactorily on any gasoline intended for automotive use including oxygenated gasolines.
OPERATING INSTRUCTIONS
• STARTING A COLD ENGINE
Fill fuel tank with proper gas and oil mixture. See Fuel and Lubrication. Set unit on ground so that it rests on housing feet.
- Pull the throttle trigger (A). (It will auto lock) Fig.
- Prime the carburetor. Pump the primer bulb (C) 10 times (Fig. 4B)
- Your unit is designed with a 2 position choke (D): START "F" and RUN * D|Move choke lever to START "F" position (Fig. 4C).
- Grip handle firmly.
- Pull starter rope out a short way until resistance is felt (approximately 100mm). Pull starter rope

GB
quickly and evenly until engine starts or attempts to run. Once engine starts, warm up at full throttle for 10 seconds and release throttle.
- Push down the throttle lock (B), the throttle trigger (A) will back to the normal position. (Fig. 4A)
- Move the choke to RUN *T position (Fig. 4E)
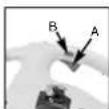
Fig. 4A
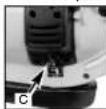
Fig. 4B Fig. 4C
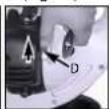
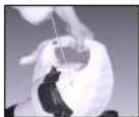
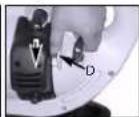
Fig. 4D Fig. 4E
NOTE: If engine fails to start after repeated attempts, refer to Troubleshooting section.
NOTE: Always pull starter rope straight out. Pulling starter at an angle will cause rope to rub against the eyelet. This friction will cause the rope to fray and wear more quickly. Always hold starter handle when rope retracts. Never allow rope to snap back from extended position. This could cause rope to snag or fray and also damage the starter assembly.
• STOPPING THE ENGINE
Emergency Stopping Procedure. When it is necessary to stop blower engine immediately, DEPRESS the switch to stop.
Normal Stopping Method. For normal stopping, push down the throttle lock, the throttle trigger will back to the normal position and allow engine to return to idle speed. Then DEPRESS and HOLD the "OFF" switch until the engine stops completely.
• STARTING A WARM ENGINE (Engine has been stopped for no more than 15-20 minutes)
- Pull starter rope again. Engine should start with ONE or TWO pulls. If engine fails to start after 6 pulls, repeat steps 2 through 6 (see Starting a cold engine).
- If engine does not start, or starts and then stops after 5 rope pulls, follow procedure "STARTING A COLD ENGINE".
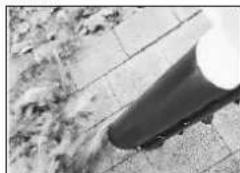
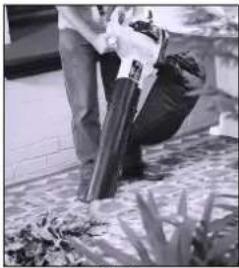
• BLOWER OPERATIONS (Fig. 5)
Your Talon blower is designed to easily remove debris from patios, walkways, lawns, bushes, etc., and many hard to reach areas where debris may accumulate.
WARNUNG: Because of flying debris, always wear
12
American National Standards Institute (A.N.S.I.) approved shielded safety glasses or face shield when operating blower.
Before using your blower, review Safety Precautions in your User Manual, and all regulations for operation of the unit. These precautions and regulations are for your protection.
natural_image
Close-up of a pipe running on pavement with debris and greenery (no visible text or symbols)Fig. 5
CAUTION: Hold the blower so that hot exhaust does not damage clothing and is not inhaled by operator.
DO NOT operate the blower with other people or animals in the immediate vicinity. Allow a minimum of 30 feet (9 meters) between operator and other people or animals.
We recommend that a face mask be worn when operating blower in dusty areas.
Stand away from the debris, at a distance that will easily allow you to control the direction of blown debris. Never blow debris in direction of bystanders.
To control velocity of airstream, blower can be operated at any speed between idle and full throttle. Experience with the unit will help you determine the amount of airflow necessary for each application.
• VACUUM OPERATIONS
WARNUNG: NEVER OPERATE VACUUM WITHOUT VACUUM BAG PROPERLY ATTACHED, AS FLYING DEBRIS COULD CAUSE INJURY TO OPERATOR AND BYSTANDERS. ALWAYS MAKE SURE VACUUM BAG ZIPPER IS CLOSED BEFORE OPERATING UNIT.
Do not vacuum hot or burning materials (e.g. hot ash, glowin gcigarettes) from outdoor fireplaces or barbecue pits, always wait for these materials to be cool enough. Do not vacuum lighted smoking material such as discarded cigars or cigarettes. Do not operate unit near open flame.
CAUTION: This unit is designed to vacuum up debris such as leaves, small bits of paper, small twigs, weeds, grass clippings, etc. Do not use this unit for any other purpose.
Do not attempt to vacuum rocks, broken glass, bottles, tin cans or other such objects. Damage to impeller and unit as well as operator injury could result.
If vacuum tube is level with power unit horizontal, rocks or large objects may be drawn into tube, damaging the Impeller.
To Operate Vacuum:
1. Follow correct starting procedures as explained in this manual.
2. Allow engine to return to idle. Put the shoulder harness on so the strap is over your right shoulder. Put the vacuum bag strap on so it is over your left shoulder.
CAUTION: Do not allow shoulder harness to cover, block, or come in contact with exhaust outlet during operation. The muffler generates heat and could burn, melt, or damage harness strap.
3. Place your left hand on the top handle and right hand on side handle as shown (Fig. 6).
4. Swing unit side to side to vacuum debris.
CAUTION: To avoid clogging vacuum tube. DO NOT FORCE OR PLACE SUCTION TUBE INTO A PILE
natural_image
Person using a vacuum cleaner to clean leafy material (no visible text or symbols)Fig. 6
OF DEBRIS.
• VACUUM TUBE CLOGGING To Unclog Vacuum Tube:
- Turn engine "OFF". Promptly compress vacuum bag while it is still inflated, expelling air out of the suction tube.
This reverse airflow is usually sufficient to dislodge most obstructions. If the obstruction cannot be cleared by compressing vacuum bag, follow this procedure: - Remove and inspect vacuum tubes.
- Carefully clean out nozzle.
- Reinstall vacuum tubes.
AIR FILTER
CAUTION: NEVER operate blower without the air filter or dust and dirt will be sucked into the engine and damage it. The air filter must be kept clean. If it becomes damaged, install a new filter.
To Clean Air Filter:
- Remove 2 screws (A) holding air filter cover in place, remove cover (B) and lift filter (C) from cover (Fig. 7A and B).
- Wash filter in soap and water. DO NOT USE GASOLINE!
- Air dry filter
- Reinstall air filter and air filter cover.
NOTE: Replace filter if frayed, tom, damaged or unable to be cleaned.
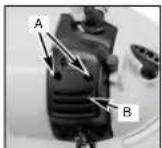
Fig. 7A
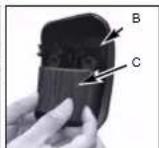
Fig. 7B
• CARBURETOR ADJUSTMENT
The carburetor was pre-set at the factory for optimum performance. If further adjustments are necessary, please take your unit to the nearest professional.
• SPARK PLUG
- Spark plug gap = .025 in. (0,6 mm) (Fig. 8).
- Torque to 105 to 130 inch pounds (12 to 15 N·m). Connect spark plug boot.
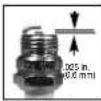
Fig. 8
• VACUUM BAG CLEANING
A dirty bag will obstruct airflow, thereby reducing vacuum efficiency.
To Clean Baq
- Detach vacuum bag from unit.
- Open zipper and remove contents.
- Turn bag INSIDE OUT and shake vigorously. This procedure should be performed on a regular basis.
- Turn bag RIGHT SIDE OUT, close zipper and attach to unit.
NOTE: If vacuum bag is unusually dirty, it should be washed by hand in warm water with a mild detergent. Rinse thoroughly. Let dry before using.
• STORING A UNIT
WARNING: Failure to follow these steps may cause varnish to form in the carburetor and difficult starting or permanent damage following storage.
- Perform all the general maintenance
GB
recommended in the Maintenance Section of your User Manual.
- Clean outside surface of unit.
- Drain fuel from the fuel
- After fuel is drained, start engine.
- Run engine at idle until unit stops. This will purge the carburetor of fuel.
- Allow engine to cool (approx. 5 minutes)
- Using a spark plug wrench, remove the spark plug.
- Pour 1 teaspoon of clean 2-cycle oil into the combustion chamber (Fig. 9). Pull starter rope slowly several times to coat internal components. Replace spark plug.
- Store unit in a cool, dry place away from any source of ignition such as an oil burner, water heater, etc.
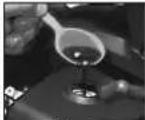
Fig. 9
- REMOVING A UNIT FROM STORAGE
- Remove spark plug.
- Pull starter rope briskly to clear excess oil from combustion chamber.
- Clean and gap spark plug or install a new spark plug with proper gap.
- Prepare unit for operation.
- Fill fuel tank with proper fuel / oil mixture. See Fuel and Lubrication Section.
| TROUBLE SHOOTING THE ENGINE | ||
| PROBLEM | PROBABLE CAUSE | CORRECTIVE ACTION |
| Unit won't start or starts but will not run. | Incorrect starting procedures. | Follow instructions in the User Manual. |
| Incorrect carburetor mixture adjustment setting. | Have carburetor adjusted by an Authorized Service Center. | |
| Fouled spark plug. | Clean / gap or replace plug. | |
| Fuel filter plugged. | Replace fuel filter. | |
| Unit starts, but engine has low power. | Incorrect lever position on choke. | Move to RUN position. |
| Dirty air filter. | Remove, clean and reinstall filter. | |
| Incorrect carburetor mixture adjustment setting. | Have carburetor adjusted by an Authorized Service Center. | |
| Engine hesitates. | Incorrect carburetor mixture adjustment setting. | Have carburetor adjusted by an Authorized Service Center. |
| No power under load. | ||
| Runs orally. | Incorrectly gapped spark plug. | Clean / gap or replace plug. |
| Smokes excessively. | Incorrect carburetor mixture adjustment setting. | Have carburetor adjusted by an Authorized Service Center. |
| Incorrect fuel mixture. | Use properly mixed fuel (40:1 mixture). | |
• AVERTISSEMENTS ET CONSIGNES DE SECURITE
LISEZ MINUTIEUSEMENT CE MODE D'EMPLOI ET TOUS LES SUPPLEMENTS (SI PRESENTS) AVANT D'UTILISER L'APPAREIL.
Fig. 1A Fig. 1B
• MONTAGE DE LA
COURROIE DE RETENUE
natural_image
Two-panel image showing a hand holding a device with labeled parts A and B, no readable text or symbols present.Fig. 3
• CARBURANT
natural_image
Close-up of a pipe with wet pavement and debris, no visible text or symbolsFig. 5

F
natural_image
Person using a handheld tool to clean or remove leafy ground (no visible text or symbols)Fig. 6
TUBE ASPIRATEUR BOUCHE
• WAARSCHUWINGS- EN VEILIGHEIDS-INSTRUCTIES
LEES AANDACHTIG DE HANDLEIDING EN ALLE AANHANGSELS (INDIEN BIJGESLOTEN) VOORDAT U HET TOESTEL IN GEBRUIK NEEMT.
natural_image
Technical illustration of a handheld device with labeled parts A, B, C, D (no text or symbols beyond labels)Fig. 1A Fig. 1B
• MONTAGE VAN DE
DRAAGRIEM
natural_image
Two-panel image showing hands holding a device and a bag, with arrows indicating motion (no text or symbols)Fig. 3
• MOTORBRANDSTOF EN MOTOROLIE
• MOTORBRANDSTOF
natural_image
Close-up of a cylindrical object on a tiled surface with textured ground (no visible text or symbols)Fig. 5
natural_image
Person using a handheld tool to clean leafy material on a tiled floor (no visible text or symbols)Fig. 6
natural_image
Close-up of a cylindrical object with a white circular top, resting on a paved surface (no visible text or symbols)Fig. 5
natural_image
Person using a tool on a patterned surface, no visible text or symbolsFig. 6
• LUFTFILTER
natural_image
Close-up of a handheld device with labeled parts (A, B, C, D) showing mechanical assembly and motion indicators (no readable text or symbols beyond labels)Kuva 1A Kuva 1B
• KANTOHIHNAN ASENNUS
natural_image
Two-panel image showing a hand holding a camera and a bag, with arrows indicating motion direction (no text or symbols)Kuva 3
• POLTTOAINE
natural_image
Close-up of a pipe or pipe with wet pavement and debris, no visible text or symbolsKuva 5
natural_image
Person using a handheld tool on a tiled floor, no visible text or symbolsKuva 6
• TUKKEUTUNUT IMUPUTKI
natural_image
Two-panel image showing hands holding a camera and a bag, with arrows indicating motion direction (no text or symbols)Fig. 3
• BRÆNDSTOF OG DRIVMIDLER
• BRÆNDSTOF
natural_image
Close-up of a pipe running on tiled ground with visible debris (no text or symbols)Fig. 5
natural_image
Person using a handheld bower on a paved surface with greenery (no visible text or symbols)Fig. 6
• TILSTOPPET SUGER∅R
• RENG∅RING AF OPSAMLERPOSE
natural_image
Close-up of a cylindrical object on tiled floor, possibly a pipe or tool, with no visible text or symbols.Fig. 5
natural_image
Person using a handheld power tool on a patterned surface (no visible text or symbols)Fig. 6
• TUBO DI ASPIRAZIONE OSTRUITO
• CANDELA DI ACCENSIONE
natural_image
Close-up of a dark cylindrical object on a tiled surface, possibly a pipe or container, with no visible text or symbols.Fig. 5
natural_image
Person using a tool on a tiled floor, no visible text or symbolsFig. 6
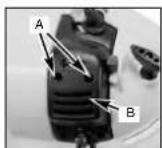
Fig. 7A
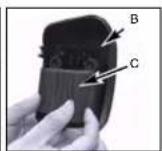
Fig. 7B
• ELDUGULT SZÍVÓCSÓ
2000/14/EG: L_WM = 107 dB; L_WA = 108 dB P = 0.8 kW
×
89/336/EWG_93/68/EEC
□
95/54/EG:
□
90/396/EWG
X
97/68/EG: e4*97/68SH2G3*2002/68*0109^00
□
89/686/EWG
EN ISO 14982
Eschenstraße 6 - D-94405 Landau/Isar (Germany)
Info-Tel. 0180-5 120 509 • Telefax 0180-5 835 830
The product described in these instructions comes with a 2-year warranty covering defects. This 2-year warranty period begins with the passing at risk or when the customer receives the product.
For warranty claims to be accepted, the product has to receive the correct maintenance and be put to the proper use as described in the operating instructions.
Your statutory rights of warranty are naturally unaffected during these 2 years.
This warranty applies in Germany, or in the respective country of the manufacturer's main regional sales partner, as a supplement to local regulations. Please note the details for contacting the customer service center responsible for your region or the service address listed below.
NL GARANTIE
The reprinting or reproduction by any other means, in whole or in part, of documentation and papers accompanying products is permitted only with the express consent of ISC GmbH.