THERA MATT PRO - Coffee machine Create - Free user manual and instructions
Find the device manual for free THERA MATT PRO Create in PDF.
| Brand | Create |
| Model | THERA MATT PRO |
| Product type | Espresso coffee machine with integrated milk frother |
| Power supply | 220-240 V ~ 50/60 Hz (check on rating label) |
| Water tank capacity | Approximately 1.5 L (between Min and Max) |
| Milk tank capacity | Approximately 0.6 L |
| Pressure | High pressure pump (typical 15 bars) |
| Main functions | Single/double espresso, single/double cappuccino, single/double latte, milk froth only, manual brew |
| Control panel | 6 indicator lights, buttons for espresso, cappuccino, latte, cleaning |
| Included filters | 1-cup filter, 2-cup filter, ESE pod filter (44 mm) |
| Automatic shut-off | Yes, after 15 minutes of inactivity (standby mode) |
| Automatic descaling | Yes, with reminder after 500 cycles or on request |
| Cleaning | Water tank and milk tank dishwasher safe (lid by hand), frothing tube self-cleaning |
| Spare parts | Portafilter, filters, water tank, milk tank, measuring spoon |
| Repairability | Authorized service center for repairs |
| Safety | Overheat protection, automatic shut-off, hot surface, do not immerse |
| Energy consumption | Not specified (estimated 1200-1500 W) |
| Dimensions (approx.) | Not provided (estimated 30 x 25 x 35 cm) |
| Weight (approx.) | Not provided (estimated 5-7 kg) |
Frequently Asked Questions - THERA MATT PRO Create
User questions about THERA MATT PRO Create
0 question about this device. Answer the ones you know or ask your own.
Ask a new question about this device
Download the instructions for your Coffee machine in PDF format for free! Find your manual THERA MATT PRO - Create and take your electronic device back in hand. On this page are published all the documents necessary for the use of your device. THERA MATT PRO by Create.
USER MANUAL THERA MATT PRO Create
natural_image
Line drawing of a modern espresso machine with control panel and gauges (no text or symbols)Thera Matt Pro
User manual | Manual de instrucciones
CREATE CREATE CREATE ATE CREATE CREATE CRE CREATE CREATE CREATE ATE CREATE CREATE CRE CREATE CREATE CREATE ATE CREATE CREATE CRE CREATE CREATE CREATE ATE CREATE CREATE CRE CREATE CREATE CREATE ATE CREATE CREATE CRE CREATE CREATE CREATE ATE CREATE CREATE CRE CREATE CREATE CREATE ATE CREATE CREATE CRE CREATE CREATE CREATE ATE CREATE CREATE CRE CREATE CREATE CREATE ATE CREATE CREATE CRE CREATE CREATE CREATE ATE CREATE CREATE CRE CREATE CREATE CREATE ATE CREATE CREATE CRE CREATE CREATE CRE CREATE CREATE CRE ATE CREATE CREATE CRE CREATE CREATE CRE CREATE CREATE CRE CREATE CREATE CRE
CREATE CREATE CREATE ATE CREATE CREATE CRE CREATE CREATE CREATE ATE CREATE CREATE CRE CREATE CREATE CREATE ATE CREATE CREATE CRE CREATE CREATE CREATE ATE CREATE CREATE CRE CREATE CREATE CREATE ATE CREATE CREATE CRE CREATE CREATE CREATE ATE CREATE CREATE CRE CREATE CREATE CREATE ATE CREATE CREATE CRE CREATE CREATE CREATE ATE CREATE CREATE CRE CREATE CREATE CREATE ATE CREATE CREATE CRE CREATE CREATE CREATE ATE CREATE CREATE CRE CREATE CREATE CREATE ATE CREATE CREATE CRE CREATE CREATE CRE CREATE CREATE CRE ATE CREATE CREATE CRE CREATE CREATE CRE CREATE CREATE CRE
INDEX
ENGLISH
Safety warnings 6
Parts list 8
Control panel 9
Before First use 9
Select the right cup 10
Select the right coffee 10
Coffee drinks 11
Operating instructions 11
Select the function 13
Cleaning and maintenance 14
Troubleshooting 18
ESPAÑOL
Thank you for choosing our coffee machine. Before using the appliance, and to ensure the best use, carefully read these instructions.
The safety precautions enclosed herein reduce the risk of death, injury and electrical shock when correctly adhered to. Keep the manual in a safe place for future reference, along with the completed warranty card, purchase receipt and package. If applicable, pass these instructions on to the next owner of the appliance. Always follow basic safety precautions and accident-prevention measures when using an electrical appliance. We assume no liability for customer failing to comply with these requirements.
SAFETY WARNINGS
When using any electrical appliance, basic safety precautions should always be observed.
- Read all instructions and save them for future reference.
- Make sure that your outlet voltage corresponds to the voltage stated on the rating label of the coffee maker.
- To protect against fire, electric shock and injury to persons do not immerse cord, plug or unit in water or other liquid.
- Close supervision is necessary when any appliance is used by or near children.
- Unplug from outlet when not in use and before cleaning. Allow to cooling before putting on or taking off parts, and before cleaning the appliance.
- Do not operate any appliance with a damaged cord or plug or after the appliance malfunctions, or has been damaged in any manner. Return appliance to an authorized service facility for examination, repair or adjustment.
- The use of accessories not recommended by the appliance manufacturer may result in fire, electric shock or injury to persons.
- To disconnect, turn any control to the off position then remove plug from the wall outlet.
- Do not touch any hot surfaces, use handles or knobs.
- Do not use outdoors or for commercial purposes.
- Do not let the cord hang over the edge of any table or counter, or touch any hot surface.
- Use on a hard, flat level surface only, to avoid interruption of airflow underneath the appliance.
• Always be sure to place the water tank tightly back in the unit with its lid closed and fill with water on or above the minimum before turning the appliance on. - Do not remove the porta-filter while brewing coffee. Please make sure the three lights are on before you remove the porta-filter to make additional coffee. Caution should also be taken while removing the porta-filter since the metal parts will be hot. Please make sure to hold it by the handle and to use the filter retention clip to dispose the grounds. Caution should be taken when moving the unit with hot liquids.
-
Do not remove the water tank until the unit is turned off.
-
This appliance is not intended to be operated by means of an external timer or separate remote-control system.
- The appliance can be used by children aged from 8 years and above and persons with reduced physical, sensory or mental capabilities or lack of experience and knowledge if they have been given supervision or instruction concerning use of the appliance in a safe way and understand the hazards involved. Children shall not play with the appliance. Cleaning and user maintenance shall not be made by children unless they are older than 8 and supervised.
- Keep the appliance and its cord out of reach of children under 8 years old.
- Before removing any of the parts and accessories, make sure the three lights are on, press the power button to the off position “O” and unplug the appliance.
- Do not remove the porta-filter at any time during the brewing process.
- Use caution when removing the porfa-filter. The metal parts may still be very hot. Also, there may be hot water floating on the top of the filter. Hold it only by its handle and dispose of the brewed coffee ground by using the filter retention clip.
- If coffee does not drip, the filter is blocked. Turn off the appliance and allow it to cool down. The blockage may be caused by the coffee being too finely ground. See the “Problems and causes” section.
- When cleaning the frothed milk dispensing tube: Place a large cup under the tube. Fill the milk tank with water and place it back on the unit. Turn the Froth Control Knob clockwise to the clean position and then press and hold the latte /clean button for 3 seconds and release to activate the clean function. Let the unit dispense the water through the tube for approximately 30 seconds and then press the latte /clean button once to stop the process.
- Do not place on or near a hot gas or electric burner, or in a heated oven.
- Do not use the appliance for other than intended use.
- Do not leave the appliance on unattended.
- This appliance is intended to be used in household and similar applications such as: staff kitchen areas in shops, offices and other working environments; farm houses; by clients in hotels, motels and other residential type environments; and bed and breakfast type environments.
- Never submerge the appliance in water or other liquids. There is danger of electric shock.
- Pressure: In order to avoid possible burns to body parts and/or other injury from hot steam and water or damages to the unit, never remove the water tank or the porta-filter while your espresso/cappuccino maker is brewing coffee or frothing. Make sure the three lights are on before you can remove the porta-filter to make additional cups of coffee. If you need to add more water or milk to the tanks, please make sure the three lights are on and ensure to switch off the unit by pressing the red button on the side of the unit to the off position “O”.
PARTS LIST

text_image
1 2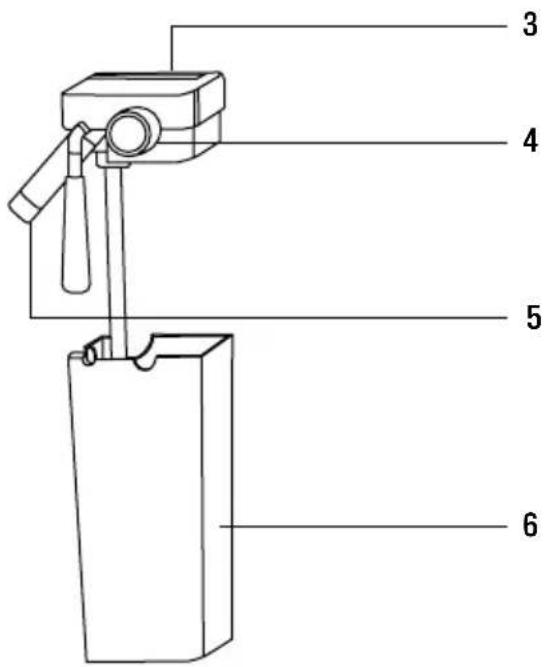
text_image
3 4 5 6
text_image
Labeled diagram of a toaster with numbered parts for identification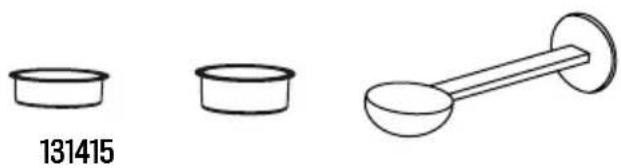
natural_image
Three simple line drawings of containers and a bulb-like object, no text or symbols present- Water tank lid
- Water tank
- Milk tank lid
- Control knob
- Steam nozzle
- Milk tank
- Top deck decoration
-
Filter holder
-
Support for small cups
- Switch
- Drip plate
- Drip tray
- 1-cup filter
- 2-cups filter
- Coffee measuring Spoon and tamper
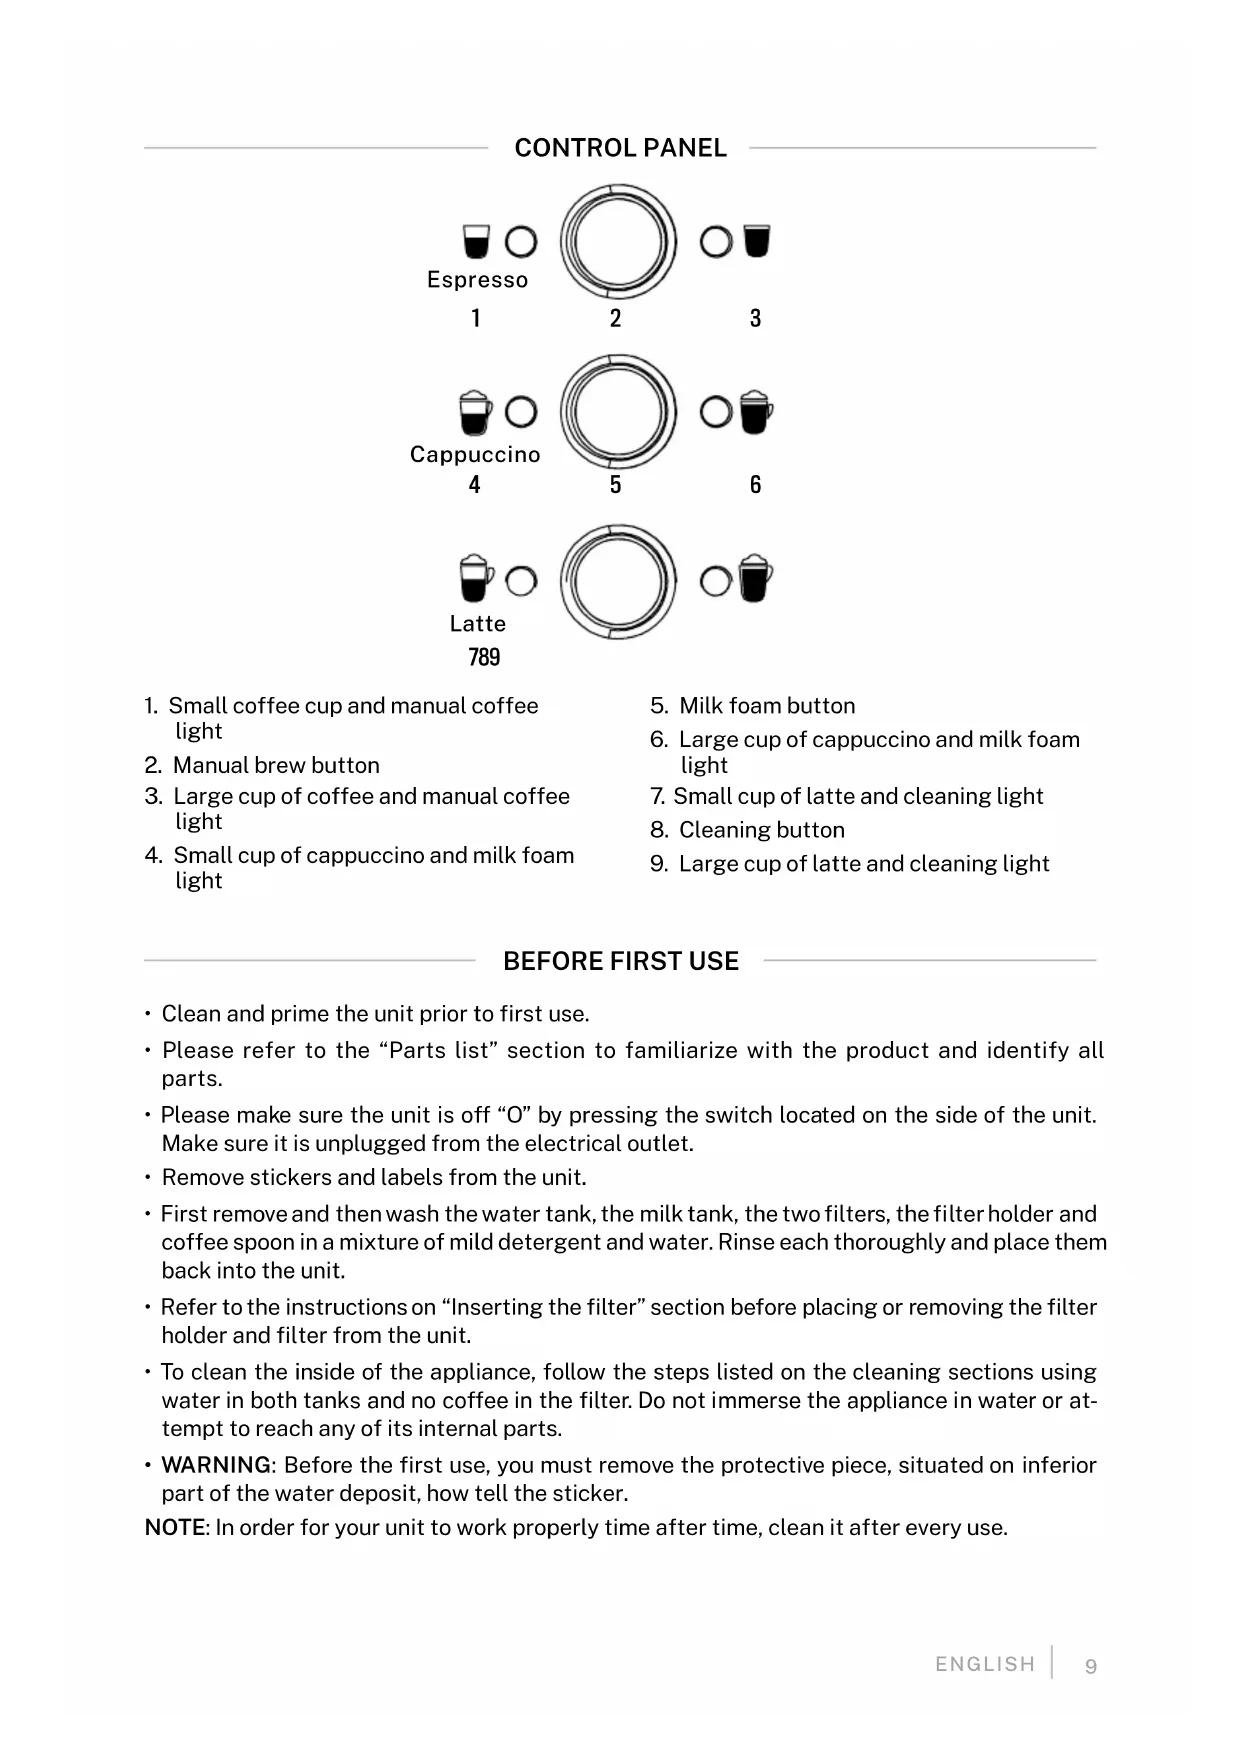
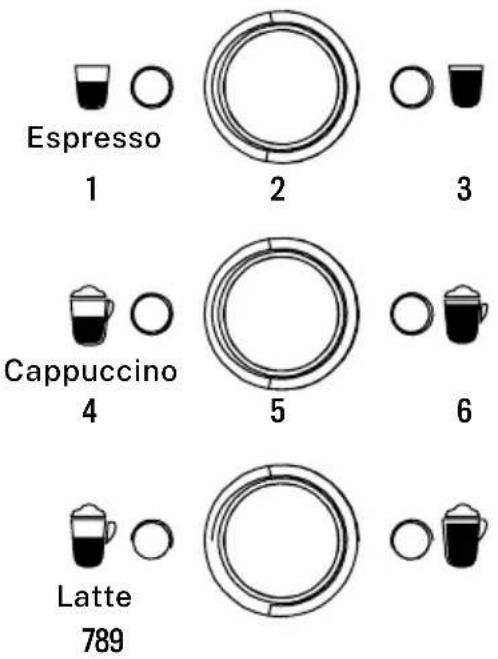
CONTROL PANEL
text_image
Espresso 1 2 3 Cappuccino 4 5 6 Latte 789- Small coffee cup and manual coffee light
- Manual brew button
- Large cup of coffee and manual coffee light
-
Small cup of cappuccino and milk foam light
-
Milk foam button
- Large cup of cappuccino and milk foam light
- Small cup of latte and cleaning light
- Cleaning button
- Large cup of latte and cleaning light
BEFORE FIRST USE
- Clean and prime the unit prior to first use.
- Please refer to the “Parts list” section to familiarize with the product and identify all parts.
- Please make sure the unit is off "O" by pressing the switch located on the side of the unit. Make sure it is unplugged from the electrical outlet.
- Remove stickers and labels from the unit.
- First remove and then wash the water tank, the milk tank, the two filters, the filter holder and coffee spoon in a mixture of mild detergent and water. Rinse each thoroughly and place them back into the unit.
- Refer to the instructions on "Inserting the filter" section before placing or removing the filter holder and filter from the unit.
• To clean the inside of the appliance, follow the steps listed on the cleaning sections using water in both tanks and no coffee in the filter. Do not immerse the appliance in water or attempt to reach any of its internal parts.
- WARNING: Before the first use, you must remove the protective piece, situated on inferior part of the water deposit, how tell the sticker.
NOTE: In order for your unit to work properly time after time, clean it after every use.
To prime the unit, run the steam cycle for 90 seconds by following the steps below:
- Fill the water tank between the MIN and MAX levels.
- Fill the milk tank with water between the MIN and MAX levels.
- Select one of the filters and place it on the filter holder. Place the filter holder in the unit ensuring it is properly locked and place a cup under it. Also, make sure the tip of the frothed milk dispensing tube is inside the cup.
- Plug the appliance into the appropriate outlet.
- Turn the switch on "I".
- The six control panel lights will start blinking. Once these lights become solid, press the cappuccino button twice.
- Once this process is completed, the six control panel lights will turn on solid.
- Now your unit has been primed and is ready to be used.
SELECT THE RIGHT CUP
Before preparing your beverage, please make sure to select the right cup size according to the following table:
| BEVERAGE TYPE RATIO | ||
| Espresso | Single | 60 ml |
| Double | 119 ml | |
| Cappuccino | Single | 178 ml |
| Double | 355 ml | |
| Latte | Single | 296 ml |
| Double | 474 ml | |
The coffee should be freshly ground and dark roasted. You may want to try a French or Italian roast ground for espresso. Pre-ground coffee will only retain its flavour for 7 – 8 days, provided it is stored in an airtight container and in a cool, dark area. Do not store in a refrigerator or freezer. Whole beans are recommended to be ground just before use. Coffee beans stored in an airtight container will keep its flavor for up to 4 weeks.
- The grind:
This is a vital step in the espresso making process if you are grinding your own coffee and takes practice. The coffee must be of a fine grind.
The correct grind should look like salt.
If the grind is too fine, the water will not flow through the coffee even under pressure. These grinds look like powder and feel like flour when rubbed between fingers.
If the grind is too coarse, the water flows through the coffee too fast, preventing a full-flavored extraction.
Be sure to use a quality grinder for uniform consistency.
COFFEE DRINKS
- Espresso:
A unique method of coffee brewing in which hot water is forced through finely ground coffee. Popular in Europe, it is a far richer and more full-bodied brew than regular drip coffee. Because of its richness, espresso is usually served in 44 to 59 ml (1.5 to 2 oz.) cups.
- Cappuccino:
A drink made with about 1/3 espresso, 1/3 steamed milk, and 1/3 frothed milk.
- Latte:
A drink made with about 1/4 espresso and 3/4 steamed milk.
OPERATING INSTRUCTIONS
- Fill the water tank:
-
Fill the water tank with water, you may either use a jar to fill it up or remove it from the unit and then fill it up under the tap. If you have removed it from the unit to fill up with water, please make sure to place it back tightly in its place. Fill the tank with the desired amount of water ensuring it ranges within the "MIN" and "MAX" markings on the tank. Never use warm or hot water to fill the water tank.
-
Close the water tank lid and place it back in the unit ensuring it fits tightly.
- Fill the milk tank:
- If you plan to prepare cappuccino or latte, remove the milk tank from the unit. Open the lid and then pour the quantity of cold milk you estimate you will need between the "MIN" and "MAX" levels.
- When done, place the milk tank back in the unit ensuring it fits tightly.
Note: You can use the type of milk of your preference, i.e. whole milk, low fat milk, organic or soy milk.
- Choose the filter:
Select the filter to be used as follows:
- For a single cup: Use the filter for a single cup of espresso if using ground coffee.
- For a double cup or two cups: Use the filter for a double cup.
NOTE: The 1-cup filter included with your unit has been designed to work also with ESE (44 mm) pods.
- Insert the filter:
- To insert the selected filter in the filter holder, make sure to align the notch on the filter with the groove inside the filter holder.
- Turn the filter to the left or right to lock in place. This will help secure the filter in the filter holder.
NOTE: To remove and clean the filter, turn filter to the left or right to align the filter notch with the groove inside the filter holder.
WARNING: Make sure the filter has cooled before attempting to remove it.

text_image
ne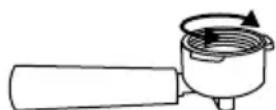
- Fill with coffee:
Place selected filter on filter holder as follows:
- Fill the filter with fresh, fine ground espresso coffee (do not overfill).
Note: The ground coffee amount can't exceed the MAX mark.
-
Tamp and compress firmly and evenly the ground coffee.
-
Clean any excess of coffee from the rim to ensure proper fit under brew head.
- Place the filter holder:
-
Place the filter holder underneath the brew head, attach the filter holder by first moving the retainer clip back.
-
Place the handle so that the handle lines up with the open lock icon on the unit and fits into the groove.
-
Then, slowly turn it to the right until the retention clip is aligned with the closed lock symbol on the unit.

natural_image
Line drawing of a coffee maker with handle and control panel (no text or symbols)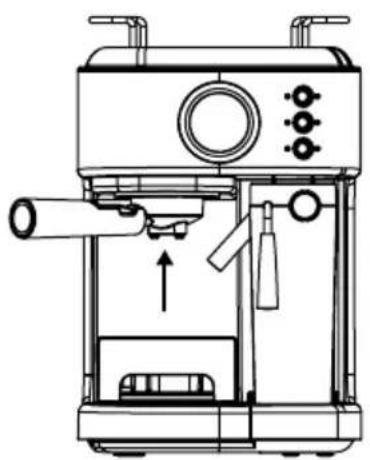
natural_image
Line drawing of a manual coffee maker with control panel and handle (no text or symbols)
natural_image
Line drawing of a kitchen appliance interior with control panel and door (no text or symbols)- Place the cup(s):
- Pull out the drip tray bracket if you are using a small cup to brew espresso.
- Keep the drip tray bracket inside its compartment if you are using a larger cup to brew cappuccino.
- Keep the drip tray bracket inside its compartment if you are using a larger cup to brew latte.

natural_image
Line drawing of a coffee maker with handle and control panel (no text or symbols)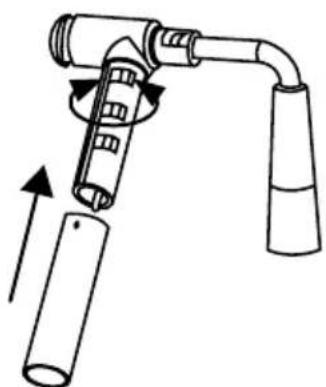
natural_image
Diagram of a hairdryer tool with a cylindrical body and lever mechanism (no text or symbols)CAUTION: When brewing cappuccino or latte, please make sure to adjust the frothing tube lever in order to position the froth milk dispensing tube inside the cup to be used, additionally, you can also adjust the length of frothed milk dispensing tube by locking it onto a different position of the frothing tube lever to adapt to different sizes of cups. And you can clean it by rotating it out, then fix it in.
- Turn the unit on:
- Make sure the unit is plugged in.
- Turn the unit on "I" position. The six control panel lights will start blinking during heating and until the water reaches the perfect temperature. Once the six lights become solid, the unit is ready to use.
Note: The frothing tube is very hot, please take care.
SELECT THE FUNCTION
- Espresso:
- Press coffee button once (☐ illuminates) to brew a single cup of coffee.
- Press coffee button twice (illuminates) to brew a double cup of coffee.
- Press and hold the coffee button for 3 seconds ( 🚙 🚙 🚙 🚙 🚙 🚙 🚙 🚙 🚙 🚙 🚙 🚙 🚙 🚙 🚙 🚙 🚙 🚙 🚙 🚙 🚙 🚙 🚙 🚙 🚙 🚙 🚙 🚙 🚙 🚙 🚙 🚙 🚙 🚙
- The unit can brew espresso according to your setting, and it can stop automatically. When light solidly, it means it has finished brewing and you can enjoy your espresso.
Warning: After the coffee machine has finished brewing, please don't take out the filter immediately, just wait for 10 seconds more or less.
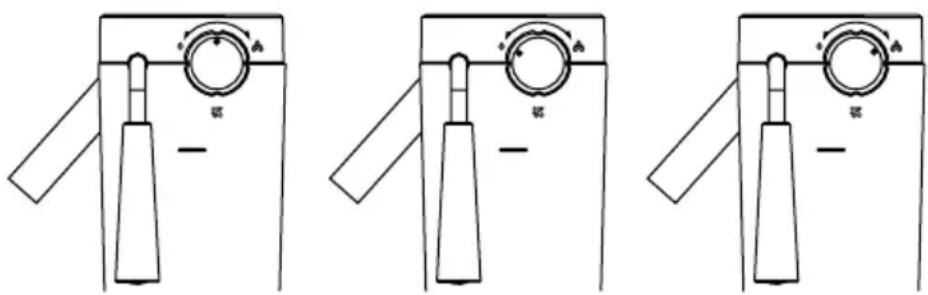
- Cappuccino:
Before brewing cappuccino, turn the froth control knob to the middle position, you can adjust the quantity of frothed milk according to your preference by turning the Froth Control Knob to the right for more froth and to the left for less froth.
Note: The froth intensity can be adjusted during the brewing cycle.
- Press the Cappuccino Button once to brew a small cup of cappuccino.
- Press the Cappuccino Button twice to brew a large cup of cappuccino.
The unit will start brewing the cappuccino according to your selection. After that, your delicious cappuccino is ready to be enjoyed.
- Latte:
Prior to preparing your latte, adjust the quantity of frothed milk according to your preference by turning the Froth Control Knob to the right for more froth and to the left for less froth.
- Press the Latte button once to brew a small cup of latte coffee.
- Press the Latte button twice to brew a large cup of latte coffee.
text_image
Diagram showing three variations of a device handle mechanism with labeled terminals and rotation indicators- Frothed milk:
The unit also allows you to prepare frothed milk only.
- Press and hold the Cappuccino Button for 3 seconds if you wish to add more foam to your beverage or to prepare frothed milk for any other beverage, e.g. macchiatto, hot chocolate, tea, etc.
- When done, press the Cappuccino Button once again to stop it.
- After preparing your beverages with milk: Once you are done preparing your beverage with milk, you can either store the unit's milk tank directly in the refrigerator (ready to be used for the next time) or dispose of the leftover milk.
- If there is no any operation within 15 minutes, the unit will enter sleep mode, you can press any button to wake up the unit.
CLEANING AND MAINTENANCE
Please read ALL of the instructions, cautions, notes and warnings included in this instruction manual carefully before you begin to use this appliance. When this unit is used, some parts and accessories get hot and need to cool down. Proper care and maintenance will ensure the long life of the Espresso, Cappuccino, and Latte coffee Maker and its trouble-free operation. Save these instructions and refer to them often for cleaning and care tips.
CORRECT USE OF GROUND COFFEE FOR ESPRESSO MAKERS
Do not use sugar roasted ground coffee or sugar roasted coffee beans as these will clog the filter and damage the appliance. If sugar roasted coffee is accidentally used, stop using the unit and bring it to the closest service center for maintenance. We recommend descaling the machine periodically to keep it in good working condition. Contact our service centres to learn about this process.
DESCALING
With the milk tank placed in position, the appliance will remind the user to perform descaling by having the six indicators quickly flashing alternately. At that time, the user shall fill the water tank with 600 ml clean water and dedicated descaler, then press Espresso and Latte buttons simultaneously and then the appliance enters into descaling condition automatically.
Then, the six indicators will slowly flash alternately, after working for about half an hour, the six indicators quickly flash alternately, and then the user shall empty the water tank and refill it with 600 ml clean water.
After that, press the Espresso and Latte buttons simultaneously again and the appliance will continue to perform descaling. The six indicators will slowly flash alternately, after working for about half an hour, the appliance will stop working and will go back to the standby condition.
NOTE:
- You can press any functional buttons to perform the corresponding function when the appliance reminds you to perform descaling. And the appliance will continue to remind you to perform descaling after finishing performing the corresponding function.
- The descaling process can be stopped at any time by pressing any button, then the appliance will continue to remind the user to perform descaling. And the appliance will enter into normal standby mode only after finishing the whole descaling process.
CLEANING THE MILK TANK AND FROTHING TUBE
Even though you can store the milk tank with leftover milk in the refrigerator, it is important to clean the tank and frothing tube regularly to avoid clogging and building residues. In order to clean the milk tank, please follow the instructions listed below:
- Remove the milk tank from the unit.
- Remove the lid of the tank.
- The steam tube connector can be detached by rotating it. You can clean it by tap water. After cleaning, please fix it into the milk tank lid by rotating it again.
- When cleaning the milk tank, you can open the silicon sheet (don't pull it out), wash it by tap water. After cleaning, place back the silicon sheet.
-
Pour any milk left and rinse and wash the milk tank and its lid thoroughly with warm soapy water. Rinse and dry well. Do not use abrasive cleaners and scouring pads, as they will scratch the finish. The milk tank is also dishwasher safe (top rack). Do not place the lid of the milk tank on the dishwasher.
-
Place a large empty cup under the frothing tube.
-
Turn the Froth Control Knob clockwise to the clean position then press and hold the latte/clean button for 3 seconds and
natural_image
Line drawing of a medical device with arrows indicating movement or force (no text or symbols)release to activate the clean function. The unit will start releasing steam through the frothing tube, let it run for a few seconds until you don't see any milk in the cup. When done, press the latte/clean button once to stop the process.
- Dispose any water left on the milk tank and place it back in the unit.
Note: For disassembling the milk tank, you should raise it up a little, then pull it out.
CLEANING THE BREW HEAD, THE PORTA-FILTER AND FILTER
- Switch the power button on the side of the unit to the off position "O" and unplug the power cord from the electrical outlet.
- Some of the metal parts might still be hot. Do not touch them with your hands until they have cooled.
- Remove the porta-filter and discard the coffee grounds or used pod. Wash both the porta-filter and filter with warm soapy water and rinse them well. Do not wash the porta-filter and filters in the dishwasher.
- Wipe the lower part of the brew head in the unit with a damp cloth or paper towel to remove any coffee grounds that might have been left.
- Place the porta-filter (without any filter) back in the brew head in the unit.
- Place an empty large cup under the porta-filter.
- Press the espresso button once and let the unit brew with water only until it stops automatically.
CLEANING THE WATER TANK
Discard the remaining water by removing the tank and turning it upside down over the sink. It is recommended to empty the water tank between uses. Wash the water tank with soapy water, rinse it well and wipe it dry. The water tank is also dishwasher safe.
CLEANING THE UNIT
- Wipe the housing with a soft wet cloth. Do not use abrasive cleaners or scouring pads, as they will scratch the finish.
- Do not store the porta-filter in the brew head. This can adversely affect the seal between the brew head and the porta-filter while brewing espresso.
- Caution: Do not immerse the appliance in water.
DESCALING THE UNIT
Mineral deposits built-up in the unit will affect the operation of the appliance. Your appliance must be descaled when you begin to notice an increase in the time required to brew espresso, or when there is excessive steaming. Also, you may notice a build-up of white deposits on the surface of the brew head.
The frequency of cleaning depends on the hardness of the water used. If you are using soft water (filtered water), the cleaning frequency should be every 80 brew cycles; if you are using hard water (tap water), the cleaning frequency should be every 40 brew cycles.
- Descale the water tank:
- Fill the tank with fresh, undiluted white household vinegar.
- Allow appliance to sit overnight with the vinegar solution in the water tank.
- Discard vinegar by removing the tank and turning it upside down over the sink.
- Rinse the water tank thoroughly with tap water by filling the tank half full with water and then pouring the water back out into the sink, repeating this step twice.
- Descale internal parts:
- Make sure you descale the inside of the water tank first by following the “Descaling” steps above.
- Make sure to switch the power button to the "O" position and the power cord is disconnected from the electrical outlet. Fill the tank with white vinegar above the minimum level.
- Insert the porta-filter (with filter and no coffee) and place a jar or regular cup on top of the drip tray and under the porta-filter.
-
Plug the power cord into the electrical outlet.
-
Press the power button to switch the unit on "I". Once the six control panel lights turn solid blue, press the Espresso Button twice. The vinegar will start flowing through the unit and it will stop automatically.
-
Place a jar or large cup (with at least 325ml/11-ounce capacity) under the tube. Fill the milk tank with water and place it back on the unit. Turn the Froth control knob clockwise to the clean position, then press and hold latte button for 3 seconds to activate the clean function. Let the unit dispense the water through the tube for approximately 30 seconds and then press double latte button once to stop the process.
-
Repeat Steps 1 to 6 as necessary using only tap water to rinse any remaining traces of vinegar out of the machine.
- Manual descaling mode:
After the unit has been working for 500 cycles, it will enter descaling alarming. Cappuccino and latte indicator blink in turn. If you don't descale in time, waterway system may block.
Note: If you want to descale before 500 cycles, you can descale manually as following steps:
- Ensure the power switch is at the position of "O", and the power cord is unplugged. Fill 400 ml white vinegar and 600 ml water into the water tank. Assemble the milk tank into the unit, turn frothing control knob clockwise to clean position.
- Press the power switch to "I" position, cappuccino and latte indicators blink in turn. Press Espresso button and Latte button at the same time, the unit will enter descaling mode automatically. The 6 indicator lights blink by turning a circle clockwise, the frothed milk dispensing tube will flow out hot water and steam. After 10 minutes, the unit will enter standby mode and the 6 indicator lights will illuminate.
- Discard the residual descaling solution, and clean the water tank, fill appropriate amount of pure water, brew two cups of Espresso continuously and then brew two cups of Latte continuously. The cleaning will be finished and the 6 indicator lights will illuminate. The unit will recover to the standby mode and after the unit has been working for 500 cycles again, the unit will remind descaling again.
Note: Under descaling reminding status, you still can operate the unit normally, and after operation, it will return to descaling reminding status.
| PROBLEM CAUSE SOLUTION | ||
| Coffee does not come out. | No water in tank.Coffee grind is too fine.Too much coffee in the filter.Appliance was not turned on or plugged in.Coffee has been tamped/ compressed too much. | Add waterGrind medium ground coffee.Fill filter with less coffee.Plug unit into electrical outlet and turn it on.Refill filter basket with coffee, do not tamp too much. |
| Coffee comes out around the edge of the porta-filter. | Porta-filter not rotated to full lock position.Coffee grounds around the filter basket rim.Too much coffee in the filter. | Rotate filter holder to full lock position.Wipe off rim.Fill with less coffee. |
| Milk is not foamy after frothing or it is not coming out of the frothing tube. | It ran out of steam.Milk is not cold enough.Frothing tube is blocked. | Ensure there is enough water in the tank.Chill milk and frothing tank prior to making cappuccino.Follow the instructions to clean the milk tank and frothing tube. |
| Coffee comes out too quickly. | Ground coffee is too coarse.Not enough coffee in filter. | Use a finer grind.Use more coffee. |
| Coffee is too weak. | You are using the small filter for double espresso.Ground coffee is too coarse. | Use large filter for double espresso.Use a finer grind. |
| The three control panel lights are flashing alternatively. | Water tank is out of water. Add water to tank. | |
In compliance with Directives: 2012/19/EU and 2015/863/EU on the restriction of the use of dangerous substances in electric and electronic equipment as well as their waste disposal. The symbol with the crossed dustbin shown on the package indicates that the product at the end of its service life shall be collected as separate waste. Therefore, any products that have reached the end of their useful life must be given to waste disposal centres specialising in separate collection of waste electrical and electronic equipment, or given back to the retailer at the time of purchasing new similar equipment, on a one for one basis. The adequate separate collection for the subsequent start-up of the equipment sent to be recycled, treated and disposed of in an environmentally compatible way contributes to preventing possible negative effects on the environment and health and optimises the recycling and reuse of components making up the apparatus. Abusive disposal of the product by the user involves application of the administrative sanctions according to the laws.
text_image
Labeled diagram of a toaster with numbered parts for identification
natural_image
Three simple line drawings of containers and a bulb-like object, no text or symbols presentnatural_image
Diagram showing two mechanical components with arrows indicating motion or rotation, no text or symbols presentnatural_image
Line drawing of a microwave oven with handle and control panel (no text or symbols)
natural_image
Line drawing of a manual coffee maker with control panel and lever mechanism (no text or labels)
natural_image
Line drawing of a toaster oven with control panel and door handle (no text or symbols)natural_image
Line drawing of a coffee maker with handle and control panel (no text or symbols)
natural_image
Diagram of a hairdryer tool with a cylindrical body and lever mechanism (no text or symbols)text_image
Diagram showing three variations of a kitchen sink with labeled valves and rotating controls, likely illustrating a manual valve mechanism.natural_image
Line drawing of a medical device with arrows indicating movement or force (no text or symbols)text_image
Labeled diagram of a toaster with numbered parts for identification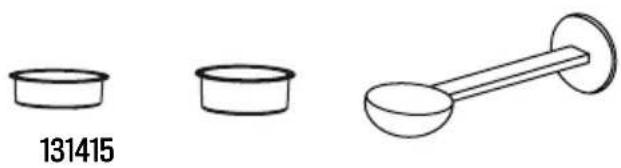
natural_image
Three simple line drawings: three cylindrical containers and one dumbbell-shaped object (no text or symbols)natural_image
Diagram showing two steps of a mechanical press or press device with arrows indicating motion (no text or symbols present)natural_image
Line drawing of a modern coffee maker with a hand mixer and control panel (no text or symbols)
natural_image
Line drawing of a coffee maker with handle and control panel (no text or symbols)
natural_image
Line drawing of a microwave oven with control panel and door (no text or symbols)natural_image
Line drawing of a coffee maker with handle and side panel, showing internal components without any text or symbols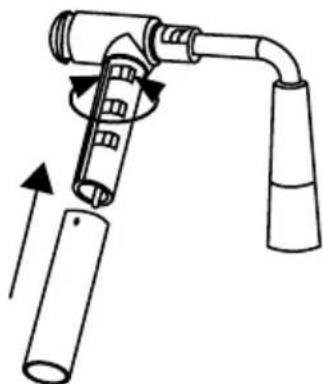
natural_image
Diagram of a mechanical device with rotating components and directional arrows (no text or symbols)natural_image
Line drawing of a medical device with arrows indicating movement or force (no text or symbols)text_image
Technical diagram of a device with six labeled parts, showing internal structure and assembly steps.natural_image
Simple line drawing of a mechanical component with a handle and cylindrical housing (no text or symbols)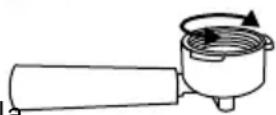
natural_image
Line drawing of a microwave oven with handle and control panel (no text or symbols)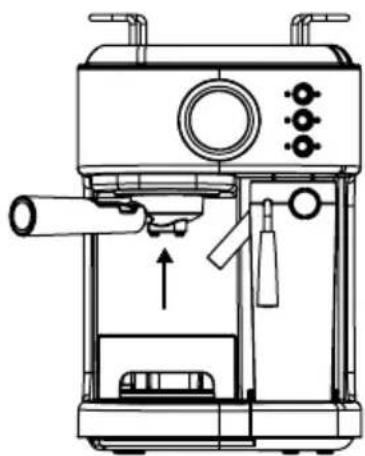
natural_image
Line drawing of a coffee maker with handle and control panel (no text or symbols)
natural_image
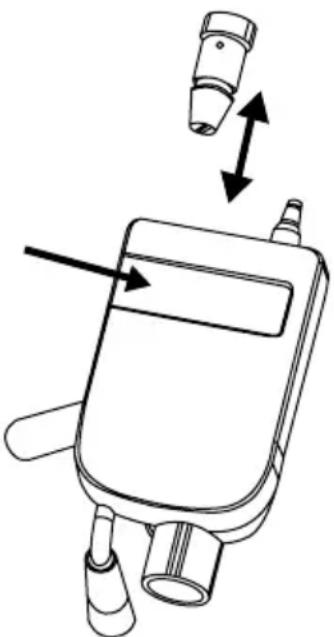
Line drawing of a coffee maker with control panel and side arm (no text or symbols)- Placez la (les) tasse (s):
natural_image
Line drawing of a coffee maker with handle and control panel (no text or symbols)
natural_image
Diagram of a hairdryer tool with a cylindrical body and lever mechanism (no text or symbols)text_image
Diagram showing three variations of a kitchen sink with labeled controls and directional arrows indicating rotation or movement.- Lait moussé:
natural_image
Line drawing of a medical device with arrows indicating movement or force (no text or symbols)text_image
Technical diagram of a device with six labeled parts, showing internal structure and assembly steps.natural_image
Line drawing of a coffee maker with handle, spout, and control panel (no text or labels)
natural_image
Line drawing of a manual coffee maker with control panel and handle (no text or symbols)
natural_image
Line drawing of a microwave oven with control panel and air vent (no text or symbols)natural_image
Line drawing of a coffee maker with handle and side panel, showing internal components without any text or symbols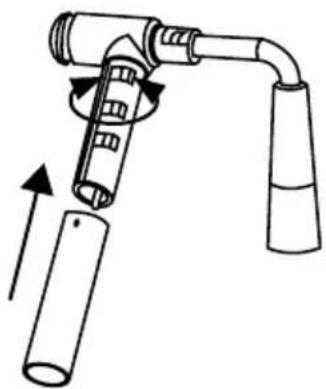
natural_image
Diagram of a mechanical device with rotating shaft and housing, showing directional arrows (no text or symbols)text_image
Diagram showing three identical hand positions with labeled circular components and directional arrows, likely illustrating a mechanical or electrical setup.natural_image
Line drawing of a medical device with arrows indicating movement or force (no text or symbols)text_image
Technical diagram of a device with six labeled parts, showing internal components and assembly lines.text_image
Labeled diagram of a 12-inch taner with numbered parts for identification
natural_image
Three simple line drawings of containers and a dumbbell (no text or symbols)text_image
Diagram showing a cooking step with a lid and a side view of a pan, illustrating the process of adding or removing a lid.natural_image
Line drawing of a coffee maker with handle and control panel (no text or symbols)
natural_image
Line drawing of a manual coffee maker with control panel and handle (no text or symbols)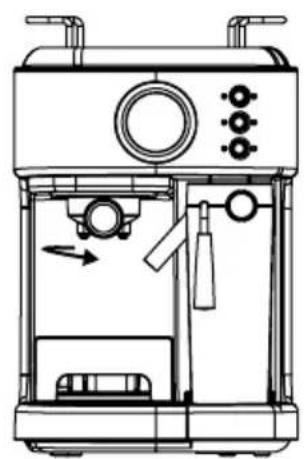
natural_image
Line drawing of a microwave oven with control panel and door handle (no text or symbols)natural_image
Line drawing of a coffee maker with handle and side panel, showing internal components without any text or symbols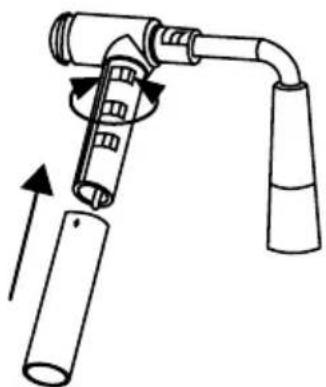
natural_image
Diagram of a hairdryer tool with a curved handle and two cylindrical parts, showing motion arrows (no text or symbols)text_image
Diagram showing three identical hand-punch tool configurations with labeled 'α' and directional arrows indicating rotation or movement.- Schaummilch:
natural_image
Line drawing of a medical device with arrows indicating movement or force (no text or symbols)VEILIGHEIDSWAARSCHUWINGEN
text_image
Technical diagram of a device with six labeled parts, showing internal components and assembly lines.- Watertank dop
- Watertank
- Melk tank dop
- Bedieningsknop
- Stoommondstuk
- Melk tank
- Bovendek decoratie

text_image
7 8 9 10 11 12 131415natural_image
Diagram showing two mechanical components with arrows indicating motion or rotation, no text or symbols presentnatural_image
Line drawing of a microwave oven with control panel and side arm (no text or symbols)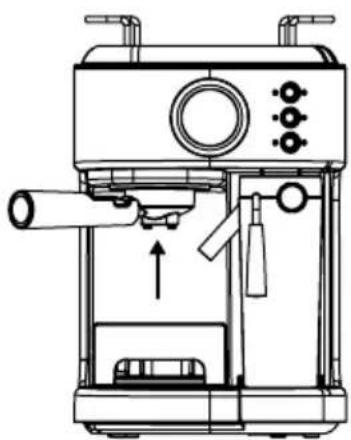
natural_image
Line drawing of a manual coffee maker with control panel and spool (no text or symbols)
natural_image
Technical line drawing of a microwave oven with control panel and door (no text or labels)natural_image
Line drawing of a coffee maker with handle and control panel (no text or symbols)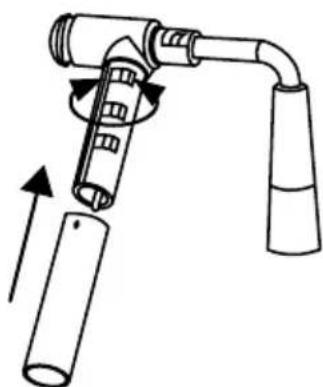
natural_image
Diagram of a hairdryer tool with a cylindrical body and lever mechanism (no text or symbols)text_image
Diagram showing three variations of a device with labeled ports and directional arrows indicating rotation or movement.- Melkschuim:
natural_image
Line drawing of a medical device with arrows indicating movement or force (no text or symbols)VOORBEREIDINGSKOP, FILTERHOUDER EN FILTER REINIGEN
HET APPARAAT SCHOONMAKEN
text_image
Labeled diagram of a toaster with numbered parts for identification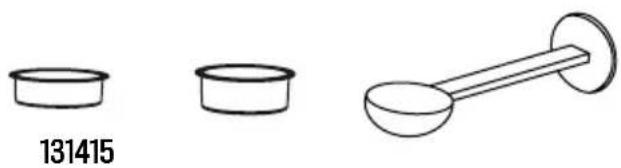
natural_image
Three simple line drawings of containers and a dumbbell (no text or symbols)natural_image
Diagram showing two mechanical components with arrows indicating motion or rotation, no text or symbols presentnatural_image
Line drawing of a microwave oven with handle and control panel (no text or symbols)
natural_image
Line drawing of a coffee maker with handle and control panel (no text or symbols)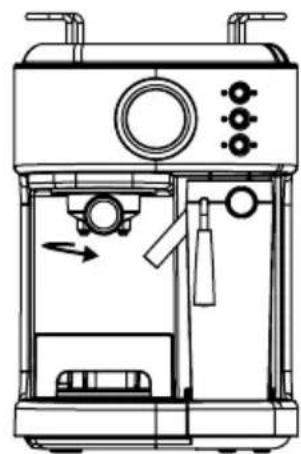
natural_image
Line drawing of a coffee maker with control panel and side arm (no text or symbols)natural_image
Line drawing of a coffee maker with handle and side panel, showing internal components without any text or symbols
natural_image
Diagram of a hairdryer tool with a cylindrical component and lever mechanism (no text or symbols)text_image
Diagram showing three identical hand positions with labeled 'A' and 'B' indicators, likely illustrating a mechanical or electrical setup.- Pianka mleczna: