FXMH126 - Hedge trimmers Fuxtec - Free user manual and instructions
Find the device manual for free FXMH126 Fuxtec in PDF.
| Brand | Fuxtec |
| Model | FXMH126 |
| Product type | Gasoline hedge trimmer |
| Engine | 2-stroke, air-cooled, 25 cm³ displacement |
| Maximum power | 0.7 kW at 7500 rpm |
| Fuel supply | Gasoline/oil mixture 40:1, unleaded SP98 |
| Fuel tank capacity | 300 ml |
| Fuel consumption | 0.47 kg/h |
| Cutting length | 550 mm |
| Maximum cutting thickness | 28 mm |
| Blade speed | 2050 min⁻¹ |
| Idle speed | 2700~3400 min⁻¹ |
| Net weight | 6.0 kg |
| Spark plug | L8RTF/NHSP (gap 0.6-0.7 mm) |
| Guaranteed sound power level | 105 dB(A) |
| Vibrations (front/rear handle) | 2.92 / 3.37 m/s² (K=1.5) |
| Adjustable handle | Yes, tilt 90° to each side |
| Safety | Throttle lock, anti-unintentional start device |
| Maintenance | Air filter cleaning, gearbox greasing every 25 h, blade sharpening |
| Warranty | 24 months (wear parts excluded) |
| Spare parts | Spark plug, blade, air filter, fuel filter |
Frequently Asked Questions - FXMH126 Fuxtec
User questions about FXMH126 Fuxtec
0 question about this device. Answer the ones you know or ask your own.
Ask a new question about this device
Download the instructions for your Hedge trimmers in PDF format for free! Find your manual FXMH126 - Fuxtec and take your electronic device back in hand. On this page are published all the documents necessary for the use of your device. FXMH126 by Fuxtec.
USER MANUAL FXMH126 Fuxtec
- Technical Data 33
- Symbols and safety instructions on the device 34
- Component overview 36
- Intended use / not intended use 37
- Safety instructions for handling and maintaining the device 39
-
Starting/stopping the device 43
-
Refuelling the device 45
- Maintenance and cleaning 47
- Storage of the device 50
- Troubleshooting 51
- Customer service 52
- Warranty 52
- Disposal instructions 52
- EU Declaration of Conformity 53
VERSION FRANÇAISE 54
15.3-22.4N.m. (150-220kgf-cm)
Zündkerzenmodell
L6
Your new device has been developed and designed to meet FUXTEC's high standards, such as easy operation and user safety. Properly treated, this equipment will serve you well for years to come.

WARNING: To reduce the risk of injury, the user must read and understand this manual before operating the equipment.
FUXTEC GMBH
KAPPSTRÄBE 69, 71083 HERRENBERG-GÜLTSTEIN, GERMANY
We are constantly striving to improve our products. Therefore technical data and illustrations can change!
15. Technical Data
| Description | Petrol hedge trimmer |
| Type | FX-MH126 |
| Engine | Air cooled; 2-stroke |
| Displacement | 25cm³ |
| Maximum output power (kW) (in accordance with ISO 8893) | 0.7kW / 7.500min-1 |
| Sound pressure level LPA at the operator position according to EN ISO 10517 | 90.9 dB (A) (K=3dB) |
| Sound power level measured LWA according to ISO 10517 | 103.2 dB(A) (K=3dB) |
| Guaranteed sound power level LWA (2000/14/EC) | 105dB(A) |
| Dry weight (without fuel) | 6.0kg |
| Fuel tank capacity (L) | 300ml |
| Fuel consumption (kg/h) (in accordance with ISO 8893) | 0.47kg/h |
| Cutting length | 550mm |
| Max. Cutting thickness | 28mm |
| Petrol/oil mixture | 40:1 |
| Knife speed | 2050 min-1 |
| Idle speed | 2700~3400 min-1 |
| Max. engine speed | 10500 min-1 |
| Spark plug | L8RTF/NHSP |
| Hand-arm vibration according to EN ISO 10517 | |
| - Front handle | 2.92m/s2 |
| - Rear handle | 3.37 m/s2 |
| K=1.5 m/s2 |
16. Symbols and safety instructions on the device
| Warnings on the petrol hedge trimmer | |
| WARNING IMPROPER USE MAY LEAD TO SERIOUS INJURY | |
| READ AND UNDERSTAND THIS MANUAL BEFORE USE. | |
| ALWAYS WEAR EYE AND EAR PROTECTION | |
| Wear FOOT PROTECTION. | |
| Wear PROTECTIVE CLOTHING WHILE WORKING | |
| Wear GLOVES (Sharp edges!) . | |
| WARNING FLAMMABLE MATERIALS | |
| CAUTION: CONTAMINANTS, DO NOT INHALE | |
| DEVICE MUST NOT BE USED IN THE RAIN | |
| THE GUARANTEED NOISE LEVEL COMPLIES WITH THE LEGAL NOISE GUIDELINES | |
| WARNING: DANGER OF HOT COMPONENTS | |
| WARNING: HIGHLY FLAMMABLE | |
| HANDLE CAN BE ADJUSTED BY 90° IN EACH DIRECTION |
SAFETY FIRST
This manual contains warnings that are marked with symbols. These refer to particularly critical danger points. To avoid serious injuries, the corresponding safety instructions must be read carefully and followed.
WARNING!
This symbol indicates instructions that must be followed to prevent accidents that could result in serious injury or death.
IMPORTANT
This symbol indicates instructions that must be followed to avoid errors, breakdowns or damage to the equipment.
NOTE
This symbol indicates tips and remarks that may be useful for using the equipment.
17. Component overview

- Front handle
- Pull cord starter
- Start/stop switch
- Throttle lock
- Rear handle
- Throttle lever
- Unlocking handle
-
Tank
-
Air filter
- Choke lever
- Primer pump
- Spark plug
- Exhaust
- Hand protection
- Cutting blade
- Blade protection
18. Intended use / not intended use
The petrol-powered hedge trimmer is exclusively intended for cutting hedges or bushes. The maximum branch diameter of the hedge must not exceed 28mm.
Proper use also includes reading and adhering to the operating instructions before each use. Before and during use, the hedge trimmer must be checked for mechanical damage. If repairs are necessary, please contact us.
Only spare parts approved by the manufacturer or original spare parts may be used. The hedge trimmer may only be operated in open garden areas.
If non-approved or non-original spare parts are used, the operator and not the manufacturer is liable for any damage to property or persons.
Any use other than that mentioned above is an improper use.
Other risks
Even when the tool is used properly, there is always a certain amount of residual risk that cannot be excluded. The following potential hazards can be identified from the type and design of the tool:
- Contact with the unprotected shear blade (cutting injuries).
- Reaching into the operating hedge trimmer (cutting injuries).
- Unforeseen, sudden movement of the clippings (cutting injuries).
- Throwing away defective shearing teeth.
- Centrifuging of parts of the material to be cut.
- Damage to hearing if prescribed hearing protection is not worn.
- Inhalation of cutting material particles, exhaust gases from the combustion engine.
- Contact of petrol on the skin.
- Burns from touching hot surfaces.
Warning: The actual existing vibration emission value during the use of the device may differ from the value specified in the instruction manual or by the manufacturer. This can be caused by the following influencing factors, which should be observed before or during use:
- Is the device being used correctly?
- Is the cutting method of the material or how it is processed correct?
- Is the condition of the device correct when used?
- Is the cutting tool sharp or is it the correct cutting tool?
- Are the handles firmly mounted on the device body?
If you experience an unpleasant feeling or discoloration of the skin on your hands throughout the use of the device, stop working immediately. Take sufficient breaks from work. Failure to take sufficient breaks can lead to hand-arm vibration syndrome (white finger disease).
An estimation of the degree of strain depending on the work or use of the device should be made and appropriate breaks in work should be taken. In this way, the degree of stress can be significantly reduced throughout the working time. Minimize your risk of being exposed to vibrations. Maintain this device according to the instructions in the operating manual.
Avoid using the device at temperatures of 10^ or less. Make a work plan that limits the vibration exposure.
A certain amount of noise from this equipment cannot be avoided. Do noisy work at approved and designated times. If necessary, observe rest periods and limit the duration of work to the absolute minimum. For your personal protection and the protection of persons in the vicinity, wear suitable hearing protection. National regulations may restrict the use of this equipment.
19. Safety instructions for handling and maintaining the device
BEFORE USE
a. Read this manual carefully until you are thoroughly familiar with it; always follow all safety and operating instructions.
b. Always follow the safety instructions. The hedge trimmer may only be used to trim hedges or small bushes. Cutting other materials is prohibited.
c. Do not operate the equipment when under the influence of alcohol, when you are tired or sleepy, when drowsiness is a side effect of medication, or when it may otherwise impair your judgment or ability to operate the equipment properly and safely.
d. Never run the engine in enclosed spaces or buildings. The exhaust gases contain dangerous carbon monoxide.
e. Never operate the equipment under the following conditions:
- on slippery ground, or when there is no firm grip
- at night, in dense fog and when the field of vision may be restricted and a clear overview of the working area is lacking.
- during heavy rainfall, thunderstorms, storms and in all weather conditions that could endanger the safe use of the equipment.
f. When using the device for the first time, it is imperative that experienced specialists instruct in its operation.
g. Sufficient time for breaks must be provided when determining the work schedule. The equipment should be operated for a maximum of 30 - 40 minutes at a time; after that, a break of 10 - 20 minutes should be provided before continuing work. The total duration of work should not exceed 2 hours in one day.
h. Keep the manual handy for quick reference in case of questions.
i. This equipment may only be sold, loaned or otherwise transferred together with the manual.
j. Children and other persons who cannot fully understand the instructions in this manual should not be permitted to use this equipment.
HANDLING OF FUEL
a. The Engine of the equipment runs on a fuel mixture containing highly flammable petrol. Fuel canisters must not be stored in locations with hot water storage tanks, near cookers, open fires, electrical or welding sparks, or near other heat sources or fire sources that could ignite the fuel. Filling the fuel tank in these places is also prohibited.
b. Do not smoke when working with the equipment or when filling the fuel tank.
c. Switch off the Engine and let it cool down before filling the fuel tank. Before refuelling, ensure that there are no sparks or naked flames nearby.
d. When refuelling, wipe off any spilled fuel thoroughly with a dry cloth.
e. After refuelling, tighten the fuel filler cap and move the equipment about 3m from the refuelling location before starting the Engine.
TRANSPORT
a. During transport, it is imperative that the enclosed protective cover or other suitable protective coverings be used.
b. When transporting the equipment in vehicles, make sure that it cannot tip over during transport.
c. If the ddevice is transported over long distances or in vehicles, the fuel tank must be emptied beforehand to prevent fuel spillage during transport.
WORKING CONDITIONS
a. Wear suitable clothing and protective equipment when working with this equipment:
(1) Protective helmet (You must wear a helmet when working on sloping ground).
(2) Safety goggles or face protection
(3) Tight protective gloves
(4) Non-slip work shoes
(5) Hearing protection (especially for long-term work)
b. The following must also be carried:
(1) Combi-tool
(2) Fuel for refilling
(3) Spare cutting blade (if available)
(4) Ropes, warning signs, etc. For marking the working area
(5) Whistle (for communication with employees and for emergencies)
(6) Axe or saw (to remove obstacles)
c. Do not wear loose clothing, jewellery or short trousers and do not work in sandals or barefoot.
BEFORE STARTING THE ENGINE
a. Check equipment for loose fastenings and leaking fuel. Check cutting tools for proper mounting and tightness. In particular, the cutting edge and its connecting part must be checked carefully.
b. The cutting edge can only be used if it is ensured that there are no cracks or bends in the cutting edge. Damaged cutting edges must not be used under any circumstances.
c. Only use sharp cutting edges.
d. To avoid chipping of the cutting edges, grind the corners of the blade round.
e. After mounting the cutting edge and tightening the screw, check that it is properly fastened. The blade is not permitted to have any play to avoid excessive vibration throughout operation.
BEFORE USE
a. Before starting work, check the working area to avoid injury from obstacles such as tree stumps, stones, tin cans or broken glass. Remove all obstacles before starting work. (Terrain conditions, characteristics of the area, position of the obstacles, danger of the surroundings)
b. When working with the equipment, a radius of 15 m is considered a danger zone which must not be entered by anyone. If necessary, this danger area must be marked with yellow warning tape or with warning signs. If two or more persons are working at the same time, always ensure an adequate safety distance.
c. Start the Engine according to the instructions in the manual and make sure that the cutters do not move when the Engine is idling.
DURING USE
a. Grip the handles firmly with both hands. When stopping work, first reset the throttle to "start speed", then release the device.
b. When working, always ensure that the device is firmly balanced.
c. Always keep the Engine speed at the level required for cutting and never increase it unnecessarily.
d. If you want to remove branches that have wrapped around the cutting edge, or if you want to check the device or cutting edge, the Engine must first be stopped. Wait until the cutting is completely stopped before carrying out such operations.
e. If the cutting edge has collided with hard objects such as stone, stop the Engine immediately and then check the cutting edge. If the cutting edge is damaged, it must be replaced immediately.
f. If work is interrupted by third parties, always switch off the Engine before turning.
g. To avoid electric shock, it is forbidden to touch the spark plug and cable when the Engine is running.
h. Never touch the muffler, spark plug or other metal parts of the Engine while the Engine is running or immediately after switching off the Engine. Doing so may cause severe burns or electric shock.
i. If two or more persons are working at the same time, always maintain a sufficient safety distance.
NOTES ON KICKBACK
Kickback of the device means that the device shakes heavily when the fast-moving cutting edges collide with hard objects such as stone, concrete, wooden piles, etc. This unexpected kickback can prevent the operator from operating the device properly. To avoid this kickback, the following notes on kickback must be observed.
- Avoid colliding with hard objects, such as a pole, steel cable, rocks. This can prevent damage to the cutting equipment.
- Please grip the handles firmly with both hands.
- During use, the eyes must focus on the cutting, otherwise the throttle lever must be reset to "start speed".
- Hold the equipment far enough away from your feet.
MAINTENANCE INSTRUCTIONS
- To ensure proper operation, the equipment must be regularly maintained and checked according to the instructions in this manual. If it is necessary to replace any part or perform any maintenance or repair work not described in this manual, contact your service representative.
- Under no circumstances should the equipment be disassembled or modified in any way. This could cause damage or operating errors.
-
Always switch off the Engine before any maintenance or inspection.
-
Always wear sturdy gloves when assembling/disassembling and sharpening the cutting edge to prevent hand injuries.
20. Starting/stopping the device
STARTING THE ENGINE
WARNING!
The cutting blade starts to move when the Engine is started.
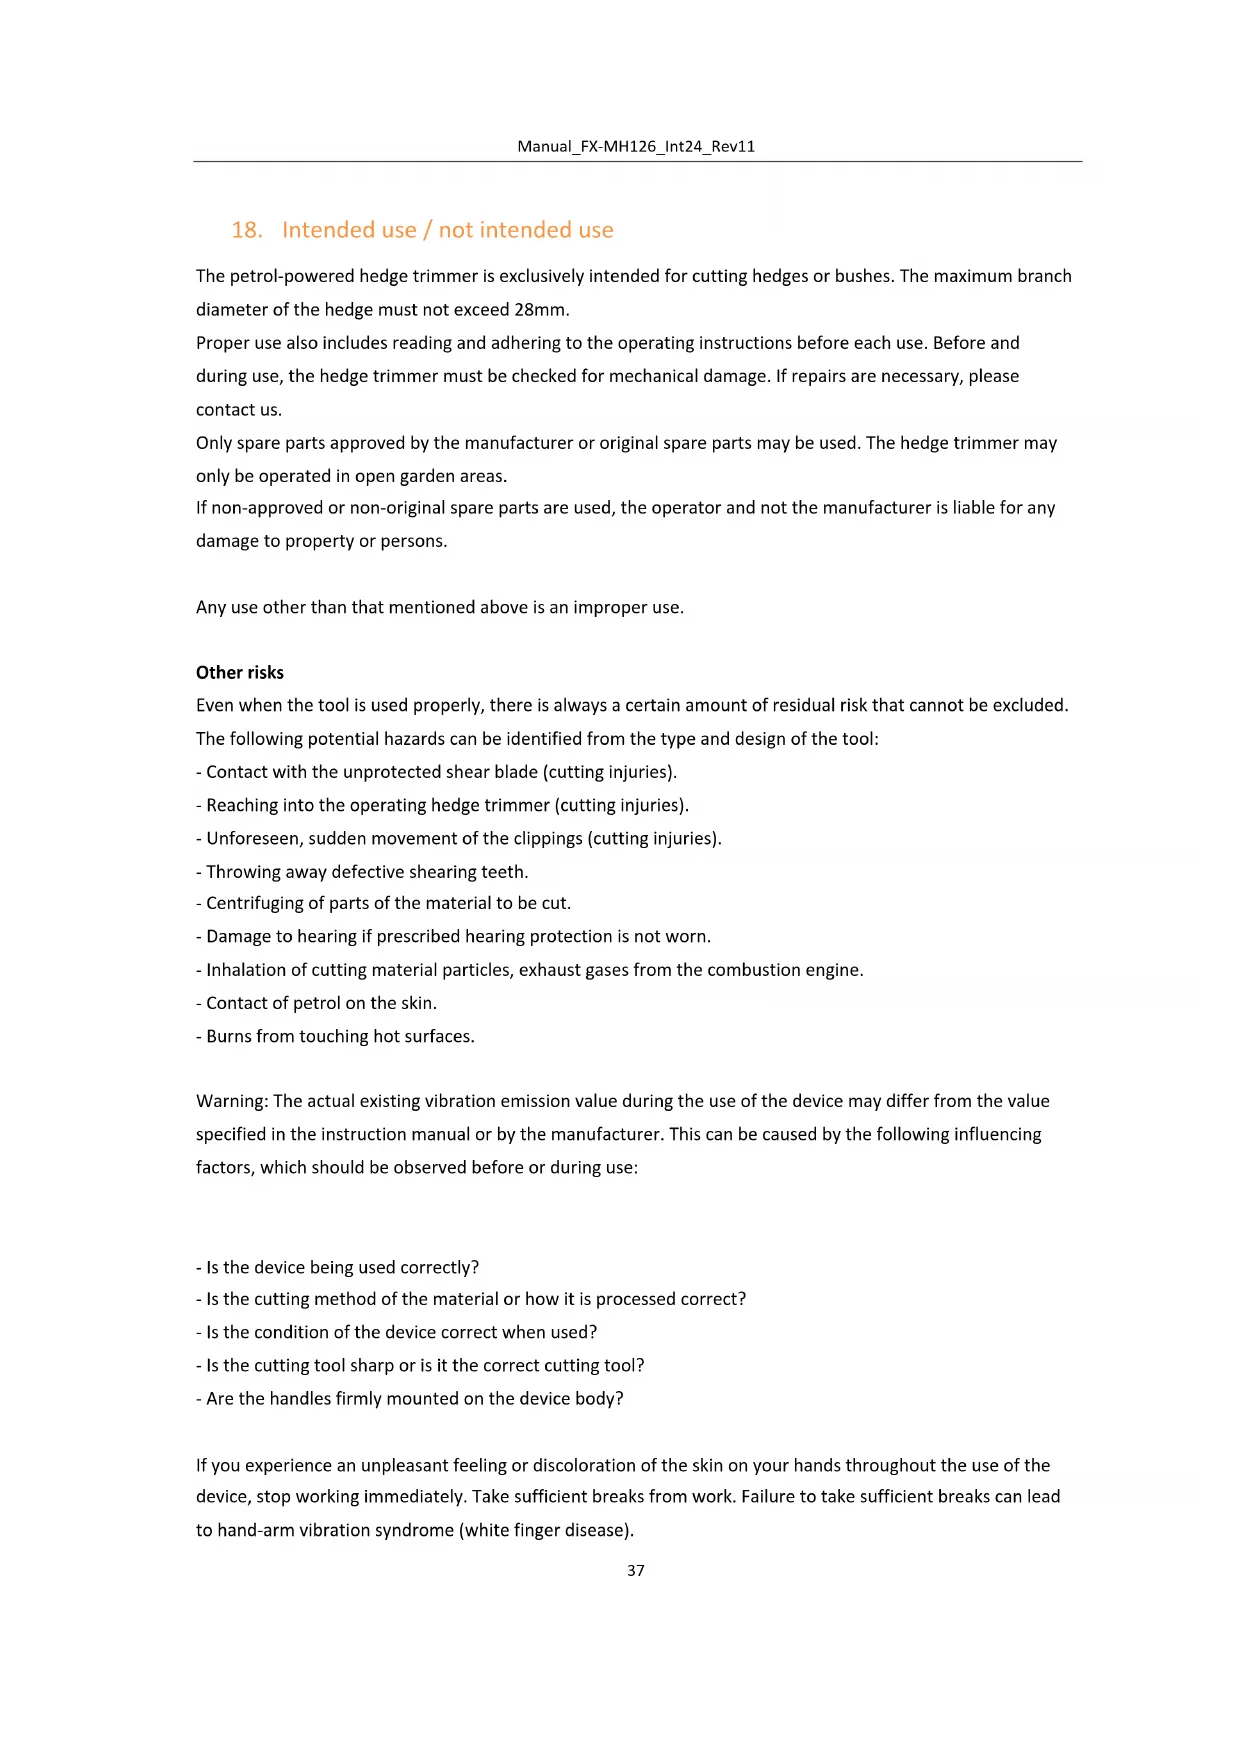
- release the throttle and make sure that it is fully down (F1)
- set the ignition switch to "I (run) (F1)
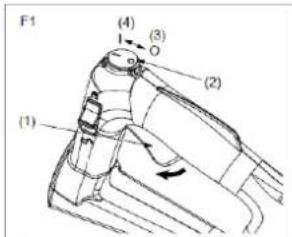
- press the starter injection pump (primer pump) several times until fuel flows in the transparent tube (F2)
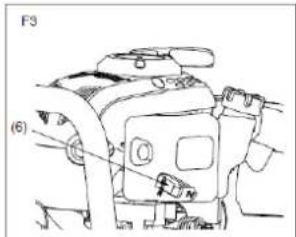
- move the choke lever to the closed position. (F3) - Towards the throttle stick
(1) Throttle lever
(2) Ignition switch
(3) Stop
(4) Start
(5) Starter injection pump
(6) Fuel line
(7) Choke lever
(8) Open
(9) Closed
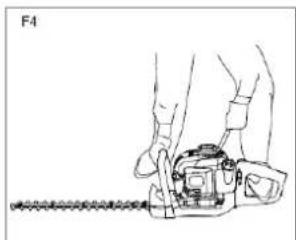
- place the equipment on a flat, solid surface. The cutting head must remain free and must not encounter any obstacles.
- hold the equipment firmly and pull the starter cord quickly and firmly until the Engine responds (2-3 strong pulls).
- IMPORTANT: Engine has not started (it only indicates that it wants to start). Then press the throttle lever (1) so that the choke lever automatically returns to the open position. Then pull the starter cable until the Engine runs.
IMPORTANT!
- Do not pull the starter cable all the way to the end and do not let it spring back by releasing the knob. This could lead to starter errors.
- Push the choke lever down to open the choke. (F3)
- Let the Engine warm up for a few minutes before starting work.
NOTE
-
if the Engine is to be restarted immediately after switching off, the choke must be left open (F3)
-
too much choke can lead to starting problems due to overly excessive fuel flow. If the Engine cannot be started after several attempts, open the choke and pull the starter cable repeatedly or remove the spark plug and dry it.
STOPPING THE ENGINE (F1)
- release the throttle valve lever and let the Engine run for half a minute
- move the ignition switch to the "0"(STOP) position
NOTE
If the Engine does not stop after switching off, close the choke so that the Engine stops after a while.
IMPORTANT
During the first 20 hours of operation, the hedge trimmer should not be used at full power for long periods.
ADJUSTING THE IDLE SPEED
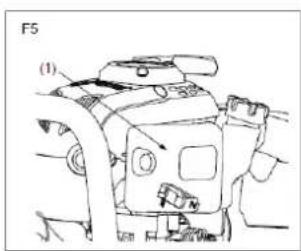
Before adjusting the carburettor, clean the air filter and let the Engine run warm.
- The idle limiting screw is adjusted so that there is a sufficient safety margin between the idle speed and clutch engagement.
(1) Air filter (F5)
(2) Idle speed limiter screw (F6)
WARNING!
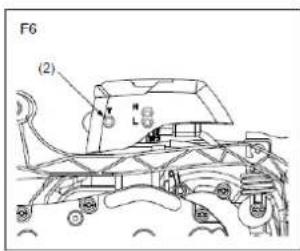
When the Engine is idling (2,700 ~ 3400 rpm), the blade should not move. You can adjust the carburettor yourself (please contact our customer service). However, we recommend having this done by an authorized mechanic.
USE:
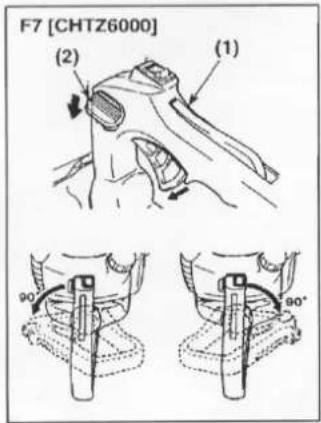

For easy trimming of hedges, the handle can be turned 90^ to the right or left.
Do not operate the throttle during this procedure!
WARNING!
Proceed as follows:
-
release the handle by pressing the locking lever.
-
Turn the handle until the locking lever audibly engages.
-
When the grab handle is locked in its new position, the throttle can be operated again.
(1) Handle
(2) Locking lever
-
only use as much gas as the use of the equipment requires. excessive Engine speeds are not necessary.
-
Avoid cutting thicker branches as this may damage the cutting blades and shorten the life of the power system.
- If the equipment is held at an angle of 5 - 10^ to the object to be cut, the work can be done more easily and the cutting will be more attractive.
Always hold the body on the carburettor side of the equipment, never on the exhaust side. - When a new piece of equipment is used for the first time, grease may leak out of the gear case during the first few minutes. Since this is excess grease, there is no reason for concern. Just wipe it off when you stop the equipment again.
21. Refuelling the device
WARNING!
Gasoline is very highly flammable. Avoid smoking or handling naked flames or sparks near the fuel.
- Remove all obstacles before starting work.
- Also ensure that the Engine has stopped and cooled down before refuelling.
- For this purpose, a free area outside of buildings must be selected.
IMPORTANT!
RECOMMENDED MIXING RATIO: FUEL 40: OIL 1
-
Do not use mixed oil (2-stroke water cooling) as this can lead to spark plug contamination and block the exhaust port or cause the piston ring to seize.
-
Using mixed fuel that has not been used for a month or more may cause the carburettor to clog, resulting in the engine not operating properly. Store excess fuel in a closed container in a cool place. The air-cooled two-stroke engine consumes a mixture of quality engine oil and regular gasoline (with or without lead, but without alcohol).
- The Engines should be lubricated with oil that has a special formula for use with air-cooled 2-stroke petrol engines. We recommend here the original FUXTEC 2T oil (Made in Germany) to ensure the longevity of the Engine.
FUEL MIXTURE
Mix fuel with 2-stroke oil in a container provided for this purpose. Note the following the mixture table on the following page for correct fuel/oil ratio. Shake the tank to ensure complete mixing.
| Petrol | Two-stroke engine oil (40:1) | Petrol | Two-stroke engine oil (40:1) |
| 1 Litre | 0.025 Litre | 5 Litre | 0.125 Litre |
| 2 Litre | 0.050 Litre | 10 Litre | 0.250 Litre |
WARNING: Lack of lubrication rules out the liability of the device manufacturer.
Gasoline and oil may not be mixed in a ratio of more than 40:1.

WARNING

- Petrol is highly flammable and can cause an explosion if sparks are produced
- Refuel only in well-ventilated rooms and have the Engine cool down before filling. Smoking and open flames as well as any sparks must be avoided throughout refuelling.
- Do not overfill the tank (see figure max. level)
After refuelling, check that the fuel filler cap is properly closed - Avoid any spillage of petrol
- Keep the device away from children
22. Maintenance and cleaning
WARNING!
Always wear safety gloves when cleaning and servicing the equipment, switch off the Engine and let it cool down.
1. FILTER
The cleanliness of the filter must be checked every day. If the filter on one side of the carburettor is dusty, it must be cleaned. When assembling the filter, the order must be observed as follows: Filter core filter filter core. If the dust is not removed, the dust will continue to penetrate the Engine causing piston wear or even damage to the Engine.
2.CUTTING EDGE
If the slit between the cutting edges exceeds 0.7mm , the cutting edge must be replaced. Otherwise the dust can penetrate through the slot into the gear box and cause internal wear.
3. SAFETY CUT-OUT (1, F12)
WARNING!
Stop operation if the safety cut-out is defective.
The safety cut-out is a device that prevents the throttle lever from being accidentally operated. Throughout the safety cut-out, you can operate the throttle.

a. Make sure that the throttle lever does not operate if you do not press the safety cut-out.
b. Make sure that the throttle lever can be operated if you touch or press it while pressing the safety cut-out.
c. Make sure that the safety cut-out returns to its original position when you remove your hand from the safety cutout.
If you find a defect in the above checks, contact your nearest service centre for repair.
A deformed or damaged anti-vibration system can cause breakage, causing the Engine and/or the cutter blade to become loose or fall off.
Check regularly that the springs are not deformed or damaged.
5. AIR FILTERS
IMPORTANT!
A dirty air filter has a negative effect on engine performance.
Check the foam filter and clean with compressed air if necessary. If the filter element is dirty, it should be replaced.
6. FUEL FILTER
If the fuel supply is reduced, check the fuel filler cap and the fuel filter for blockages.
7. SUPPLY OF COOLING AIR
This Engine is air-cooled. Dust or wood shavings between the cooling air intake and the cylinder fins will cause the Engine to overheat. Periodically check and clean the cylinder fins after removing the air filter and cylinder cover.
8. IGNITION PLUG
Starting errors and misfires are often caused by a dirty spark plug. The spark plug must be cleaned regularly and replaced as required.
IMPORTANT
When removing the spark plug, it is forbidden to remove the washer from the spark plug cap. Without this washer, the Engine may overheat.
IMPORTANT
When fitting, first tighten the spark plug with your fingers and then tighten it a quarter turn with a socket wrench.
TORQUE
15.3-22.4N.m. (150-220kgf-cm)
Spark plug model
L6
Spark plug caps
0.6-0.7mm
9. GEARBOX HOUSING
Every 25 operating hours, apply universal grease to the surface of the inner shaft.
Pump in sufficient lubricant with the aid of a lubricant pump until it emerges from the blade attachment.
10. EXHAUST PORT
a. Remove the muffler and use a screwdriver to remove carbon deposits from the exhaust port. Also remove carbon deposits from the exhaust port and cylinder exhaust port. (F13)
(1) Screwdriver
(2) Exhaust silencer
b. Retighten screws, bolts and brackets.
c. Check that no oil or grease has come between the clutch lining and the clutch drum and clean with oil and lead-free petrol if necessary.
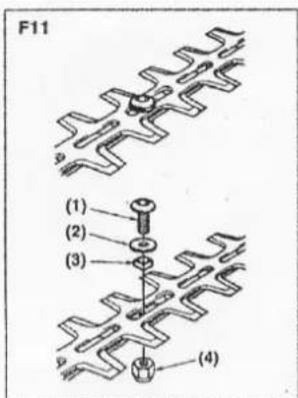
11. TIGHTENING
When attaching the blade, make sure to secure the spacer, washer and screw, then tighten the nut.
(1) Screw
(2) Washer
(3) Spacer
(4) Nut
- Check the blade and fasteners for tightness, cracks or bending.
- Check the cutting edges and sharpen with a flat file.
- Keep the cutting edges sharp.
- Round off the back.
- Do not grind with water.
The distance between the upper and lower shearing blades does not need to be adjusted, as this product, due to its design, always guarantees an optimal distance when assembled correctly. (F11)

| System/Component | Procedure | Before use | After every 25 hours | After every 50 hours | After every 100 hours | Note | |
| ENGINE | Fuel leaks, fuel splashes | Wipe | X | Replace if necessary | |||
| Fuel tank, air filter, fuel filter | check/clean | X | X | Replace carburettor, if necessary | |||
| idling adjustment screw | Check idle speed | X | GAP: 0.6 - 0.7 mm Replace if necessary | ||||
| Spark plug | Clean and readjust cylinder gap | X | |||||
| Cylinder fins, air intake opening | clean | X | |||||
| muffler, spark extinguisher, cylinder outlet | clean | X | |||||
| SHAFT | throttle valve lever, ignition switch | Check function | X | ||||
| cutting parts | replace if something is not correct | X | |||||
| Gearbox housing | Lubricate | X | |||||
| Screws/nuts/bolts | tighten/replace | X | X | not the adjusting screws |
Maintenance before long-term storage
IMPORTANT!
When draining the fuel, avoid spilling the fuel. Spillage must be removed and the lid of the container closed tightly.
- Have the engine run with an empty fuel tank until it stops on its own to remove any remaining fuel in the engine
- Remove the spark plugs and pour 1-2cc of two-stroke engine oil into the engine. Pull the pull starter 2 - 3 times. Then reinstall the spark plugs.
- Wet metal parts with anti-rust oil and place the protective cover on the cutting edge.
- Store the device in a place protected from moisture for storage.
23. Storage of the device

WARNING: If you do not follow these steps, deposits may form in the carburettor. This makes it difficult to start later and causes permanent damage.
-
Performing all general maintenance as described in the maintenance section of your user manual are recommended.
-
Clean the exterior of the device, drive axle, protective shield and nylon cutting head.
- Drain fuel from the fuel tank.
- After the fuel is drained, start the device.
- Have the device idling until the device stops by itself. This will clean the carburettor of fuel.
- Let the device cool down (about 5 minutes).
- Using a spark plug wrench, remove the spark plug.
- Pour 1 teaspoon of clean 2-stroke oil into the combustion chamber. Pull the starter cord Slowly several times to coat internal components. Replace the spark plug.
- Store the device in a cool, dry place away from any ignition source such as an oil burner, water heater, etc.
TRANSPORT SAFETY
Make sure that the device is well secured during transport to avoid fuel loss, damage or injury. Install a transport protection system of metal sheets during transport and storage.
24. Troubleshooting
- Difficulties during start-up
| Situation | Cause | Solution | |
| No ignition spark | Spark plug | Carbon deposition between the diodes of the spark plug | Clean the spark plug. Adjust the gap 0.6~0.7mm, Replace the spark plug |
| other | ignition coil defective flywheel magnet too weak | Replace the ignition coil or flywheel | |
| Weak ignition spark | Compression | Too much petrol in the combustion chamber, poor fuel or water in the tank | Remove spark plug and have it dry, replace fuel. |
| Carburettor stops pumping oil | Oil pipe blocked | Clean the carburettor and clean the pipes | |
| Poor starting performance | normal oil supply but weak compression | Piston rings worn, spark plug not screwed down, cylinder head not tight, wrong valve clearance or ignition timing. | replace tighten screws replace or adjust |
| normal oil supply and good ignition spark | Poor contact between ignition cap and spark plug | Replace or check | |
- Difficulties during operation
| Situation | Cause | Solution |
| Engine does not reach speed | choke is in "COLD START" position, exhaust system blocked no air supply, moving elements worn, ignition spark weak, too much valve clearance, cylinder head sooty | Open choke, replace exhaust systemCheck or replace ignition coil, adjust flywheel, spark plug |
| Operating materials run out | Lines to carburettor clogged, Spark plug spacing incorrect | Replace the lines and if necessary the carburettor; adjust gap dimension |
| Engine noises | Wrong choke position, Camshaft damaged | Check/replace camshaft |
| Carburettor leaking | Failure of the non-return valve on the tank cap | Replace the fuel filler cap |
| Carburettor gasket worn out | Replace carburettor or gasket | |

If no troubleshooting solves the problem, please contact the customer support of FUXTEC
GmbH directly. Only use original parts approved by FUXTEC, otherwise there is a risk of danger.
25. Customer service
Have your purchased equipment repaired only by qualified personnel and only with original spare parts. This will ensure that the safety of the equipment is maintained.
26. Warranty
The warranty period is 24 months from date of purchase. Please keep your proof of purchase in a safe place. Wearing parts and damage caused by improper use, use of force, technical modifications, use of incorrect accessories or non-original spare parts and repair attempts by non-qualified personnel are excluded from the warranty. Warranty repairs may only be carried out by FUXTEC technicians.
27. Disposal instructions
Please contact your local municipality for the disposal of the equipment. Please dispose of all operating materials such as petrol and oil in advance.
28. EU Declaration of Conformity
We hereby declare,
FUXTEC GMBH
KAPPSTRABE 69,71083 HERRENBERG,GERMANY
that the device described below, by virtue of its design and construction and in the version placed on the market by us, complies with the relevant essential health and safety requirements of the EC Directives.
Designation of the device:
Petrol hedge trimmer
Device type:
FX-MH126
Trademark:
FUXTEC
Power consumption/cubic
25cm³
capacity
Measured sound power level according
Guaranteed sound power level
L_WA = 105dB
Relevant EC guideline:
EC device directive 2006/42/EC
EC directive on electromagnetic compatibility (EMC) 2014/1/EC
EC-directive Noise emission (2000/14/EWG & 2005/88/EC)
Applied harmonised EN ISO 10517
Standards: EN ISO 14982
Manufacturer signature/date:

Leonhard Zirkler, 27^th of March 2023
Name and address of the person
L. Zirkler
authorised to compile the
FUXTEC GMBH - KAPPSRABE 69, 71083 HERRENBERG, GERMANY
technical documentation
established within the
Community
VERSION FRANÇAISE
MODE D'EMPLOI ORIGINAL
INDICATIONS D'ENTRETIEN
Carburant recommende
15.3-22.4N.m. (150-220kgf-cm)
Directives EU pertinentes: Directive Machines UE 2006/42/EG
8. CANDELA DI ACCENSIONE
15.3-22.4N.m. (150-220kgf-cm)
Leonhard Zirkler, 27/03/2023
63. Repostar laquina
ADVERTENCIA
MEZCLA DE COMBUSTIBLE
15,3-22,4N.m. (150-220kgf-cm)
Modelo de bujía Tapas de bujía
L60,6-0,7mm
9. CAJA DE CAMBIOS
Leonhard Zirkler, 27/03/2023
INSTRUÇÉS DE MANUTENÇão
15,3-22,4N.m. (150-220kgf-cm)
Modelo de vela de ignicao Tampas de vela de ignicao
L60,6-0,7mm
9. CAIXA DE VELOCIDADES
Leonhard Zirkler, 27/03/2023
ARBEIDSOMSTANDIGHEDEN
15,3-22,4N.m. (150-220kgf-cm)
TRANSPORTBESCHERMING
Leonhard Zirkler, 27/03/2023
7. SÄTT ATT KYLA LUFT
15,3-22,4N.m. (150-220 kgf-cm)
Leonhard Zirkler, 27/03/2023