TV connect - Graphic tablet ARCHOS - Free user manual and instructions
Find the device manual for free TV connect ARCHOS in PDF.

| Product Type | Graphics Tablet |
| Brand | Archos |
| Model | TV Connect |
| Dimensions (approx.) | 10 cm × 10 cm × 2 cm |
| Weight | Approximately 200 g |
| Power Supply | Mains charger (5 V) |
| Remote Control | ARCHOS TV TOUCH remote control with 2 AA LR6 batteries |
| Connectivity | WiFi, Ethernet, Bluetooth (remote), micro-USB, mini-HDMI, USB, micro-SD card reader |
| Main functions | Media streaming, internet browsing, Android games, key mapping, video and music via UPnP/SMB |
| Operating System | Android |
| Webcam | Built-in, adjustable |
| Maintenance and cleaning | Clean with a soft, dry cloth |
| Security | Screen lock via PIN or pattern |
| Spare parts and repairability | Not specified |
| General information | Use above the TV, startup assistant included |
Frequently Asked Questions - TV connect ARCHOS
User questions about TV connect ARCHOS
0 question about this device. Answer the ones you know or ask your own.
Ask a new question about this device
Download the instructions for your Graphic tablet in PDF format for free! Find your manual TV connect - ARCHOS and take your electronic device back in hand. On this page are published all the documents necessary for the use of your device. TV connect by ARCHOS.
USER MANUAL TV connect ARCHOS
Package contents. 2
Description of the ARCHOS TV CONNECT. 4
Getting started. 8
Description of the ARCHOS TV TOUCH remote. 10
ARCHOS TV TOUCH remote gesture mode. 12
Navigating through the ARCHOS TV CONNECT. 14
Connecting to Internet 15
Archos Game mapping tool. 16
The AndroidTM interface. 22
Archos video & music 24
Getting familiar with AndroidTM 26
Troubleshooting 28
For more information, please consult the FAQs on www.archos.com. Make sure to read them before considering any product return. Your deal may be no big deal. As we are often updating and improving our products, your device's software may have a slightly different appearance or modified functionality than presented in this Quick Start Guide.
Package Contents

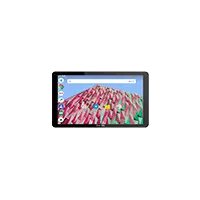
ARCHOS TV CONNECT
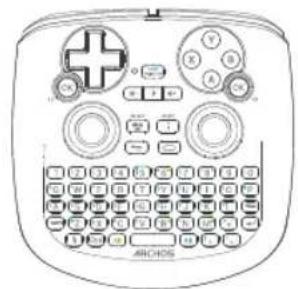
ARCHOS TV TOUCH remote*
*The ARCHOS TV TOUCH remote functions with 2 AA LR6 batteries.

HDMI cable
QSG booklet
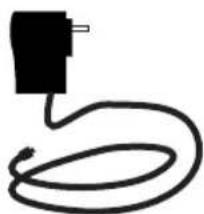
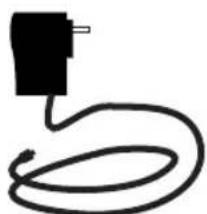
Power supply

Warranty, legal & safety booklet
Description of the ARCHOS TV CONNECT
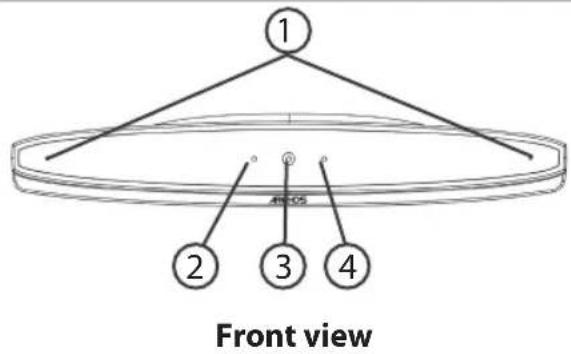
1 Microphones
On light
③ Webcam
4 Notification light
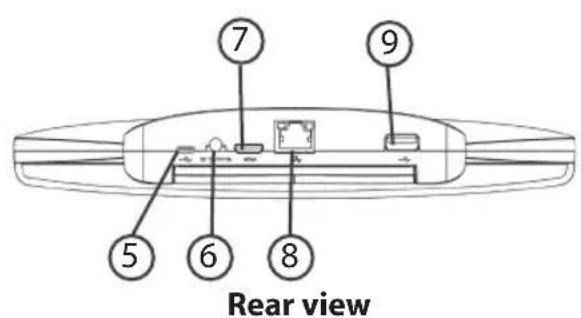
Micro-USB port
Power connector
⑦ Mini-HDMI video output
Ethernet port
USB port
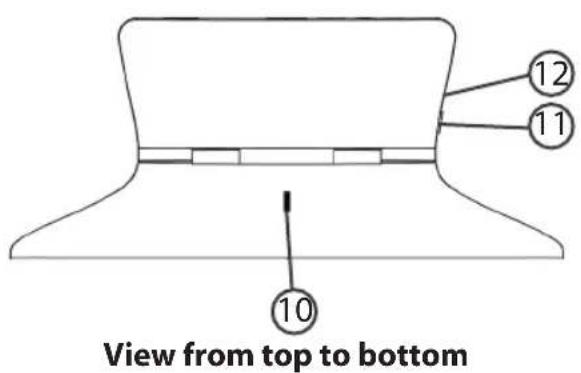
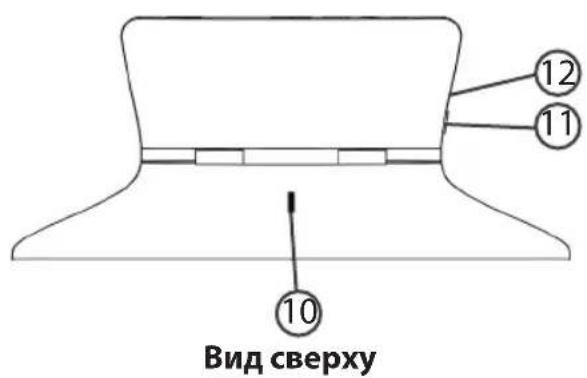
10 Camera adjustment wheel
11 ON/OFF button
Micro-SD card slot
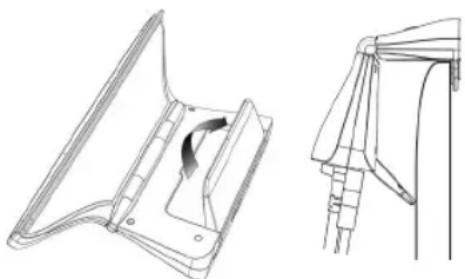
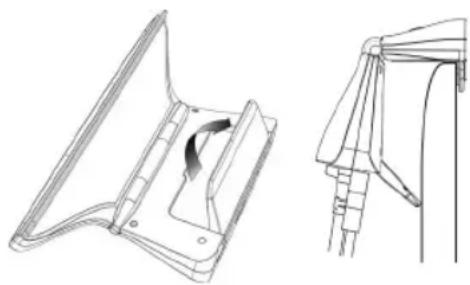
Getting Started
Connecting
- Place the ARCHOS TV CONNECT on the TV.
- Connect the supplied power cable to the ARCHOS TV CONNECT and to a wall outlet.
- Connect the HDMI cable to the ARCHOS TV CONNECT and to the TV.
- Turn on the TV.
- On the ARCHOS TV CONNECT, press the ON/OFF button
to turn on the ARCHOS TV CONNECT. The ON/OFF button of the ARCHOS TV TOUCH remote can't turn on the ARCHOS TV CONNECT.
The ARCHOS TV CONNECT turns on.
On your TV, if you are not on the correct HDMI channel, you will need to switch to the correct HDMI channel.
TIPS:
To receive more complete service, please register your product. From the device, select the "Apps" button, then select "Online registration" and follow the on-screen instructions.
From a computer, go to www.archos.com/register.
Through the wizard
The first time you start up your ARCHOS, the installation wizard will help you associate it with its ARCHOS TV TOUCH remote and do the setup:
-Remote control discovery
-Language
-Remote control pointer mode
-Date & time
-WiFi connection
-Location service options
-3rd party apps
Remote control discovery
Language
Disclaimer
Remote control pointer mode
Date and Time
Wifi Connection
My Location
Third party applications
ARCHOS TV CONNECT Interface display on TV
To adjust the display of the ARCHOS TV CONNECT interface on TV, go to: Settings > Display and select Overscan. Drag the cursor to increase the overscan.
Description of the remote
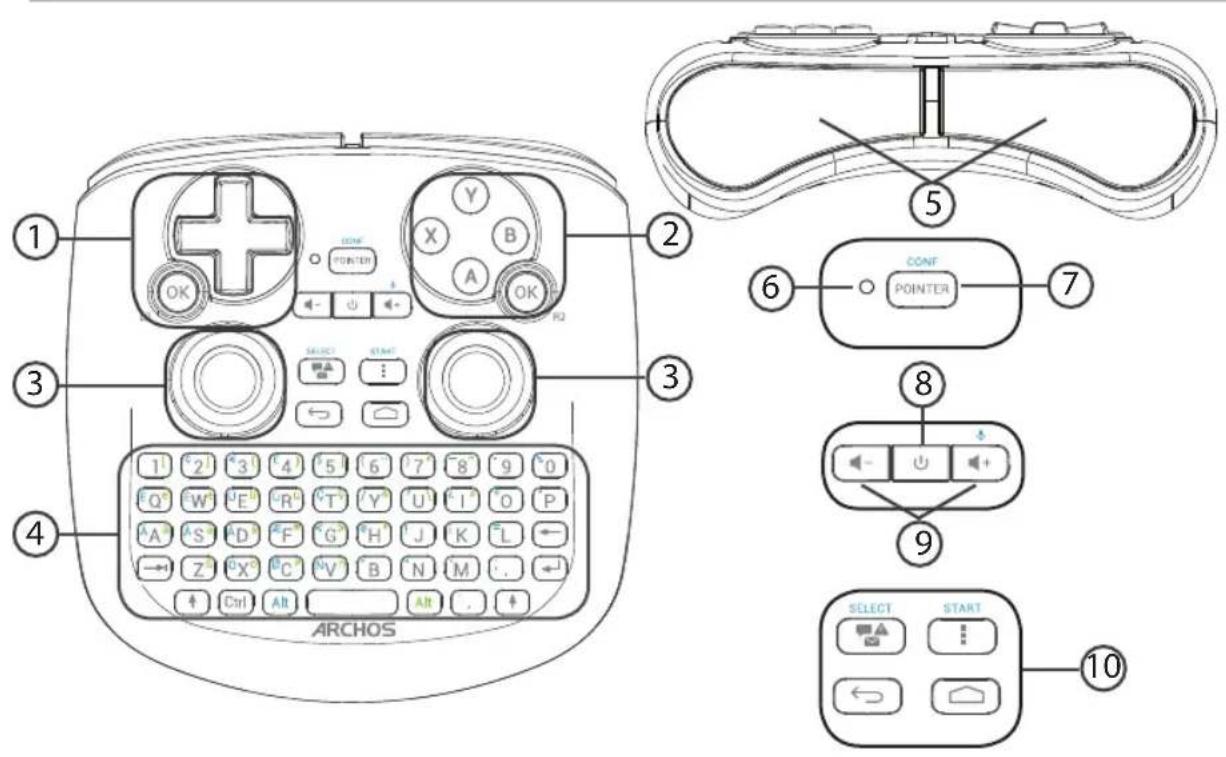
1 Directional Pad
A,X,Y,B buttons
3 Analog sticks
4 Keyboard1)
(5) Triggers
6 Functioning indicator
Pointer display switch
ON/OFF button
(1)Qwerty keyboard
Volume buttons
10 Android interface buttons
ARCHOS TV TOUCH remote gesture mode
In many applications, you can use the analog sticks of the ARCHOS TV TOUCH remote to perform standard Android gestures. You can choose between two modes: Gesture emulation mode and Finger mode. These two modes allow you to zoom out or zoom in when surfing the web and to change maps display.
Switching between the modes
- To manage the gesture mode, select the "All Apps" button.
- In the "All Apps" interface, select the Archos tool application.
- Select "Gesture mode" to choose between Gesture emulation mode and Finger mode.
Gesture emulation mode
In the Gesture emulation mode, the analog sticks allow you to:
| ←→ | Zoom in: Move at the same time the left analog stick to the left and the right analog stick to the right. |
| →→ | Zoom out: Move at the same time the left analog stick to the right and the right analog stick to the left. |
| ↑ | Rotate clockwise: Move at the same time the left analog stick up and the right analog stick down. |
| ↓ | Rotate counter-clockwise: Move at the same time the left analog stick down and the right analog stick up. |
Finger mode
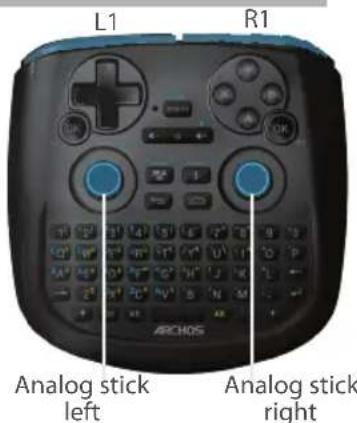
In the Finger mode, each analog stick corresponds to a virtual finger.
-
The left analog stick corresponds to the virtual finger named L1.
-
The right analog stick corresponds to the virtual finger named R1.
Using the virtual fingers
- Use the left (right) analog stick to move the virtual finger L1 (R1).
- When you select an icon with the left (right) analog stick, press the L1 (R1) button to validate.
Validating corresponds to a finger touch.
| Zoom in: Hold the L1 and R1 buttons and move the left analog stick to the left and the right analog stick to the right. |
| Zoom out: Hold the L1 and R1 buttons and move the left analog stick to the right and the right analog stick to the left. |
| Rotate clockwise: Hold the L1 and R1 buttons and move the left analog stick up and the right analog stick down. |
| Rotate counterclockwise: Hold the L1 and R1 buttons and move the left analog stick down and the right analog stick up. |
Navigating through the ARCHOS TV CONNECT
You can use, either the pointer, or the Finger mode to navigate through interfaces and to select items.
Pointer
- On the remote, press the "Pointer" button to activate or deactivate the pointer on screen.
- If the "Pointer functioning light" is on, the pointer is displayed on screen.
- To select an item, put the pointer on the item and press the "OK" button.
- To move an item, put the pointer on the item and hold the "OK" button until the item enlarges, then move it.
- To swipe between home screens, move the pointer left or right while holding the "OK" button.
Finger mode
- Use the left (right) analog stick to move the virtual finger L1(R1).
- When you select an item with the left (Right) analog stick, press the "L1 (R1)" button to validate.
- To move an item, put the L1 (R1) virtual finger on the item and hold the "L1 (R1)" button until the item enlarges, then move it.
TIP:
Pointer mode is deactivated after 2 minutes if not used.
Connecting to Internet
Connecting to a WiFi Network
WARNING: Make sure that you are in a WiFi zone.
During the installation wizard, you will reach the WiFi connection step.
- At the WiFi connection step, the WiFi is turned on automatically.
- Once the WiFi is on, the ARCHOS TV CONNECT will scan for WiFi networks in range.
- Select the name of network you want to connect to.
Private networks are shown with a lock icon and will require you to enter a password.
Connecting via the Ethernet port
Connect a RJ 45 cable to the Archos and to your Internet modem.
TIPS:
- When entering a WiFi password, we recommend that you select "Show password" so you can see the characters you are typing.
- To get the correct WiFi password (or settings) for the network, contact the Internet service provider.
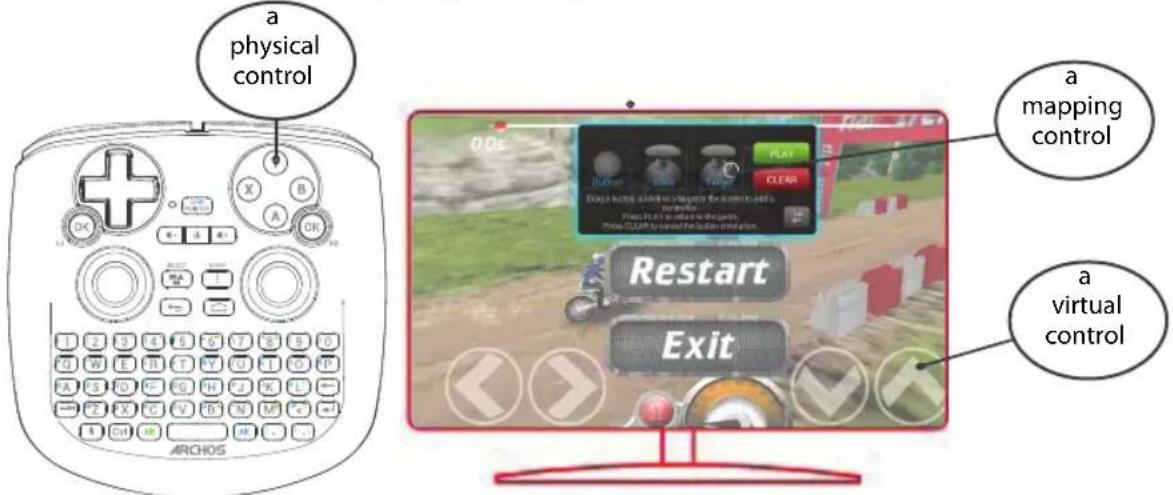
ARCHOS Game mapping tool
ARCHOS mapping tool is an application installed in your ARCHOS TV CONNECT. It is used for games. It allows you to link the virtual controls of games to the physical controls of the ARCHOS TV TOUCH remote by using mapping controls.
Tip1:
Within ARCHOS mapping tool, there are already mapping profiles for over 100 games. For a game with a mapping profile, hold the "Alt" and "Pointer" buttons to display the preloaded mapping.
Tip2:
Whenever you launch a game whose virtual controls are mapped, the right mapping profile will automatically be selected.
Starting ARCHOS mapping tool
- Start a game.
When you reach the starting screen, the virtual controls are displayed.
2. On the ARCHOS TV TOUCH remote, hold the "Alt" and "Pointer" buttons.
The mapping overlay is displayed with the mapping tool interface.

ARCHOS Game mapping tool
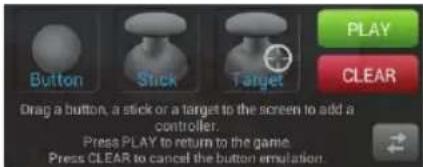
Positioning a mapping control
Select and drag a type of mapping control to the desired virtual button.
There are three types of mapping control

Button
It is for the directional pad ,the X,Y,B,A, buttons and the L1,R1,L2,R2,Start, Select buttons.

Stick
It is for the analog directional sticks.

Target It is for analog stick targeting. It is placed normally in the central area of the screen on shooting games.
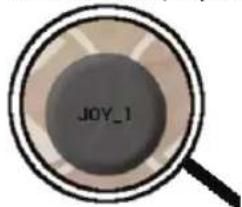
Linking a mapping control to a physical control
- When a mapping control is placed on a virtual control, you are asked to select the desired physical control you want to associate with it.
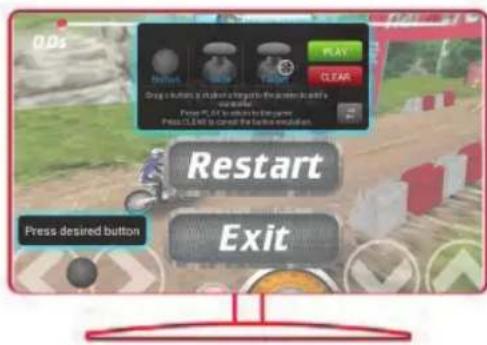
- Once a physical control is associated to the mapping control, the name of the physical control is displayed on the mapping control.
EN
ARCHOS Game mapping tool
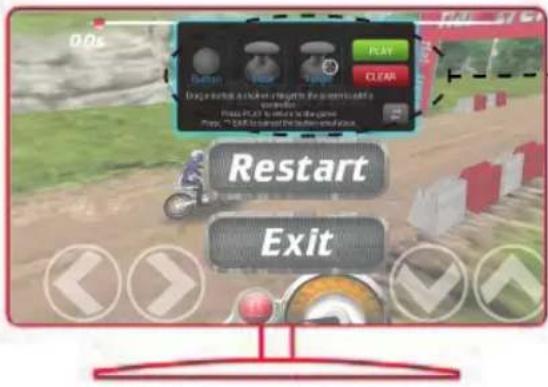
Enlarging a mapping control
Some virtual controls are larger than the mapping controls. Enlarge the mapping control so that it is tailored to the virtual control.
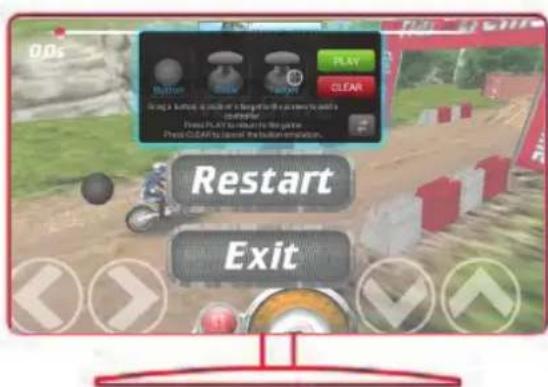
Saving your parameters
When you have mapped the virtual controls of a game, select "Play" to validate.
The profile is saved and associated with that game.
The mapping overlay disappears and you can play.
Whenever you start the game, you are informed that the emulation of virtual controls is running.
Press the notification to display the mapping profile of the game. You can either modify it, or delete it.
Tips:
-You can only enlarge the mapping controls Stick and Target.
-Each mapping is specific to a game.
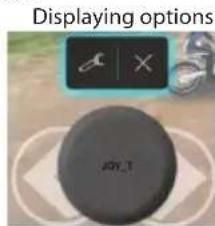
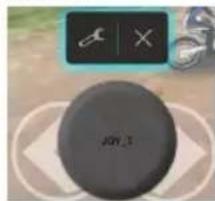
Q&A about the mapping
You placed a mapping control on a virtual control but no option is available?
- Select the mapping control and hold the "OK" button.
A menu box is displayed - Select the icon to set up the mapping control.
You want to remove a mapping control that you set?
- Select the mapping control and hold the "OK" button.
A menu box is displayed - Select the × icon to remove the mapping control.
You want to remove a mapping profile set for a game?
- From ARCHOS mapping tool, select "Clear".
- Select "OK" to confirm.

Removing a mapping profile
The Android™ Interface
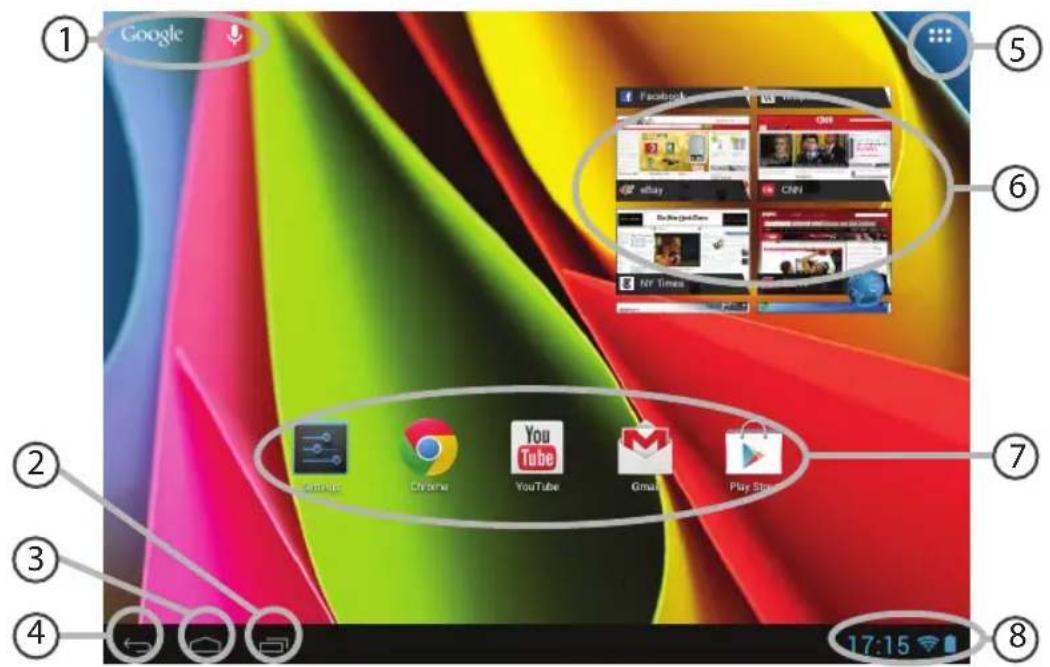
GoogleTM Search >Select "Google" for text search or select the microphone icon for voice search.
"Recent apps" button
"Home" button
"Back" button
"All Apps" button > Select this icon to show all the applications and widgets installed on your ARCHOS. All your downloaded applications are here.
⑥ Widget
AndroidTM apps shortcuts >Select to start an application.
The status bar > Displays notifications and quick settings.
The Android™ Interface

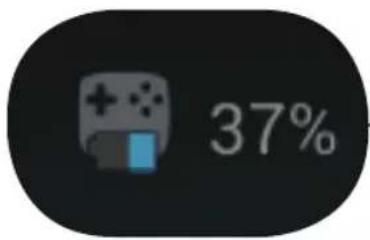
The Quick settings
-Notifications:
To activate/deactivate incoming notifications.
-Settings:
To access all your settings.

Here is the percentage of batteries remaining for the ARCHOS TV TOUCH remote.

The Recent Apps
Opens a list of thumbnail images of apps you've worked with recently:
-To open an app, select it.
-To close an app, select and swipe it left or right.
ARCHOS video & music
You can watch shared media files stored on your server(s). There are two main ways: Media server (UPnP) and Shared folders (SMB).
To access shared media
- Select the Archos Video (or Archos Music) application.
Make sure you are connected to Internet. - In the External column, select Media servers UPnP or Shared folders (SMB).
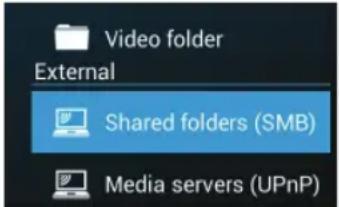
The available servers are displayed.

TIPS:
The servers you want to access must be connected to the same Internet network.
Prior to accessing media on your server(s), you need to set up sharing settings on your server(s).
Some servers do not require authorizations to share media. See the sharing options of your OS.
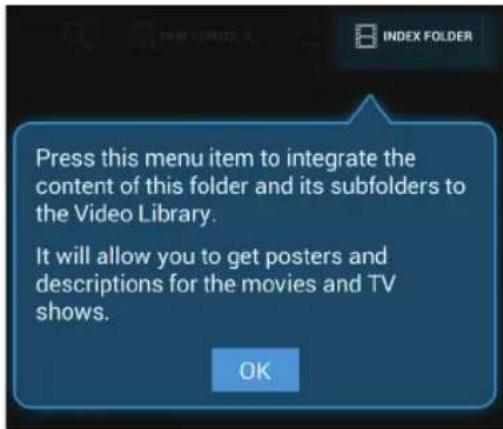
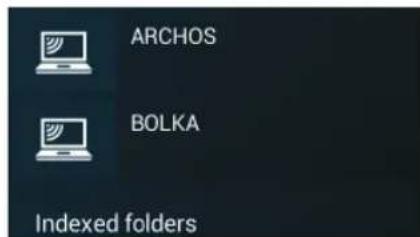
Indexing folders
Indexing will allow you to integrate folders and sub folders in the Archos Video (Music) library
and to get posters and descriptions.
- In the Archos Video (Music), select Shared folders (SMB) in the External column.
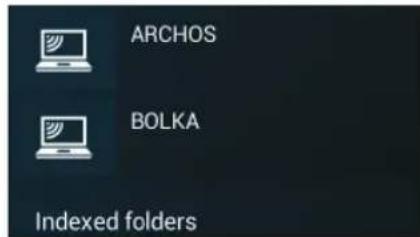
- Select the desired server. Available folders are displayed.
The menu bar displays the option "Index folder".
3. Select a folder, then select "Index folder". Or
Select "Index folder" to index all the displayed folders. The indexed folders are dispayed below the servers icons.
Getting familiar with Android™
Google account
A Google account lets you take full advantage of any Google apps and services that you may want to use.
- Go to "Settings" > "Accounts" > "Add account".
- Select the account type "Google" to add.
- Follow the onscreen steps to enter information about the account.
The extended home screen:
Navigate between different home screen panels by moving the pointer left and right while holding an "OK" button.
Moving a home screen item:
Select the item until the positioning gridlines appear, then slide it to the desired location, and release.
Removing a home screen item:
Select the item, slide it towards the top of the screen and drop it over the "Remove" icon.
Uninstalling an item:
From the "All apps" screens, select the item, slide it towards the top of the screen and drop it over "Uninstall" bin.
Creating application folders:
Select an app icon and drop it over another on a home screen and the two icons will be combined.
Widgets:
Select the "All Apps" icon on your home screen. Select "Widgets" at the top of the screen. From the main Widget screen, you can move around widgets just as you do for app icons.
Changing your wallpaper:
Select an empty space on a home screen and hold the "OK" button.
Locking the touchscreen:
From the quick settings dashboard in the status bar, select "Settings". In "Settings", scroll down and select "Security". Select "Screen lock". Select the type of lock you would like to use. After you set a lock, a lock screen is displayed whenever your screen wakes up, requesting the pattern, pin or other specified key.
Troubleshooting
If you do not see the pointer:
The ARCHOS TV TOUCH remote goes in stand by mode. Press any button on the remote to wake it up. A message displayed on screen tells you the remote is active.
If your ARCHOS TV TOUCH remote does not respond:
Press the ON/OFF button on the ARCHOS TV CONNECT. Select the option "Start remote pairing process" and confirm. Follow the onscreen instructions. Note that a short press on the ON/OFF button allows you to switch between options and a long press to validate.
If your WiFi reception is too low:
Make sure you are not far from the WiFi hotspot.
Update the firmware of the device: http://www.archos.com/support.
Reset and redefine your connection parameters.
Contact your WiFi connection provider.
If you can't access media on external servers:
Make sure the devices are connected to the same Internet network.
Make sure the servers are turned on and sharing options set.
Consult the help of your device to know the sharing process.
Table des matières
Remote control discovery
Language
Disclaimer
Remote control pointer mode
Date and Time
Wifi Connection
My Location
Third party applications
L1, R1, L2, R2, Start, Select.

Stick
Remote control discovery
Language
Disclaimer
Remote control pointer mode
Date and Time
Wifi Connection
My Location
Third party applications
Remote control discovery
Language
Disclaimer
Remote control pointer mode
Date and Time
Wifi Connection
My Location
Third party applications
Remote control discovery
Language
Disclaimer
Remote control pointer mode
Date and Time
Wifi Connection
My Location
Third party applications
Weergave van de ARCHOS TV CONNECT Interface
Verbinding makes meteen WiFi-networkk
ARCHOS Game mapping tool. 182
Interface AndroidTM 188
Música e video Archos. 192
Remote control discovery
Language
Disclaimer
Remote control pointer mode
Date and Time
Wifi Connection
My Location
Third party applications
Exibicao da interface ARCHOS CONNECT TV
Paraaabstaraexibicao da interfaceARCHOS CONNECTTV,vapara:Configurações>ExibireseLECTIONAROverscan.Arrasteo cursorparaaugentar ooverscan.
, hotoes, X, Y, Be A, e botoes L1, R1, L2, R2, Start e Select.

Manipulo Serve para os Manipulos anlogicos.

Mira
*IyIbT Dv ARCHOS TV TOUCH pa6oTaet ot IByx 6aTapeek AA LR6.

Ka6eIbHDMI
KpaTKe pyKOBoDCTBO
3apnHoe yctpoIcTBO

TapaHTn n HnCTpyKcnn no 6e3oNaChOCTn
Описанne ARCHOS TV CONNECT
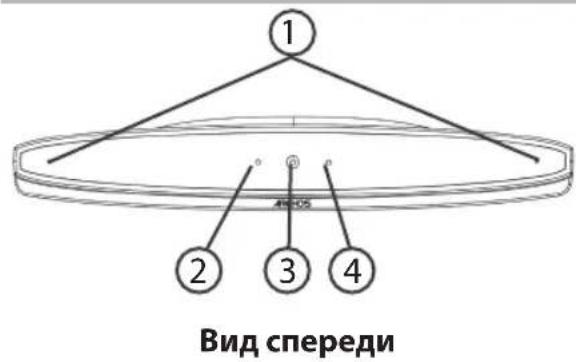

MnKpoΦoHbI
② INHnKaTOp BKnIoueHnA
3 Be6-kanepa
4 Ppeynpejdaiou nnHdkaTOp
5 TOpT MnKpo-USB
6 Pa3bem nHTaHn
7 BndeobbIXoMmHn-HDMI
8 IopT Ethernet
9 NopT USB
10 Koneco perynipOBKn KaMepbl
11 KhoNka BKnIoueHnA
12 Pa3bem dIa KapT Micro-SD
Hauano pa60tbl
IopdkloueHne
- Пocтавы ARCHOS TV CONNECT Ha TeJeBn3Op (cM. nllIOCTpaun).
2.ПоdkлючITE ARCHOST TV CONNECT Kpo3eTke c NOMOьIO NOCTaBЯMOrO B KOMпкTe Ka6eI\PHTaHnI.
3.Поdkлючite ARCHOS TV CONNECTКтелевизусnomoью noctab然是MOROBKOMпгкte ka6eЯHDMI. - BkIIOUHTe TelenBn3Op.
- Haxmte KhoNky BkIoueHnARCHOS TV CONNECT, yTo6bI BKIOuHTb ARCHOS TV CONNECT.
ARCHOS TV CONNECT BkJIOUHTcA.
EcnB TaW TeNeBn3Op He HacTpoEH Na npaBnIbHbI KaHaN HDMl, Heo6xOJMo NepeKJIouHTb ero Ha npaBnIbHbI KaHaN HDMl.
COBET:
3apezucmpuyme c0e u3deue, ymo6bl noluyamb o6cnykuahe 8 60one noHOM obbeMe. Ppuokchumecb K Khonke Apps Ha nnhueme, zamem b6bpume Online registration (unmepakmuha pezucmpaui) u cledyume kpanhim uncmpkyuam. Ppu pa6ome c Komnbomepom nepeudume no CcbInke www.archos.com/register.
Mactep hactpoikn
Remote control discovery
Language
Disclaimer
Remote control pointer mode
Date and Time
Wifi Connection
My Location
Third party applications
- KaTToIbKO 6yIeT yCTaHOBHeHa CB3b MeJx dy fN3uueckm CpeIcTBOM ynpaBHeHn I cpeIcTBOM COIOCTaBHeHn, cpa3y Xe HaIMMeHOBaHHe fN3uueckoro CpeIcTba ynpaBHeHn OTO6pa3ntc H a CpeIcTBe COIOCTaBHeHn.

Macwta6npoBaHne cpeCTB conoCTaBHeH
Pa3Mep HeKOTOpbIX BnrtyabHbIX CpeiCTB ynpaBHeHna 60JIbwe pa3Mepa CpeiCTB COIOCTaBHeHn. 3axMMte CpeiCTBO COIOCTaBHeHn, UTO6bl yBeJIuHTb erO pa3Mep I NOOrHaTb NOD pa3Mep BnrtyabHoro CpeiCTBa ynpaBHeHn.
CoxpaHeHne napaMeTpob
Iocne 3aBepHnra conocTabHeHnA n Hn3nuecknx n BnptyalbHbix cpeicTB ynpabHeHn, bI6epnte Play (IrpaTb) PLAY dna noTBePxJdeHn. IpOphiNb 6yJeT coXpAHn C Brz3aH C eToi ngoi.
DOnoJIHnTeBbHbI 3KpaH CONOCTaBJIeHNA NCue3HeT, IN Bbl MoKeTe HaUNHaTb INrpy.
Bcayn pa3, kOrda Bbl haunhaete nrgy, Bbl coo6uyn, yTO mnyaun BNpTyalbHorO ynpablenpa6otaet.
Haxmnte Ha npedynpexdeHnn, yTo6bl noka3aTb npofoNb conocTabneHn urpbl. Bbl moKeTe n3MeHntb nn nn ydaNTb erO.
Pndka3Kn
-ByeJIuHTb MoXHO ToIbKO CpeDCTBa CONOCaJIeHnA «ДJOKoCTNk» n «LcJIb».
- KaJIOe conOCTaBHeHne o6NaJaAeT cneuHbIMn CBOIcTBAMn IJRA KaJIOI OTdJIbHOI rPbl.
BonpocblnOTBebI O CONoCTaBJeHnn
YTo DeNaTb,ecn nocne coBmeueHn cpeCTBa conoCTaBleHn C BnptyanbHbIM
cpeCTBOM ynpaBneHn He NoABnEeTcHn OINH BapNaHT Bbl6opa?
- BbI6epnte cpeIcTBo coNocTbIeHn y n HaxMITE KhONKy «OK», He otnycka ee.
OTo6pa3ntcMeHIO
- Bb6epnte nKToIpaMMy dHa3NaueHncrepctBa cOnOCTaBHeHn.
Xotnte ydaIb paHee hAcTpoEHHOcpeDCTBO conoctabneHn?
- BbI6epnte cpeiCTBO coNocTabnHn HaKMITE KHOKNKy OK》,He OTnycka ee.
OTo6pa3ntcMeHIO
- Bb6epnte nKtorpammy dny ydaeneHn cpeCTBa conoctabneHn.
XOTnte ydaNTb npoHnIb conocTabneHna, HacTpoEHbI dnn daHHo nrgbl?
- Bytnte ARCHOS nra coonocTabnene KhoNOK bbi6epnte Clear (OuNTb).
2.ДЯ NOДТВЕРЖDEHNAHKMnTe OK.

Интуpeис Android™

1 NocK GoogleTM
HaMMte HaЯрпьК «Google»,ЧTOбI BBINONHNTb TEKCTOBын ПОИСК, ИИН HA MKNpOΦOH, ChTO6bl BBINONHNTb FOLOCOBOI ПОИСК.
2 KhoNKn "nocneHnx npnloKeHn"
3 Khonka"Domon
(4) Khonka "Ha3a"
KhoNka"Bce npUOKeHnA"Прикочитесь К STОД ПИКТогамme,ЧTO6bl OTO6pa3NTb BCE пиLOженя вджеты, установленье B Baшем ARCHOS. 3decb haxoJrTcB СЗагуженьe Bamп пиLOженя.
BnJxKer
7 Apnbikn npuIoxeHn AndroidTM
πpικοκηntecbКПικTOrpaMmeДЯЗауSCa pινIoXeHn.
8 Ctpoka coctoHn
OTo6paKaiaOTcA COo6uEHNr N 6bIcTpbl He HAcTpoiKn.
Интуpeис Android™

Быстые насточи
-Notifications:
AKTnBaun/daekTnBaunBxoDanyx coo6eHnn.
-Settings:
IOCTyI KO BcEM HaCTPOiKaM.
IpoeHT octabweicra 3apKn 6aTapeB nybTe DnctaHNoHHoro ynpabLeHNA RCHOSTVTOUCH

PocneHne npUloxKeHna
OTkpbyBaetc CnUCOK 3CKN3OB npNUOKeHn, C KOTOpbIMn Bbl HeDaBHO pa6oTani:
-4To6blOTKpbITb npnIOxKeHne, Bbl6epnte ero.
-утобл зakрытприложенue, bblберnte erои nepetatauTe BnEBO nIN BnpaBO.
Bndeo my3bika Archos
Bbl mokeTe npocmatpmbaTb faIb MylbTmmeHa, haoJauuiec B o6eM DocTyne, KOtOpbie xpaHrTaHa Baunx cepBepax. Ecb TaOchOBhix cnoc6a: Media server (UPnP) (CepBep MylbTmEHa) n Shared folders (SMB) (Pankn o6eero docTyna).
ДяdoctynaKфайlamMynbTmmeMaB O6uem doctyne
- Bb6epuTe npInoxKeHne Archos Video (nAn Archos Music). Y6eDntecb, yTo yCTaHOBJeHo nOdkIouHeNe K INHTepHety.
- B koloHke External BbI6epnte Media servers UPnP (CepBepbl MyIbTmEma) nn Shared folders (SMB) (PAnKn oOcero doctyna).

BydyTOTo6paKeHbIIOCTyHbIe cepBepbl.

CepBepb, K KOtOpbIM Bbl XOTnTe NOLyUHTb DoCTyn, DOJXHbI 6bITb NODKIIoueHbI K Toi Jxce CeTn INHTepHeT.
PpeKJe Yem NOLyUHTb DoCTyn K faiJam M yJbTmMeJa Ha cepBepax, Heo6xoJIMO HAcTpOuNTb o6ui n
DocTyn Ha BauxxCepBepax.
HeKoTOpbIe cepBepb He Tpe6yIot aTOpU3aunn DnA NOJyEHHa DoCTyna K faiJam MyJbTmMeJa.
YtoUHInTe HAcToPiKn O6Uero DoCTyna dnnBaWeN OC.
HndeknpoBaHne nanok
INHeKcnpOBaHnE No3BOJNT BKNIOHTb NaIKN I NOpNaIKN B 6N6JIIOTeKy BNDeO (My3bIKN)
Archos, nonyuntb nHx n3o6paXeHn n onncAHn.
- BПриложен Archos Video (Music) Вьберпe Shared folders (SMB) (Пашиообselfero Достуна)В колонke External (BHeшнe).
- Bb6epnte HxKhbl cepBep. OTo6pa3aTcI DocTyHbIe nAnKn.
B CTPOKe MeHIO OTo6paKaEcT pyHKT «Index folder» (INHeKcnpoBaTb nanky). - Bb6epnte nanky, 3aTeM Bb6epnte «Index folder» (Инда ekсюваты пankу).
Vnn
Bb6epnte Index folder》,T06bl npoHneKcnpobatb BCE oTo6paxeHHbIe nankn.
IponHneKcnpoBaHHbI naKN 6ydyT oTo6paXeHbI Hxke 3HauchOB cepBepOB.

3HaKOMCTBO C AndroidTM
yuetnag3anncb Google
YyETHa 3aIncb Google n03B0JareT noJIb3OBAtbcra IIO6bIMn npINIOXeHnA Mn n CnyK6amn Google, KaKe BAM MOrTy nOHaIo6uTbcra.
- Bb6epnte Settings > Accounts > Add account (Hactpoyn > YyeTHbIe 3aIncn > Do6abITb yyeTHyIO 3aIncb).
- Bb6epnte Tn yueTHo 3aHncn dIy doabHeHra «Google»
3.CneyuTe HNCTpyKzmaH aKpaHe, YTO6bI BBecTu INHΦOpMaZIO O CBOe yUeTHO 3aINcN.
PacunpeHHbI rnaBHyI eKpaH:
IpeeknioaTecb Mejdy pa3hblm naneJMa ngAbaHOrO ekpaHa, nepemeaayka3aTeB BneBO IN Bnpabo npn Haxato KhoNke OK).
IepemeseHne o6beKta Ha rIaBHOM 3KpaHe:
Bb6epnte oBeKT n DoXdntecb noRbIeHn IINn HappaBraUoSei peWetKn, 3aTeM nepetaunte erO B HyxHoe MeCTOn O TnyCTnTe.
ydaJIeHne 06beKta c rnaBHoro 3KpaHa:
BbI6epnte o6bekt, nepetaunTe erO K BepxHemy KpaIO 3KpaHa N OTnycTne HaI 3HaYKOM «Remove» (UdaNTb).
DenHCTaIIaIaIouo6bekTa:
Bb6epnte o6beKT, npeTaunTe erO K BepxHemy KpaIO 3KpaHa N OTnycTne HAD KOp3HHoJ «Uninstall» (DeuHcTaalnpobatb).
Co3dahne nanok nla npuloxhen:
Bb6epnte 3NaOK npnloKeHn I OTnycTe ero Ha dpyrM 3NaUkOM Ha rnaBHOM 3KpaHe, n Dba 3NaUka 6yDyT COBMeueHbl.
BudjkeTbI:
Bb6epnte 3NaOK «All Apps» (Bce npnoKeHn) Ha rnaBHOM 3KpaHe. Bb6epnte «Widgets» (BnJKeTb) B bepxHe qactn 3KpaHa. Ha rnaBHOM 3KpaHe BnJKeTOB MOKHO MaHnPyIupoBaTb BnJKeTaMn TaK Je, KaK 3HaUkAmn npINOKeHn.
U3meHeHne 06oEB:
Bb6epnte npctoe MeTo Ha rIabHom 3KpaHn HaxmTe KhoNkY O K , He otnycka ee.
EcnBbI He BnDnte yka3aTeNb:
IyBbT Dv Archos nepeWeB pexm OxuaHnHaXMMTe IIO6yIO KhoNky Ha NybTe, yTO6bpa36yDntb erO. Ha 3KpaHe oTo6paxKaetc coo6uHne o TOM, yTO nybTaKtNBeH.
EcnBaw npblr Dy Archos He pearpyeT:
Hahmnte KhoNky BkIoueHnHa ARCHOS TV CONNECT. BbIbepnte BapnaHT «Start remote pairing process» (Haatb npoecc ydaIeHHoKOMMytaun) n noTBePnte. CneynTe HnCTpyKzum, oTo6paKaIOUImcHa 3KpaHe. O6paTte BnImaHne, uTo KopoTkoE HaxaTne Ha KhoNky BkIoueHnNo3BOJareT nepeKIOuATbcMekdy BapnaHTAmn, a DOnrOe HaxaTne NcNoIb3yETcI INaTBePxKeHn.
Ecn npoBeHcrrhanaWiFi cnMxKom Hn3Km:
Y6eHntecb, yTO Bbl HaxoHnTecb Heaaleko OT TouKn Joctyna WiFi.
06HOBuTe MKNpOnporpaMMHoe o6ecneueHne ycTpoNCTBa: http://www.archos.com/support.
C6pocbTe n yctaHOBnTe 3aHOBO npaMeTpbl NOkJIoueHn.
06paTntecb K cBoemy npoBaIdepy coeHHeHnWiFi.
EcnBbI He MoXeTe NOnyUInb DoCTyn K faaJnAm MylbTmMeJa Ha BHeuHnx cepBepax:
Y6eIHTecb, yTO yCTpoiCTBa NOkJIIOUeHbI K OJHOI n ToJ ke CETn IHTepHET.
Y6eNTecb, yTO cepBepbl BkJIIOueHbI Ha HnX HAcTpoEH oUm IocTyI.
O6paTnTeCb K cnpaBKe no BaWemy yCTpOiCTBy, YTO6bl y3HaTb nOpO6Hee o npoecce o6uero doctyna.
National restrictions
This device is intended for home and office use in all EU countries (and other countries following the EU directive 1999/5/EC) without any limitation except for the countries mentioned below:
Country Restriction ReasonRemark
Bulgaria None General authorization required for outdoor use and public service
France Outdoor use limited
to 10mW e.i.r.p. within the band 2454-2483.5 MH
Military Radiolocation use. Refarming of the 2.4 GHz band has been ongoing in recent years to allow current relaxed regulation. Full implementation planned 2012
Italy None If used outside of own premises, general authorization is required.
Luxembourg None General authorization required for network and service supply (not for spectrum)
Norway Implemented This subsection does not apply for the geographical aera within a radius of 20~km from the centre of Ny-Alesund
Russian Federation None Only for indoor applications
Note: Frequency 2454-2483.5MHZ are restricted to indoor use in France.
Consult the declaration of conformity on http://www.archos.com/products/declaration_conformity.html
Open Source Software Offer
The software bundled with this product includes software files subject to certain open source license requirements. Such open source software files are subject solely to the terms of the relevant open source software license. Such open source software is provided on an "AS IS" basis to the maximum extent permitted by applicable law.
For the open source files contained herein, please access "Open source license" section located at: Settings\About tablet\Legal information on the device for the relevant copyright and licensing terms. You may obtain a copy of Apache License, Version 2.0 at http://www.apache.org/licenses/License-2.0.
You may also obtain a copy of GNU General Public License, Version 2 at the Free Software Foundation, INC, 51 Franklin Street, Fifth Floor, Boston, MA 02110-1301, USA.
Until the date that is three years after our last shipment of this product, you may obtain a copy of the source code corresponding to the binaries for any GPL-Licensed file by contacting ARCHOS customer service at http://www.archos.com and ARCHOS will send you a link to such source code or will provide instructions to get the source on a physical medium.
This offer is valid to anyone in receipt of this information.