Joy 00178850 - Power bank HAMA - Free user manual and instructions
Find the device manual for free Joy 00178850 HAMA in PDF.
| Product type | Portable battery |
| Brand | Hama |
| Model | Joy 00178850 |
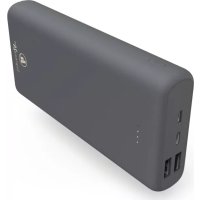
| Battery capacity | 5200 mAh / 18.4 Wh |
| Battery type | Lithium-ion (3.6 V) |
| Input / output voltage | 5 V |
| Input / output current | 2.1 A (2100 mA) |
| Input port | Micro-USB (IN) |
| Output port | USB-A (OUT) |
| Charge indicator | 4 LEDs (25% per LED) |
| Package contents | Battery, Micro-USB cable, instruction manual |
| Main functions | Charging mobile devices, optimized charging, automatic shut-off |
| Care and cleaning | Clean with a slightly damp, lint-free cloth, no harsh detergent |
| Safety | Do not open, avoid overheating and humidity, do not charge and discharge simultaneously |
| Spare parts and repairability | Battery non-replaceable, product to be recycled at end of life |
| General information | Domestic use, dry indoor, keep out of reach of children |
Frequently Asked Questions - Joy 00178850 HAMA
User questions about Joy 00178850 HAMA
0 question about this device. Answer the ones you know or ask your own.
Ask a new question about this device
Download the instructions for your Power bank in PDF format for free! Find your manual Joy 00178850 - HAMA and take your electronic device back in hand. On this page are published all the documents necessary for the use of your device. Joy 00178850 by HAMA.
USER MANUAL Joy 00178850 HAMA
Operating Instructions
Bedienungsanleitung
Mode d'emploi
Thank you for choosing a Hama product.
Take your time and read the following instructions and information completely. Please keep these instructions in a safe place for future reference. If you sell the device, please pass these operating instructions on to the new owner.
1. Explanation of Warning Symbols and Notes

Warning
This symbol is used to indicate safety instructions or to draw your attention to specific hazards and risks.

Note
This symbol is used to indicate additional information or important notes.
2. Package Contents
- Power Pack, 5200 mAh
- Micro-USB charging/connecting cable
- T hese operating instructions
3. Safety Notes
- T he product is intended for private, non-commercial use only.
- Protect the product from dirt, moisture and overheating, and only use it in a dry environment.
- K eep this product, as all electrical products, out of the reach of children!
- D o n ot drop the product and do not expose it to any major shocks.
- Do not operate the product outside the power limits given in the specifications.
- Do not open the device or continue to operate it if it becomes damaged.
- D ispose of packaging material immediately according to locally applicable regulations.
- Since the battery is integrated and cannot be removed, you will need to dispose of the product as a w hole. Do this in compliance with the legal requirements.
- Do not modify the product in any way. Doing so voids the warranty.
4. Operation
4.1 Charging the Power Pack
- B egin charging the power pack by connecting the included Micro-USB charging/connecting cable to the power pack's Micro-USB (IN 5 V/2.1 A) input and to a suitable USB charger. Please refer to the operating instructions for the USB charger used.
C hargbingbeginsand endsautomatically. - Charge the Power Pack fully before using it for the first time.

Note - Capacity
- T he capacity is always shown when the Power Pack is charging.
Each status LED corresponds to 25% of the capacity. When an LED is permanently illuminated, this indicates that this capacity level has already been reached. The Power Pack is charged to at least 75% if three LEDs are illuminated, and the fourth is flashing. - I fall four status LEDs light up, the full capacity is available.
- Press the button of the Power Pack to switch it on and to check its current capacity.
- To switch the power pack off, press the button twice until the status LEDs go out.

Warning - Battery
- O nly use suitable charging devices or USB connections for charging.
- As a rule, do not charge devices or USB connections that are defective and do not try to repair them yourself.
- Do not overcharge the product or allow the battery to completely discharge.
- A void storing, charging or using batteries in extreme temperatures.
- When stored over a long period of time, batteries should be charged regularly (at least every three months).
4.2 Charging terminal devices
- C onnect the included Micro-USB charging/connecting cable to the USB port on the power pack (OUT 5V/2.1A) and to the Micro-USB port on your terminal device (mobile phone, smartphone, etc.).
- T he Micro-USB charging/connecting cable included may not be suitable for the USB connection of your terminal device. In this case, use the USB cable that was included with your terminal device.
- Charging begins automatically. The status LEDs show the remaining capacity when the Power Pack is charging.
- T he current battery status of your terminal device will appear on this device.
- Press the button on the power pack twice to stop charging and switch it off. The status LEDs should switch off.
- The Power Pack will automatically switch off if it is not connected to a terminal device.

Warning - Connecting terminal devices
- Before connecting a terminal device, check whether the power output of the charger can supply sufficient power for the device.
- Ensure that the total power consumption of the connected terminal device does not exceed 2100mA .
- P lease refer to the instructions in the operating manual of your terminal device.
- It is essential that you observe these specifications and the safety instructions regarding the power supply of your devices.
- T he power pack must not be charged and discharged at the same time!

Note - O optimised charging
- O optimised charging means that the Power Pack recognises the connected terminal device and supplies it with the optimal current to minimise charging. Please note that the maximum power output of the power pack is 2100mA .

Warning
- Never connect the charging cable of the Power Pack to both the input and the output of the Power Pack at the same time. This could damage the battery.
- Do not connect any terminal devices while the Power Pack is charging. This could damage the Power Pack and the connected device.
5. Care and Maintenance
Only clean this product with a slightly damp, lint-free cloth and do not use aggressive cleaning agents.
6. Warranty Disclaimer
Hama GmbH & Co KG assumes no liability and provides no warranty for damage resulting from improper installation/mounting, improper use of the product or from failure to observe the operating instructions and/or safety notes.
7. Service and Support
Please contact Hama Product Consulting if you have any questions about this product. Hotline: +49 9091 502-115 (German/English) Further support information can be found here: www.hama.com
8. Technical Data
| Input | 5V=2100mA |
| Power output 5V 2100mA | --- |
| Battery type 3.6V/Li-Ion | |
| Min. capacity 5100mAh/18.4Wh | |
| Typ. capacity | 5200mAh |
9. Recycling Information
Note on environmental protection:
After the implementation of the European Directive 2012/19/EU and 2006/66/EU in the national legal system, the following applies: Electric and electronic devices as well as batteries must not be disposed of with household waste. Consumers are obliged by law to return electrical and electronic devices as well as batteries at the end of their service lives to the public collecting points set up for this purpose or point of sale. Details to this are
defined by the national law of the respective country. This symbol on the product, the instruction manual or the package indicates that a product is subject to these regulations. By recycling, reusing the materials or other forms of utilising old devices/Batteries, you are making an important contribution to protecting our environment.