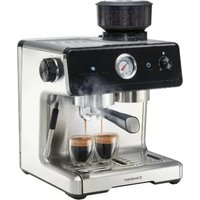
SKKM 200 A1 - Coffee machine SILVERCREST - Free user manual and instructions
Find the device manual for free SKKM 200 A1 SILVERCREST in PDF.

| Product type | Conical burr coffee grinder |
| Brand | SilverCrest |
| Model | SKKM 200 A1 |
| Power supply | 220-240 V ~, 50-60 Hz |
| Power consumption | 200 W |
| Bean hopper capacity | approx. 250 g |
| Ground coffee container capacity | approx. 160-185 g (max. 125-140 g) |
| Number of grind settings | 25 (from fine to coarse) |
| Quantity setting | For 1 to 14 cups (time-controlled) |
| Burr material | Stainless steel |
| Auto-stop function | Yes, after approx. 12 seconds or when the set quantity is reached |
| Portafilter support | Yes, for portafilters with outer diameter approx. 60 mm |
| Included accessories | Cleaning brush, dosing spoon/tamper |
| Protection class | II (double insulation) |
| Dimensions (L x W x H, estimated) | Approx. 12 x 12 x 28 cm |
| Weight (estimated) | Approx. 1.5 kg |
| Cleaning | Brush burrs; hopper and container are dishwasher safe |
| Warranty | 3 years |
Frequently Asked Questions - SKKM 200 A1 SILVERCREST
User questions about SKKM 200 A1 SILVERCREST
0 question about this device. Answer the ones you know or ask your own.
Ask a new question about this device
Download the instructions for your Coffee machine in PDF format for free! Find your manual SKKM 200 A1 - SILVERCREST and take your electronic device back in hand. On this page are published all the documents necessary for the use of your device. SKKM 200 A1 by SILVERCREST.
USER MANUAL SKKM 200 A1 SILVERCREST
Operating instructions
FR BE
MOULINÀ CAFÉ ÉLECTRIQUE
Mode d'emploi
CZ
ELEKTRICKY MLYNEK NA KÁVU
Návod k obsluze
SK
ELEKTRICKY MLYNČEK NA KÁVU
Návod na obsluhu
DK
ELEKTRISK KAFFEMØLLE
GB/IE Operating instructions Page 1
Safety instructions 3
Assembling the appliance 5
Operating the appliance 5
Operation 6
Selecting the grind setting 6
Setting the coffee powder quantity 7
Using the coffee powder container 7
Using the portafilter holder 8
Cleaning. 8
Storage 9
Troubleshooting 9
Disposal 10
Kompernass Handels GmbH warranty 10
Service 11
Importer 11
Introduction
Congratulations on the purchase of your new appliance.
You have selected a high-quality product. The opera-ting instructions are part of this product. They contain important information on safety, use and disposal. Before using the product, familiarise yourself with all operating and safety instructions. Use this product only as described and only for the specified areas of application. Please also pass these operating instructions on to any future owner(s).
Intended use
This appliance is intended exclusively for grinding roasted coffee beans.
This appliance is intended exclusively for use in dry interior rooms in private households. It is not for use outdoors or for commercial purposes.
Package contents
The appliance is supplied with the following components as standard:
- Coffee grinder with stainless steel taper mill
- Coffee bean container with lid
- Coffee powder container with lid
- Portafilter holder
- Cleaning brush
- Coffee spoon
- Operating instructions
NOTE
- Check the package for completeness and signs of visible damage. If any items are missing or damaged as a result of defective packaging or transportation, contact the service hotline (see section "Service").
Appliance description
(See fold-out page for illustrations)
1 Coffee bean container lid
Coffee bean container
Silicone ring
Upper grinding mechanism
Lower grinding mechanism
Scale for adjusting the grind setting
Output opening
Cable retainer
9 Dial for regulating the coffee powder quantity
Start/stop button
1 Cleaning brush
12 Portafilter holder
13 Coffee powder container lid
Silicone plug
15 Coffee powder container
16 Coffee spoon
Technical data
| Rated voltage | 220-240 V ~ (AC), 50-60 Hz |
| Input power 200 W | |
| Coffee bean container ② capacity | approx. 250 g |
| Coffee powder container ⑮* | approx. 160-185 g |
| Max. fill level of coffee powder container ⑯* | approx. 125-140 g |
| Protection class | II / ☑ (double insulation) |
| All the parts of this appliance that come into contact with food are food-safe. |
- Among other things, the capacity or the maximum filling quantity depends on the grind setting of the coffee powder and can therefore vary.
Safety instructions

RISK OF ELECTRIC SHOCK
- Connect this appliance only to correctly installed mains power sockets supplying a mains voltage of 220 - 240 ~V , 50 - 60 ~Hz .
- To avoid potential risks, if the appliance power cable is damaged, it must be replaced by the manufacturer, its customer service or by a qualified technician.
In event of operating malfunctions and before cleaning the appliance, remove the plug from the mains power socket.
Always remove the power cable from the socket by pulling on the plug, not on the power cable itself. - Do not crimp or crush the power cable, and route the cable so that it cannot be stepped on or tripped over.
- The appliance must not be exposed to moisture or used outdoors. If the housing is penetrated by liquid, disconnect the appliance from the mains power socket immediately and have it repaired by a qualified technician.
- Never touch the appliance, the power cable or the power plug with wet hands.
- All repairs to the appliance must be carried out by authorised specialist companies or Customer Service. Improper repairs may put the user at risk. They will also invalidate any warranty claim.
- Do not open the housing of the appliance motor unit. Should you do so, the safety of the appliance is no longer assured and the warranty will become void.
- Disconnect the appliance from the mains power source immediately after use. The appliance is completely free of electrical power ONLY when unplugged.

ever immerse the appliance in water or other liquids!
WARNING! RISK OF INJURY!
This appliance shall not be used by children.
- Keep the appliance and its cord out of reach of children.
- Appliances can be used by persons with reduced physical, sensory or mental capabilities or lack of experience and knowledge if they have been given supervision or instruction concerning use of the appliance in a safe way and if they understand the hazards involved.
Children shall not play with the appliance. - Cleaning and user maintenance may not be carried out by children.
- The grinding mechanism has very sharp edges. Never insert your fingers, cutlery or other objects into the grinding mechanism.
The appliance should always be disconnected from the mains when unattended and before assembly, disassembly or cleaning. - Use this appliance only as described in this instruction manual. Never use it for other purposes.
Misuse of the appliance can lead to a risk of injury!
ATTENTION! DAMAGE TO PROPERTY!
- Do not use the appliance to grind or chop any food other than roasted coffee beans.
Do not operate the appliance without coffee beans.
Do not grind coffee that has already been ground. - Use only the original accessories supplied with the appliance.
- Do not use an external timer switch or a separate remote control system to operate the appliance.
After operating the appliance for 3 minutes, allow it to cool down for at least 30 minutes.
Assembling the appliance
NOTE
For quality assurance reasons, every coffee grinder is tested at the factory using coffee beans. Small amounts of coffee powder might therefore remain in the grinding mechanism. This does not mean your originally packaged appliance is not brand new.
1) Clean the appliance before initial use as described in the section "Cleaning".
2) Place the appliance on a level surface.
3) Unwind the cable from around the cable retainer 8 and guide it through the recess at the edge of the housing.
4) Place the silicone ring 3 on the upper part of the grinding mechanism 4 in such a way that the silicone ring 3 is lying flat on the upper part of the grinding mechanism 4 and is flush with it.
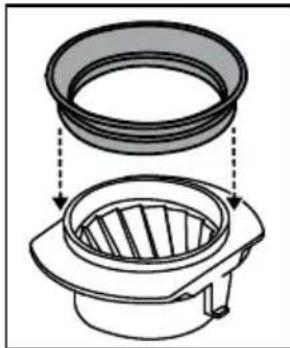
5) Insert the upper part of the grinding mechanism 4 into the lower part 5. The dot on the upper part of the grinding mechanism 4 must be aligned with the line on the housing, so that the two catches at the side slide into the corresponding recesses.
6) Place the coffee bean container 2 into the housing so that the arrow on the coffee bean container 2 is pointing to the symbol on the appliance housing. Turn the coffee bean container 2 a little way clockwise to lock it into position.
NOTE
The appliance can not be operated unless the coffee bean container 2 has been correctly inserted.
Operating the appliance
NOTE
- When starting the appliance for the first time, you may notice a small amount of smoke and a slight odour coming from the appliance. This is due to production residue. This is normal and is completely harmless. Ensure sufficient ventilation; for example, by opening a window.
If you are using the appliance for the first time, proceed as follows to remove any production residue:
1) Set up the appliance, as described in the previous section.
2) Insert the power plug into a mains wall socket.
3) Open the silicone plug 14 in the lid 15 of the coffee powder container 15 and push it into the appliance under the output opening 7 so that it sits stably in the round recess.
4) Add 3 tablespoons of coffee beans into the coffee bean container 2 and replace the lid 1.
5) Turn the coffee bean container 2 clockwise until the arrow on the coffee bean container 2 is above the 15 on the scale for adjusting the grind setting 6.
6) Turn the dial to position 2 and press the start/stop button to start the grinding process. The grinding process stops automatically after about 12 seconds.
7) If some of the coffee beans have still not been ground at the end of the grinding process, start it again by pressing the start/stop button.
8) If all of the coffee beans have been ground before the end of the grinding process, stop it by pressing the start/stop button to prevent the grinding mechanism from running empty.
NOTE
Before removing the coffee powder container 15, tap it lightly on the housing in front of the output opening to knock any coffee powder residue into the coffee powder container 15.
9) Remove the coffee powder container 15 and dispose of the ground coffee.
The appliance is now ready for use.
Operation
Add a maximum of approx. 250g of coffee beans into the coffee bean container 2. The lid 1 should still close. If necessary, shake the appliance carefully so that the coffee beans are evenly distributed in the coffee bean container 2.
ATTENTION! PROPERTY DAMAGE!
After operating the appliance for 3 minutes, allow it to cool down for at least 30 minutes.
NOTE
It is best to always freshly grind your coffee beans before use. Pre-ground coffee powder loses its aroma quickly.
- You can stop the grinding process at any time by pressing the start/stop button 10 . Pressing the start/stop button 10 again will start a new grinding process.
Selecting the grind setting
You can use the different grinder settings to adjust the grain size of the coffee powder.
As a rule of thumb, the finer the grind, the shorter the contact time of the coffee powder with the water will be. This is why espresso makers require very finely ground powder, filter coffee machines and hand filters a medium grind and cafetières a rather coarse grind.
NOTE
- Please also note the information about suitable powder fineness in the operating manual of your coffee machine.
The suggested grind settings are for guidance only. The ideal grind setting depends, for example, on the type of bean, the roast or your personal preferences. You should therefore try out the various options to find the optimum grind setting for your purposes.
Turn the coffee bean container 2 until the arrow on the coffee bean container 2 is above the desired grind setting on the scale for adjusting the grind setting 6. You can choose from 25 grind settings:
- 1 - 6: Fine powder, suitable for espresso preparation in the espresso pot or in a standard portafilter espresso machine. We recommend grinder setting 4.
- 6-16: Medium-fine powder, suitable for preparing standard household filter coffee. We recommend grinder setting 8.
- 16 - 25: Medium-fine to coarse powder, suitable for making coffee in a cafetière. We recommend grinder setting 20.
First select the recommended setting and then adjust the grinder by 1-2 levels at a time until you find the setting that suits you best.
Setting the coffee powder quantity
NOTE
The cup numbers next to the dial 9 are for orientation purposes only. The amount of coffee powder ground per cup depends on the type of bean, the roast and the grinding setting used.
The cup setting is time-controlled: At each step, the appliance grinds for approx. 6 seconds, i.e. 1 cup for approx. 6 seconds, 2 cups for approx. 12 seconds, etc. Depending on the grinder setting, a larger or smaller amount of coffee will be ground for the same cup setting. With a finer grind, the coffee beans run through the grinder more slowly than with a coarse setting and a smaller volume of coffee powder is produced.
The amount of coffee powder you need to make a cup of coffee typically depends on the type of bean, the roast, the grind setting used, cup size and your personal preferences. Try out which combination of bean type, grind setting and coffee powder quantity is best-suited for your purposes.
You can set a coffee powder quantity for 1- 14 cups. Select the required quantity with the dial 9.
Using the coffee powder container
1) Open the silicone plug 14 in the lid 13 of the coffee powder container 15 by turning it to one side.
2) Push the coffee powder container 15 into the appliance under the output opening 7 so that it sits stably in the round recess.
3) Press the start/stop button to start the grinding process. The grinding process stops automatically as soon as the set quantity of coffee powder is reached.
4) Use the start/stop button to manually adjust the amount of coffee powder as required.
NOTE
Before removing the coffee powder container 15, tap it lightly on the housing in front of the output opening to knock any coffee powder residue into the coffee powder container 15.
5) If you are grinding a large quantity of coffee beans, remove the coffee powder container 15 if necessary between grinds and shake it a little to distribute the coffee powder evenly. Replace the coffee powder container 15 in the housing and press the start/stop button 10 to start a new grinding process. As soon as the MAX marking in the coffee powder container 15 is reached, the container must be emptied.
6) Once you have ground enough coffee beans, turn the dial to the position OFF and remove the mains plug from the socket.
Using the portafilter holder
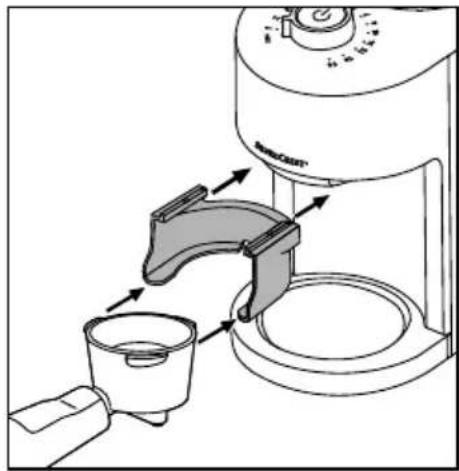
If you use a espresso machine with a portafilter to prepare your coffee, you can fill the portafilter directly with coffee powder. The portafilter holder is suitable for portafilters with an outer diameter of approx. 60mm (without fins).
1) Push the portafilter holder 12 as far as the stop into the guide rails next to the output opening with the opening facing forwards. Then slide the portafilter between the guide rails of the portafilter holder 12:
2) Use the dial to set a coffee powder quantity of 1 or 2 cups. Refer to the operating instructions of your espresso machine for the required quantity.
3) Press the start/stop button to start the grinding process. We recommend filling the portafilter in several small steps in order to dose the coffee powder precisely. Use the start/stop button to stop the grinding process or start it again.
4) Remove the portafilter and compact the coffee powder with the stamp/tamper of the coffee spoon 16.
5) If the desired fill level is not yet reached, push the portafilter back into the portafilter holder 12 and start a new grinding process.
Stop the grinding process by pressing the start/stop button 10. Finally, compact the coffee powder again with the stamp/tamper of the coffee spoon 16.
6) Once you have ground enough coffee beans, turn the dial to the OFF position and remove the mains plug from the socket.
Cleaning
RISK OF ELECTRIC SHOCK
Before cleaning the appliance, always pull out the plug from the mains power socket.
Never immerse the appliance in water or other liquids!
ATTENTION! PROPERTY DAMAGE!
Do not use abrasive or aggressive cleaning materials. These can irreparably damage the surfaces!
Do not moisten the grinding mechanism 4/ 5 to clean it!
NOTE
If there are still coffee beans in the coffee bean container 2, do not simply remove it in order to empty it out completely. The coffee beans would fall out of the coffee bean container 2. Instead, remove the lid 1 and pour the beans into a large bowl, for example. Store the coffee beans in an airtight container to preserve the aroma.
1) If the appliance is still plugged in, remove the power plug from the mains power socket.
2) Turn the coffee bean container ② anticlockwise until the arrow on the coffee bean container ② is above the symbol on the appliance. Pull the coffee bean container ② upwards and off the appliance.
3) Remove the lid 1 from the coffee bean container 2. The cleaning brush 1 is stored beneath the lid 1.
4) Pull the upper part of the grinding mechanism ④ upwards out of the appliance and pull off the silicon ring ③
5) Clean the upper and lower parts of the grinding mechanism 4/5 as well as the output opening 7 using the cleaning brush 11.
NOTE
During the grinding process, coffee fat is produced, which creates residue in the grinding mechanism 4 / 5 over time. Coffee fat and coffee powder residue must be removed at regular intervals with the cleaning brush to ensure an optimum grinding result.
6) Wash the coffee bean container 2 together with its lid 1, the coffee powder container 15 and lid 13 and the silicone plug 14, the portafilter holder 12, the cleaning brush 11 and the silicone ring 3 in lukewarm washing up water. Rinse with fresh water to remove all detergent residues and dry all parts thoroughly.
NOTE

The coffee bean container 2
together with its lid 1, the coffee
powder container 15 and lid 13 and
the silicone plug 14 as well as the portafilter holder 12 can also be washed in the dishwasher. If possible, place all the parts in the upper basket of the dishwasher and make sure that they are not jammed in place.
7) Clean the surfaces of the appliance with a damp cloth. For stubborn dirt, add some mild detergent to the cloth. Afterwards, wipe with a cloth moistened only with water to remove all detergent residue. Ensure that the appliance is completely dry before using it again.
Storage
1) Always wipe the appliance down thoroughly before storing as described in the section "Cleaning".
2) Wind the power cable around the cable retainer 8 in an anticlockwise direction. Guide the end of the power cable with the plug through the recess on the housing.
3) Store the appliance in a clean, dry location.
Troubleshooting
The appliance is not working.
The coffee bean container 2 has not been correctly inserted.
Check that the coffee bean container 2 is correctly positioned (see section Assembling the appliance).
The dial is set to the OFF position.
Set the required coffee powder quantity (see section "Setting the coffee powder quantity").
The power plug is not connected to the mains power.
Insert the plug into a mains power socket.
The mains power socket is defective.
Use a different mains power socket.
The appliance is defective.
Contact Customer Service (see section "Service").
The appliance is unusually loud or the motor does not start or does not run smoothly.
There is a foreign body in the grinding mechanism 4/5.
Clean the grinding mechanism 4/5 (see section "Cleaning").
Disposal

Never dispose of the appliance in normal domestic waste. This product is subject to the provisions of European Directive 2012/19/EU.
Dispose of the appliance through an approved disposal centre or at your community waste facility. Please observe the currently applicable regulations. Please contact your waste disposal centre should you be in any doubt.

Your local community or municipal authorities can provide information on how to dispose of the worn-out product.

The product is recyclable, subject to extended producer responsibility and is collected separately.

The packaging is made from environmentally-friendly material and can be disposed off at your local recycling plant.

Dispose of the packaging in an environmentally friendly manner. Note the labelling on the packaging and separate the packaging material components for disposal if necessary. The packaging material is labelled with abbreviations (a) and numbers (b) with the following meanings: 1-7: Plastics, 20-22: Paper and cardboard, 80-98: Composites.
This appliance has a 3-year warranty valid from the date of purchase. If this product has any faults, you, the buyer, have certain statutory rights. Your statutory rights are not restricted in any way by the warranty described below.
Warranty conditions
The warranty period starts on the date of purchase. Please keep your receipt in a safe place. This will be required as proof of purchase.
If any material or manufacturing fault occurs within three years of the date of purchase of the product, we will either repair or replace the product for you or refund the purchase price (at our discretion).
This warranty service requires that you present the defective appliance and the proof of purchase (receipt) within the three-year warranty period, along with a brief written description of the fault and of when it occurred.
If the defect is covered by the warranty, your product will either be repaired or replaced by us. The repair or replacement of a product does not signify the beginning of a new warranty period.
Warranty period and statutory claims for defects
The warranty period is not prolonged by repairs effected under the warranty. This also applies to replaced and repaired components. Any damage and defects present at the time of purchase must be reported immediately after unpacking. Repairs carried out after expiry of the warranty period shall be subject to a fee.
Scope of the warranty
This appliance has been manufactured in accordance with strict quality guidelines and inspected meticulously prior to delivery.
The warranty covers material faults or production faults. The warranty does not extend to product parts subject to normal wear and tear or to fragile parts which could be considered as consumable parts such as switches, batteries or parts made of glass.
The warranty does not apply if the product has been damaged, improperly used or improperly maintained. The directions in the operating instructions for the product regarding proper use of the product are to be strictly followed. Uses and actions that are discouraged in the operating instructions or which are warned against must be avoided.
This product is intended solely for private use and not for commercial purposes. The warranty shall be deemed void in cases of misuse or improper handling, use of force and modifications / repairs which have not been carried out by one of our authorised Service centres.
Warranty claim procedure
To ensure quick processing of your case, please observe the following instructions:
Please have the till receipt and the item number (IAN) 399050_2107 available as proof of purchase.
You will find the item number on the type plate on the product, an engraving on the product, on the front page of the operating instructions (below left) or on the sticker on the rear or bottom of the product.
If functional or other defects occur, please contact the service department listed either by telephone or by e-mail.
You can return a defective product to us free of charge to the service address that will be provided to you. Ensure that you enclose the proof of purchase (till receipt) and information about what the defect is and when it occurred.
You can download these instructions along with many other manuals, product videos and installation software at www.lidl-service.com.
This QR code will take you directly to the Lidl service page (www.lidl-service.com) where you can open your operating instructions by entering the item number (IAN) 399050_2107.
Service
GB
Service Great Britain
Tel.: 0800 404 7657
E-Mail: kompernass@lidl.co.uk
IE
Servicelreland
Tel.: 1890 930 034
(0,08 EUR/Min., (peak))
(0,06 EUR/Min., (off peak))
E-Mail: kompernass@lidl.ie
IAN3990502107
Importer
Please note that the following address is not the service address. Please use the service address provided in the operating instructions.
KOMPERNASS HANDELS GMBH
BURGSTRASSE 21
44867 BOCHUM
GERMANY
www.kompernass.com
Inhaltsverzeichnis
Einleitung 14
WARNING! STROMSCHLAGGEFAHRI!
KOMPERNASS HANDELS GMBH
BURGSTRASSE 21
44867 BOCHUM
DEUTSCHLAND
www.kompernass.com
Table des matieres
Introduction 26
Chere cliente, cher client,
Chere cliente, cher client,
KOMPERNASS HANDELS GMBH
BURGSTRASSE 21
44867 BOCHUM
ALLEMAGNE
www.kompernass.com
Inhoud
Inleiding 40
WAARSCHUWING! LETSELGEVAAR!
KOMPERNASS HANDELS GMBH
BURGSTRASSE 21
44867 BOCHUM
DUITSLAND
www.kompernass.com
Obsah
Uvod 52
Pouziti v souladu s urcenim 52
Rozsah dodávky. 52
Popis pristroje 52
Technické udaje 52
POZOR! HMOTNÉ ŠKODY!
- Po 3 minutach provozu necheje pristroj alespon 30 minut vychladnout.
UPOZORNÉNÍ
POZORI HMOTNÉ SKODY!
KOMPERNASS HANDELS GMBH
BURGSTRASSE 21
44867 BOCHUM
NEMECKO
www.kompernass.com
Spistresci
KOMPERNASS HANDELS GMBH
BURGSTRASSE 21
44867 BOCHUM
NIEMCY
www.kompernass.com
Obsah
Uvod 76
KOMPERNASS HANDELS GMBH
BURGSTRASSE 21
44867 BOCHUM
NEMECKO
www.kompernass.com
Índice
KOMPERNASS HANDELS GMBH
BURGSTRASSE 21
44867 BOCHUM
ALEMANIA
www.kompernass.com
Indholdsfortegnelse
KOMPERNASS HANDELS GMBH
BURGSTRASSE 21
44867 BOCHUM
TYSKLAND
www.kompernass.com
Indice
Introduzione 112
Uso conforme 112
KOMPERNASS HANDELS GMBH
BURGSTRASSE 21
44867 BOCHUM
GERMANIA
www.kompernass.com
Tartalomjegyzék
Bevezeto 124
KOMPERNASS HANDELS GMBH
BURGSTRASSE 21
44867 BOCHUM
NÉMETORSZÁG
www.kompernass.com
Kazalo
KOMPERNASS HANDELS GMBH
BURGSTRASSE 21
44867 BOCHUM
NEMCIJA
KOMPERNASS HANDELS GMBH
BURGSTRASSE 21
44867 BOCHUM
GERMANY
www.kompernass.com