Concept 300 - Speaker Q-ACOUSTICS - Free user manual and instructions
Find the device manual for free Concept 300 Q-ACOUSTICS in PDF.
| Product type | Passive bookshelf speaker |
| Brand | Q-ACOUSTICS |
| Model | Concept 300 |
| Frequency response (-6 dB) | 55 Hz – 30 kHz |
| Impedance (average) | 6 Ω |
| Minimum impedance | 4.7 Ω |
| Sensitivity | 84 dB/W/m |
| Recommended power | 25 – 200 W |
| Distortion (120 Hz - 20 kHz) | < 0.2 % |
| Crossover frequency | 2.5 kHz |
| Woofer | 165 mm (6.50 inches) |
| Tweeter | 28 mm (1.10 inch) |
| Weight (per speaker) | 14.5 kg |
| Dimensions (W x H x D) | 220 x 355 x 400 mm |
| Wiring type | Bi-wire capable |
| Filter jumper | Treble adjustment: -0.5 dB / normal / +0.5 dB |
| Foam plugs included | Yes (to reduce bass if placed near a wall) |
| Included accessories | Manual, cleaning cloth, jumper, foam plugs |
| Optional stands (reference) | Pair of Q Concept 300 stands (492 x 688 x 430 mm) |
| Warranty | 4 years (extendable to 5 years on registration) |
| Maintenance | Slightly damp cloth, no solvents |
| Safety | Do not expose to water or heat, do not disassemble |
Frequently Asked Questions - Concept 300 Q-ACOUSTICS
User questions about Concept 300 Q-ACOUSTICS
0 question about this device. Answer the ones you know or ask your own.
Ask a new question about this device
Download the instructions for your Speaker in PDF format for free! Find your manual Concept 300 - Q-ACOUSTICS and take your electronic device back in hand. On this page are published all the documents necessary for the use of your device. Concept 300 by Q-ACOUSTICS.
USER MANUAL Concept 300 Q-ACOUSTICS
natural_image
Abstract black logo design resembling a stylized letter 'Q' (no text or symbols)ACOUSTICS
Concept 300
OWNER'S MANUAL

text_image
ENGLISHEN 01 DEUTSCHDE 12 ESPAÑOLES FRANÇAISFR 32 ITALIANOIT 42 NL NEDERLANDS 52 POLSKIPL 62 PORTUGUESPT 72 РУССКИЙRU 82 SVENSKASV 中国ZH 102
natural_image
Gray-scale icon of a speaker with two concentric circles and a 'Q' symbol at the base (no text or symbols beyond the icon)Contents
4 Important safety information and warnings
5 Package contents
5 Introduction
6 Set up
6 Speaker installation
6 Speaker positioning
8 Connections
8 Terminals and connectors
8 Standard connections
8 Bi-wire connections
9 Crossover jumper
10 Running in
10 Aftercare
10 Accessories
11 Warranty
11 Specifications
Important Safety Information and Warnings
1. Safety Information and Warnings
Before making any connections to your loudspeakers make sure that all active units in your system are switched off at the mains.
When switching on your sound system or changing input sources, set the main volume control at a low level. Turn up the level gradually.
NEVER play your sound system at full volume. The position of the volume control is deceptive and does not indicate the power level of the system. Using very high volume settings may damage your hearing.
1.1. Instructions
Read and understand these instructions before you use your loudspeakers. If damage is caused by failure to follow these instructions, the warranty will not apply. Please keep these instructions in a safe place.
Read these instructions.
Keep these instructions.
Heed all warnings.
Follow all instructions.
Do not use this apparatus near water.
DO NOT connect your loudspeaker terminals to the mains supply.
Do not install near any heat sources such as radiators, heat registers, stoves, or other apparatus (including amplifiers that produce heat.
Only use attachments/accessories specified by the manufacturer.
Unplug this apparatus during lightning storms or when unused for long periods of time.
2. Unpacking your loudspeakers

Unpack the speakers fully. Lift the speakers from the cartons by holding the cabinets. Do not use the protective bags to lift them. The Concept 300s are heavy - get assistance to lift them.
When manoeuvring loudspeakers, do not drag them across the floor as this may cause damage - lift each speaker before moving it. Be cautious with buttons and belt buckles as these easily cause cosmetic damage.
Check the loudspeaker carefully. If any items are damaged or missing, report this to your retailer as soon as possible.
Retain the packaging for future transport. If you dispose of the packaging, please do so following all recycling regulations in your area.
3. Installation
- Only use the accessories supplied with the Concept 300.
- To prevent injury, this apparatus must be securely mounted in accordance with the installation instructions.
- If you play your loudspeakers without their grilles fitted, be careful to protect the drive units from damage.
- DO NOT dismantle the loudspeaker. You will invalidate the warranty.
- The use of this apparatus is safe to use in tropical and/or moderate climates.
3.1. Moisture
• To reduce the risk of fire or electric shock, this apparatus should not be exposed to rain, moisture, dripping or splashing.
- Do not use this apparatus near water.
3.2. Servicing
Refer all servicing to qualified service personnel. Servicing is required when the apparatus has been damaged in any way, liquid has been spilled or objects have fallen into the apparatus, the apparatus has been exposed to rain or moisture, does not operate normally, or has been dropped.
4.0. Symbols used on this product
Hazard Warning Symbol

The 'exclamation mark' calls attention to features for which you should read this manual closely to prevent operation and maintenance problems.
CAUTION: To prevent electric shock, match wide blade of plug to wide slot, fully insert.
Waste Electrical and Electronic Equipment Symbol
This symbol indicates that when the unit is to be discarded, it must be separated from other household-type waste and sent to separate collection facilities for recovery and recycling of electrical and electronic equipment.

Please make sure you are familiar with your local rules on the separate collection of electrical and electronic products.
Package Contents
natural_image
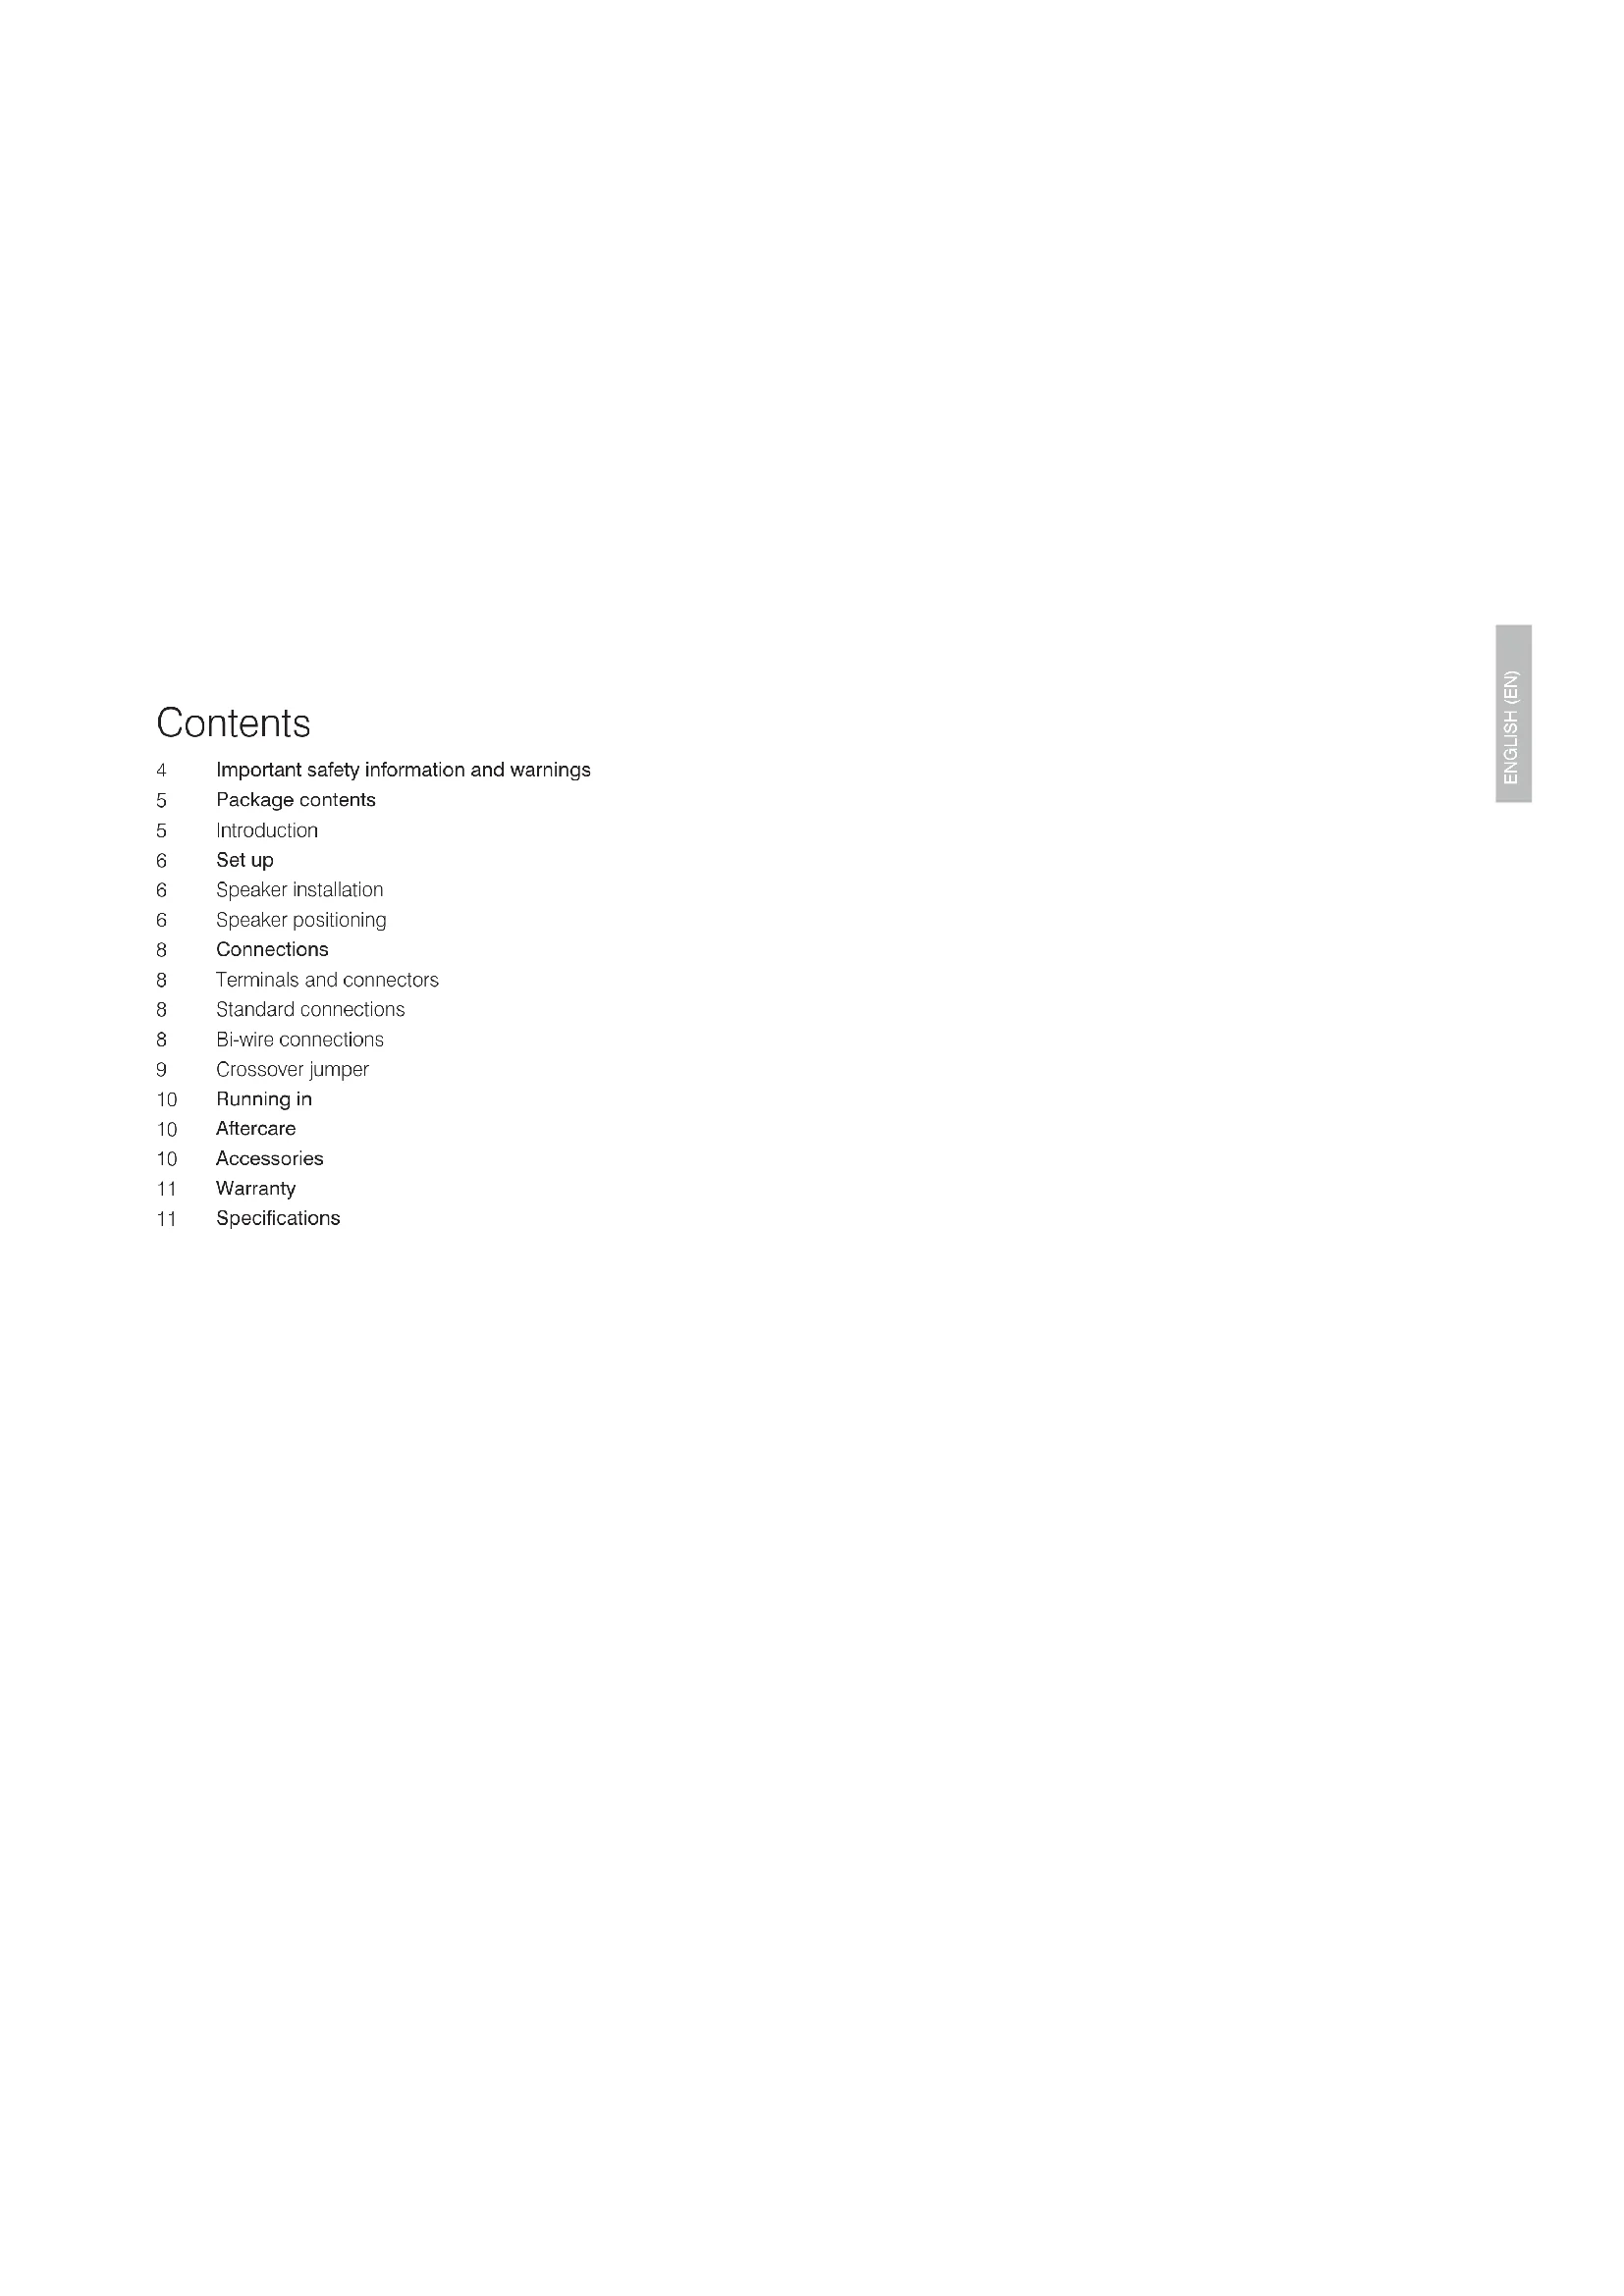
Line drawing of a speaker with two circular speakers and a G button (no text or symbols)1 x Concept 300

1 x Owner's manual

1 x Cleaning cloth

1 x Jumper

1 x Foam bung
Thank you for purchasing a pair of Q Acoustics Concept 300.
This manual is intended to take you through the setup and installation of the Concept 300. It will help provide a trouble free setup and ensure optimum performance from the product.
Please read the instructions, important safety information and warnings carefully before installation and use, to ensure the safe and satisfactory operation of this product.
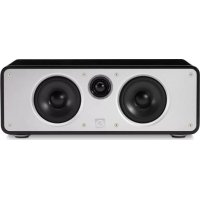
The objective with the Concept 300 was to concentrate on achieving a perfect balance between art and science to produce a loudspeaker that would be stylish, contemporary, fine-sounding and accurate.
A talented team of people has produced a beautiful loudspeaker that can be manufactured so consistently that the sound and performance of every unit will be identical.
We hope you enjoy the Q Acoustics experience.
Set up
Speaker Installation
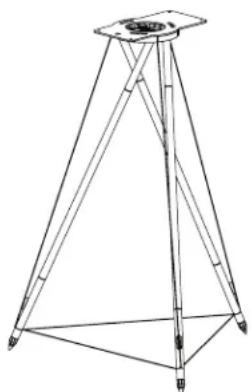
The Concept 300 speakers have been designed and tested to be used on the Concept 300 Floor Stand for the optimum listening experience.
Every Concept 300 has been factory set to level the speakers as the base is isolated from the main speaker body using our custom suspension system. This isolating technology allows for a calculated amount of movement within the speaker base so please do not be alarmed by this during setup.
Please contact your local dealer if you are unsure when setting up your Concept 300.
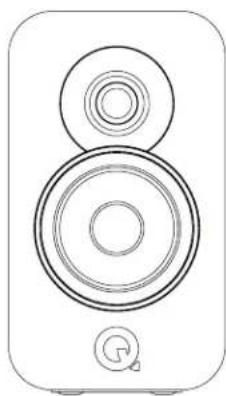
Speaker Positioning
The speakers should be placed 2.0 - 4.0 m apart and equidistant from the seated listener. Turning the speakers slightly inwards will sharpen the stereo image at the expense of a narrower sound stage.
text_image
0.6 - 1.0 m 2.0 - 4.0 m 1.0 - 1.5 mFoam Bung
Concept Series speakers are rear ported and designed to work best with at least 600 mm of free space behind them. Generally, the closer the speakers are to the rear wall the more the bass frequencies will be reinforced until they overwhelm the overall sound. In this instance closing the rear port with the foam bung will tend to reduce bass, which is useful when domestic circumstances demand that the Concept 300 is used closer to a rear wall.
Ensure the bungs are fitted snugly into the port without inserting them too far. You will find the level of bass is reduced but definition and bass extension is increased. The optimal position of the speakers will only be found through experimentation and by making small adjustments during the first few listening sessions.
natural_image
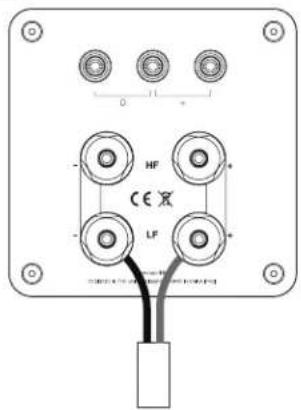
Technical line drawing of a mechanical device with a circular component and three connectors (no text or symbols)Connections
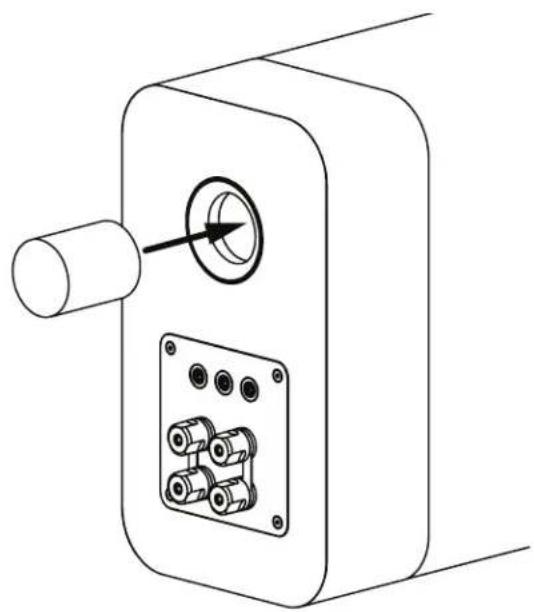
Terminals and Connectors
The Concept 300s are bi-wireable. A bi-wireable crossover has four terminals. The upper pair of terminals connect to the treble (HF) speaker and the lower pair to the bass (LF) speaker. The crossovers are pre-fitted with removable links to connect the terminal pairs and configure the loudspeaker in single-wire mode. This allows you to connect the loudspeaker conventionally using one pair of cables.
Standard Connections
Connect the RED (+) terminal of the RIGHT loudspeaker to the RED, Positive (+) terminal on the RIGHT channel of the amplifier.
Connect the BLACK (-) terminal of the loudspeaker to the matching BLACK, Negative (-) terminal of the amplifier.
Repeat this procedure for the LEFT channel.
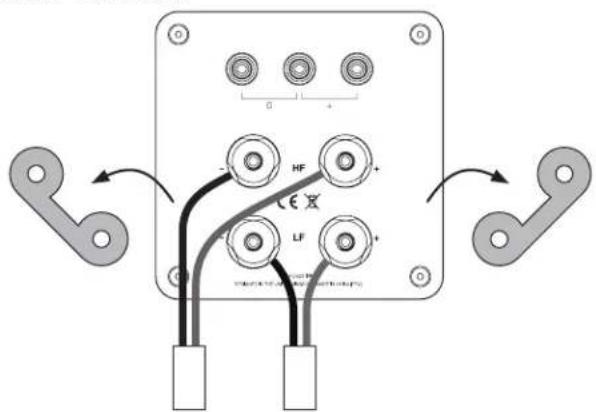
Bi-Wire Connections
To bi-wire: Prepare two twin cables for each loudspeaker. Unscrew all the loudspeaker terminals and remove both links. Now connect the treble terminals and the bass terminals to the amplifier following the procedure described in standard connections. Refer to illustration above.
Standard Connections
text_image
- HF - CE X - LF 0 + * *Bi-Wire Connections
text_image
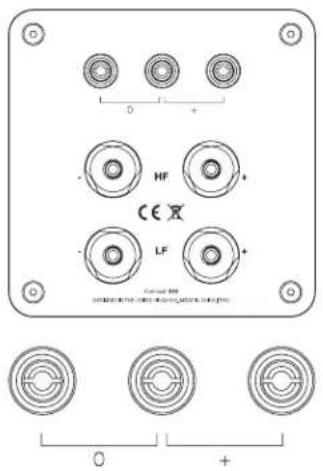
Diagram of an electronic device with labeled components including HF, LF, and CE indicators, showing wiring connections.Crossover jumper
The Concept 300 loudspeaker system features an elegant way to allow the user to tailor high frequency response to the particular listening environment by the placement of a simple jumper bar on the rear of the speaker.
With the jumper fitted to the two leftmost terminals the speakers will deliver the level of HF energy the designer intended for a 'normal' room acoustic. Removing the jumper completely, delivers a response with less HF (treble) energy than the "ideal" response and a small increase in HF energy will be obtained with the jumper fitted to the two rightmost terminals.
Heavily furnished rooms may require a small increase in HF level whereas sparsely decorated rooms may be quite reverberant and require a response with slightly less HF energy.
Please bear in mind that there is no "correct" position. The final position should be the one which gives the listener maximum enjoyment when listening to their favourite music.
Less treble (-0.5dB) Normal More treble (+0.5dB)
text_image
HF CE LF 0 + - + - - - 0 + -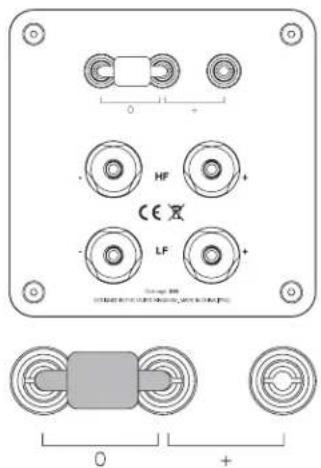
text_image
HF CE LF 0 + - - - - - - - - - - - - - - - - - - - - - - - - - - - - - - - - - - - - - - - - - - - - - - - - - - - - - - - - - - - - - - - - - - - - - - - - - - - - - - - -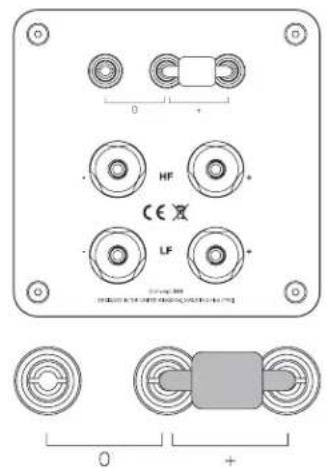
text_image
0 + HF CE LF + 0 + 0 +Running In
In common with many types of complex mechanical systems the Concept 300 loudspeaker will not deliver its optimum performance until it has been in use for a certain initial running-in period. The correct performance of a loudspeaker depends in part on the compliance of the suspension materials used during manufacture and these will only attain their long term steady state once they are operating at the temperature and modulus of elasticity specified during the design phase. It can take several days for a speaker which has been stored in a cold warehouse to finally reach room temperature and so we recommend at least 24 hours of normal use for the drive units to loosen up sufficiently for them to perform as the designer intended.
Accessories
Q Concept 300 stand pair
(W x H x D) 492 x 688 x 430mm
natural_image
Technical line drawing of a tripod-mounted surveying instrument with no visible text or symbolsAftercare
Cabinet Care

Clean cabinets only with a lightly dampened cloth. Do not use solvent based cleaning materials. Never use abrasives of any kind.
The cabinet surfaces will usually only require light dusting. Should an aerosol or other cleaner be used, apply the cleaner onto the cloth first and not directly onto the product. Test a small area first, as some cleaning products may damage the finish. Avoid products that are abrasive, or contain acid or alkaline agents. Do not use any cleaning materials on the drive units and avoid touching them as damage may result.

Real wood veneers are treated with an ultra-violet resistant lacquer to minimise changes in colour over time. Nevertheless, like all natural materials, a degree of colour change is to be expected. Keep the speakers away from direct sources of heat such as radiators and warm air vents in order to minimise the possibility of the wood veneer cracking. Keep the speakers away from direct bright sunlight.
Grilles
Grilles should only be cleaned using a soft brush when necessary.
If using the Concept 300 with the grilles removed, remember to replace them if pets or children are present.
Drive Units
Do not touch the drive units as they are easily damaged when exposed.
Warranty
Q Acoustics passive loudspeaker products are warranted free of defects in materials and workmanship for a period of 4 years from the date of purchase. During the warranty period Q Acoustics will, at its option, repair or replace any product found to be faulty after inspection by the company or its appointed distributor or agent.
Misuse and fair wear and tear are not covered by warranty.
Goods for repair should in the first instance be returned to the supplying dealer. If this is not possible contact Q Acoustics or their appointed distributor for your area to determine the correct warranty procedure. If possible the original packaging should be used to return the product as damage sustained during transit to the repair centre is not covered by the warranty. The warranty does not in any way affect your legal rights.
Warranty can be extended to 5 years by registering your product at qacoustics.co.uk/register.
For service information contact: info@qacoustics.co.uk
Q Acoustics
Stortford Hall Industrial Park
Bishops Stortford, Herts, UK
CM23 5GZ
Specifications
Performance
Frequency Response (-6dB) 55 Hz - 30 kHz
Average Impedance 6 Ω
Minimum Impedance 4.7 Ω
Sensitivity
Recommended Power 25 – 200 W
Distortion (120Hz - 20kHz) <0.2%
Crossover Frequency 2.5 kHz
Driver dimensions
Mid / Bass Driver 165 mm (6.50 in)
High Frequency Driver 28 mm (1.10 in)
Weight and dimensions
Weight (per cabinet) 14.5 kg (31.9 lbs)
Cabinet inc. base and terminals 220 x 355 x 400 mm
(W x H x D) (8.6 x 13.97 x 15.75 in)

natural_image
Abstract black logo design with no text or symbolsACOUSTICS
Concept 300
Benutzerhandbuch
Inhaltsverzeichnis
natural_image
Line drawing of a speaker with two circular speakers and a G button (no text or symbols)1 × Concept 300
natural_image
Technical line drawing of a mechanical device with a circular component and three connected ports (no text or symbols)Anschlüsse
text_image
- HF - CE X - LF 0 + * *Bi-Wire-Anschlüsse

text_image
Diagram of an electronic device with labeled components including HF, LF, and CE indicators, showing wiring connections.Crossover-Jumper
natural_image
Technical line drawing of a tripod-mounted surveying instrument with no visible text or symbolsNachsorge
Gehäusepflege

Stortford Hall Industrial Park
Bishops Stortford, Hertfordshire, UK
CM23 5GZ
Technische Daten
Leistung
Frequenzgang (-6 dB) 55 Hz–30 kHz
natural_image
Abstract black logo design with no text or symbolsACOUSTICS
Concept 300
MANUAL DEL USUARIO
Índice
natural_image
Line drawing of a speaker with two circular speakers and a G button (no text or symbols)natural_image
Technical line drawing of a mechanical device with a circular component and three connected ports (no text or symbols)Conexiones
text_image
Diagram of an electronic device with labeled components including HF, LF, and CE indicators, showing wiring connections.Puente cruzado
natural_image
Technical line drawing of a tripod-mounted surveying instrument with no visible text or symbolsCuidado
Stortford Hall Industrial Park
Bishops Stortford, Herts, Reino Unido
CM23 5GZ
Especificaciones
Rendimiento
natural_image
Abstract black logo design with no text or symbolsACOUSTICS
Concept 300
MANUEL DU PROPRIÉTAIRE
Sommaire
natural_image
Line drawing of a speaker with two circular speakers and a G button (no text or symbols)1 Concept 300
natural_image
Technical line drawing of a mechanical device with a circular component and three connectors (no text or symbols)Connexions
text_image
- HF - CE X - LF 0 + * *text_image
Diagram of an electronic device with labeled components including HF, LF, and CE indicators, showing wiring connections.natural_image
Technical line drawing of a tripod-mounted surveying instrument with no visible text or symbolsStortford Hall Industrial Park
natural_image
Abstract black logo design with no text or symbolsACOUSTICS
Concept 300
MANUALE UTENTE
Sommario
natural_image
Line drawing of a speaker with two circular speakers and a small G button at the base (no text or symbols)1 Concept 300
natural_image
Technical line drawing of a mechanical device with a circular component and three connected ports (no text or symbols)Collegamenti
Collegamenti bi-wiring
text_image
- HF - CE X - LF 0 + * *Collegamenti bi-wiring

text_image
Diagram of an electronic device with labeled components including HF, LF, and CE indicators, showing wiring connections.Ponte crossover
natural_image
Technical line drawing of a tripod-mounted surveying instrument with no visible text or symbolsStortford Hall Industrial Park
Bishops Stortford, Herts, UK
CM23 5GZ
Specifiche
Prestazioni
Distorsione (120 Hz-20 kHz) <0.2%
natural_image
Abstract black logo design with no text or symbolsACOUSTICS
Concept 300
GEBRUIKERSHANDLEIDING
Inhoudsopgave
natural_image
Line drawing of a speaker with two circular speakers and a G button (no text or symbols)1 x Concept 300
natural_image
Technical line drawing of a mechanical device with a circular component and three connected ports (no text or symbols)Aansluitingen
text_image
Diagram of an electronic device with labeled components including HF, LF, and CE indicators, showing wiring connections.Crossover-geleiderbrug
natural_image
Technical line drawing of a tripod-mounted surveying instrument with no visible text or symbolsNazorg
Stortford Hall Industrial Park
natural_image
Abstract black logo design with no text or symbolsACOUSTICS
Concept 300
INSTRUKCJA OBSŁUGI
Spis treści
natural_image
Line drawing of a speaker with two circular speakers and a G button (no text or symbols)natural_image
Technical line drawing of a mechanical device with a circular component and three connectors (no text or symbols)Podłączenia
Styki i złącza
text_image
- HF - CE X - LF 0 + * *text_image
Diagram of an electronic device with labeled components including HF, LF, and CE indicators, showing connections between terminals.Zworka zwrotnicy
natural_image
Technical line drawing of a tripod-mounted surveying instrument with no visible text or symbolsObsługaposprzedaży
Pielęgnacja obudowy

Stortford Hall Industrial Park
Bishops Stortford, Herts, Wielka Brytania
CM23 5GZ
Danetechniczne
natural_image
Abstract black logo design with no text or symbolsACOUSTICS
Concept 300
MANUAL DO UTILIZADOR
Índice
natural_image
Line drawing of a speaker with two circular speakers and a Q button (no text or symbols)1 x Concept 300

1 x Manual do utilizador

1 x Pano de limpeza

1 x Fio-ponte

1 x Tampa de espuma
natural_image
Technical line drawing of a mechanical device with a circular component and three connectors (no text or symbols)Ligações
Terminais e conectores
text_image
Diagram of an electronic device with labeled components including HF, LF, and CE indicators, showing wiring connections.natural_image
Technical line drawing of a tripod surveying instrument with no visible text or symbolsCuidadosposteriores
Stortford Hall Industrial Park
Bishops Stortford, Herts, Reino Unido
CM23 5GZ
Especificações
Desempenho
natural_image
Abstract black logo design with no text or symbolsACOUSTICS
Concept 300
natural_image
Line drawing of a speaker with two circular speakers and a G button (no text or symbols)natural_image
Technical line drawing of a mechanical device with a circular component and three connected ports (no text or symbols)Соединения
natural_image
Technical line drawing of a tripod-mounted surveying instrument with no visible text or symbolsStortford Hall Industrial Park
natural_image
Abstract black logo design with no text or symbolsACOUSTICS
Concept 300
ÄGARMANUAL
Innehåll
natural_image
Line drawing of a speaker with two circular speakers and a G button (no text or symbols)1 x Concept 300

1 x Ägarmanual

1 x Rengörningsduk

1 x Jumper

1 x skumgummipropp
natural_image
Technical line drawing of a mechanical device with a circular component and three connected ports (no text or symbols)Anslutningar
text_image
Diagram of an electronic device with labeled components including HF, LF, and CE indicators, showing wiring connections.natural_image
Technical line drawing of a tripod surveying instrument with no visible text or symbolsEfterskötsel
Skötsel av kabinett

Stortford Hall Industrial Park
Bishops Stortford, Herts, Storbritannien
CM23 5GZ
Specifikationer
Prestanda
natural_image
Abstract black logo design with no text or symbolsACOUSTICS
Concept 300
用户手册
目录
natural_image
Line drawing of a speaker with two circular speakers and a G button (no text or symbols)1 台 Concept 300

1 本用户手册

1块抹布

1条跨接线

1个泡沫塑料塞
感谢您购买 Q Acoustics Concept 300。
natural_image
Technical line drawing of a mechanical device with a circular component and three connected ports (no text or symbols)连接
接线端和连接器
text_image
Diagram of an electronic device with labeled components including HF, LF, and CE indicators, showing wiring connections.交叉跨接线
natural_image
Technical line drawing of a tripod-mounted surveying instrument with no visible text or symbols售后保养
箱体保养

Stortford Hall Industrial Park
Bishops Stortford, Herts, UK
CM23 5GZ
规格
性能
Our policy is one of continuous product improvement.
We reserve the right to change the designs and specifications without notice.
This document contains information that is subject to change without notice
Q16597-IS-ALL_r3