Concept 20 - Speaker Q-ACOUSTICS - Free user manual and instructions
Find the device manual for free Concept 20 Q-ACOUSTICS in PDF.

| Product type | Passive 2-way bookshelf speaker with rear port |
| Brand | Q-ACOUSTICS |
| Model | Concept 20 |
| Woofer | 125 mm |
| Tweeter | 25 mm |
| Frequency response | 64 Hz - 22 kHz |
| Nominal impedance | 6 ohms |
| Minimum impedance | 4 ohms |
| Sensitivity | 88 dB |
| Recommended amplifier power | 25 - 75 W |
| Crossover frequency | 2.9 kHz |
| Connection | Bi-wiring possible, gold-plated terminals |
| Recommended placement | On Q Acoustics stands or shelf, 200 mm from rear wall |
| Included accessories | User manual, foam bungs for bass correction |
| Care and cleaning | Dry cloth, no abrasive or solvent products |
| Passive speakers warranty | 5 years |
| Safety precautions | Do not expose to water, excessive heat, do not open |
| Compatibility | Stereo amplifier, home theater system |
Frequently Asked Questions - Concept 20 Q-ACOUSTICS
User questions about Concept 20 Q-ACOUSTICS
0 question about this device. Answer the ones you know or ask your own.
Ask a new question about this device
Download the instructions for your Speaker in PDF format for free! Find your manual Concept 20 - Q-ACOUSTICS and take your electronic device back in hand. On this page are published all the documents necessary for the use of your device. Concept 20 by Q-ACOUSTICS.
USER MANUAL Concept 20 Q-ACOUSTICS
User Manual and Product Specifications

ACOUSTICS
Concept Series
User Manual and Product Specifications

Important Information - Please Read Carefully
Read these instructions.
Keep these instructions.
Heed all warnings.
Follow all instructions.
Do not use this apparatus near water.
Clean only with dry cloth.
Do not block any ventilation openings.
Install in accordance with the manufacturer's instructions.
Do not install near any heat sources such as radiators, heat registers, stoves, or other apparatus (including amplifiers) that produce heat.
Use only attachments/accessories specified by the manufacturer. Use only with a cart, stand, tripod, bracket, or table specified by the manufacturer, or sold with the apparatus.
When a cart is used, use caution when moving the cart/apparatus combination to avoid injury from tip-over.

Unplug this apparatus during lightning storms or when unused for long periods of time.
Warning: To reduce the risk of fire or electrical shock, do not expose this product to rain or moisture. The product must not be exposed to dripping and splashing and no object filled with liquids such as a vase of flowers should be placed on the product.
No naked flame sources such as candles should be placed on the product.
Caution: Changes or modifications not expressly approved by the manufacturer could void the user's authority to operate this device.
Service: Equipment for servicing should be returned to the supplying dealer, or to the service agent for your area. The addresses of the main Service Agents for the UK are listed in this manual.
Third parties: In the unlikely event that you pass this product on to a third party, include these operating instructions with the product.

Q Acoustics Concept Series
Introduction
The Q Acoustics Concept Series is a range of loudspeakers designed to meet the highest expectations of dedicated 2-channel audiophiles and discerning movie enthusiasts.
The range comprises:
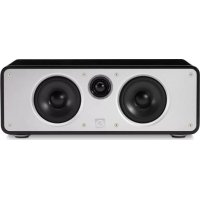
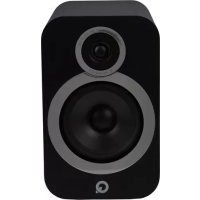
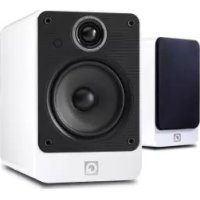
Concept 20: Bookshelf speaker with a 125mm bass driver.
Concept 40: Floorstander with two 125mm bass drivers.
Before making any connections to your loudspeakers make sure that all active units in your system are switched off at the mains.
When switching on your sound system or changing input sources, set the main volume control at a low level. Turn up the level gradually.
NEVER play your sound system at full volume. The position of the volume control is deceptive and does not indicate the power level of the system. Using very high volume settings may damage your hearing.
DO NOT connect your loudspeaker terminals to the mains supply.
DO NOT expose your loudspeakers to excessive cold, heat, humidity or sunlight.
If you play your loudspeakers without their grilles on, be careful to protect the drive units from damage.
DO NOT use makeshift stands. Fit the Q-Acoustics dedicated stand according to the instructions and using any fixings provided. Your dealer will advise you.
DO NOT dismantle the loudspeaker. You will invalidate the warranty.
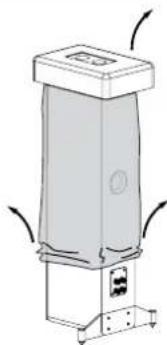
Unpacking your loudspeakers
Unpack the speakers fully. Lift the speakers from the cartons by holding the cabinets. Do not use the protective bags to lift them. The Concept 40s are heavy - get assistance to lift them if necessary.
When manoeuvring loudspeakers, do not drag them across the floor as this may cause damage - lift them before moving them.
In the carton you will find: The loudspeaker/s and this product manual.
Check the product carefully. If any items are damaged or missing, report this to your dealer as soon as possible.
Retain the packaging for future transport. If you dispose of the packaging, please do so following all recycling regulations in your area.

Preparation
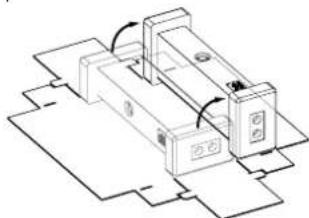
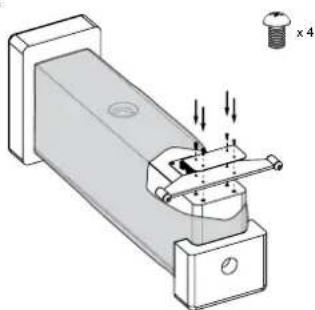
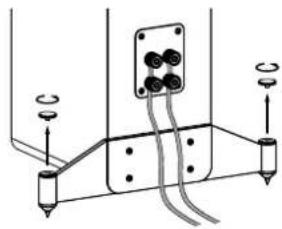
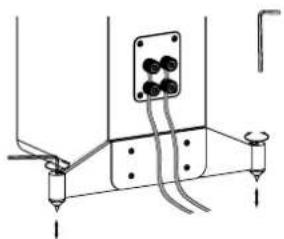
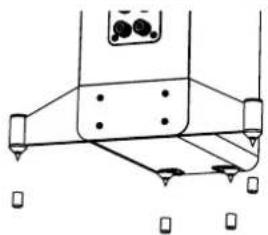
Fitting the Floorstand Spikes - Concept 40
Warning
Do not use close to a strong heat source - radiators, heaters or electrical equipment. Do not expose the stands to excessive cold, heat, humidity or sunlight. To clean use a damp cloth with washing up liquid if necessary. Do not use abrasive cleaners or cleaners containing solvent.
1

2
3
4

Spikes are sharp. Exercise care!
Never place a spiked loudspeaker where it can cause damage!
Always move your loudspeakers by lifting them - never drag them!

56
6
7
8
Warning
Do not strike the glass with anything hard or pointed.
Do not stand on glass base.
Do not overtighten the fixings.
Spikes should be fitted where floors are carpeted, for all exposed floors - wood, tiled etc use the domed feet. To avoid damage when spikes are fitted take care to place the stand where it cannot mark furnishings or pierce mains cables etc. The spikes will not damage carpets.

Preparation
Foam Bung
The Concept Series speakers are rear ported and designed to work best with some space behind them i.e. 200mm or so away from a wall. If you position your speakers close to a wall/corner then the foam bungs should be inserted into the rear ports or there could be too much bass.
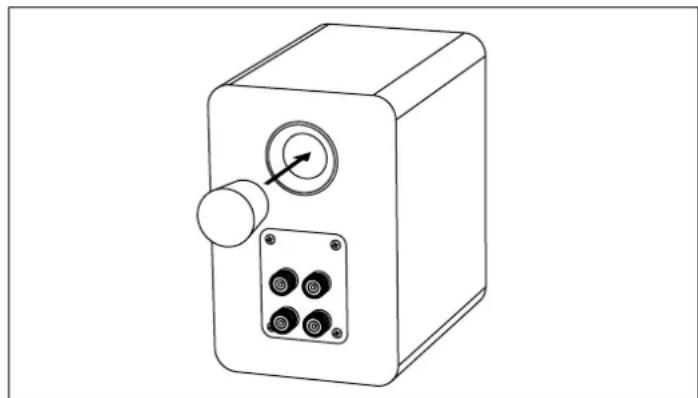
Ensure bungs are fitted snugly into the port without inserting them too far. You will find the level of bass is reduced but definition and bass extension is increased. Experiment to see what you prefer and try making small changes to the position of the speaker to optimise the final result.
Positioning
Concept 40
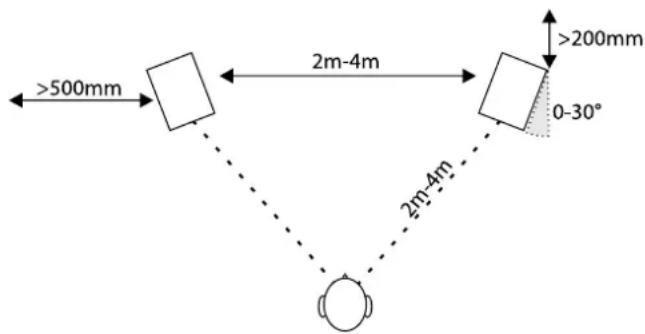
The Concept 40 loudspeakers should be positioned at least 200mm from a back wall and 500mm from the side walls. Placing the speakers closer to the wall will increase bass but could cause the sound to boom and lack precision and detail. The speakers should be 2m - 4m apart and central to the seated listener. Turning the speakers slightly inwards will sharpen a stereo image but may cause narrowing of the sound source.
Concept 20
The Concept 20s are ideally mounted on Concept floor stands. If you are stand mounting, a simple guide is that the treble unit should be at ear level to a seated listener. Stand mounted speakers should be treated as floorstanding speakers except that the speaker may be placed a little closer to the back wall. Shelf mounting is also possible. Be prepared to experiment to find the best setup for your taste in your particular listening room.

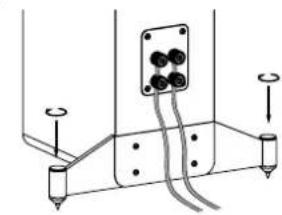
Connecting Passive Loudspeakers
Terminals and Connectors
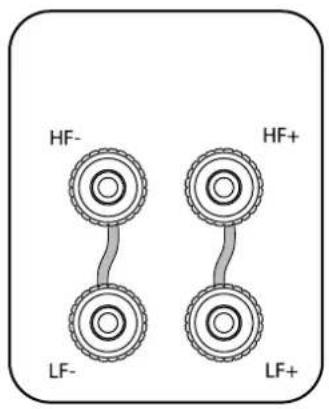
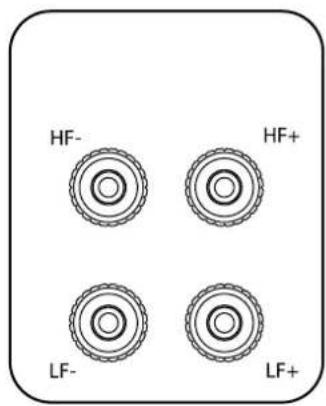
The Concept 20s and 40s are bi-wireable. A bi-wireable crossover has four terminals. The upper pair of terminals connect to the treble (HF) speaker and the lower pair to the bass (LF) speaker/s. As supplied the crossovers are fitted with removable links to connect the terminal pairs. This permits you to connect the loudspeaker conventionally using one pair of cables or in bi-wired mode with two pairs.
Standard Connection
Bi-Wired Connection
Loudspeaker Cables
Specialist loudspeaker cables will offer a higher standard of reproduction than general purpose 'bell' or 'zip' wire. Use cable with generous amounts of copper. Thin cables reduce the bass and restrict the dynamic range.
Speaker cable has a stripe or tracer along one core. By convention this is connected to the positive terminals. The cables connecting the amplifier to the front loudspeakers should ideally be the same length. Never join cables - use complete lengths.
Preparing Cables
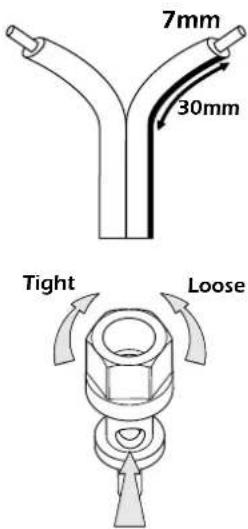
Split the cable to a depth of about 40mm . Bare the wire to a depth of 10mm and twist the ends to gather any stray wires. Crop the cable leaving 7mm of bare wire exposed.
Connecting a Terminal
Unscrew the terminal anticlockwise to expose the mounting hole in the base of the terminal column.
Insert the bare end of the cable into the hole. Re-tighten the terminal fully hand tight. Make sure there are no stray wires which could touch adjacent terminals.
In the EU it is against safety regulations to use 4mm loudspeaker plugs.

Connecting Passive Loudspeakers
Stereo Connections
Standard Connections
Connect the RED (+) terminal of the RIGHT loudspeaker to the RED, Positive (+) terminal on the RIGHT channel of the amplifier. Connect the BLACK (-) terminal of the loudspeaker to the matching BLACK, Negative (-) terminal of the amplifier. Repeat this procedure for the LEFT channel.
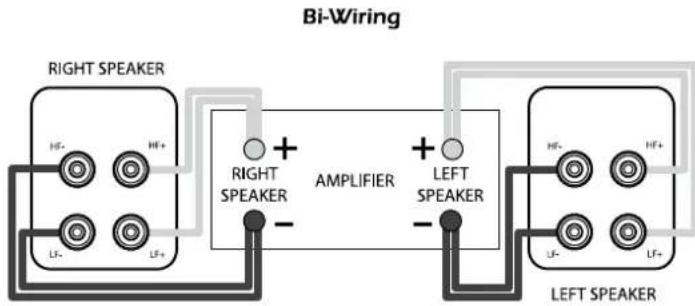
Bi-Wiring
Directly connecting the treble and bass networks of a loudspeaker to an amplifier improves both bass performance and dynamic range.
To bi-wire: Prepare two twin cables for each loudspeaker. Unscrew all the loudspeaker terminals and remove both links. Now connect the treble terminals and the bass terminals to the amplifier following the procedure described in Standard Wiring. Refer to the illustration below.

When your speakers are connected: Switch on the system and play some music at moderate level. Fine tune the speaker placement to suit.

Care and Cleaning
Warranty
Cabinet Care
Clean cabinets with a barely damp cloth. Do not use solvent based cleaning materials. If the cabinets become stained, remove the stain with a cloth lightly moistened with water, white spirit or isopropyl alcohol depending on the stain. Then lightly buff with a cloth to remove any residue of the cleaning agent. Never use abrasives of any kind.
Grilles
Lightly brush out grilles with a soft brush. Do not remove the speaker grilles unless absolutely necessary.
Drive Units
Drive units are best left untouched as they are easily damaged when exposed.
Q Acoustics loudspeakers are warranted free of defects in materials and workmanship as follows:
Passive Loudspeakers: 5 years from the date of purchase
Active Loudspeakers & Subwoofoers: 2 years from the date of purchase.
During the warranty period Q Acoustics will, at its option, repair or replace any product found to be faulty after inspection by the company or its appointed distributor or agent.
Misuse and fair wear and tear are not covered by warranty.
Goods for repair should in the first instance be returned to the supplying dealer. If this is not possible the item/s should be sent carriage paid preferably in the original packing, to Q Acoustics or their appointed distributor for your area and accompanied by proof of purchase. Damage sustained by goods in transit to the repair centre is not covered by warranty. Return carriage will be paid by Q Acoustics or their distributor as appropriate.
This warranty does not in any way affect your legal rights.
For service information in other countries contact info@qacoustics.co.uk
Q Acoustics
Armour Home Electronics Ltd
Units 7 & 8,
Stortford Hall Industrial Park,
Bishops Stortford, Herts, UK
CM23 5GZ

Q Acoustics Concept Series Specifications
| Passive Loudspeakers | Concept 20 | Concept 40 | |
| Enclosure type: | 2-way reflex | 2-way reflex with twin woofers | |
| Bass Unit: | 125mm | 2 x 125mm | |
| Treble Unit: | 25mm | 25mm | |
| Frequency response: | 64Hz - 22kHz | 53Hz - 22kHz | |
| Nominal Impedance: | 6 Ohm | 8 Ohm | |
| Minimum Impedance: | 4 Ohm | 4 Ohm | |
| Sensitivity: | 88dB | 90db | |
| Recommended Power: | 25 - 75W | 25 - 150W | |
| Crossover Frequency: | 2.9kHz | 2.3kHz | |
| Dimensions (W x H x D) | |||
| Cabinet: | 170mm x 260mm x 255mm | 170mm x 955mm x 285mm | |
| Including terminals & stabiliser: | 170mm x 260mm x 280mm | 390mm x 980mm x 305mm | |
| Weight (each): | 5.6kg | 18.5kg |

ACOUSTICS
Série Concept
Raccordements standard
Armour Home Electronics Ltd
Units 7 & 8,
Stortford Hall Industrial Park,
Bishops Stortford, Hertfordshire
170mm x 260mm x 255mm
170mm x 260mm x 280mm
5.6kg
2-way reflex with twin woofers
2 × 125 ~mm
25mm
53Hz-22kHz
8 Ohm
4 Ohm
90db
25-150W
2.3kHz
170mm x 955mm x 285mm
390mm x 980mm x 305mm
18.5kg

Serie Concept
Serie Concept Q Acoustics
Introduzione
Armour Home Electronics Ltd
Units 7 & 8,
Stortford Hall Industrial Park,
Bishops Stortford, Herts, UK
CM23 5GZ

Q Acoustics Concept Series Specifications
Q Acoustics Concept Series
Introduccion
Terminals and Connectors
Armour Home Electronics Ltd
Units 7 & 8,
Stortford Hall Industrial Park,
Bishops Stortford, Herts, UK
CM23 5GZ

Especificaiones Q Acoustics Concept Series
Units 7 & 8, Stortford Hall Industrial Park
Bishopstortford, Hertfordshire,
United Kingdom, CM23 5GZ