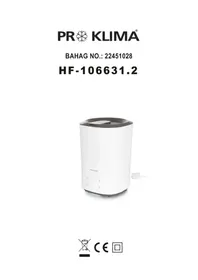
HF106631 - Fan Emerio - Free user manual and instructions
Find the device manual for free HF106631 Emerio in PDF.



| Brand | Emerio |
| Model | HF106631 |
| Product type | Air humidifier |
| Power supply | 220-240 V ~ 50-60 Hz |
| Power consumption | 30 W |
| Water tank capacity | Not specified in the manual |
| Mist output | 3 levels: low, medium, high |
| Built-in hygrostat | Yes, adjustable from 30% to 90% RH |
| Timer | 1 to 12 hours |
| Night mode | Yes (turns off display and night light) |
| Aromatherapy function | Yes, via aroma box with cotton |
| Auto shut-off | In case of insufficient water level |
| Water filter | Ceramic filter and ceramic balls (softening) |
| Recommended water type | Fresh, distilled, or demineralized water |
| Maintenance | Clean the transducer, basin, and tank weekly |
| Cleaning the transducer | Use citric acid or descaling agent |
| Cleaning the ceramic filter | Soak in vinegar for 5 min, rinse, dry in sun |
| Spare parts available | Replacement filters (at Bauhaus retailer), aroma cotton |
| Intended use | Household, indoor only |
| Recycling | Do not dispose with household waste, follow directive 2012/19/EU |
Frequently Asked Questions - HF106631 Emerio
User questions about HF106631 Emerio
0 question about this device. Answer the ones you know or ask your own.
Ask a new question about this device
Download the instructions for your Fan in PDF format for free! Find your manual HF106631 - Emerio and take your electronic device back in hand. On this page are published all the documents necessary for the use of your device. HF106631 by Emerio.
USER MANUAL HF106631 Emerio
CBeToIIOJHnT DnCnJIe Nc Mrrat Tpr NbTN C OuaKbaHaTa BnaXHoCT N CneT ToBa Ue Ce BbpHe KbM POKa3BaHe Ha TeKyUaTa BnaXHoCT. YpeBbT BnI3a BbB YHKUraTa Ha NOctOaHHa BnaXHoCT.
Pn yHKnraT a NOCToHHa BlaXHOCT HbOTO Ha n3nyckaHeTo Ha Mbrna He MoKe da ce perynipa. YpeDbT ige ro perynipa aBtOMaTHNo.
Korato OuaKaBaHaTa BnaJHocTe c 16% no-BnCoka OT TeKyuata Ta BnaJHocT, ypeIbT Ie pa6OTc HnBO Ha n3nyckaHe Ha Mbrla 3.
Korato ouakbaHata BnaJxHocTe c 10% - 15% no-BncoKa oT Tekyuata BnaJxHocT, ypeIbT ue pa6oTu C HnBO Ha n3nyckaHe Ha MbyIa 2.
- Korato ouakbaHaTа влжнocTe c 1% - 9% no-Bucoka ot tekuyaTa влжнocTe, ypeDbT ue paBOTn C HnBO 1.
Korato OuaKaBaHaTa BnaJHoCT e No-HnCKa OT TeKuIaTa BnaJHoCT ypeIbT Ie 6bIe B peKIM Ha 3acnBaHe.
CleHnactpoiBaHe Ha ouaKaBaHaTa BnaXHoCT CBeToNDIOHNrT DnCnIe NcNLe NOKa3Ba TeKyuTa BAJxHOCT, OauKaBaHaTa BnaXHoCT (6aBHO MmraHe) n TaMepa (aKO e HacTpoEH cpeDyBaHe B uKbI.
3a6eIeKka: IIO BpeMe Ha pa6oTa npOdbJIknteHn Ho HATNCKaHe Ha 6yToHa ,HUMIDITY"(BJIAXHOCT) 3a 2 ceKyniNe IpnuHHn BIn3aHe Ha ypeDa B HOseH peKIM. INDnKaTOpHaTa CBeTlnHa B DOJHaTa qAcT Ha ypeDa ige Ce n3KnIOuH, KaTO n CBTeODnOHDnA T DnCIIe. HOBO npOdbJIknteHn Ho HATNCKaHe ige npuHHn n3JIn3aHe OTHoupeKIM.
Функця abTomaTnHо n3KЛIOuBaHe
Korato BoDATA B Cbda CtaHe TBbpe MaIko, 3a da NpDnBpka pa6oTata Ha OBnaJHntel, Toi cnpa pa6oTa aBTOMaTHNO. INHdkaTopHaTcCBeTlnHa B DOJIHaTc qact Ha ypeDa uce CBETHe B YepBeHo. DOnleTe BOHNpaeePBOap IdoKoCHete OTHOB6yToHa 3a BkL./u3Kn. 3a pectapTnpaHe. YepBeHaTc CBetlnHa uze ce npomeHn Ha cnHra.
IPOIDPbJxKA
B clyuante, koraTo BodaTa e TBbpda (Koeto O3Haaba, ye cbdbpxa TBbpde MHoro KaIunn MArHe3n), TMOxe da npuHn npoblemc ,KOTlen KaMbk" (BapOBnK) n Da npuHHn TeKKn YtaKN Bbpy NOBbpxHOCTTa HaCbDa 3a BOda, TpaHCIOcepa n BbTpeSHaT a NobbpxHOCT Ha BOHNr pe3epBOap. YtaKNte no NobbpxHOCTTa Ha TpaHCIOcep a MORaT da NOBnraT Ha npabINHOT My fYHKUOHnpaHe.
PpeopbUbaMe Bn cIeHTo:
1) I3noI3BaIte cTyeHa npEbaPeHa BOda IIN DeCTnIInpaHa BOda.
2)ПоунstВаиТe TpaHcДиОсра,ВODнЯ pe3epBoaPиMOdYna cбс CBda 3a BOda BCaKa ceDMUca.
3) CmehnTe BOaTa B pe3epBoapa YecTo, 3a Da n36eHHeT "KOTLeH KaMbK"/BapOBnK.
4) I3toBaIte BoaTa OT BODHnpeepBoap nnoCyuwaBaiTe cba 3a BOa, npeDn da npnbipate ypeDa 3a Dblro BpeMe.
5) Празулnotpe6a поисваite цлия урази и ce уberpaite, ue BCnckn quactn ha ypeda ca HanbIHO noDCyweH.
Korato nma teu ot dbHOTo Ha pe3epBoapa, ot yacTta, KbdeTo e npyXHHata, MoJHaTnCHete n OTnycHeTe npyXHHata HAKOLKO nbTN, 3a da OTcTaHnTe OCTaTbCHTe OT KOTJIeH KaMbK, KOINTO MORa Da npnUHHaBt Teya.
Kak ce nouchta bHnIbphata cnCTema:
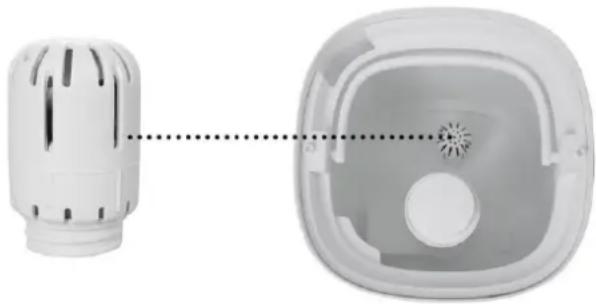
1)Почиствашипегиону Керамнчни Флтбсд уnotpe6а Ha 1000 Л вoda.В звисмocт оТ КачесьOTO Ha BODaTа,akо Керамнчпсе сфepn ca 3ambpcehn,Флтбрт Тр6Ba Да 6bde поисьанно-үсто.
2) ToM MoKe Da 6bDe nToH e B oUeT 3a OKoJIo 5 MInHyTu. CneT ToBa Ro n3nJaKHeTe c uNcTa BoDa.
3) OctaBeTe ΦπTbpa Ha cnBnue 3a 4-6 yaca.
4) Mojete da 3akynite pe3epBn HnItpn OT MeCTHm Maar3n Ha Bauhaus.
Kak ce nooHCTBa TpaHCIOcepbT:
1) NocTaBeTe 5-10 KaNKn npenapat npoTbK KOTJIeH KaMbK IIN JIMMOHeHa KICeLIHa BbpxY NOBbpXHOCTTa Ha TpaHCIOcepa N3UkaKaIte 2-5 MmHyTu.
2) ɪəsʌpɒwete nɔbɒpxhʊcɪtæ n cʌeɪd TOBA nɪŋlaɪkHeTe TpaHcɪdOcepa C BOɪda.
Kak ce nouchTba cbdbT 3a BOda:
1) Nocntete cba 3a Bda C Meka Kbpna I n3noJI3BaIte npenapat npOTNB KOJIeH KaMbK IIN JIMMOHeHa Kncelina.
2) Ako KOTlENrT KaMbK NOKPnBa HAKO YacT Ha Cbda 3a BODa, KaHHeTe npenapata npOTNB KOTIeH KaMbK INI JIMoHEnHa TcCSeINHa Bbpxy KOTIeHnKaMbK I rO NoNCTe Tc YeTKa.
3)ИзплakHeTe cБда 3a BODa C BODa.
PbKOBOdCTBO 3A OTCTPAHRAHE HA HEN3IPABHOCTN
Ako nma npo6nem c Hopmalhata pa6ota, MoJra, BuxTe cneHnTe ToUKn:
| ПюбLEM | Вьзможни ручни | Вьзможни решения |
| Влага на поьрхостта okоло уреда | Уре=dbт с много виска настroduка, вьздуньт не моче за бсорбира поаванatable влажно и тя с конденира. | Hamалente Из napаянatable влага. |
| Мьглata миршие стоанно | Пл actmacata може за миршие рри пьвITE наковлк полизвannahу | Из Bavадete ВODпя pezeрваор, оеворете калaka и го OCTавете за 12 ча в xlадно пошени. |
| Мрьсанни застая ВODа. | Почистуе ворону розервоги и налейные чься ВODа. | |
| Остычес мирис от димфузирано apоматно масло върху памuya с.apоматноатор. | Остранente памuya с.apоматноатор, димфузnete Г счесы ВODа и Г оставete наизbethхе. | |
| He ce nizapява достаъуновMbгla | В сбда 3a ВODа Има Тьърд e Многу утайka. | Почистуе trпансдиюcertа и сьда 3a ВODа |
| Вodatura ePrekaileno Мрьсанни спocstavenа Тьърд e Дьлго в pezeрвога. | Почистуе ворону розервоги и сmedене счесы ВODа. | |
| Дюзата може дa e Блокираза. | Остранente BCИЧКИБLOКИРASIImpedmetи ot дюзата. | |
| Налiche e ecteстveна ил n3kyctbeha BeHTnlaция B cStатуа, koeto Влие на НарactbaheTo на npoцента оТносителна Влажноct. | П探测ete дalmа с Затворени врати и поztорциte. | |
| П探测ete дalmiВ сстаяне работи Климатik. | ||
| Henopmaileншum | Звкът bьв ВODиня розервогрpezoира, korato НИВOTо на ВODаТа e Tьърд e Nscko. | Haleite ВODa bьв ВODиня розервогр. |
| Уретът e Вьрху NeCTabilna Повьрхост | Премецпуеда Вьрху Stabilna,равна поьрхост. | |
| Hailicete e kondeнзаша в сстая. | Сстийота Temnéратуа e Тьърд e Nscka. | Отолente сстая. |
| Mbyrlata впебашино спiraда n3ллза. | Инданатогнata сvetлinaе eчерва. | Доблнente ВODиня розервогр. |
| Прогамираняпегидпогдпа таймера e ИЗTekьл. | Влухе obлжнітеля. | |
| Zeileboto HINBO Na BLaЖност e DoCTnГно.T. | - - | |
| Kontroлneyт панел не равotи | Рьцete Вс sa Tьърд e Blajkhni, korato равOTITE C контралпя панел. | Дрьжte рьцete си сухи, korato равOTITE C контралпя панел. |
| Балл praxce о появая okolo oblaжнітеля. | Използвага e ВODа с Виско минерално сьдьржане. | Използвага Decentnilupa ha ВODa c oblaжнітеля. Ако не разлалагаTe с Decentnilupa ha ВODa, Използвагапочистени ял Филtripира на ВODa. He 3abrabayte da поисстavesьп ВODиня розервогр ВEDньж садMinuho. |
| Овлжнітелят He e правліно почесень сед пос导读ату уnotpeбa. | Почистуе obлжнітеля. | |
| Инданатогнata сbeltлinaе e синя рпri вьлочвае, ho He nizmлзаMbгla. | Цelевatable вьлжноct e doctnilngnta. | Увелочete сzelевatable вьлжноct. |
| Инд�示ахета сбетлиа e черва. | Ная м вда в peз扼вогараз. | Довленье вodниpeз扼вогаи изчakайто пое 1 минута. |
| Новото на вда та e поcke. | ||
| HeobхомOTO НВО на вда та оше не e достигало вьв ВODни сьд. | Изчakайто пое 1 минута. | |
| Воронят peз扼вога рe и e правлино поциониран. | Пробerte поциониранeto на вороняpeз扼вога вьрух ochobata. | |
| Овлajнітеліт не e вьрух paвна повьрхноct. | Пробerte поциониранeto на obлajнітелі. |
TEXHNUECKN DAHHN
3axpaHbaHe:220V-240V\~50Hz-60Hz
MoHocT:30W
PeuzuklnpaHe
Ta3n Mapknipobka O3Nauchaba, ye To3n npOdyKT He Tpr6Ba Da ce n3xBpIa 3aeJHO c dpyrN 6HTOBn OTnaDbuB V DbpxkabTe, 3a KOnTO e B Cnla DnpeKTHBa 2012/19/EU. 3a Da ce npDeOTbpaTAT OTpuCaTeJIHNTe Bb3dEiCTBnB BbpxU OkOIHaTcpeDa IIN YuOBeShKOTo 3dPaBe, nopOJeHN OT HeKoHTPOJInpaHOTo INXbPJIaHe Ha OTnaDbuI, Tpr6Ba Da npEJaTe npOdyKTa 3a pezKnIpaHe, C
KoETo 1e NpOINOMOrHeTe UcToUHbNMa MoJel Ha NOBTOPO H3NOJ3BaHe Ha MaTePnAInTe. 3a Da npEpaTe H3NoJ3BaHO To UcTpoIcTBo 3a peuKInpaHe, H3NoJ3BaIte CnCTemnte 3a BpbuaHe n cb6npaHe nn ce CBpKHe TbPROBCKnI ppeclTabNTel, OT KOROTO cTe 3akynnll npOdykTa. TbPROBCKnI npEcdTabNTel Morat Da npEdaT npOdykTa 3a peuKInpaHe, Cbo6pa3eHo C ona3BaHeto Ha OKoJIHaTa cpeJa.
PRUVODCE PřI RESENI PROBLEMU
Thank you very much for purchasing our product. In order to ensure correct operation, please read this manual and instruction carefully before use.
IMPORTANT INSTRUCTIONS
When using electrical appliances, basic precautions should always be followed to reduce the risk of fire, electric shock, burns and other injuries.
- Read and save these instructions. Attention: pictures in the IM are for reference only.
- This appliance can be used by children aged from 8 years and above and persons with reduced physical, sensory or mental capabilities or lack of experience and knowledge if they have been given supervision or instruction concerning use of the appliance in a safe way and understand the hazards involved.
- Children shall not play with the appliance.
- Cleaning and user maintenance shall not be made by children without supervision.
- This appliance is intended to be used in household and similar applications.
- Unplug the appliance during filling and cleaning.
- Regarding maintenance, filling, cleaning and descaling of the appliance, please refer to the related paragraphs of the manual.
- If the supply cord is damaged, it must be replaced by the manufacturer, its service agent or similarly qualified persons in order to avoid a hazard.
- Before inserting the plug into the mains socket, please check that the voltage and frequency comply with the specifications on the rating label.
-
Disconnect the mains plug from the socket when the appliance is not in use and before cleaning.
-
Ensure that the mains cable is not hung over sharp edges and keep it away from hot objects and open flames.
- Do not plug or unplug the appliance from the electrical outlet with a wet hand.
- Never attempt to open the housing of the appliance, or to repair the appliance yourself. This could cause electric shock.
- Do not add detergents, chemical solutions in the appliance.
- Keep detergents and chemical solutions away from children.
- If there is any abnormal smell during normal operation, please switch off and disconnect power supply and ask qualified technician for repairing.
- Do not touch water in the water tank & components in the water when the unit is working.
- Do not switch on the appliance without water in the water tank.
- Do not scrape transducer at will.
- Do not clean transducer with detergents and chemical solutions.
- Indoor and domestic use only.
- When moving the appliance, lift it by the base unit; not by the water tank.
- Do not put items like clothing or towels on top of the appliance. If the nozzle is obstructed, this may cause the malfunction.
- Never use this appliance in a room where aerosol products (sprays) are used or in a room or where oxygen is being administered.
- Turn off the appliance and unplug it before removing the water tank and moving the unit.
-
Excessive humidity in a room can cause water condensation on windows and some furniture. If this happens, turn off the appliance.
-
Never place housing under water flow or immerse in liquids.
- Always place the humidifier on a hard, flat and level surface. Avoid exposure to direct sunlight and always keep it away from walls and heat sources such as stoves, radiators, etc. Warning: The humidifier may not work correctly if it is not placed on a level surface.
- Fill the water tank with fresh, distilled or demineralized water. Do not drop any other liquid into water tank or water basin.
- Do not shake the humidifier as this might cause the water spill over into the base of humidifier.
- Do not pour hot water into the tank, i.e. at a temperature in excess of 40^ C.
- The ideal relative humidity level for human comfort is in fact between 45% and 65% . Excess humidity shows up in the form of condensation on cold surfaces or cold walls in the room. To measure the room's humidity correctly, use a hygrometer available in most specialist shops and hypermarkets.
PARTS
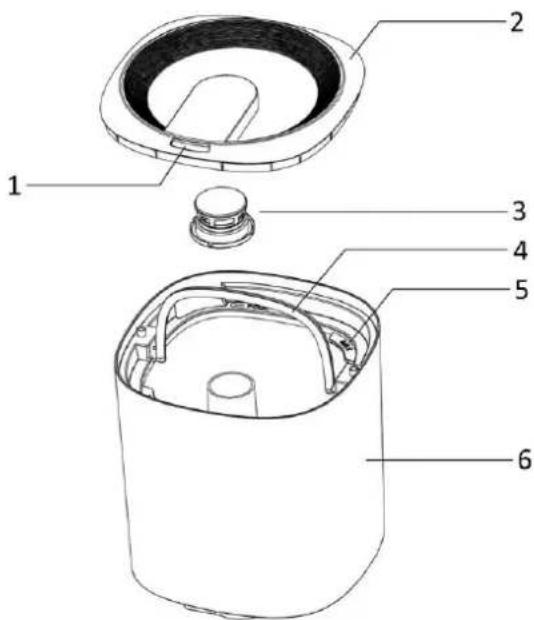
- Nozzle
- Top cover
- Mist block cover
- Handle
- Water tank frame (marked with the correct direction to pour the water:POUR; the max water level: MAX)
- Water tank
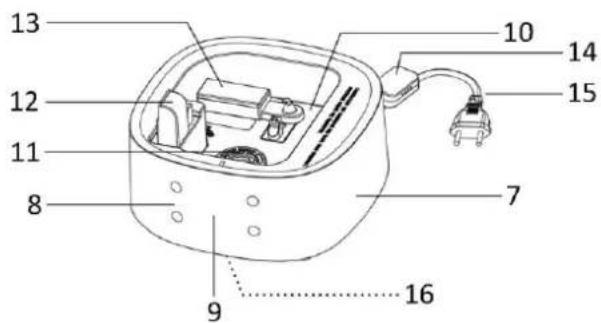
- Base
- Control panel
- LED display
- Water basin
- Transducer
- Air outlet
- Buoy
- Sensor
- Power cord and plug
- Indicator light
Control panel
- On/off button
- Mist output button
- Timer button
- Humidity button
FUNCTION
1. Relative Humidity Setting
1) Relative humidity in different environments suitable for people:
Bedroom, sitting room: 45-65%RH
Patient's room: 40 - 55% RH
Room with technical equipment: 45-60%RH
Room with piano: 40-60%RH
Museum, exhibition hall, and library: 40-50%RH
2. Water filter
1) Hard water can be softened by ceramic balls.
2) Strange smell can be eliminated by ceramic filter in the water.
3. Aroma box
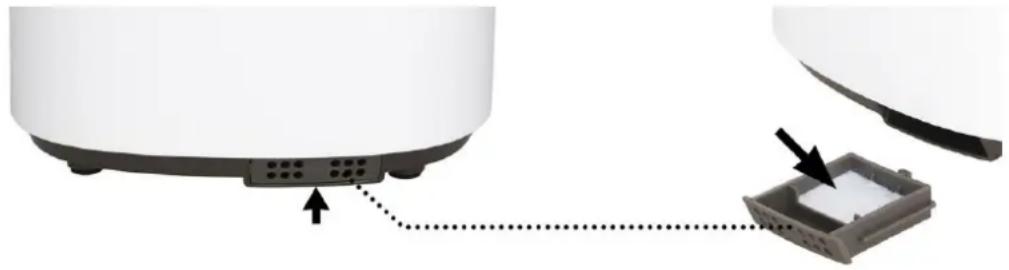
1) Press out the aroma box from the base.
2) Use water-soluble aroma oil and drop it on to the cotton.
3) Put the aroma box back into the humidifier. The aroma function will remain on when the humidifier is running.
4) To stop the aroma function or when storing the humidifier, clean the cotton in the aroma box.
5) Only drop aroma oil into aroma cotton. Do not drop any liquid except clean water into the water tank or basin.
Before operating, put unit at room temperature for half of an hour before running.
It is recommended to use the unit below temperature of 20^ and relative humidity less than 80% RH .
Use water below 40^
Clean the water basin before using.
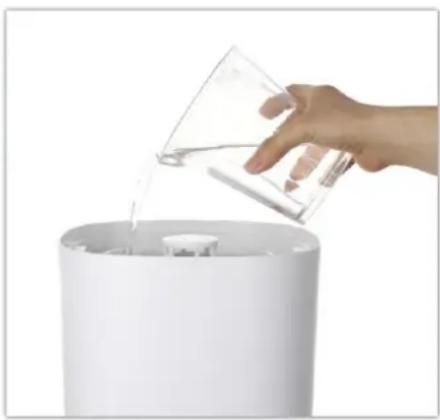
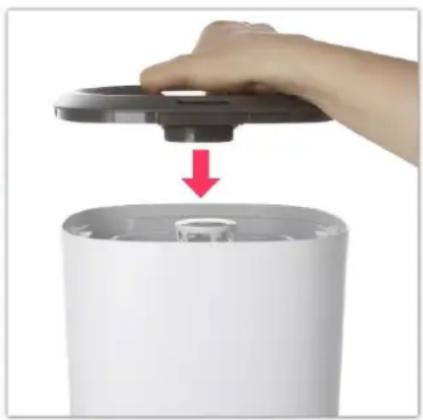
Filling instruction
Usage instructions
- Put the appliance on a flat surface.
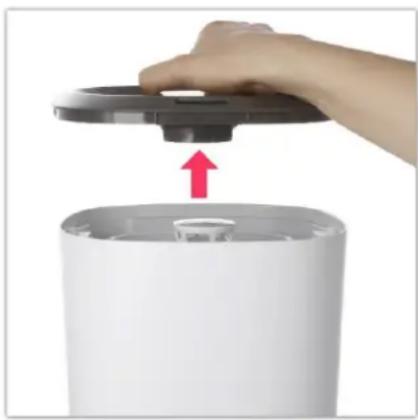
- Remove the top cover, fill water into the water tank and then put back the top cover. Alternatively, take out the water tank for filling water, afterwards put the water tank back on the main base.
- Check if the rated voltage meets the input voltage, and plug in the electric socket. The LED display will flash once and a beep sound will be heard. The appliance is in standby state.
- Touch the button "ON/OFF" on the control panel to switch on the appliance. The appliance begins to work at the mist output level "2" by default. The indicator light in the bottom of the unit illuminates in blue. The LED display shows the current humidity and the mist output level alternately.
- Touch the button "MAX/MIN" to adjust the mist output: 1 = low level of the mist output; 2 = medium level of the mist output; 3 = high level of the mist output.
- Touch the button "TIMER" to set your desired working time from 01-12 hours. (Touch the button till the LED display shows "---". It means to cancel the timer setting.)
The LED display will flash the set timer three times and then turn back to show the current humidity. The timer has been set.
Once the timer is set, the LED display will show the current humidity, the mist output level and the timer and then repeat circularly.
Note: You can also long touch the button "TIMER" for 2 seconds to cancel the timer function during working.
- Touch the button "HUMIDITY" to set your expected humidity from 30% RH to 90% RH . Touch once; it will increase by 5% RH . (Touch the button till the LED display shows "Co". It means to cancel the humidity setting.)
The LED display will flash the expected humidity three times and then turn back to show the current humidity. The appliance enters into the constant humidity function.
Under constant humidity function, the mist output level is nonadjustable. The appliance will adjust it automatically.
- When the expected humidity is 16% RH higher than the current humidity, the appliance works in mist output level 3.
- When the expected humidity is 10% RH - 15% RH higher than the current humidity, the appliance works in mist output level 2.
- When the expected humidity is 1% RH - 9% RH higher than the current humidity, the appliance works in level 1.
- When the expected humidity is less than the current humidity, the appliance will be in sleeping state. Once the expected humidity is set, the LED display will show the current humidity, the expected humidity (slow twinkle) and the timer (if set) and then repeat circularly.
Note: During working, long touch the button "HUMIDITY" for 2 seconds, the appliance enters into the night mode. The indicator light in the bottom of the unit will be off as well as the LED display. Long press again to exit the night mode.
Auto shut-off function
Once the water in the basin is too little to keep the humidifier working, the humidifier will automatically stop working. The indicator light in the bottom of the unit will turn red. Refill the water tank, and touch the on/off button again to restart. The red light will change to blue color.
MAINTENANCE
In case when the water is hard which means water contains too much calcium and magnesium, they can cause "white powder (limestone)" problem and may cause heavy sediments on the surface of the water basin, transducer and inner surface of the water tank. Sediments on the surface of the transducer could influence proper function.
We recommend:
1) Use cold boiled water or distilled water.
2) Clean the transducer, water tank and basin unit every week.
3) Change water in water tank frequently to avoid "white powder" / limestone.
4) Make sure to drain water out from the water tank and dry the water basin before storing the unit for a long period of time.
5) Clean the whole unit, and make sure that all parts of the unit are dried completely before use.
When there is leakage from the bottom of the tank, from the part where the spring is, please press and release the spring a couple of times to remove calcareous residue which can cause the leakage.
How to clean the filter system:

1) Clean the ceramic filter after using 1000L water regularly. Depend on the water quality, if the ceramic balls are dirty, the filter needs to be cleaned more frequently.
2) It can be dipped in vinegar about 5 minutes. Then rinse it with clean water.
3) Put the filter under the sun for 4 6 hours.
4) You can purchase replacement filters in your local Bauhaus store.
How to clean the transducer:
1) Put 5-10 drops of decalcifying agent or citric acid on the surface of the transducer; wait for 2-5 minutes.
2) Brush out the surface and then rinse the transducer with water.
How to clean the water basin:
1) Clean the water basin with soft cloth and use a decalcifying agent or citric acid.
2) If the scale deposit is covered in any place of the water basin, drop the decalcifying agent or citric acid on the scale deposit and clean it out with a brush.
3) Rinse the water basin with water.
TROUBLE SHOOTING GUIDE
Any trouble found in normal operation; please kindly refer to the following points:
| Trouble | Possible reasons | Possible solutions |
| Moisture on the floor around the unit | Device is set too high, the air cannot absorb the expelled moisture, it comes to rain down. | Reduce moisture evaporation. |
| Mist smells abnormally | Plastics might smell during first applications | Take out water tank, open cover, let it stay 12 hours in cool position. |
| Dirty water or long time staying water. | Cleaning water tank, fill in clear water. | |
| Residual smell from diffusing aroma oil on the aroma cotton. | Remove the aroma cotton, rinse it under clean water and allow it to dry. | |
| Insufficient mist evaporation | Too much sediment in the water basin. | Clean transducer and water basin |
| Water is too dirty or water kept too long in the tank. | Clean water tank, change to fresh clear water. | |
| The nozzle could be blocked. | Remove any blocking items from the nozzle. | |
| There is natural or artificial air replacement in the room which interfere the increase of %RH. | Check if doors and windows are closed. | |
| Check if there is no air conditioning working in the room. | ||
| Abnormal noise | Resonant sound in water tank when water level is too low. | Fill water into water tank |
| Unit is on an unstable surface | Move the unit to a stable flat surface. | |
| There is condensation in the room. | The room temperature is too low. | Heat the room up. |
| The mist suddenly stops coming out. | Indicator light is in red. | Refill water tank. |
| Programmed timer period has run out. | Turn humidifier on. | |
| The target humidity level is reached. | —— | |
| Control panel does not work | Hands are too wet when operating the control panel. | Keep hands dry while operating the control panel. |
| White dust appears around the humidifier. | Water being used has a high mineral content. | Use distilled water with the humidifier. If distilled water is not available, use purified or filtered water. Remember to clean water tank at least once a week. |
| Humidifier was not properly cleaned after last use. | Clean the humidifier. | |
| Indicator light is in blue when switched on, but no mist come out. | The target humidity is reached. | Increase the target humidity. |
| Indicator light is in red. | No water in the tank. | Refill the water tank and wait at least 1 minute. |
| Water level is low. | ||
| The water level required has not yet reached the water basin. | Wait at least 1 minute. | |
| The water tank isn’t well positioned. | Check the positioning of the tank on the base. | |
| The humidifier isn’t on a flat surface. | Check the positioning of the humidifier. |
TECHNICAL DATA
Power supply: 220V-240V ~ 50Hz-60Hz
Power: 30W

Recycling
This marking indicates that this product should not be disposed with other household wastes throughout the 2012/19/EU. To prevent possible harm to the environment or human health from uncontrolled waste disposal, recycle it responsibly to promote the sustainable reuse of material resources. To return your used device, please use the return and collection systems or contact the
retailer where the product was purchased. They can take this product for environmental safe recycling.
Zahvaljujemo vam što ste kupili naš proizvod. Kako bist esigurali pravilan rad, molimo da prije korištenja pažljivo pročitate ovaj prisćnik i upute.
VAŽNE UPUTE

- Функця abTomaTnHо n3KЛIOuBaHe
- IPOIDPbJxKA
- Kak ce nooHCTBa TpaHCIOcepbT:
- Kak ce nouchTba cbdbT 3a BOda:
- PbKOBOdCTBO 3A OTCTPAHRAHE HA HEN3IPABHOCTN
- TEXHNUECKN DAHHN
- PeuzuklnpaHe
- PRUVODCE PřI RESENI PROBLEMU
- IMPORTANT INSTRUCTIONS
- PARTS
- Control panel
- FUNCTION
- Relative Humidity Setting
- Water filter
- Aroma box
- Filling instruction
- Usage instructions
- Auto shut-off function
- MAINTENANCE
- How to clean the filter system:
- How to clean the transducer:
- How to clean the water basin:
- TROUBLE SHOOTING GUIDE
- TECHNICAL DATA
- Recycling
- VAŽNE UPUTE
Brand : Emerio
Model : HF106631
Category : Fan