
Twinlink - Stroller JANE - Free user manual and instructions
Find the device manual for free Twinlink JANE in PDF.
| Brand | JANE |
| Model | Twinlink |
| Category | Single stroller |
| Recommended age | From birth up to 15 kg (about 3 years) |
| Maximum child weight | 15 kg |
| Maximum basket weight | 4 kg |
| Parking brake | Brake pedal to lock/unlock with foot |
| Front wheels | Swiveling with direction locking device |
| Safety harness | Adjustable harness with central click buckle |
| Reclining backrest | Adjustable to multiple positions via straps (red logo to lower, black to raise) |
| Adjustable footrest | Multiple positions, buttons on the seat to lower |
| Safety bar | Removable, detachable from one or both sides via side buttons |
| Canopy | Extendable with viewing window |
| Rain cover | Included, attachment via velcros to the chassis |
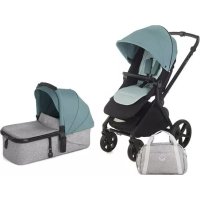
| Bassinet compatibility | Compatible with SMART bassinet (optional) |
| Folding | Compact with folding safety, foldable handlebar |
| Maintenance | Wash plastic parts with warm water and soap; removable cover washable (follow label) |
| Warranty | Complies with current regulations, requires invoice and registration on janeworld.com |
Frequently Asked Questions - Twinlink JANE
User questions about Twinlink JANE
0 question about this device. Answer the ones you know or ask your own.
Ask a new question about this device
Download the instructions for your Stroller in PDF format for free! Find your manual Twinlink - JANE and take your electronic device back in hand. On this page are published all the documents necessary for the use of your device. Twinlink by JANE.
USER MANUAL Twinlink JANE
natural_image
Black and red baby stroller with black body and orange handle, no visible text or symbolsnatural_image
Illustration of hands assembling a car's wheel assembly with a mechanical component (no text or symbols visible)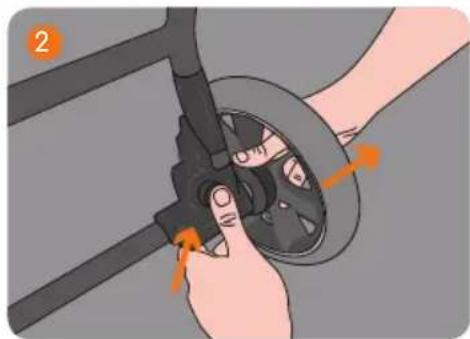
natural_image
Illustration of hands adjusting a car wheel component with orange arrows indicating motion (no text or symbols)
natural_image
Illustration of a stroller with a hand inserting a plug into it, no text or symbols present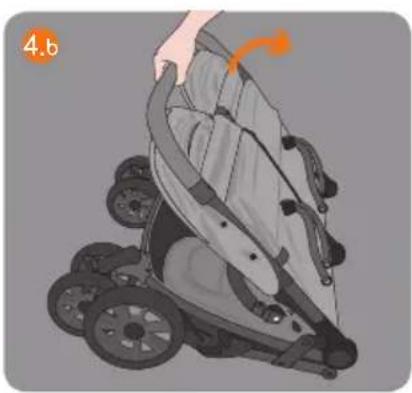
natural_image
Illustration of a stroller with a hand adjusting its seat, showing motion arrows (no text or symbols)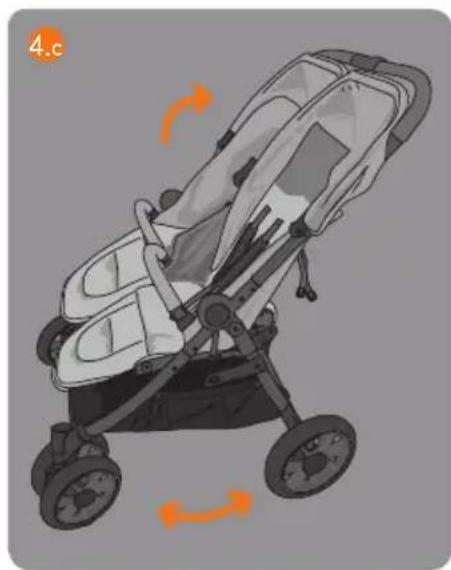
natural_image
Illustration of a baby stroller with motion arrows indicating rotation (no text or symbols)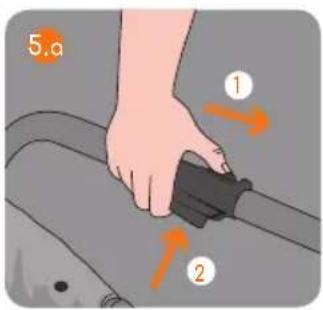
natural_image
Illustration of a stroller with hand and orange arrow indicating motion (no text or symbols)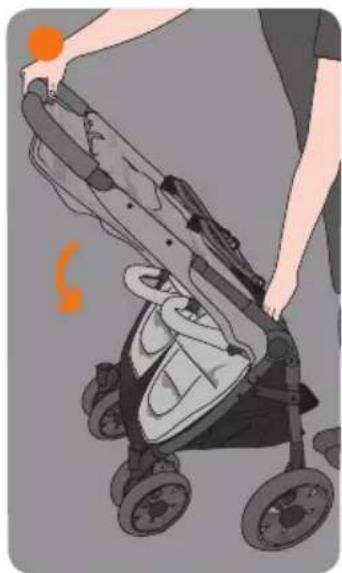
natural_image
Illustration of a person pushing a stroller with a baby in the background (no text or symbols)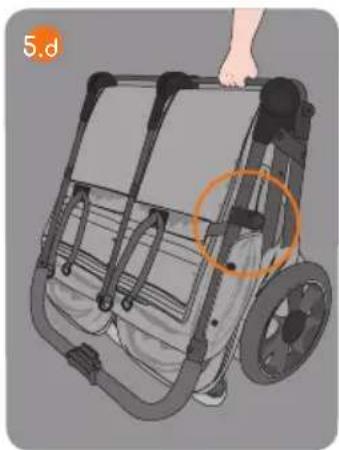
natural_image
Illustration of a stroller with handle and wheels, no text or symbols present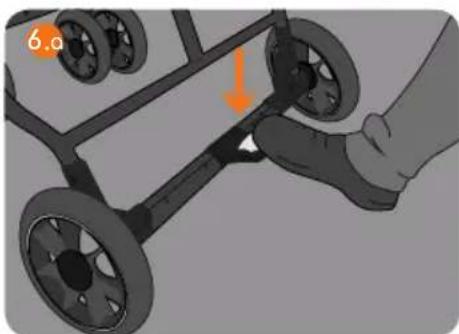
natural_image
Illustration of a hand operating a stroller with wheels and a hand adjusting the handle (no text or symbols)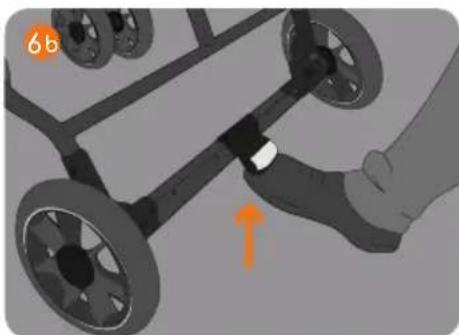
natural_image
Illustration of a hand operating a stroller with wheels and a handle, showing motion direction (no text or symbols)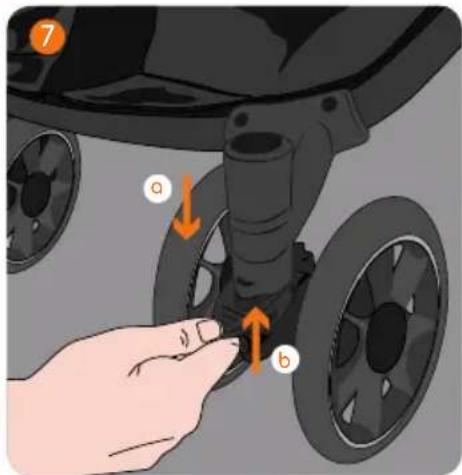

natural_image
Illustration of a person adjusting a car seatbelt device (no text or symbols visible)
natural_image
Hand holding a black plastic clip attached to a vehicle (no text or symbols visible)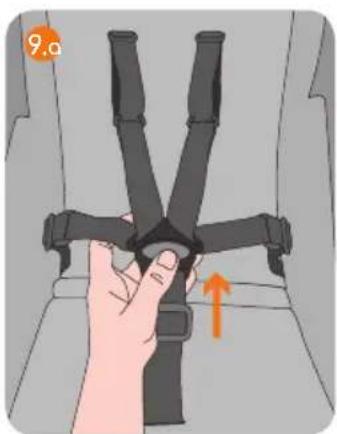
natural_image
Illustration of a hand adjusting a V-shaped seatbelt buckle (no text or symbols)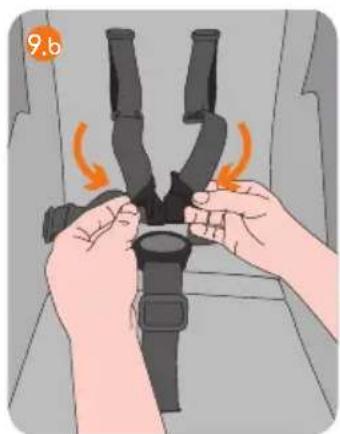
natural_image
Illustration of hands adjusting a black seatbelt buckle with orange motion arrows (no text or symbols)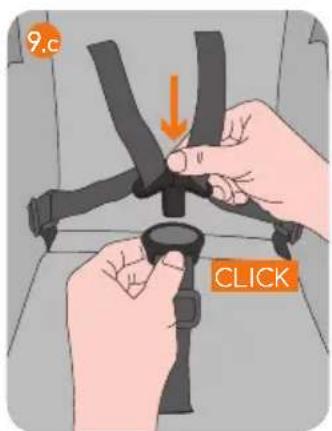
natural_image
Diagram of a car seatbelt with orange directional arrows indicating movement or force (no text or symbols)TWINLINK
natural_image
Illustration of hands performing a massage or maneuver on a dark object, with orange arrows indicating motion direction (no text or symbols)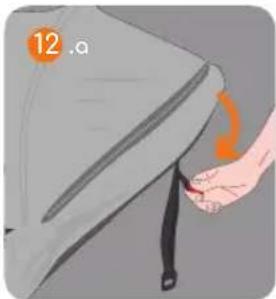
natural_image
Illustration of a hand adjusting a gray garment with a belt, showing a curved orange arrow (no text or symbols)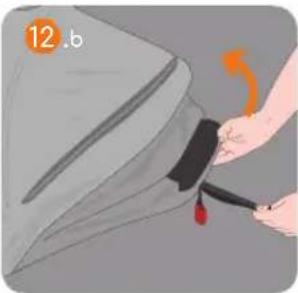
natural_image
Illustration of a hand adjusting a black belt with a red droplet, showing motion (no text or symbols)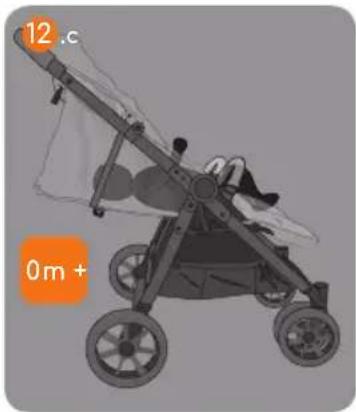
natural_image
Illustration of a stroller with a child inside, labeled '12.c' and '0m+' (no text or symbols on the diagram itself)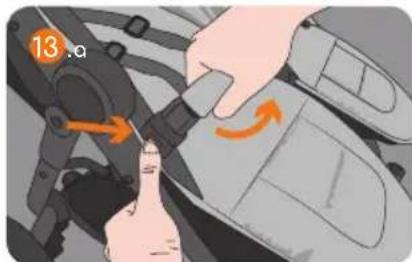
natural_image
Illustration of hands adjusting a mechanical component with orange arrows indicating motion (no text or symbols)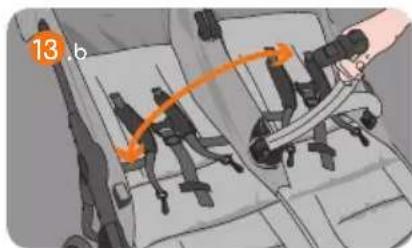
natural_image
Illustration of a person adjusting a baby stroller with a hand on the seat (no text or symbols)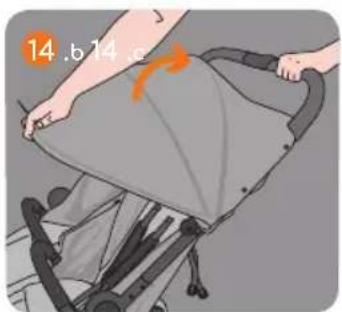
natural_image
Illustration of a person using a stroller to lift a gray blanket, with an orange arrow indicating motion (no text or symbols)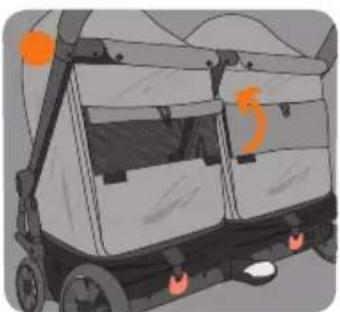
natural_image
Illustration of a cartoon-style street tube with orange lights and decorative elements (no text or symbols)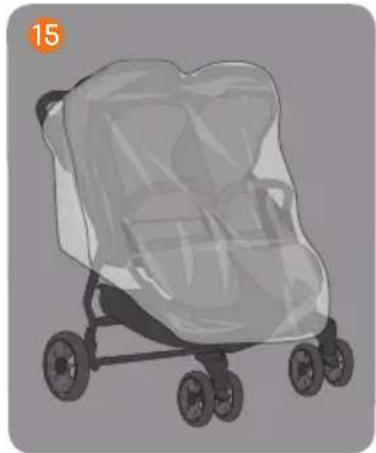
natural_image
Illustration of a baby stroller with a translucent cover, no text or symbols presentTWINLINK

INSTRUCCIONES
ÍNDICE
A. INFORMATION AND SAFETY WARNINGS
Instructions
IMPORTANT: Read carefully and keep them for future reference.
WARNINGS :
- Never leave the child unattended.
- Make sure that all the locking devices are engaged before using the product.
- To avoid injury, make sure that the child is kept at a safe distance when unfolding and folding this product.
- Do not let the child play with this product.
- Always use the restraint system.
- Check that the fastening devices for the carrycot, the seat or the car seat are correctly engaged before using the product.
- This product is not suitable for running or skating.
- This pushchair is suitable for children from birth and up to a weight of 15 kg.
- Never let the child stand up on the footrest or on the footboard.
USAGE RESTRICTIONS:
- The most reclined position is recommended from birth up to 6 months.
- Always put the brake on when getting children in or out of the pushchair.
- Any load attached to the handlebar and/or back of the back-rest and/or the sides of the pushchair will affect its stability.
- This pushchair has been designed to carry one or two children, do not use it to carry more than two children at a time.
- Do not use accessories that have not been approved by JANÉ.
- Only use replacement parts supplied or recommended by JANE.
- For baby carriers used with a chassis, this pushchair is not a substitute for a cot or a bed. If the child needs to sleep, you should put him in a suitable carrycot, cot or bed.
- The maximum weight to be carried in the basket must not exceed the weight stated on the basket (4 kg).
- This product is not salt water resistant.
B. FITTING AND REMOVING THE WHEELS
insert the wheel axle into the chassis axle until you hear it click firmly into place. Make sure that they are securely attached. ① To remove the rear wheels, press the button found on the brake bar and pull the wheel. ②
To fit the front wheels, keep the front locking button pressed down, slot the front wheels into the axle and push upwards. Release the front locking button. You should feel the wheels slot firmly into place. Make sure that they are securely attached. 3
To remove the front wheels, press the front locking button and remove the front wheel by pulling it downwards. ③

WARNING: Never fit or remove the wheels while the baby is in the pushchair.

WARNING: Take the wheels off the chassis from time to time and remove any dirt or sand from the wheel axle. Use a brush and a damp cloth to clean the dirt off the wheels.
C. UNFOLDING AND FOLDING
UNFOLDING
To open your TWIN-LINK, place it on a flat surface with the handlebar facing upwards and release the folding lock found on the left rear leg of the chassis 4 and lift the handlebar upwards until it is fully opened and you hear the main locks slot into place. 4 to - 4

WARNING: Before using your TWIN-LINK pushchair, make sure that all the fastening and locking devices are correctly engaged and locked.
FOLDING
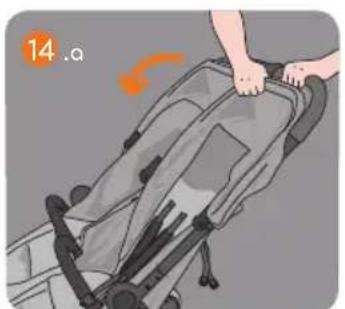
Before folding your TWIN-LINK pushchair, put the parking brake on 6 a always remove the SMART soft carrycot, take any objects out of the basket that could prevent the pushchair from closing properly, release the steering lock on the front wheels 7 a and close the hood 14 b
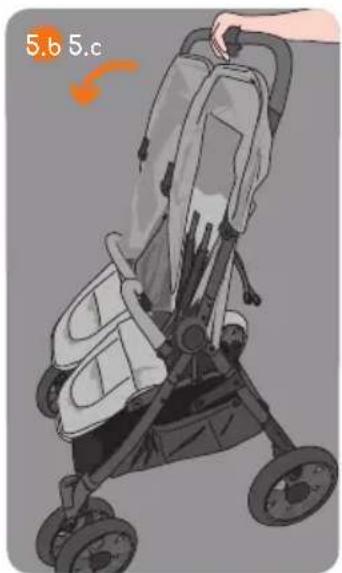
Slide the safety button to the left and simultaneously press the central button under the handlebar 5 apush the handlebar forwards 5 b - 5 c so the pushchair folds up completely.
Always make sure that the chassis folding lock is securely fastened to prevent the pushchair from coming open while being carried 5 d


WARNING: It is essential to make sure that the child is kept at a safe distance from the pushchair when folding or unfolding it. Sharp points and areas where fingers could get trapped are inevitable during these operations.
D. PARKING BRAKE
BRAKE: Press the lever downwards with your foot to put the parking brake on your pushchair. 6.a
RELEASING THE BRAKE: Use your foot to press the lever upwards to take the parking brake off. 6 b

WARNING: When the brake is on make sure that the push-chair has braked correctly. It may be necessary to push the pushchair slightly for the brake to be fully activated.
E. LOCKING THE FRONT WHEELS
Your pushchair is fitted with front swivel wheels that can be locked if you prefer.
To lock them, push the lever between the wheels downwards.
To unlock the front wheels, pull the lever upwards.


WARNING: Keep the swivel axle free from dust to ensure a smooth, long-lasting swivel action.
F. SEAT BELT
Your pushchair is fitted with a safety harness to keep your child safe at all times.
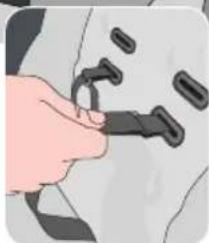
You should adjust the strap height of the safety harness in line with your child's height.
Pass the shoulder strap through the appropriate slot in the seat.

Make sure that it is securely fastened.
To unfasten the belt system press the button in the middle of the harness until the straps come undone. 9 a
To fasten the harness bring the ends of the buckles together and insert them into the fastener until you hear them click locked.

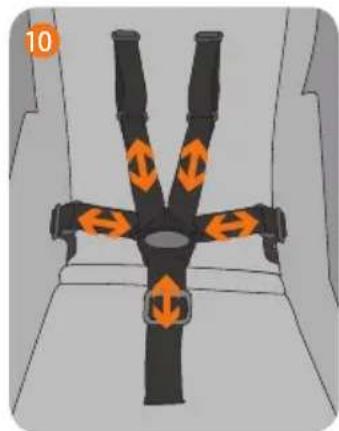
Adjust the straps so that they fit the child correctly with the right tension. To adjust the length of the straps, slide the buckles up or down. Make sure that the straps are not twisted.


WARNING: Always use the seat belt whenever the child is sitting or lying in the seat.
G. USE FOR CHILDREN UNDER 6 MONTHS
To use the seat with children under 6 months old, adjust the angle of the seat to its most reclined position. 12.c Adjust the harness to its lowest position. 8

Compatible with the SMART portable carrycot. ATTENTION: Read the assembly instructions.
H. ADJUSTING THE FOOTREST
The foot rest can be adjusted to different positions. To do this, simultaneously press the buttons found on the outside of the seat to move it downwards. To move it upwards you don't need to press the buttons, simply pull the footrest up.

WARNING: Do not let the child stand up on the footrest.
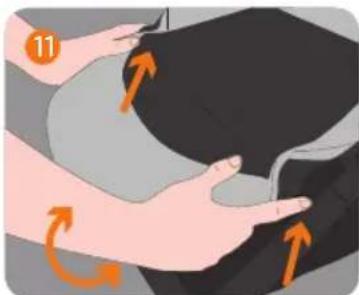
I. ADJUSTING THE ANGLE OF THE BACKREST
So your baby can travel in the most comfortable position at all times, you can adjust the angle of the backrest.
To lower the backrest pull the strap found on the back, with the red logo, downwards to the required position. 12.a
To raise the backrest pull the strap with the black logo upwards.


WARNING: It is recommended to use the most reclined position until the child is 6 months old. 12.c
J. SAFETY ARMREST
The safety armrest is designed to fit into the slots in the chassis of the pushchoir. If you want you can release just one side of the armrest (or both) by simply pressing the side buttons and the armrest will be fully hinged by the other side. 13.a-13.b

WARNING: The child should be kept away from the mobile parts when the responsible adult is handling these. The appearance of cutting, compression and pinch points are inevitable during these operations.

WARNING: Never hold the pushchair or seat by the safety armrest, it is not a carry handle.

K. HOOD
Adjust the hood as necessary to protect your child from the sun and wind. The hoods have a top window so you can see your babies.
Push the hood forwards to open it or backwards to close it .b as required.

Your TWIN-LINK is fitted with windows so you can see your children.

WARNING: Do not place objects on top of the hood.
L. RAIN COVER
Fit the rain cover as shown in figure 15 and fasten the Velcro strips to the chassis to secure it.
Make sure the rain cover is completely dry before putting it away in the bag!
M. MAINTENANCE
Do not expose the upholstery to sunlight for long periods.
Wash the plastic parts with soap and warm water and carefully dry all the parts afterwards.
The upholstery can be taken off for washing. (Always check the care label for the washing instructions).
Regularly check the brakes, harnesses and fastening elements that may suffer wear and tear through use.
For your safety and the correct maintenance of this product, it is important to bring it to one of our official workshops for regular inspections.

N. INFORMATION ABOUT THE GUARANTEE
This product comes with a guarantee in compliance with Royal Legislative Decree 1 / 2015 of 24 July. Keep your purchase receipt, you will need to show it in the shop where you bought the product to prove the guarantee is valid if you have any complaints.
This guarantee does not include any defects or breakages caused by inappropriate use of the article or non-observance of the safety and maintenance rules listed in the instructions pages and on the care labels, as well as faults cause by wear and tear through normal use and daily handling.
The label displaying the chassis number of the model should never be taken off, it contains important information.

NOTICE: For the maximum safety and care of your new JANÉ item, it is very important that you register your new product on our website www.janeworld.com This registration means that we can inform you, if necessary, of the evolution and maintenance of your product. Additionally, if you would like, we can also inform you about new models or news that we think may be useful for you.


NOTICE
SOMMAIRE
A. INFORMATIONS ET MISES EN GARDE 30
B. MONTAGE ET DÉMONTAGE DES ROUES 31
C. DÉPLIAGE ET PLIAGE 31
D. FREIN DE STATIONNEMENT 32
E. BLOCAGE DES ROUES AVANT 32
F. HARNAIS DE SÉCURITÉ 32
G. UTILISATION POUR DES ENFANTS DE MOINS DE 6 MOIS 33
H. RÉGLAGE DU REPOSE-PIED 33
I. RÉGLAGE DE L'INCLINAISON DU DOSSIER 33
J. ARCEAU DE SÉCURITÉ 33
K. CAPOTE 34
L. HABILLAGE DE PLUIE 34
M. ENTRETIEN 34
N. INFORMATIONS RELATIVES À LA GARANTIE 35
A. INFORMATIONS ET MISES EN GARDE
Instructions
B. MONTÁŽ A DEMONTÁŽ KOL


- INSTRUCCIONES
- ÍNDICE
- INFORMATION AND SAFETY WARNINGS
- Instructions
- WARNINGS :
- USAGE RESTRICTIONS:
- FITTING AND REMOVING THE WHEELS
- UNFOLDING AND FOLDING
- UNFOLDING
- FOLDING
- PARKING BRAKE
- LOCKING THE FRONT WHEELS
- SEAT BELT
- USE FOR CHILDREN UNDER 6 MONTHS
- ADJUSTING THE FOOTREST
- ADJUSTING THE ANGLE OF THE BACKREST
- SAFETY ARMREST
- HOOD
- RAIN COVER
- MAINTENANCE
- INFORMATION ABOUT THE GUARANTEE
- NOTICE
- SOMMAIRE
- INFORMATIONS ET MISES EN GARDE
- MONTÁŽ A DEMONTÁŽ KOL
Brand : JANE
Model : Twinlink
Category : Stroller