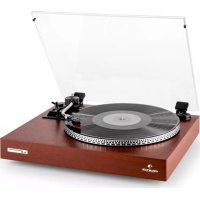
Belle Epoque 1908 - Media player Auna - Free user manual and instructions
Find the device manual for free Belle Epoque 1908 Auna in PDF.
| Product Type | Multimedia player with turntable, CD player, cassette player, FM/AM/DAB radio, Bluetooth and USB |
| Brand and Model | Auna Belle Epoque 1908 |
| Dimensions (W x H x D) | 50 x 22 x 33 cm |
| Weight | 8 kg |
| Power Supply | 220-240 V ~ 50/60 Hz |
| Power Consumption | 19 W max. |
| Output Power | 2 x 2.5 W |
| Radio | FM 87.5-108 MHz, AM (MW) 530-1600 kHz, DAB (models 10029995/10030660) |
| Turntable Speed | 33, 45, 78 RPM |
| CD Playback | CD, CD-R, CD-RW, MP3 |
| USB Port | MP3 playback and recording |
| Cassette Player | C60-C90 cassettes |
| Bluetooth | Frequency 2402-2480 MHz, max transmission power 2 dBm (models 10021696, 10030660) |
| AUX Input | 3.5 mm AUX-IN socket |
| Headphone Output | 3.5 mm headphone socket |
| Package Contents | Device, user manual |
| Safety Instructions | Do not open the device, keep out of reach of children, do not expose to moisture or excessive heat |
| Cleaning | Use a dry cloth, do not use volatile liquids |
| Warranty | 2 years for manufacturing defects under proper use |
| Recycling | Do not dispose of with household waste, deposit at a collection point |
Frequently Asked Questions - Belle Epoque 1908 Auna
User questions about Belle Epoque 1908 Auna
0 question about this device. Answer the ones you know or ask your own.
Ask a new question about this device
Download the instructions for your Media player in PDF format for free! Find your manual Belle Epoque 1908 - Auna and take your electronic device back in hand. On this page are published all the documents necessary for the use of your device. Belle Epoque 1908 by Auna.
USER MANUAL Belle Epoque 1908 Auna
INHALTSVERZEICHNIS
Technische Daten 4
Member of Berlin Brands Group
Handwerkerstr. 11
15366 Dahlwitz-Hoppegarten
Deutschland
natural_image
Symbol of a trash bin with crossed lines and a horizontal bar below (no text or labels)Berlin Brands Group UK Ltd
PO Box 1145
Oxford, OX1 9UW
United Kingdom
Congratulations on the purchase of your device. Please read the following instructions carefully and follow them to prevent potential damage. We accept no liability for damage caused by disregarding the instructions or improper use. Please scan the QR code to access the latest operating instructions and for further information about the product.

CONTENTS
TechnicalData 30
Safety Instructions 31
First commissioning (all models) 32
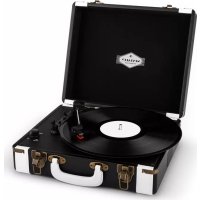
Overview (Model 10008633, 10031957, 10021696) 33
Remote control (Model 10008633, 10031957, 10021696) 34
Overview (Model 10029995, 10030660) 35
Front view (Model 10029995, 10030660) 36
Model 10029995, 10030660 37
Rear view and turntable (all models) 38
Operation (all models) 39
USB Functions (Model 10008633, 10031957, 10021696) 42
USB Functions (Model 10029995, 10030660) 44
DAB Functions (Model 10029995, 10030660) 47
Radio Functions (Model 10029995, 10030660, 10008633 10021696 10031957) 48
Special Functions (Model 10021696, 10030660) 49
Time / Timer / Alarm (Model 10030660, 10029995) 50
Disposal Considerations 52
Declaration of Conformity 52
TECHNICALDATA
| Item number | 10008633, 10021696, 10029995, 10030660, 10031957 |
| Power supply 220-240 V ~ 50/60 Hz | |
| Radio | AM: 530-1600 kHz |
| FM: 87.5–108 MHz | |
| Record speed 33/45/78 RPM records | playable |
| CDs CD/CD-R/CD-RW/MP3 | |
| USB connection | For playing MP3 files from USB data carriers |
| Cassette deck C60 - C90 | |
| Output power 2 x 2.5 W | |
| Power consumption 19 W max. | |
| Dimensions / Weight 50 x 22 x 33 cm, 8 kg | |
| Package contents Device, operating | instructions |
Model 10021696, 10030660
| BT frequency 2402-2480 MHz | |
| BT transmission power (max.) 2 dBm |
SAFETY INSTRUCTIONS
- These operating instructions are intended to familiarise you with the operation of this product. Therefore, always keep these instructions in a safe place so that you can access them at any time.
- When you purchase this product, you receive a two-year warranty against defects when used properly.
- Please use the product only in its intended manner. Any other use may lead to damage to the product or in the vicinity of the product.
- Modifying or changing the product will compromise product safety. Attention risk of injury! Never open the unit without authorisation and never carry out repairs yourself!
- Handle the product carefully. It can be damaged by bumps, blows or falls from a small height.
- Keep the product away from moisture and extreme heat.
- Do not drop metal objects into this device.
- Do not place any heavy objects on the device.
- Only clean the device with a dry cloth.
- Do not block the ventilation openings.
- Only use accessories recommended by the manufacturer or a qualified service professional.
- The warranty is void if the unit is tampered with by third parties.
Small objects/packaging parts (plastic bags, cardboard, etc.):
Keep small objects and packaging parts (e.g. screws and other mounting material, memory cards) out of the reach of children so that they cannot be swallowed by them. Do not let small children play with plastic film. There is a danger of suffocation!
Transporting the device:
Please keep the original packaging. To achieve sufficient protection when transporting the unit, pack the unit in the original packaging.
Cleaning the outer surface:
Do not use volatile liquids such as bug sprays. Excessive pressure when wiping the surface can cause damage. Rubber or plastic parts should not be in contact with the appliance for a long period of time. Use a dry cloth.
FIRST COMMISSIONING (ALL MODELS)
- Carefully remove the unit from the box and remove all packing material.
- Unwind the mains cable along its entire length.
- Unwind the FM antenna along its entire length / extend the telescopic antenna.
- Place the unit on a stable, level surface so that you can easily reach a plug socket and the unit is not in direct sunlight or near sources of heat, dust, moisture, humidity or strong magnetic fields.
- Lift the protective cover of the record player. This is provided with a transport safety screw. To make the turntable operable, turn them clockwise with a coin or screwdriver.
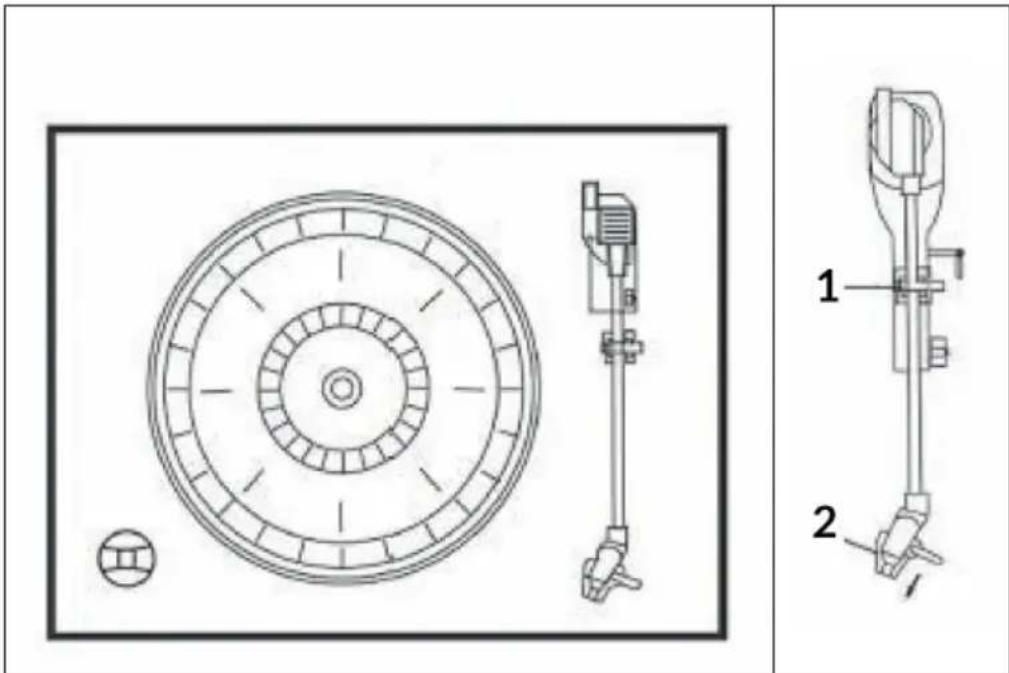
| 1 | Tone arm lock | 2 | Needle cover |
- Remove the plastic needle cover by sliding it in the direction of the arrow.
- Remove the twisted wire that was attached to the tone arm for transport.
- Release the locking lever of the arm.
- Plug the power plug into the mains socket.
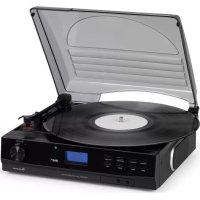
OVERVIEW (MODEL 10008633, 10031957, 10021696)
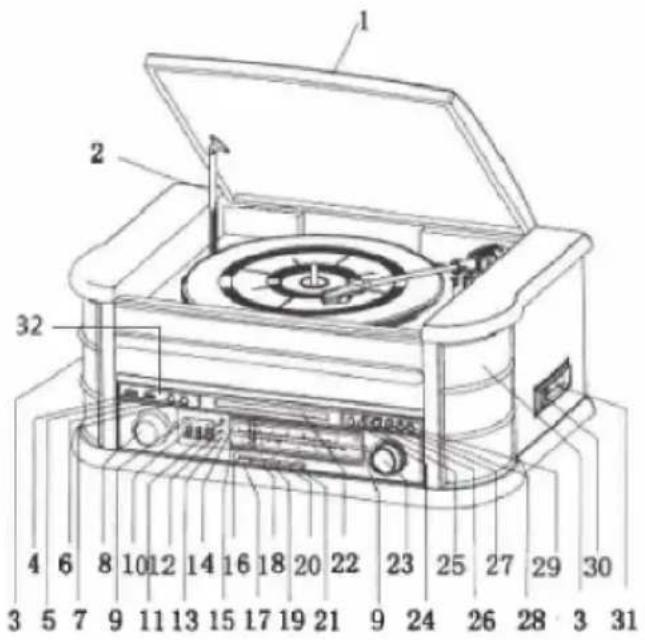
| 1 | Cover | 17 | AM button |
| 2 | Lid holding bar | 18 | FM button |
| 3 | Speaker | 19 | CD/USB button |
| 4 | USB | 20 | Cassette button |
| 5 | AUX-IN | 21 | PHONO/AUX-IN button |
| 6 | REC/DEL button | 22 | CD compartment |
| 7 | FUNCTION button (function selection) | 23 | Tuning control |
| 8 | Volume control | 24 | PLAY/PAUSE button |
| 9 | Tuner lighting | 25 | STOP button |
| 10 | Display | 26 | DN/F.R button (down/rewind) |
| 11 | Remote control sensor | 27 | UP/F.F button (up/fast forward) |
| 12 | Operating display | 28 | PLAY MODE button |
| 13 | Display FM ST./REC | 29 | OP/CL button (open/close) |
| 14 | FM scale | 30 | EJ/F.F button (eject/fast-forward cassette) |
| 15 | AM scale | 31 | Cassette compartment |
| 16 | Radio tuner | 32 | Headphone socket |
REMOTE CONTROL (MODEL 10008633, 10031957, 10021696)
| 1 POWER button (device on/off) | |
| 2 Open/close CD compartment | |
| 3 REC button (recording) | |
| 4 DEL button (delete) | |
| 5 | MODE button. Press repeatedly to select one of the modes: FM / AM / CD / USB / AUX / PHONO / TAPE |
| 6 STOP button | |
| 7 REP button (Repeat) | |
| 8 PROG button (programming) | |
| 9 PLAY/PAUSE button | |
| 10 Rewind | |
| 11 Folder- | |
| 12 Title- | |
| 13 Title+ | |
| 14 Number buttons | |
| 15 +10 titles | |
| 16 Volume+ | |
| 17 Volume- | |
| 18 Fast fast forward | |
| 19 Folder+ | |
| 20 Equaliser | |
- The buttons on the remote control have the same functions as the buttons on the control panel. The remote control is used for CD/MP3/USB modes.
- Press and hold the PLAY/PAUSE buttons to switch between CD and USB.
- Press the DELETE button 2 times to delete a file in USB mode.
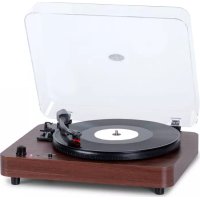
OVERVIEW (MODEL 10029995, 10030660)
| 1 | Cover | 4 | Speaker |
| 2 | Lid holding bar | 5 | Stop / eject cassette |
| 3 | Turntable | 6 | Cassette deck |
FRONT VIEW (MODEL 10029995, 10030660)

| 7 | USB | 18 | Open/close CD compartment |
| 8 | AUX-IN | 19 | Volume control / POWER button / STANDBY button |
| 9 | Headphone connection | 20 | Operating display |
| 10 | FUNCTION button. Press repeatedly to select one of the modes: DAB / FM / CD / USB / PHONO / TAPE / AUX | 21 | DAB menu |
| 11 | Remote control sensor | 22 | DAB Info |
| 12 | CD compartment | 23 | DAB search |
| 13 | PLAY/PAUSE button | 24 | Preset DAB stations |
| 14 | STOP button | 25 | DAB input button |
| 15 | DN/F.R button (down/rewind) | 26 | Display |
| 16 | UP/F.F button (up/fast forward) | 27 | Radio tuner / REPEAT button (repeat function) |
| 17 | REC/DEL button |
MODEL 10029995, 10030660
| 1 POWER button (device on/off) | |
| 2 Open/close CD compartment | |
| 3 REC button (recording) | |
| 4 DEL button (delete) | |
| 5 | MODE button. Press repeatedly to select one of the modes: FM / AM / CD / USB / AUX / PHONO / TAPE |
| 6 STOP button | |
| 7 | REP button (repeat) / VOL+ (increase volume) |
| 8 | PROG button (programming) / VOL- (decrease volume) |
| 9 PLAY/PAUSE button | |
| 10 | DAB search |
| 11 INFO button | |
| 12 Title- / fast rewind | |
| 13 Title+ / fast forward | |
| 14 Number buttons | |
| 15 +10 titles | |
| 16 ENTER button (enter button) | |
| 17 MENU button | |
| 18 Equaliser | |
| 19 PRESET button | |
| 20 TIMER button | |
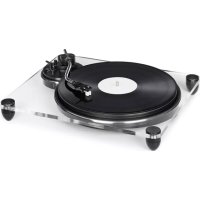
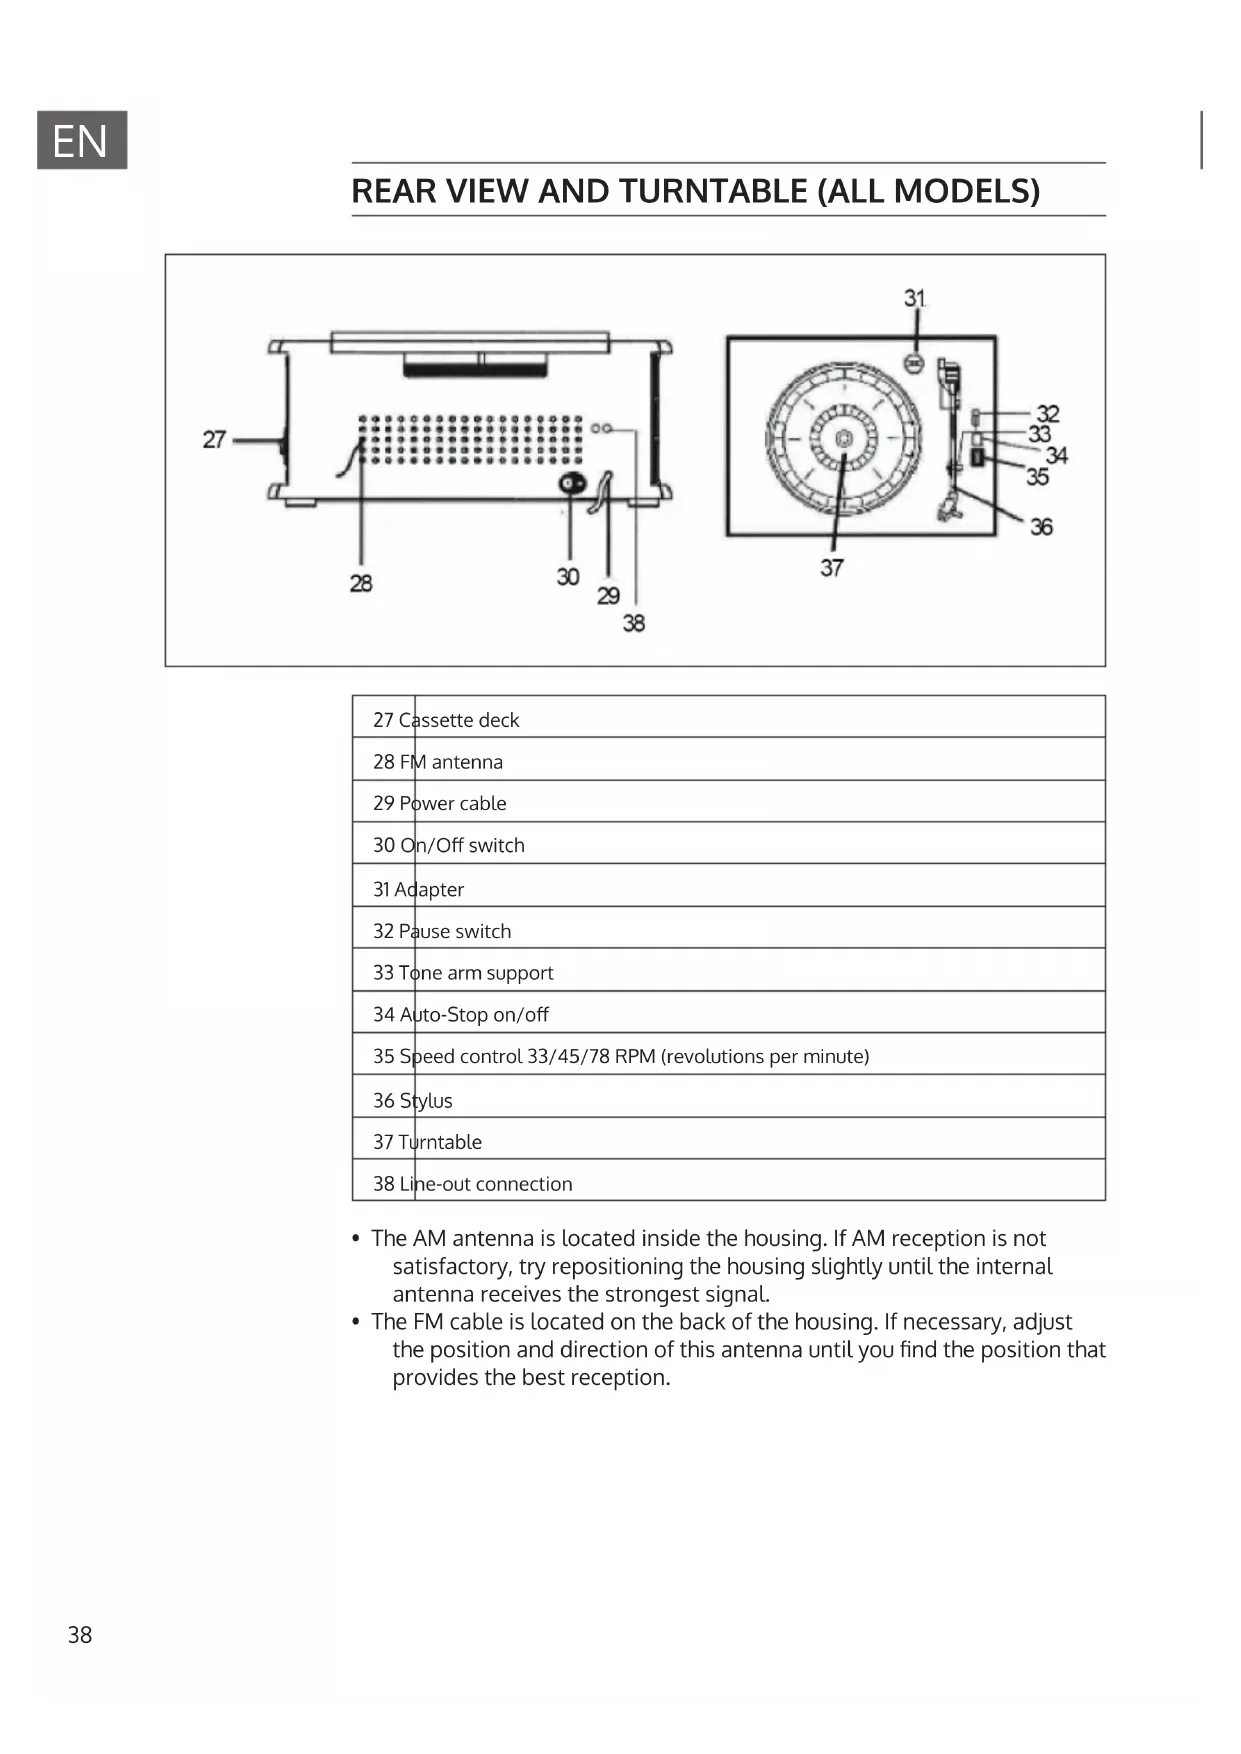
REAR VIEW AND TURNTABLE (ALL MODELS)
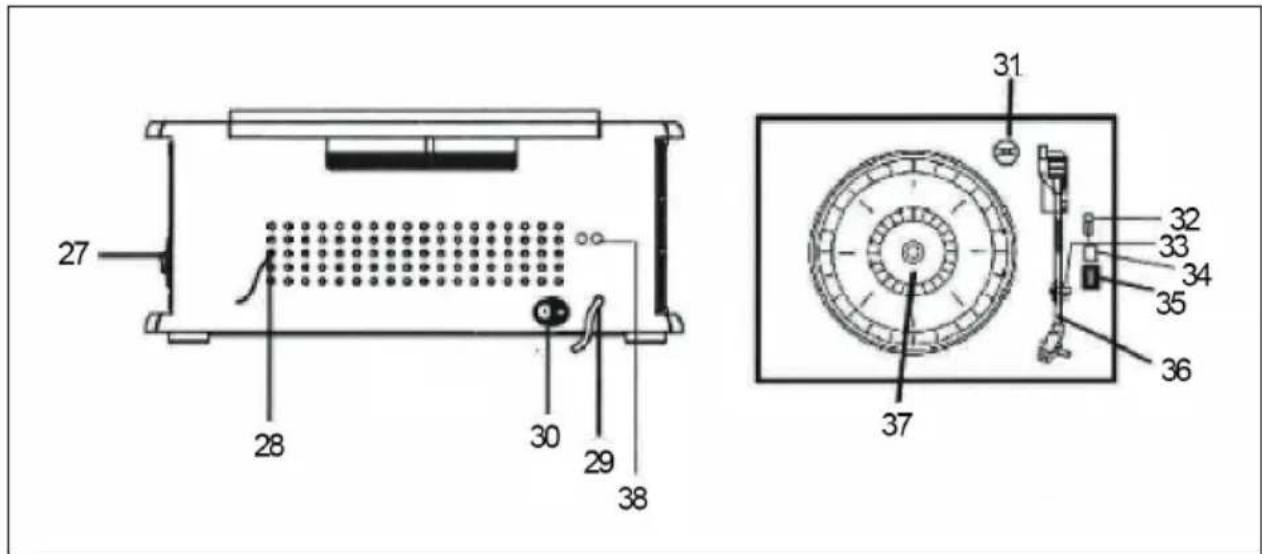
| 27 Cassette deck |
| 28 FM antenna |
| 29 Power cable |
| 30 On/Off switch |
| 31 Adapter |
| 32 Pause switch |
| 33 Tone arm support |
| 34 Auto-Stop on/off |
| 35 Speed control 33/45/78 RPM (revolutions per minute) |
| 36 Stylus |
| 37 Turntable |
| 38 Line-out connection |
- The AM antenna is located inside the housing. If AM reception is not satisfactory, try repositioning the housing slightly until the internal antenna receives the strongest signal.
- The FM cable is located on the back of the housing. If necessary, adjust the position and direction of this antenna until you find the position that provides the best reception.
Switch on/off the unit
- To turn the appliance on, press the POWER button. The operating lamp lights up.
- Press the MODE or FUNCTION button to select the desired function (AM / FM / CD / USB / TAPE / PHONO / AUX IN)
- Adjust the volume with the volume control.
- When you have finished, press the POWER button again to switch off the unit.
Note: The unit switches to standby mode if there is no operation after 15 minutes. Please press the POWER button 2 times if you want to switch the unit on again.
Radio functions
- To turn the system on, press the POWER button.
- Make sure you have connected the FM antenna cable to the back of the unit.
- Press the AM button for AM or FM button for FM radio or press the FUNCTION button to select the radio mode.
- Turn the TUNING control to tune to the desired radio station. The FM ST/REC display will flash.
CD functions
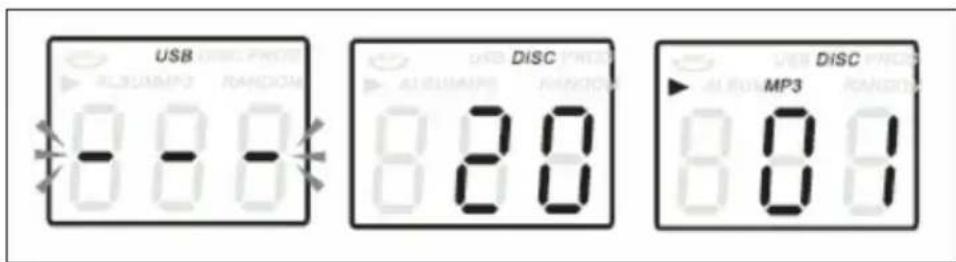
- Press the CD/USB button or the FUNCTION button to enter CD mode. The symbol [---] and DISC appear on the display. The unit can play CD, CD-R and CD-RW.
- Press the CD tray open/close button to open the CD drawer. Place your CD in the CD drawer with the labelled side facing up.
- Press the CD tray open/close button of the CD compartment again to close the CD drawer. Playback starts automatically with the first track. The MP3 symbol is displayed when an MP3 file is detected on the CD.
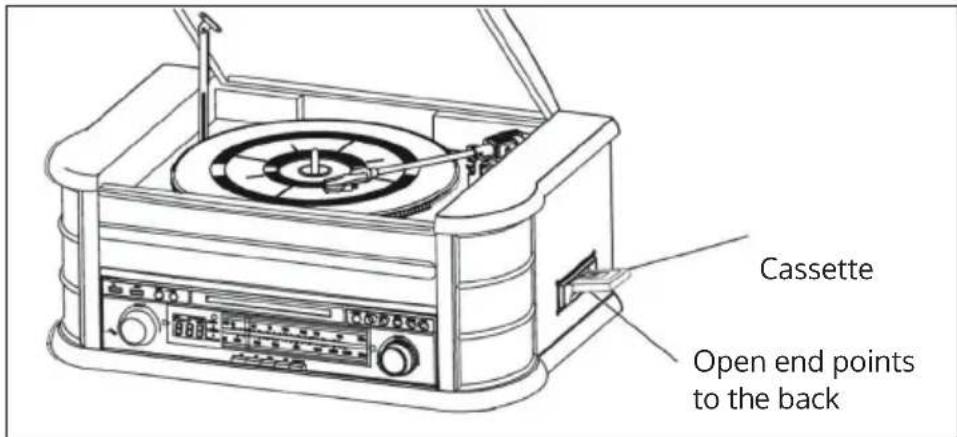
Cassette functions
Note: Before inserting the cassette into the player, make sure that the cassette is wound tightly so that the tape does not block the mechanism.
- To turn the system on, press the POWER button.
- Press the TAPE button or the FUNCTION button to enter TAPE mode.
- Insert the cassette into the slot on the right-hand side of the housing. The side you want to play should be facing up and the open end facing back.
- Cassette playback starts as soon as the cassette is inserted. Adjust the volume with the volume control to the desired loudness.
- Press POWER again to turn off the system.
Fast forward or eject the cassette
- To fast forward the tape, press the button down about halfway. The belt will run forward quickly as long as the button is pressed. Normal playback resumes when the button is released.
- When the tape is over, the player stops automatically. Press all the way down to remove the cassette from the player. You can press the button at any time to stop playing the cassette.

Playing a record
- To turn the system on, press the POWER button.
- Press the PHONO button or the FUNCTION button to enter PHONO mode.
- Make sure you have removed the needle cover from the needle and loosened the tone arm latch that secures the tone arm to the tone arm rest.
- Set the turntable speed control to the appropriate speed 33, 45 or 78 RPM. If you are playing 45 RPM singles, place the 45 RPM adapter on the centre spindle.
- Place the record on the centre spindle.
- Push the auxiliary lever at the end of the tone arm upwards to lift the tone arm out of its holder. Move the tone arm to the edge of the record. The turntable starts automatically. Carefully lower the tone arm onto the record by pushing down the auxiliary lever at the end of the tone arm.
- Adjust the volume control to the desired level.
- When the tone arm reaches the end of the record, it will stop automatically.
- To turn the system off, press the POWER button. The power indicator goes off.
Note: Do not stop or turn the turntable manually. If you move or shake the turntable without securing the tone arm clamp, the tone arm may be damaged.
AUX-IN function
Connect the audio system to an external device via the AUX IN socket on the rear panel and press the PHONO/AUX IN button or the FUNCTION button to enter AUX mode. Then start playback on the external device.
USB FUNCTIONS (MODEL 10008633, 10031957, 10021696)
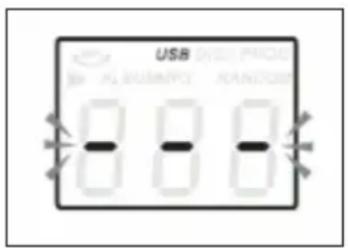
- First press the CD/USB button and then the FUNCTION button to start the USB mode. The symbols [---] and USB are displayed.
- Insert a USB data carrier into the USB socket.
- The PLAY/PAUSE, DN/UP and STOP functions are exactly the same as for CD playback.
Note: Press the FUNCTION button on the control panel or press and hold the PLAY/PAUSE button on the remote control for 2 seconds to switch between CD and USB playback.
Playing an MP3 in CD/USB mode
- Press the PLAY/PAUSE button to start or pause playback of the selected track.
- During the playback of the title, the title number and the folder number of the selected title are shown in the display.
- You can stop playback at any time by pressing the STOP button.
Skip a title / search within a title
While a track is playing in CD/USB mode:
- Briefly press the UP/F.F (▶▶) or DN/F.B (▶) button to move to the next or previous track.
- Press and hold UP/F.F () or DN/F.B () to search a specific location within a title.
- Press the 10+ or 10- button to skip forward or back 10 tracks.
Recording a CD to USB
Insert the USB data carrier into the USB socket. Then press the CD/USB button. Place the CD in the CD compartment and play the track to be recorded. Press the RECORD button once. The display shows [REC-ONE]. Press the RECORD button again to start recording the track.
To record all the tracks, press the RECORD button once and then the NEXT button and the display will show [REC-ALL]. Then press the RECORD button to start the recording.
Note: Recording will fail if you press the STOP button during recording.
Recording an MP3-CD to USB
Insert the USB data carrier into the USB socket. Then press the CD/USB button. Place the CD with the MP3 files in the CD compartment and play the MP3 track to be recorded. Then press the RECORD button twice to start the recording. If you play all MP3 files, all tracks are recorded.
Note: Recording will fail if you press the STOP button during recording.
Recording a cassette to USB
Insert the USB data carrier into the USB socket. Then press the TAPE button. Insert the cassette into the deck. Play the cassette. Then press the RECORD button twice to start the recording. Then press the STOP button to stop the recording.
Recording a vinyl record to USB
Insert the USB data carrier into the USB socket. Then press the PHONO/AUX IN button. Play the record and press the RECORD button twice to start recording. Then press the STOP button to stop the recording.
Recording tracks via the AUX-IN connection
Insert the USB data carrier into the USB socket. Connect the external audio device to the AUX-IN socket on the back of the unit. Then press the PHONO/AUX IN button to play the sound from the external device and press the RECORD button twice to start recording.
Delete title from USB data carrier
Press the CD/USB button to select USB mode. Select the track you want to delete and press the DEL button for 2 seconds to delete the track.
USB FUNCTIONS (MODEL 10029995, 10030660)
Recording a CD
Insert the USB data carrier into the USB socket. Press the REC button once during CD playback. The display shows [REC-1]. Press the REC button a second time to record the track being played or press the UP/F.F button once on the unit to record the entire CD. The display shows [REC-A].
Recording an MP3-CD
Insert the USB data carrier into the USB socket. Press the REC button once during MP3-CD playback. [REC-1] appears on the display.
- Option 1: Then press the REC button a second time to confirm. [REC] flashes and recording starts after 5 seconds.
- Option 2: Press the UP/F.F button on the unit once to record all files in the folder being played. The display shows [REC-F].
- Option 3: Press the UP/F.Fbutton twice on the unit to record all files on the MP3-CD being played. The display shows [REC-A].
Recording a cassette
Insert the USB data carrier into the USB socket. During cassette playback, press the REC button once. The display shows [USB]. Press the REC button a second time to confirm. [USB] flashes in the display and recording starts after 5 seconds. Press the PLAY/PAUSE button once to stop recording and [USB] stops flashing. Press the PLAY/PAUSE button again to continue recording and [USB] will start flashing again.
Recording a vinyl record
Insert the USB data carrier into the USB socket. In PHONO mode, press the REC button once. The display shows [USB]. Press the REC button a second time to confirm. [USB] flashes in the display and recording starts after 5 seconds. Press the PLAY/PAUSE button once to stop recording and [USB] stops flashing. Press the PLAY/PAUSE button again to continue recording and [USB] will start flashing again.
Recording to USB via BT connection
Insert the USB data carrier into the USB socket. Press the REC button once during BT mode. The display shows [USB]. Press the REC button a second time to confirm. [USB] flashes in the display and recording starts after 5 seconds. Press the PLAY/PAUSE button once to stop recording and [USB] stops flashing. Press the PLAY/PAUSE button again to continue recording and [USB] will start flashing again. Then press the STOP button to stop the recording.
Recording via the AUX-IN connection
Insert the USB data carrier into the USB socket. In AUX mode, press the REC button once. The display shows [USB]. Press the REC button a second time to confirm. [USB] flashes in the display and recording starts after 5 seconds. Press the PLAY/PAUSE button once to stop recording and [USB] stops flashing. Press the PLAY/PAUSE button again to continue recording and [USB] will start flashing again.
Recording from any mode
While listening to music in PHONO / TAPE / BT / AUX-IN / DAB mode, press REC button. The display shows [REC]. The REC display is flashing. The recording is now being carried out.
Attention: Note that the recording speed is 1:1.
Press the STOP button to stop the recording. The unit creates a folder on the USB data carrier that contains all recorded tracks.
Playback from USB data carrier
- Insert the USB data carrier into the USB socket.
- Press the FUNCTION button repeatedly to select the USB mode.
- The unit automatically starts reading the files on the USB data carrier.
- Proceed as for playing CDs to listen to tracks from your USB data carrier.
Delete title from USB data carrier
- Press and hold the REC button during playback. The display shows [DEL].
- Press the button ◀◀◀ or ▶repeatedly to select between ONE (delete one track) / FOLDER (delete folder) / ALL (delete all files).
- Press the REC button again to confirm.
DAB FUNCTIONS (MODEL 10029995, 10030660)
DAB mode
Press the FUNCTION button on the unit or the MODE button on the remote control to select DAB mode. Then press the button or to search for channels.
DAB menu
Press the MENU button to access the following options:
- Full scan: Select this option to perform a full scan for available DAB stations. You can also press SCAN (23) to perform the same action.
- Manual search: Select this option to manually select the DAB frequency.
- DRC: Select this option to choose between DRC low, DRC high and DRC off. Dynamic Range Control can be useful in noisy environments and for quiet radio broadcasts.
- Prune: If you switch on this option, all stations with a poor reception signal are skipped.
Save DAB stations
You can store up to 20 DAB stations for quick recall.
-
Press and hold the PRESET button. [PRESET STORE] appears on the display.
-
Then press the button or to select the memory number.
-
Press the ENTER button to confirm.
-
Press PRESET button to navigate through the stored stations.
DAB Info
Press the INFO button several times to display the following information: station name, transmission rate, date, time.
RADIO FUNCTIONS (MODEL 10029995, 10030660, 10008633 10021696 10031957)
FM mode
Press the FUNCTION button on the unit or the MODE button on the remote control to select FM mode. Then turn the radio tuner to search for stations manually.
FM menu
Press the MENU button to access the following options:
- Scan setting: Select this option to choose whether to scan for all channels or only for channels with a strong reception signal.
- Audio setting: Select this option to choose mono sound or stereo sound.
Save FM stations
You can store up to 20 stations for quick recall.
- Press and hold the PRESET button. [PRESET STORE] appears on the display.
- Then press the button or to select the memory number.
- Press the ENTER button to confirm.
- Press PRESET button to navigate through the stored stations.
FM Info
Press the INFO button several times to display the following information: programme type, broadcast frequency, audio setting, date, time.
SPECIAL FUNCTIONS (MODEL 10021696, 10030660)
Repeat function
While music is playing, press the REPEAT button on the unit to select one of the following repeat functions:
- Repeat 1: The current title is played repeatedly.
- Repeat folder: The current folder is played repeatedly.
• All: All titles are played repeatedly. - Random: A random selection of titles is played.
Programming a CD Playlist
This function allows you to program a list of up to 99 titles.
- Insert a CD and press the STOP button as soon as playback starts.
- Press the PROG button on the remote control. The display shows [P01].
- Press the button on to select the desired title. Then press the PROG button on the remote control again to save the track in the programme memory.
- The display shows [P02]. Repeat step 3 to select and save all desired titles one after the other.
- Press the PLAY/PAUSE button to start programme playback.
- Press the STOP button once to stop programme playback. Press the STOP button twice to delete the programme.
BT functions
- Press the FUNCTION button to select the BT function. The display shows [BT].
- Select the Belle Epoque stereo system on your portable device (smartphone, tablet) and confirm the connection.
- When pairing is successful, the LED stops flashing.
- Now you can listen to the music from your portable device through the stereo system.
Note: In BT mode, music is controlled exclusively via the mobile device.
TIME / TIMER / ALARM (MODEL 10030660, 10029995)
Model 10030660 has two operating modes:
- Standby mode: The display shows the current time and the speakers and backlight are switched off.
- Playback mode: The blue backlight is on and you can listen to music.
If no sound is produced, the unit automatically switches to standby mode after 15 minutes. To switch between playback and standby mode, press the volume control.
Set the current time
Note: The unit must be in standby mode for this.
- Press and hold the STOP button. The digits [12/24] flash on the display. Press the button ◀◀◀ or ▶repeatedly to set the desired time format. Press the STOP button again to confirm.
- The hour digits flash on the display. Press the button repeatedly to set the current number of hours. Press the STOP button to confirm.
- The minute digits flash on the display. Press the button repeatedly to set the current number of minutes. Press the STOP button to confirm.
- The year digits flash on the display. Press the button repeatedly to set the current year. Press the STOP button to confirm.
- The month digits flash on the display. Press the button repeatedly to set the current month. Press the STOP button to confirm.
- The day digits flash on the display. Press the button repeatedly to set the current day. Press the STOP button to confirm.
Set an alarm
Note: The unit must be in standby mode for this.
- Press and hold the TIMER button on the remote control. The hour digits flash on the display. Press the ◀◀◀ or ▶button repeatedly to set the hours for the alarm. Press the TIMER button again to confirm.
- The minute digits flash on the display. Press the button repeatedly to set the minutes for the alarm. Press the TIMER button to confirm.
- Press the button repeatedly to select the alarm mode: DAB / FM / CD / USB / TAPE. Press the TIMER button to confirm.
To activate/deactivate the alarm:
- Press the TIMER button to activate the timer. The alarm symbol appears on the display. As soon as the alarm time is reached, the unit starts playing in the selected mode.
- Press the TIMER button in standby mode to deactivate the timer. The alarm symbol disappears from the display.
Setting the sleep timer
This function allows you to listen to the radio to fall asleep.
While the unit is on, press the TIMER button on the remote control several times to set the desired time (in minutes): Off / 15 / 30 / 45 / 60 / 90. The radio will turn on and, after the set time has elapsed, will automatically turn off.
DISPOSAL CONSIDERATIONS
natural_image
Symbol of a trash bin with crossed lines and a horizontal bar below (no text or labels)If there is a legal regulation for the disposal of electrical and electronic devices in your country, this symbol on the product or on the packaging indicates that this product must not be disposed of with household waste. Instead, it must be taken to a collection point for the recycling of electrical and electronic equipment. By disposing of it in accordance with the rules, you are protecting the environment and the health of your fellow human beings from negative consequences. For information about the recycling and disposal of this product, please contact your local authority or your household waste disposal service.
This product contains batteries. If there is a legal regulation for the disposal of batteries in your country, the batteries must not be disposed of with household waste. Find out about local regulations for disposing of batteries. By disposing of them in accordance with the rules, you are protecting the environment and the health of your fellow human beings from negative consequences.
DECLARATION OF CONFORMITY

Manufacturer:
Chal-Tec GmbH, Wallstrasse 16, 10179 Berlin, Germany.
Importer for Great Britain:
Berlin Brands Group UK Ltd
PO Box 1145
Oxford, OX1 9UW
United Kingdom
The complete declaration of conformity of the manufacturer can be found at the following link: https://use.berlin/10031957
Estimado cliente:
ÍNDICE
Datos técnicos 54
natural_image
Symbol of a trash bin with crossed lines indicating no waste, and a solid black rectangle below (no text or labels)Berlin Brands Group UK Ltd
PO Box 1145
Oxford, OX1 9UW
United Kingdom
Cher client, chère cliente,
SOMMAIRE
Fiche technique 78
natural_image
Symbol of a trash bin crossed with a diagonal line, representing no waste or discharge (no text or labels)DÉCLARATION DE CONFORMITÉ

Fabricant :
Chal-Tec GmbH, Wallstraße 16, 10179 Berlin, Allemagne.
Berlin Brands Group UK Ltd
PO Box 1145
Oxford, OX1 9UW
United Kingdom
INDICE
Dati tecnici 102
natural_image
Symbol of a trash bin crossed with a diagonal line, representing no waste or discharge (no text or labels)Berlin Brands Group UK Ltd
PO Box 1145
Oxford, OX1 9UW
United Kingdom
INNEHÅLLSFÖRTECKNING
Tekniska data 126
| 1 | Tonarmslås | 2 | Nålskydd |
natural_image
Symbol of a trash bin crossed with a diagonal line, representing no waste or discharge (no text or labels)Berlin Brands Group UK Ltd
PO Box 1145
Oxford, OX1 9UW
United Kingdom