Wallie - Hi-fi system Auna - Free user manual and instructions
Find the device manual for free Wallie Auna in PDF.
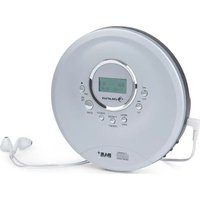
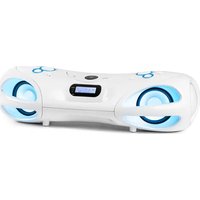
| Product type | Compact hi-fi system with CD player, FM radio, Bluetooth, USB, auxiliary input and headphone jack |
| Power supply | AC/DC power adapter: input 100-240 V ~ 50/60 Hz, output 5 V = = 1.2 A; standby < 1 W |
| Output power | 2 × 10 W RMS under 8 Ω, 1 kHz, distortion < 10% |
| Speakers | 2 × 7.6 cm (3.0 inch) drivers, impedance 8 Ω |
| Radio tuner | FM, range 87.5 – 108 MHz, automatic and manual search, 20 presets |
| CD player | Single disc, compatible CD-R/RW, plays MP3/WMA, programming up to 32 tracks (CD) or 99 (MP3) |
| USB port | USB 1.1/2.0, mass storage compatible, up to 32 GB, MP3/WMA formats (non-DRM) |
| Bluetooth | Version 2.1 + EDR, profiles A2DP and AVRCP, range up to 8 m, password 0000 |
| Auxiliary input | 3.5 mm audio jack (AUX IN) |
| Headphone output | 3.5 mm headphone jack (mutes speakers) |
| Alarm functions | Programmable alarm with beep, CD, USB or radio; snooze 9 min; sleep timer (5 to 120 min) |
| Equalizer | 4 preset modes (via remote control) |
| Display | LCD screen |
| Remote control | Infrared, CR2025 battery included, range 3-5 m |
| Backup batteries | 2 × AA (not included) for clock backup |
| Dimensions (approx.) | Not provided in the manual (estimate: approx. 30 × 20 × 15 cm for the main unit) |
| Weight (approx.) | Not provided (estimate: approx. 2.5 kg with speakers) |
| Cleaning and maintenance | Clean with a soft, dry cloth; do not use chemicals; wipe CDs from center to edge |
| Safety | Do not open the device, do not expose to moisture or extreme heat, keep batteries out of reach of children |
| Warranty | 2 years for manufacturing defects (proper use) |
Frequently Asked Questions - Wallie Auna
User questions about Wallie Auna
0 question about this device. Answer the ones you know or ask your own.
Ask a new question about this device
Download the instructions for your Hi-fi system in PDF format for free! Find your manual Wallie - Auna and take your electronic device back in hand. On this page are published all the documents necessary for the use of your device. Wallie by Auna.
USER MANUAL Wallie Auna
Wllie Microsyst Microsyst
30
www.auna-multimedia.com

Member of Berlin Brands Group
Handwerkerstr. 11
15366 Dahlwitz-Hoppegarten
Deutschland
Berlin Brands Group UK Ltd
PO Box 1145
Oxford, OX1 9UW
United Kingdom
Congratulations on purchasing this equipment. Please read this manual carefully and take care of the following hints to avoid damages. Any failure caused by ignoring the items and cautions mentioned in the instruction manual is not covered by our warranty or any liability. Scan the QR code to get access to the latest user manual and other information about the product:

CONTENTS
Technical Data 30
Safety Instructions 31
Device Overview 32
Remote Control 35
Installation 36
System Connections & Battery Operation 37
Getting Started 38
Operation and Functions 40
FM Radio 40
CD Player 41
BT43
USB 44
AUX IN 45
Using Headphones 45
Alarm Operation 46
Cleaning and Care 48
Troubleshooting 49
Disposal Considerations 51
Declaration of Conformity 51
TECHNICAL DATA
| Item number 10033227 100 | 33228 | |
| Power supply 220-240 V ~ 50/60 Hz | ||
Tuner:
Frequency range: FM 87.5 - 108 MHz
CD player:
Type: Single disc multi-play compact disc player
Signal readout: Non-contact, 3-beam semiconductor laser pickup
D/A converter: Multi bit D/A converter
Frequency response: 20 - 20,000 Hz
USB host:
Interface: Complies with USB 1.1 (Full Speed)/2.0 Mass Storage Class. Support Bulk only and CBI protocol.
Support file: MPEG 1 Layer 3 WMA (Non DRM)
Bitrate support: MP3 (32 ~ 320 kbps) WMA (64 ~ 160 kbps)
General:
Speakers: 7.6cm (3.0 in) cone × 2
Speaker impedance: 8 Ω
Output power: 2x10 W per channel, min. RMS driven into 8 Ω at 1 kHz with no more than 10 % total harmonic distortions
Input terminal: AUDIO IN (Φ 3.5) × 1
Power sources: AC/DC adapter (included), Input AC 100 - 240 V ~ 50/60 Hz Output DC 5V = = 1.2 A
Power standby: <1W
BT frequency: 2.400 GHz - 2.480 GHz
BT radio-frequency
power (max.): 4 dBm
Compatible BT Profile: A2DP (Advanced Audio Distribution Profile), AVRCP (Audio/Video Remote Control Profile) BT 2.1 +EDR
SAFETY INSTRUCTIONS
- This instruction manual is intended to familiarize you with the operation of this product. Always keep this manual in a safe place so that you can access it at any time.
- When you purchase this product, you receive a two-year warranty for defects if the unit is used as intended.
- Please use the product only as intended. Any other use may result in damage to the product or its environment.
- Disassembly or modification of the product affects its safety. Attention: Risk of injury! Never open the product without authorization and never repair it yourself!
- Handle the product carefully. It can be damaged by shocks, blows or falling from a low height.
- Keep the product away from moisture and extreme heat.
- Do not allow metal objects to fall into this unit. Do not place heavy objects on this product.
- Clean only with a dry cloth. Do not block ventilation openings.
- Only use accessories recommended by the manufacturer or a qualified dealer.
The warranty is void in the event of foreign intervention on the device.
Small objects
- Keep small objects (i.e. screws, mounting material, memory cards etc.) and packaging out of the range of children. Do not let children play with plastic film. Choking hazard!
Transporting the device
- Please keep the original packaging. To ensure sufficient protection of the device during shipment or transportation, make sure to put it back in its original packaging.
Cleaning the surface
- Do not use volatile liquids such as insecticide spray. Excessive pressure during wiping can damage surfaces. Plastic or rubber materials must not remain in contact with the device for a long period of time. Use a dry cloth.
DEVICE OVERVIEW
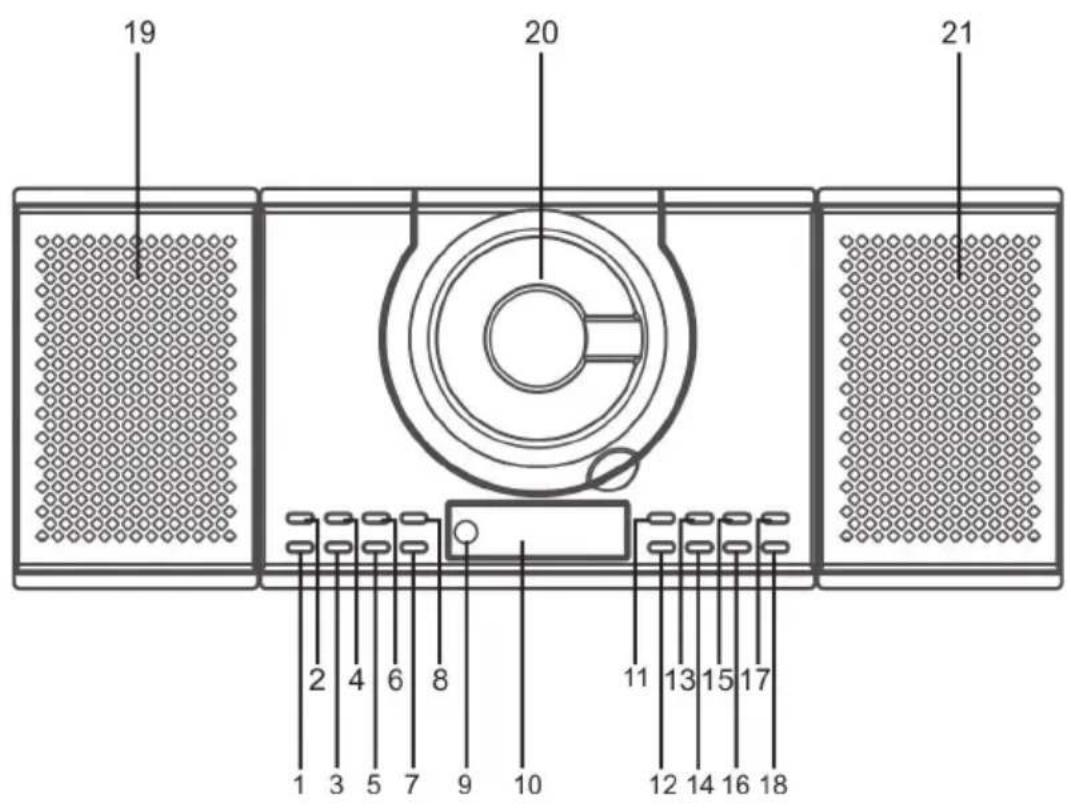
| 1 | SKIP/SEARCH BACKWARD, TUNER - BUTTON | 8 | MEMORY BUTTON, PROG BUTTON |
| 2 | STANDBY BUTTON 9 REMOTE SENSOR | ||
| 3 | SKIP/SEARCH FORWARD, TUNER + BUTTON | 10 | LCD DISPLAY |
| 4 | FUNCTION BUTTON 11 SLEEP/SNOO | ZE BUTTON | |
| 5 | PLAY/PAUSE, FM SCAN BUTTON | 12 | AL SET, EQ BUTTON |
| 6 | RANDOM BUTTON 13 REPEAT BUTTON | 14 | TIME SET BUTTON |
| 7 | STOP BUTTON, BT PAIR BUTTON | ||
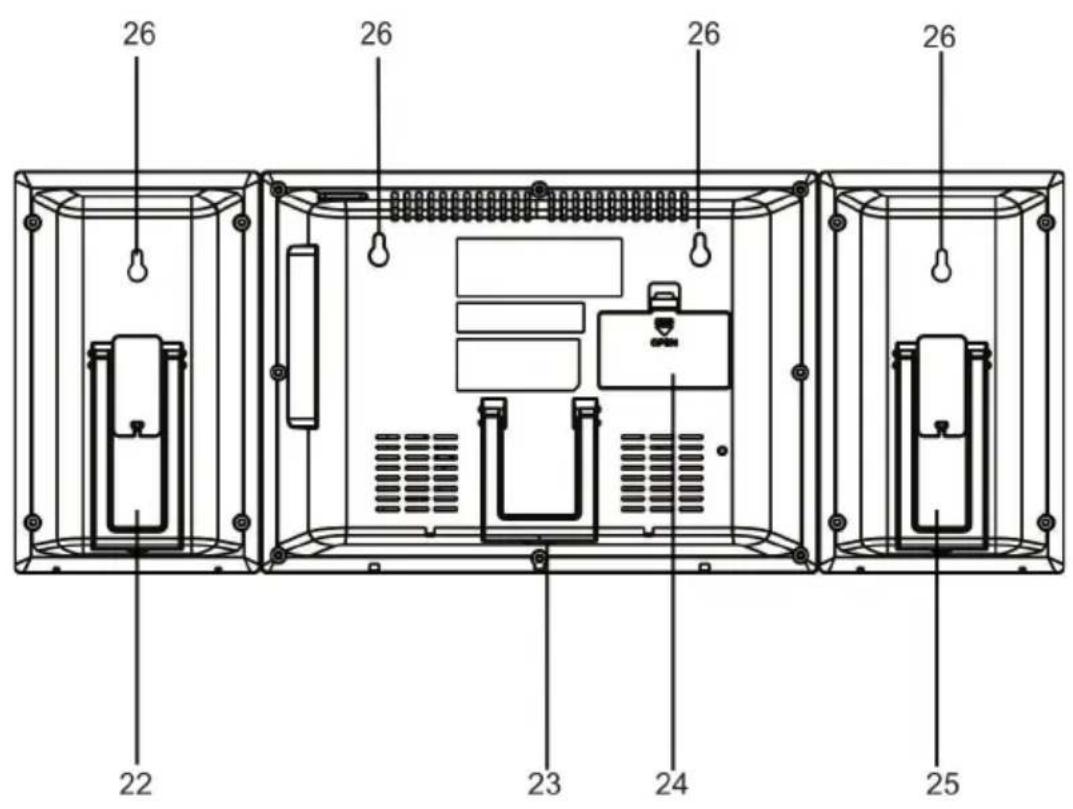
| 15 | PRESET+, FOLDER + BUTTON 24 | BATTERY DOOR | |
| 16 | PRESET- , FOLDER - BUTTON 25 | L-SPEAKER SUPPORT FRAME | |
| 17 | VOLUME + BUTTON 26 HANGER HOLES | ||
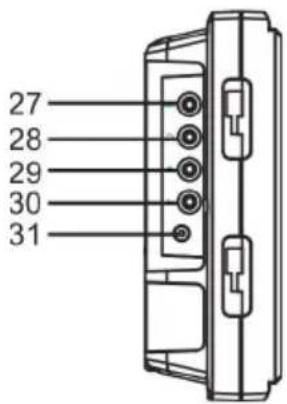
| 18 | VOLUME - BUTTON 27 AUDIO IN JACK | ||
| 19 | L-SPEAKER 28 PHONE JACK | ||
| 20 | CD DOOR 29 L-SPEAKER OUT JACK | ||
| 21 | R-SPEAKER 30 R-SPEAKER OUT JACK | ||
| 22 | R-SPEAKER SUPPORT FRAME 31 | IN JACK | |
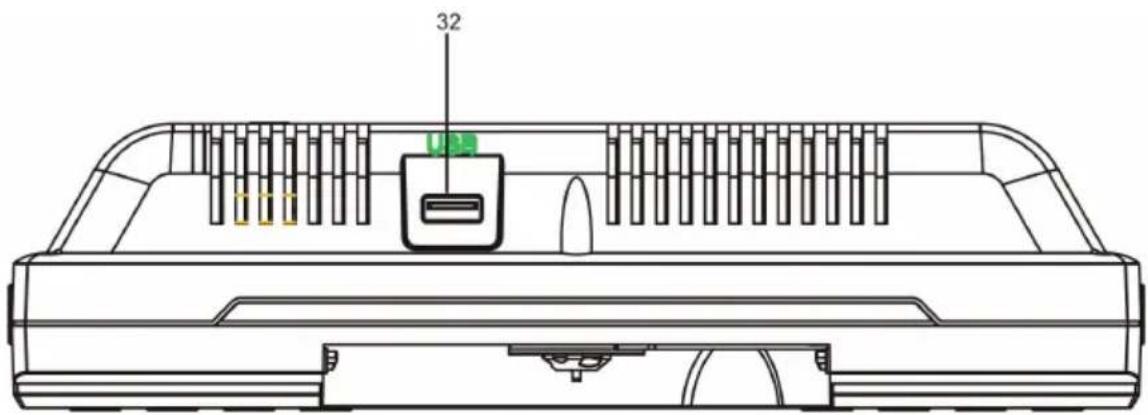
| 23 | MAIN UNIT SUPPORT FRAME 32 | JACK | |
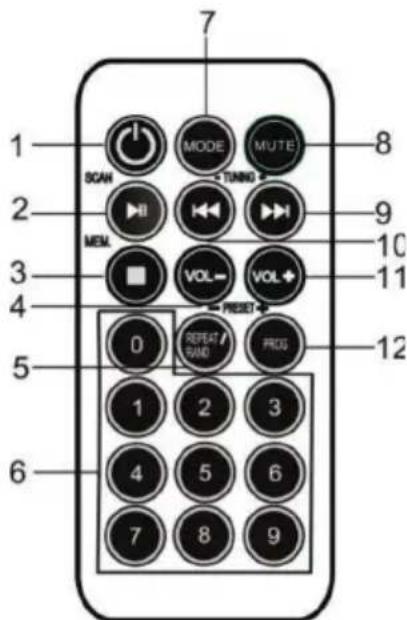
| Key functions | |
| 1 | STANDBY BUTTON |
| 2 | PLAY/PAUSE/FM SCAN BUTTON |
| 3 | STOP/MEM. BUTTON |
| 4 | VOL - BUTTON |
| 5 | REPEAT/RANDOM/PRESET - BUTTON |
| 6 | NUMERIC BUTTONS |
| 7 | MODE BUTTON |
| 8 | MUTE BUTTON |
| 9 | SKIP/SEARCH FORWARD/TUNING + BUTTON |
| 10 | SKIP/SEARCH BACKWARD/TUNING - BUTTON |
| 11 | VOL + BUTTON |
| 12 | PROG / PRESET + BUTTON |
NOTE: The remote control unit is designed to operate on 1 x CR2025 battery.
INSTALLATION
Installing the speakers
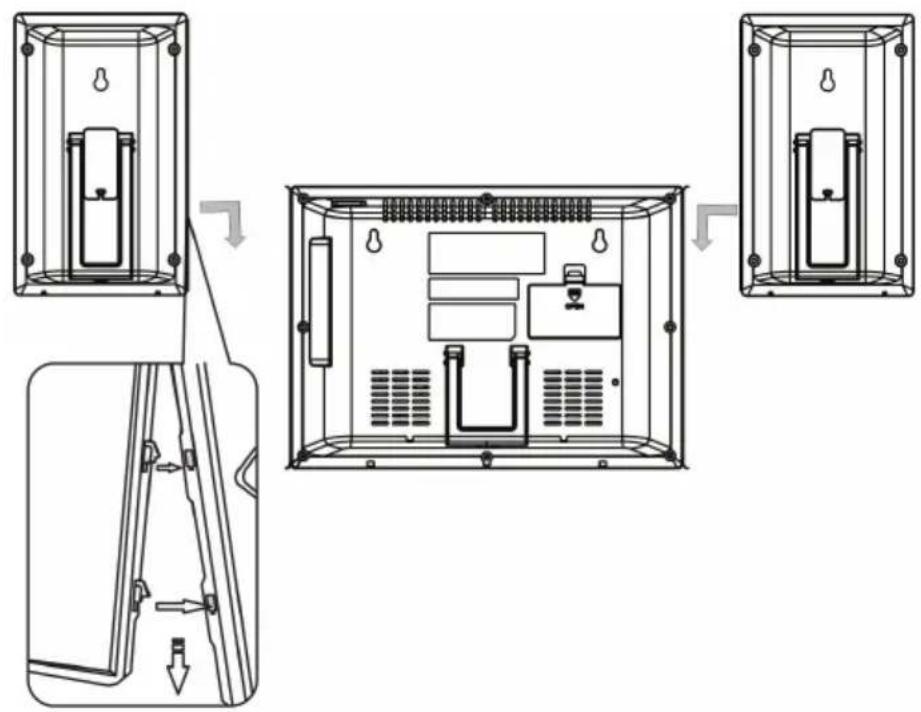
Wall mounting
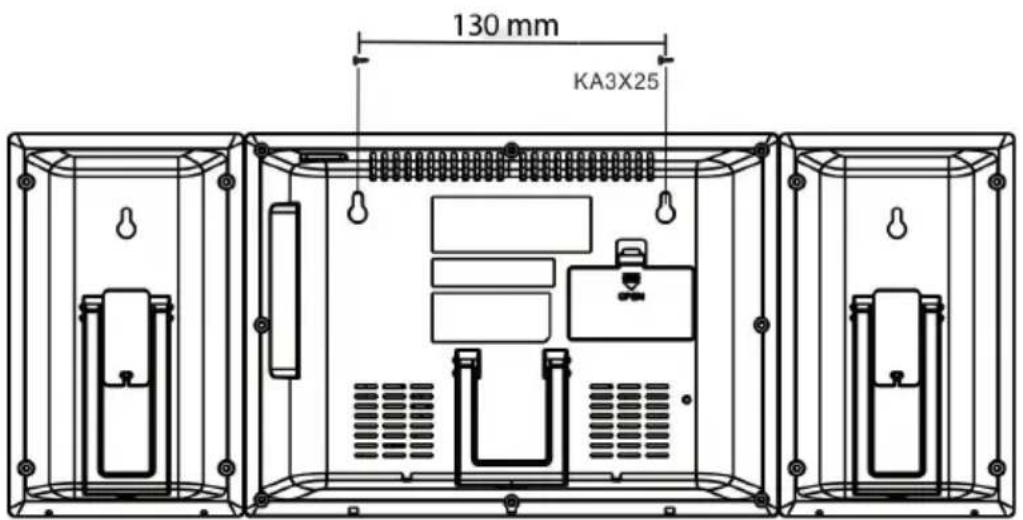
- Make sure to unplug the AC/DC power lead before making any connections:
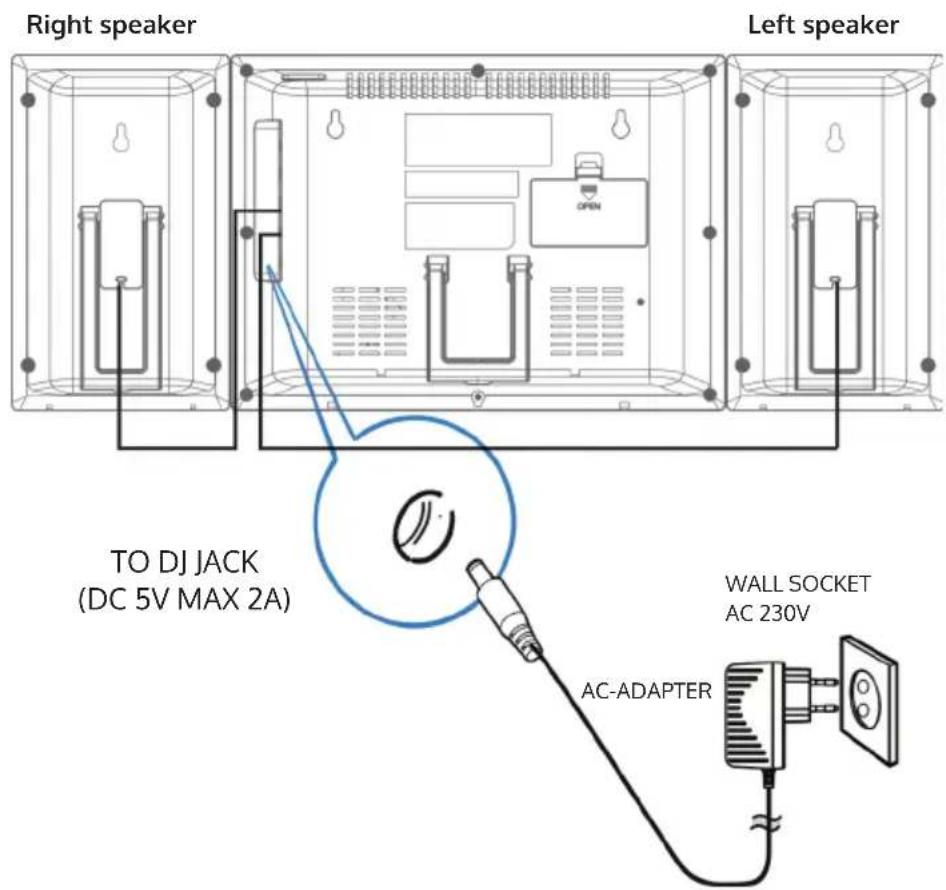
Power sources
- This Music System operates on 230V 50Hz . Do not attempt to operate the radio on any other power source. You could cause damage to the unit.
- Please be sure the power outlet you plug this unit into is working and receives constant (unswitched) power.
- The system is also equipped with a battery backup system for the clock that is powered by 2 "AA" (UM-3) size batteries (not included).
NOTE: The batteries may be installed as a backup option to maintain the clock time if electrical power fails. In the event of power outage, the clock time will not be displayed, however the clock will continue to operate so current time will be maintained.
GETTING STARTED
1) Installing backup batteries in the system
- Remove the BATTERY DOOR.
- Install 2 × "AA" (UM-3) batteries (not included) according to the polarity diagram inside the battery compartment.
- Close the BATTERY DOOR
NOTE: The backup battery is only for the Clock Setting and cannot back up the Alarm Setting.
2) Installing batteries in the remote control
The remote control operates on one CR2025 battery (included). To activate the remote control, remove the insulation tab inserted in the battery compartment. When the operation of the remote control becomes intermittent or unsatisfactory, replace the original battery with a new CR2025 lithium battery.
- Slide out the battery holder from the remote control case.
- Replace the 3V CR2025 battery. Be sure the battery is installed correctly. The remote
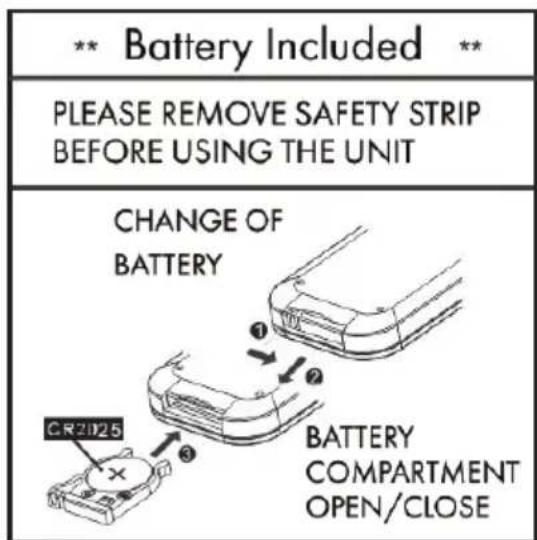
will not work if the battery is installed with the wrong polarity.
- Insert the battery holder back into the battery slot.

WARNING
Do not ingest battery. Chemical burn hazard!
The remote control supplied with this product contains a coin/button cell battery. If the coin/button cell battery is swallowed, it can cause severe internal burns in just 2 hours and can lead to death.
Keep new and used batteries away from children. If the battery compartment does not close securely, stop using the product and keep it away from children.
If you think batteries might have been swallowed or placed inside any part of the body, seek immediate medical attention.
NOTE: Be sure that the batteries are installed correctly. Wrong polarity may damage the unit. For best performance and longer operating time, we recommend the use of good quality alkaline type batteries.
Battery care
- Do not mix old and new batteries.
- Do not mix alkaline, standard (carbon-zinc) or rechargeable (nickel-cadmium) batteries.
- If the unit is not to be used for an extended period of time, remove the battery. Old or leaking batteries can cause damage to the unit.
- Do not dispose of batteries in fire, batteries may explode or leak.
Using the remote control correctly
NOTE: The remote control is only for operating the CD/USB, BT player and radio.
- Point the remote control at the REMOTE SENSOR (IR) located on the front of the system (9).
- The functions of the remote buttons are the same as the corresponding controls on the main unit.
- The performance of the infrared SENSOR may be degraded causing unreliable operation if there is strong ambient light source in the same room.
- The recommended effective distance for remote operation is about 10-15 feet.
Muting
- The volume is muted temporarily when pressing the MUTE button (8) on the remote control.
- Press again to restore the volume.
Preset EQ (remote control only)
- This unit provides 4 different EQ modes to enhance your listening experience. You can select the desired effect by pressing the EQ button on remote control repeatedly at following sequence:

OPERATION AND FUNCTIONS
FM RADIO
AUTO Scan (SCAN)
You can use the scan (auto tune) function to automatically scan for new digital radio stations and remove inactive ones.
- Press and hold the PLAY/PAUSE/FM SCAN button (5) on main unit or (2) on remote control for 2 seconds to choose "Scan". The number of stations found will be displayed during the auto tune. When the auto tune has finished, it will tune to the last station that you were listening to. If the last station you were listening to is no longer available, it will tune into the first station in the alphabetical list.
- To manually tune to a specific radio station, tap the FORWARD or BACKWARD buttons (3/1) on main unit or (9/10) on remote control repeatedly.
Recalling Preset Memory Channels
- In radio mode, recall the pre-set channels by pressing the buttons PRESET + or PRESET - on main unit (15/16) or on remote control (5/12) repeatedly. (Note: "P01" will blink in the display if you are programming preset for the first time.)
NOTE: The clock and FM radio station presets will need to be reset if the power is interrupted or in the event of a power outage. "12:00" will appear and start blinking on the LCD display to notify you that the power was interrupted and the clock will need to be reset. Please follow the steps above to resave the preset stations.
NOTE: During FM search and listening the LCD shows no frequency display.
CD PLAYER
Disc play mode
- Press the STANDBY button (2) on the main unit or (1) on the remote control to turn the power on.
- Press the SOURCE button on the remote control or CD/USB button to turn on the CD mode.
- Pull the CD tray with one finger to open it.
- Playback will start from track 1 once the player has finished reading the TOC. The PLAY INDICATOR will appear steadily on the LCD DISPLAY (10).
- While playing, press the PLAY/PAUSE button (5) on the unit to pause. The PAUSE indicator will appear steadily on the LCD DISPLAY (10). Press the PLAY/PAUSE button (5) again to resume playing.
- Adjust the volume using the VOLUME +/- buttons (17/18) on the unit or (4/11) on remote control.
Procedure to play MP3/WMA disc
To play back CD-R/RW
- Press the CD/USB button on the remote control, and load an MP3/WMA disc.
- Press the PRESET/FOLDER + or - buttons (15/16) on the main unit or (5/12) on the remote control to select desired playback folder.
- Select the desired file to be played back by pressing the buttons SKIP FORWARD or SKIP BACKWARD (3/1) on the main unit or (9/10) on the remote control.
- Press the PLAY/PAUSE button (5) on the main unit or (2) on the remote control. Playback will start and file name will be displayed.
- In the case of playback with the folder mode on, press the PRESET/FOLDER + or - buttons, and the folder can be selected even though it is in playback/pause mode. It will continue playback/pause mode with the 1st track of the selected folder.
Play mode
Repeat 1:
When the REPEAT button is pressed once, (13) on the main unit or (5) on the remote control, the "REPEAT 1" indicator will appear steadily on the LCD display. The current track will be played repeatedly.
Repeat all:
When the REPEAT button is pressed twice, the "REPEAT ALL" indicator will appear on the LCD display. The whole disc will be played continuously.
- To cancel repeat function:
Press the REPEAT button until the repeat indicator is off.
- Random play:
When the RANDOM button (6) is pressed three times, the "RAND" indicator will appear on the LCD display. The tracks on the disc will be played in random order automatically.
To cancel random play:
Press the RANDOM button again. "RAND" indicator will disappear.
Notes on random play:
- If you press the FORWARD button during random play, you can move to the track selected next by the random operation. On the other hand, the BACKWARD button does not allow you to move to the previous track. The beginning of the track being played will be located.
- In random play, the unit will select and play tracks automatically. (You cannot select the order of the tracks.)
Skip and search mode
- During Play or Pause mode, tap the SKIP FORWARD or SKIP BACKWARD buttons (3/1) on the main unit or (9/10) on remote control to go to the next track or go back to the beginning of the current track.
- During playback, press and hold the SEARCH FORWARD or SEARCH BACKWARD buttons (1/3 on the main unit or 9/10 on remote control) to search within the current track with audible high speed playback.
Program setting (remote control only)
User can program up to 32 tracks in CD mode or 99 tracks in MP3 in any desired order. Program mode is activated while in STOP mode.
- Press the PROG button (12) on the remote control to enter program mode.
- Press the FORWARD or BACKWARD buttons (9/10) to select the track that you want to preset.
- Press the PROG button (12) to confirm the track.
- Repeat steps 2-3 to program more tracks. Once it is completed, press the PLAY/PAUSE button (2) on the remote control to start playback of the programmed tracks.
BT
The unit has a BT function that can receive a signal within 8 metres.
Pairing the unit with a BT device to listen to music:
- Press the STANDBY button (2) on the main unit or (1) on the remote control.
- Press FUNCTION button (4) on the main unit or the MODE button (7) on the remote control to turn on the BT mode.
- If the unit is not paired with any BT device, the display will flash "BT."
- Activate your BT device and select the search mode.
- "MC120" will appear on your BT device list.
- Select "MC120" and enter "0000" for the password if necessary.
- To disconnect the BT function, press the FUNCTION button (4) on the main unit or the MODE button (7) on the remote control to switch to another mode or disconnect the function from your BT device.
Notes on using BT:
- If the signal strength is weak, your BT receiver may disconnect, but it will re-enter pairing mode automatically.
- For a better signal reception, remove the obstacles between the unit and the BT device.
- This unit supports A2DP (Advanced Audio Distribution Profile) and AVRCP (Audio Video Remote Control Profile) functions. This can only be paired with one BT device at one time.
- Compatibility with all devices and media types is not guaranteed.
- Some mobile phones with the BT function may connect and disconnect as you make and end calls. This is not an indication of a problem with your unit.
USB
- There is an USB socket (32) located at the front of the unit. When a USB device is connected to the unit, repeatedly press the FUNCTION button (4) on the unit or the MODE button (7) on the remote control to select USB mode.
- The unit will automatically display the total number of tracks.
- All playback features are the same as if you were playing an MP3 CD.
REP_ONE: Press the REPEAT button (13) once on the main unit or (5) on the remote control. "REPEAT 1" will show on the display. It will play the current track repeatedly.
REP_ALL: Press the REPEAT button three times. "REPEAT ALL" will show on the display. It will play all files repeatedly.
REP_folder: Press the REPEAT button twice. "REPEAT ALL" will show on the display. It will play the current folder repeatedly.
REPEAT OFF: Press the REPEAT button once more again, the repeat function will turn off.
Notes on using USB:
- The unit can only play the MP3 file format in USB operation.
- If your USB device is loaded with MP3s but the display keeps showing "NO" on the display, the format of your USB device might not be compatible with the unit.
This unit supports USB versions 1.1 and 2.0. - The unit can support USB devices with up to 32 GB of memory.
- The unit may not be compatible with all USB devices and memory cards, this is not an indication of a problem with the unit.
AUX IN
- Use a connection lead to connect a portable audio player etc. to the AUDIO IN socket (27). When using video equipment, connect the audio output to this unit and the video output to a television.
- Press the STANDBY button (2) on the main unit or (1) on the remote control to turn the power on.
- Press the FUNCTION button (2) repeatedly on the main unit or the MODE button (7) on the remote control to select the AUX IN function.
- Play the connected equipment. If volume level of the connected device is too high, sound distortion may occur. Should this happen, lower the volume of the connected device. If volume level is too low, increase the volume of the connected device.
NOTE: To prevent noise interference, place the unit away from the television.
USING HEADPHONES
(Not included!)
Inserting the plug of your headphones into the system's PHONE JACK (28) will enable you to listen to CDs, the radio or other music sources in private. When using headphones, the speakers will be automatically disconnected. Use the VOLUME +/- buttons (17/18) on the main unit or (4/11) on the remote control to adjust the volume.
ALARM OPERATION
Setting the alarm clock
This function allows the system to turn on automatically and wake you using a beeping alarm, a CD, USB, BUZZER or RADIO.
- In standby mode, hold the AL SET button (12) on the main unit for three seconds, then alarm time "00:00" will appear on the display. Hour digits of the alarm clock will start flashing.
- Press the FORWARD or BACKWARD buttons (3/1) to set the hour and then press the AL SET button (12) again to confirm. Minute digits will be flashing.
- Press the FORWARD or BACKWARD buttons (3/1) to set the minute and then press the AL SET button (12) again to confirm. Alarm wake up source will appear in display.
- Press the FORWARD or BACKWARD buttons (3/1) to select wake to CD, USB, Buzzer or radio, and then press the AL SET button (12) again to confirm. Alarm volume level will be flashing.
NOTE: Alarm volume level setting is not available in beeping alarm setting.
- Press the FORWARD or BACKWARD buttons (3/1) to preset the wake up alarm volume level and then press the AL SET button (12) to finish alarm setup.
Notes on the alarm function:
1 If "Wake to CD,USB" is selected but a CD or USB is not inserted, the alarm will default to the Beeping Alarm automatically when the alarm wake time is reached.
2 For 'Wake to Radio," the system will default to the last radio station listened to before switching off.
3 The volume of the alarm will be increased to the setting volume.
Active/deactivate alarm function
- To activate ALARM, tap the AL SET button (12) once. The alarm icon will be shown on LCD display.
- To cancel alarm function, tap the AL SET button (12) again until the alarm icon goes off.

Wake to CD, USB, Radio or Beeping Alarm
- When the alarm time is reached, the CD, radio or beeping alarm will sound for the time you set then shut off and reset itself for the following day – without you having to press the SNOOZE button (11).
- You may activate the snooze function manually after the alarm sounds by pressing the SNOOZE button (11). The buzzer will stop for the snooze time (9 minutes) then will come on again. The snooze operation can be repeated again within the remaining minutes from the set alarm time.
NOTE: Remaining time must be greater than 9 minutes from the alarm off time, otherwise the alarm will stop until the next day.
- To stop the alarm immediately after it sounds, tap the STANDBY button (2) on the main unit or (1) on the remote control. It will reset itself for the following day.
- To cancel the following day's alarm, tap the AL SET button once. The ALARM icon goes off.
Snoopze function
Press the SNOOZE button (11) on the main unit once to terminate the alarm mode temporarily, and the alarm will restart again after 9 minutes on each press.
Sleep operation
This function allows you to program the system to switch itself off after a set period of time. You can set your sleep time in power on mode:
- To activate the sleep function, press the SLEEP button (11) on the main unit. The display will show "Sleep Timer-OFF,120,90,60,30,20,10,5" and flash.
- When the display shows your desired sleep time, release the button. The sleep timer is now activated. The display will show "10" indicating "10 minutes" sleep time and so on. When the sleep time has counted down to zero, the unit will go off.
- To cancel sleep, press the SLEEP button (11) on the main unit once again. The sleep function will turn off.
CLEANING AND CARE
Care of compact discs
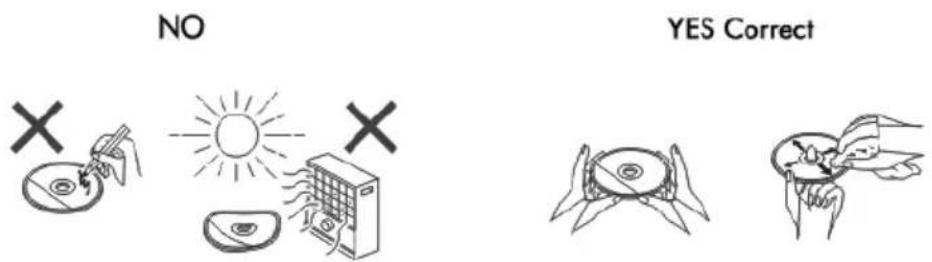
Compact discs are fairly resistant to damage, however mistracking can occur due to an accumulation of dirt on the disc surface. Follow the guidelines below for maximum enjoyment from your CD collection and player.
- Do not write on either side of the disc, particularly the non-label side from which signals are read. Do not mark this surface.
- Keep your discs away from direct sunlight, heat, and excessive moisture.
- Always hold the CDs by the edges. Fingerprints, dirt, or water on the CDs can cause noise or mistracking. If a CD is dirty or does not play properly, clean it with a soft, dry cloth, wiping straight out from the centre, along the radius.
Cleaning the cabinet
- Periodically wipe the cabinet with a soft cloth and a diluted soap solution, then with a dry cloth.
NOTE:
- Do not use chemicals for cleaning (petrol, paint thinner, etc.). It may damage the cabinet.
- Do not apply oil to the inside of the unit. It may cause malfunctions.
TROUBLESHOOTING
| Problem Possible Cause | |
| The radio makes unusual noises continuously. | ·Is the unit placed near the TV or computer? ·Is the FM antenna placed properly? Move the antenna away from the AC power lead if it is located nearby. |
| The remote control does not work. | ·Is the AC power lead of the unit plugged in? ·Is the battery polarity correct? ·Is the battery dead? ·Is the distance or angle incorrect? ·Is the remote control sensor receiving strong light? |
| Disc playback does not start. Disc playback stops in the middle or is not performed properly. | ·Is the disc loaded face down? ·Does the disc satisfy the standards? ·Is the disc distorted or scratched? |
| Disc playback sounds are skipped, or stopped in the middle of a track. | ·Is the unit located near excessive vibrations? ·Is the disc very dirty? ·Has condensation formed inside the unit? |
| USB device cannot be detected. | ·Are there any MP3/WMA files available? ·Is the device properly connected? ·Is it an MTP device? ·Does the device contain AAC files only? |
| USB playback does not start. | ●Is it a copyright protected WMA file? ●Is it a false MP3 file? |
| BT sound is interrupted or distorted. | ●Is the unit too near to a device that generates electromagnetic radiation? ●Is there any obstacle between the unit and the BT stereo audio source device? |
| No sound is heard. | ●Is the volume level set to "Min?" ●Are the headphones connected? ●Is the unit too far from the BT stereo audio source device? ●Is the unit paired with the BT stereo audio source device? |
| When a button is pressed, the unit does not respond. | ●Set the unit to the power stand-by mode and then turn it back on. |

If there is a legal regulation for the disposal of electrical and electronic devices in your country, this symbol on the product or on the packaging indicates that this product must not be disposed of with household waste. Instead, it must be taken to a collection point for the recycling of electrical and electronic equipment. By disposing of it in accordance with the rules, you are protecting the environment and the health of your fellow human beings from negative consequences. For information about the recycling and disposal of this product, please contact your local authority or your household waste disposal service.
This product contains batteries. If there is a legal regulation for the disposal of batteries in your country, the batteries must not be disposed of with household waste. Find out about local regulations for disposing of batteries. By disposing of them in accordance with the rules, you are protecting the environment and the health of your fellow human beings from negative consequences.
DECLARATION OF CONFORMITY
CE UK CA
Manufacturer:
Chal-Tec GmbH, Wallstrasse 16, 10179 Berlin, Germany.
Importer for Great Britain:
Berlin Brands Group UK Ltd
PO Box 1145
Oxford, OX1 9UW
United Kingdom
Hereby, Chal-Tec GmbH declares that the radio equipment type Wallie is in compliance with Directive 2014/53/EU. The full text of the EU declaration of conformity is available at the following internet address: use.berlin/10033227
For Great Britain: Hereby, Chal-Tec GmbH declares that the radio equipment type Wallie is in compliance with the relevant statutory requirements. The full text of the declaration of conformity is available at the following internet address: use.berlin/10033227
Estimado cliente:
Berlin Brands Group UK Ltd
PO Box 1145
Oxford, OX1 9UW
United Kingdom
Chere cliente, cher client,
Berlin Brands Group UK Ltd
PO Box 1145
Oxford, OX1 9UW
United Kingdom
(non incluse in consecna!)
Berlin Brands Group UK Ltd
PO Box 1145
Oxford, OX1 9UW
United Kingdom
Berlin Brands Group UK Ltd
PO Box 1145
Oxford, OX1 9UW
United Kingdom