
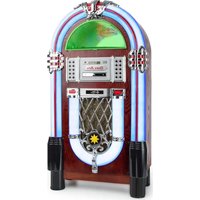
Spacewoofer DAB+ - Hi-fi system Auna - Free user manual and instructions
Find the device manual for free Spacewoofer DAB+ Auna in PDF.

| Product Type | Hi-Fi System |
| Brand | Auna |
| Model | Spacewoofer DAB+ |
| Power Supply | AC 100-240 V ~ 50/60 Hz or DC 12 V (8 UM-2 "C" batteries not included) |
| Power | 30 W |
| Standby Power | 0.5 W |
| FM Frequency Range | 87.5 - 108 MHz |
| DAB/DAB+ Frequency Range | 174.928 - 239.200 MHz (Band III) |
| CD Player Frequency Range | 100 Hz - 16 KHz |
| Bluetooth Range | up to 10 meters |
| Connections | 3.5 mm AUX input, 3.5 mm headphone jack, USB port, telescopic FM antenna |
| Players | CD, CD-R, CD-RW, MP3, USB, Bluetooth, FM/DAB+ radio |
| Audio Functions | Equalizer (FLAT, CLASSIC, ROCK, POP, JAZZ, DBBS), ID3-Tag |
| LED Lighting | 8 different flashing effects |
| Remote Control | Yes (CR2025 battery included) |
| Display | LCD Screen |
| Safety | Overload protection, auto shut-off after 15 min in CD/USB/BT/AUX mode |
| Cleaning | Soft dry cloth, do not use abrasive products |
| Recycling | WEEE compliant, batteries to be recycled separately |
| Warranty | Contact customer service, do not open yourself |
Frequently Asked Questions - Spacewoofer DAB+ Auna
User questions about Spacewoofer DAB+ Auna
0 question about this device. Answer the ones you know or ask your own.
Ask a new question about this device
Download the instructions for your Hi-fi system in PDF format for free! Find your manual Spacewoofer DAB+ - Auna and take your electronic device back in hand. On this page are published all the documents necessary for the use of your device. Spacewoofer DAB+ by Auna.
USER MANUAL Spacewoofer DAB+ Auna
Member of Berlin Brands Group
Handwerkerstr. 11
15366 Dahlwitz-Hoppegarten
Deutschland
Berlin Brands Group UK Limited
PO Box 42
272 Kensington High Street
London, W8 6ND
United Kingdom
Congratulations on purchasing this equipment.
Please read this manual carefully and take care of the following hints to avoid damages. Any failure caused by ignoring the items and cautions mentioned in the instruction manual is not covered by our warranty and any liability. Scan the QR code to get access to the latest user manual and other information about the product:

CONTENTS
Technical Data 26
Safety Instructions 26
Product description and Controls 28
Power Source 29
Remote Control 30
Basic functions 31
FM Radio 33
DAB Radio Mode 34
CD/MP3 37
USB40
BT40
AUX-IN 41
Disposal Considerations 42
Declaration of Conformity 42
TECHNICAL DATA
Item number 10036341 10036342
Power supply AC 100-240 V ~ 50/60 Hz
DC 12V UM-C x 8 pcs
Power consumption (Watt) 30 W
Standby consumption (Watt) 0,5 W
Receiver frequency range FM 87.5 - 108 MHz
CD player frequency range 100 Hz - 16 KHz
BT reach Up to 10 meters
DAB/DAB+ 174.928 - 239.200 MHz (Band III)
Operation temperature +5^ - + 35^
Connectors
AUX IN input 3.5 mm
3.5 mm
USB port
SAFETY INSTRUCTIONS
- This device may only be used by children from the age of 8 and up and by persons with reduced physical, sensory and mental capabilities or a lack of experience and / or knowledge if they are supervised or have been instructed in the safe use of the device and have understood the resulting dangers.
- Cleaning and user maintenance should not be done by children unless they are 8 years of age or older and are supervised.
Children must not play with the device. - Observe all notes listed in the operating instructions.
- Do not use the unit near water or in a humid environment.
- Make sure that no liquid is spilled over the unit and the unit openings.
-
Move the unit carefully to avoid damaging it.
-
Do not block the device outputs.
- Do not place the unit near heat sources (e.g. heating). Do not expose the device to direct sunlight.
- Plug the power plug of the unit into the power outlet in the manner intended.
- The device is equipped with overload protection. Should this need to be replaced, contact customer service or a similarly qualified person.
- Unplug the unit from the wall outlet if it will not be used for a long period of time.
- Do not attempt to service or repair the unit yourself. In this case, the warranty expires.
- The mains plug is used to disconnect the device from the mains after it has been switched off. Make sure that the mains plug is always freely accessible.
- Do not expose the device to splash water or place objects filled with liquid, such as vases, on the device.
- Do not expose the batteries to extreme heat such as sunlight or fire.
- Do not obstruct the ventilation of the unit by blocking the ventilation openings with objects such as newspapers, tablecloths, curtains, etc..
- Ensure that a minimum distance of 5mm to all sides of the unit is maintained.
- Do not place sources of open flame ignition, such as lit candles, on the unit.
- Dispose of used batteries in an environmentally friendly manner.
- Use the device only in temperate climate, not in tropical climate.
WARNING
Risk of injury! To reduce the risk of electric shock, do not open either the cover or the back of the unit. The device does not contain any parts that could be serviced by the customer. Please contact customer service or similarly qualified personnel for maintenance and repair.
PRODUCT DESCRIPTION AND CONTROLS
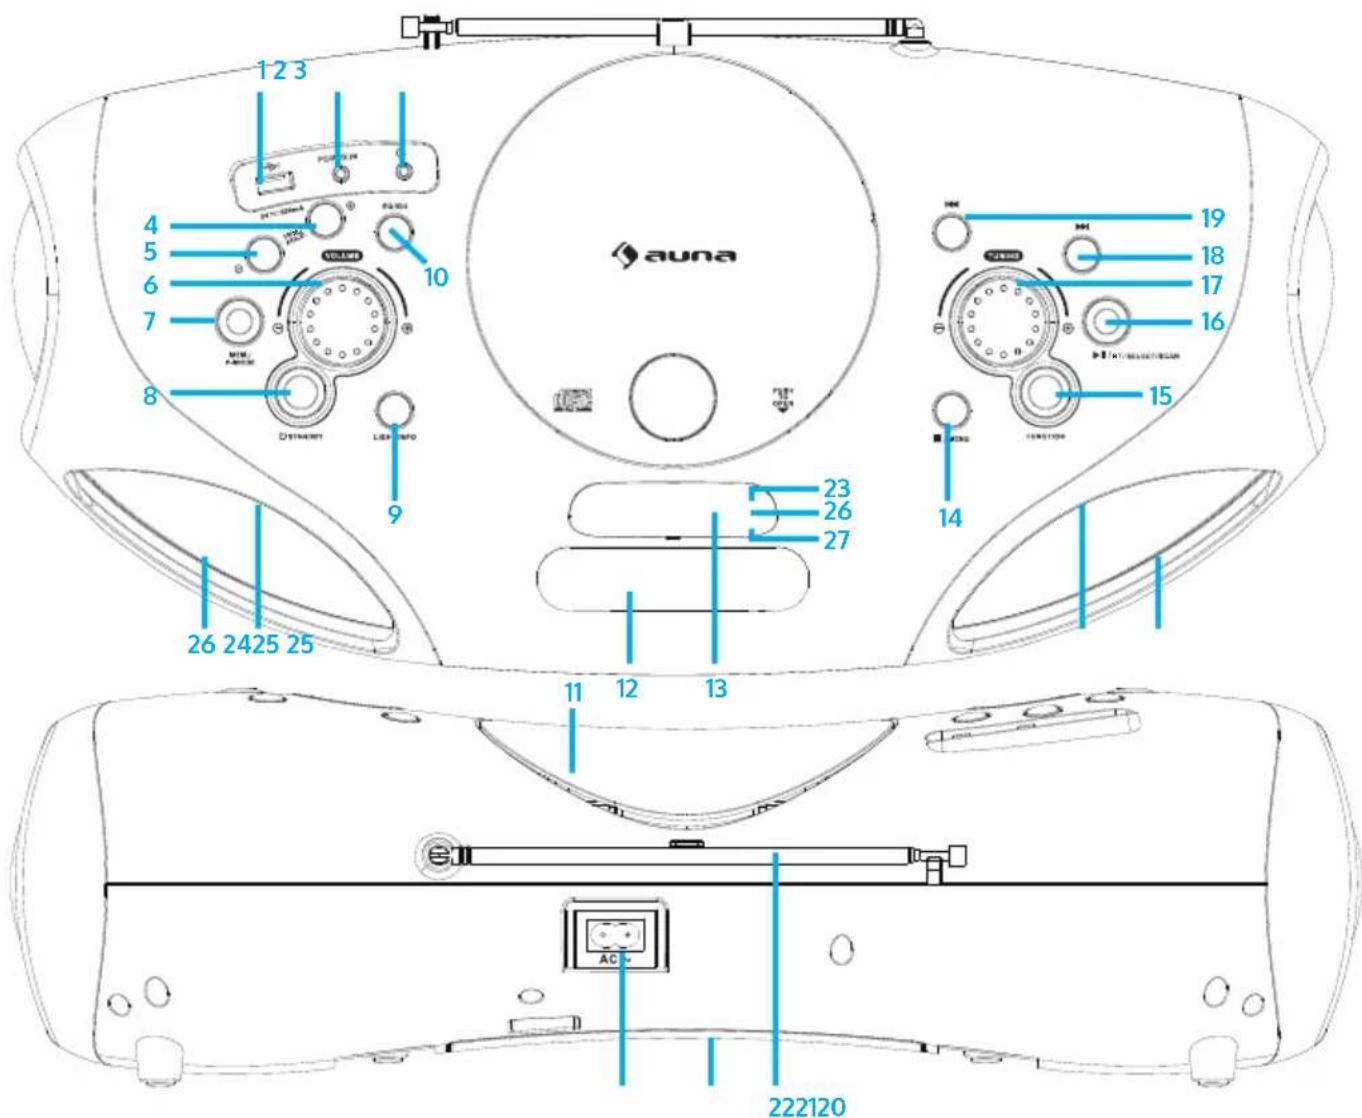
| 1 USB port | |
| 2 AUX IN jack | |
| 3 Phones jack | |
| 4 FOLD.+/+10/MEM.+ Button (Scroll up in folders/lists/memory list) | |
| 5 FOLD.-/-10/MEM.- Button (Scroll down in folders/lists/memory list) | |
| 6 Volume Knob | |
| 7 MEM./P-MODE Button (Program selection/Programming mode/Memory) | |
| 8 Standby button 18 Next/Fast Forward button | |
| 9 Light / Info button 19 Back/Fast Backward button | |
| 10 EQ/ID3 Button (Tone Control/Display MP3 Information) | 20 AC socket |
| 11 CD door 21 Battery compartment | |
| 12 Handle 22 FM antenna | |
| 13 Display 23 Standby indicator | |
| 14 Stop / Menu button 24 Speakers | |
| 15 Function button 25 LED light | |
| 16 Play/Pause/Pair/Select/Scan button | 26 IR indicator |
| 17 Tuning Knob 27 Pair indicator | |
POWER SOURCE
This unit is designed to be operated on AC/DC.
AC Operation
- Plug the tail of supplied AC power cord into AC socket on unit and the plug into household AC outlet. The batteries will be automatically disconnected.
DC Operation
- Open the battery compartment door. Install 8 pcs UM-2 "C" size batteries (not included) into compartment. Please follow correct polarities as indicated.
Note: When using battery, take off the AC cable from unit.
Remove batteries if they are flat or not being used for a long period of time.
Batteries contain chemical substances, so they should be disposed of properly.
ESD hints - The product maybe reset or not reset to operation of control due to electrostatic discharge, just switch off and reconnect again.
REMOTE CONTROL

Key functions
1 FUNC (Function selection key)
2 MUTE
3 MEM (Memory key)
4 EQ (Tone control)
5 FOLD./10/M. (UP/DOWN)
(Scroll up/down in folders/lists)
6 Baei/Fast Backward/Tuning -
7 Play/Pause
8 P-MODE/Info (Programming mode)
9 Stb / Menu
10 PAIR (BT Pairing key)
11 Next/Fast Forward/Tuning +
12 ID3 (Display MP3 information)
13 VOLUME (UP/DOWN)
14 LIGHT
15 MO/ST (Mono/stereo key)
16 STANDBY (On/Off key)
17 Remote sensor
18 Battery compartment
Note: Please pull battery protector before using.
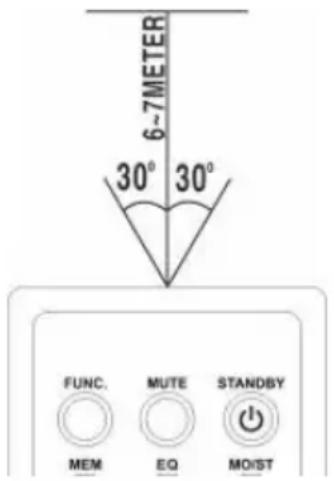
Remote control operation
- To operate the unit with the remote control, point the remote handset at the remote sensor on the front panel and press the appropriate button on the remote handset.
- The remote works best within a range of 6 7 meters from the front panel and on an angle of 30 degrees.
- Bright sunlight or room light conditions can interfere with the remote control.
- If the remote operation is unsatisfactory or stops working entirely, first try replacing the remote batteries, then try reducing the room lighting conditions.
Lithium battery installation of remote control
The remote control includes one CR2025(3V) lithium battery.
- To replace the battery, gently push the clasp to the right direction accordingly to the instruction and then pull out the battery compartment.
- Take the drained battery out and install a new lithium battery(CR-2025) in the compartment with the positive polarity upwarded. Then push the compartment back to its position with a "click" sound indicating installation finished.
BASIC FUNCTIONS
Tuning on the unit
- After connecting the power, press the Standby button (8) on unit or the STANDBY button (16) on remote control to turn on the unit.
- Press the Function selection button (15) on unit or the FUNC button (1) on remote control to choose FM/CD/USB/BT/AUX/DAB function.
Note: In CD/USB/BT/AUX mode, when the unit is not providing the main function for 15 minutes, the unit will automatically switch into standby mode. Press the Standby button to turn on the unit again.
Volume control
- Rotate the Volume knob (6) on unit to increase or decrease volume.
Headphone jack
- If required, insert a headphone with a 3.5mm jack plug (not included) into the headphone jack (3). The speaker (24) is automatically muted.

CAUTION:
Listening at high volume over a long period of time can damage your ears.
ID3 tag system (show MP3 info)
Some MP3 files are encoded with information such as the name of the song, the artist, and the album. Together, this information is called an "ID3 tag".
- Press and hold the EQ/ID3 button (10) on unit or the ID3 key (12) on remote control to turn the ID3 tag display on or off. When the ID3 tag display is on, the unit will display tag information in the order shown below.
→SONG NAME→ARTIST NAME→ALBUM NAME→ID3 OFF
EQ function (equalizer)
This unit has a built-in equalizer system.
- Press the EQ/ID3 button (10) on unit or the EQ key (4) on remote control to select a different music style (sound tone): FLAT, CLASSIC, ROCK, POP, JAZZ and DBBS.
LED light
- Press and hold the Light button (9) on unit or the LIGHT key (14) on remote control to turn on the LED light and choose from 8 different flashing modes effect. To disable the LED light, press the Light button until the display shows "LIGHT OFF".
FM RADIO
Tuning radio stations
- Press the Function selection button (15) on unit or the FUNC key (1) on remote control to select the radio mode: FM.
- Tune to desired station by rotating the Tuning knob (17) on unit, the display will show the band frequency. Example: FM 97.10 MHz. You can also press and hold the FORWARD or BACK button for fast searching, it will auto stop at any station with strong signal.
- Rotate the Volume knob (6) on unit to increase or decrease volume.
- Extend the telescopic antenna (22) to its full length and gently move the unit back and forth to get the best reception, or place the unit in an open location.
- To turn off the radio, press the Function selection button (15) on unit or the FUNC key (1) on remote control to switch to other functions or press Standby button (8) on unit or STANDBY key (16) on remote control to turn off the unit.
Auto preset memory / scan
- To search for and automatically save stations to preset memory, press and hold the Play button (16) on unit. Any station with a strong enough signal will be saved to preset memory. After the unit finishes scanning, the unit will automatically tune to preset station number 1 (P01).
- To tune to the next or previous preset station, press FOLD./10/M.+/- button (4 & 5) on the unit or FOLD./10/M. (UP/DOWN) key (5) on the remote control.
Manual preset memory operation
You may pre-store 30 radio stations in memory for your preference.
- Rotate the Tuning knob (17) on unit to select the desired station that you want to save as a preset.
- Press the MEM./P-MODE button (7) on unit or press MEM key (3) on remote control, "P01" will flash on the display to indicate that you are saving the station as preset memory 01. To change the preset memory sequence, press the FOLD./10/M +/- button (4 & 5) on unit or FOLD./10/M (UP/DOWN) key (5) on remote control, then press MEM./P-MODE button (7) on unit or press MEM key (3) on remote again to enter.
- Search another station, repeat steps (1) and (2) until all desired stations stored. Up to 30 FM stations can be programmed.
- Press the FOLD./10/M +/- button (4 & 5) on unit or FOLD./10/M (UP/ DOWN) key (5) on remote control to switch between the stored stations.
DAB RADIO MODE
DAB radio mode receives DAB/DAB+ digital radio and displays information about the station and programmed/track as broadcast. Press the FUNCTION button on the unit or remote control until display reads "Welcome to DAB".
- To do a full scan, press and hold the STOP/MENU button on the unit or press STOP/MENU key on the remote control to enter menu selection, select the "full scan" option and press the PLAY/PAUSE/PAIR/SELECT/SCAN button on the unit or PLAY/PAUSE/SELECT key on the remote control to confirm. Once a full scan is complete, the radio will play the first station on the station list.
- To choose between the scanned station list, rotate the TUNING knob on the unit or press TUN-/or TUN+/ on the remote control to scroll through the list of stations and press the PLAY/PAUSE/PAIR/SELECT/SCAN button on the unit or PLAY/PAUSE/SELECT key on the remote control to confirm. The Now playing screen will display the new station details.
- To remove stations that are listed but unavailable, press and hold the STOP/MENU button on the unit or press STOP/MENU key on the remote control to enter menu selection, press TUN-/or TUN+/ button on unit or remote control to select the "Prune" option and press the PLAY/ PAUSE/PAIR/SELECT/SCAN button on the unit or PLAY/PAUSE/SELECT key on the remote control to enter, and then press the PLAY/PAUSE/ PAIR/SELECT/SCAN button on the unit or PLAY/PAUSE/SELECT key on the remote control to choose YES or NO option, press the PLAY/PAUSE/ PAIR/SELECT/SCAN button on the unit or PLAY/PAUSE/SELECT key on the remote control to confirm. This removes all invalid stations, indicated in the station list with a "?" in front of the station name.
Preset stations
To store a station in a preset memory, tune to the station that you want to save as a preset, then Press and hold the MEM/P-MODE button on the unit or press and hold MEM key on the remote control until the display shows "Preset Store". Press TUN-/or TUN+/ button on the unit or remote control to choose a preset memory position (for example, "preset 1"), then press the PLAY/PAUSE/PAIR/SELECT/SCAN button on the unit or PLAY/ PAUSE/SELECT key on the remote control to confirm. Use the 10/M./FOLD. +/- button on the unit or FOLD./10/M UP/DOWN key on the remote control to tune to the desired stations. Repeat this operation to save up to 30 preset stations.
Manual tune
To do a manual tune, press and hold the STOP/MENU button on the unit
or press STOP/MENU key on the remote control to enter menu selection, select the "Manual tune" option and press the PLAY/PAUSE/PAIR/SELECT/SCAN button on the unit or PLAY/PAUSE/SELECT key on the remote control to confirm. Press TUN-/- or TUN+/- button on the unit or remote control to tune to the desired stations.
Now playing information
While a station is playing, the screen shows its name and DLS (Dynamic Label Segment) information broadcast by the station such as program name, track title and contact details. To view further information, press the LIGHT/INFO button on the unit or press the P-MODE/INFO key each time to show next set of information, cycling through: DLS text, DL Plus information (this is only displayed if broadcast by the station), signal strength, program type, ensemble name, channel number/frequency, signal error rate and bit rate.
Dynamic range compression (DRC)
This function helps to reduce the difference between the loudest and quietest audio being broadcast. There are 3 options in this setting, the options available are: DRC off/DRC high/DRC low. To change the DRC setting, press and hold the STOP/MENU button on the unit or press STOP/MENU key on the remote control to enter menu selection, press TUN-/or TUN+/ button on the unit or remote control to select the "DRC" option then use the PLAY/PAUSE/PAIR/SELECT/SCAN button on the unit or PLAY/ PAUSE/SELECT key on the remote control to choose a desired option.
System
The system setting allows you to select display languages, reset to factory settings and view the software version.
Language
To select different languages for display messages. Press and hold the STOP/MENU button on the unit or press STOP/MENU key on the remote control to enter menu selection, press TUN-/or TUN+/ on the unit or remote control to select the "System" option, and press the PLAY/PAUSE/ PAIR/SELECT/SCAN button on the unit or PLAY/PAUSE/SELECT key on the remote control to confirm, select "language", and then you can choose the language you want.
Factory reset
Factory reset can help to clear all user defined settings, replacing them with the original default values, including the DAB station list and preset stations. Press and hold the STOP/MENU button on the unit or press STOP/MENU key on the remote control to enter menu selection, press TUN-/or TUN+/ on the unit or remote control to select the "System" option and press the PLAY/PAUSE/PAIR/SELECT/SCAN button on the unit or PLAY/
PAUSE/SELECT key on the remote control to enter, select "Factory Reset" then press TUN-/or TUN+/ button on the unit or remote control to choose YES or NO option, then press the PLAY/PAUSE/PAIR/SELECT/SCAN button on the unit or PLAY/PAUSE/SELECT key on the remote control to confirm.
Software upgrade
To upgrade the software for the unit. Press and hold the STOP/MENU button on the unit or press STOP/MENU key on the remote control to enter menu selection, press TUN-/or TUN+/ button on the unit or remote control to select the "System" option and press the PLAY/PAUSE/ PAIR/SELECT/SCAN button on the unit or PLAY/PAUSE/SELECT key on the remote control to enter, select "Software Upgrade" then press TTUN-/or TUN+/ button on the unit or remote control to choose YES or NO option, then press the PLAY/PAUSE/PAIR/SELECT/SCAN button on the unit or PLAY/PAUSE/SELECT key on the remote control to confirm.
Software version
This displays the current software version. Press and hold the STOP/MENU button on the unit or press STOP/MENU key on the remote control to enter menu selection, press TUN-/or TUN+/ button on the unit or remote control to select the "System" option and press the PLAY/PAUSE/ PAIR/SELECT/SCAN button on the unit or PLAY/PAUSE/SELECT key on the remote control to enter, select "SW version" then press the PLAY/PAUSE/ PAIR/SELECT/SCAN button on the unit or PLAY/PAUSE/SELECT key on the remote control to view the current software version.
CD/MP3
Discs for Playback
This system can playback all digital audio CD/MP3, finalized digital audio CD-Recordable (CD-R) discs, finalized digital audio CD-Rewritable (CD-RW) discs and CD-DA format digital audio CD/CD-R/CD-RW discs.
LOADING A DISC
- Press the Function selection button (15) on unit or the FUNC key (1) on remote control to select "CD" mode.
- Press the PUSH TO OPEN button to open the CD door, "OP" will be shown on the display.
- Place an audio CD/MP3 DISC into the tray with the front side facing up.
- Close the CD door.
- The display will show a flashing "READING", then the total number of tracks would be shown and the playback will start from track.
- To remove the CD, press Stop button (■) to turn off the unit, then press the PUSH TO OPEN button to open the CD compartment lid. Hold the CD by its edges, and take it out carefully.
Note: Make sure the disc is stopped before opening the CD door (11). To ensure good system performance, wait until the unit completely reads the disc before proceeding. If no disc loaded into the tray, or the disc is unreadable, the display will show "NO".
Playing a disc
- To pause playback, press Play/Pause button (16) on unit or Play/Pause key (7) on remote control, the current playing time will flash on the display. To resume playback, press Play/Pause button (16) on unit or Play/Pause key (7) on remote control again.
- To stop playback, press Stop button (■) on unit or (9) on remote control.
Selecting a desired track/passage
To select a desired track:
- Press the FORWARD oder BACK button on stop mode or during playing until the desired track appears on the display. It will start play automatically.
To search for a particular passage during playback (track scanning at high speed):
- Press and hold FORWARD oder BACK button to scan the current playing track at high speed until desired point (passage) appears, then release the button for normal playback mode. Playback will start again from this point.
To select a song which track number exceeds 10 (for MP3 disc only):
- To select a song/track which number exceeds 10, press the FOLD/10/M +/- button (4 & 5) on unit or FOLD/10/M (UP/DOWN) key (5) on remote control each time to skip forward or backward 10 tracks.
To select a desired folder (if the disc contains more than one folder):
- To select a desired folder, press and hold the FOLD/10/M +/- button (4 & 5) on unit or FOLD/10/M (UP/DOWN) key (5) on remote control each time to skip forward or backward a folder.
Programming tracks
Programming tracks of disc is possible when playback is stopped. Up to 20 tracks for CD disc and 99 tracks for MP3 disc can be stored in the memory in any order.
- In stop mode, press the MEM./P-MODE button (7) on unit or MEM key (3) on remote control to enter program setting. The MEM logo and "P01" will show on the display with "F00" flashing. Press FOLD/10/M +/- button (4 & 5) on unit or FOLD/10/M (UP/DOWN) key (5) on remote control to choose the desired folder. Then press the FORWARD oder BACK button to choose the desired track to be programmed as P01, then press MEM./P-MODE button (7) on unit or MEM key (3) on remote control again to confirm.
- Repeat step 1 to store other desired tracks until all tracks are programmed.
- Press the Play button (16) on unit or the Play key on remote control to start playback from the first programmed track.
- Press the Stop button 4) on unit to stop program playback. To clear the program, you may press the Stop button 14) on unit when the disc stopped and open the CD compartment lid, the program will be erased.
Repeat play
You can play one track or all tracks on the disc repeatedly.
To Repeat a Single Track:
- Press MEM./P-MODE button (7) on unit or P-MODE key (8) on remote control during play, the display will show "REP-1" (REPEAT) and the current track will be played over an over again till you press the Stop button
- To cancel repeat play, press MEM./P-MODE button (7) on unit or P-MODE key (8) on remote control until the symbol "REP-1" disappears from the display.
To repeat all the tracks
- Press MEM./P-MODE button (7) on unit or the P-MODE key (8) on remote control until the symbol shows steadily on the display, all tracks on the disc will be played over and over again till you press the Stop button
- To cancel repeat play, press the MEM./P-MODE button (7) on unit or the P-MODE key (8) on remote control until the symbol REP-ALL disappears from the display.
To repeat the folder (only for MP3 discs which contain more than one folder):
- Press the MEM./P-MODE button (7) on unit or P-MODE key (8) on remote control until the symbol REP-DIR (REPEAT DIR) shows steadily on the display, the current folder will be repeated over and over again till you press the Stop button
- To cancel repeat play, press the MEM./P-MODE button (7) on unit or P-MODE key (8) on remote control until the symbol REP-DIRT (REPEAT DIR) disappears from the display.
Random play
- Press the MEM./P-MODE button (7) on unit or P-MODE key (8) on remote control in play mode till the "SHUFFLE" shows steadily on the display, the random play will start from next track automatically, until all tracks are played over and then it will stop.
- Press the MEM./P-MODE button (7) on unit or P-MODE key (8) on remote control again until the "SHUFFLE" disappears from the display to cancel.
Intro play
- Press the MEM./P-MODE button (7) on unit or P-MODE key (8) on remote control in play mode till the "INTRO" shows steadily on the display, the intro play will start and scan 10 seconds for every track.
- To cancel intro play, press the MEM./P-MODE button (7) on unit or P-MODE key (8) on remote control again until "INTRO" disappear from the display.
USB
- Press the Function selection button (15) on unit to select "USB" mode.
- Connect the USB device to the USB input (1). The LCD will show the total number of tracks stored in the USB. The playback starts from track 1 automatically after reading the USB.
- To pause playback, press the button (16) on unit or key (10) on remote control, the current playing time will flash on the display. To resume playback, press the button again.
- Press the button (16) on unit or the (10) on remote control to stop playing. The display will show total number of USB and "STOP".
- The different selection modes Proceed program play/Repeat play (repeat 1 - repeat folder - repeat all)/Random play/Intro play operation as the same described above in the "CD/MP3" section.
Note: Do not use any USB extension cable for connecting the USB device as it may cause interference.
BT
- Press the Function selection button (15) on unit or the FUNC button (1) on remote control to switch to BT function, the LCD will display "BT" and the Pair indicator (27) will flash at high speed.
- Turn on the BT function on the device, scan the unit "Spacewoofer DAB+ and connect, then input the password "0000" if required, the Pair blue light will light up to indicate connection done, and the display will show "BT". Press the Play/Pause/Pair button (16) on the unit or the Play key (7) on the remote control to start playback. If the unit can't connect the relative BT within 2 minutes, press the Play/Pause/Pair button (16) on unit or the PAIR key (10) on remote control to reconnect.
-
Rotate the Volume knob on unit or adjust the volume on the BT device to your desired level.
-
Press FORWARD or BACK button on the unit or on external device to choose the desired track.
- To stop playback, press Paay/Pause/Pair button (16) on unit or the Stop key on the external device.
Note: The Bluetooth works best within 10 meters.
AUX-IN
- Press the Function selection button (15) on unit or the FUNC key (1) on remote control to select "AUX" mode.
- Insert the AUX line plug into the AUX IN jack (Ø 3.5 mm) (2) on the player, music from the device would be amplified and exported from the speakers.
- Adjust the volume on the unit or on the device to your desired level.
- Proceed play/pause and next/previous on the device.

If there is a legal regulation for the disposal of electrical and electronic devices in your country, this symbol on the product or on the packaging indicates that this product must not be disposed of with household waste. Instead, it must be taken to a collection point for the recycling of electrical and electronic equipment. By disposing of it in accordance with the rules, you are protecting the environment and the health of your fellow human beings from negative consequences. For information about the recycling and disposal of this product, please contact your local authority or your household waste disposal service.
This product contains batteries. If there is a legal regulation for the disposal of batteries in your country, the batteries must not be disposed of with household waste. Find out about local regulations for disposing of batteries. By disposing of them in accordance with the rules, you are protecting the environment and the health of your fellow human beings from negative consequences.
DECLARATION OF CONFORMITY
CE UK CA
Manufacturer:
Chal-Tec GmbH, Wallstrasse 16, 10179 Berlin, Germany.
Importer for Great Britain:
Berlin Brands Group UK Limited PO Box 42
272 Kensington High Street London, W8 6ND
United Kingdom
Hereby, Chal-Tec GmbH declares that the radio equipment type Spacewoofer DAB is in compliance with Directive 2014/53/EU. The full text of the EU declaration of conformity is available at the following internet address: use.berlin/10036341
For Great Britain: Hereby, Chal-Tec GmbH declares that the radio equipment type Spacewoofer DAB is in compliance with the relevant statutory requirements. The full text of the declaration of conformity is available at the following internet address: use.berlin/10036341
Chere cliente, cher client,
Berlin Brands Group UK Limited
PO Box 42
272 Kensington High Street
London, W8 6ND
United Kingdom
DC 12V UM-C (8 Stuck)
Potencia (vatos) 30 W
Berlin Brands Group UK Limited
PO Box 42
272 Kensington High Street
London, W8 6ND
United Kingdom
Berlin Brands Group UK Limited PO Box 42
272 Kensington High Street London, W8 6ND
United Kingdom
- Member of Berlin Brands Group
- Dahlwitz-Hoppegarten
- Deutschland
- CONTENTS
- TECHNICAL DATA
- Connectors
- SAFETY INSTRUCTIONS
- WARNING
- PRODUCT DESCRIPTION AND CONTROLS
- POWER SOURCE
- AC Operation
- DC Operation
- REMOTE CONTROL
- Key functions
- Remote control operation
- Lithium battery installation of remote control
- BASIC FUNCTIONS
- Tuning on the unit
- Volume control
- Headphone jack
- CAUTION:
- ID3 tag system (show MP3 info)
- →SONG NAME→ARTIST NAME→ALBUM NAME→ID3 OFF
- EQ function (equalizer)
- LED light
- FM RADIO
- Tuning radio stations
- Auto preset memory / scan
- Manual preset memory operation
- DAB RADIO MODE
- Preset stations
- Manual tune
- Now playing information
- Dynamic range compression (DRC)
- System
- Language
- Factory reset
- Software upgrade
- Software version
- CD/MP3
- Discs for Playback
- LOADING A DISC
- Playing a disc
- Selecting a desired track/passage
- Programming tracks
- Repeat play
- Random play
- Intro play
- USB
- BT
- AUX-IN
- DECLARATION OF CONFORMITY
- CE UK CA
- Manufacturer:
- Importer for Great Britain:
- Chere cliente, cher client,
Brand : Auna
Model : Spacewoofer DAB+
Category : Hi-fi system