Oxford SE - Hi-fi system Auna - Free user manual and instructions
Find the device manual for free Oxford SE Auna in PDF.

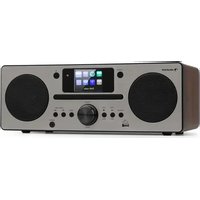
| Product type | Mini stereo system (Hi-Fi system) |
| Brand | Auna |
| Model | Oxford SE |
| Output power | 10 W x 2 (RMS) |
| Power supply | 100-240 V ~ 50/60 Hz (input), 12 V / 2.5 A (output) |
| Standby consumption | ≤ 1 W (normal standby), ≤ 2 W (network standby) |
| FM radio ranges | 87.5 – 108 MHz |
| DAB radio ranges | 174.928 – 239.200 MHz |
| Turntable | Yes, with speed selection 33/45/78 rpm |
| CD player | Yes, compatible with CD audio, CD-R, CD-RW, MP3, WMA |
| USB port | Yes, front (MP3/WMA file playback) |
| Auxiliary input (AUX-IN) | Yes, 3.5 mm jack |
| Headphone output | Yes, 3.5 mm jack |
| Remote control | Yes, included |
| Equalizer (EQ) | Yes, presets (via remote control) |
| Playback functions | Repeat (1, folder, all), random, intro, programming (20 tracks) |
| Dimensions (W x H x D) | Approx. 250 x 150 x 300 mm |
| Weight | Approx. 3 kg |
| Housing material | Plastic |
| Color | Black |
| Included accessories | Power adapter, remote control, cable antenna, speaker cables (RCA) |
| Care and cleaning | Wipe with a lint-free cloth; do not use liquids or solvents |
| Safety | Class 1 laser device; do not open or repair yourself; risk of electric shock |
| Repairability | Leave to qualified personnel; no user-serviceable parts |
Frequently Asked Questions - Oxford SE Auna
User questions about Oxford SE Auna
0 question about this device. Answer the ones you know or ask your own.
Ask a new question about this device
Download the instructions for your Hi-fi system in PDF format for free! Find your manual Oxford SE - Auna and take your electronic device back in hand. On this page are published all the documents necessary for the use of your device. Oxford SE by Auna.
USER MANUAL Oxford SE Auna
INHALTSVERZEICHNIS
Technische Daten 4
The lighting flash and arrow head within the triangle is warning sign alerting you of dangerous voltage inside the product
CAUTION
RISK OF ELECTRIC SHOCK DO NOT OPEN
CAUTION: TO REDUCE THE RISK OF ELECTRIC SHOCK DO NOT REMOVE COVER (OR BACK). NO USER SERVICIABLE PARTS INSIDE. REFER SERVICING TO QUALIFIED SERVICE PERSONNEL.

The exclamation point within the triangle is a warning sign alerting you of important instructions accompanying the product
REP-1, REP-DIR, REP-ALL, SHUFFLE, INTRO
REP-1, REP-DIR, REP-ALL, SHUFFLE, INTRO
Dynamic Label Segment (DLS)
Member of Berlin Brands Group
Handwerkerstr. 11
15366 Dahlwitz-Hoppegarten
Deutschland
natural_image
Symbol of a trash bin crossed with a diagonal line, representing no waste or discharge (no text or labels)Berlin Brands Group UK Limited PO Box 42 272 Kensington High Street London, W8 6ND United Kingdom
Congratulations on purchasing this equipment. Please read this manual carefully and take care of the following hints to avoid damages. Any failure caused by ignoring the items and cautions mentioned in the instruction manual are not covered by our warranty and any liability. Scan the QR code to get access to the latest user manual and other information about the product.

CONTENTS
Technical Data 30
Safety Instruction 32
Device Description and Function Keys 34
Setup 38
First Steps and Use 39
Record Player 40
CD Player 41
USB Mode 44
FM Radio 45
DAB Radio Mode 46
Aux In Mode 50
Troubleshooting 51
Disposal Considerations 52
Declaration of Conformity 52
TECHNICAL DATA
| Item number 10040051, 10040052, 10040053 | |
| Power supply 100–240 V ~ 50/60 Hz | |
| Input | AC 100-240V ~ 50/60Hz, 1.5 A Max. |
| Output 12 V/2.5 A | |
| Output power 10 W x 2 | |
| Radio frequencies | FM: 87.5 - 108 MHzDAB: 174.928 - 239.200 MHz |
| Power consumption (standby) ≤ 1 W | |
| Power consumption (network standby) | ≤ 2 W |
| Operating temperature 0-35 °C | |
| Operating position Horizontal | |
WARNINGS

The lighting flash and arrow head within the triangle is warning sign alerting you of dangerous voltage inside the product
CAUTION
RISK OF ELECTRIC SHOCK DO NOT OPEN
CAUTION: TO REDUCE THE RISK OF ELECTRIC SHOCK DO NOT REMOVE COVER (OR BACK). NO USER SERVICIABLE PARTS INSIDE. REFER SERVICING TO QUALIFIED SERVICE PERSONNEL.

The exclamation point within the triangle is a warning sign alerting you of important instructions accompanying the product
CAUTION: TO REDUCE THE RISK OF ELECTRIC SHOCK AND SERIOUS PERSONAL INJURY, DO NOT REMOVE ANY COVER. NO USER-SERVICABLE PARTS INSIDE. REFER SERVICING TO QUALIFIED SERVICE PERSONNEL ONLY. WARNING: TO REDUCE THE RISK OF FIRE OR ELECTRICAL SHOCK, DO NOT EXPOSE THIS PRODUCT TO WATER, RAIN OR MOISTURE.
Triangle with lightning plus explanation as follows:
DANGEROUS VOLTAGE: The lightning flash with arrowhead symbol within the equilateral triangle is intended to alert the user to the presence of uninsulated dangerous voltage within the product's enclosure that may be of sufficient magnitude to constitute a risk of electric shock to persons.

Triangle with exclamation point plus explanation as follows:
ATTENTION: The exclamation point within the equilateral triangle is intended to alert the user to the presence of important operating and maintenance (servicing) instructions in the literature accompanying this product.
CAUTION: Danger of personal injury
Never touch or look into the optical lens within the CD compartment. This is a CLASS-1 laser product.

CAUTION: Danger of hearing damage
To avoid possible hearing damage, do not listen to this Retro turntable at high volume levels for long periods of time. Always keep the volume within reasonable limits.
SAFETY INSTRUCTION
Please read these instructions fully before installing or operating.
General safety information
- Keep the product and all its parts out of reach of small children.
- This product is not intended for use by persons (including children) with reduced physical, sensory or mental capabilities, or lack of experience and knowledge, unless they have been given supervision or instruction concerning the use of the appliance by a person responsible for their safety.
- Do NOT place foreign objects into the CD compartment. Use of controls or adjustments other than those specified herein, may result in hazardous laser light beam exposure. Do NOT open the cover and do NOT attempt to repair it yourself. Refer servicing to qualified personnel. This product does not contain any user serviceable parts. Unauthorised handling of the device may damage it and will void your warranty.
Power source
- Only use the power supply that came with the product. Using an unauthorised power supply will invalidate your guarantee and may irrecoverably damage the product.
- Disconnect your Retro Turntable from the mains power supply during thunderstorms.
- Always check that you have completely switched off your Retro Turntable, before you change or disconnect the power supply.
- Where the mains power plug or an appliance coupler is used as the disconnect device, the disconnect device shall remain readily operable.
- The power socket must be within easy reach
- In order to avoid electric shock, do not bend, stretch or pull the power supply cable.
- Switch the Retro Turntable off at the mains power socket and unplug it if you are leaving it unattended for a long period of time (holidays etc).
- Do not attempt to open the product. This product does not contain any user serviceable parts.
- Unauthorised handling of the product may damage it and will void your warranty.
Moisture and water: To reduce the risk of fire or electric shock:
- Do not use this product near water or moisture.
- Do not use this product near a bath or sink, near a swimming pool or anywhere else that water or moisture is present.
- Do not place objects filled with water, such as a vase, on or near the product.
- Keep it dry. Avoid exposure to precipitation, humidity and liquids which could all affect the product circuitry.
Heat sources and flames
- Do not leave this product in high temperatures as electronic devices and plastic parts may warp in heat.
- Keep it away from bright sunlight or heat sources, such as a radiator.
- Never place any type of candle or naked flame on top of, or near the product.
Ventilation
- Do not install this product in a confined space.
- Allow adequate ventilation to prevent heat build-up.
- Do not block or cover slots, holes or openings on the product by placing on soft furnishings such as carpets, rugs or beds as these are provided for functionality and/or ventilation to ensure safe operation of the product.
- For indoor use only.
Care and cleaning
- All care and cleaning operations should be carried out with the Retro Turntable unplugged from the mains power.
- Occasionally wipe the cabinet with a lint free cloth.
- Never clean the unit with liquids or solvents.
DEVICE DESCRIPTION AND FUNCTION KEYS

1 Spindle adapter
2 Turntable platter
3 Tone arm lever
4 Turntable auto stop on/off
5 33/45/78 RPM turntable speed selection
6 Tone arm
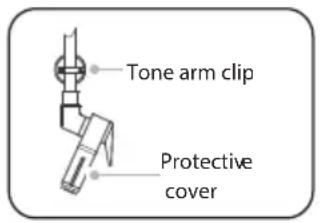
7 Tone arm clip
8 Stylus and stylus cover
Front view
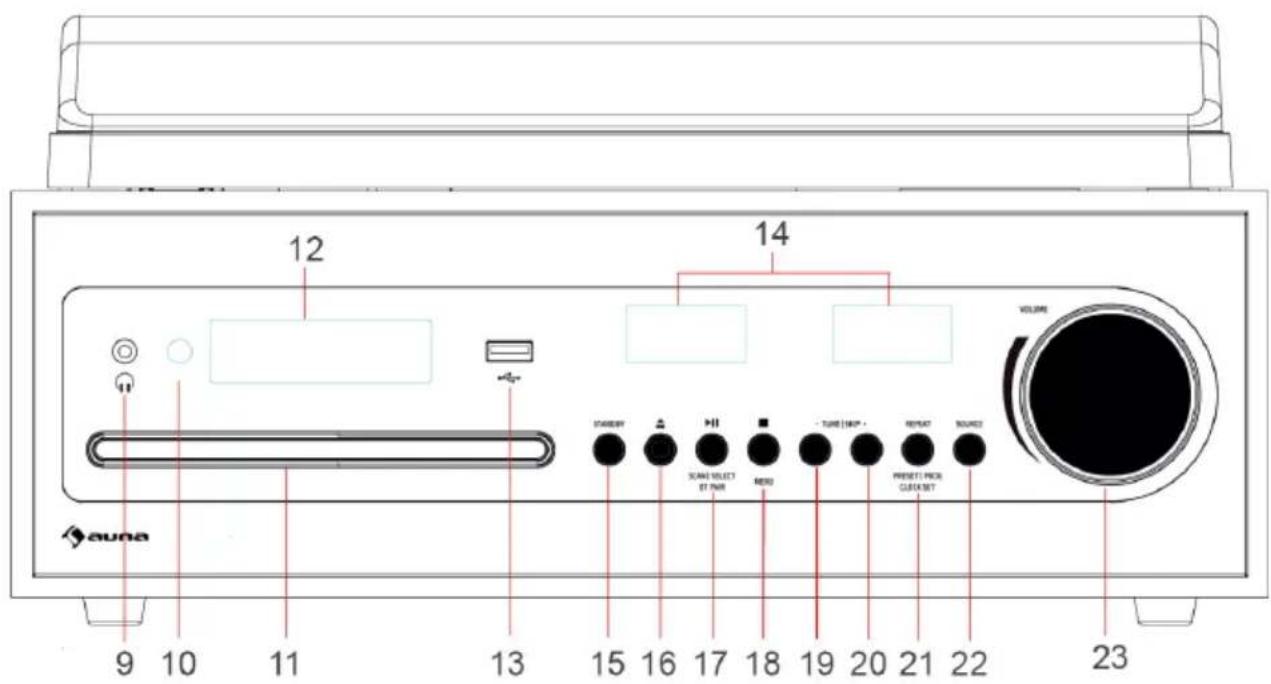
9 Earphone jack
10 Remote control receiver
11 CD tray
12 Backlight display
13 USB jack
14 UV meters display
15 Power On/Standby
16 CD eject
17 Play/Pause/Scan/Select/Stop/Menu
18 Tune/Skip - (Prev)
19 Tune/Skip + (Next)
20 Repeat/Preset/Prog/Clockset
21 Source (DAB/FM/CD/USB/AUX IN/Phono)
22 Volume
Rear view
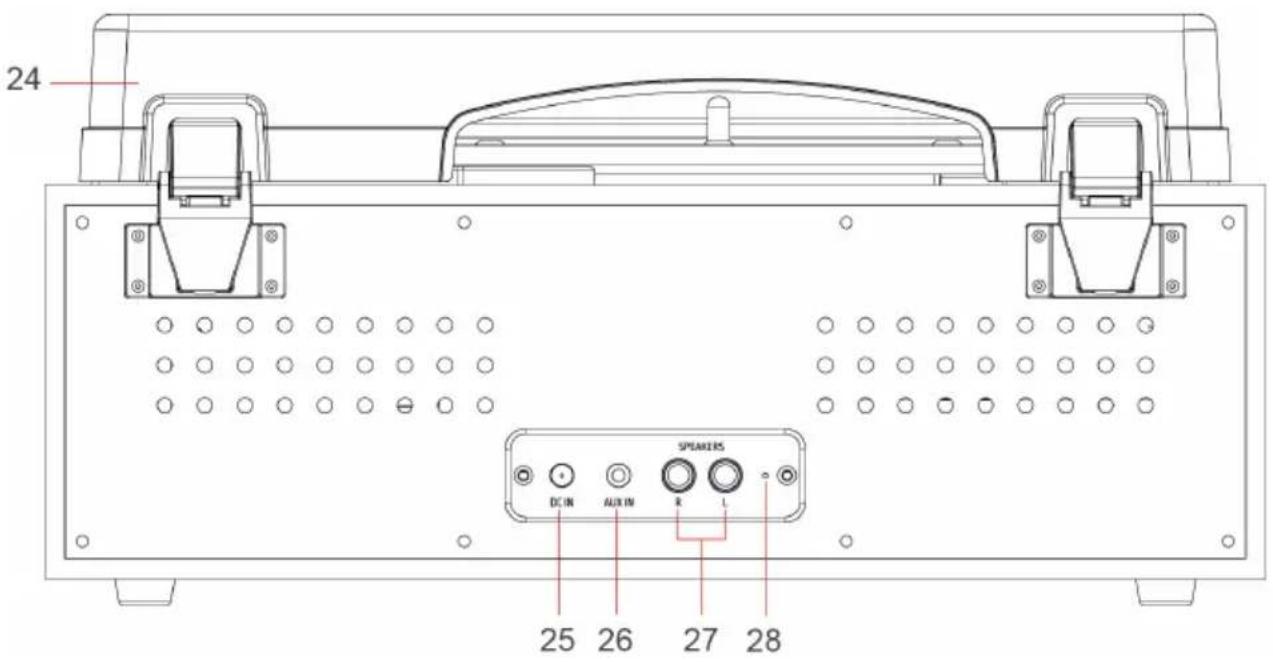
23 Turntable dust cover
24 DC IN
25 AUX IN
26 RCA Speaker sockets (R/L)
27 Cable antenna (pigtail)
Remote control
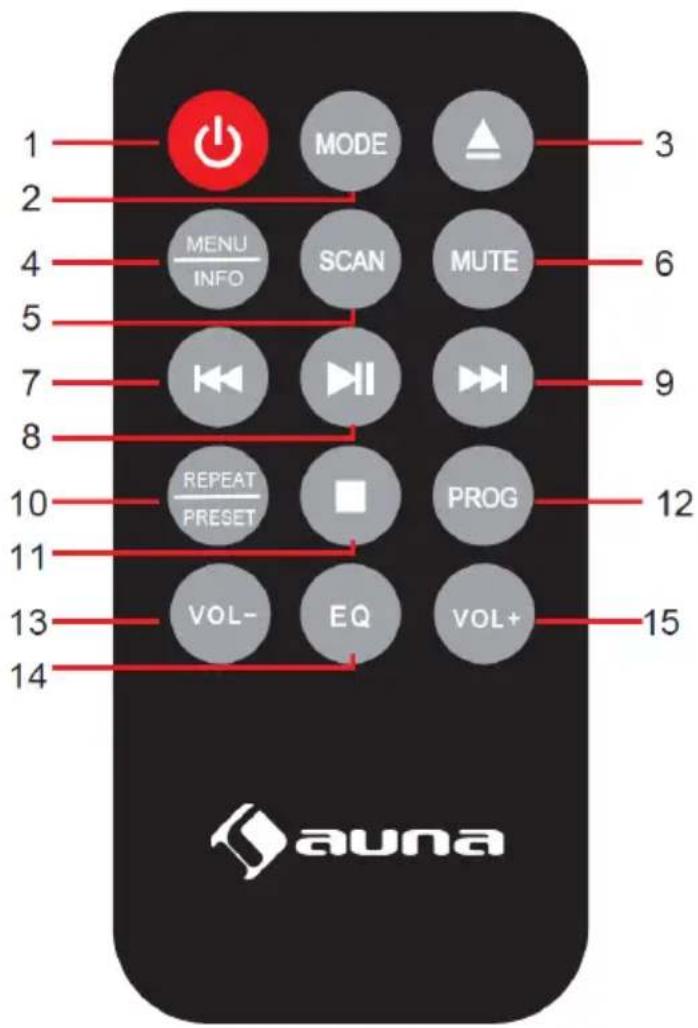
1 Power On/Standby
2 MODE
3 EJECT
4 MENU/INFO
5 SCAN
6 MUTE
7 TUNE -/SKIP BACKWARD
8 PLAY/PAUSE/SELECT
9 TUNE +/SKIP FORWARD
10 REPEAT/PRESET
11 STOP
12 PROGRAM
13 VOL- (Decrease volume)
14 EQ (Equalizer)
15 VOL+ (Increase volume)
SETUP
Positioning the Retro Turntable
where your Retro Turntable and speakers will be situated. If you place the Retro Turntable on the same surface and very close to the speakers, the sound quality can be affected by the airborne movements coming from the speakers and from any vibrations from the surface on which they have been placed.
If at all possible, it is recommended that you leave a space of approximately 40cm between each speaker Felt turntable mat Spindle adapter
Getting to know your Retro Turntable You'll be up and running in no time 10 and the Retro Turntable and that the surface on which you have placed the Retro Turntable and speakers, does not suffer from too much vibration, which can then be transmitted up into the Retro Turntable. Please make sure that:
- the Retro Turntable and speakers are on a flat and stable surface, which does not suffer from too much vibration. If you can, place the speakers on a different surface to the Retro Turntable.
- it is at least 1 metre away from other electrical appliances to avoid interference.
- it is within 1.4 metres of a power socket. Please ensure that the mains power lead and speaker wires are not a trip hazard.
- it is where it will be in range of the connected or 'paired' bluetooth device (e.g. iPod/ iPhone/iPad/ Android/other phone/Computer), which is about 10 metres or less (33 feet or less) in line of sight.
- you do not place your Retro Turntable or speakers directly onto antique or polished surfaces..
Setting up
- Remove any product packaging materials, including any tape or foam that has been used to protect the product during transportation.
- Connect the speakers to the Left and Right speaker sockets on the back of the Retro Turntable. Please note that the speaker cable with the red RCA plug should be connected to the red RCA socket and the speaker cable with the white RCA plug should be connected to the white RCA socket.
- Fully extend the wire radio aerial on the back of the Retro Turntable to receive the best possible FM radio reception and sound quality.
- Plug the mains power plug into the mains power wall socket and switch on. Your Retro Turntable will now be in Standby mode.
- We recommend that you now set the clock.
FIRST STEPS AND USE
Set the clock
In standby mode:
- Short press the REPEAT button.
- A '00:00' will now flash in the display. Short press the TUNE/SKIP buttons to display the correct hour and then short press the PLAY button to confirm.
- The minute digits will then flash in the display. Short press the TUNE/SKIP buttons to display the correct minutes and then short press the PLAY button to confirm.
- Your clock is now set and will be displayed in Standby mode.
Power on
Short press the Standby button. Your Retro Turntable will turn on, 'DAB' will be displayed and your product will be in DAB mode.
Standby mode
This product is designed to go to Standby mode automatically after 15 minutes (approximately), if it does not receive an audio signal. Short press the Power button to switch your product back on again.
Changing the source (mode)
Short press the SOURCE button to change between DAB, FM, CD, USB, Aux in and Phono (Turntable) modes. Please check the display, which will confirm the mode.
Adjusting the volume
Turn the large right hand rotary volume control clockwise to increase the volume and anti-clockwise to decrease the volume.
Using headphones
You can connect headphones with a 3.5 mm plug (not included) to the socket on the front of the Retro Turntable. When you have headphones connected the speakers are switched off and all sound is via the headphones.
Note: Always keep the volume within reasonable limits.
RECORD PLAYER
Check that your Retro Turntable is in PH/Turntable mode. If you are not already in PH mode, repeatedly short press the Source button until you are in PH mode (check the display). PH will be displayed.
Auto Stop On/Off
Under the dust cover and to the right of the tone arm, there is an OFF/ON slide switch. This is for the turnable auto stop feature.
If you would prefer the turntable to only turn when the tone arm is moved over the record and to stop when the record stops, then set this switch to ON. If you would prefer for the turntable to turn as soon as you select PH/Turntable mode and to continue turning even when the record you are playing comes to an end, you change to another mode or switch the Retro Turntable product to Standby mode, then set this switch to OFF.
Changing the Turntable speed (RPM))
Before you play a record, you need to check the correct speed or RPM that the record should be played at. Your Retro Turntable has 3 RPM speeds, 33, 45 and 78 RPM.
The RPM selector switch is under the dust cover and to the right of the tone arm.
Playing a record
- Lift the dust cover.
- Check if the record you intend to play will need the spindle adapter and place this over the spindle, if necessary.
- Place your record onto the turntable felt mat.
- Check that you have removed the protective cover from the stylus and unclipped the tone arm.
- Select the correct speed for your record using the RPM selector switch.
- Choose to turn the auto stop for the turntable on or off, as required.
- Use the tone arm lever to lift the tone arm.
- Move the tone arm across to your record.
- Use the tone arm lever to gently lower the stylus onto the groove on your record. Your record will begin to play.
-
Use the large right hand rotary control to adjust the volume.
-
At the end of the record; if you have selected auto stop on, the turntable will stop turning automatically, if you have selected auto stop off the turntable will continue to turn until you change the mode or switch the product to Standby mode.
- Use the tone arm lever to lift the tone arm.
- Move the tone arm across to the rest position.
Suspend play
To temporarily suspend playing your record.
- Use the tone arm lever to lift the tone arm and stylus from the record.
- To resume play, use the tone arm lever to gently lower the stylus onto your record again.
CD PLAYER
Check that your Retro Turntable is in CD mode. If you are not already in CD mode, repeatedly short press the Source button until you are in CD mode (check the display). The display will show 'Cd', followed by '- - -. If the CD compartment is empty 'N0' will then be displayed.
Play a CD
Note: It is not possible to play DVD or computer CDs.
- Short press the ▲button to open the CD drawer. 'OPEN' will be displayed..
- Place an audio CD, label side up, onto the CD tray. Please ensure that the CD is laying flat within the recessed CD shaped area on the tray.
- Short press the ▲button. The CD drawer will close, ‘- - -’ will be displayed and after a short delay the first track will begin to play; the elapsed time of the track will be displayed.
CD controls
Play/Pause: Short press the ▶II. button The track number will flash in pause mode. Short press the ▶II.
Next track: Short press the Tune/Skip + button
Previous track: Short press the Tune/Skip - button
Stop: Short press the ■ button.
Repeat and Random modes
Press the REPEAT button several times to select one of the following repeat settings:
REP-1, REP-DIR, REP-ALL, SHUFFLE, INTRO.
- If you select REP-1, the selected track will be played repeatedly.
- If you select REP-DIR, the selected folder will be played repeatedly.
- If you select REP-ALL, ALL tracks will be played repeatedly.
- If you select SHUFFLE, the tracks will be played in random order.
- If you select INTRO, only the first 10 seconds of each track will be played so you can check which track it is.
Press the REPEAT button briefly to disable the repeat function.
Note: The REP-DIR option is only available when you insert a CD in WMA or MP3 format instead of a normal CD.
Programmed play mode
In programmed play mode, you can program the play order of the tracks on your CD. You can program up to 20 tracks in total.
Note: To set up programmed play mode, the CD must be stopped in the CD compartment and must not be paused or playing.
In CD mode, with the CD you wish to programme in the CD compartment and stopped:
- Short press the REPEAT button to enter CD programmed play mode. 'P01' will be displayed.
- Short press the TUNE/SKIP + or - buttons to go to the track number that you would like to program to play first. Short press the REPEAT button to confirm.
- 'P02' will now be displayed and you can select the second track that you would like to programme. Continue to select each track as in Step 2 above, up to a total of 20 tracks.
Note: After you have selected track 20 in the programmed play list 'FULL' will be displayed.
- Short press the REPEAT button again to confirm the last track in the programmed play mode list.
- Short press the ▶II button to play the programmed tracks.
- To exit programmed play mode, short press the ■ button twice.
Remove the CD
Short press the ▲button. The CD drawer will open and 'OPEN' will be displayed. Remove the CD from the compartment. Short press the ▲button to close the CD drawer. '- - -', followed by 'NO' will be displayed.
Note: If you stop or pause playing a CD for approximately 20 minutes, your product will go to Standby mode automatically.
USB MODE
When in USB mode, insert the USB device into the USB port on the front of the stereo. The stereo will automatically start playing music after the USB device is inserted.
Music control during playback
- Press the button to pause or restart playback.
- Press the Tune/Skip - or Tune/Skip + buttons on the stereo or the ◀◀◀ /▶buttons on the remote control to skip back or forward a track.
- When you have selected a specific track, press the button ▶II to start playback.
- Press and hold the Tune/Skip - or Tune/Skip + buttons on the stereo or the 1 button on the remote control to rewind or fast forward within a track.
Repeat and Shuffle
Press the REPEAT button repeatedly to select one of the following repeat settings:
REP-1, REP-DIR, REP-ALL, SHUFFLE, INTRO.
- If you select REP-1, the selected track will be played repeatedly.
- If you select REP-DIR, the selected folder will be played repeatedly.
- If you select REP-ALL, ALL tracks will be played repeatedly.
- If you select SHUFFLE, the tracks will be played in random order.
- If you select INTRO, only the first 10 seconds of each track will be played so you can check which track it is.
Note: The USB device is selected as soon as it is inserted.
FM RADIO
If you are not already in FM mode, repeatedly short press the SOURCE button to go to FM mode (check the display). If you were listening to an FM station when you switched the product to standby mode then this station will be automatically selected when you switch the product back on.
Wire radio aerial
Please make sure that the wire aerial on the back of the Retro turntable is fully extended and adjusted before you attempt to tune to an FM radio station (a vertical position is recommended). This will ensure that the maximum signal strength is available when the product begins to scan. Extending the aerial also ensures the best possible sound quality.
Tuning to an FM station
In FM mode:
- Long press the TUNE/SKIP + button to scan up the frequency band. Long press the TUNE/SKIP - button to scan down the frequency band.
- Short press the TUNE/SKIP + or - button to adjust the frequency band in 0.05MHz steps.
Note: If reception is poor check that the wire aerial is fully extended or try moving the product to another location.
Storing an FM station preset
Your Retro Turntable can store up to 30 FM stations in its preset memories for instant access to your favourite stations.
- Tune the Retro Turntable to the FM radio station that you wish to preset.
- Long press the REPEAT button until 'P XX' starts to flash on the display (where XX is the preset number).
- Short press the TUNE/SKIP ◀ or ▶, button to move to the preset number that you would like to store the radio station to (1-30).
- Short press the PLAY button. 'P XX' will stop flashing confirming that the preset has been stored.
Note: If there is already an existing FM station stored under a preset, it will be overwritten when you store new stations.
Tuning to an FM station
In FM mode:
- Repeatedly short press the REPEAT button to move through the preset locations (1-30).
- When you pause between each press, the frequency stored under each preset location will be displayed and your product will tune to and play the stored station.
DAB RADIO MODE
- Check that your Retro Turntable is in DAB mode. If you are not already in DAB mode, repeatedly short press the SOURCE button to go to DAB mode (check the display)
- The first time you use your Retro Turntable or if the station list is empty, your Retro Turntable will automatically begin to scan for DAB radio stations. Scan and then after a short delay the number of stations found during the scan will also be displayed.
- If you were listening to a DAB station when you switched the Retro Turntable off, then this station will automatically be selected when you switch the radio back on.
Wire radio aerial
Please make sure that the wire aerial on the back of the Retro Turntable is fully extended and adjusted before you attempt to tune to a DAB radio station (a vertical position is recommended). This will ensure that the maximum signal strength is available when the Retro Turntable begins to scan. Extending the aerial also ensures the best possible sound quality.
Changing DAB stations
In DAB mode:
- Use the - TUNE/SKIP + buttons to scroll through the available stations.
- When the station that you would like to listen to is displayed, short press the PLAY button. There will be a short delay whilst your Retro Turntable tunes to your selected station.
Scanning for DAB stations
With DAB radio, additional stations and services regularly become available so it's a good idea to carry out a manual scan every now and then to make sure that you have the most up to date station listing stored within the memory of your Retro Turntable.
If you have moved your Retro Turntable to another location, e.g.: if you go on holiday, then it is also a good idea to carry out a manual scan.
In DAB mode: Press and hold the STOP button of Retro Turntable or press MENU button of remote control, short press the - TUNE/SKIP + buttons to select full scan then press the ▶II button to full scan.
Prune DAB stations
You can remove the DAB stations in the station list that cannot be received in your area. These are listed with a '?' prefix.
- Long press the STOP button on Retro Turntable or press the MENU button on remote control. Use the - TUNE/SKIP + buttons to scroll to Prune. Short press the ▶ II button.
- 'Prune' and a flashing 'N' is displayed. Use the TUNE/SKIP - button to scroll to Y. Short press the SELECT button to prune the station list. Stations with a '?' prefix will now no longer be displayed.
- Short press the STOP button on Turntable or the MENU button on remote control to exit the Menu options.
Preset/store DAB stations
Your Retro Turntable can store up to 30 DAB radio stations in its preset memories for instant access to your favourite stations.
- Tune the Retro Turntable to the DAB radio station that you wish to preset.
- Long press the REPEAT button on the Retro Turntable or the Preset on the remote control until Empty 1 is displayed.
- Use the - TUNE/SKIP + buttons to move the preset number that you would like to store the radio station to (Empty 1 – Empty 30).
- Short press the ▶II button to store the station to that preset location. Stored will be displayed.
Note: If there is already an existing DAB station stored under a preset, it will be overwritten when you store the new station
Tune to a DAB station preset
In DAB mode:
- Short press the REPEAT button on Retro Turntable or the PRESET button on remote control. The name or frequency or a stored station will be displayed, or 'Empty 1' if no station has been stored.
- Use the - TUNE/SKIP + buttons to move the preset location and station that you would like to listen to (1-30).
- Short press the ▶II. button. Your Retro Turntable will instantly tune to that station and begin to play.
Note: If no DAB station has been stored under the preset location, 'Empty' will be displayed, then the Retro Turntable will revert to the previously selected radio station.
DAB display information
When listening to a DAB station you can change the information that will appear on the display. There are several different types of information that are sent by the broadcaster.
Dynamic Label Segment (DLS)
This is scrolling text information supplied by the broadcaster. Information could be the name of an artist or music title, DJ's name, contact details for the radio station etc.
Signal Strength
An empty rectangular will appear on the display to indicate the minimum signal strength for acceptable listening. The row of solid rectangles indicate the actual signal strength that you are receiving. The stronger the signal, the further to the right the row of solid rectangles will be.
Programme Type (PTY)
Such as "FLAT", "CLASSIC", "POP", "JAZZ", "ROCK" or "BASS".
Multiplex Name
Displays the broadcasting area and collection of radio stations on this frequency e.g.: BBC National DAB, Digital1 Network Channel and Frequency - e.g.: 12B 225.648 MHz
Signal error
This is displayed as a number between 0-99. It would not be possible to satisfactorily listen to a radio station with a signal error rate of 30 or above. Try adjusting the aerial or relocating your radio to improve reception.
Signal information
The data rate at which the signal is being transmitted. Repeatedly short press the Stop button on the Retro Turntable or the Info button on remote control to cycle through the different information options.
Dynamic range control (DRC)
The dynamic range for each radio programme is set by the broadcaster for each radio station and may be different for the types of programme broadcast, such as pop or classical music or a chat show. The dynamic range control signal is transmitted in parallel with the audio signal for each programme and with your Micro you can use this control signal to expand or compress the dynamic range (the difference between the loudest and quietest sounds) of the reproduced audio signal. Changing the dynamic range can affect the 'loudness' and/or 'quality of sound' of the programme that you hear so that it will be more suited to your listening conditions and your own personal listening requirements, e.g. in a noisy environment, where quiet sounds might be swamped, setting the compression to maximum will 'boost' the quiet sounds, whilst keeping the loudest sounds at their original level.
There are 3 levels of compression:
-
DRC off: No compression. This is the default setting.
• DRC low: Medium compression.
• DRC high: Maximum compression. -
Long press the STOP button on the Retro Turntable or press the MENU button on remote control. Use the - TUNE/ SKIP + buttons to scroll to DRC. Short press the ▶ II button.
-
Use the - TUNE/SKIP + buttons to scroll through the options available and short press the ▶ II button.
-
Short press the STOP button on the Retro Turntable or the MENU button on remote control to exit from the Menu.
AUX IN MODE
Check that your Retro Turntable is in Aux in mode. If you are not already in Aux in mode, repeatedly short press the SOURCE button to go to Aux in mode (check the display).
Using a 3.5 mm audio input connection cable (not included), Aux in allows for a quick and easy connection to an external sound source.
- Connect one end of the 3.5 mm audio connection cable to the headphone (or auxiliary out) socket of your secondary device, connect the other end to the Aux in socket on the front of your Retro Turntable.
- Press the PLAY button on your external device to start playback through the Retro turntable speakers. To gain optimal volume levels, adjust the output volume level on both the secondary device and on the Retro turntable.
Note: It is recommended that you unplug the Audio cable from the Aux in socket after you have finished listening to your external device.
TROUBLESHOOTING
No power
- Check the power plug connection at the wall socket.
- Short press the Power button to power on the Retro Turntable.
The tone arm skips grooves, slides over the record or does not move
- The Retro Turntable is not on a flat surface. Please move the product to a flat and stable surface
- The record is dirty or scratched. Clean the record with a record cleaner or play a different record.
The Turntable speed is incorrect
Select the correct speed according to the specification on the record. (33, 45 or 78 RPM).
No sound / Sound distortion
- Adjust the volume
- The stylus is dirty. Clean the stylus with a soft brush.
- The record is dirty or dusty. Clean the record with a record cleaner.
- Check that you are in the correct mode for the music that you wish to listen to.
Retro Turntable powers off:
Your Retro Turntable has been designed to automatically go to Standby mode after approximately 20 minutes without an audio signal, to save power. Short press the Power button to turn the product back on again.
DISPOSAL CONSIDERATIONS
natural_image
Symbol of a trash bin crossed with a diagonal line, representing no waste or discharge (no text or labels)If there is a legal regulation for the disposal of electrical and electronic devices in your country, this symbol on the product or on the packaging indicates that this product must not be disposed of with household waste. Instead, it must be taken to a collection point for the recycling of electrical and electronic equipment. By disposing of it in accordance with the rules, you are protecting the environment and the health of your fellow human beings from negative consequences. For information about the recycling and disposal of this product, please contact your local authority or your household waste disposal service.
This product contains batteries. If there is a legal regulation for the disposal of batteries in your country, the batteries must not be disposed of with household waste. Find out about local regulations for disposing of batteries. By disposing of them in accordance with the rules, you are protecting the environment and the health of your fellow human beings from negative consequences.
DECLARATION OF CONFORMITY

Manufacturer:
Chal-Tec GmbH, Wallstrasse 16, 10179 Berlin, Germany.
Importer for Great Britain:
Berlin Brands Group UK Limited PO Box 42 272 Kensington High Street London, W8 6ND United Kingdom
Hereby, Chal-Tec GmbH declares that the radio equipment type Oxford SE is in compliance with Directive 2014/53/EU. The full text of the EU declaration of conformity is available at the following internet address: use.berlin/10040051
For Great Britain: Hereby, Chal-Tec GmbH declares that the radio equipment type Oxford SE is in compliance with the relevant statutory requirements. The full text of the declaration of conformity is available at the following internet address: use.berlin/10040051
Cher client, chère cliente,
SOMMAIRE
Fiche technique 54
The lighting flash and arrow head within the triangle is warning sign alerting you of dangerous voltage inside the product
CAUTION
RISK OF ELECTRIC SHOCK DO NOT OPEN
CAUTION: TO REDUCE THE RISK OF ELECTRIC SHOCK DO NOT REMOVE COVER (OR BACK). NO USER SERVICIABLE PARTS INSIDE. REFER SERVICING TO QUALIFIED SERVICE PERSONNEL.

The exclamation point within the triangle is a warning sign alerting you of important instructions accompanying the product
ATTENTION : N'OUVREZ PAS LE BOÎTIER POUR ÉVITER UN CHOC ÉLECTRIQUE ET DES BLESSURES GRAVES. L'APPAREIL NE CONTIENT AUCUNE PIÈCE RÉPARABLE PAR L'UTILISATEUR. ADRESSEZ-VOUS EXCLUSIVEMENT À UN PERSONNEL QUALIFIÉ. MISE EN GARDE : POUR RÉDUIRE LES RISQUES D'INCENDIE OU DE CHOC ÉLECTRIQUE, N'EXPOSEZ PAS CET APPAREIL À L'EAU, À LA PLUIE OU À L'HUMIDITÉ.
REP-1, REP-DIR, REP-ALL, SHUFFLE, INTRO
REP-1, REP-DIR, REP-ALL, SHUFFLE, INTRO
Changer de station DAB
En mode DAB :
Dynamic Label Segment (DLS)
natural_image
Symbol of a trash bin crossed out by a diagonal line, with no text or labels present.DÉCLARATION DE CONFORMITÉ

Fabricant :
Chal-Tec GmbH, Wallstraße 16, 10179 Berlin, Allemagne.
Berlin Brands Group UK Limited PO Box 42
272 Kensington High Street
London, W8 6ND
United Kingdom
INDICE
Dati tecnici 78
 The lighting flash and arrow head within the triangle is warning sign alerting you of dangerous voltage inside the product The lighting flash and arrow head within the triangle is warning sign alerting you of dangerous voltage inside the product | CAUTIONRISK OF ELECTRIC SHOCK DO NOT OPENCAUTION: TO REDUCE THE RISK OF ELECTRIC SHOCK DO NOT REMOVE COVER (OR BACK). NO USER SERVICIABLE PARTS INSIDE. REFER SERVICING TO QUALIFIED SERVICE PERSONNEL. |  The exclamation point within the triangle is a warning sign alerting you of important instructions accompanying the product The exclamation point within the triangle is a warning sign alerting you of important instructions accompanying the product |
ATTENZIONE: NON APRIRE L'ALLOGGIAMENTO, IN MODO DA EVITARE SCOSSE ELETTRICHE E SERIE LESIONI. ALL'INTERNO NON CI SONO COMPONENTI CHE NECESSITANO DI MANUTENZIONE DA PARTE DELL'UTENTE. RIVOLGERSI ESCLUSIVAMENTE A TECNICI QUALIFICATI.
AVVERTIMENTO: PER RIDURRE IL RISCHIO DI INCENDI E SCOSSE ELETTRICHE, NON ESPORRE IL DISPOSITIVO A PIOGGIA, ACQUA O UMIDITÀ.
REP-1, REP-DIR, REP-ALL, SHUFFLE, INTRO.
REP-1, REP-DIR, REP-ALL, SHUFFLE, INTRO.
Dynamic Label Segment (DLS)
natural_image
Symbol of a trash bin crossed out by a diagonal line, with no text or labels present.Berlin Brands Group UK Limited PO Box 42
272 Kensington High Street
London, W8 6ND
United Kingdom
ÍNDICE
Datos técnicos 102
The lighting flash and arrow head within the triangle is warning sign alerting you of dangerous voltage inside the product
CAUTION
RISK OF ELECTRIC SHOCK DO NOT OPEN
CAUTION: TO REDUCE THE RISK OF ELECTRIC SHOCK DO NOT REMOVE COVER (OR BACK). NO USER SERVICIABLE PARTS INSIDE. REFER SERVICING TO QUALIFIED SERVICE PERSONNEL.

The exclamation point within the triangle is a warning sign alerting you of important instructions accompanying the product
REP-1, REP-DIR, REP-ALL, SHUFFLE, INTRO.
REP-1, REP-DIR, REP-ALL, SHUFFLE, INTRO.
natural_image
Symbol of a trash bin crossed out by a diagonal line, with no text or labels present.Berlin Brands Group UK Limited PO Box 42
272 Kensington High Street
London, W8 6ND
United Kingdom