Harvard IR - Hi-fi system Auna - Free user manual and instructions
Find the device manual for free Harvard IR Auna in PDF.

| Brand | Auna |
| Model | Harvard IR |
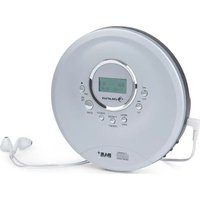
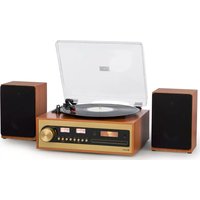
| Product type | Hi-fi system with CD player, DAB/FM radio, Internet radio, Bluetooth, USB port |
| Power supply | 100-240 V~ 50/60 Hz |
| Output power | 2 x 10 W RMS |
| Supported audio formats | Audio CD, MP3, WMA (USB) |
| Network connectivity | Wi-Fi 802.11 a/b/g (2.4 GHz and 5 GHz), Ethernet RJ45 |
| Radio functions | DAB+, FM stereo, Internet radio (thousands of stations), Spotify Connect |
| Bluetooth | Yes, unspecified version, range approx. 10 m |
| Auxiliary input | AUX 3.5 mm jack |
| USB port | Yes, USB 2.0/3.0 compatible, up to 32 GB, charges at 1 A |
| CD player | Yes, motorized drawer, plays Audio CD, MP3, WMA |
| Display | Color TFT screen |
| Remote control | Yes, with LR6 1.5 V AA battery (not included) |
| Antenna | DAB/FM rod antenna |
| Equalizer | Presets (Flat, Classic, Rock, Pop, Jazz) + X-Bass |
| Timer | Sleep function |
| Standby consumption | Reduced if network standby mode is disabled |
| Care and cleaning | Clean with a soft, dry cloth. Do not use liquids. |
| Safety | Class 1 laser, do not open the housing. Keep away from water and heat. |
| Spare parts and repairability | Repair by qualified technician only. No consumer-replaceable parts. |
Frequently Asked Questions - Harvard IR Auna
User questions about Harvard IR Auna
0 question about this device. Answer the ones you know or ask your own.
Ask a new question about this device
Download the instructions for your Hi-fi system in PDF format for free! Find your manual Harvard IR - Auna and take your electronic device back in hand. On this page are published all the documents necessary for the use of your device. Harvard IR by Auna.
USER MANUAL Harvard IR Auna
INHALT
Technische Daten 4
WPA/WPA2-Verschlüsselung, WPS.2.412
DAB/DAB+ Radio 174,928 (5A) MHz-239,200 (13F) MHz
FM Radio 87,5 MHz-108,0 MHz (50-kHz-Schritte)
WARNUNG
The lighting flash and arrow head within the triangle is warning sign alerting you of dangerous voltage inside the product
CAUTION
RISK OF ELECTRIC SHOCK DO NOT OPEN
CAUTION: TO REDUCE THE RISK OF ELECTRIC SHOCK DO NOT REMOVE COVER (OR BACK). NO USER SERVICIABLE PARTS INSIDE. REFER SERVICING TO QUALIFIED SERVICE PERSONNEL.

The exclamation point within the triangle is a warning sign alerting you of important instructions accompanying the product
natural_image
Warning symbol with exclamation mark inside a triangle (no text or numbers)VORSICHT:
bar
Volume | Category | Volume | |---|---| | Bar 1 | 10 | | Bar 2 | 15 | | Bar 3 | 20 | | Bar 4 | 25 | | Bar 5 | 30 | | Bar 6 | 35 | | Bar 7 | 40 | | Bar 8 | 45 | | Bar 9 | 50 | | Bar 10 | 55 | | Bar 11 | 60 | | Bar 12 | 65 | | Bar 13 | 70 | | Bar 14 | 75 | | Bar 15 | 80 | | Bar 16 | 85 | | Bar 17 | 90 | | Bar 18 | 95 | | Bar 19 | 100 | The chart displays a single bar for 'Volume' with no additional categories or time series visible. The values are explicitly labeled as '20'.
MENÜ IM DISPLAY
Wiedergabequellen
Internet radio menu
Changing digital radio station
STREAMING ÜBER BT
Dynamic Range Control
www.spotify.com/connect/third-party-licenses
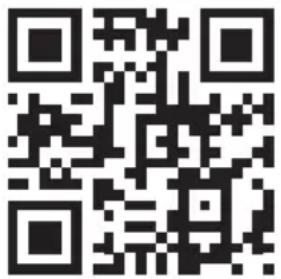
Congratulations on purchasing this equipment. Please read this manual carefully and take care of the following hints to avoid damages. Any failure caused by ignoring the items and cautions mentioned in the instruction manual are not covered by our warranty and any liability. Scan the QR code to get access to the latest user manual and other information about the product.
CONTENTS
Technical Data 38
Safety Instructions 40
Overview 42
Getting Started 46
Control Functions 47
Display / Source Menu 48
Spotify Connect 50
CD Player 51
USB Operation 52
Listening to Digital or FM Radio 53
Streaming using BT 54
Disposal Considerations 65
TECHNICAL DATA
Item number 10034088, 10034089
Power requirement
Power input 100-240 V\~ 50/60 Hz
Output Power 2 CH x 10 W RMS
CD player section
Radio devices
Tuner section FM stereo, DAB/FM super heterodyne tuner
Antenna DAB/FM lead antenna
Network Wi-Fi: 802.11a, 802.11b and 802.11g supported with WEP and WPA/WPA2 encryption, WPS.2.412 GHz \~ 2.472 GHz (channels 1 to 13), 5 GHz. 0.5 MB broadband speed
Radio frequencies
DAB/DAB+ tuner 174.928 (5A) MHz-239.200 (13F) MHz section
FM tuner section 87.5 MHz-108.0 MHz (50 kHz step)
WARNING
 | CAUTION |  |
| RISK OF ELECTRIC SHOCKDO NOT OPEN | ||
| CAUTION: TO REDUCE THE RISK OF ELECTRIC SHOCK AND SERIOUS PERSONAL INJURY, DO NOT REMOVE ANY COVER. NO USER-SERVICABLEPARTS INSIDE. REFER SERVICING TO QUALIFIED SERVICE PERSONNEL ONLY.WARNING. TO REDUCE THE RISK OF FIRE OR ELECTRICAL SHOCK, DO NOT EXPOSE THIS PRODUCT TO WATER, RAIN OR MOISTURE. | ||
 | Triangle with lightning plus explanation as follows:DANGEROUS VOLTAGE: The lightning flash with arrowhead symbol within the equilateral triangle is intended to alert the user to the presence of uninsulated dangerous voltage within the product's enclosure that may be of sufficient magnitude to constitute a risk of electric shock to persons. |
 | Triangle with exclamation point plus explanation as follows:ATTENTION: The exclamation point within the equilateral triangle is intended to alert the user to the presence of important operating and maintenance (servicing) instructions in the literature accompanying this product. |

SAFETY INSTRUCTIONS
Read these instructions. All uses guidelines must be read before using the device. Keep the instructions for future use.
- Children over the age of 8 and persons with reduced physical, sensory or mental capabilities or those with a lack of experience and knowledge may only use the device if they are instructed on how to do so by a person responsible for their safety, or if they are supervised and understand the hazards associated with the use of the device.
- Attention, use and security guidelines must be respected.
- The device must not be used near water or be put in contact with moisture.
- Make sure has no liquid is spilled on device and device openings.
- Move device carefully, avoid shocks.
- Do not block the breakdown of the device outputs.
- Do not place the device near from a heat source (e.g. radiator). Do not expose it to the Sun.
- Plug the device as indicate on this information form.
- This device has a connection with overload protection. Replacement should only be done by an experienced technician or the device manufacturer.
- For cleaning the device, please follow the recommendations of the notice.
- The power cord should be unplugged when not using for a long period of time.
• Device shall be repaired by a qualified person when:
a. the power cord is damaged,
b. objects have fallen into the apparatus or a liquid has been spilled into device,
c. device was exposes to the rain,
d. device does not work correctly without notable exterior change,
e. device is broken.
- The user shall not try to maintain device beyond that which is described in this information form.
- The apparatus shall not be exposed to dripping or splashing and that no objects filled with liquids, such as vases, shall be placed on apparatus.
- To be completely disconnect the power input, the mains plug of apparatus shall be disconnected from the mains." as the disconnect devices is the mains plug of apparatus.
- The mains plug of apparatus should not be obstructed OR should be
easily accessed during intended use.
- Battery shall not be exposed to excessive heat such as sunshine, fire or the like.
- Excessive sound pressure form earphones and headphones can cause hearing loss.
- Minimum distance (8 cm) around the apparatus for sufficient ventilations.
- The ventilation should not be impeded by covering the ventilation opening with items such as newspaper, table-cloths, curtain etc;
- No naked flame sources such as lighted candles should be placed on the apparatus.
- Attention should be drawn to the environmental aspects of battery disposal.
- The use of apparatus in moderate climates.
- Danger of explosion if battery is incorrectly replaced.
- Replace only with the same or equivalent type.
- The main plug shall remain readily operable.
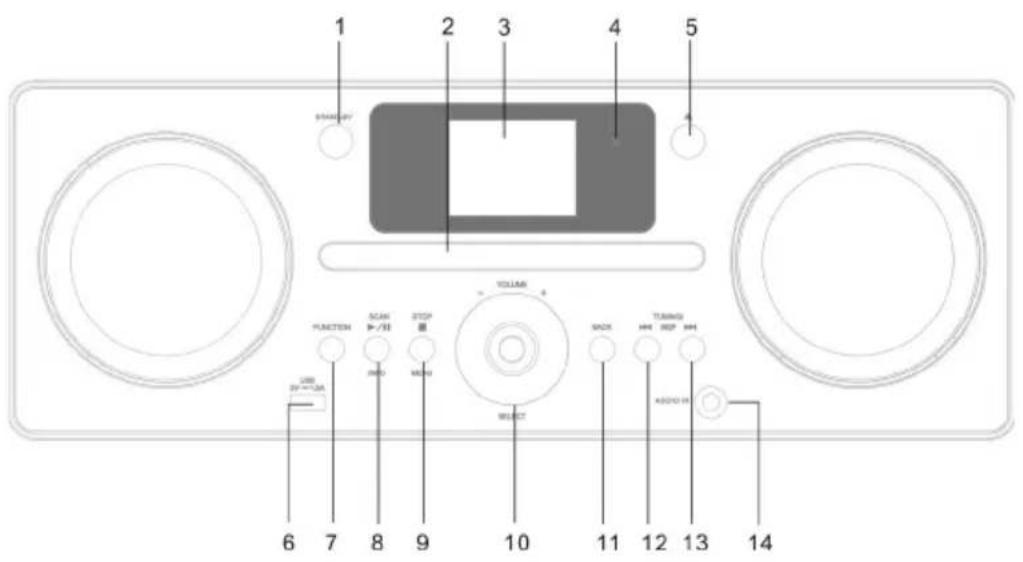
OVERVIEW
Front
Rear view
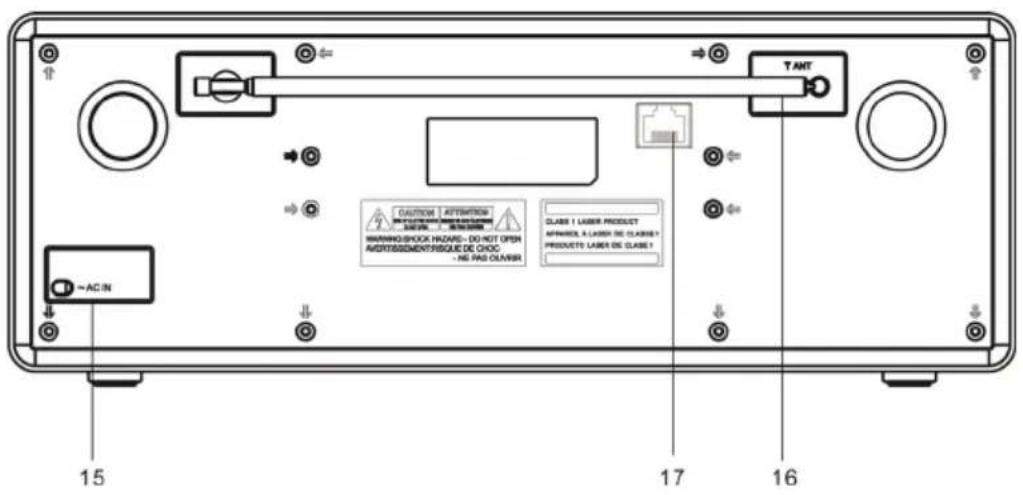
1 Power on/standby button
2 CD door
3 TFT display
4 Remote control sensor
5 Open/close button
6 USB port
7 Function button
8 CD/bluetooth play/pause /scan button/ info button
9 CD stop button/ menu button
10 Volume control knob / select button
11 Back button
12 CD/bluetooth skip/ previous tune- button
13 CD/BT skip
Next / tune+ button
14 Aux in jack
15 Mains cable
16 DAB/FM ant
17 Network port
Remote control
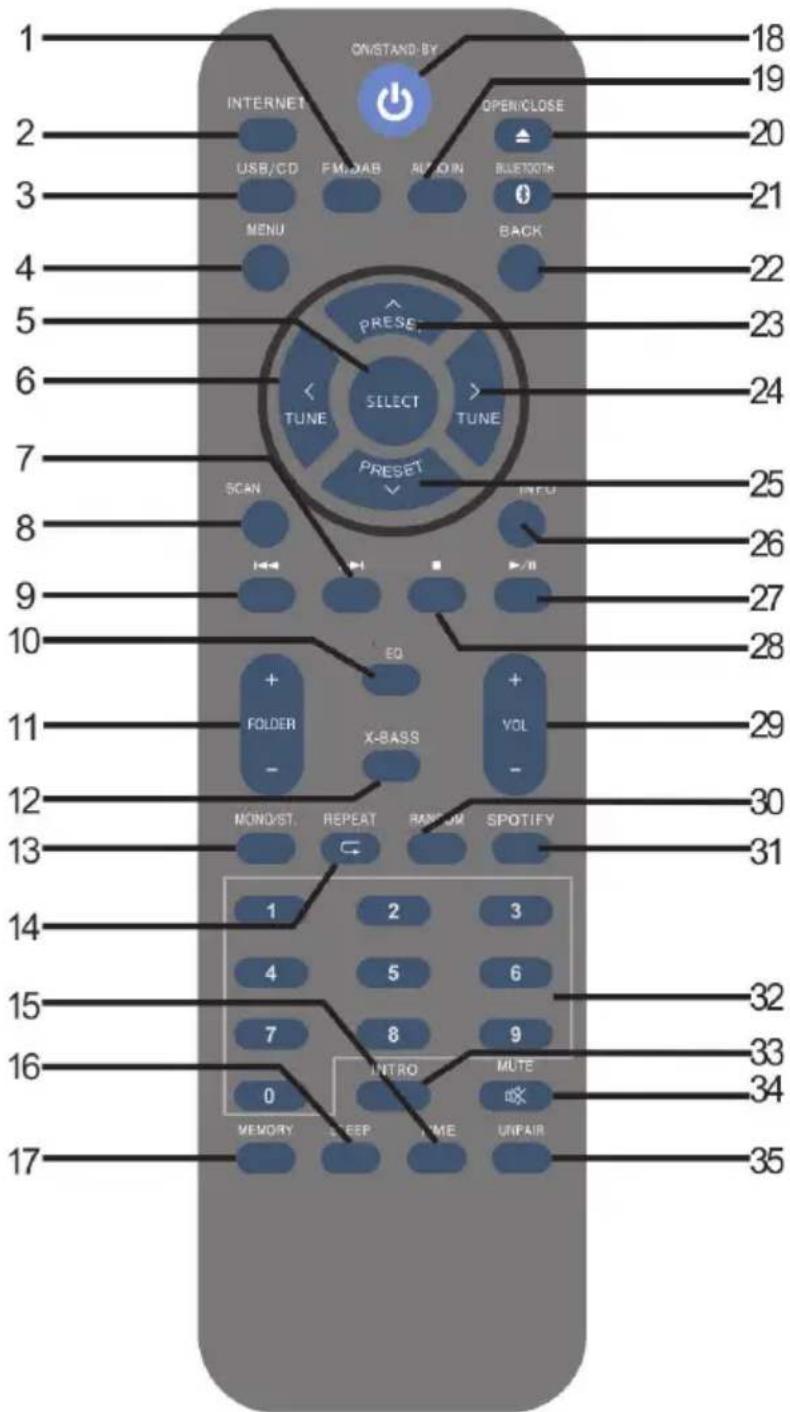
1 DAB/FM function
2 Internet button
3 Usb/CD button
4 Menu button
5 Select button
6 Tuner up button
7 CD/usb track up or time up button
8 DAB/fm scan button
9 CD/USB track down or time down button
10 EQ button
11 Folder up/down button
12 X-bass button
13 FM mono/st. Button
14 Repeat button
15 Time/clk.Set button
16 Sleep button
17 Memory button
18 On/standby button
19 Aux in select button
20 Open/close button
21 BT select button
22 Back button
23 Preset up button
24 Tuner down button
25 Preset down button
26 DAB info button
CD/USB display button
27 CD/USB play/pause button
28 CD /USB/BT stop button
29 Volume up and down button
30 Random button
31 Spotify button
32 Direct seach / number keys
33 Intro button
34 Mute button
35 BT unpair button
GETTING STARTED
Accessories included
Carefully remove the unit and all accessories from the package.
Please verify that you have all the following accessories before recycling the gift box.
- User Manual
- Remote control
Power function
This unit operates on 100-240VAC \~ 50/60 Hz AC household current, Do not attempt to operate the unit from any other power source. You could cause damage to the unit and void your warranty.
Ac power connection
Plug the AC power cord into an available 100-240VAC \~ 50/60 Hz AC Outlet. Make sure the plug is securely inserted into the AC outlet.
Remote Control
Battery Replacement for the Remote Control
- Open the battery cover.
- Insert the LR6 1.5V AA/AM3 battery (not included). Make sure to match the (+) and (-) ends of the battery with the (+) and (-) ends indicated in the battery compartment.
- Close the cover.

natural_image
Warning symbol with exclamation mark inside a triangle (no text or numbers)CAUTION:
Danger of explosion if the battery is replaced incorrectly. Replace only with the same or equivalent type battery. Insert the battery holder back into the battery slot.
NOTE: Only use a well-known brand of battery to ensure the longest life and best performance.
Battery Precautions
- Replacement of batteries must be done by an adult.
- The supply terminals are not to be short-circuited.
• Non-rechargeable batteries are not to be recharged. - Exhausted batteries are to be removed.
- Only batteries of the equivalent type are to be used.
- Batteries are to be inserted with the correct polarity.
- Dispose of batteries properly. Do not dispose of batteries in fire. The batteries may explode or leak.
CONNECTING TO THE MAINS SOCKET
Unwind the mains cable to its full length. Connect the mains cable at the rear of the main unit to the mains socket. The unit is now connected and ready to use.
NOTE: Connecting the unit to any other power source may cause damage to the unit
CONTROL FUNCTIONS
Getting started
Powering on/off
When you first connect the unit to the mains socket, the unit will be in standby mode after showing "welcome to Internet radio starting...."
- Press the standby button on the unit or remote control to switch the unit on.
- Press the standby button on the unit or remote control to switch the unit back to standby on mode.

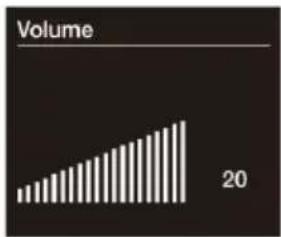
Adjusting and muting the volume
Turn the Volume dial or press the Volume buttons on the remote to increase or decrease the volume.
Press the Volume dial or press the Mute button on the remote to mute.

bar
Volume | Category | Volume | |---|---| | 1 | 20 |
DISPLAY / SOURCE MENU
Press the Function button to display the 'Function' menu. Turn and press the Select dial to switch between sources.
| Description Function | |
| Internet Radio Listen to an internet radio station or podcast. | |
| Spotify Listen to Spotify BT Listen to content streamed from your phone or tablet. | |
| My Music Player Listen to tracks from your computer. | |
| DAB Radio Listen to a digital radio station. | |
| FM Radio Listen to an FM radio station. | |
| BT Listen to content streamed from your phone or tablet. | |
| CD Player Listen to a CD. | |
| Aux In Listen to content from a device connected to your Aux in connection. | |
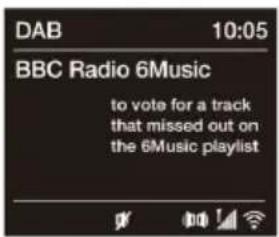
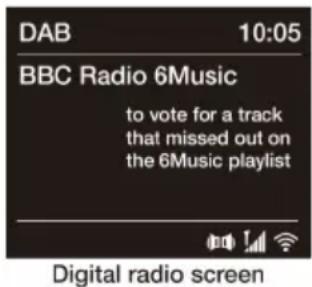
Changing the information shown on screen
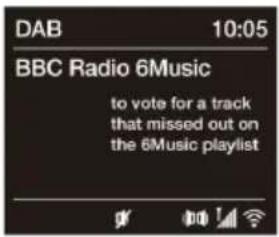
When listening to a digital radio station, FM radio station or you are streaming a track from your BT device, you can change the information that is displayed on screen. When listening to an MP3 on a CD,USB, displays information about the track.
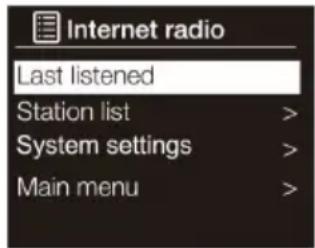
Internet radio
When listening to digital radio, press the Select dial to toggle the information displayed on screen between 'Scrolling text', 'Signal strength', 'Programme type', 'Ensemble', 'Frequency', 'Signal error', Bitrate', 'Time' or 'Date'.
Digital radio
When listening to digital radio, press the Select dial to toggle the information displayed on screen between 'Scrolling text', 'Signal strength', 'Programme type', 'Ensemble', 'Frequency', 'Signal error', 'Bitrate', 'Time' or 'Date'.
FM radio
When listening to FM radio, press the Select dial to toggle the information displayed on screen between 'Scrolling text', 'Programme type', 'Date' or 'Frequency'
Internet listening
You can connect Harvard to your network to access to thousands of internet radio stations and podcasts from around the world. Once connected to the internet you can also access additional subscription services such as Spotify, which provides you with instant access to millions of music tracks.
Listening to internet content
Local (My Favourites)
Select this option to start listening to an internet radio station that you added to your favourites list.
Location
Select this option to browse for an internet radio station based in your country. Turn and press the Select dial to select 'All stations' to view all local based stations in alphabetical order. To browse for a station based on genre, turn and press the Select dial to select the genre you want to browse for.
Stations
Even though the Internet radio portal contains thousands of stations, you may want to listen to stations not listed. You can add your own stations via the portal (www.wifiradio-frontier.com).
These added stations are accessible by selecting "Station list > Stations > [Station]"
Podcasts
Podcasts are prerecorded audio shows on a wide variety of subjects such as comedy, arts, business, and culture, for you to enjoy anytime. Turn and press the Select dial to browse for a podcast based on the 'Location' or 'Genre'.
Search podcasts
Select this option to search for a podcast. Turn and press the Select dial to highlight and select characters. Select 'BKSP' to delete a character. Turn and press the Select dial to start searching for an podcast. To cancel your search, turn and press the Select dial to select 'CANCEL'.
Help
Select this option to view some frequently asked questions relating to
Internet radio menu
internet radio.
My added stations
Favourites are stored in the Internet radio portal and are available to all Internet radios that are registered with the same account. You must register the radio in the Internet radio portal before making use of the favourites.
- To register your radio with the portal (www.wifiradio-frontier.com).
Access code can be found from "Station list > Help > Get access code". - To store a favourite station, press and hold the select button until the display shows "Favourite added". The station will then save in the list of favourites.
SPOTIFY CONNECT
Your new device has Spotify Connect built in
Use your phone, tablet or computer as a remote control for Spotify. Go to spotify.com/connect to learn how.
Spotify Connect
- Connect your iTuner to your wifi network.
- Open up the Spotify app on your phone, tablet or laptop using the same wifi network.
- Play a song and select Devices Available.
- Select your iTuner and start listening.

Spotify®
Licenses
The Spotify Software is subject to third party licenses found here: https://www.spotify.com/connect/third-party-licenses
CD PLAYER
Inserting a CD
Press the open/close button to open the disc tray, CD with the label side up into the CD compartment the open/close button to close the disc tray. displays 'Reading' for a few seconds while the CD loads. After a few seconds, your CD will start to play automatically.
Playing a track
During audio CD playback, display shows the track number and the amount of time the track has been playing. will also display the file name if this is available.
Playback controls
You can use the following controls on the front panel or remote control to control CD playback:
| ▶ II | Press to pause the track that is currently playing. If you have paused a track, press to resume playback. |
| ▶▶ | Press to play the previous track. Press and hold to rewind the track that is currently playing. |
| ◀◀ | Press to skip to the next track. Press and hold to fast forward the track that is currently playing. |
| ■ | Press to stop the CD. |
Repeating tracks
You can use the 'Repeat' setting on repeat the track that is currently playing or the entire CD. To change the 'Repeat' setting:
- Press the Menu button and turn and press the Select dial or press the Repeat button on the remote control to choose 'Repeat'.
- Turn and press the Select dial or use the
 | Select this option if you want to repeat the track that is currently playing. |
 | Select this option if you want to repeat the entire CD. |
 | Select this option if you want to repeat the entire Folder. |
Random playback
All tracks on the disc can be played in a random order.
- During playback mode, press the RANDOM button on the remote control. The ✗ indicator will show on the display. All tracks will be played randomly.
- Press the ◀/▶ buttons to playback the next random track.
- After all the tracks have played once, the playback will stop automatically.
- To cancel random playback, press the RANDOM button during RANDOM playback. Normal playback will resume
Ejecting a CD
Press the OPEN/CLOCE button. Wait until displays 'OPEN' and remove the CD.
Intro Playback
-
Press INTRO on the remote control. The "INTR" indicator will show on the display. The unit will play the ,rst 10 seconds of each track.
-
Press INTRO on the remote control again to resume normal playback."
USB OPERATION
- Press the Function button to display the 'function' menu.
- Turn and press the Select dial to select 'Music Player'.
| ▶ II | Press to pause the track that is currently playing. If you have paused a track, press to resume playback. |
| ▶▶ | Press to play the previous track. Press and hold to rewind the track that is currently playing. |
| ◀◀ | Press to skip to the next track. Press and hold to fast forward the track that is currently playing. |
| ■ | Press to stop the CD. |
Note: The unit can only play MP3 and WMA file formats in USB operation.
This unit supports USB version 2.0 and 3.0.
The unit can support USB devices with up to 32GB of memory.
The unit may not compatible with all USB devices; this is not an indication of a problem of the unit.
Repeat Playback
- Press REPEAT once on the remote control, ⏻ will show on the display. It will play the current folder repeatedly.
- Press REPEAT once more again, the repeat function will turn off. Charge Your Device
You can charge your device through the USB socket on this unit with a USB cable (not supplied).
Notes:
- The maximum current for USB charging is 1A.
- All devices for USB charging are not guaranteed.
- The USB charging is supported during power ON mode, it is not support during STANDBY mode:
LISTENING TO DIGITAL OR FM RADIO
Changing digital stations Using the front panel controls
- Turn the Select dial left or right to browse through the list of available digital stations.
- Push the Select dial to change the station. Using the remote control
- Press the or button on the remote to browse through the list of available digital stations.
- Press the Select button to change the station.
Using the remote control
- Press the button on the remote to browse through the list of available digital stations.
- Press the < or > Select button to change the station.
Changing FM stations
Seek tuning: Press the Select dial ◀/▶ the or buttons on the front panel to seek to the next or previous FM radio station that has a strong signal. If you are using the remote control press the or buttons on the remote control to seek to the next or previous station.
Manual tuning: Turn the Select dial right or left or press the or buttons on the front panel to step up or down 0.05 MHz. If you are using the remote control press the < or > buttons to step up or down 0.05 MHz.
Auto Scan: Press SCAN button to activate auto scan.
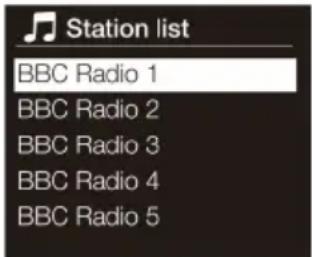
Changing digital radio station
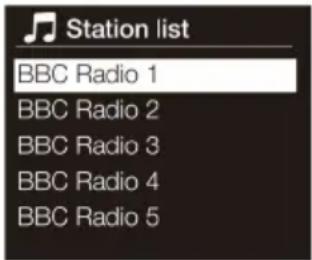
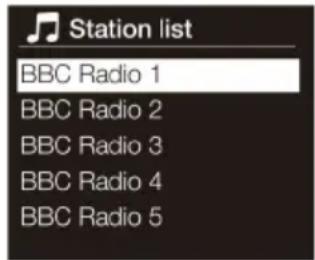
Station List
- During DAB mode, press and hold MENU button to access DAB menu.
- Press Preset ∧ or ∨ to select "Station List" and then press Select to confirm.
- A list of DAB stations will show on the display.
STREAMING USING BT
Pairing a mobile device
Before you can stream audio, you will need to pair your phone or tablet. Note: BT pairing varies on different mobile devices. See your mobile device manual for specific information.
To pair using BT:
- Press the Function button and turn and press the Select dial to select 'BT'. display the BT input display and the BT icon will start to flash.
Note: If the BT icon is displayed, is already connected to another BT device. See below for more information.
- On your mobile device, select the option to add a new BT device. On some mobile devices you may need to select the search or scan option.
- Start the pairing process on your mobile device. Do this by selecting 'Harvard' from the list of available devices that appear on the mobile device's screen. Your mobile device will connect to automatically once paired.
You will now be able to start streaming audio to from your mobile device.
Disconnecting a mobile device
You can only have one mobile device connected to via BT at any one time. If you want to stream audio from a different mobile device, you will need to disconnect any mobile device that is currently connected to via BT first. To disconnect a mobile device:
- Press the Menu button and turn and press the Select dial to select 'BT disconnect'.
- Turn and press the Select dial to select 'Yes' to disconnect your mobile device.

If your mobile device goes out of BT range (this is usually around 10m (30ft)) the mobile device's BT connection is disconnected automatically. To manually disconnect your mobile device, you will need to open the BT
settings on your mobile device (see your mobile device's manual for more information).
When you disconnect a mobile device, Will remain in the 'BT' Function. To listen to another Function, e.g. digital radio, press the Function button to display the home menu and turn and press the Select dial to choose the Function you want to listen to.
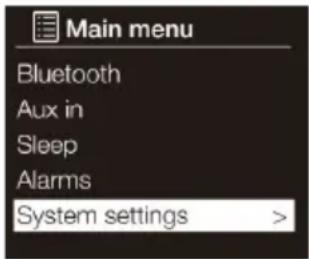
Options and settings
Press the Menu button on the remote control to access the Settings menu.
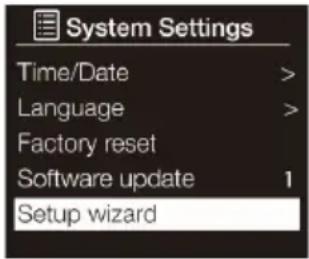
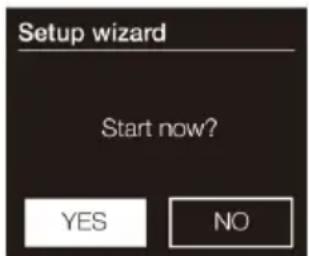
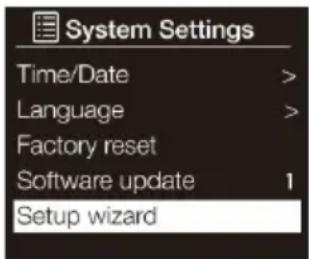
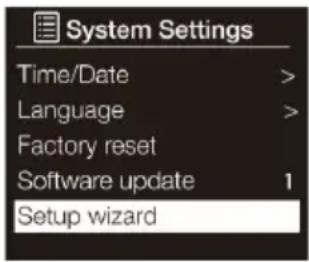
Setup wizard
- Press the Menu button.
- Turn and press the Select dial to select 'Main menu' > 'System settings' > 'Setup Wizard'.
- To run the setup wizard now, turn and press the Select dial to select 'YES'. To set up later, turn and press the Select dial to select 'NO'.
- Turn and press the Select dial to choose between a 12 or 24 hour time format.
- Turn and press the Select dial to select the method that you want to use for updating time. You can choose to update the time based on the 'DAB' or 'FM' radio signal or you can update time from your network. To disable automatic time updates, choose 'No update'.
- Turn and press the Select dial or use the
- If you have set your use the 12 hour time format, turn and press the Select dial or use the
- To set up so that you can use the Pure Select app to take out of standby ('Keep network connected'), turn and press the Select dial to choose 'YES'. If you want to disable this feature to save power, turn and press the Select dial to choose 'NO'.
- Will display a message to tell you that the Setup wizard has completed. Press the Select dial to exit the Setup wizard.
Helpful hint: Your Wi-Fi key is case sensitive, make sure to enter it exactly as shown.
Connecting your Wi-Fi using the network wizard
- Press the Menu button.
- Turn and press the Select dial or use the
- Turn and press the Select dial or use the
control to select the name (Network wizard) of your Wi-Fi network. If your network requires a key, follow steps 5-6.
- Enter your network key or password by turning and pressing the Select dial or use the
- Turn and press the Select dial or use the
Helpful hint: Your Wi-Fi key is case sensitive, make sure to enter it exactly asshown.
Connecting your Wi-Fi using push button connect
You can use push button connect to connect your Wi-Fi if your router supports WPS. Refer to your router user guide for more information on WPS.
- Press the Menu button.
- Turn and press the Select dial or use the
- Follow the steps shown on screen to finish push button connect setup.
Viewing network settings
- Press the Menu button on the remote control
- Turn and press the Select dial or use the
- Turn and press the Select dial or use the
Manually connecting your wireless network
Manually configure your wireless network (for advanced users only).
- Press the Menu button on the remote control
- Turn and press the Select dial or use the
- CNet Remote PIN Setup If you want to restrict the devices that can connect using the Pure Select app, you can get request a PIN number when you first connect.
To set up a pin number:
-
Press the Menu button.
-
Turn and press the Select dial or use the
- Enter your network key or password by turning and pressing the Select dial or use the
- Turn and press the Select dial or use the
Network profile
Every time you connect to a new Wi-Fi, Will store the connection information as a profile so that if you plan to use In several locations, you won't have to keep re-enter the Wi-Fi settings. Harvard stores the four most recent Wi-Fi profiles and will try to connect to a Wi-Fi network using the stored profiles. can't connect to the Wi-Fi using one of the stored profiles, you will need to connect to your network using the wizard or manually. If you think you will only visit a Wi-Fi connection once, you can delete the profile by carrying out the following:
- Press the Menu button on the remote control
- Turn and press the Select dial or use the
- Turn and press the Select dial or use the
- Turn and press the Select dial or use the
Note: You cannot delete a profile that is currently in use.
Clear network settings
Delete all previous Wi-Fi connections, passwords and other network settings. If using the wireless connection method, this will also perform a fresh scan for available networks.
- Press the Menu button on the remote control.
- Turn and press the Select dial or use the
- Turn and press the Select dial or use the
control to choose 'Yes' to clear all network settings. If you want to keep the current network settings, turn and press the Select dial or use the
Keep network connected
- Press the Menu button on the remote control
- Turn and press the Select dial or use the
- Turn and press the Select dial or use the
Note: will consume more power if you decide to maintain the network connection during standby.
Equaliser
This system supports a variety of equalizers and sound e-ects.
- Press EQ button on the remote control to access Equaliser menu Alternatively
- During System settings mode, Preset ∧ or ∨ to
- The display will show : FLAT > CLASSIC > ROCK > POP > JAZZ
- Press Preset ∧ or ∨ to select and then press
X-Bass control
When the power is first turned on, the unit will enter the extra bass mode which emphasises the bass frequencies, and "X-BASS" will appear. To cancel the extra bass mode, press the X-BASS button on the remote contro
Time and date settings
The clock will automatically set itself using your digital radio signal, FM radio signal or your network. If the time or date does not update automatically, you can manually set it using this option.
Note: Any time or date updates received by a digital broadcast will override manual settings.
Setting the time and date manually
- Press the Menu button on the remote control
- Turn and press the Select dial or use the
control to select 'Main menu' > 'System settings' > 'Time/Date'.
- Turn and press the Select dial or use the
- If you have set to use the 12 hour time format, turn and press the Select dial or use the
Time and date synchronization options
You can synchronize the time and date using either the FM or digital radio signal or your internet connection.
To specify the clock synchronization options:
- Press the Menu button on the remote control.
- Turn and press the Select dial or use the
- Turn and press the Select dial or use the
- Turn and press the Select dial or use the
Changing the time format
- Press the Menu button on the remote control.
- Turn and press the Select dial or use the
- Turn and press the Select dial or use the
- Turn and press the Select dial or use the
Setting the time zone
- Press the Menu button on the remote control.
- Turn and press the Select dial or use the
- Turn and press the Select dial or use the
- Turn and press the Select dial or use the
Changing your preferred language
You can select the language that uses for menus and options.
-
Press the Menu button on the remote control.
-
Turn and press the Select dial or use the
- Turn and press the Select dial or use the
Carrying out a factory reset
Resetting removes all presets, stored stations, alarms and resets all other options to default settings.
- Press the Menu button on the remote control.
- Turn and press the Select dial or use the
- Turn and press the Select dial or use the
Displaying the software version
To display the version of software and Spotify that is running:
- Press the Menu button on the remote control.
- Turn and press the Select dial or use the
- Turn the Select dial to scroll down the screen and view all of the version information.
Backlight
You can adjust the duration that the screen is illuminated for and the brightness of the screen when switched on or in standby.
Power-on level
To specify the brightness of the screen when switched on or in standby:
- Press the Menu button on the remote control.
- Turn and press the Select dial or use the
- Turn and press the Select dial or use the
- Turn and press the Select dial or use the
DAB settings
Note: You can only see the DAB settings when you have selected 'DAB' as
Scan
You can use the scan (autotune) function to automatically scan for new digital radio stations and remove inactive ones. To carry out an auto tune:
- Press the Menu button on the remote control.
- Turn and press the Select dial or use the
Manual tuning
To manually tune digital radio station that broadcasts on DAB Band III:
- Press the Menu button on the remote control..
- Turn and press the Select dial or use the
- Turn and press the Select dial or use the
- Press the Menu button to return to the main menu.
Prune invalid
To remove inactive stations from the station list:
- Press the MENU button on the remote control or hold the MENU button repeatedly on the main unit to select MENU function.
- Turn and press the Select dial or use the
- Turn and press the Select dial or use the
Dynamic range control
Dynamic Range Control (DRC) is used to make quieter sounds in a digital radio broadcast easier to hear at low volume or in a noisy environment. Check with the broadcasters to find out if they use DRC.
- To change the DRC settings: Press the MENU button on the remote control or hold the MENU button repeatedly on the main unit to select MENU function.
- Turn and press the Select dial or use the
- Turn and press the Select dial or use the
control to choose between one of the following options:
| DRC high Applies | maximum compression to the DRC level. |
| DRC low: Applies | reduced compression to the DRC level. |
| DRC off: Removes | DRC compression. |
Changing the digital radio station order
- Press the MENU button on the remote control or hold the MENU button repeatedly on the main unit to select MENU function.
- Turn and press the Select dial or use the
- Turn and press the Select dial or use the
| Alphanumeric Choose this option to display digital radio stations in alphanumerical order. | |
| Ensemble Choose this option to list stations in groups according to their multiplex. Multiplexes or ensembles are groups of stations owned and broadcast by a single operator. | |
| Valid Choose this option to only display active radio stations |
FM radio settings
Note: You can only see the FM radio settings when you have selected 'FM' as the radio function.
FM stereo option
You can choose between stereo or mono reception when listening to FM radio. Mono may improve clarity where stereo signals are weak.
To change between Stereo or Mono reception:
- Press the MENU button on the remote control or hold the MENU button repeatedly on the main unit to select MENU function..
- Turn and press the Select dial or use the
- To use mono reception, turn and press the Select dial or use the
buttons on the remote control to choose 'NO'.
FM scan
You can choose whether automatically stops at the next available FM station or the next available FM station with a strong signal when scanning for an FM station. To change the FM scan setting:
- Press the MENU button on the remote control or hold the MENU button repeatedly on the main unit to select MENU function.
- Turn and press the Select dial or use the
- To automatically stop at the next available FM station with a strong signal, turn and press the Select dial or use the
Chal-Tec
Chal-Tec GmbH
Wallstr. 16 10179 Berlin, Germany
www.chal-tec.com
The Spotify software is subject to third party licenses found here:
https://www.spotify.com/connect/third-party-licenses
All listed brands are trademarks of their companies. Errors and omissions excepted, and subject to technical change. Our general terms of delivery and payment are applied.
DISPOSAL CONSIDERATIONS

According to the European waste regulation 2012/19/EU this symbol on the product or on its packaging indicates that this product may not be treated as household waste. Instead it should be taken to the appropriate collection point for the recycling of electrical and electronic equipment. By ensuring this product is disposed of correctly, you will help prevent potential negative consequences for the environment and human health, which could otherwise be caused by inappropriate waste handling of this product. For more detailed information about recycling of this product, please contact your local council or your household waste disposal service.

Declaration of Conformity
Producer: Chal-Tec GmbH, Wallstraße 16, 10179 Berlin. Germany
This product is conform to the following European Directives:
2011/65/EU (RoHS) 2014/53/EU (RED)
The complete declaration of conformity of the manufacturer can be found at the following link. Scan this QR code or enter the URL.
use.berlin/10034088
Chère cliente, cher client,
SOMMAIRE
Fiche technique 68
Radio DAB/DAB+ 174,928 (5A) MHz-239,200 (13F) MHz
Radio FM 87,5 MHz-108,0 MHz (par pas de 50 kHz)
MISE EN GARDE

The lighting flash and arrow head within the triangle is warning sign alerting you of dangerous voltage inside the product
CAUTION
RISK OF ELECTRIC SHOCK DO NOT OPEN
CAUTION: TO REDUCE THE RISK OF ELECTRIC SHOCK DO NOT REMOVE COVER (OR BACK). NO USER SERVICIABLE PARTS INSIDE. REFER SERVICING TO QUALIFIED SERVICE PERSONNEL.

The exclamation point within the triangle is a warning sign alerting you of important instructions accompanying the product
ATTENTION : POUR RÉDUIRE LES RISQUES DE CHOCS ÉLECTRIQUES, NE DÉMIONTEZ AUCUN CACHE. L'APPAREIL NE CONTIEN AUCUNE PIÈCE À ENTRETENIR. ADRESSEZ-VOUS UNIQUEMENT À DES PERSONNELS QUALIFIÉS POUR LA MAINTENANCE. MISE EN GARDE / POUR RÉDUIRE LE RISQUE D'INCENDIE ET DE CHOC ÉLECTRIQUE, NE PLONGEZ PAS L'APPAREIL DANS L'EAU ET NE L'EXPOSEZ PAS À LA PLUIE OU À L'HUMIDITÉ.
natural_image
Warning symbol with exclamation mark inside a triangle (no text or numbers)ATTENTION :
MENU À L'ÉCRAN
Source audio
Internet radio menu
https://www.spotify.com/connect/third-party-licenses
LECTEUR CD
Pour insérer un CD

Changing digital radio station
STREAMING PAR BT


Dynamic Range Control
https://www.spotify.com/connect/third-party-licenses
INDICE
Dati tecnici 102
RadioDAB/DAB+ 174,928 (5A) MHz-239,200 (13F) MHz
Radio FM 87,5 MHz-108,0 MHz (intervalli da 50 kHz)
AVVERTIMENTO

The lighting flash and arrow head within the triangle is warning sign alerting you of dangerous voltage inside the product
CAUTION
RISK OF ELECTRIC SHOCK DO NOT OPEN
CAUTION: TO REDUCE THE RISK OF ELECTRIC SHOCK DO NOT REMOVE COVER (OR BACK). NO USER SERVICIABLE PARTS INSIDE. REFER SERVICING TO QUALIFIED SERVICE PERSONNEL.

The exclamation point within the triangle is a warning sign alerting you of important instructions accompanying the product
natural_image
Warning symbol: black exclamation mark inside a triangle (no text or numbers)ATTENZIONE:
MENU SUL DISPLAY
Internet radio menu
Cercare podcast
https://www.spotify.com/connect/third-party-licenses
LETTORE CD
Inserire un CD

Changing digital radio station
STREAMING TRAMITE BT

Dynamic Range Control
https://www.spotify.com/connect/third-party-licenses
ÍNDICE
Datos técnicos 136
Radio DAB/DAB+ 174,928 (5A) MHz-239,200 (13F) MHz
Radio FM 87,5 MHz-108,0 MHz (pasos de 50 kHz)
ATENCIÓN
The lighting flash and arrow head within the triangle is warning sign alerting you of dangerous voltage inside the product
CAUTION
RISK OF ELECTRIC SHOCK DO NOT OPEN
CAUTION: TO REDUCE THE RISK OF ELECTRIC SHOCK DO NOT REMOVE COVER (OR BACK). NO USER SERVICIABLE PARTS INSIDE. REFER SERVICING TO QUALIFIED SERVICE PERSONNEL.

The exclamation point within the triangle is a warning sign alerting you of important instructions accompanying the product
PRECAUCIÓN: : NO ABRA LA CARCASA PARA EVITAR DESCARGAS ELÉCTRICAS Y LESIONES GRAVES. EN EL INTERIOR NO HAY COMPONENTES A MANTENER POR EL CLIENTE. PÓNGASE EN CONTACTO ÚNICAMENTE CON ESPECIALISTAS CUALIFICADOS. ADVERTENCIA. PARA REDUCIR EL RIESGO DE INCENDIO O DESCARGA ELÉCTRICA, NO EXPONGA EL APARATO AL AGUA, LA LLUVIA O LA HUMEDAD. ADVERTENCIA. PARA REDUCIR EL RIESGO DE INCENDIO O DESCARGA ELÉCTRICA, NO EXPONGA EL APARATO AL AGUA, LA LLUVIA O LA HUMEDAD.
natural_image
Warning symbol with exclamation mark inside a triangle (no text or numbers)ATENCIÓN:
bar
Volume | Category | Volume | |---|---| | Bar 1 | 10 | | Bar 2 | 15 | | Bar 3 | 20 | | Bar 4 | 25 | | Bar 5 | 30 | | Bar 6 | 35 | | Bar 7 | 40 | | Bar 8 | 45 | | Bar 9 | 50 | | Bar 10 | 55 | | Bar 11 | 60 | | Bar 12 | 65 | | Bar 13 | 70 | | Bar 14 | 75 | | Bar 15 | 80 | | Bar 16 | 85 | | Bar 17 | 90 | | Bar 18 | 95 | | Bar 19 | 100 | The chart displays a single bar for 'Volume' with a total of 20 units. The bars are ordered in descending order from top to bottom. The values are explicitly labeled above each bar.

MENÚ EN LA PANTALLA
Internet radio menu
Buscar Podcasts
https://www.spotiy.com/connect/third-party-licenses.
LECTOR DE CD
Inserción de un CD
Changing digital radio station
STREAMING A TRAVÉS DE BT


https://www.spotify.com/connect/third-party-licenses