
CDC 200 DAB+ - Hi-fi system Auna - Free user manual and instructions
Find the device manual for free CDC 200 DAB+ Auna in PDF.

| Product Type | Portable hi-fi system with CD player and DAB+/FM radio |
| Brand | Auna |
| Model | CDC 200 DAB+ |
| Article Numbers | 10035248, 10035249 |
| Mains Power | 230 V ~ 50/60 Hz (adapter not included) |
| USB Power | Micro USB 5 V / 1 A (cable included) |
| Rechargeable Battery | Lithium-Ion 1000 mAh |
| DAB Radio | Frequency 174.9 - 239.2 MHz |
| FM Radio | Frequency 87.5 - 108 MHz |
| Station Memory | 30 DAB presets + 30 FM |
| CD Playback | Audio CDs and MP3 |
| Anti-skip Function | Approximately 60 seconds shock protection |
| BBS (Bass) Function | Bass enhancement enable/disable |
| Inputs | Micro USB charging port, 3.5 mm headphone jack |
| Output | 3.5 mm headphone jack |
| Antenna | Headphone cable serves as antenna |
| Key Lock | Yes (HOLD switch) |
| Operating Temperature | 0 °C to +40 °C |
| Cleaning | Damp cloth, no solvents |
| Safety | Do not open (laser radiation), do not expose to liquids |
Frequently Asked Questions - CDC 200 DAB+ Auna
User questions about CDC 200 DAB+ Auna
0 question about this device. Answer the ones you know or ask your own.
Ask a new question about this device
Download the instructions for your Hi-fi system in PDF format for free! Find your manual CDC 200 DAB+ - Auna and take your electronic device back in hand. On this page are published all the documents necessary for the use of your device. CDC 200 DAB+ by Auna.
USER MANUAL CDC 200 DAB+ Auna
INHALT
CLASS 1 LASER PRODUCT
CLASS 1 LASER PRODUCT APPAREIL LASER DE CLASSE 1 PRODUCTO LASER DE CLASE 1
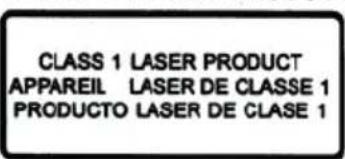
CAUTION INVISIBLE LASER RADIATION WHEN OPEN AND INTERLOCKS DEFEATED. AVOID EXPOSURE TO BEAM

natural_image
Warning symbol with a black triangle containing a central sunburst pattern (no text or numbers)This product contains a low power laser device.
SICHERHEITSHINWEISE
natural_image
Technical line drawing of a circular mechanical component with internal components and mounting holes (no text or symbols)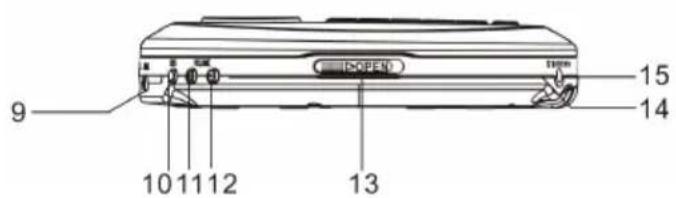
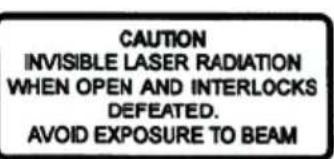
CAUTION: Danger of hearing impairment
Member of Berlin Brands Group
Handwerkerstr. 11
15366 Dahlwitz-Hoppegarten
Deutschland
natural_image
Symbol of a trash bin crossed with a diagonal line, no text or numbers presentCongratulations on purchasing this equipment. Please read this manual carefully and take care of the following hints to avoid damages. Any failure caused by ignoring the items and cautions mentioned in the instruction manual is not covered by our warranty and any liability. Scan the QR code to get access to the latest user manual and other information about the product:

CONTENTS
Safety Instructions 23
Overview 25
First Use 26
DAB/FM Operation 27
System 29
CD Operation 31
Care and maintenance 33
Disposal Considerations 34
Declaration of Conformity 34
TECHNICAL DATA
| Item number 10035248, | 10035249 |
| Power supply AC/DC adaptor (not included)USB cable | 230 V ~ 50/60 Hz5V (1A) DC micro-USB (cable supplied)Lithium-ion rechargeable battery (1000 mAh) |
| Inputs | 5V DC (1A) Micro-USB power socketThe supplied Micro-USB cable is only suitable for charging |
| Outputs 3.5 mm stereo | headphone socket |
| Presets | 30 DAB presets, 30 FM presets |
| Operational temperature | 0°C to +40°C |
| Aerial | Supplied in-ear headphones act as aerial |
| DAB frequency 174.9-23 | 9.2 MHz |
| FM frequency 87.5-108 | MHz |
CLASS 1 LASER PRODUCT

This product contains a low power laser device.
SAFETY INSTRUCTIONS
Before you use read the following safety instructions.
- As the laser beam used in this compact disc player is harmful to the eyes, do not attempt to disassemble the casing.
- Stop operation immediately if any liquid or solid object should fall into the cabinet.
- Do not touch the lens or poke at it. If you do, you may damage the lens and the player may not operate properly.
- Do not put anything in the safety slot. If you do, the laser diode will be ON when the CD door is still open.
- This unit employs a laser. The use of controls or adjustment or performance of procedures other than those specified here may result in exposure to hazardous radiation.
- If you do not follow the operating instructions provided, it may compromise the safety of your product and this may invalidate the warranty.
- Do not expose the product to dripping or splashing. Do not place objects filled with liquids, such as vases, on the product.
- If liquid or water spills onto the product, switch it off immediately and contact your dealer.
- If you are using a mains-powered adapter, do not touch the product with wet hands.
- The internal battery in this product is not user replaceable. Do not expose the battery to excessive heat or naked flames. Ensure adequate ventilation and airflow around the product particularly when charging. Dispose of the product in accordance with local environmental rules.
- Using the product in rooms or climates with high humidity and temperatures may cause condensation to form inside the product, which can damage the product. Use the product in moderate climates only.
- Do not use your product in extremely hot or cold temperature. Keep the device away from heat sources, such as radiators or gas/electric fires. Do not expose your product to naked flames, such as lighted candles.
- To charge your product, only connect it to a supply source that meets the safety
- Isolation requirements of EN 62368 or EN 60950-1 for an accessible safety extra low voltage circuit. For this connection, use either the supplied microUSB cable or a suitably CE approved power adapter with the correct USB output rating.
- Power the product using anexternal 5V DC 1A power supply. The maximum output current is 1A, protected by an internal circuit.
- Before you charge your product, ensure that the available supply voltage corresponds with the required operation voltage of the product.
- Disconnect your product from the charging power supply if you will not
use your product for a long period of time (for example, if you are going on holiday).
- Always unplug your product from the charging power supply before cleaning. When cleaning the product, do not use any type of abrasive pad or abrasive cleaning solutions as these may damage the product's surface.
- To reduce the risk of electric shock, do not remove any screws. The product does not contain any user-service able parts inside. Product repairs should only be carried out by authorised personnel.
This device may be only used by children 8 years old or older and persons with limited physical, sensory and mental capabilities and / or lack of experience and knowledge, provided that they have been instructed in use of the device by a responsible person who understands the associated risks.
To prevent possible hearing damage, do not listen at high volume levels for long periods of time. Consistent exposure to high volumes when using headphones candamage your hearing. Always check the volume level before you insert headphones into your ears. Use of headphones other than those supplied by Pure may expose youto hearing damage, as the high level volume warning on the device may be inaccurate. Use of headphones while operating a vehicle is not recommended and is illegal in some areas. If you find that listening to is distracting while operating any type of vehicle or performing an activity that requires your full attention, stop listening
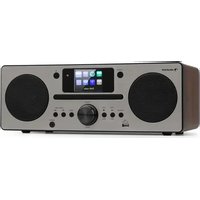
OVERVIEW
natural_image
Technical line drawing of a circular mechanical component with internal components and mounting holes (no text or symbols)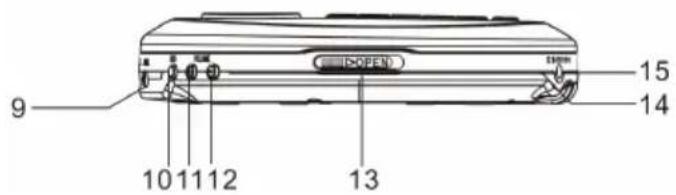
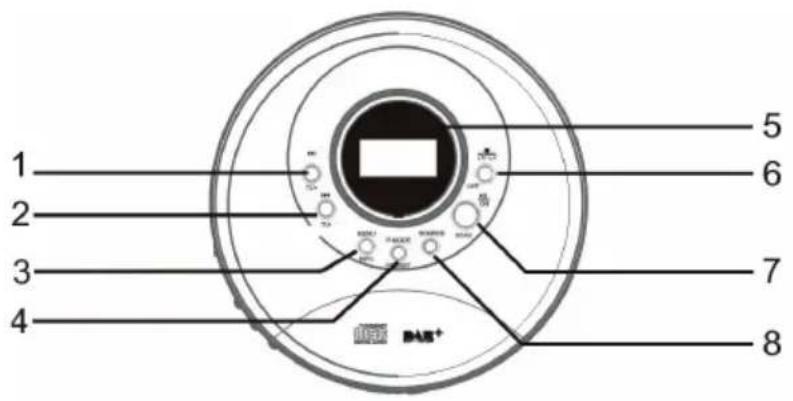
1 Next/TU+ button
2 Previous/TU-button
3 Menu/info button
4 P-mode / preset button
5 LCD display
6 Stop/enter/ power off button
7 Play/Pause/Scan button
Power on button
8 Source button
9 Earphones jack
10 BBS on/off button
11 Volume + button
12 Volume - button
13 CD door open switch
14 Mini USB jack
15 DC in jack
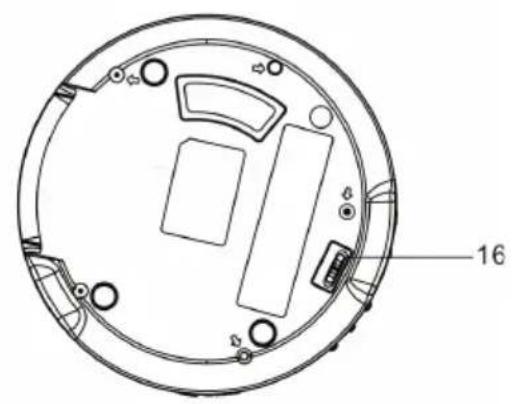
16 Hold switch
FIRST USE
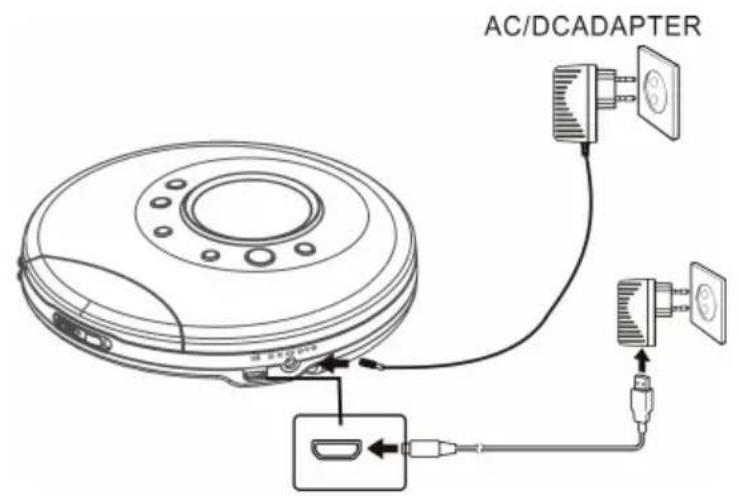
AC ADAPTER (not included) OPERATION
(AC adapter: input AC 230V \~ 50/60Hz, output DC 4.5V 1000mA)
-
Plug the AC adapter (not included) into normal AC power outlet socket.
-
Insert the DC plug of the AC adapter cord into the DC IN JACK .
WARNING: Before connecting to the power supply, ensure that the supply corresponds to the information on the rating label at the back of the apparatus.
USB POWER
- Operate with USB power DC 5V 1000mA.
- Plug one end (micro USB plug) of the USB cable into the USB PORT and the other end of the cable to the USB charger/power bank/computer (not included)
- When the unit is operated using USB power, the battery source will automatically be disconnected.
- Connect the other end of the micro-USB cable to a power outlet, using a USB power adapter.
- You can also charge the battery by connecting DAB to a computer's USB port.
SWITCHING ON FOR THE FIRST TIME
Before you switch on the first time, charge the battery for at least 8 hours.
- Press and hold the PLAY / POWER ON button to turn on the unit.
- Press and hold the STOP /POWER OFF button to 'standby'.
To power off mode
When the unit is in the power standby mode. Press and hold the STOP / POWER OFF button. The unit will enter the Power off "Bye Bye" mode.
Earphones connection
Connect the plug of the stereo earphone (included) into the EARPHONES JACK.
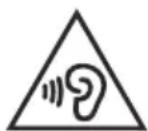
CAUTION: Danger of hearing impairment
Avoid excessive volume levels for long period of time when using the earphones. Prolonged use at high levels may impair your hearing. Do not use earphones while operating a motorized vehicle, as it may create a traffic hazard and is illegal in many areas.
DAB/FM OPERATION
Switching to SOURCE mode
- The first time the DAB Digital Radio is switched, it will start up DAB mode.
- If the DAB Digital Radio is in DAB mode, press the SOURCE button repeatedly until FM is shown on the display.
- Once in FM mode, your DAB Digital Radio will tune to the start of the available FM range (87.50MHz) or the last FM station lited.
- To manually change the FM frequency, make sure that you have not selected any other sub-menus. Turn the TU+/- to change the frequency by 0.05 MHz.
Changing the dab display information
- If the in DAB mode, press MENU/INFO button to select different info to show on the display, such as DLS (Dynamic Label Segment), signal strength, PTY (Program me Type), ensemble, frequency, signal quality, bit rate codec, time, date.
- If the in FM mode, press MENU/INFO button to select different info to show on the display, such as Radio text, PTY (Program me Type), stereo/mono, time, date.
DAB mode – choosing menu options
If the DAB Digital Radio is in DAB mode, press and hold MENU/INFO button to enter the menu list. Press the Next/ Previous button to select option through the list of menu. Then, stop at your preferred option and Push the ENTER button to confirm. The menu options are: Full scan, system,Prune,DRC, Manual tune, Preset Store,Preset Recall,
Full scan
Under menu list, press the Next/ Previous button to select "Full scan" through the list of menu, Push ENTER button to confirm and full scan starts automatically. Once a scan is completed, the radio returns to play the previously-selected station or first station on the station list.
Note: if no radio station found, it shows "No DAB Station". For a better reception, extend the antenna or do the full scan again in another place.
Manual tune
As well as the normal method of scanning, you can also manually tune to a particular channel/frequency. This can be useful for adjusting your antenna to achieve the best possible reception and scanning a particular channel to update the station list. Under menu list, press the Next/ Previous button to select "Manual tune" through the list of menu, Push Select button to confirm. Then press the Next/ Previous button to select a particular channel/frequency and then Push ENTER button to confirm the setting. The display shows a live indication of the received signal strength on the selected frequency. Adjustments to your antenna will be manifested in the received signal strength displayed.
DRC (Dynamic range compression)
This function reduces the difference between the loudest and quietest audio being broadcast. Effectively, this makes quiet sounds comparatively louder and loud sounds comparatively quieter. Options: off(default)/high/low Under menu list, press the Next/ Previous button to select "DRC" through the list of menu, Push ENTER button to confirm. Then pres the Next/ Previous button to select a particular setting and Push ENTER button to confirm the setting.
Note: DRC only works if it is enabled by the broadcaster for a specific station.
Prune
This removes all invalid stations indicated in the station list with a '?' in front of the station name. Under menu list, press the Next/ Previous button to select "Prune" through the list of menu, Push ENTER button to confirm. Then press the Next/ Previous button to select
SYSTEM
Press the Menu button to view the main menu .Press the Next/ Previous button to select 'System',Push the ENTER button to confirm.the menu options are::Time,Language, Factory Reset, Software version.
1. Time
If there is any DAB+ radio signal, the unit will automatically update the time, there is no signal, can also be set manually.
- Set Time/Date: set hour / set minute / set month / set date>set year > saved
- Auto update options: update from Any / update from DAB / update from FM / No update
- Set 12/24 hour: 12hour/24hour
- Set date format: DD-MM-YYYY/MM-DD-YYYY Cycle through Time menu by Push the ENTER button, select a particular option, and Push the ENTER button changes.
2. Language
- the language used for display messages can be selected from below options: English, German. The system menu, press the Next/ Previous button to select "Language" through the list of menu, Push the ENTER button to confirm. Cycle through Language menu by press the Next/ Previous button, select and stop at a particular language, Push the ENTER button to confirm.
3. Factory Reset
This function clears all user defined settings, replacing them with the original default values, so time/date, preferences/settings, DAB station list and preset stations are all lost. Under the system menu, press the Next/ Previous button to select "Factory Reset" through the list of menu, Push the ENTER button to confirm. Then, use the Next/ Previous button to choose
4. Software version
This is used to display the current software version. Under the system menu, press the Next/ Previous button to select "Software version" through the list of menu fig.14, Push the ENTER button to confirm. Then, the existing SW version will be showed.
FM mode – choosing menu options
- If the DAB Digital Radio is in FM mode, press and hold MENU/ INFO button to enter the menu list. Press the Next/ Previous button to select option through the list of menu. Then, stop at your preferred option and Push the ENTER button to confirm. The menu options are: scan setting, Preset Store, Preset Recall, system.
- Scan setting – by default, FM scans stop at any available station (All stations). This may result in poor quality audio from weak stations. Options: Strong stations only / All stations Under menu list, press the Next/ Previous button to select a particular option in "Scan setting", then Push the ENTER button to confirm the change to new setting.
PRESET button
PRESET 30 DAB STATIONS AND 30 FM FAVORITE STATIONS
- Store a station to the preset list – to store a station, selected your
- desired radio station, then press and hold the PRESET button for a seconds until the LCD display "Preset store #: (Empty)", or "#: saved radio station". Either press the Next/ Previous button to select your desired station preset number, Push on the ENTER button to confirm your selection, the display will show "Preset # Stored".
Recall a station from the preset list
- To recall a preset station, press the "PRESET" button once, either the Next/ Previous button to select presets station that you have stored. When the display shows your desired preset number, Push ENTER button to confirm.
Note: If you choose a preset that hasn't been allocated a station, then "Empty" will be displayed.
NEXT TU+/ TU- PREVIOUS button
Choosing radio stations or options
- If the DAB Digital Radio is in DAB mode, press Next/ Previous button to cycle through the radio station list when you are listening. Or press Next/ Previous button to cycle through the menu list for options.
- If the DAB Digital Radio is in FM mode, press Next TU+ / TU- Previous button to manual adjust the frequency by 0.05MHz. Or you can press and hold TU+/- button to auto-scan station. Or press Next / Previous button to cycle through the menu list for options.
CD OPERATION
Please read this important information:
CD mechanisms used in devices like this are designed to fully read all commercial CDs. They will also read self-compiled CD-R/CD-RW/MP3 discs but it may take up to 10 seconds for playback to start. If playback does not start, it is likely due to the quality of the CD-R/RW disc and/or the compatibility of the CD compilation software. Manufacturer is not responsible for the playback quality of CD-R/RW discs.
Do not attach a label or seal to either side of the CD-R/RW disc. It may cause a malfunction.
- Slide the CD DOOR OPEN SWITCH to open the CD door. Carefully place an audio CD/MP3 CD with its label side upward in the CD compartment and close the CD door.
- The player will start reading TOC of the disc.
- The total number of tracks and time on the CD will appear on the LCD DISPLAY fter a few seconds
Note: The total number of folder and tracks on the MP3 CD will appear on the LCD DISPLAY.
- Tap the PLAY/PAUSE button to start to play.
- Adjust the VOLUME +/- button to obtain the desired sound.
- To suspend playing, tap the PLAY/PAUSE button again. To resume playing, tap the PLAY/PAUSE button again.
- You can choose to play your favorite track directly by pressing either the NEXT/PREVIOUS buttons: The LCD Display will indicate the correct track number selected.
- To locate a particular passage within a track, keep the NEXT/PREVIOUS button depressed until it is found.
Note: Low level audio will be heard during the search process to assist in locating correct point in the track.
- To repeat a particular track, tap the PLAY MODE button repeatedly until the REP1 indicator lights on the LCD DISPLAY.
- To repeat the entire CD, tap the PLAY MODE button repeatedly until the REP ALL indicator lights on the LCD DISPLAY.
Note: To repeat the entire folder of the MP3 CD, tap the PLAY MODE button repeatedly until the REP DIR indicator lights on the LCD DISPLAY.
- Tap the PLAY MODE button until the RANDOM indicator light on the LCD display to play songs randomly.
- Tap the PLAY MODE button until the INTRO indicator light on the LCD DISPLAY to play the first 10 seconds of each song on the disc.
- To stop playing, tap the STOP button.
Program operation
This function allows the tracks to be played in a programmed sequence. Programs can be set in STOP mode.
- Tap the PLAY MODE button once. The MEM. indicator will flash and Program Channel Number "P01" will appear and the track number "001" will blink on the LCD DISPLAY to prompt for input.
- Tap the NEXT/PREVIOUS buttons repeatedly to select the track to be programmed.(For a MP3 CD, the folder number will show on the LCD DISPLAY)
- Tap the PLAY MODE button again to store selection. The Program Channel No. will change to "002" and the track number "002" will blink to prompt for input
- You may repeat steps 2 - 3 to program as many as 24 tracks. (For a MP3 CD, you may repeat steps 2 - 3 to program as many as 99 tracks.)
- Tap PLAY/PAUSE button to start the programmed play
- You may repeat the current programmed track or all programmed tracks by pressing the PLAY MODE button once or twice at programmed play mode.
- Tap STOP button once to stop playback.
- Tap PLAY/PAUSE button to resume programmed play.
- To cancel programmed play and, press the STOP button twice.
Anti-shock protection
This player incorporates an electronic anti-skip circuit to prevent interruption of the sound output when the unit is subjecting to shock, vibration or rolling during CD playback.
Once anti-skip buffer is full, it will give you approximately 60 seconds of protection against interruption of sound output. If the player is subjected to shock or rolling for longer than the buffer memory, some interruption of sound output will occur. This is normal and to be expected and the sound will resume once the player has stabilized from the shock or rolling disturbance.
Note: The anti-skip function provides for continues sound output when the unit is subjected to shock or vibration. It will not compensate for errors arising from the use of defective, scratched or dirty discs.
BBS function
Tap the BBS ON/OFF button to turn on the BBS to enhance the bass effect of the music. Tap again to turn off the BBS.
Hold function
To prevent accidental function changes during active use, this unit is fitted with a function hold. After the unit has been powered on and playing in CD, slide the HOLD SWITCH to ON position. HOLD INDICATOR will show on the LCD display.
CARE AND MAINTENANCE
- Clean your unit with a damp (never wet) cloth. Solvent or detergent should never be used.
- Avoid leaving your unit in direct sunlight or in hot, humid or dusty places.
- Keep your unit away from heating appliances and sources of electrical noise such as fluorescent lamps or motors.
- If drop-outs or interruptions occur in the music during CD play, or if the CD fails to play at all, its bottom surface may require cleaning. Before playing, wipe the disc from the center outwards with a good soft cleaning cloth.
DISPOSAL CONSIDERATIONS

natural_image
Symbol of a trash bin crossed with a diagonal line, representing no waste or discharge (no text or labels)If there is a legal regulation for the disposal of electrical and electronic devices in your country, this symbol on the product or on the packaging indicates that this product must not be disposed of with household waste. Instead, it must be taken to a collection point for the recycling of electrical and electronic equipment. By disposing of it in accordance with the rules, you are protecting the environment and the health of your fellow human beings from negative consequences. For information about the recycling and disposal of this product, please contact your local authority or your household waste disposal service.
This product contains batteries. If there is a legal regulation for the disposal of batteries in your country, the batteries must not be disposed of with household waste. Find out about local regulations for disposing of batteries. By disposing of them in accordance with the rules, you are protecting the environment and the health of your fellow human beings from negative consequences.
DECLARATION OF CONFORMITY

Manufacturer:
Chal-Tec GmbH, Wallstrasse 16, 10179 Berlin, Germany.
Importer for Great Britain:
Berlin Brands Group UK Ltd PO Box 1145 Oxford, OX1 9UW United Kingdom
Hereby, Chal-Tec GmbH declares that the radio equipment type CDC 200 is in compliance with Directive 2014/53/EU. The full text of the EU declaration of conformity is available at the following internet address: use.berlin/10035248
For Great Britain: Hereby, Chal-Tec GmbH declares that the radio equipment type CDC 200 is in compliance with the relevant statutory requirements. The full text of the declaration of conformity is available at the following internet address: use.berlin/10035248
Cher client,
SOMMAIRE
Fiche technique 38
CLASS 1 LASER PRODUCT
CLASS 1 LASER PRODUCT APPAREIL LASER DE CLASSE 1 PRODUCTO LASER DE CLASE 1
CAUTION INVISIBLE LASER RADIATION WHEN OPEN AND INTERLOCKS DEFEATED. AVOID EXPOSURE TO BEAM

This product contains a low power laser device.
CONSIGNES DE SÉCURITÉ
natural_image
Warning symbol of an ear inside a triangle (no text or numbers)natural_image
Technical line drawing of a circular mechanical component with internal components and mounting holes (no text or symbols)
natural_image
Symbol of a trash bin crossed with a diagonal line, no text or numbers presentDÉCLARATION DE CONFORMITÉ

Fabricant :
Chal-Tec GmbH, Wallstraße 16, 10179 Berlin, Allemagne.
ÍNDICE
CLASS 1 LASER PRODUCT
CLASS 1 LASER PRODUCT APPAREIL LASER DE CLASSE 1 PRODUCTO LASER DE CLASE 1
CAUTION INVISIBLE LASER RADIATION WHEN OPEN AND INTERLOCKS DEFEATED. AVOID EXPOSURE TO BEAM

This product contains a low power laser device.
natural_image
Warning symbol with a stylized ear inside a triangle (no text or numbers)natural_image
Technical line drawing of a circular mechanical component with internal components and mounting holes (no text or symbols)
natural_image
Symbol of a trash bin crossed with a diagonal line, no text or numbers presentBerlin Brands Group UK Ltd
PO Box 1145
Oxford, OX1 9UW
United Kingdom
INDICE
CLASS 1 LASER PRODUCT
CLASS 1 LASER PRODUCT APPAREIL LASER DE CLASSE 1 PRODUCTO LASER DE CLASE 1
CAUTION INVISIBLE LASER RADIATION WHEN OPEN AND INTERLOCKS DEFEATED. AVOID EXPOSURE TO BEAM

This product contains a low power laser device.
AVVERTENZE DI SICUREZZA
natural_image
Warning symbol with a stylized ear inside a triangle (no text or numbers)natural_image
Technical line drawing of a circular mechanical component with internal components and mounting holes (no text or symbols)
natural_image
Symbol of a trash bin crossed with a diagonal line, no text or numbers presentnatural_image
Abstract white logo design on dark background, resembling stylized letter 'S' or wave form (no text or symbols)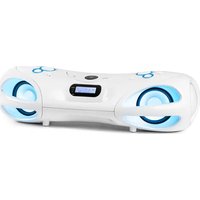
- INHALT
- CLASS 1 LASER PRODUCT
- SICHERHEITSHINWEISE
- CAUTION: Danger of hearing impairment
- Member of Berlin Brands Group
- Dahlwitz-Hoppegarten
- CONTENTS
- TECHNICAL DATA
- SAFETY INSTRUCTIONS
- OVERVIEW
- FIRST USE
- AC ADAPTER (not included) OPERATION
- USB POWER
- SWITCHING ON FOR THE FIRST TIME
- To power off mode
- Earphones connection
- DAB/FM OPERATION
- Switching to SOURCE mode
- Changing the dab display information
- DAB mode – choosing menu options
- Full scan
- Manual tune
- DRC (Dynamic range compression)
- Prune
- SYSTEM
- Time
- Language
- Factory Reset
- Software version
- FM mode – choosing menu options
- PRESET button
- Recall a station from the preset list
- NEXT TU+/ TU- PREVIOUS button
- CD OPERATION
- Please read this important information:
- Program operation
- Anti-shock protection
- BBS function
- Hold function
- CARE AND MAINTENANCE
- DISPOSAL CONSIDERATIONS
- DECLARATION OF CONFORMITY
- Manufacturer:
- Importer for Great Britain:
- SOMMAIRE
- CONSIGNES DE SÉCURITÉ
- DÉCLARATION DE CONFORMITÉ
- Fabricant :
- ÍNDICE
- INDICE
- AVVERTENZE DI SICUREZZA
Brand : Auna
Model : CDC 200 DAB+
Category : Hi-fi system