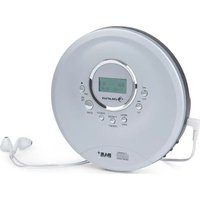
IR190 WD - Hi-fi system Auna - Free user manual and instructions
Find the device manual for free IR190 WD Auna in PDF.
| Product type | Hi-fi system |
| Brand | Auna |
| Model | IR190 WD |
| Power supply | 220-240 V ~ 50-60 Hz |
| FM radio | 87.5 – 108 MHz |
| Internet radio | Yes (via Wi-Fi) |
| Connectivity | Wi-Fi 802.11 b/g/n, Bluetooth, USB, AUX, headphone output |
| Supported audio formats | WMA, MP3, FLAC, WAV |
| CD player | Yes, with programming up to 20 tracks (CD) / 99 (MP3) |
| Equalizer | Normal, Flat, Jazz, Rock, Classical, Pop, etc. |
| Alarm | 2 alarms + nap alarm, repeat, sound selection |
| Sleep timer | 15, 30, 60, 90, 120, 150 or 180 minutes |
| Display | Color or monochrome, analog or digital |
| Remote control | Yes (included) |
| Additional functions | Weather, Information center, UPnP/DLNA, streaming |
| Maintenance | Clean with a dry, soft cloth |
| Safety | On/off switch, auto shutdown, power management |
| Documents | User manual (152 pages) available in several languages |
Frequently Asked Questions - IR190 WD Auna
User questions about IR190 WD Auna
0 question about this device. Answer the ones you know or ask your own.
Ask a new question about this device
Download the instructions for your Hi-fi system in PDF format for free! Find your manual IR190 WD - Auna and take your electronic device back in hand. On this page are published all the documents necessary for the use of your device. IR190 WD by Auna.
USER MANUAL IR190 WD Auna
INHALTSVERZEICHNIS
Geräteübersicht 4
Mediathek 10
Member of Berlin Brands Group
Handwerkerstr. 11
15366 Dahlwitz-Hoppegarten
Deutschland
natural_image
Symbol of a trash bin crossed with a diagonal line, representing no waste or discharge (no text or labels)Berlin Brands Group UK Limited PO Box 42
272 Kensington High Street
London, W8 6ND
United Kingdom
Congratulations on purchasing this device. Please read the following instructions carefully and follow them to prevent possible damages. We assume no liability for damage caused by disregard of the instructions and improper use. Scan the QR code to get access to the latest user manual and more product information.

CONTENTS
Product Description 30
Media Center 36
Information Center 39
Configuration 40
FM Radio 48
BT Connection 49
CD Player 50
Disposal Considerations 52
Declaration of Conformity 52
TECHNICAL DATA
| Item number 10032013, 10032014 | |
| Power supply 220-240 V ~ 50-60 Hz | |
| FM radio 87.5–108 MHz | |
| WLAN specifications | |
| Standard | 802.11 b/g/n |
| Frequency band | 2402–2480 MHz |
| Max. transmit power | 17 dBm |
| BT specifications | |
| Frequency band 2402–2480 MHz | |
| Streaming UPnP, DLNA | |
| Supported file types WMA, MP3 |
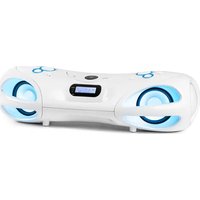
PRODUCT DESCRIPTION

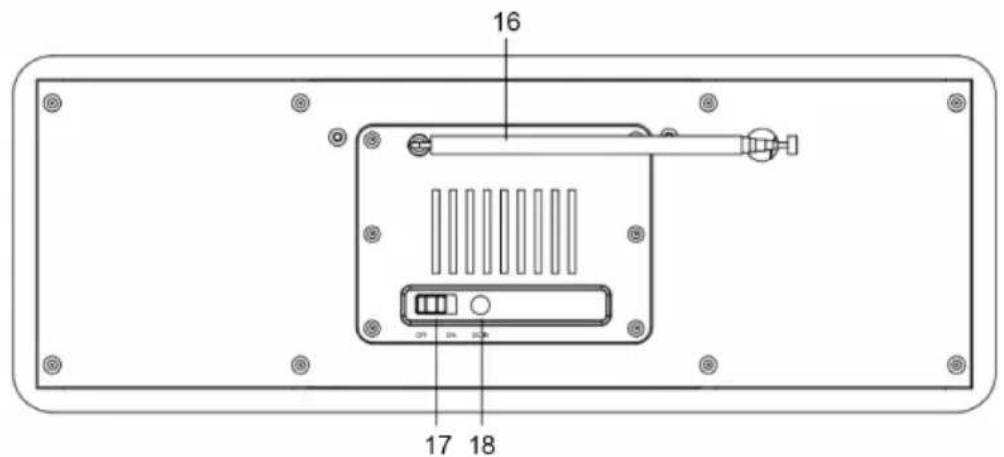
| 1 Standby - Press to switch between standby and on | 10 Right - Turn right |
| 2 Remote control receiver 11 Volume knob - Rotate rotary knob to adjust the volume when in working mode | |
| 3 Menu - Show Menu for the current mode | 12 Aux in socket |
| 4 Favorite - access to your favorite stations quickly | 13 USB port-play your USB sticks |
| 5 Left - Turn left 14 Headphone out | |
| 6 Play/Pause 15 Navigate/OK/Stop - Combine key | |
| 7 Ejection - Press for CD ejection 16 Telescopic antenna | |
| 8 Backward 17 On/Off switch button | |
| 9 Forward 18 DC IN socket | |
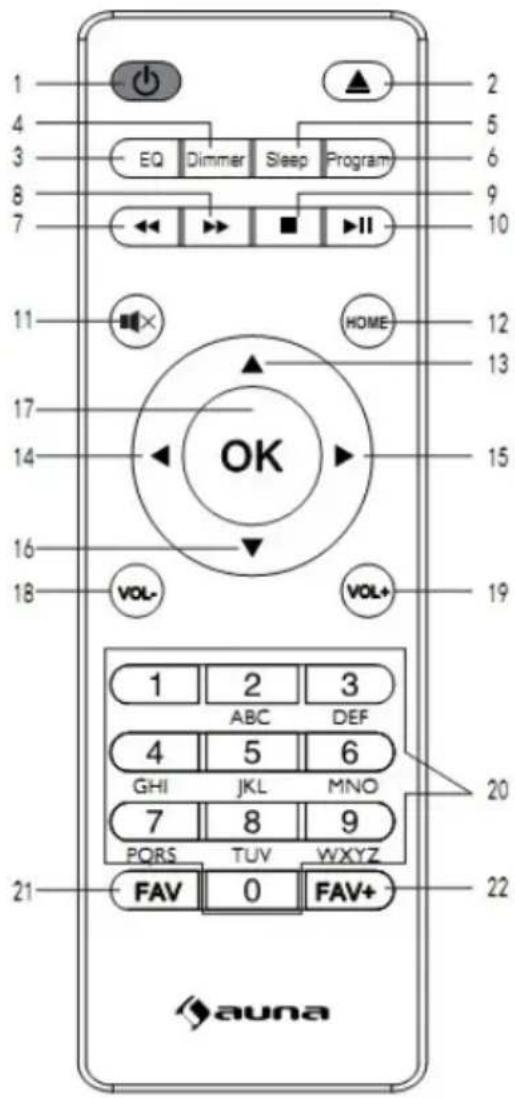
Remote Control
1 Standby / On
2 Ejection, press for CD ejection
3 EQ button
4 Dimmer
5 Sleep
6 CD program
7 Backward button
8 Foward button
9 Stop
10 Play / Pause button
11 Mute
12 Home
13 Up
14 Left
15 Right
16 Down
17 OK
18 Volume-
19 Volume+
20 Number buttons
21 Fav
22 Fav+
FUNCTIONS AND SETTINGS
| Function Settings | ||
| Time Display: Analog/Digital | ||
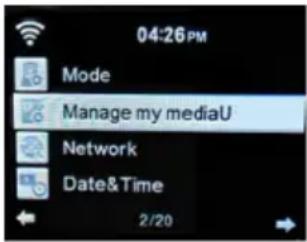
| Manage my mediaU | ||
| Network Wireless Network | Configuration | |
| Wireless Network (WPS PBC) | ||
| Manual Configuration | ||
| Check Network when Power On | ||
| Date and Time Set Date and Time | ||
| Set Time Format | ||
| Set Date Format | ||
| Daylight Saving Time (dst) | ||
| Alarm Alarm 1 (Turn Off) Turn On | ||
| Turn Off | ||
| Alarm 2 (Turn Off) Turn On | ||
| Turn Off | ||
| NAP Alarm 1 (Turn Off) | ||
| Alarm Volume | ||
| Timer | ||
| Language | ||
| Dimmer Power Saving | ||
| Turn On | ||
| Display Color | ||
| Monochrome | ||
| Power Managemet | ||
| Sleep Timer | ||
| Buffer | ||
| Weather Show on Standy | ||
| Temperature Unit | ||
| Set Location | ||
| FM Setup Mode(Set mono/ | Set stereo) | |
| Threshold(Seek Threshold/Stereo Threshold)) | ||
| Local Radio Setup Manual | Setup(Country) | |
| Manual Setup (City) | ||
| Auto Detect | ||
| Playback Setup Off | ||
| Repeat all | ||
| Repeat one | ||
| Shuffle | ||
| Device Rename (AirMusic) | ||
| AirMusic Control App | ||
| Equalizer | ||
| Reset to Default | ||
| Internet Radio My Favorite | ||
| Radio Station/Music | ||
| Local Radio | ||
| Sleep Radio | ||
| History | ||
| Service Search Radio Station | Add New Radio Station | |
| Media Center USB | ||
| UPnP | ||
| My Playlist | ||
| Clear My playlist | ||
| Information Center Weather | Information | |
| Financial Information | ||
| System Information | ||
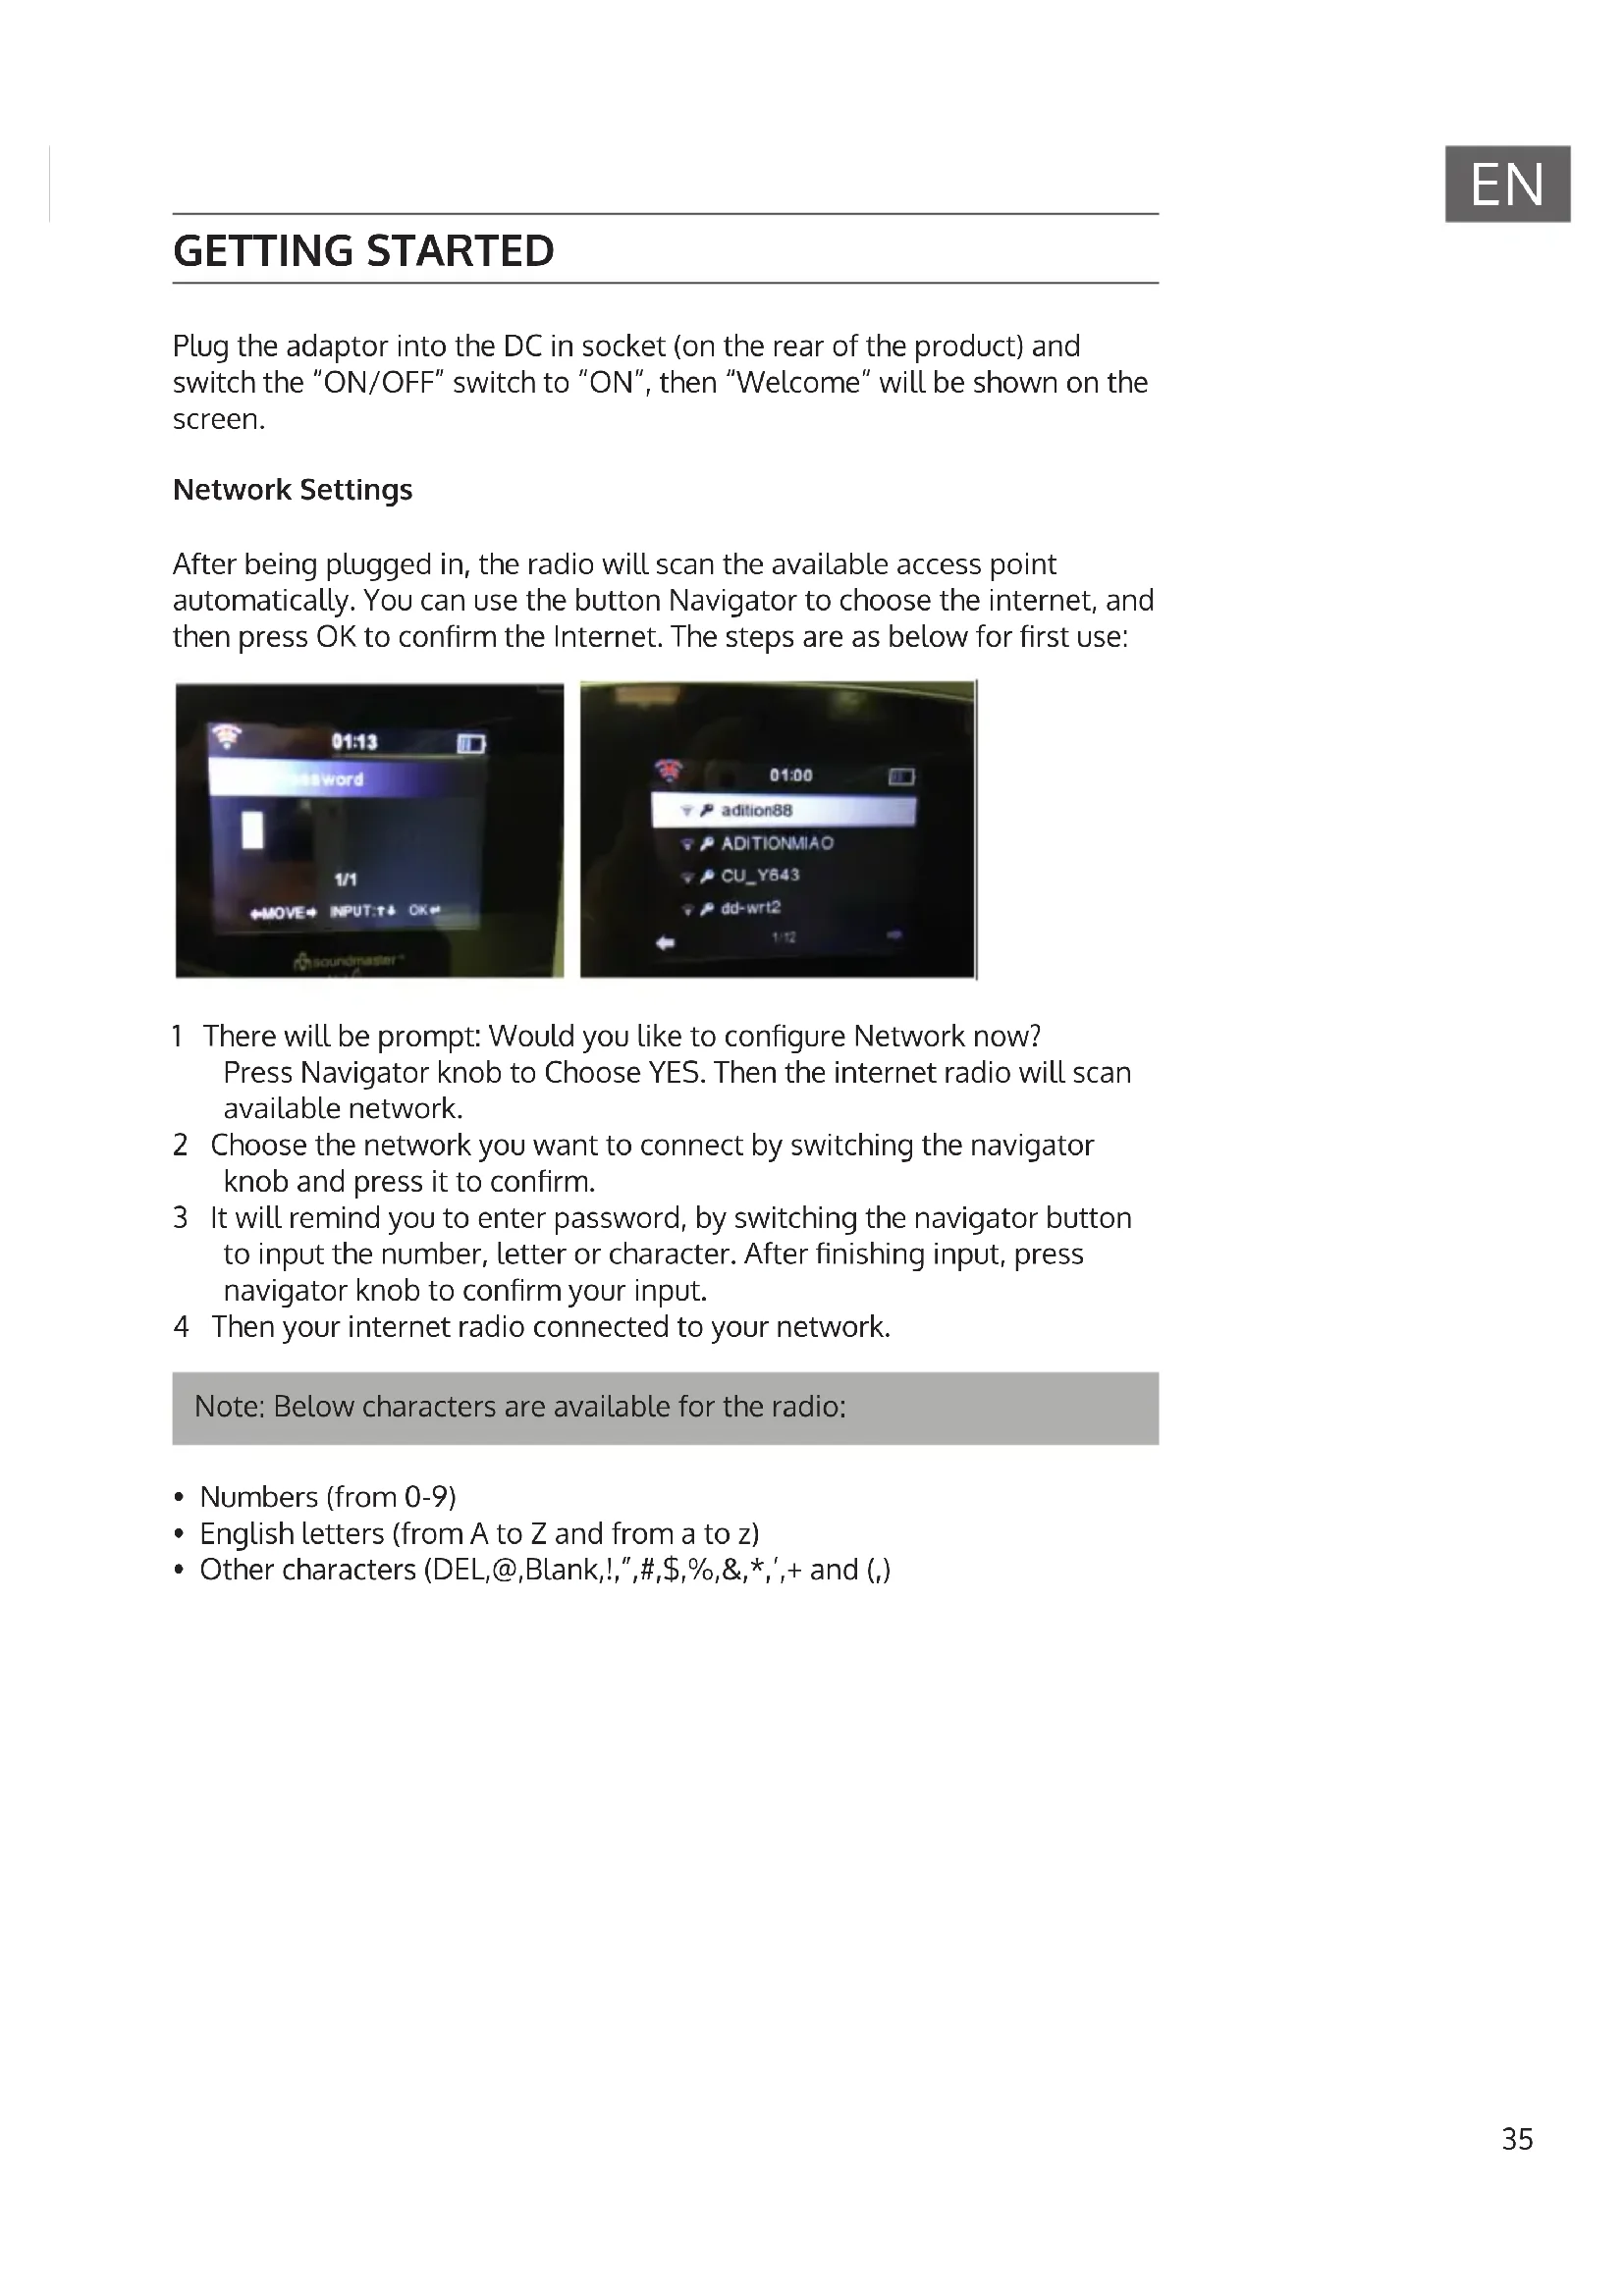
GETTING STARTED
Plug the adaptor into the DC in socket (on the rear of the product) and switch the "ON/OFF" switch to "ON", then "Welcome" will be shown on the screen.
Network Settings
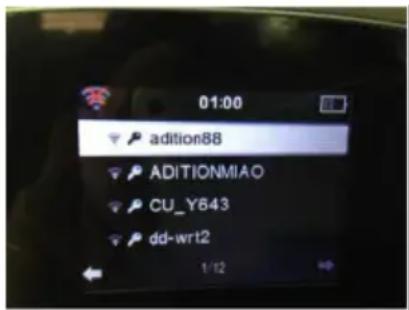
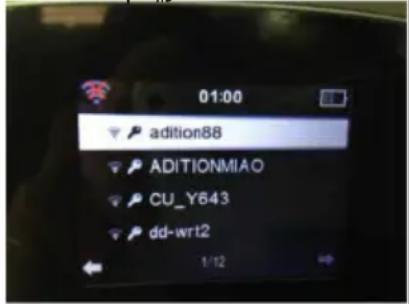
After being plugged in, the radio will scan the available access point automatically. You can use the button Navigator to choose the internet, and then press OK to confirm the Internet. The steps are as below for first use:
1 There will be prompt: Would you like to configure Network now?
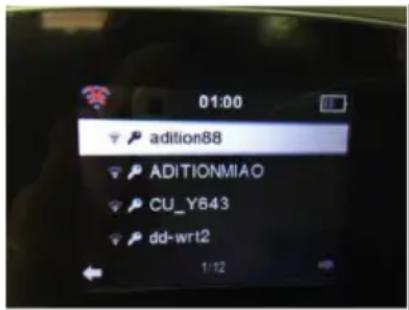
Press Navigator knob to Choose YES. Then the internet radio will scan available network.
2 Choose the network you want to connect by switching the navigator knob and press it to confirm.
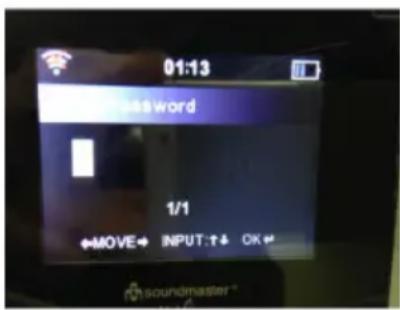
3 It will remind you to enter password, by switching the navigator button to input the number, letter or character. After finishing input, press navigator knob to confirm your input.
4 Then your internet radio connected to your network.
Note: Below characters are available for the radio:
- Numbers (from 0-9)
- English letters (from A to Z and from a to z)
- Other characters (DEL,@,Blank,!,",#,\$,%,&,*,'+ and (,)
AUX(Line input)
Function: To set up the playing mode of program with audio play from out source.
1 Press Menu and Rotate navigate button to choose Aux.
2 Press OK to confirm.
Internet Radio
Functions: To set up the play mode of internet radio
1 Press Menu. Rotate Navigate button to choose Internet radio.
2 Press OK button to enter the interface, then below choices will be shown on the screen:
- My Favorite
• Radio Station/Music - Local Radio
- Sleep Radio
- History
- Service
MEDIA CENTER
USB
Play the audio medium by USB, which is compatible with the files of WMA/MP3/FLAC/WAV. Compatible with USB3.0 and lower versions.
For the setup of play, please refer to the Playback setup in Configuration.
1 Press Menu☐Rotate Navigate button to choose "Media Center".
2 Press OK to enter the interface.
3 Choose "USB" by rotate Navigate button and enter it by OK button.
UPNP
FUNCTIONS: Play the media in computer.
1 Press Menu. Rotate Navigate button to choose "Media Center".
2 Press OK button to enter the interface.
3 Choose"UPNP"by rotate Navigate button. Enter it by press OK Button.
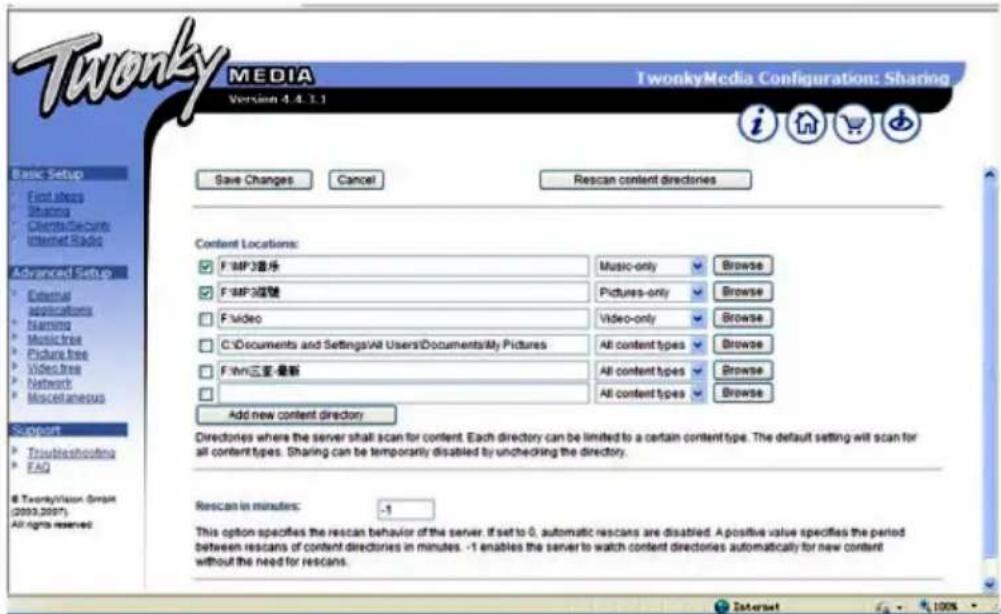
Note: You must install the software of "Windows Media Play 11" (or upgrade versions) or Twonky Media in Your computer, which is necessary for the UPNP operation. In "Windows Media Play", you should get the media to share in your playlist. Your computer must be available to the internet. The media must be put in your playlist. Your computer must be allowed to be linked with others. (You can set up it in "Windows Media Play" by hand or automatically)
My Playlist
1 Press Menu.
2 Rotate Navigate button to choose "Media Center".
3 Press OK button to enter the interface.
4 Choose "My playlist" by rotate Navigate Button. Enter it by OK button.
Note: In the UPNP model, when playing you can long press OK button to put the chosen file into your "My playlist".
Clear My Playlist
1 Press Menu. Rotate Navigate button to choose "Media Center".
2 Press OK button to enter the interface.
3 Choose "Clear My playlist" by rotate Navigate Button.
4 Enter it by Enter button.
Note: By cutting off the power, the files of your "My playlist" will be cleared automatically.
My Media U
Functions: Fastly play the program of internet radio per the personal playlist.
1 In Standby choose „My media U“.
2 Press OK to confirm.
Note: For the first time, you need register in http://www.mediayou.net and set up related data before you use it, otherwise the display will show info to reminder you not to connect the internet. This option default disable. User need select Enable in Manage My MediaU of Configuration, then can see My media U in Media Center.
INFORMATION CENTER
Functions: check the weather all over the world, Browse the stock status of main stock exchange globally, show the system info of the unit.
1 Press Menu > Rotate Navigate button to choose "information center".
2 Press OK button to enter the interface.
3 Choose the Item by rotate Navigate button.
4 Confirm it by OK button.
Weather Information
1 Press OK button, it will enter the interface to choose location then choose the city by Navigate button, press OK button to enter.
2 In the interface of city weather, you can check the weather in recent 5 days by Left or right button.
Financial infomation
Note: on the interface of "Financial information", you can Aim at your interested items by cursor, then the related Information will be shown automatically.
System information
Functions: To check the software version, the MAC, ID and IP of the wireless internet.
CONFIGURATION
Functions: To set up Network, Alarm, Date & Time, Language, Weather, Dimmer and etc.
1 Press Menu. Rotate Navigate button to choose "Configuration".
2 Press OK to enter the interface.
3 Choose the item by Left or Right.
4 Confirm it by OK button.
Note: Press Left button can return to the upper menu. There are 21 items can be setting as below:
Time Display
You can select Analog or Digital for standby time display.
Manage My MediaU
„Enable" means to manage my media; "Disable" means not to manage my media. If you select Disable, My Media option of the menu will be conceal. If you select Enable, you can see My Media U option in main menu.
Network
Wireless Network Configuration
It can search the wireless network automatically and Show the searched list of network, then press OK to link it. (If the network is with password, you should input the password.)
Wireless Network (WPS PBC)
When choosing WPS PBC, It will show "Please press the WPS button on your router within 120 Secs", you must press the WPS button of Router, then the network in both sides will be linked automatically.
Manual Configuration
1 Press Menu > Configuration > Network.
2 Choose "Manual Configuration" by navigate knob > Enter > Wireless > Enter.
3 Then three items in the list (DHCP, Enter SSID, Manage).
Note: In the mode of 'ON' (DHCP), the unit will check the IP address of wireless network and link the network automatically. In the mode of 'OFF' (DHCP), the unit will not check the IP address of wireless network and link the network automatically.
Check Network when Power On
Functions: When "Power On", choose "Enable" to check the status of network link automatically; choose "Disable" not to check it.
Note: If the network is not linked on the mode of "Enable", it will automatically show the choices for you to set up the network.
Date and Time
1 Press Menu☐Configuration. Press OK to confirm.
2 Press Rotate Navigate button to choose "Date & Time".
3 Press OK button to enter the interface.
Set Date and Time
- Manual Setup: You can manual set the date and time.
- Auto Detect (UTC+00:00). 00:00 means the time Difference between server and local time.
Set Time Format
The format of 24 hour is default. You can also choose 12 hour.
Set Date Format
The format of DD/MM/YYYY is default. You can also choose:
- YYYY/MM/DD
- MM/DD/YYYY
Alarm
To set up three alarms (Alarm 1, Alarm 2, NAP Alarm) and the Alarm Volume.
1 Press Power☐Configuration. Press OK to confirm.
2 Press Rotate Navigate button to choose "Alarm".
3 Press OK button to enter the interface.
Settings:
- When alarm rings, it will enter the display of "Standby" automatically.
- You can set up the alarm volume by "Alarm Volume".(Volume 7 is default)
- If you press any button when alarm rings, the alarm will be closed and enter the model of standby with 5 minute SNOOZE.
- To press Standby button, it will exit the mode of SNOOZE.
- After the alarm setup, you should exit it, then the new setup can come into use.
- Two alarms won't ring at the same time.(Only after one alarm stop ringing, another alarm can be used).
NAP Alarm
The time of NAP Alarm is from 5 minutes to 120 minutes. And after the setup of the NAP Alarm, it begins to count down the time until the time is over, then it will switch to the standby model automatically and rings.
Alarm 1
- Turn On
- Turn Off
- Repeat: To set up the Alarm Date. The choices are as: Everyday, Once, Mon, Tue, Wed, Thu, Fri, Sat, Sun.
• Time: To set up the Alarm time. - Sound: To set up the Alarm sound. You can choose: Beep, Melody, Internet Radio or USB. Alarm sound Melody is default.
Timer
1 Press Power > Configuration.
2 Press OK to confirm. Press Rotate Navigate button to choose "Timer".
3 Press OK button to enter the interface.
4 Press Left and Right to set the time and confirm by press the rotary knob. When in Count down, you can press OK button to stop.
Language
Press Menu > Configuration > Language. Press ok to enter. It can support 17 languages:
English, Deutsch, Espanol, Francais (France), Portuges, Nederlands, Italiano, Pyccknn, Svenska, Norske, Dansk, Magyar, Cesky, Slovensky, Poski, Turkce, Suomi.
Dimmer
1 Press Menu > Configuration > Dimmer.
2 Press OK to confirm. Choose the Item by press Rotate Navigate button. Press OK button to confirm.
3 Press Navigate button or Left and Right button to adjust the brightness.
Tips: There are two items for your choice (Power saving and Turn On).
Display
There are 2 models you can select : Color and Monochrome
Power management
Configure to go to standby mode automatically during in the menu or/ and without Wifi signal. Choose the power management timer(5/15/30 mins) to set the duration of the radio to switch standby mode automatically when you are not controlling it. Choose "Turn off" to ignore the power management function.
Sleep Timer
To power off the unit automatically by setting up the sleep timer.
Press Menu > Configuration > Sleep Timer. Press OK to confirm. The time range is from Turn OFF, 15, 30, 60, 90, 120, 150, 180 minutes.
Buffer
1 Press Menu > Configuration > Buffer.
2 Select the buffer from 2 seconds to 8 seconds.
Weather
To show the current weather of selected city
Press Menu > Configuration > Weather > Select to choose the city and below Items are for your choice:
Set Location
To set up global city weather showing.
Choose district > country > city. Press OK to confirm it and the weather info will be shown in the display.
Temperature Unit
To set up the Temperature Unit by Centigrade or Fahrenheit .
Show ON Standby
To turn on or turn off the setup.
FM Setup
To set the FM sound quality.
Press Menu > Configuration > FM setup. There are two options below:
- Mode: Set mono or Set stereo
• Threshold: Seek Threshold or Stereo Threshold - There are three sub-option for seek threshold or stereo threshold: Strong, Default, Weak
Local Radio Setup
1 Press Menu > Configuration > Local Radio Setup.
2 Press OK to choose the status of Local Radio (The station of local radio is Decided by the internet IP address).
Manual Setup
1 Press Standby > Configuration > Local Radio Setup > Manual Setup.
2 Choose district and country to enter the interface, press OK (Save as local Radio") will show on the display.
3 Press OK button to confirm.
Auto Detect
Press Standby > Configuration > Local Radio Setup > "Auto Detect" to check the stations of Local Radio automatically.
Note: It will create the radio station of local internet automatically as per the local and national ID.
Playback Setup
Press Standby > Configuration > Playback Setup. Press OK to choose the play status:
OFF
means to play first track to last track in the folder in one circle then stop playing.
Repeat all
means to play first track to last track in the folder repeatedly.
Repeat one
means to play the chosen track repeatedly.
Shuffle
means to play all the items in your playlist randomly.
Device (DLNA setup)
- Rename (Air Music)
- If using the PC,Win 7 will support the DLNA
- If using other Samsung Smart Phone, you can Download the APP like Bubbleupn or Skifta to use the DLNA.
Equaliser
Equalizer can change the music playing effects.
1 Press Menu > Configuration > Equalizer.
2 Press OK to choose different music impact (Normal, Flat, Jazz, Rock, Soundtracks, Classical, POP, News, my EQ).
Resume When Power On
Press Menu > Configuration > Resume When Power On. Press OK to choose On or Off.
- ON means to continue the mode automatically when the power was off and switch on again.
- OFF means not to continue the mode and just show the main menu when the power was off and switch on again.
Software Update
It's just used for production and maintenance.
Caution: Before starting a software upgrade, ensure That the unit is plugged into a stable mains power connection. Disconnecting power during a software may permanently damage the unit.
Reset to Default
Choose this item, it will show' Are you sure to reset to default setting'. 'YES', it will delete all your present setup and resume to the original mode 'NO', it will keep all your present setup and return to the upper menu.
FM RADIO
Press the Mode button multiple times on the unit and choose FM. The first time you do this, the FM frequency '87.5MHz' will be displayed.
Tuning
Manual tuning
Short press right button for forward tuning or press left button for backward tuning.
Automatic tuning
Hold and press right button for automatic forward tuning or hold and press left button for automatic backward tuning.
Full scan tuning
Press navigate knob can start full band scan and automatically store available stations, it can store 20 stations at maximum.
How to store a preset station
Up to 20 stations can be set. To store a station that you are currently playing. Press and hold 'Fav' button on main unit or remote control, below image will show on the display:
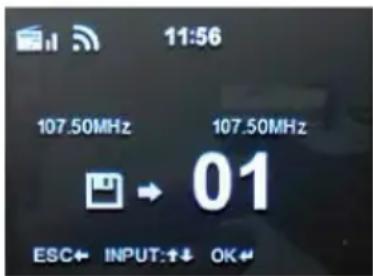
Press 'Left' button or 'Right' button to change the number you want to store the station as. Then press Navigate button on the main unit or OK button on the remote control to save.
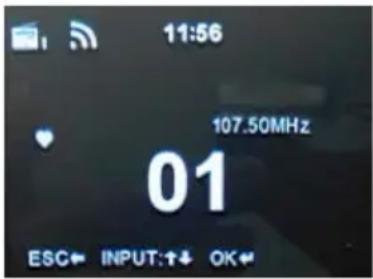
How to play a preset radio station
1 Press the 'Fav' button on the main unit or remote control.
2 Press 'Right' or 'Left' button to scroll through your preset stations, up to 20.
3 Press the Navigate button on main unit or OK button on remote control to select your choice. Please refer to image :
BT CONNECTION
- To choose your mode, press through your choices using the 'Mode' button. The choices will be displayed on the front screen.
- Turn on BT on your phone and 'IR-190 CD' will appear. Click on this to connect. When the unit makes a short sound, it has successfully connected.
- To choose music you will need to choose the album or playlist from your phone, but once selected you can then use the 'right' or 'Left' button to select previous or next tracks.
- To pause the music playback, please press play/pause button; to resume music playback, press play/pause button again.
- To disconnect the BT connection, press stop button.
Note: The operational range between the unit and a BT device is approximately 10 meters, without any objects in the way.
CD PLAYER
- To choose CD Mode, press through your choices using the 'Mode' button. The choices will be displayed on the front screen-select 'CD'.
- Insert the CD into the CD port at the front of the unit. The CD will read automatically and start playing.
- Press and release the 'Play/pause' button to play/pause on the main unit or remote control.
- Press and release 'Left' or 'Right' button to select previous or upcoming tracks.
- Press and hold the 'Backward' or 'Forward' to rewind or fast forward. Press and release the 'Stop' button to stop.
- Press and release the eject button on the main unit or remote control to eject the CD.
Note: Whilst the CD is playing, the current track number and elapsed time will be displayed.
Playback Setup
If you want to set up playback method, please go to playback setup section of configuration to choose :off, Repeat all, Repeat one or Shuffle.
OFF
Means to play first track to last track in one circle then stop playing.
Repeat all
means to play first track to last track repeatedly.
Repeat one
means to play the chosen track repeatedly.
Shuffle
means to play all tracks in your CD randomly.
Program Playback
• Make sure the CD is in stop status
- Press the 'Program' button, it will show P001, P001 represents the position for first program. [001] represents the track position. you can press 'Left' or 'Right' button to select track.
- Press 'Program' to confirm your selection and go to your next Program P002. You can follow above procedure to program P002 and upcoming program.
- After program was done, press 'Play' button to play programmed tracks.
- If you want to exit program process, press 'Stop' button to exit.
- After program was done, press 'Eject' button or press 'Stop' button twice can quit program playing mode.
- Program track qty for CD disc is 20 and for MP3 disc is 99.
DISPOSAL CONSIDERATIONS

natural_image
Symbol of a trash bin crossed with a diagonal line, representing no waste or discharge (no text or labels)If there is a legal regulation for the disposal of electrical and electronic devices in your country, this symbol on the product or on the packaging indicates that this product must not be disposed of with household waste. Instead, it must be taken to a collection point for the recycling of electrical and electronic equipment. By disposing of it in accordance with the rules, you are protecting the environment and the health of your fellow human beings from negative consequences. For information about the recycling and disposal of this product, please contact your local authority or your household waste disposal service.
This product contains batteries. If there is a legal regulation for the disposal of batteries in your country, the batteries must not be disposed of with household waste. Find out about local regulations for disposing of batteries. By disposing of them in accordance with the rules, you are protecting the environment and the health of your fellow human beings from negative consequences.
DECLARATION OF CONFORMITY

Manufacturer:
Chal-Tec GmbH, Wallstrasse 16, 10179 Berlin, Germany.
Importer for Great Britain:
Berlin Brands Group UK Limited
PO Box 42
272 Kensington High Street
London, W8 6ND
United Kingdom
Hereby, Chal-Tec GmbH declares that the radio equipment type IR-190 is in compliance with Directive 2014/53/EU. The full text of the EU declaration of conformity is available at the following internet address: use.berlin/10032013
For Great Britain: Hereby, Chal-Tec GmbH declares that the radio equipment type IR-190 is in compliance with the relevant statutory requirements. The full text of the declaration of conformity is available at the following internet address: use.berlin/10032013
Estimado cliente:
ÍNDICE DE CONTENIDOS
natural_image
Symbol of a trash bin crossed out by a diagonal line, with no text or labels present.Berlin Brands Group UK Limited
PO Box 42
272 Kensington High Street
London, W8 6ND
United Kingdom
SOMMAIRE

Ma liste de lecture
Mémoire tampon (Buffer)
natural_image
Symbol of a trash bin crossed with a diagonal line, representing no waste or discharge (no text or labels)DÉCLARATION DE CONFORMITÉ

Fabricant :
Chal-Tec GmbH, Wallstraße 16, 10179 Berlin, Allemagne.
Berlin Brands Group UK Limited
PO Box 42
272 Kensington High Street
London, W8 6ND
United Kingdom
INDICE

La mia playlist
natural_image
Symbol of a trash bin crossed out by a diagonal line, with no text or labels present.Berlin Brands Group UK Limited
PO Box 42
272 Kensington High Street
London, W8 6ND
United Kingdom
INNEHÅLLSFÖRTECKNING
Tekniska data 125
Enhetsöversikt 126
Mediatek 132
natural_image
Symbol of a trash bin crossed with a diagonal line, representing no waste or discharge (no text or labels)Berlin Brands Group UK Limited
PO BOX 42
272 Kensington High Street
London, W8 6ND
Storbritannien