
PKLLP 360 B2 - Laser pointer PARKSIDE - Free user manual and instructions
Find the device manual for free PKLLP 360 B2 PARKSIDE in PDF.
| Product type | Cordless cross-line laser level |
| Brand | Parkside |
| Model | PKLLP 360 B2 |
| Laser class | 2 |
| Wavelength | 510-530 nm |
| Working area | 20 m |
| Leveling accuracy | ± 0.4 mm/m |
| Self-leveling range | ± 3° |
| Leveling time | Approx. 4 seconds |
| Operating voltage | 4 V |
| Battery capacity | 2.6 Ah |
| Charging voltage | 5 V (USB-C) |
| Charging current | 1.7 A |
| Weight (without tripod) | Approx. 440 g |
| Package contents | 1 x laser level, 1 x tripod, 1 x USB-C cable, 1 x instruction manual |
| Main functions | 360° horizontal laser line, vertical laser line, self-leveling, non-self-leveling mode, magnetic mounting |
| Cleaning and maintenance | Clean the exterior with a dry cloth; clean the laser openings with compressed air or a slightly damp cotton swab |
| Safety | Do not look into the laser beam; keep out of reach of children; do not use outdoors |
| Spare parts and repairability | Integrated battery not user-replaceable; repair by qualified technician only |
| General information | Indoor use only; 5-year warranty; customer service France: 0800904879, Belgium: 080071011 |
Frequently Asked Questions - PKLLP 360 B2 PARKSIDE
User questions about PKLLP 360 B2 PARKSIDE
0 question about this device. Answer the ones you know or ask your own.
Ask a new question about this device
Download the instructions for your Laser pointer in PDF format for free! Find your manual PKLLP 360 B2 - PARKSIDE and take your electronic device back in hand. On this page are published all the documents necessary for the use of your device. PKLLP 360 B2 by PARKSIDE.
USER MANUAL PKLLP 360 B2 PARKSIDE
Operation and safety notes
FR BE
NIVEAU LASER EN CROIX SANS FIL 4 V
Warnings and symbols used. Page 20
Introduction 21
Intended use. Page 21
Scope of delivery. Page 21
Description of parts. Page 22
Technical data. 22
Safety instructions. 23
Safety instructions for batteries / rechargeable batteries . Page 24
Before first use. 25
Operation. 25
Charging the rechargeable battery. Page 25
Switching on/off Page 26
Using horizontal and vertical laser lines. Page 26
Working with the automatic leveller. Page 26
Working without the automatic leveller . 27
Working with the tripod. 27
Adjusting the tripod. Page 28
Cleaning and care . Page 29
Storage 29
Troubleshooting. Page 29
Disposal. 30
Warranty 31
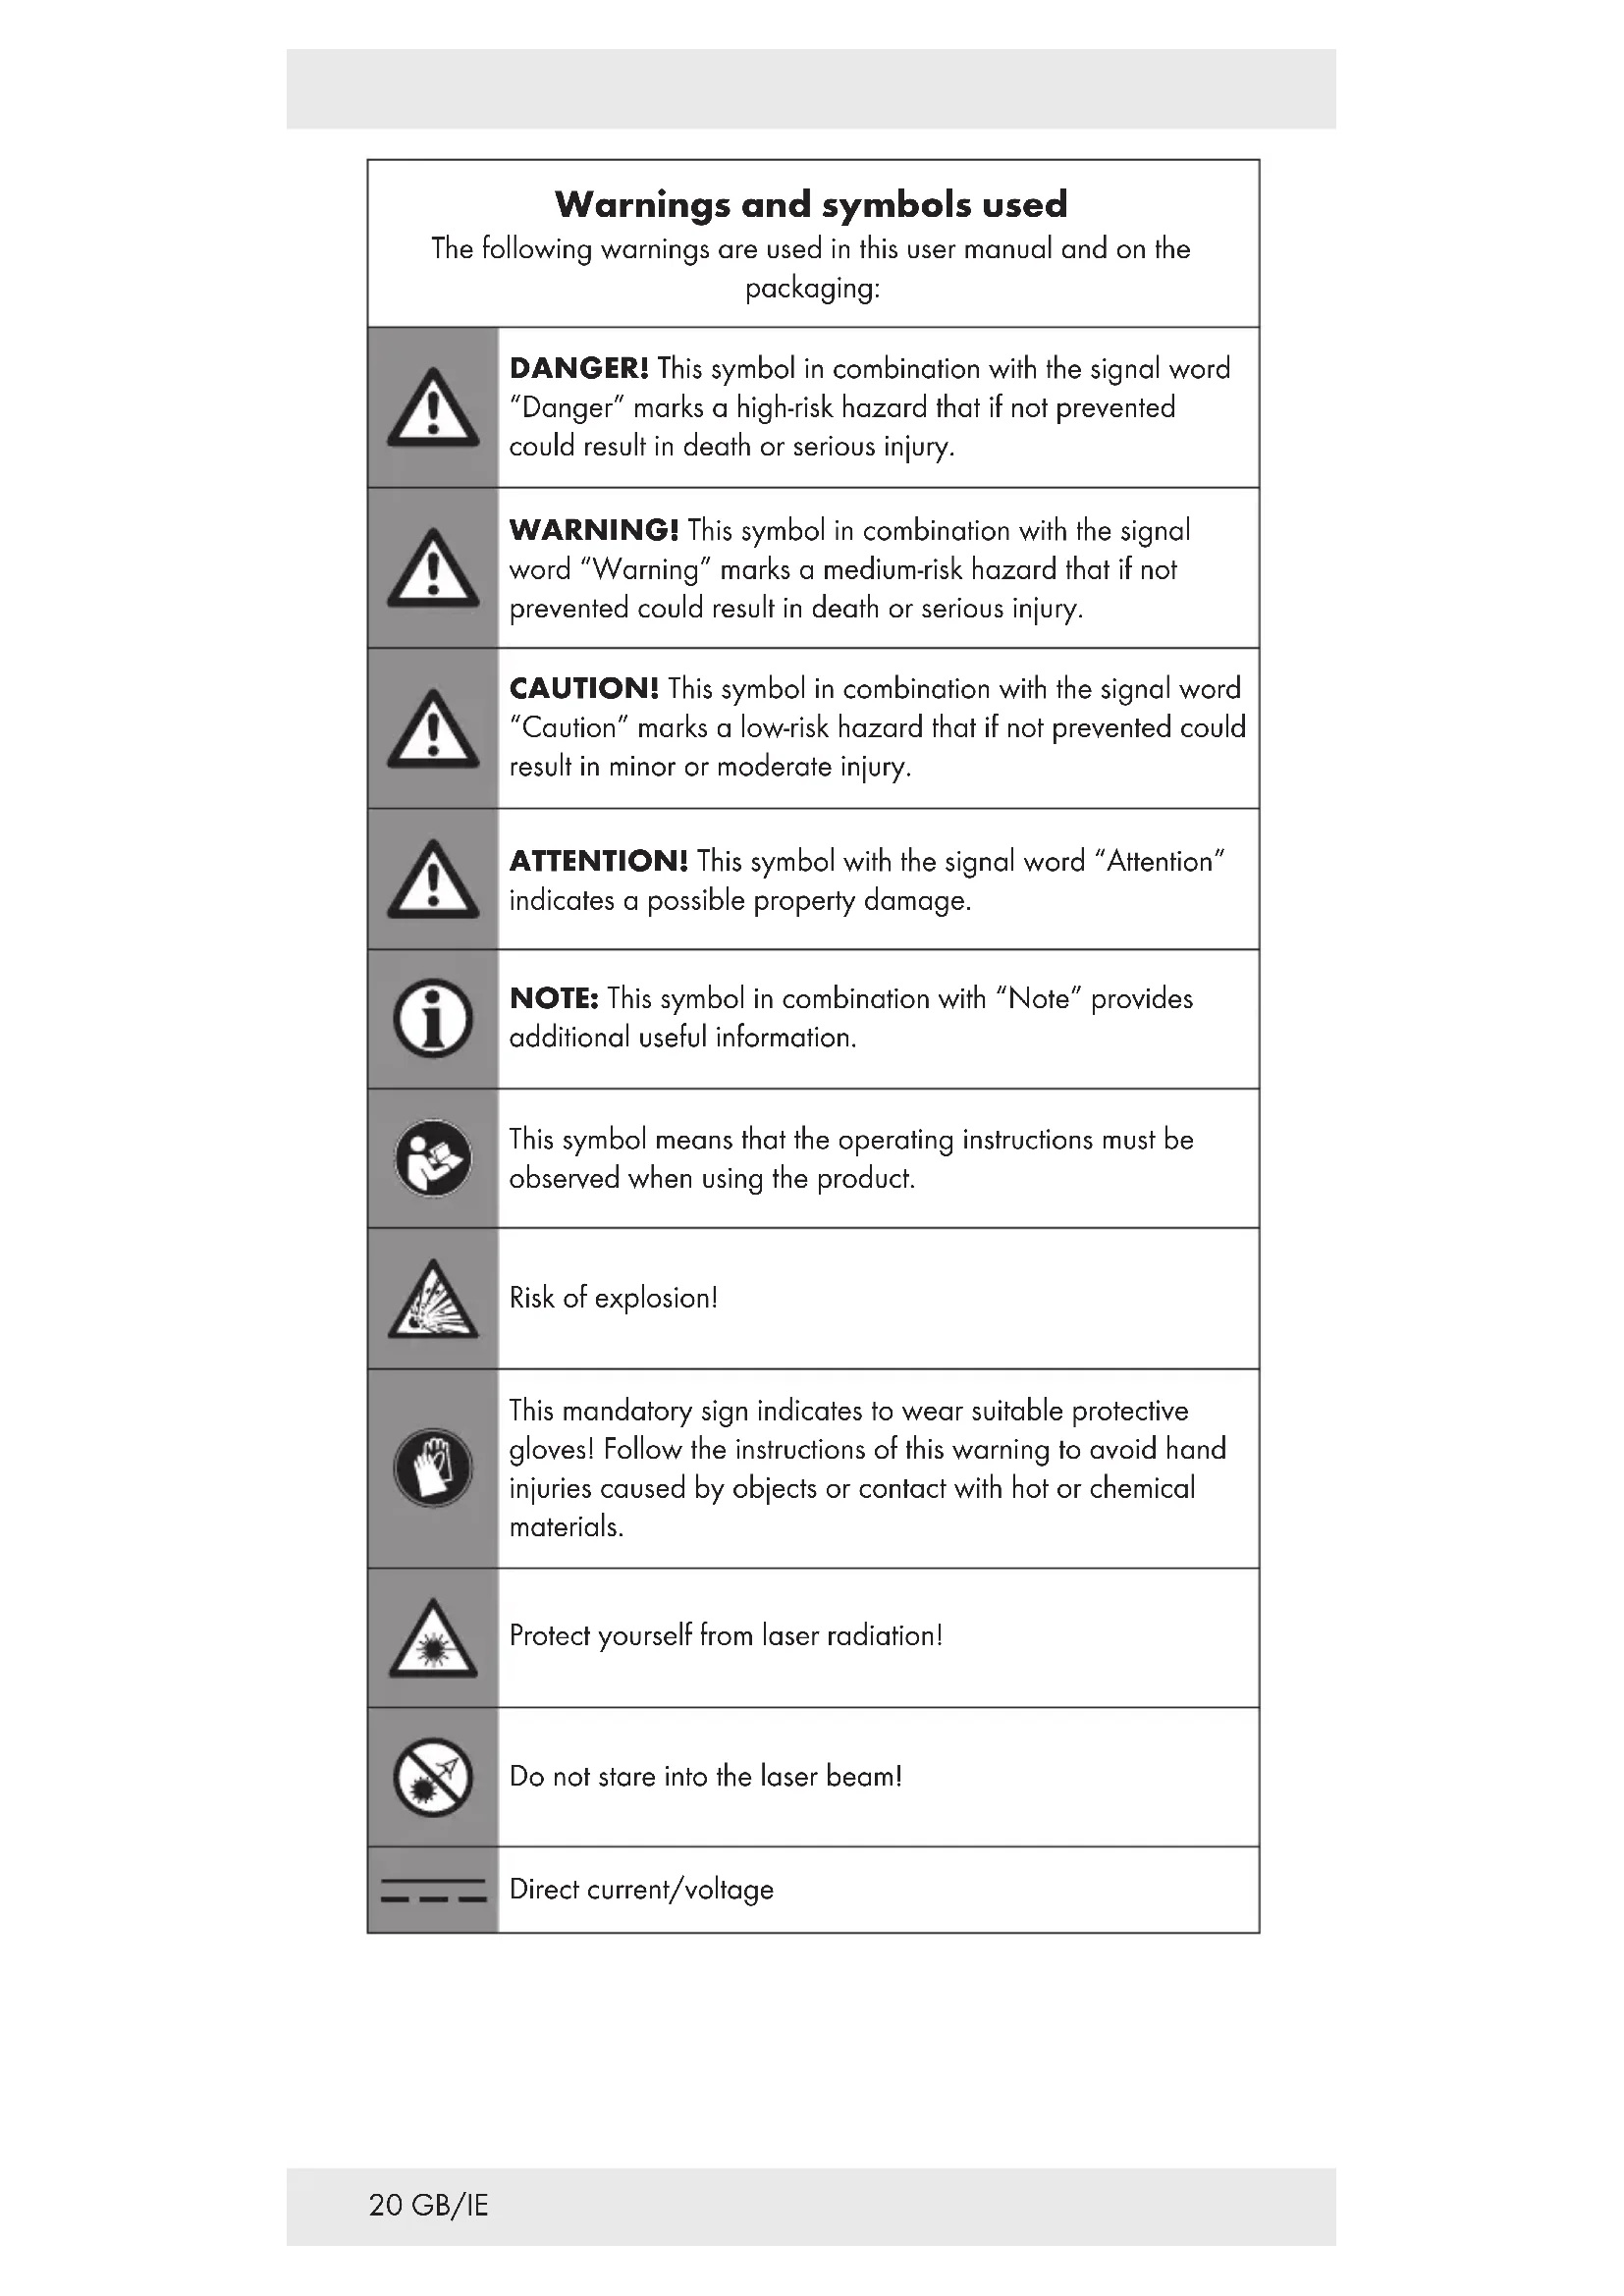
| Warnings and symbols used The following warnings are used in this user manual and on the packaging: | |
| ! | DANGER! This symbol in combination with the signal word "Danger" marks a high-risk hazard that if not prevented could result in death or serious injury. |
| ! | WARNING! This symbol in combination with the signal word "Warning" marks a medium-risk hazard that if not prevented could result in death or serious injury. |
| ! | CAUTION! This symbol in combination with the signal word "Caution" marks a low-risk hazard that if not prevented could result in minor or moderate injury. |
| ! | ATTENTION! This symbol with the signal word "Attention" indicates a possible property damage. |
| i | NOTE: This symbol in combination with "Note" provides additional useful information. |
| This symbol means that the operating instructions must be observed when using the product. | |
| Risk of explosion! | |
| This mandatory sign indicates to wear suitable protective gloves! Follow the instructions of this warning to avoid hand injuries caused by objects or contact with hot or chemical materials. | |
| Protect yourself from laser radiation! | |
| Do not stare into the laser beam! | |
| Direct current/voltage | |
| USB connection | |
| Use in dry indoor rooms only. | |
| CE mark indicates conformity with relevant EU directives applicable for this product. | |
CORDLESS CROSS LINE LASER 4V
Introduction
We congratulate you on the purchase of your new product. You have chosen a high quality product. The instructions for use are part of the product. They contain important information concerning safety, use and disposal. Before using the product, please familiarise yourself with all of the safety information and instructions for use. Only use the product as described and for the specified applications. If you pass the product on to anyone else, please ensure that you also pass on all the documentation with it.
Intended use
This product is suitable for projecting vertical and horizontal lines. The laser lines can be used both individually and together.
Do not use this product for any other purpose.
This product is only intended for normal indoor use.
This product is only intended for private household use, not for commercial purposes.
The manufacturer accepts no liability for damages caused by improper use.
Scope of delivery
After unpacking the product, check if the delivery is complete and if all parts are in good condition. Remove all packaging materials before use.
Please contact customer service if parts are missing or damaged.
1x Cordless cross line laser
1× Tripod
1x USB-C charging cable
1x Instruction manual
Description of parts
Before reading, unfold the page containing the illustrations and familiarise yourself with all functions of the product.
(Fig. A)
1 360^ laser
2 Magnets
3 Charging socket
4Butterfly screw
5 Handwheel bolt
6 Lever
7 Tripod legs
8 Snap fasteners
9 Locking ring
10Crank handle
11 Locking ring
12 Adjusting screw
13 Dragonfly (bubble vial)
14 Levelling slide switch
15 Charge indicator
16 On/off button
17 Leveler light
18 Vertical laser
19 Tripod mount
20 USB-C charging cable
(Fig. B)
21 Internal thread
22 Tripod screw
Technical data
Working range: 20m^
Weight (without tripod): approx. 440g
Operating voltage U_max:4V
Nominal capacity: 2.6 Ah
Charging voltage U_IN 5V
Charging current: 1.7 A
Self-levelling range: ± 3^
Levelling accuracy: ± 0.4mm / m
Laser wavelength: 510-530 nm
Laser class: 2
Levelling time: approx. 4 seconds
- The working range may be restricted by environmental conditions (e.g. bright light).

Safety instructions
BEFORE USING THE PRODUCT, PLEASE FAMILIARISE YOURSELF WITH ALL OF THE SAFETY INFORMATION AND INSTRUCTIONS FOR USE! WHEN PASSING THIS PRODUCT ON TO OTHERS, PLEASE ALSO INCLUDE ALL THE DOCUMENTS!
In the case of damage resulting from noncompliance with these operating instructions the warranty claim becomes invalid!
No liability is accepted for consequential damage! In the case of material damage or personal injury caused by incorrect handling or non-compliance with the safety instructions, no liability is accepted!
Children and persons with disabilities
WARNING! RISK OF LOSS OF LIFE OR ACCIDENT TO INFANTS AND CHILDREN!
Never leave children unsupervised with the packaging material. The packaging material represents a danger of suffocation.
Children frequently underestimate the dangers. Always keep children away from the packaging material.
The product is to be used by adults only. Children under the age of 16 may not use the product except under supervision.
- Keep children away from the product.
General notes
Observe the information on operation, cleaning, storage and disposal in the operating instructions.
Check the product each time before using. If damaged, have the product repaired. Do not use the product if damaged.
Turn off the product when not in use. Do not leave the product unsupervised.
- Keep the product away from medical devices, magnetic data storage media and magnetically sensitive devices.
Handling the laser
CAUTION! Laser beam - Do not look into the beam! Laser class 2.
Do not aim the laser beam at people.
Markings and warnings are located on the top and bottom of the product.

Safety instructions for batteries / rechargeable batteries
DANGER TO LIFE! Keep batteries / rechargeable batteries out of reach of children. If accidentally swallowed seek immediate medical attention.

DANGER OF EXPLOSION! Never recharge nonrechargeable batteries. Do not short-circuit batteries / rechargeable batteries and / or open them. Overheating, fire or bursting can be the result.
Never throw batteries / rechargeable batteries into fire or water.
Do not exert mechanical loads to batteries / rechargeable batteries.
Risk of leakage of batteries / rechargeable batteries
- Avoid extreme environmental conditions and temperatures, which could affect batteries / rechargeable batteries, e.g. radiators / direct sunlight.
If batteries / rechargeable batteries have leaked, avoid contact with skin, eyes and mucous membranes with the chemicals! Flush immediately the affected areas with fresh water and seek medical attention!

Wear Protective Gloves! Leaked or damaged batteries / rechargeable batteries can cause burns on contact with the skin. Wear suitable protective gloves at all times if such an event occurs.
This product has a built-in rechargeable battery which cannot be replaced by the user. The removal or replacement of the rechargeable battery may only be carried out by the manufacturer or his customer service or by a similarly qualified person in order to avoid hazards. When disposing of the product, it should be noted that this product contains a rechargeable battery.
Before first use
Remove the packaging. Check if all parts are complete.
Charge the rechargeable battery (see "Charging the rechargeable battery").
Operation
- Charging the rechargeable battery
① NOTE: The rechargeable battery is not replaceable. If you have any problems with the battery, please contact the service centre.
- Plug the USB-C charging cable [20] into the charging socket [3].
- Connect the USB-C charging cable [20] to a USB port.
Charge indicator 15 Meaning
Red Rechargeable battery is charging.
Green Rechargeable battery is fully charged.
- Once charging is complete, first remove the USB-C charging cable 20 from the USB port.
- Remove the USB-C charging cable [20] from the product.
NOTE: The product can be used whilst charging. It is normal for the product to warm up slightly whilst charging. During the charging process, you may not be able to work with the product if the battery is almost or completely empty. This depends on the charger used.
- Switching on/off

CAUTION! Laser beam - Do not look into the beam 1 18!
Turn your head away or close your eyes to prevent looking into the laser beam. Risk of eye injury!
Switching on: Briefly press the on/off button 16.
Switching off: Press and hold the on/off button 16 for 2 seconds.
Using horizontal and vertical laser lines
After switching on, the 360^ laser line 1 and the vertical laser line 18 are activated.
Activate the 360^ laser line 1 only: Briefly press the on/off button 16.
Activate the vertical laser line 18 only: Briefly press the on/off button 16.
Working with the automatic leveller
- Push the levelling slide switch 14 to the left (open lock).
- Place the product on a horizontal, solid surface or fasten the product to a tripod (see "Working with the tripod").
- Switch on the product. The leveller light 17 lights up.
Leveller light 17
Meaning
Green Automatic levelling is possible. Levelling
is complete once the laser lines no longer move.
Red Automatic levelling is not possible.
The laser lines flash.
NOTE: In the event of vibrations, the laser will level itself automatically. Wait until the laser lines no longer move.
- Working without the automatic leveller
① NOTES:
The leveller light will illuminate permanently in red when working without the automatic leveller. The laser lines depicted are not levelled.
The product has 2 magnets 2 . The magnets allow you to attach the product to surfaces that attract magnetic objects, e.g. steel shelves.
ATTENTION! The magnetic surface used should be flat and not curved or uneven surface. Otherwise, the product will fall down and will be damaged.
- Push the levelling slide switch 14 to the right (closed lock).
- Switch on the product.
Working with the tripod
(Fig. B) Screwing the laser onto the tripod mount 19
Screw the internal thread [21] of the product hand tight onto the tripod screw [22].
Removing/inserting the tripod mount
- Open the lever 6
- Remove the tripod mount 19 in an upward direction.
- Place the tripod mount [19] on the tripod for insertion.
- Lock the tripod mount [19] by closing the lever 6.
ATTENTION! Do not use excessive force. This may damage the product.
Adjusting the tripod
(Fig. C)
NOTE: You can use the dragonfly 13 to check the horizontal alignment of the tripod.
- Pull the tripod legs 7 apart.
- Lock the tripod legs into position with the locking ring 9
Setting the height, tripod feet
- Open the snap fasteners [8].
- Extend the tripod legs to the desired length.
- Close the snap fasteners 8
Setting the height, crank handle
- Fold up the crank handle [10].
- Hold the crank handle 10 firmly with one hand.
- Unscrew the locking ring by turning it to the left.
- Crank the tripod to the desired height.
- Turn the locking ring [1] to the right to lock this position.
Adjusting the inclination, forward/back
- Turn the handwheel bolt 5 to the left to loosen.
- Set the desired inclination.
- Turn the handwheel bolt 5 to the right to lock the inclination into place.
Adjusting the inclination, sideways
- Turn the butterfly screw 4 to the left to loosen.
- Fold the tripod to the desired inclination.
- Turn the butterfly screw 4 to the right to lock into place.
Rotating the tripod
- Turn the adjusting screw 12 to the left to loosen.
- Hold the handwheel bolt 5 and turn the tripod in the desired direction.
- Turn the adjusting screw 12 to the right to lock into place.
Cleaning and care
WARNING! Never submerge the product in water or other liquids.
WARNING! For repair purposes the product may only be opened by a professional. Have the product repaired by qualified professionals and only with original replacement parts. This ensures that the safety of the product is maintained.
The product requires no maintenance.
Do not allow water to enter into the product during cleaning.
Keep the product clean to ensure good, secure work.
Use a dry cloth to clean the outside.
Clean the openings of the 360^ laser 1 and the vertical laser 18 with a soft air jet. In cases of heavy contamination, remove the dirt with a slightly damp cotton swab.
Do not exert any strong pressure!
Storage
If you will not be using the product for a prolonged period of time, store it in a clean, dry place that is not exposed to direct sunlight.
Troubleshooting
Problem Possible cause Solution
| Product does not start. | Rechargeable battery is flat. | Charge the rechargeable battery. |
| Automatic leveller does not work. | Automatic leveller cannot oscillate freely. Product is not aligned sufficiently parallel with the floor. | Align the product so it is parallel with the floor. |
Disposal
The packaging is made entirely of recyclable materials, which you may dispose of at local recycling facilities.

Observe the marking of the packaging materials for waste separation, which are marked with abbreviations (a) and numbers (b) with following meaning: 1-7: plastics / 20-22: paper and fibreboard / 80-98: composite materials.

The product and packaging materials are recyclable, dispose of it separately for better waste treatment. The Triman logo is valid in France only.

Contact your local refuse disposal authority for more details of how to dispose of your worn-out product.

To help protect the environment, please dispose of the product properly when it has reached the end of its useful life and not in the household waste. Information on collection points and their opening hours can be obtained from your local authority.
Faulty or used batteries / rechargeable batteries must be recycled in accordance with Directive 2006/66/EC and its amendments. Please return the batteries / rechargeable batteries and / or the product to the available collection points.
Environmental damage through incorrect disposal of the batteries / rechargeable batteries!
Batteries / rechargeable batteries may not be disposed of with the usual domestic waste. They may contain toxic heavy metals and are subject to hazardous waste treatment rules and regulations. The chemical symbols for heavy metals are as follows: Cd = cadmium, Hg = mercury, Pb = lead. That is why you should dispose of used batteries / rechargeable batteries at a local collection point.
Warranty
The product has been manufactured to strict quality guidelines and meticulously examined before delivery. In the event of product defects you have legal rights against the retailer of this product. Your legal rights are not limited in any way by our warranty detailed below.
The warranty for this product is 5 years from the date of purchase. The warranty period begins on the date of purchase. Please keep the original sales receipt in a safe location. This document is required as your proof of purchase.
Should this product show any fault in materials or manufacture within 5 years from the date of purchase, we will repair or replace it - at our choice - free of charge to you. This warranty becomes void if the product has been damaged, or used or maintained improperly.
The warranty applies to defects in material or manufacture. This warranty does not cover product parts subject to normal wear, thus possibly considered consumables (e.g. batteries) or for damage to fragile parts, e.g. switches, rechargeable batteries or glass parts.
Warranty claim procedure
To ensure quick processing of your case, please observe the following instructions:
Please have the till receipt and the item number (e.g. IAN 123456_7890) available as proof of purchase.
You will find the item number on the rating plate, an engraving, on the front page of the instructions for use (bottom left), or as a sticker on the rear or bottom of the product.
If functional or other defects occur, please contact the service department listed either by telephone or by e-mail.
You can return a defective product to us free of charge to the service address that will be provided to you. Ensure that you enclose the proof of purchase (till receipt) and information about what the defect is and when it occurred.
Service

Service Great Britain
Tel.:08000569216
E-Mail: owim@lidl.co.uk

Service Ireland
Tel.:1800200736
E-Mail: owim@lidl.ie

Gooi batterijen/accu's nooit in vuur of water.
Rotation of stativet
- Drej justeringsskrue 12 mod venstre for oplasning.
- Hold fingerskruen 5 og drej stativ onsket retning.
- Drej justeringsskrue 12 mod hore for l.asning.


- NIVEAU LASER EN CROIX SANS FIL 4 V
- Warnings and symbols used. Page 20
- Introduction 21
- Safety instructions. 23
- Before first use. 25
- Operation. 25
- Cleaning and care . Page 29
- Storage 29
- Troubleshooting. Page 29
- Disposal. 30
- Warranty 31
- CORDLESS CROSS LINE LASER 4V
- Introduction
- Intended use
- Scope of delivery
- Description of parts
- Technical data
- Safety instructions
- Children and persons with disabilities
- WARNING! RISK OF LOSS OF LIFE OR ACCIDENT TO INFANTS AND CHILDREN!
- General notes
- Handling the laser
- Safety instructions for batteries / rechargeable batteries
- Risk of leakage of batteries / rechargeable batteries
- Before first use
- Operation
- Charge indicator 15 Meaning
- - Switching on/off
- Using horizontal and vertical laser lines
- Working with the automatic leveller
- Leveller light 17
- Meaning
- - Working without the automatic leveller
- ① NOTES:
- Working with the tripod
- Removing/inserting the tripod mount
- Adjusting the tripod
- Setting the height, tripod feet
- Setting the height, crank handle
- Adjusting the inclination, forward/back
- Adjusting the inclination, sideways
- Rotating the tripod
- Cleaning and care
- Storage
- Troubleshooting
- Disposal
- Environmental damage through incorrect disposal of the batteries / rechargeable batteries!
- Warranty
- Warranty claim procedure
- Rotation of stativet
Brand : PARKSIDE
Model : PKLLP 360 B2
Category : Laser pointer