
PTBS 30 A1 - Irrigation system PARKSIDE - Free user manual and instructions
Find the device manual for free PTBS 30 A1 PARKSIDE in PDF.
| Product type | Outdoor drip irrigation system |
| Brand | Parkside |
| Model | PTBS 30 A1 |
| Max. operating pressure | 2 bar |
| Supplied components | Base unit with pressure regulation, 2 L-connectors (13 mm), 1 T-piece (13 mm), 5 T-reducers (13 mm/4.6 mm), 2 plugs (13 mm), 5 plugs (4.6 mm), 2 shut-off valves (4.6 mm), 35 inline drippers (4.6 mm), 20 tube clips (4.6 mm), 5 tube clips (13 mm), 1 distribution tube 15 m (4.6 mm), 1 distribution tube 15 m (13 mm), instruction manual |
| Intended use | Watering flower beds, potted plants and window boxes outdoors (non-professional use) |
| Safety | Do not direct water jet at people, animals or electrical devices; not suitable for drinking water; disassemble during frost periods |
| Connection | To water tap or garden hose via base unit |
| Main functions | Drip irrigation with pressure regulation, shut-off valves for adjustable flow, integrated filtration |
| Cleaning | Clean with a damp, lint-free cloth; clean the filter of the base unit under running water |
| Storage | Empty and dry completely before storage; store frost-free |
| Materials | Distribution tubes, plastic fittings; recyclable packaging |
| After-sales service France | Tel. 0800 919270, e-mail: kompernass@lidl.fr |
| After-sales service Belgium | Tel. 070 270 171 (0.15 EUR/min), e-mail: kompernass@lidl.be |
| Repairability index | Not specified in the manual |
Frequently Asked Questions - PTBS 30 A1 PARKSIDE
User questions about PTBS 30 A1 PARKSIDE
0 question about this device. Answer the ones you know or ask your own.
Ask a new question about this device
Download the instructions for your Irrigation system in PDF format for free! Find your manual PTBS 30 A1 - PARKSIDE and take your electronic device back in hand. On this page are published all the documents necessary for the use of your device. PTBS 30 A1 by PARKSIDE.
USER MANUAL PTBS 30 A1 PARKSIDE
IRRIGATION KIT, TROPFBEWÄSSERUNGS-SET, SET D'ARROSAGE GOUTTE-Ä-GOUTTE PTBS 30 A1
GB IE
IRRIGATION KIT
Operating instructions
FR BE
SET D'ARROSAGE GOUTTE-À-GOUTTE
Mode d'emploi
CZ
KAPKOVÁ ZAVLAŽOVACÍ SYSTEM
Návod k obsluze
SK
KVAPKOVY ZAVLAžOVACI SYSTEM
Návod na obsluhu
DK
DRYPVANDINGSSYSTEM
Before reading, unfold the page containing the illustrations and familiarise yourself with all functions of the device.
DE AT CH
GB/IE Operating instructions Page 1
Introduction 2
Intended use 2
Package contents 2
Technical specifications 3
Safety information 3
Connection and assembly 4
Operation 8
Dismantling 8
Cleaning 8
Storage 9
Disposal. 9
Service 10
Importer. 10
IRRIGATION KIT PTBS 30 A1
Introduction

Congratulations!
You have purchased a high-quality product. Familiarise yourself with the product before using it for the first time. To do this, read the following operating instructions thoroughly. Use the product only as described and for the range of applications specified. Keep these operating instructions in a safe place. Please, also pass all documents on to any future owner.
Intended use
This product is intended exclusively for watering outdoor garden beds, pots and balcony flower boxes. The product is not intended for commercial use.
The manufacturer accepts no responsibility for damage attributable to misuse.
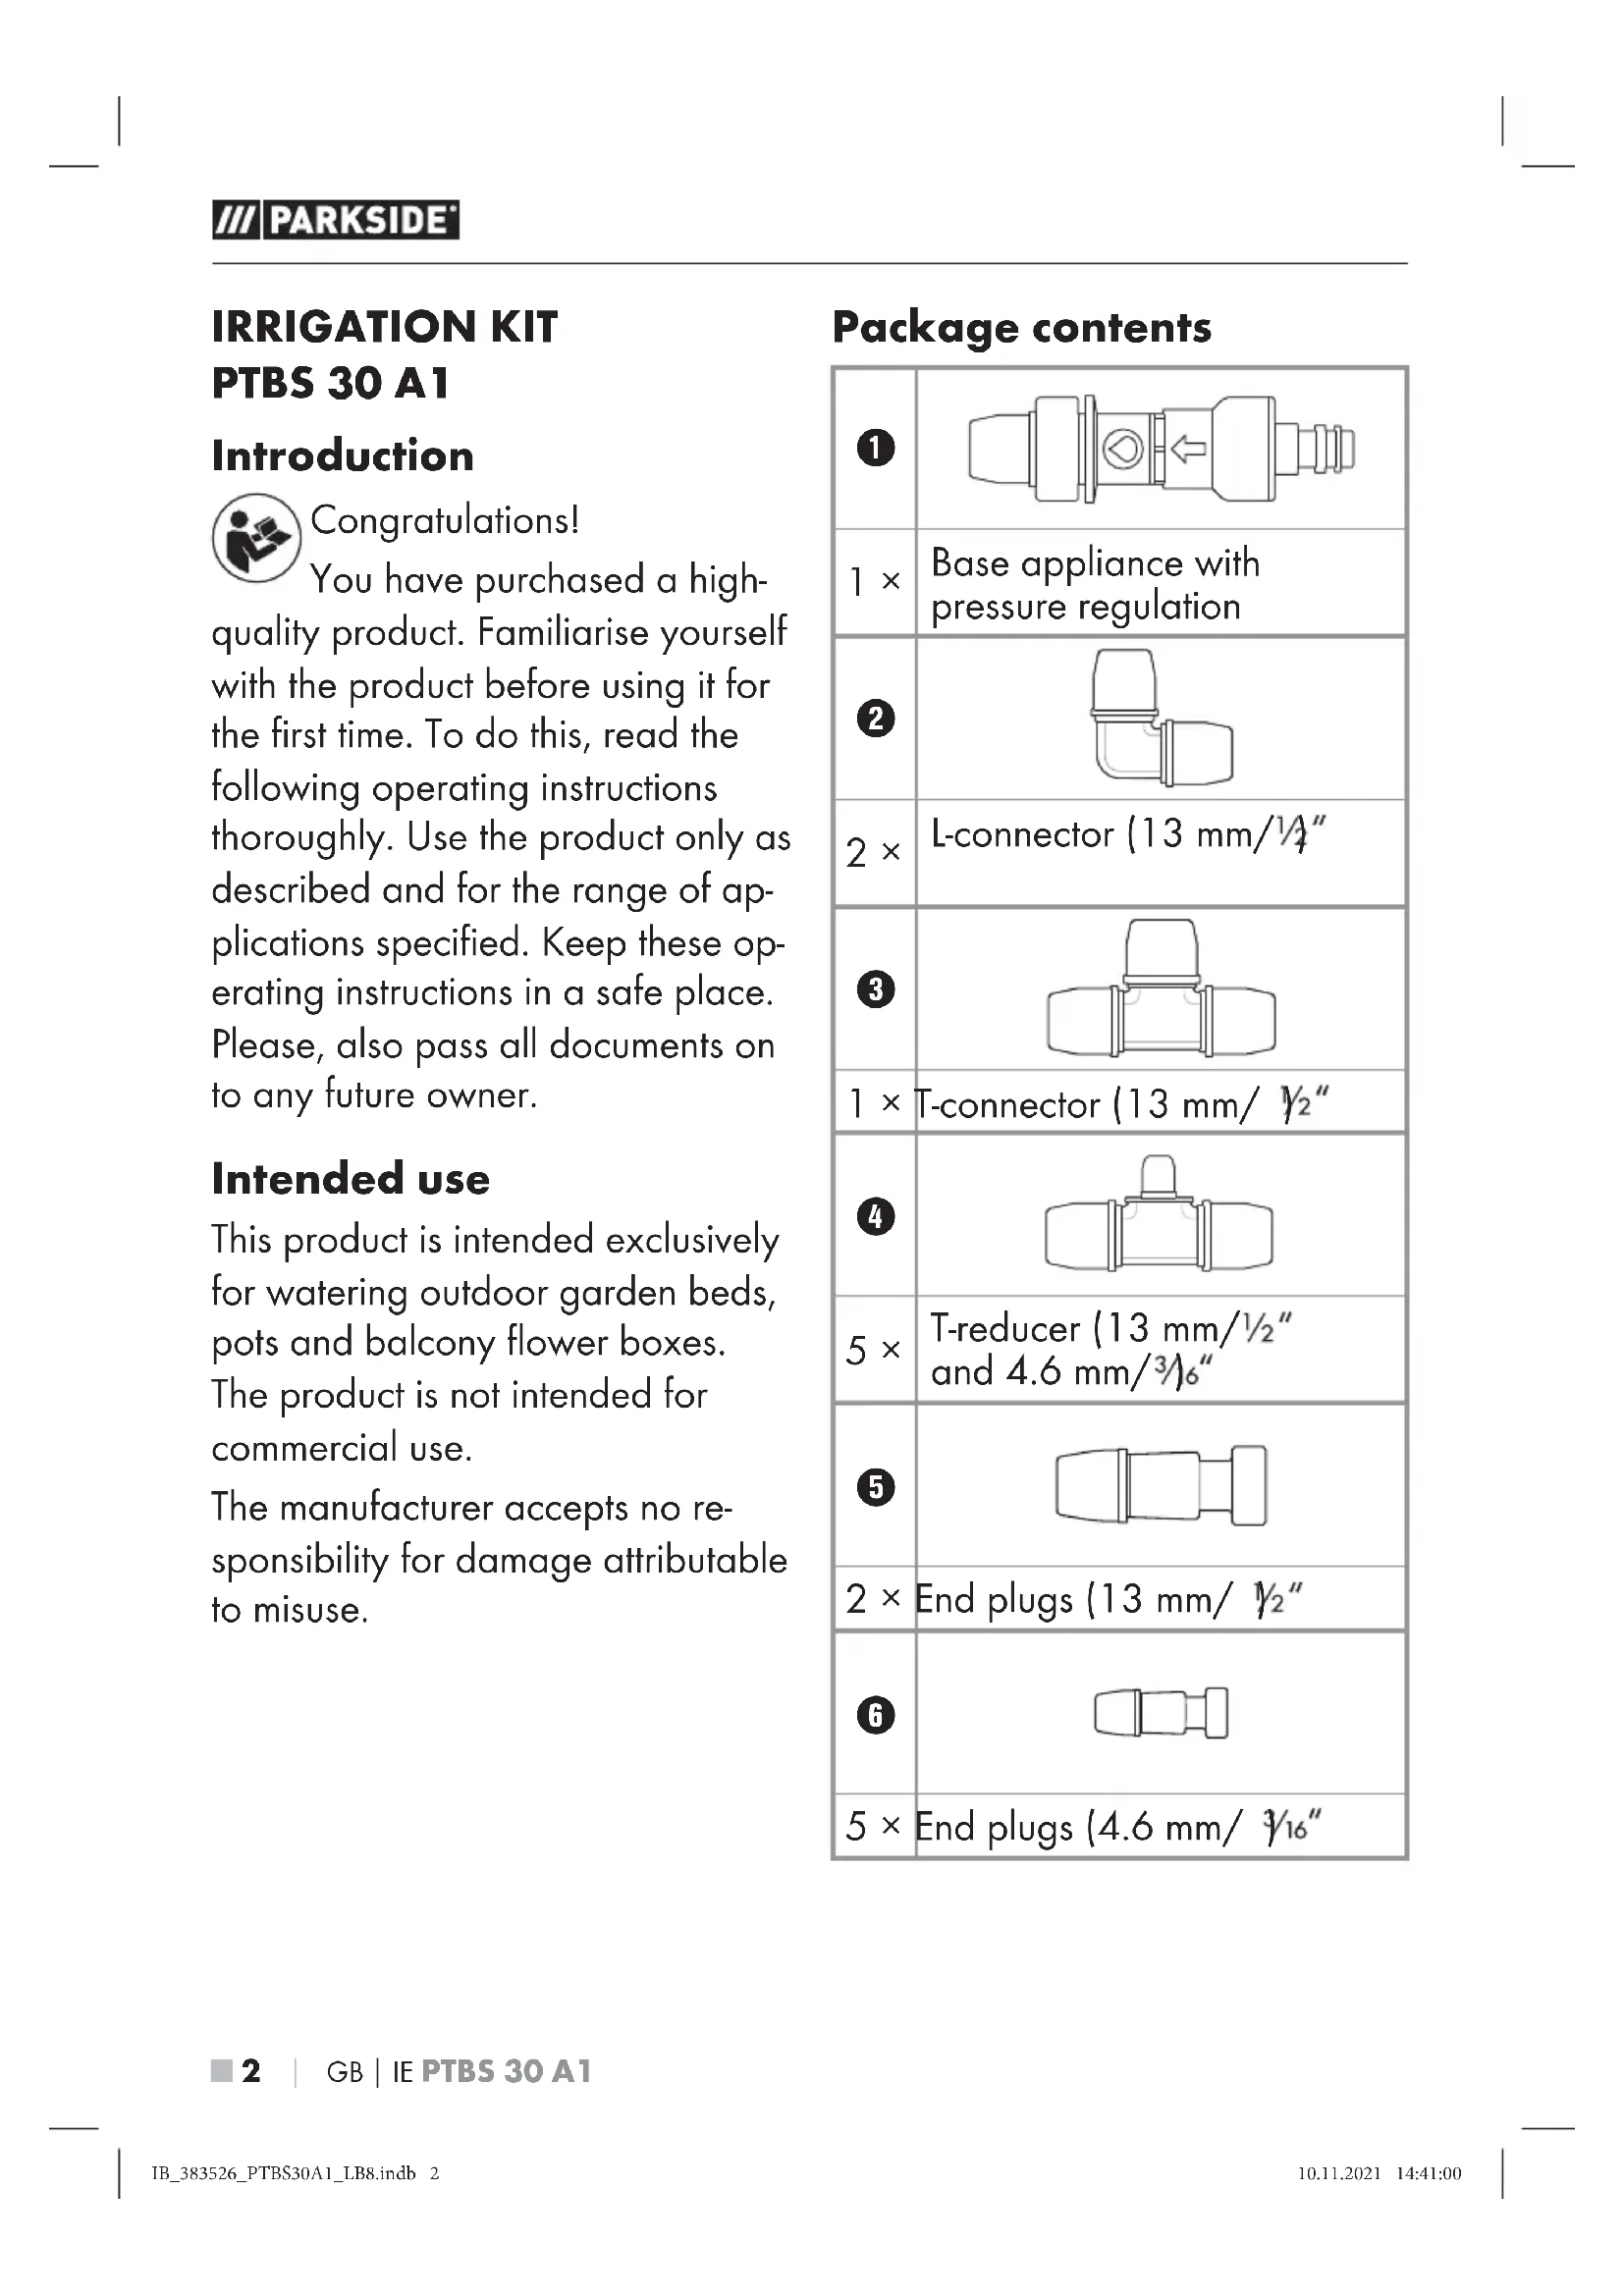
Package contents
| 1 | Base appliance with pressure regulation |
| 2 | L-connector (13 mm/1/4") |
| 3 | T-connector (13 mm/1/2") |
| 4 | T-reducer (13 mm/1/2" and 4.6 mm/3/6") |
| 5 | End plugs (13 mm/1/2") |
| 6 | End plugs (4.6 mm/3/16") |
| 7 | |
| 2× | Shut-off valve (4.6 mm/316" |
| 8 | |
| 35× | Inline dripper (4.6 mm/316" |
| 9 | |
| 20× | Hose holder (4.6 mm/316" |
| 10 | |
| 5× | Hose holder (13 mm/12" |
| 11 | |
| 1× | 15 m distributor tube (4.6 mm/316" |
| 12 | |
| 1× | 15 m distributor tube (13 mm/12" |
| 1× | Operating instructions |
NOTE
Check the package for completeness and signs of visible damage.
Technical specifications
Max. operating pressure: 2 bar
Safety information
Read all safety warnings and all instructions!
Do not direct the water jet at electrical equipment!
Do not direct the water jet at people or animals!

Do not drink from them.
those!
Do not allow children to play with the product.
This product may be used by children aged 8 years and above and by persons with limited physical, sensory or mental capabilities or lack of experience and knowledge, provided that they are under supervision or have been told how to use the product safely and are aware of the potential risks.
Use this product only in conjunction with the base appliance 1.
Make sure that no dirt particles can clog the connections or get inside the hose.
Make sure all the connections are firmly attached.
After using the product, always close the water outlet (tap)!
Dismantle the product during cold weather to avoid frost damage.
Connection and assembly
NOTE
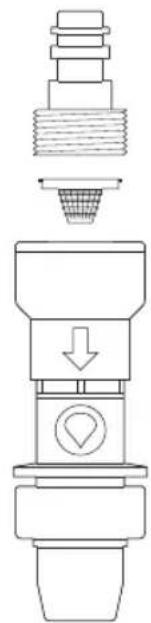
You can connect the base appliance to a water tap or to the coupler of a garden hose. The arrow symbol on the base appliance indicates the flow direction of the water.
The wide distributor tube is laid from the base appliance to the vicinity of the desired irrigation point. The narrow distributor tube is laid from the wide distributor tube, directly past your plants, which are watered by the inline drippers.
Before assembly, take a look at the example connection diagram on the fold-out page. The following description is based on this example.
Garden hose connection
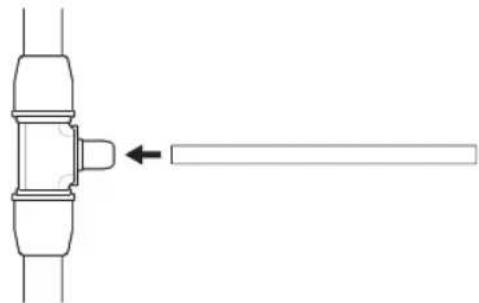
Connect the base appliance to the connector of your garden hose.

Tap connection
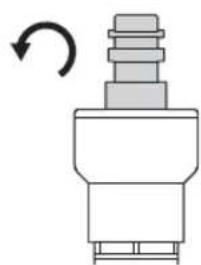
Unscrew the garden hose section anticlockwise from the base appliance 1.
Screw the base appliance 1 clockwise onto a water tap.
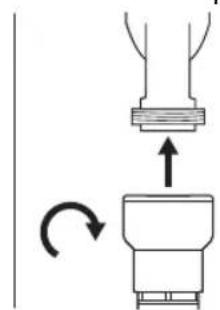
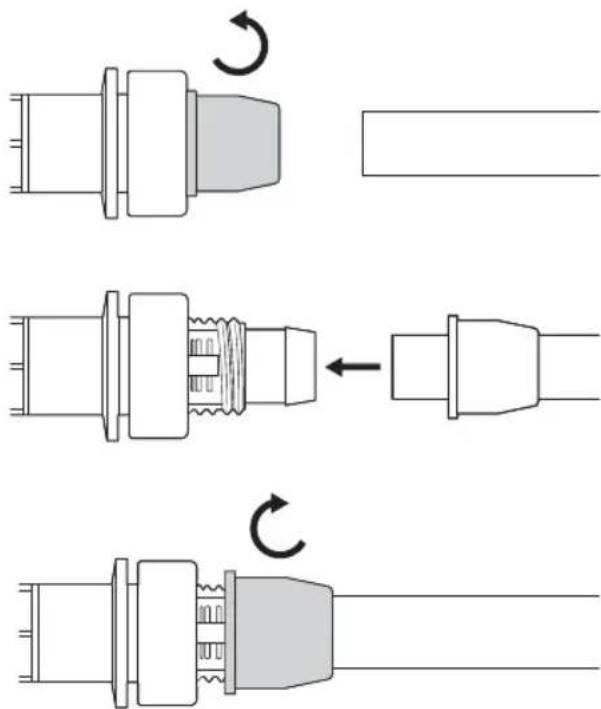
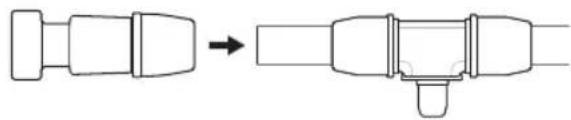
Connection principle of the distributor tubes 11/12
All parts of the product that you can connect to the distributor tubes 1/12 follow the same principle.
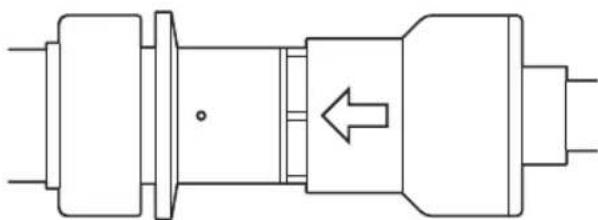
Unscrew the union nut anticlockwise.
Push the union nut with the narrow side onto a distributor tube 11/12.
Push the distributor tube 11/12 onto the bracket.
Screw the union nut clockwise onto the thread of the bracket.
Assembly
NOTE
- Spread out the distributor tubes 11 / 12 and leave them in the sun for one to two hours to make them easier to straighten.
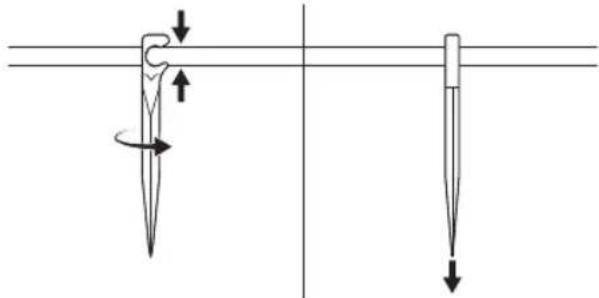
Use sharp all-purpose scissors to cut the distributor tubes
11/12. Straighten and debrur the cut with a cutter if necessary.
Use the long hose holders for the wide distributor tubes
12 and the short hose holders
9 for the narrow distributor tubes 11.
Lay out the wide distributor tube 12 and cut it into the required lengths. Cut the ends of all distributor tubes 12 straight.
Connect the required L- and T-connectors 2 / 3 with the cut-to-size distribution pipes 12.

Connect the T-reducers 4 to the distributor tubes 12 in the locations where you line them up with the rows of your plants.

Connect the end plugs 5 to the distributor tubes 12 at the points where you do not wish to connect anything else.
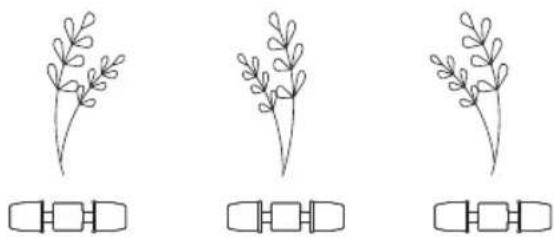
Place the inline drippers 8 near the roots of the plants to be watered.
Place the shut-off valves 7 where your plants require separately adjustable water delivery. You can regulate the water supply for a single plant or a whole row of plants separately.

Lay out the narrow distributor tube 1 and cut it into the required lengths. Cut the ends of all distributor tubes 1 straight.
Connect the T-reducers 4 to the distributor tubes 11.
Connect the inline dippers 8 and the shut-off valves 7 to the distributor tubes 11.

Connect the end plugs 6 to the distributor tubes 1 at the points where you do not wish to connect anything else.

Clamp the wide distributor tubes 12 into the long hose holders 10 and push the hose holders 10 into the ground.
Clamp the narrow distributor tubes 1 into the short hose holders 9 and push the hose holders 9 into the ground.
Operation
Turn on the water tap. The base appliance ① regulates the water pressure.
NOTE
The base appliance 1 has an opening on one side through which air is released if the water pressure is too high. Make sure that this opening is never obstructed.
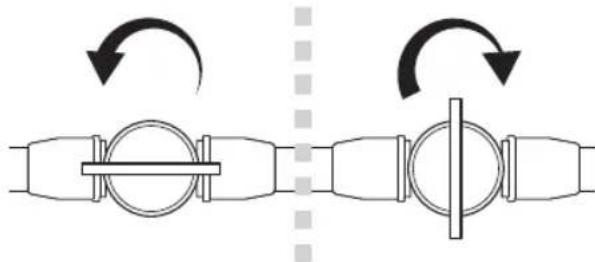
Adjust the shut-off valve (turn anticlockwise to open/ clockwise to close).
Turn off the tap when you are finished watering.
Dismantling
Unscrew the base appliance 1 anticlockwise from the tap. If you are using a garden hose, push the front part of the coupler back and pull off the base appliance 1.
Push all of the distributor tubes 11/12 out of the hose holders 9/10.
Pull the hose holders 9 / 10 out of the ground.
Dismantle the distributor tubes 11/12 from all parts.
Cleaning
ATTENTION
Do not use caustic, abrasive or solvent-based cleaning materials. They can damage the surfaces of the product.
Clean the product using a damp, lint-free cloth.
Clean the connections from time to time to ensure a tight fit.
Cleaning the base appliance
Unscrew the garden hose section anticlockwise from the base appliance 1.
Remove the sieve and clean it under running water.
Replace the sieve in the base unit 1.
Screw the garden hose section clockwise into the base appliance 1.
Storage
Completely empty all watercarrying parts of the product.
Let the product dry completely before storage.
Store the product in a frostproof location to prevent frost damage.
Disposal

Your municipal or city administration can provide you with information on
options for disposing of used products.

The product is recyclable, subject to extended producer responsibility and is collected separately.

The packaging materials have been selected for their environmental com
patibility and ease of disposal and are thus recyclable.
Dispose of packaging materials that are no longer needed in accordance with applicable local regulations.
Dispose of the packaging in an environmentally friendly manner. Observe
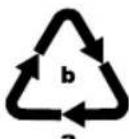
the labels on the different packaging materials and separate them as needed. The packaging materials are labelled with abbreviations (a) and numbers (b) with the following meanings: 1-7: plastics,
20-22: paper and cardboard, 80-98: composites.
Service
GB Service Great Britain
Tel.: 0800 404 7657
E-Mail: kompernass@lidl.co.uk
IE Servicelreland
Tel.: 1890 930 034
(0,08 EUR/Min., (peak))
(0,06 EUR/Min., (off peak))
E-Mail: kompernass@lidl.ie
IAN 383526 2107
Importer
Please note that the following address is not the service address. Please use the service address provided in the operating instructions.

KOMPERNASS HANDELS GMBH
BURGSTRASSE 21
44867 BOCHUM
GERMANY
www.kompernass.com
Inhaltsverzeichnis
KOMPERNASS HANDELS GMBH
BURGSTRASSE 21
44867 BOCHUM
DEUTSCHLAND
www.kompernass.com
Table des matieres
KOMPERNASS HANDELS GMBH
BURGSTRASSE 21
44867 BOCHUM
ALLEMAGNE
www.kompernass.com
Inhoud
KOMPERNASS HANDELS GMBH
BURGSTRASSE 21
44867 BOCHUM
DUITSLAND
www.kompernass.com
Obsah
KOMPERNASS HANDELS GMBH
BURGSTRASSE 21
44867 BOCHUM
NÉMECKO
www.kompernass.com
Spistresci
KOMPERNASS HANDELS GMBH
BURGSTRASSE 21
44867 BOCHUM
NIEMCY
www.kompernass.com
Obsah
KOMPERNASS HANDELS GMBH
BURGSTRASSE 21
44867 BOCHUM
NEMECKO
www.kompernass.com
Indice
Characteristicas techniques
KOMPERNASS HANDELS GMBH
BURGSTRASSE 21
44867 BOCHUM
ALEMANIA
www.kompernass.com
Indholdsfortegnelse
Indledning 82
Forskriftsmaesiganvendelse. 82
Pakkens indhold 82
Tekniske data 83
Sikkerhedsanvisninger 83
Tilslutning og montering 84
Drift 88
Afmontering 88
Rengoring 88
Opbevaring 89
Bortskaffelse 89
Service 90
Imporr 9
DRYPVANDINGSSYSTEM PTBS 30 A1
Indledning

Tillykke!
KOMPERNASS HANDELS GMBH
BURGSTRASSE 21
44867 BOCHUM
TYSKLAND
www.kompernass.com
Indice
KOMPERNASS HANDELS GMBH
BURGSTRASSE 21
44867 BOCHUM
GERMANIA
www.kompernass.com
Tartalomjegyzék
KOMPERNASS HANDELS GMBH
BURGSTRASSE 21
44867 BOCHUM
NÉMETORSZÁG
www.kompernass.com
Kazalo
KOMPERNASS HANDELS GMBH
BURGSTRASSE 21
44867 BOCHUM
NEMCIJA
www.kompernass.com
Pooblaščeni serviser
S1 ServisSlovenija
Tel.: 018889273
E-Mail: kompernass@lidl.si
IAN383526_2107

KOMPERNASS HANDELS GMBH
BURGSTRASSE 21
44867 BOCHUM
GERMANY
www.kompernass.com
Last Information Update · Stand der Informationen · Version des informations · Stand van de informatie
Stav informaci · Stan informaci · Stav informacion · Estado de las informaciones · Tilstand af information
Versione delle informazioni · Informazione k allasa · Stanje informacij: 11/2021 · Ident.-No.: PTBS30A1-112021-1
IAN 383526_2107
- IRRIGATION KIT, TROPFBEWÄSSERUNGS-SET, SET D'ARROSAGE GOUTTE-Ä-GOUTTE PTBS 30 A1
- DE AT CH
- GB/IE Operating instructions Page 1
- IRRIGATION KIT PTBS 30 A1
- Introduction
- Intended use
- NOTE
- Technical specifications
- Safety information
- Connection and assembly
- Garden hose connection
- Tap connection
- Connection principle of the distributor tubes 11/12
- Assembly
- Operation
- Dismantling
- Cleaning
- ATTENTION
- Cleaning the base appliance
- Storage
- Disposal
- Service
- Importer
- Inhaltsverzeichnis
- Table des matieres
- Inhoud
- Obsah
- Spistresci
- Indice
- Characteristicas techniques
- Indholdsfortegnelse
- DRYPVANDINGSSYSTEM PTBS 30 A1
- Indledning
- Tartalomjegyzék
- Kazalo
- Pooblaščeni serviser
Brand : PARKSIDE
Model : PTBS 30 A1
Category : Irrigation system