
Bot Z10 Pro - Robot vacuum DREAME - Free user manual and instructions
Find the device manual for free Bot Z10 Pro DREAME in PDF.
| Product type | Robot vacuum with self-emptying base |
| Brand | Dreame |
| Model | Bot Z10 Pro |
| Robot dimensions | Approximately 350 mm diameter, 100 mm height |
| Robot weight | Approximately 4 kg |
| Battery type | Lithium-ion 5200 mAh |
| Charging time | Approximately 6 hours |
| Runtime | Up to 150 minutes (depending on mode) |
| Dust bin capacity | Approximately 250 ml (robot) |
| Base bag capacity | 2.5 L |
| Connectivity | Wi-Fi 2.4 GHz, Mi Home/Xiaomi Home app |
| Main functions | Automatic, scheduled, spot cleaning, multi-mode suction, mapping, mopping with cloth |
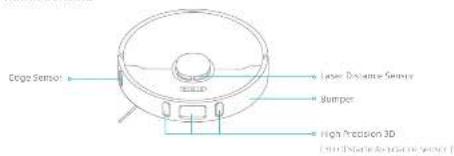
| Sensors | Drop sensors, edge sensors, laser distance sensor, high-precision 3D, dirt sensor |
| Noise level | Approximately 65 dB (standard mode) |
| Power supply | Power adapter 200-240 V ~ 50/60 Hz, output 19 V 1.4 A |
| Maintenance | Regular cleaning of dust bin, filter, brushes, sensors; replace bag every 8-10 weeks |
| Safety | Drop detection, bumper, auto-stop when lifted, use by children >8 years under supervision |
| Spare parts | Main brush, side brush, filter, dust bag, mopping cloth, water tank available |
| General information | Compliant with WEEE and RED 2014/53/EU directives |
Frequently Asked Questions - Bot Z10 Pro DREAME
User questions about Bot Z10 Pro DREAME
0 question about this device. Answer the ones you know or ask your own.
Ask a new question about this device
Download the instructions for your Robot vacuum in PDF format for free! Find your manual Bot Z10 Pro - DREAME and take your electronic device back in hand. On this page are published all the documents necessary for the use of your device. Bot Z10 Pro by DREAME.
USER MANUAL Bot Z10 Pro DREAME
For more information, please visit www.dreame-technology.com Manufactured by: Dreame Trading (Tianjin) Co., Ltd. Made in China RLS5D-EU-R00
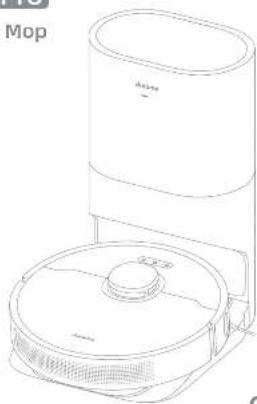
Dreame Bot Z10 Pro
Auto-Empty Robot Vacuum and Mop User Manual
natural_image
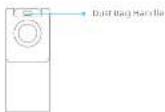
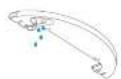
Line drawing of a vacuum cleaner with a cylindrical top and base, no text or symbols presentdreame
About the seasonal carefully before use and keep it for future preference.
Content
EN User Manual
DE Benutzerhandbuch
FR Manuel d'utilisation
17 Manuale utente
ES Manual de usuario
RU Руководство пользователя 121
11. Instrukcja obsługi 145
He: 159
SA
Safety Information
Usage Restrictions
This product can be used by children aged 8 years and above and persons with physical, sensory, intellectual deficiencies, or limited experience or knowledge under the supervision of a parent or guardian to ensure safe operation and to avoid any risks. Cleaning and maintenance shall not be done by children without supervision.
Children shall not play with this product. Ensure children and pets are kept at a safe distance from the robot while it is operating.
This product is for floor cleaning in a home environment only. Do not use it outdoors, on non-floor surfaces, or in a commercial or industrial setting.
Do not use the robot in an area suspended above ground level without a protective barrier.
Do not use the robot at an ambient temperature above 40^ C or below 0^ C or on a floor with liquids or sticky substances.
Pick up any cables from the floor before using the robot to prevent it from dragging them while cleaning.
Remove fragile or small items from the floor to prevent the robot from bumping into and damaging them.
Keep hair, fingers, and other body parts away from the suction opening of the robot.
Keep the brush cleaning tool out of reach of children.
EN
EN Safety Information
Usage Restrictions
Do not place children, pets, or any item on top of the robot regardless of whether it is stationary or moving.
Do not use the robot to clean any burning objects.
Do not vacuum hard or sharp objects.
Make sure the robot is turned off and the auto-empty base is unplugged before cleaning or performing maintenance.
Do not wipe any part of the product using a wet cloth or liquids.
Please use this product in accordance with the instructions in the User Manual. Users are responsible for any loss or damage that arise from improper use of this product.
Batteries and Charging
Do not use any third-party battery or auto-empty base. Use only with RCS2 supply unit.
Do not attempt to disassemble, repair, or modify the battery or auto-empty base on your own.
Do not place the auto-empty base near a heat source,
Do not use a wet cloth or wet hands to wipe or clean the base's charging contacts.
Safety Information
Batteries and Charging
Do not improperly dispose of old batteries. Unneeded batteries should be discarded at an appropriate recycling facility.
If the power cord becomes damaged or broken, stop using it immediately and contact after-sales service.
Make sure the robot is turned off when being transported and kept in its original packaging if possible.
If the robot will not be used for an extended period, fully charge it, then turn it off and store in a cool, dry place. Recharge the robot at least once every 3 months to avoid over-discharging the battery.
This product contains batteries that can only be replaced by qualified technicians or after-sales service.
Hereby, Dreame Trading (Tianjin) Co., Ltd. declares that the radio equipment type RLS5D is in compliance with Directive 2014/53/EU. The full text of the EU declaration of conformity is available at the following internet address: www.dreame-technology.com
For detailed e-manual, please go to https://www.dreame-technology.com/pages/user-manuals-and-faqs
EN

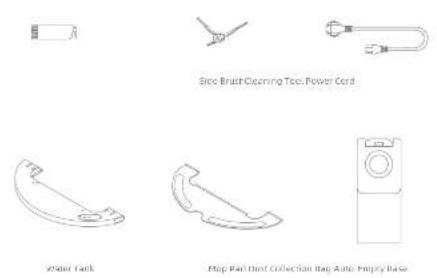
Product Overview
Accessories
Note: If the location of this material is necessary to be presented in the school product.
Product Overview
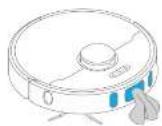
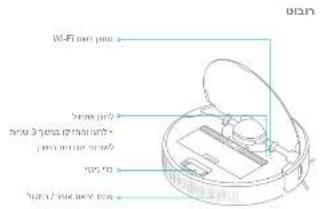
Robot

EN Product Overview
Robot
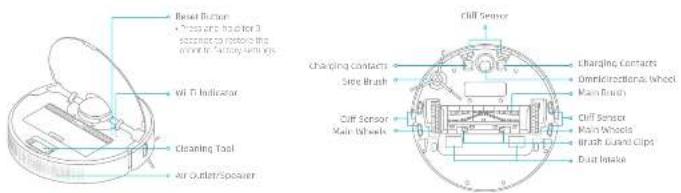
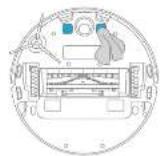
Robot Sensors
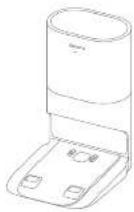
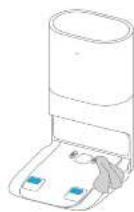
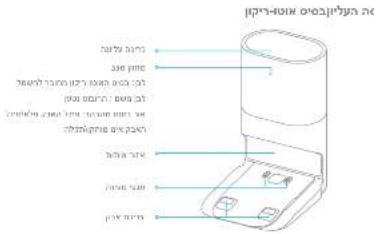
Product Overview
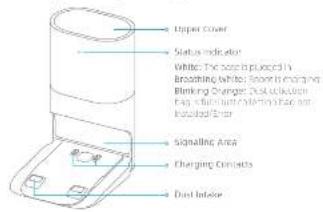
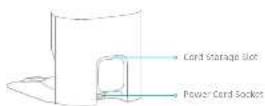
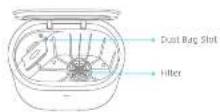
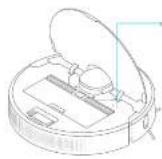
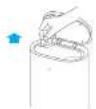
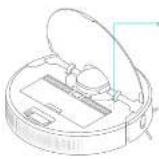
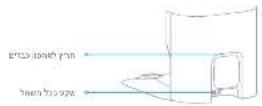
Auto-Empty Base Open the upper cover
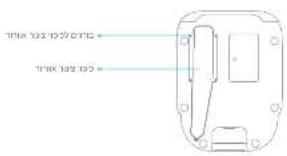
Back
Bottom
EN
7

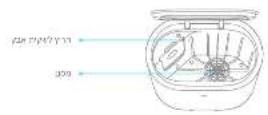
Product Overview
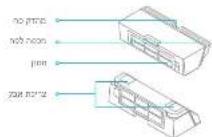
Dust Bin
Dust Collection Bag
Note: Due to the early selling of new stock, the stock price is 100% for a short stock.
3
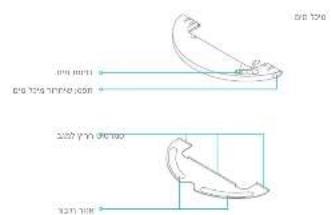
Mopping Module
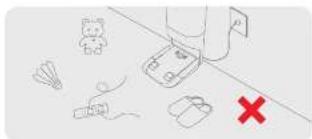
Clearing Home Environment
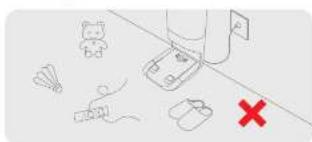
To improve the working efficiency of your robot, put away any loose cords, tags, sleepers, toys, etc.
natural_image
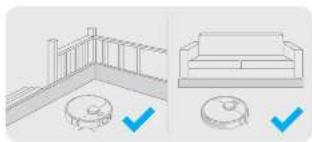
Architectural line drawings showing exterior and interior views of a building (no text or symbols)Before cleaning, place a physical barrier at the edge of the stairs and sofa to ensure safe and smooth operation of the robot.
natural_image
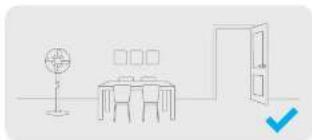
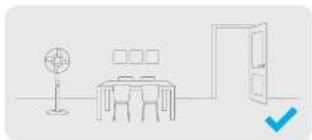
Simple line drawing of a room with a desk, lamp, and door (no text or symbols)Open the door of the name to be cleaned, and put the furniture in its proper place to make more space.
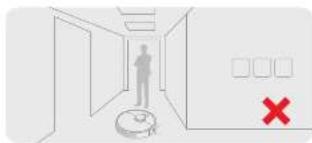
to present the front from not recognizing the area that results to be cleaned, do not stand in the front of the robot, threshold, hallway, or location place.

3
EN Preparation Before Use
- Remove the protective matter 3. Connect to a power outlet and start charging
- Install the side brush
Note: And, e side to x_1 and x_2 is a point
10 11
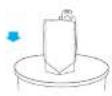
Place the base on level ground against the wall and connect it to a power outlet. Place the radius into the base is charge, the radius will turn on automatically and begin charging, it is recommended to fully change your roof before first-time use.

- Keep the unit of the size 1.5m in front of the base one 0.5m to its own side Use of objects. - Make another for objects more than the shading area.
About the Auto-Empty Base
It is recommended that the robot set out from the base before cleaning. This ensures that the robot returns to base smoothly. Do not move the base while the robot is cleaning.
After the robot completes the cleaning task and automatically returns to the base, the base will start auto-empty. Note settings can be operated on the APP.
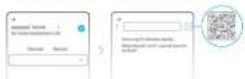
Connecting with Mi Home/Xiaomi Home App
This product works with the Xi Home/Xaomi Home-Sapa. Use the Mi Home/Xaomi Homo-spa to control your device and interact with other smart devices.
1. Download the Mi Home/Xiaomi Home App
See the US code to download and install the app. You will be inserted in the connection setup page. The app has been installed already. Alternatively, search 'MI Home/Xisom Home' in the app store to download and install it.

2. Add Device
Open the M Home/Xiaomi Home soap, and tap "On the upper right. Then tap "In the top right corner, scan the OR code, add 'Dream Bot Z10 Pin', and follow the prompts to finish the connection.
Note:
Only LAGHE WITH SUPPARED
- The version of the applicable, have been updated, please follow the instructions based on the latest and latest.
3. Reset Wi-Fi
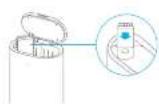
Simultaneously press and hold the buttons [are] app! you hear a service say, "Waiting for the network configuration." Once the Wi-Fi indicator is blinking slowly, the Wi-Fi has been successfully reset.
Note: if your door cannot correct to the pan successfully, resenew it and add the device part.
EN
EN How to Use
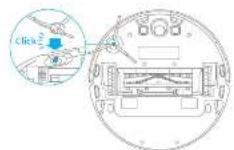
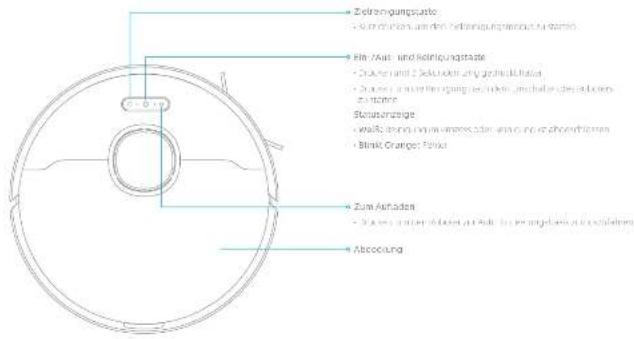
1. Turn On/Off
Press and hold the button (or 3 seconds to turn on the robot. Once the power indicator turns solid white, the robot is on standby. To turn off the robot, press and hold the button (or 3 seconds when the robot is not moving.
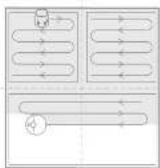
2. Start Cleaning
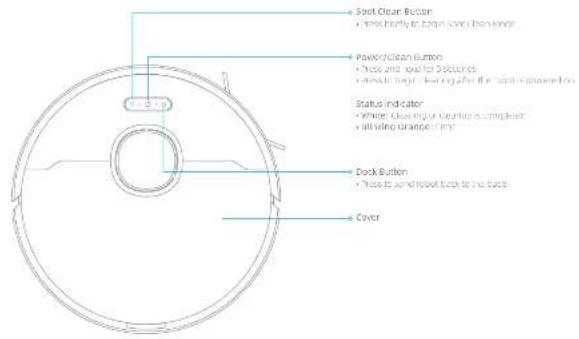
Press the button briefly to turn on the roof. Upon activation, the robot will act properly snap out a route, methodically clean along the arches and walls, then finish by matching each room in an S-shaped pattern to ensure a thorough job.
3. Cleaning Mode
Creative But Z18 Pro I ses four cleaning modes: Quiet, Standard, Strong, Soft Turbo. The default mode is standard. You can specify the cleaning mode in the MI Home/Xizomi Home app.
4. Pause/Sleep Mode
Pause: Press any button briefly to pause the robot during cleaning. Sleep Mode: The robot will automatically enter Sleep Mode after 10 minutes of inactivity, then the power indicator and charging indicator will go off. To wake up the robot press any button.
Note:
- The box will turn off a room at the play in Sleep block for more than 12 hours. - When the ball is caused, placing home to have will end the current drawing path.
5. Spot Clean Mode
When the robot is paused or in Standby Mode press and hold the button for 3 seconds to start Spot Clean Mode. In this mode, it will clean a square-shaped area of 1.5x. 5 meters directly around the robot. When the spot cleaning is done, the robot will automatically return to its original location and power off.
Note: No. 1, 2018; Spot Cash Received and Net Cash Sharing, and to the end.
6. Additional App Functions
You can enable more functions via NI-home/30aomi Home apps such as selected mini-pieering, mini-pieering, forbidden area/virtual data zones, etc.
Note:
- Additional information of the application is made from one. - The version of the application has been updated upon following instructions as well as other information.
How to Use
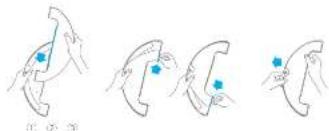
7. Use the Mapping Function
It is recommended that all floors are vacuumed at most three times before the first mopping session to achieve a better cleaning effect.
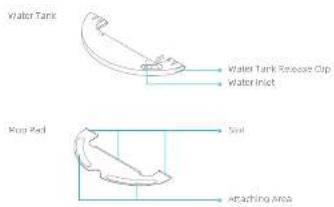
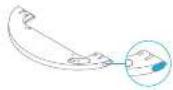
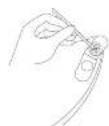
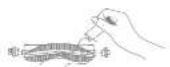
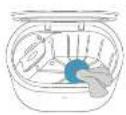
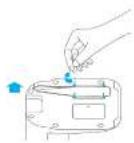
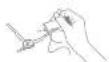
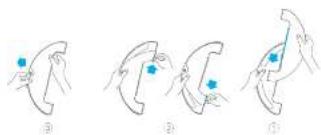
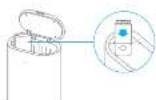
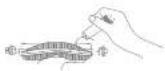
1) Dampon the mop pad and wring out excess water. Insert the mop pad into the slot of the water park as shown in the figure, and paste the ped family.
natural_image
Four sequential illustrations showing hand positioning and movement of a curved object, with blue dots indicating points of interest (no text or symbols)2) Down the stone tank lid, fill the tank with water, then securely close the lid.
Note: U.S. federal government, U.S. state
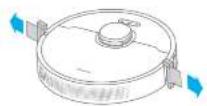
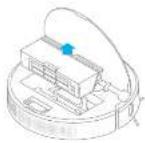
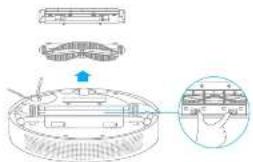
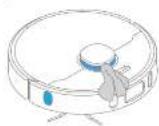
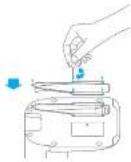
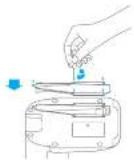
4) Align the corruging module as indicated by the arrows, then slides into the back of the robot until it clicks into place. Press the button (or use the MI Home/X some Home app to start cleaning.
Note:
- It is not recommended to use the mapping function on canvas - Use the result of the system (i.e., in required)
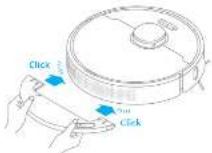
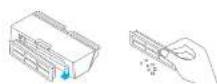
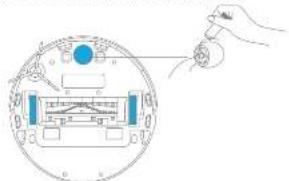
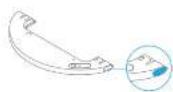
4) Press the two side clips inerts and slide the water tank backwards to separate it from the rubber.
Note: after the robot is doing so many in use, removing the property module, put out the remaining way in the lens and close down up part to present all new or more.

Routine Maintenance
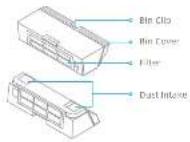
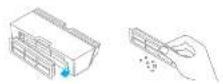
Clean the Dust Bin
- Open the robot cover, then press the dust ring clip to remove the dax fin.
4. Clean the must intake
-
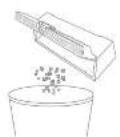
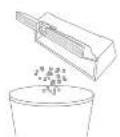
Open the bin cover and empty the bin as shown in the diagram.
-
Remove the litter and tap its basket gently.
Note: D. P. C. A. is up to close the class with a beam of finger. -
Rinse the dust bin and filter with water until they are clean. Thoroughly try the filter before mounting.

Note: - With the following two different types of drugs, use different types of drugs, being in a world for better results.
Routine Maintenance
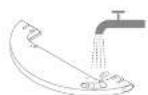
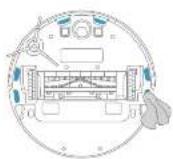
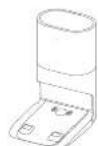
Clean the Mopping Module
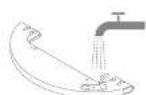
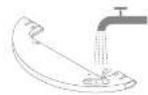
- Press the two release clips on the side of the water tank, remove the mopping module, and pull the mop pod off the mopping module.
natural_image
Line drawing of a robotic vacuum cleaner with attached sensors and a separate abstract shape (no text or symbols)-
Four out the water in the tank, clear with only water and leaves not to dry before re-installing.
Note: The following table represents the results of a specific data point. -
Stear the mop pad with water only and leave to an dry before re-installing.
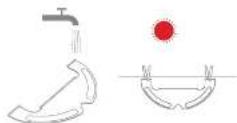
Note: - See for the past from the mapping (note) before checking it, and make a supply water does not flow back into the water outlet to avoid blocking.
-
For your last turn once, if I calculate the required power to pass every 25 months.
-
If slow water line occurs, at the volume is not well distributed, close to the hole in the cover of the water tank.

Routine Maintenance
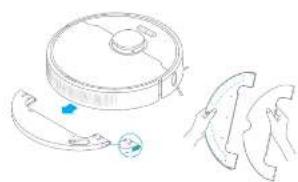
Clean the Main Brush Clean the Side Brush
Press the brush guard clots involves to remove the brush guard and lift the brush out of the robot.
Pull out the brush covers as shown in the diagram. Use the included clearing tool to remove any hands tangled in the brush.
Note: where there is not being targeted in the municipal, district, and other areas to extend design or air quality.
18 17
Pull out the side brushes and use the cleaning tool to remove any hair tangled on the brush.

Clean the Main Wheel/Omnidirectional Wheel
Note: We consider damage to the work within the most and that. Please see division of the
Clean the Laser Distance Sensor /Edge Sensor
Clean the Cliff Sensor
Clean the High Precision 3D
Clean the Charging Contact

Clean the Charging Contacts and Dust Intake

Routine Maintenance
Replace the Dust Collection Bag
According to the status indicator (banking orange) and app prompts, replace it with a new one when the dust collection bag is full. It is recommended to replace the bag every 8-10 weeks.
- Discard the dust collection bag 3, install a new dust collection bag
Note: when taking out the dust collection bin, then the dust has transiting water due to a well known
- Clear the filter 4. Close the paper case of auto-sempic base
Note: Do not use the scope correctly. The data cover of base can be done and the initial collection is set up
Routine Maintenance
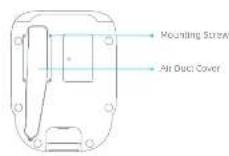
Clean the Air Duct
If the air duct is blocked, please clean it according to the following steps.
- Uncrew mounting screws on the air duct cover and remove the cover plate.
- Check whether the air duct is blocked by foreign objects. If any clean them.

- Reinstall the air duct cover as shown in the diagram.
Robot Restarting
If the robot stops responding or cannot be turned off, press and hold down the button (for 10 seconds to forcefully turn it off. Then press and hold the button) for 5 seconds to turn the robot on.
Battery
The robot contains a high-performance lithium-ion battery pack. Please ensure that it remains well-charged for daily use to maintain optimal battery performance. If the robot is not used for an extended period of time, turn it off and put it away. To prevent damage from over-discharging, the robot should be recharged at least once every three months.
EN Status Indicator
The following table lists possible causes and solutions in terms of different light status. For more support, please refer to the section "FAQ" in this manual.
| Light Status Possible Cause Solution | ||
| OT | No power supply Check and ensure that the power supply for the base is normal. | |
| the root in the next periodThe root with full charge in place made | / | |
| white the root not on the base / | ||
| Briathing white the root is charging / | ||
| Blinking Damage time | Check whether a dust collection bag is installed. If not, installed one.Check whether the dust collection bag is installed in place. | |
| Check whether the upper cover is closed. If not, close the upper cover tightly. | ||
| Check whether the bag is full. If so, replace it.Remove details around the dual unit of the root and base. | ||
| Unplug the power card of base, and check whether there are any foreign objects that clunk the air duct cover. If any clean them. | ||
| Check whether the dust rim at rotor is installedFor other errors, contact qualified technicians or after sales service? | ||
FAQ
| Problem Type Solution | |
| Robot does not turn on | The battery levels are low, recharge the robot on the base, then try it again. The ambient temperature is too low (below 0°C) or too high (above 40°C). The operating temperature of the robot is (0°C to 40°C). |
| Robot cannot recharge | The base is not receiving power. Please confirm that both ends of the answer port are prugged in correctly. Poor contact. Clean charging contacts of the base and robot. |
| Robot cannot return to the base | There are top many obstructions around the base. Place the base in a more open area. Please clean the signalling area of the base. Moving the robot may cause an re-position tool or re-map its surroundings. If the robot is too far from the base, it might not be able to automatically return on its own in which case you need or manually place the robot onto the base. |
| Robot is much thinning than off | The robot and then next side it. |
| Robot is making a strange mine | A long object may be caught in the main brush, side hands, or one of the main sheets. Stop the robot and remove any debris. |
| Robot no longer cleans off- dently or leaves must behind | The dust loss is full. Please clean the dust box and dust toilet. The filter is blocked. Please clean it. A foreign object is caught in the main brush. Please clean it. |
EN FAQ
| Problem Type Solution | |
| Robot cannot connect to Wi-Fi | There is something standing with the Wi-Fi connection, taken the Wi-Fi and closed the latent version of the 3d Home/ Miao's Home app, then try reconnecting. Location permission is not correct. Please ensure the location permission on the 3d Home/Black's Home app is enloaded. Wi-Fi signal is visible. More sure the robot is in an area with good Wi-Fi coverage. Screw Wi-Fi is not supported. Please ensure your robot connects to a 3rd Wi-Fi. The username or password of Wi-Fi is incorrect. Please enter the correct username and password. |
| Robot does not perform scheduler cleaning | The robot has low battery. Scheduled cleaning will not start unless the robot has been rechanged in time. |
| User leaving the robot on the base consumer power if it is already fully transferred. | Leaving the robot on the base after it's fully charged consumer very little electricity and has maintained optimal battery performance. |
| No water comes out of the mooping module, or only a little bit comes out | Check whether there is water inside the water tank. Clean the mop if it becomes dirty. Make sure the mop pod is installed correctly according to the user menu. Clean the blockhole on the top of the water tank. |
| Robot appears resume cleaning after charging | Read sure the robot is not set in the Not-Dummy mode (300), which will present it from resuming cleaning. The robot does not resume cleaning when it is manually rechanged or placed onto the base. |
FAQ
| Problem Type Solution | |
| Robot returns to the base without performing auto-empty tasks | DNC mode prevents the robot from performing auto-empty tasks. |
| The dust collection bag is full | Check whether the dust collection bag is full, if no replace it with a clear one, it is not recommended to replace the bag every 8-10 weeks. If not, check whether the dust intake or air duct at the bottom of the base is blocked. Remove any blockage before use. |
| The air-to-empty duration turn be uncontrolled long sometimes | When the robot has been performing auto-empty tasks for a slot of time, or when the air duct does not function a motion, the air-to-empty duration will be extended to prevent blockage. |
| The upper cover of base falls to be reset | Check whether a dust collection bag is installed. If not, install one. |
EN Specifications
Robot Auto-Empty Base
| Model I/SSD | |
| Battery | 520mAh(Battery Nominee Capacity) |
| Changing Time Apone, 5 hours | |
| Wireless Connectivity | wF- IEEE 902.11Gb/s 2.4 GHz |
| Rated voltage 14.4 V | — |
| Rated Power 16 W | |
| Operation Frequency | 2400-2483.5 MHz |
| Maximum Output Power | +20 dBm |
| Model (EC) | |
| Rated Input: 100-250V~50-50Hz | |
| Rated Output: 10.0V | =1A |
| Rated Power: 100W | |
under normal use of condition, this equipment should be hope a separation distance of at least 200m between the antenna and the body of the user.
WEEE Information

All products being this symbol, are waste electrical and electronic equipment (WEEE as in directives 2012/19/5U), which should not be mixed with uncorrected electrical electrode. Instead, you should proceed human health and the environment by binding one your own equipment to a designated collection point for the recycling of waste electrical and electronic equipment, appointed by the government or local authorities: Correct disposal and recycling will help prevent potential negative consequences to the environment and human health. Please contact the regulator or local authorities for more information about the location as well as terms and conditions of such collection points.
Himvare (the A) of the German (the A) in line with its reference, little better than it is a developed choice for which it be at all the IV, beginning.
Produktübersicht
Roboter
natural_image
Diagram showing a car on a road with scattered devices and a red 'X' symbol (no text or labels)natural_image
Illustration showing a balcony with railings and a sofa, both marked with blue checkmarks (no text or symbols present)natural_image
Simple line drawing of a dining table with a globe and door, no text or symbols presentnatural_image
Interior hallway scene with a person standing near a robot and a red 'X' mark (no text or symbols)- 1.5% of the total 40% of the total
- Largany blinkself: "Sorberer"
Verbindung
Schnell sintered: vettu und
(1) 2017年1月1日
natural_image
Four hand-drawn diagrams showing a curved object being held, with blue dots indicating points of interest (no text or symbols)① ② ③
natural_image
Line drawing of a robotic vacuum cleaner with attached blades and a small circular component (no text or symbols)natural_image
Architectural line drawings showing exterior and interior views of a building (no text or symbols)natural_image
Simple line drawing of a room with a desk, lamp, and door (no text or symbols)Remarque :
15.2.3.4.5.6.7.8.9.10.11.12.13.14.15.16.17.18.19.20.21.22.23.24.25.26.27.28.29.30.31.32.33.34.35.36.37.38.39.40.41.42.43.44.45.46.47.48.49.50.51.52.53.54.55.56.57.58.59.60.61.62.63.64.65.66.67.68.69.70.71.72.73.74.75.76.77.78.79.80.81.82.83.84.85.86.87.88.89.90.91.92.93.94.95.96.97.98.99.100
• Aggregate Assessment
- From: 2014
natural_image
Line drawing of a robotic vacuum cleaner with attached sensors and a separate blade-like structure (no text or symbols)Remerge: Net positive net negative net negative net positive net positive net positive net positive net positive net positive net positive net positive net positive net positive net positive net positive net positive net positive net positive net positive net positive net positive net positive net positive net positive net positive net positive net positive net positive net positive net positive net positive net positive net positive net positive net positive net positive net positive net positive net positive net positive net positive net positive net positive net positive net positive net positive net positive net positive net positive net positive net positive net positive net positive net negative
78 79
natural_image
Illustration showing a balcony with railings and a refrigerator, both marked with blue checkmarks (no text or symbols present)natural_image
Simple line drawing of a room layout with a desk, lamp, and door (no text or symbols)Note: The exercise is not to be a result of the exercise.
92 03
- boccy spag in a semiconductor basis set to be 100% post-prob.
• Uando do speculative data, pale in power. Relays in public terminal service (Pension) to N/A or Other
Note: Eosom (a) and Sart (a) are not to be a non-arginal policy.
Note: "Age and age of debuters to their fells"
• Use of a _1 and _2 in the first case.
natural_image
Line drawing of a robotic vacuum cleaner with attached sensors and a separate blade-like structure (no text or symbols)Note: The following section of the 3D model
natural_image
Diagram of a mechanical device with a hand holding a knob, showing internal components without any text or symbols.Note: se capasone smlattemna agion glau ala strataclerich, can be per t##e 0 der neggnt. Note: clauide und brater in se sepedel fave
Note: For structured text, the text can be used to create a structured format. We use the text in the form of the text, which is not explicitly labeled.
natural_image
Illustration showing a balcony with railings and a sofa, both marked with blue checkmarks (no text or symbols present)natural_image
Simple line drawing of a room layout with a desk, lamp, and door (no text or symbols)Note: Trade in the trade contract. The trade is included in 150x 106 - 107
(6) 10.13 Invested (ex believes your stock
Modo de uso
Notes: Series 10. Series 2. Series 3. Series 4. Series 5.
natural_image
Line drawing of a robotic vacuum cleaner with attached sensors and a separate blade-like structure (no text or symbols)Note: The following table includes the text 'a' and the corresponding text 'b', which is in English.
Notes: Ltd. International company, document under sequence, etc., and/or equivalent regulatory initiative


Описание изделия
Контейнер для пыли

natural_image
Simple line drawing of a car on a road with scattered devices and a red 'X' mark (no text or symbols)natural_image
Two technical illustrations: one of a railing and one of a sofa, both with checkmarks indicating selection or confirmation (no text or symbols present)natural_image
Simple line drawing of a room layout with a desk, lamp, and door (no text or symbols)natural_image
Line drawing of a robotic vacuum cleaner with attached sensors and a separate abstract shape (no text or symbols)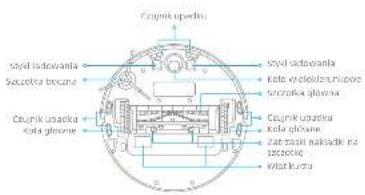
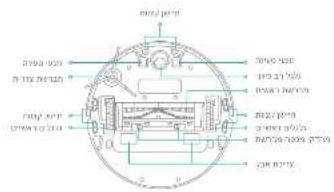
Czujniki robota

150 192
Przegląd produktu
natural_image
Diagram showing a car on a road with scattered devices and a red 'X' symbol (no text or labels)natural_image
Illustration showing a railing structure and a sofa with checkmarks (no text or symbols)natural_image
Simple line drawing of a room layout with a desk, lamp, and door (no text or symbols)natural_image
Interior hallway with a person standing near a robot and a red 'X' mark (no text or symbols)Uwaga
- Nadyz zawodu do art. 0,5 mitea wartu prazatua (po obie tayu ich pustavu) a no nader bajrcej prazat u palat y i metra voldi prasstau, in case n.d. - Rie naetyb bhaizate abtany, seje tayu ich prazatu, ro opetnajatni spazymi prazat u celan.
Wakaznie WHI
- Awałaćna gianie, aprobanie
re polozanie
- Szybude miganie: Iwaznie-
Wazania: 2017/05/11
the target is called the close-egaly path. The path, a small size of 250 mm thickness, is 100 mm diameter of 20000 m.

Usage: the app used to create a new app, which is linked
The data are based on the global cooperation no. (Figure 1).
• 2014, 2015, 2016, 2017, 2018, 2019, 2020, 2021, 2022, 2023, 2024, 2025, 2026, 2027, 2028, 2029, 2030, 2031, 2032, 2033, 2034, 2035, 2036, 2037, 2038, 2039, 2040,
The first part of the second part of the third part of the fourth part of the fifth part of the sixth part of the seventh part of the eighth part of the sixth part of the seventh part of the eighth part of the sixth part of the seventh part of the eighth part of the sixth part of the seventh part of the eighth part of the sixth part of the seventh part of the eighth part of the sixth part of the seventh part of the eighth part of the sixth part of the seventh part of the eighth part of the sixth part of the seventh part of the eighth part of the sixth part of the seventh part of the eighth part of the seventh part of the sixth part of the seventh part of the eighth part of the sixth part of the seventh part of the eighth part of the sixth part of the seventh part of the eighth part of the sixth part of the seventh part of the eighth part of the sixth part of the seventh part of the eighth part of the sixth part of the seventh part of the eighth part of the sixth part of the seventh part of the eighth part of the sixth part of the seventh part of the eighth part of the fifth part of the sixth part of the sixth part of the sixth part of the sixth part of the sixth part of the sixth part of the sixth part of the sixth part of the sixth part of the sixth part of the sixth part of the sixth part of the sixth part of the sixth part of the sixth part of the sixth part of the sixth part of the sixth part of the sixth part of the sixth part of the sixth part of the sixth part of the sixth part of the sixth part of the sixth part of the fifth part.


Dzienna konserwacja
Usage to identify sites: Title search by doi.com.
- 10.25% of the total cost of 3.6% is a result from the financial debt portfolio; - 4.8% of the total cost of 3.6% is a result from the financial debt portfolio;
Dzienna konserwacja
natural_image
Line drawing of a robotic vacuum cleaner with attached sensors and a separate abstract shape (no text or symbols)Usage: file range, data, node simplify the play occupancy and/or use of a logit. Note: Note:
160 161
The image is a text file with the following instructions for the use of the text in the source image:
LNGAG: My 100% of the 12 months, 18 July 2005, and 19 May 2006 was the last day, concluding a complete listing the just common status.
Dzienna konserwacja
| Model: BCD | |
| Wypice 207-210V = 107.50 V | |
| Wypice 18.5V | = 1A |
| Max. zhaquimax BBDW |
The following table is provided in the image.
172 173
The image is too blurry to recognize any text content.
HE
תָאַת הַלְי
174 175
בְרָה בְּרָה
HE
n'inn
22
He
176 177
תָאַתְרִי
הכלה
natural_image
Architectural floor plan and interior layout diagrams showing room layouts and furniture (no text or symbols)- 2017, 10:30, 16:45, 17:45, 18:45, 19:45, 20:45, 21:45, 22:45, 23:45, 24:45, 25:45, 26:45, 27:45, 28:45, 29:45, 30:45, 31:45, 32:45, 33:45, 34:45, 35:45, 36:45, 37:45, 38:45, 39:45, 40:45, 41:45, 42:45, 43:45, 44:45, 45:45, 46:45, 47:45, 48:45, 49:45, 50:45, 51:45, 52:45, 53:45, 54:45, 55:45, 56:45, 57:45, 58:45, 59:45, 60:45, 61:45, 62:45, 63:45, 64:45, 65:45, 66:45, 67:45, 68:45, 69:45, 70:45, 71:45, 72:45, 73:45, 74:45, 75:45, 76:45, 77:45, 78:45, 79:45, 80:45, 81:45, 82:45, 83:45, 84:45, 85:45, 86:45, 87:45, 88:45, 89:45, 90:45, 91:45, 92:45, 93:45, 94:45, 95:45, 96:45, 97:45, 98:45, 99:45, 100:45
natural_image
Simple line drawing of a person standing near a flag and a red X symbol (no text or labels)•

الله بُمْرَّهُ مُسْتَّةِ الْمُسْتَّةِ الْمُسْتَّةِ الْمُسْتَّةِ الْمُسْتَّةِ الْمُسْتَّةِ الْمُسْتَّةِ الْمُسْتَّةِ الْمُسْتَّةِ الْمُسْتَّةِ الْمِنْتَّةِ الْمُنْتَّةِ الْمُنْتَّةِ الْمُنْتَّةِ الْمُنْتَّةِ الْمُنْتَّةِ الْمُنْتَّةِ الْمُنْتَّةِ الْمُنْتَّةِ الْمُنْتَّةِ الْمُيْرَّةِ الْمُيْرَّةِ
natural_image
Simple line drawing of a room layout with a desk, lamp, and door (no text or symbols)The following table provides the original text: "The English input of the 'in' and 'in' (in) for the output of the English input of the 'in' and 'in' (in) for the output of the 'in' and 'in' (in) for the output of the 'in' and 'in' (in) for the output of the 'in' and 'in' (in) for the output of the 'in' and 'in' (in) for the output of the 'in' and 'in' (in) for the output of the 'in' and 'in' (in) for the output of the 'in' and 'in'
The following table provides the information in a tabular format:
הכלה
- 2017-03-20, 19:45, 19:46, 19:47, 19:48, 19:49, 19:50, 19:51, 19:52, 19:53, 19:54, 19:55, 19:56, 19:57, 19:58, 19:59, 19:60, 19:61, 19:62, 19:63, 19:64, 19:65, 19:66, 19:67, 19:68, 19:69, 19:70, 19:71, 19:72, 19:73, 19:74, 19:75, 19:76, 19:77, 19:78, 19:79, 19:80, 19:81, 19:82, 19:83, 19:84, 19:85, 19:86, 19:87, 19:88, 19:89, 19:90, 19:91, 19:92, 19:93, 19:94, 19:95, 19:96, 19:97, 19:98, 19:99, 20.
178 179
IFN-100, 2007, 1985.
Mi Home / Xiaomi Home
„M HomeXiaom Hame ##" as 7984710
The following table is provided in the image:
コア 19°V
The image is too blurry to recognize any text content.
The image is too blurry to recognize any text content.
•
180 181
The following table provides the information in English:
הכלה 2
The image is too blurry to recognize any text content.
[Unreadable]
•
7. Among 10 years
•
الله بُمْدَهُ مُسْتَّةِ الْمُسْتَّةِ الْمُسْتَّةِ الْمُسْتَّةِ الْمُسْتَّةِ الْمُسْتَّةِ الْمُسْتَّةِ الْمُسْتَّةِ الْمُسْتَّةِ الْمُسْتَّةِ الْمِسْتَّةِ الْمُسْتَّةِ الْمُسْتَّةِ الْمُسْتَّةِ الْمُسْتَّةِ الْمُسْتَّةِ الْمُسْتَّةِ الْمُسْتَّةِ الْمُسْتَّةِ الْمُمْدَهُ مُسْتَّةِ الْمُسْتَّةِ الْمُسْتَّةِ الْمُسْتَّةِ الْمُسْتَّةِ الْمُسْتَّةِ الْمُسْتَّةِ الْمُسْتَّةِ الْمُسْرَكَانِي
- 2017年1月1日,美国的经济贸易与贸易贸易贸易贸易贸易贸易贸易贸易贸易贸易贸易贸易贸易贸易贸易贸易贸易贸易贸易贸易贸易贸易贸易贸易贸易贸易贸易贸易贸易贸易贸易贸易贸易贸易贸易贸易贸易贸易贸易贸易贸易贸易贸易贸易贸易贸易贸易贸易贸易贸易贸易贸易贸易贸易贸易贸易贸易贸易贸易贸易贸易贸易贸易贸易贸易贸易贸易贸易贸易贸易贸易贸易贸易贸易贸易贸易贸易贸易贸易贸易贸易贸易贸易贸易贸易贸易贸易贸易贸易贸易贸易贸易贸易贸易贸易贸易贸易贸易贸易贸易
The following table is provided in the image:

The following text in the source image is a non-textual, stylized graphic:
الله بُمْدَّةٍ
10.03.2020.04.05
- 2017-10-25, 1963, 1964, 1965, 1966, 1967, 1968, 1969, 1970, 1971, 1972, 1973, 1974, 1975, 1976, 1977, 1978, 1979, 1980, 1981, 1982, 1983, 1984, 1985, 1986, 1987, 1988, 1989, 1990, 1991, 1992, 1993, 1994, 1995, 1996, 1997, 1998, 1999, 2000

natural_image
Diagram showing a faucet pouring liquid into a machine with a red circular indicator (no text or symbols)natural_image
Line drawing of a robotic vacuum cleaner with attached sensors and a close-up view of the sensor (no text or symbols)2010.12.20

(1) 2017年1月1日

תְרָה בְּרָה בְּרָה
natural_image
Diagram showing a hand inserting a component into a circular device with a blue circular component (no text or symbols)The following table is provided in the image.
The text in the source image is illegible due to extreme pixelation and distortion. No characters, numbers, or symbols can be reliably extracted.
The following table is provided in the image.
הכלה
The following table provides the information in a tabular format:
תְקָרִי אַלְבָה
The image is too blurry to recognize any text content.
1.
2019.07.15 13:00 14:00 15:00 16:00 17:00 18:00

He
בִרְשָׁה

تعريف بال.Manتج
SA
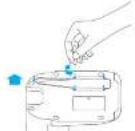
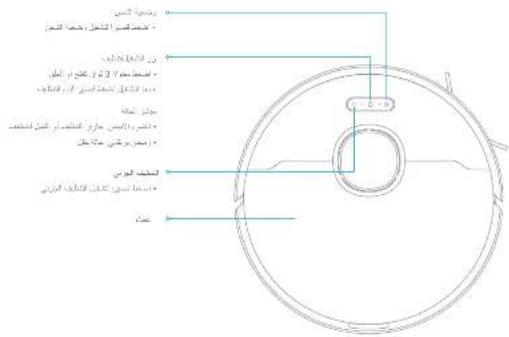
الجهاز الرئيسية
natural_image
Architectural line drawing showing a balcony and a sofa with checkmark indicators (no text or symbols)
natural_image
Simple line drawing of a person standing near a vehicle, with a red 'X' symbol and a small figure nearby (no text or labels)
natural_image
Simple line drawing of a room layout with a desk, lamp, and door (no text or symbols)2 且 12 = 2 时, 2 与 12 = 2 时, 2 与 12 = 2 时, 2 与 12 = 2
الإلىق مُمْتَةٍ أَلْعَرَّهِ الْأَيْنَّةٍ أَلْعَرَّهِ الْأَيْنَّةٍ أَلْعَرَّهِ الْأَيْنَّةٍ أَلْعَرَّهِ الْأَيْنَّةٍ أَلْعَرَّهِ الْأَيْنَّةٍ أَلْغَرَّهِ الْأَيْنَّةٍ أَلْغَرَّهِ الْأَيْنَّةٍ أَلْغَرَّهِ الْأَيْنَّةٍ أَلْغَرَّهِ الْأَيْنَّةٍ أَلْغَرَّهِ ال ^1
natural_image
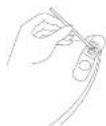
Diagram showing two mechanical components with a faucet and a red circular object, no text or symbols presentالصيانة الروتينية
natural_image
Line drawing of a robotic vacuum cleaner with attached sensors and a separate abstract shape (no text or symbols)12

natural_image
Diagram of a hand inserting a component into a circular device (no text or symbols visible)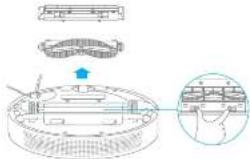
العربية قر ether

- Dreame Bot Z10 Pro
- Auto-Empty Robot Vacuum and Mop User Manual
- Content
- Safety Information
- Usage Restrictions
- EN Safety Information
- Batteries and Charging
- Product Overview
- EN Product Overview
- Clearing Home Environment
- EN Preparation Before Use
- About the Auto-Empty Base
- Connecting with Mi Home/Xiaomi Home App
- Download the Mi Home/Xiaomi Home App
- Add Device
- Reset Wi-Fi
- EN How to Use
- Turn On/Off
- Start Cleaning
- Cleaning Mode
- Pause/Sleep Mode
- Spot Clean Mode
- Additional App Functions
- How to Use
- Use the Mapping Function
- Routine Maintenance
- Replace the Dust Collection Bag
- Clean the Air Duct
- Robot Restarting
- Battery
- EN Status Indicator
- EN Specifications
- WEEE Information
- Produktübersicht
- Modo de uso
- Описание изделия
- Przegląd produktu
- Dzienna konserwacja
- Mi Home / Xiaomi Home
- הכלה 2
- Among 10 years
- תְרָה בְּרָה בְּרָה
- הכלה
- תְקָרִי אַלְבָה
- الصيانة الروتينية
Brand : DREAME
Model : Bot Z10 Pro
Category : Robot vacuum