C1 - Robot vacuum DREAME - Free user manual and instructions
Find the device manual for free C1 DREAME in PDF.

| Product type | Window cleaning robot |
| Brand | Dreame |
| Model | C1 (GCDJ2419) |
| Approximate dimensions | Approximately 30 x 30 x 8 cm |
| Weight | Approximately 2 kg |
| Power supply | AC adapter 100-240 V ~ 50/60 Hz, output 24 V ⎓ 3.75 A; built-in lithium-ion backup battery |
| Rated power | 66 W (adapter 90 W) |
| Cleaning modes | Full, Edge, Zone, Remote (via Dreamehome app) |
| Water tank capacity | Approximately 150 ml (cleaning solution included) |
| Compatible surface | Smooth flat windows, thickness ≥3 mm (glass), ≥4 mm (mirror); frame ≥5 mm |
| Operating temperature | 0 °C to 40 °C |
| Maximum humidity | 85% RH |
| Connectivity | Wi-Fi, Dreamehome app (iOS/Android) |
| Remote control range | Up to 10 m |
| Corner brushes | 8 included (4 pre-installed) |
| Lint-free cloth | 2 included (1 pre-installed) |
| Cleaning solution | 230 ml bottle included |
| Safety features | Safety cord, backup battery, anti-fall sensors, automatic shutdown on error |
| Maintenance | Regular cleaning of cloths, brushes, belts and sensors; use the app to clean belts |
| Storage | Cool, dry place, away from frost and excessive heat; drain the water tank |
| Warranty | 1 year (included in the package) |
Frequently Asked Questions - C1 DREAME
User questions about C1 DREAME
0 question about this device. Answer the ones you know or ask your own.
Ask a new question about this device
Download the instructions for your Robot vacuum in PDF format for free! Find your manual C1 - DREAME and take your electronic device back in hand. On this page are published all the documents necessary for the use of your device. C1 by DREAME.
USER MANUAL C1 DREAME
Pantone cool gary 11C
尺寸要求:
176*250mm 胶装
变更履历:
DREAME
Dreame C1 Window Cleaning Robot User Manual
The illustrations in this manual are for reference only. Please refer to the actual product for accuracy.
EN P05\~P23
DE P24\~P42
FR P43\~P61
IT P62\~P80
ES P81\~P99
NL P100\~P118
EU DECLARATION OF CONFORMITY
This EU declaration of conformity is issued under the sole responsibility of the manufacturer.
Jingjie Xunhang (Suzhou) Technology Co., Ltd.
Room 521, Unit 5011, No. 282 Dongping Street, Suzhou Industrial Park, Suzhou,
Jiangsu Province, P.R.China
On behalf of Dreame declare that the product
Description: Window Cleaning Robot
Type: GCDJ2419
Function: Cleaning Window
Complies with the following Directives
2014/30/EU, 2014/35/EU, 2011/65/EU&(EU)2015/863, 2014/53/EU
Standards conform to,
EN 60335-1:2012+A11+A13+A1+A14+A2+A15
EN 55014-2:2015
EN 60335-2-69:2012
EN IEC 61000-3-2:2019
EN 60335-2-29:2004+A2+A11
EN61000-3-3:2013+A1
ISO/FDIS 3744:2024
EN 300 328 V2.2.2
EN 55011:2016+A11
EN 301 489-1 V2.2.3
EN 55032:2015+A11
EN 301 489-17 V3.2.4
EN 55035:2017+A11
EN IEC 62311:2020
EN 62233:2008
EN IEC 63000:2018
EN 55014-1:2017+A11
Manufacturers authorized EU Representative
EUREP GmbH
Unterlettenweg 1a, 85051 Ingolstadt, Germany
eurep@eurep-gmbh.com
+49 841 8869 7744
Place of Issue: Suzhou
Date of Issue: 22/02/2025
Issuer's signature: Cui Haishun
Name of Issuer: Cui Haishun
Position of the issuer: PDT Manager
Room 521, Unit 5011, No. 282 Dongping Street, Suzhou Industrial Park,
Suzhou, Jiangsu Province, P.R.China
Original Instructions
1 Safety Information P06
2 Product Overview P09
3 Operation P12
4 Key Features P17
5 Maintenance P19
6 Storage P21
7 Troubleshooting P22
8 Specifications P23
9 Battery Disposal and Removal P23
1 Safety Information
1.1 IMPORTANT SAFETY INSTRUCTIONS
WARNING : Read all safety warnings and instructions. Failure to follow the warnings and instructions may result in electric shock, fire and/or serious injury.
- This appliance can be used by persons with reduced physical, sensory or mental capabilities or lack of experience and knowledge if they have been given supervision or instruction concerning use of the appliance in a safe way and understand the hazards involved. Children shall not play with the appliance. The appliance is not to be used if it has been dropped, if there are visible signs of damage or if it is leaking. Keep the appliance out of reach of children when it is energized.
- Do not use and charge the Appliance in extremely hot or cold environments (below 0^ C/ 32^ F or above 40^ C/ 104^ F, above 85% humidity), or it may affect battery life span.
- The Appliance can be used to clean exterior windows if it is properly tethered to a safe position with the Carabiner, winds are calm, and it is not raining or snowing.
- Before use, please use the Carabiner to lock the safety tether to a strong indoor railing, and make sure Robot is securely attached to it.
- Do not leave the Appliance unattended when using it. To prevent bodily injury or property damage caused by accidental falling of the Appliance, please make sure there are no people, animals, or valuable, fragile objects under the working area of Robot.
- Do not use the Appliance in whole gale storms and force-10 winds, or in areas where the altitude exceeds 2000 meters (6562 feet).
- Do not leave the Appliance unattended when it is plugged in.
- For household use ONLY (including exterior window). Do not use the Appliance in commercial or industrial environments.
- Do not use on broken or uneven glass, such as glass with static cling stickers, advertising posters, or raised patterns, so as to prevent glass breaking or Appliance's falling. Do not use on surfaces with gaps, such as a piece of glass with gaps or holes, or two pieces of adjacent, frameless glass with a gap between them, so as to prevent the Appliance from falling due to poor attachment.
- Only use accessories recommended or supplied by the manufacturer. Only use the Power Adapter supplied by the manufacturer.
- Please make sure your power supply voltage matches the power voltage marked on the Power Adapter.
- Do not use the Appliance on a framed glass with a frame smaller than 5 mm (0.2 in).
- Do not use on glass less than 3 mm (0.12 in) thick or mirrors less than 4 mm (0.16 in) thick.
- Do not use on glass or mirrors with a handle height of 70\~105 mm (2.76\~4.13 in).
- Do not use the Appliance on greasy windows.
- When used in high humidity environment, the cleaning performance will be affected.
-
Store the Appliance away from heat and flammable materials.
-
In rainy weather, do not use the Appliance on the exterior window to avoid the risk of Appliance's damage or falling.
- Do not use the Appliance if it does not firmly attach to the glass or has visible signs of damage.
- To reduce the risk of electrical shock, do not put the Appliance in water or other liquid. Do not place or store Appliance where it can fall or be pulled into a tub or sink.
- Do not touch power plug with wet hands.
- When charging the Appliance, do not place it on other electrical appliances and keep it away from fire and liquid.
- Take care not to damage the power cord. Do not pull on or carry the Appliance by the power cord, use the power cord as a handle, close a window on the power cord, or put heavy weights on the power cord. Keep power cord away from hot surfaces.
- Do not use with a damaged power cord or receptacle. Do not use the Appliance if it is not working properly, has been dropped, damaged, or come in contact with water. It must be repaired by the manufacturer or its service agent in order to avoid a hazard.
- If the supply cord is damaged, it must be replaced by the manufacturer or its service agent in order to avoid a hazard.
- The plug must be removed from the receptacle before cleaning or maintaining the Appliance. Do not unplug the Power Adapter by pulling on the power cord.
- The Safety Battery must be replaced by the manufacturer or its service agent in order to avoid a hazard.
- The Safety Battery must be removed and discarded according to local laws and regulations before disposal of the Appliance.
- The Appliance must be disconnected from the receptacle before removing the battery for disposal of the Appliance.
- Please dispose of used batteries according to local laws and regulations.
- Do not incinerate the Appliance even if it is severely damaged. The battery can explode in a fire.
- The Appliance must be used in accordance with the directions in this Instruction Manual. The company cannot be held liable or responsible for any damages or injuries caused by improper use.
- WARNING: For the purposes of recharging the battery, only use the detachable supply unit provided with this Appliance.
- The robot contains batteries that are only replaceable by skilled persons.
- The plug and the Power Adapter must be used indoor.
- If the vacuum glass, which Robot is working on, is leaking, remove Robot immediately after cleaning is completed.
- Before cleaning, please observe the area to attach Robot for any small particles. If there are any, please remove them or switch to a particle-free area to avoid scratching the glass.
- Clean the Cleaning Cloth in time and make sure that any small particles on it are completely removed to avoid scratching the glass.
SAVE THESE INSTRUCTIONS
1.2 Correct Disposal of this Product
This marking indicates that this product should not be disposed of with other household waste throughout the EU. To prevent possible harm to the environment or human health from uncontrolled waste disposal, recycle it responsibly to promote the sustainable reuse of material resources. To recycle your used device, please use the return and collection systems or contact the retailer where the product was purchased. They can safely recycle this product.
 | Before charging, read the instructions. |
 | Class II |
 | For indoor use only |
 | Direct current |
 | Alternating current |
 | WARNING -It is not permitted to dispose of this product as normal household waste. Ensure that the product is recycled in accordance with local legal requirements. |
2 Product Overview
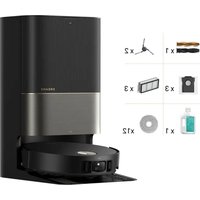
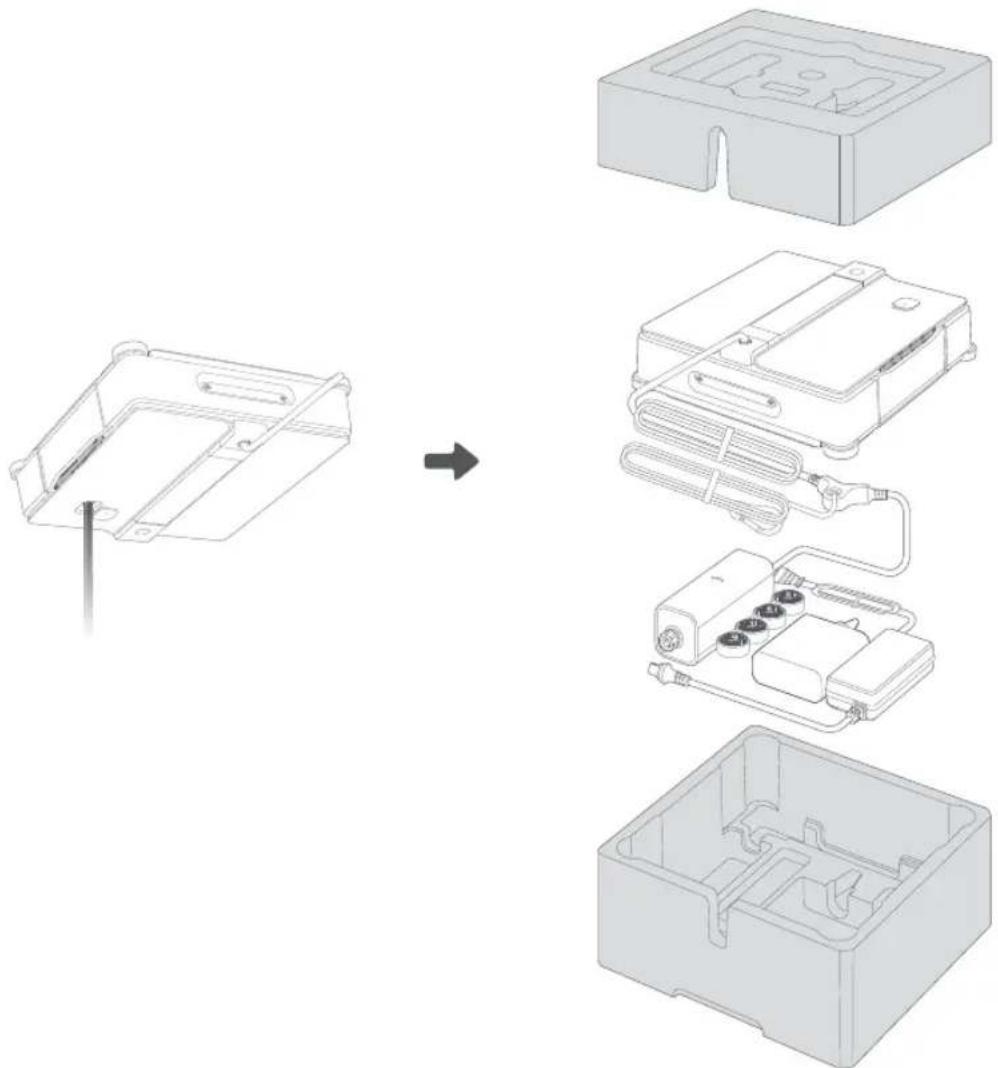
2.1 What's in the Box

6
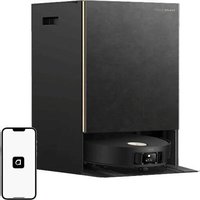
1 Robot (Includes Safety Rope and Backup Battery)
2 Adapter
3 Corner Brush × 8 (pre-installed × 4)
4 Cleaning Cloth × 2 (pre-installed×1)
5 Window Cleaning Solution (230mL)
6 User Manual
⑦ Warranty Card
8 Quick Start Guide
2.2 Robot Structure
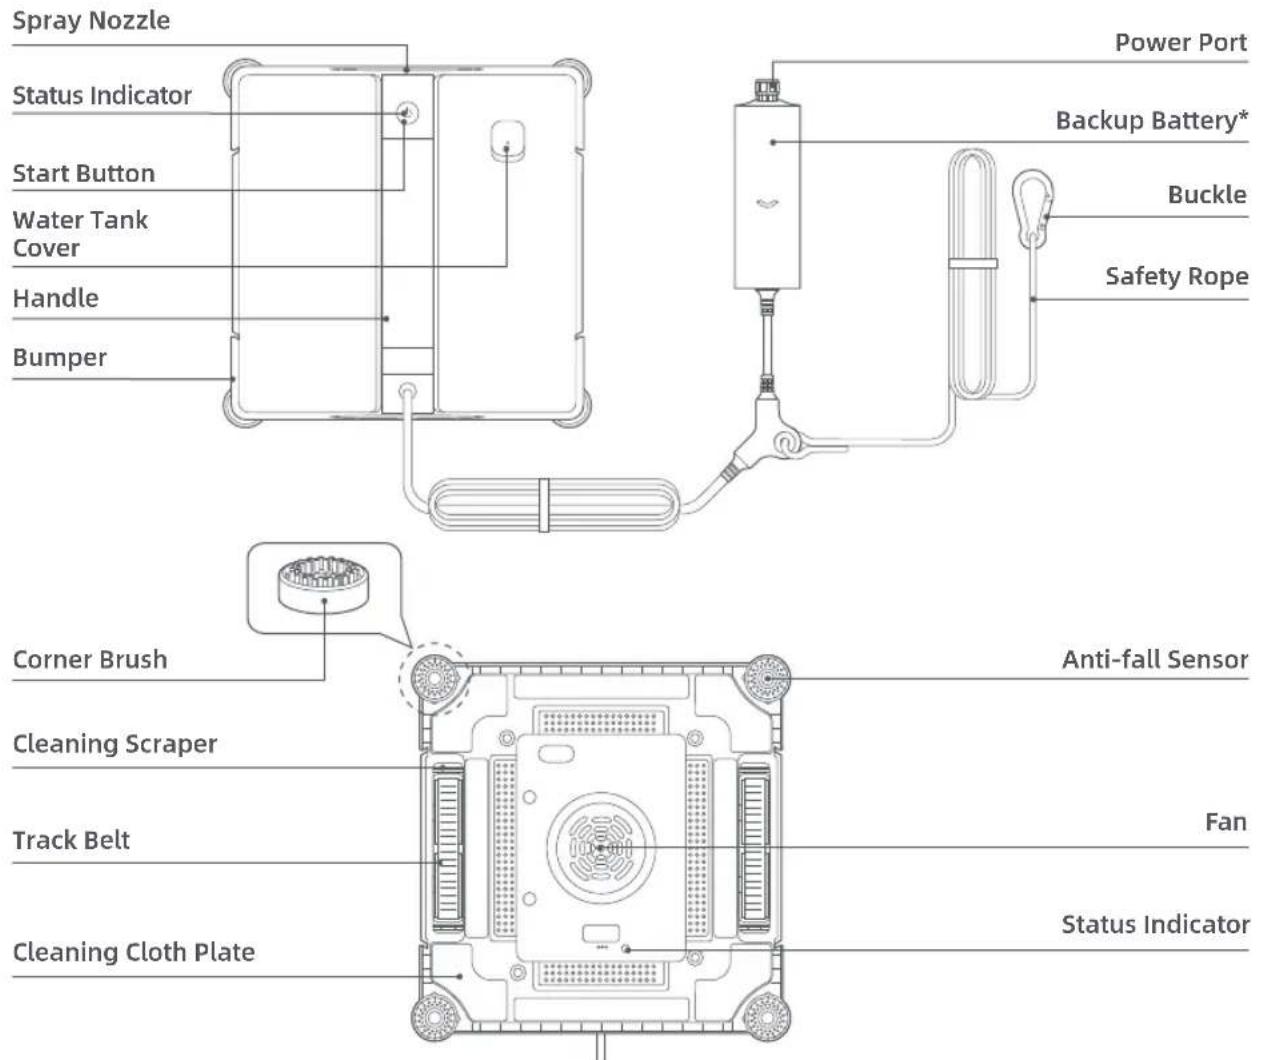
* Backup battery: Provides emergency power for the robot in case of power outage.
| Button Description | |
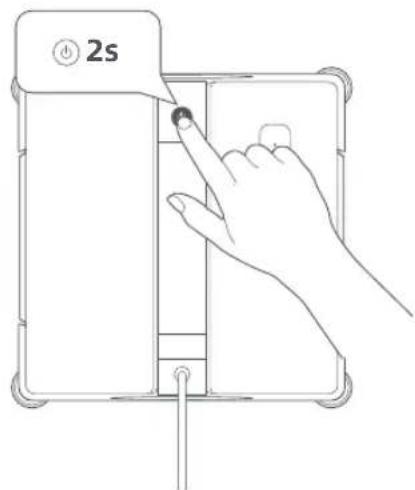
| Start Button | To turn the robot on: Press and hold ⏻ for 2 seconds.To turn the robot off: After the fan stops, press and hold ⏻ for 2 seconds. |
| To activate the fan, press ⏻ briefly after powering on the robot. | |
| To pause or resume operation, press ⏻ during cleaning. | |
| To detach the robot, press and hold ⏻ for 2 seconds when cleaning is complete or stopped. | |
| Status Light Description | |
| Steady Green Normal operation. | |
| Steady Red | An error occurs while the robot is not attached. Refer to the voice prompts or app for solutions. |
| Flashing Red (Fast) | An error occurs while the robot is attached. Refer to the voice prompts or app for solutions. |
| Flashing Red (Slow) The backup battery is charging. | |
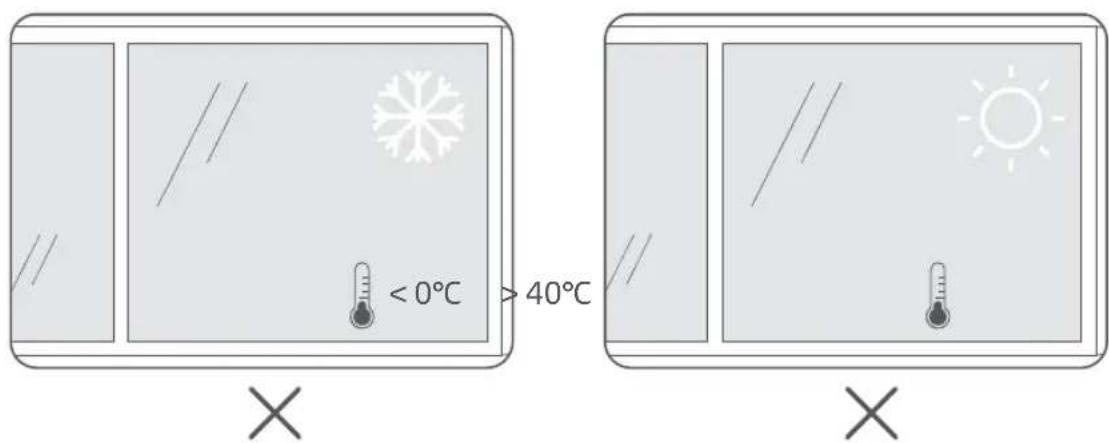
2.3 Applicable Scenarios
You can use the robot in environments with temperatures ranging from 0°C to 40°C.
Do not use the robot in extreme temperatures (below 0°C or above 40°C).
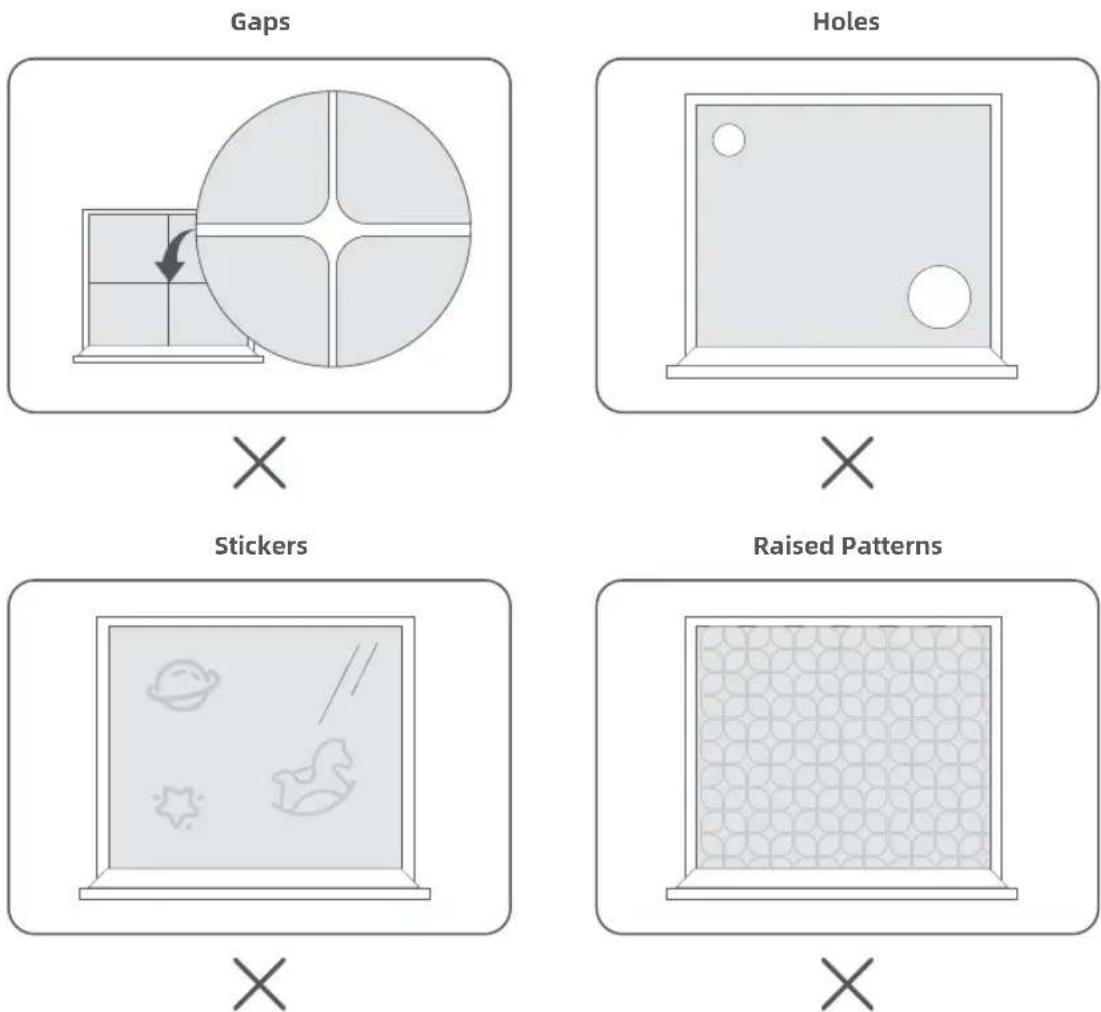
The robot is designed for smooth, flat surfaces.
Avoid using the robot on surfaces with gaps, holes, stickers, or raised patterns, as these may interfere with proper operation.
3 Operation
3.1 Before You Begin
Precautions:
- Ensure that the backup battery is sufficient to enhance safety.
- Set danger-warning area downstairs for no-balcony window and door.
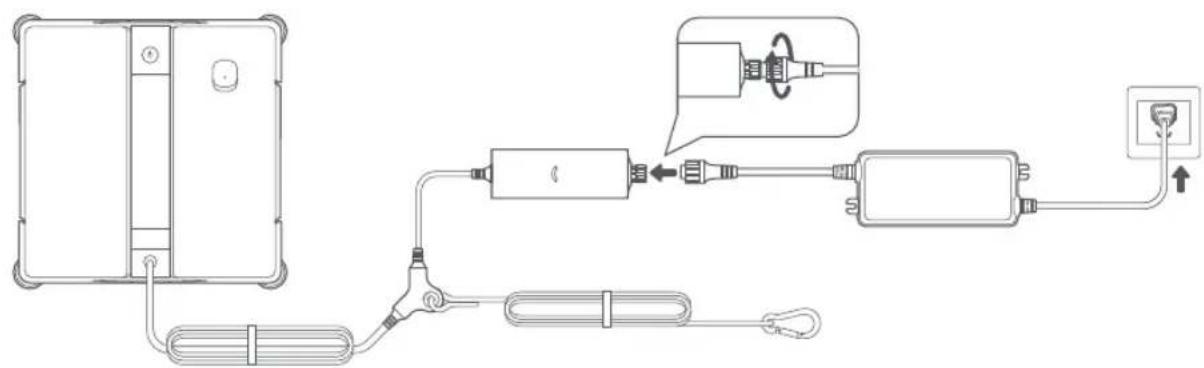
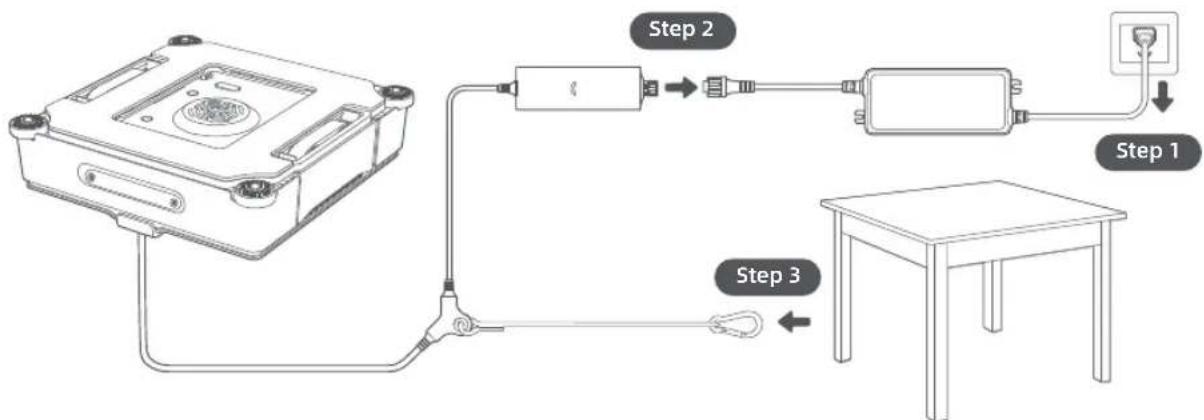
1 Connect to Power
- Connect the adapter to the robot and tighten the connector.
- Plug the adapter into a power outlet.
Note: Use the extension power cord (sold separately) if needed.
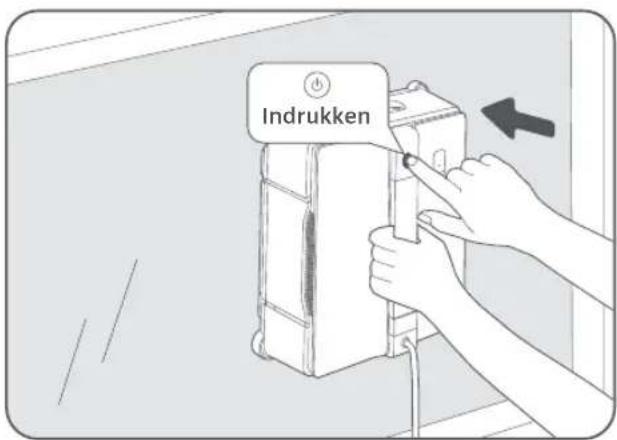
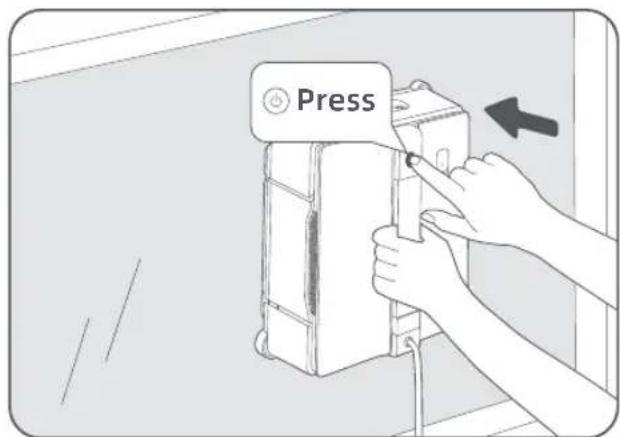
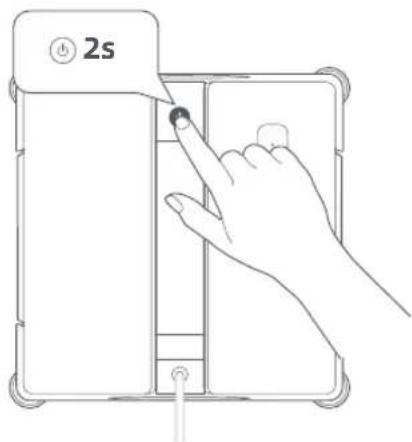
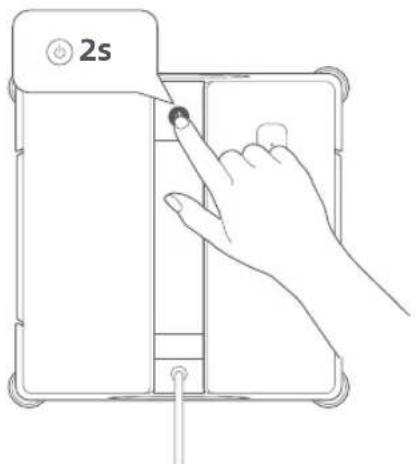
2 Power On
Press and hold the Start button for 2 seconds to turn on the robot.
Notes:
- Check that the status light shows green. If it's red, follow the voice prompts to resolve the issue.
- If not plugged in, the robot will automatically shut down after 5 minutes.
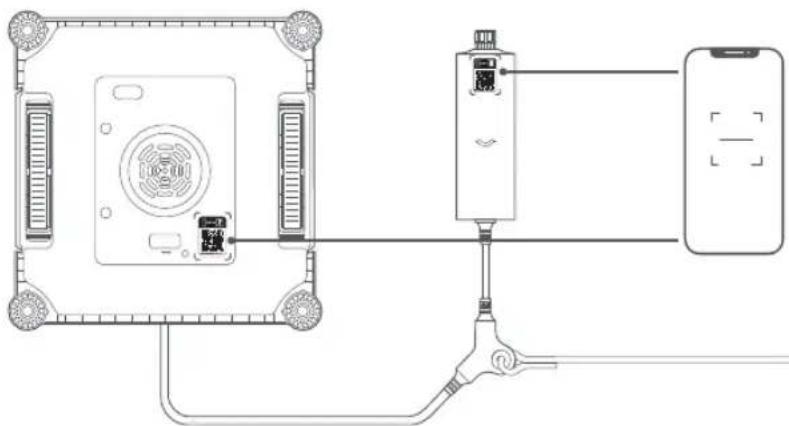
3 Connect to the Dreamehome App
Scan the QR code below or search for "Dreamehome" in the App Store or Google Play.

OR

You can also find the QR code on the backup battery or the bottom of the robot.
natural_image
Diagram of a device connection showing connections between a central device, a mobile phone, and an electronic device (no text or symbols present)After completing the installation, create an account and log in. Follow the onscreen instructions to complete the setup.
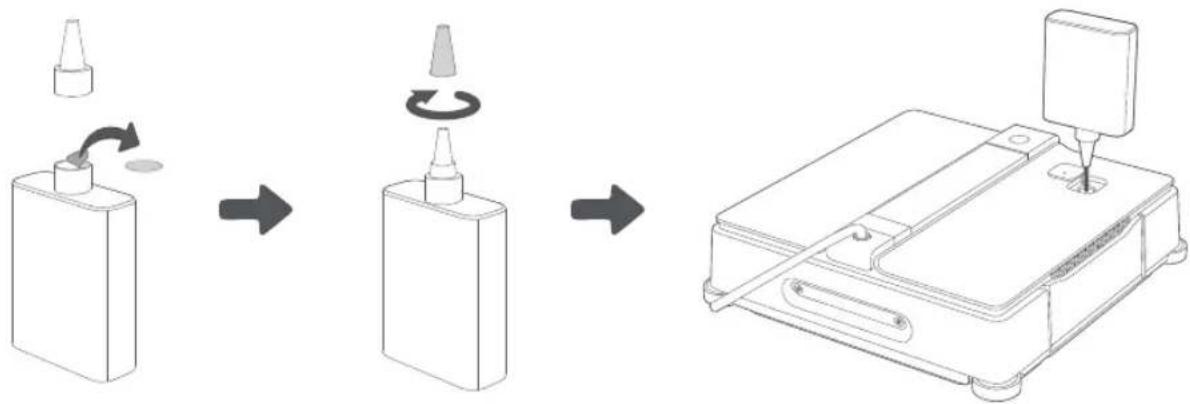
4 Fill the Water Tank
- Remove the seal from the bottle of window cleaning solution and open the nozzle cap.
- Fill the water tank with the window cleaning solution, avoiding overflow.
flowchart
graph LR
    A["Initial Bottle"] --> B["Rotating Valve"]
    B --> C["Actuator"]
    C --> D["Final Inspection Machine"]
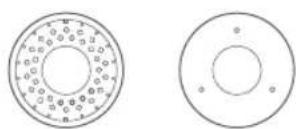
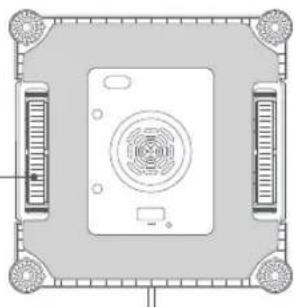
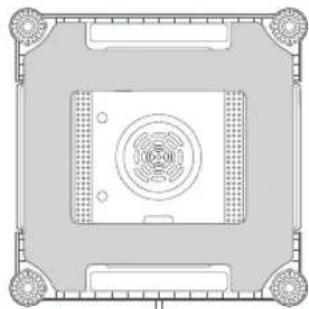
5 Check the Corner Brushes
- Ensure the corner brushes are correctly installed on the anti-fall sensors, with the bristles facing outward.
- To secure or reinstall them, press downward until you hear a click.
Bristles Bottom
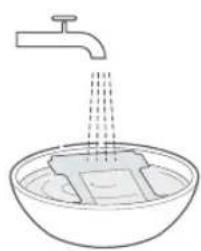
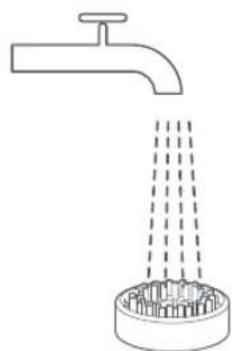
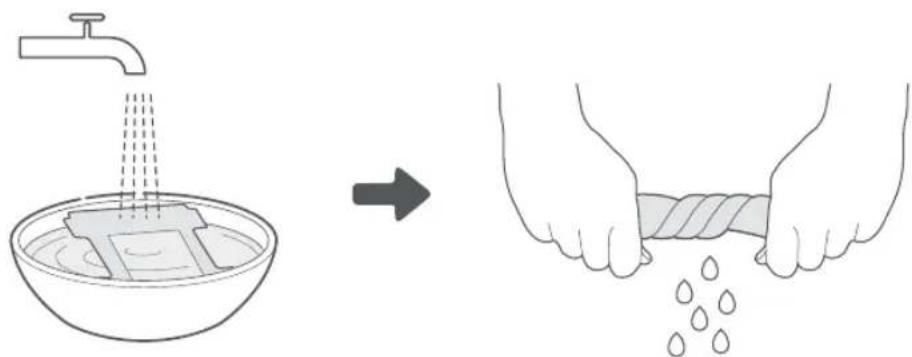
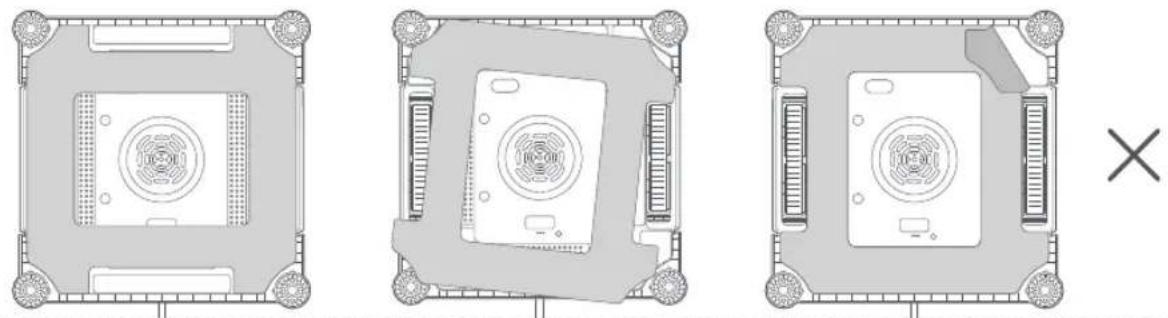
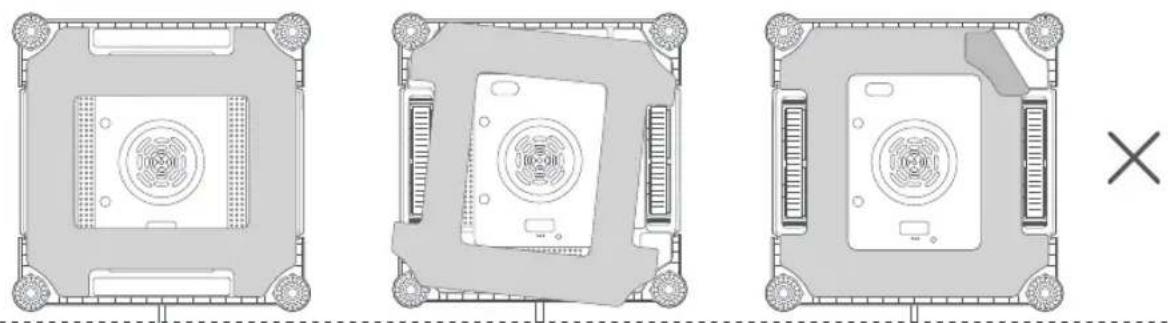
6 Prepare the Cleaning Cloth
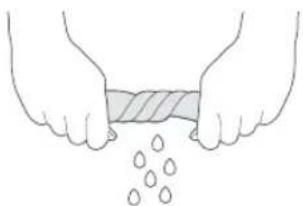
- Dampen the cleaning cloth with clean water and wring it out until it no longer drips.
Caution: An overly wet cleaning cloth may cause the robot to slip on the window.
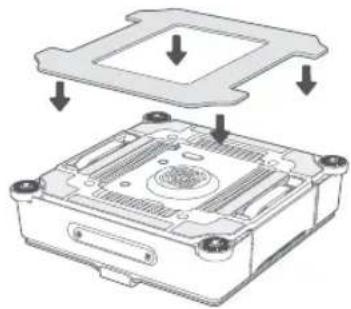
- Attach the cleaning cloth evenly onto the robot bottom.
Important:
- Properly align the cleaning cloth with the attachment plate.
- Make sure the track belts and anti-fall sensors are unobstructed to prevent attachment failure.
natural_image
Simple line drawing of a faucet releasing liquid into a basin (no text or symbols)
natural_image
Illustration of two hands holding a rectangular object with liquid droplets falling (no text or symbols)
natural_image
Technical diagram of an electronic device showing a top-down view of the internal structure with mounting holes and ventilation slots (no text or symbols present)Track Belt
natural_image
Top-down schematic of a device layout with central fan and side connectors (no text or symbols)
natural_image
Top-down architectural or mechanical diagram showing a central circular component with radial holes and surrounding corner brackets (no text or symbols)
natural_image
Top-down schematic of a computer monitor with ventilation slots and control buttons (no text or labels)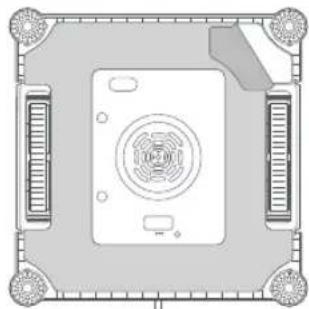
natural_image
Top-down schematic of a device layout with central fan and four corner connectors (no text or symbols)
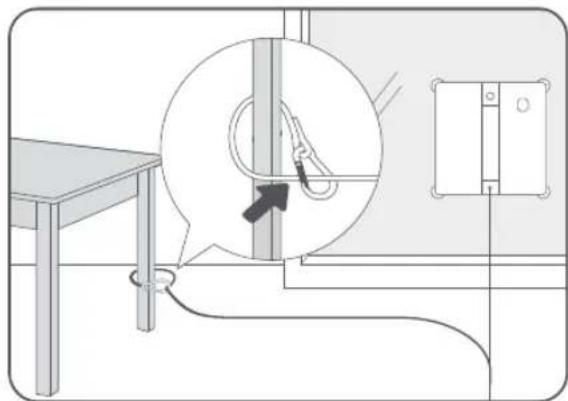
7 Fasten the Safety Rope
Securely fasten the safety rope onto guardrail or an indoor fixture ( ≥ 8 kg).
Caution:
- Check the safety rope for any damage before use.
- Ensure the knot is tight and that the rope length allows the robot to move freely on the glass while cleaning.
natural_image
Technical line drawing of a mechanical assembly with a magnified circular detail showing a tool interacting with a vertical rod (no text or symbols present)3.2 Start Cleaning
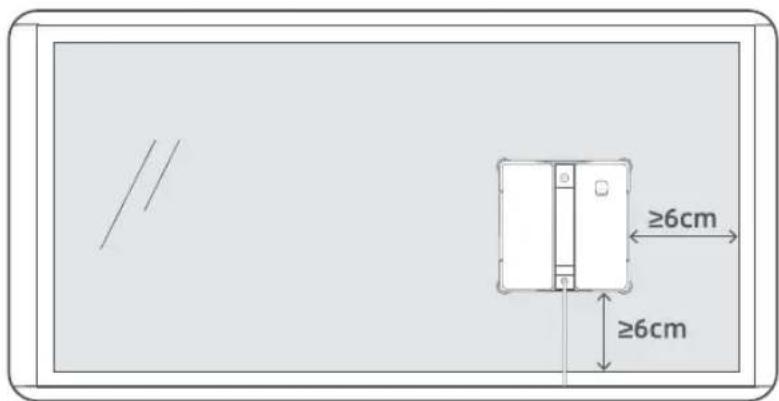
1 Press the Start button to activate the fan.
2 Attach the robot to the window.
Important: Ensure the robot is at least 6 cm away from the window frame. Caution: Confirm the robot is securely attached before letting go.
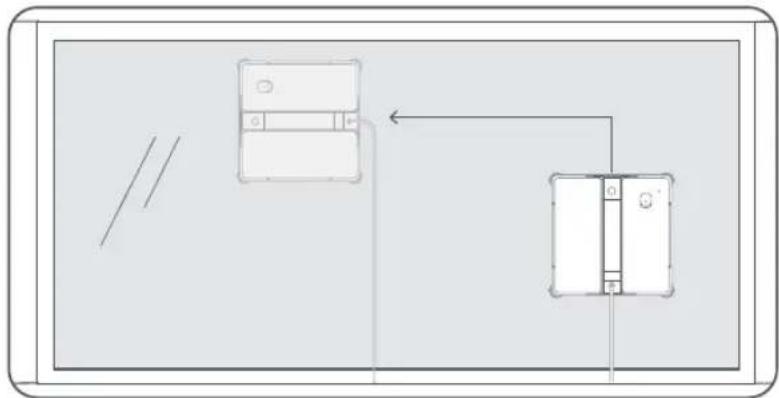
3 The robot will automatically begin cleaning the entire window.
Notes:
- If auto-cleaning does not start, refer to the voice prompt or check the app for guidance.
- To refill the water tank or replace the cleaning cloth during cleaning, press the Start button or use the app to pause the robot.
flowchart
graph TD
    A["Device 1"] --> B["Device 2"]
    B --> C["Device 3"]
    style A fill:#f9f,stroke:#333
    style B fill:#ccf,stroke:#333
    style C fill:#cfc,stroke:#333
3.3 Finish Cleaning
At the end of the cleaning cycle, the robot will return to the starting point for easy pickup. If the robot stops in an inaccessible location, use remote control to guide it back in the app.
1 Grasp the robot with one hand, then detach it using the other hand. To detach, press and hold the Start button for 2 seconds.
2 Remove the robot from the glass.
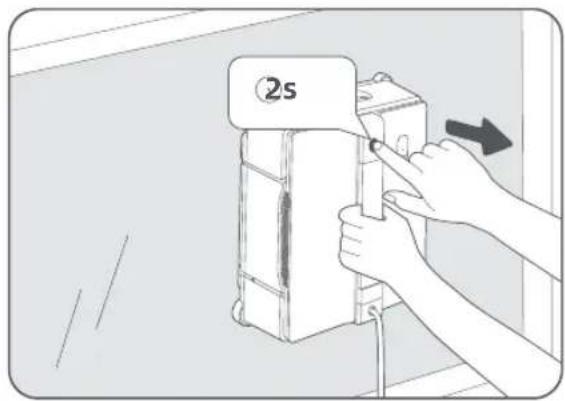
3 Press and hold the Start button for 2 seconds again to power off the robot.
4 Unplug the adapter and unfasten the safety rope.
flowchart
graph TD
    A["AC Input"] --> B["Switch"]
    B --> C["Device 1"]
    C --> D["Plug"]
    D --> E["Table"]
    style A fill:#f9f,stroke:#333
    style E fill:#bbf,stroke:#333
Important: It's recommended to regularly check the condition of the cleaning cloth, wash or replace it as needed.
4 Key Features
App Features
The Dreamehome app offers a range of advanced features that enhance the functionality of your robot. With the app, you can customize settings, view cleaning logs, access maintenance tips, and send feedback. This gives you more control over how and where your robot cleans.
| Mode Description | |
| Complete [IMAGE] | Covers all areas of the window.Note:Robot runs in Complete Cleaning by default. |
| Edge [IMAGE] | Focuses on cleaning corners and edges of the window.Note:Not available for frameless glass. |
| Zone [IMAGE] | Targets specific zones (upper, lower, left, right) relative to the robot’s position. |
| Remote [IMAGE] | Manually guide the robot to specific locations for spot cleaning. It cleans continuously while moving. |
Tap ▶ to spot clean a designated area. The robot will move in a forward and backward motion for thorough cleaning. Tap ⊙ to finish cleaning, and the robot will stop at its current position. To send it back to its starting point, tap Return or use the remote control in the app.
Auto-Resume after Interruption
After an interruption or pause, the robot will automatically resume from where it left off along the planned path. You can cancel Auto-Resume through the app.
Notes:
- Auto-Resume may not work in the following cases:
- The robot has been restarted or the Auto-Resume was cancelled.
- The area being cleaned has changed.
Auto-Resume is only available for Complete Cleaning.
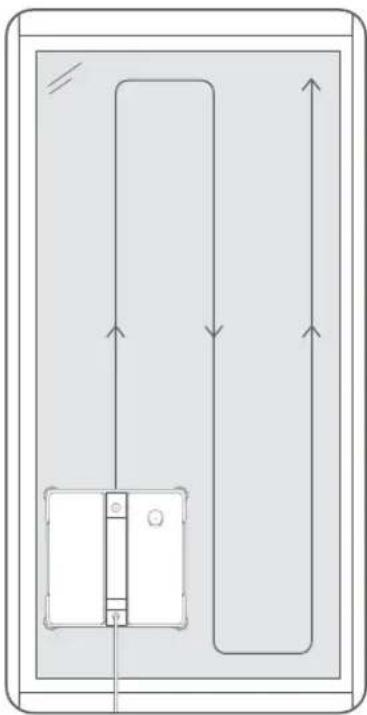
Cleaning Path
N-shaped pattern:
If the window's horizontal length is less than twice the robot's length, the robot will follow an N-shaped path.
natural_image
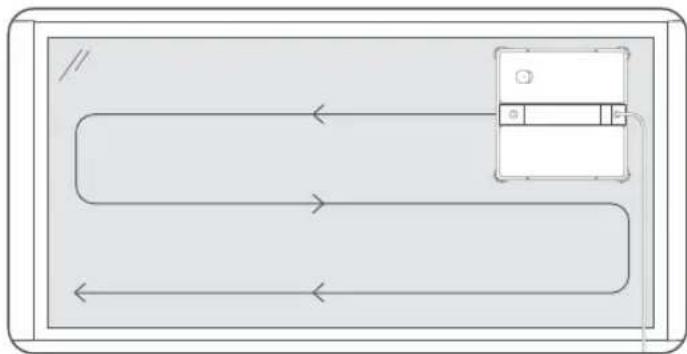
Pure electrical circuit lines without any symbolsZ-shaped pattern:
If the window's horizontal length is at least twice the robot's length, the robot will follow a Z-shaped path.
flowchart
graph TD
    A["Device Icon"] --> B{Path 1}
    B --> C["Device Icon"]
    C --> D{Path 2}
    D --> E["Device Icon"]
Notes:
- Keep your mobile device within 10 m of the robot for optimal app control.
- App features and details may vary due to continuous development and updates.
5 Maintenance
To keep your robot at peak performance, perform regular cleaning and maintenance. For additional instructions, refer to the Dreamehome app.
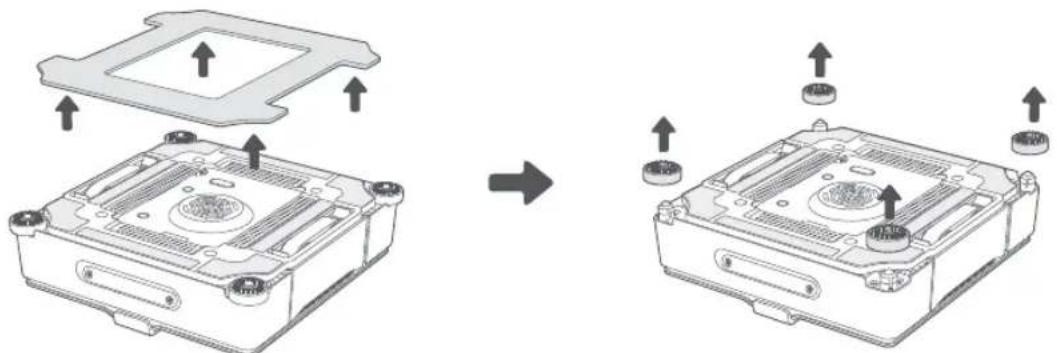
5.1 Cleaning Cloth and Corner Brushes
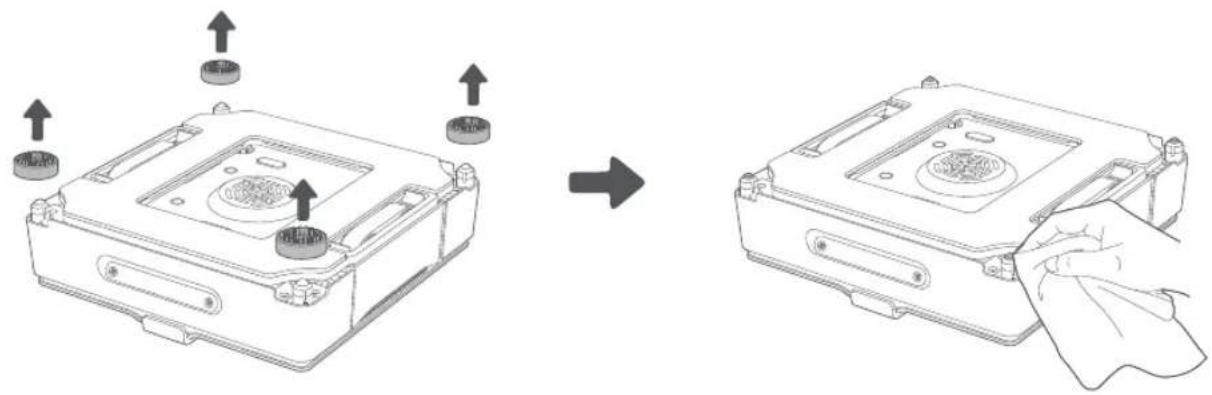
1 Remove the cleaning cloth and corner brushes. To remove the corner brush, push upwards until you hear a click.
natural_image
Diagram showing two views of an electronic device casing with mounting holes and a plastic cover (no text or symbols present)2 Rinse the corner brushes with running water. Shake them to remove excess water before reinstalling.
natural_image
Simple line drawing of a faucet with water spray and a circular base (no text or symbols)3 Wash the cleaning cloth either by hand or in a washing machine. Wring it until it does not drip.
Note: Replace the cleaning accessories if visible wear appears or if the cleaning result is not satisfactory.
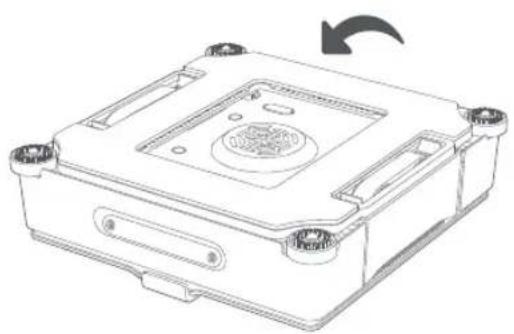
5.2 Track Belts and Anti-Fall Sensors
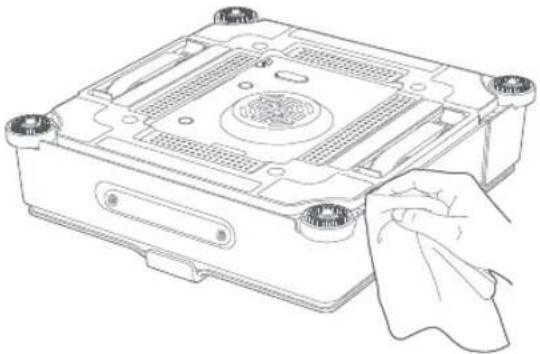
1 Ensure that the robot is turned on and that the fan is off before cleaning the track belts.
2 Place the robot on a level surface with the track belts facing up.
natural_image
Technical line drawing of a mechanical device housing with mounting holes and a central vent (no text or symbols)3 Open the app and navigate to Clean Track Belts. Tap the button to start the track rotation. Place a dry, clean cloth against the track belt for cleaning. Once finished, tap the button to stop the rotation.
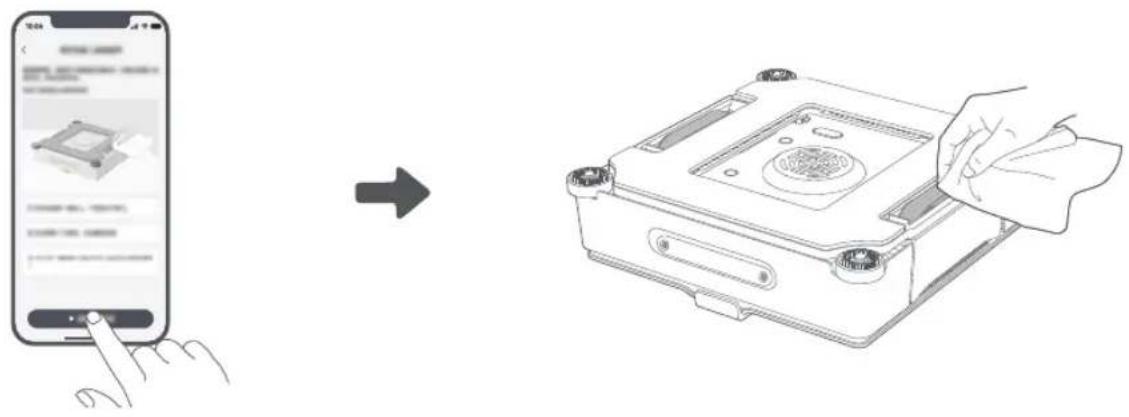
4 Remove corner brushes, then wipe the anti-fall sensors with a clean, dry cloth.
natural_image
Diagram showing a device being processed from a left-side view and then assembled, with no visible text or symbols.Important: Regularly clean the track belts to prevent dirt buildup.
5.3 Cleaning the Robot Body
Use a clean, dry cloth to wipe the cleaning cloth plate regularly.
natural_image
Line drawing of a computer case with a hand holding a cloth (no text or symbols)Caution: Do not soak the robot or wash it under water to avoid damage.
6 Storage
-
Store the robot in a cool, dry place, away from direct sunlight or extreme temperatures.
-
For long-term storage (over 1 year), charge the robot's backup battery periodically to maintain its health.
Caution: Let the cleaning cloth air dry before storing it to prevent bacteria buildup.
Important: Always empty the water tank before storing the robot to prevent nozzle clogging.
7 Troubleshooting
Your robot will alert you to issues with an audio prompt and a red status indicator. Check the Dreamehome app for further assistance.
Q1 | How to charge the backup battery?
When the robot is not attached:
- Make sure the adapter is connected to the robot correctly.
- Plug the adapter into a power source.
- Ensure the robot is turned on (red light flashing slowly).
- Charge until the LED light turns green.
When the robot is attached:
- Make sure the adapter is connected to the robot correctly.
- Plug the adapter into a power source.
- Wait for the robot to return to the starting point. If it fails to return, use the remote control in the app.
- Press and hold the Start Button for 2 seconds to detach the robot.
- Keep the robot connected to power and charge until the LED light turns green from red.
Q2 | The robot does not spray.
- Check the water level in the tank. If it's low, refill with the designated cleaning solution or clean water.
- Make sure the water spray function is enabled in the app.
- If the issue persists, please reach out to the after-sales team for further assistance.
Q3 | The robot is slipping.
- Remove the robot from the glass.
- Open the app, navigate to Clean Track Belts, and follow the onscreen instructions to clean the track belts.
- Wring the cleaning cloth to remove excess water.
- Check whether the humidity level exceeds 85%. If it does, window cleaning is not recommended.
Q4 | The robot gets stuck.
Please refer to the app for detailed solutions.
If the issue persists after trying the above solutions, please contact the after-sales team for support.
8 Specifications
| Product name Window Cleaning Robot | |
| Brand Dreame | |
| Model GCDJ2419 | |
| Rated Input 24 V | 3.75 A |
| Rated Power 66 W | |
| Adaptor Model | EU: DJSPQ2419EUUK/SG:DJSPQ2419UKCH:DJSPQ2419CHAU:DJSPQ2419AU |
| Input 100-240 V ~ 50/60 Hz 2.5 A | |
| Output 24 V | 3.75 A; 90 W |
Note: The specifications are subject to change as we continually improve our product. For the latest information, please visit our website at https://global.dreametech.com.
9 Battery Disposal and Removal
The built-in lithium-ion battery contains substances that are hazardous to the environment. Before disposing of the battery, make sure the battery is removed by qualified technicians and discarded at an appropriate recycling facility.
- The battery must be removed from the appliance before it is scrapped;
- The appliance must be disconnected from the supply mains when removing the battery;
- The battery is to be disposed of safely.
Removal Guide
- Before removing the battery, disconnect the power and run out the battery as much as possible.
- Open the backup battery cover, then remove the battery pack. Be careful not to damage the battery pack housing to avoid potential hazards.
- Unneeded batteries should be discarded at an appropriate recycling facility.
Caution:
- Before removing the battery, disconnect the power and run out the battery as much as possible.
- Unneeded batteries should be discarded at an appropriate recycling facility.
- Do not expose to a high temperature environment to avoid risks of explosion.
- Under abusive conditions, liquid may be ejected from the battery. If contact occurs, flush with water and seek medical help.
Originalanleitung
2 Einschalten
natural_image
Diagram of a device connection showing connections between a device casing, a switch, and a smartphone (no text or symbols present)flowchart
graph LR
    A["Initial Bottle"] --> B["Conical Tip"]
    B --> C["Rotating Valve"]
    C --> D["Final Assembly with Tool"]
natural_image
Diagram showing a table setup with a rope tied to a vertical pole, an inset magnified view of the rope being held, and a close-up of the rope being inserted (no text or symbols present)flowchart
graph TD
    A["Device with cable"] --> B["Switch"]
    B --> C["Switch 2"]
    C --> D["Switch 1"]
    D --> E["Power outlet"]
    F["Table with cable"] --> G["Switch 3"]
natural_image
Pure electrical circuit lines without any symbolsZ-förmiges Muster:
natural_image
Diagram showing two views of an electronic device casing with mounting holes and a plastic cover (no text or symbols present)natural_image
Simple line drawing of a faucet with water spray and a circular base (no text or symbols)natural_image
Technical line drawing of a mechanical device casing with mounting holes and a central vent (no text or symbols)natural_image
Diagram showing a device being processed from a left-side assembly to a right-side view, with no visible text or symbols.natural_image
Line drawing of a computer case with a hand holding a cloth (no text or symbols)2 Mise sous tension
natural_image
Diagram of a device connection showing a front panel, internal components, and connected to a smartphone (no text or symbols present)flowchart
graph LR
    A["Add cone"] --> B["Rotate around base"]
    B --> C["Rotating with valve"]
    C --> D["Add screwdriver"]
natural_image
Three technical diagrams showing front, side, and top views of a device casing with internal components (no text or symbols)natural_image
Diagram showing a table, rope, and hanging cable with a magnified inset highlighting the cable being inserted (no text or symbols present)natural_image
Pure electrical circuit lines without any symbolsnatural_image
Diagram showing two views of an electronic device casing with mounting holes and a plastic cover (no text or symbols present)natural_image
Line drawing of a faucet with liquid level indicator and base (no text or symbols)natural_image
Technical line drawing of a mechanical device casing with mounting holes and a central vent (no text or symbols)natural_image
Diagram showing a device being processed from an open case to a closed case, with arrows indicating process direction (no text or symbols present)natural_image
Line drawing of a computer case with a hand holding a cloth (no text or symbols)7 Dépannage
2 Accensione

natural_image
Diagram of a device connection showing connections between a central device, a mobile phone, and a battery pack (no text or symbols present)flowchart
graph LR
    A["Initial Bottle"] --> B["Conical Tip"]
    B --> C["Rotating Valve"]
    C --> D["Final Assembly with Tool"]
natural_image
Three technical line drawings of a computer case with ventilation grilles and mounting brackets, showing front, side, and top views (no text or symbols)natural_image
Technical line drawing of a mechanical assembly with a magnified circular detail showing a tool interacting with a vertical rod (no text or symbols present)natural_image
Pure electrical circuit lines without any symbolsnatural_image
Diagram showing two views of an electronic device casing with mounting holes and a plastic cover (no text or symbols present)natural_image
Simple line drawing of a faucet with water spray and a base (no text or symbols)natural_image
Technical line drawing of a mechanical device casing with mounting holes and a central vent (no text or symbols)natural_image
Diagram showing a device being processed from a left-side view and then assembled, with no visible text or symbols.natural_image
Line drawing of a computer case with a hand holding a cloth (no text or symbols)2 Encendido

natural_image
Diagram of a device connection setup showing an electronic device with ports, a switch, and a smartphone (no text or labels present)flowchart
graph LR
    A["Initial Bottle"] --> B["Conical Tip"]
    B --> C["Rotating Valve"]
    C --> D["Final Assembly with Tool"]
flowchart
graph TD
    A["Water Tap"] --> B["Shrimp being cut off"]
    B --> C["Close-up of Plate with lid"]
    C --> D["Disassembly of Board with Cover"]
    D --> E["Track Belt"]
    E --> F["Final Display"]
natural_image
Three technical line drawings of a computer case with internal components and mounting brackets, showing front, side, and top views (no text or symbols)natural_image
Diagram showing a mechanical setup with a circular component and a hanging device (no text or symbols present)natural_image
Pure diagram of a rectangular room with internal layout and directional arrows, no text or symbols presentnatural_image
Diagram showing two views of an electronic device casing with mounting holes and a plastic cover (no text or symbols present)natural_image
Line drawing of a faucet with liquid level indicator and base (no text or symbols)natural_image
Technical line drawing of a mechanical device casing with mounting holes and a central vent (no text or symbols)natural_image
Line drawing of a computer case with a hand holding a cloth (no text or symbols)2 Inschakelen
Houd de Startknop 2 seconden ingedrukt om de robot in te schakelen.
Opmerkingen:
natural_image
Diagram of a device connection showing connections between a central device, a mobile phone, and an electronic device (no text or symbols present)flowchart
graph LR
    A["Initial Bottle"] --> B["Conical Tip"]
    B --> C["Rotating Valve"]
    C --> D["Final Assembly with Tool"]
flowchart
graph TD
    A["Water Droplet"] --> B["Shank"]
    B --> C["Shank with liquid droplets"]
    C --> D["Shank with lid"]
    D --> E["Shank with circuit board"]
    E --> F["Rupsband"]
natural_image
Three technical diagrams showing front, side, and top views of a device with internal components (no text or symbols)natural_image
Technical line drawing of a mechanical assembly with a magnified circular detail showing a tool interacting with a vertical rod (no text or symbols present)3.2 Wassen starten
1 Druk op de Startknop om de ventilator te activeren.