
SCCGHP121SC200 - Speaker SCHNEIDER - Free user manual and instructions
Find the device manual for free SCCGHP121SC200 SCHNEIDER in PDF.
| Product type | Portable amplified speaker |
| Brand | Schneider |
| Model | SCCGHP121SC200 |
| Dimensions (L x D x H) | 437 x 353 x 682 mm |
| Weight | Not specified (estimated ~15 kg) |
| Power supply | 110-240 V ~ 50/60 Hz, output 12 V / 9 A |
| Power consumption | 45 W |
| Standby power consumption | ≤ 0.5 W |
| Main functions | Bluetooth 2.1, FM radio, USB/SD MP3, microphone (2 jacks), recording, LED light effects, auxiliary mode, auxiliary output for second speaker, remote control |
| Frequency response | 100 Hz - 20 kHz |
| Speakers | Woofer 12" + 2 x tweeters 3" |
| Inputs | AUX IN 3.5 mm (also FM antenna), USB, SD card, MIC-1 and MIC-2 microphones |
| Outputs | AUX OUT 3.5 mm |
| Bluetooth | Version 2.1, compatible EDR, A2DP, AVRCP, range ~10 m |
| FM radio | 87.5 - 108 MHz, auto search, memory up to 200 stations |
| USB/SD playback | FAT/FAT32 formats, MP3 only, SD/SDHC card max 32 GB |
| Built-in rechargeable battery | Charging time 6-8 hours, operation on mains or battery |
| Remote control | Batteries 2 x CR 2032 (supplied) |
| Maintenance and cleaning | Clean with a dry, soft cloth. Do not use abrasive products or solvents. |
| Safety | Do not expose to water, humidity or excessive heat. Disconnect during prolonged non-use. Do not open the device: risk of electric shock. |
| Reparability | Entrust any repair to an authorized professional. No user-serviceable components. |
| General information | Manual available in several languages. After-sales service: ADMEA/LOGISAV, ZI du Clos des Charmes, 77090 Collégien, France. |
Frequently Asked Questions - SCCGHP121SC200 SCHNEIDER
User questions about SCCGHP121SC200 SCHNEIDER
0 question about this device. Answer the ones you know or ask your own.
Ask a new question about this device
Download the instructions for your Speaker in PDF format for free! Find your manual SCCGHP121SC200 - SCHNEIDER and take your electronic device back in hand. On this page are published all the documents necessary for the use of your device. SCCGHP121SC200 by SCHNEIDER.
USER MANUAL SCCGHP121SC200 SCHNEIDER
MANUEL D'UTILISATION
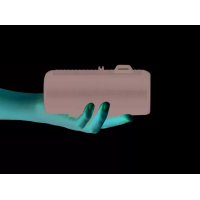
natural_image
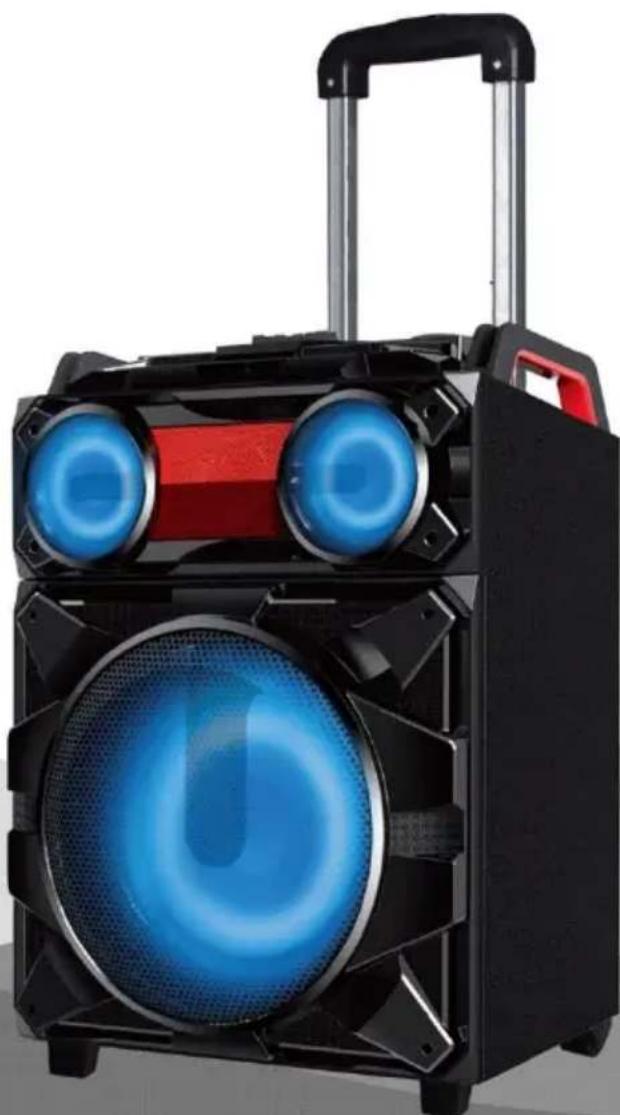
Black outdoor electronic device with blue-lit speaker and red handle, no visible text or symbolsENCEINTE PORTABLE AMPLIFIEE
Reference: PULSION 12.1
CE
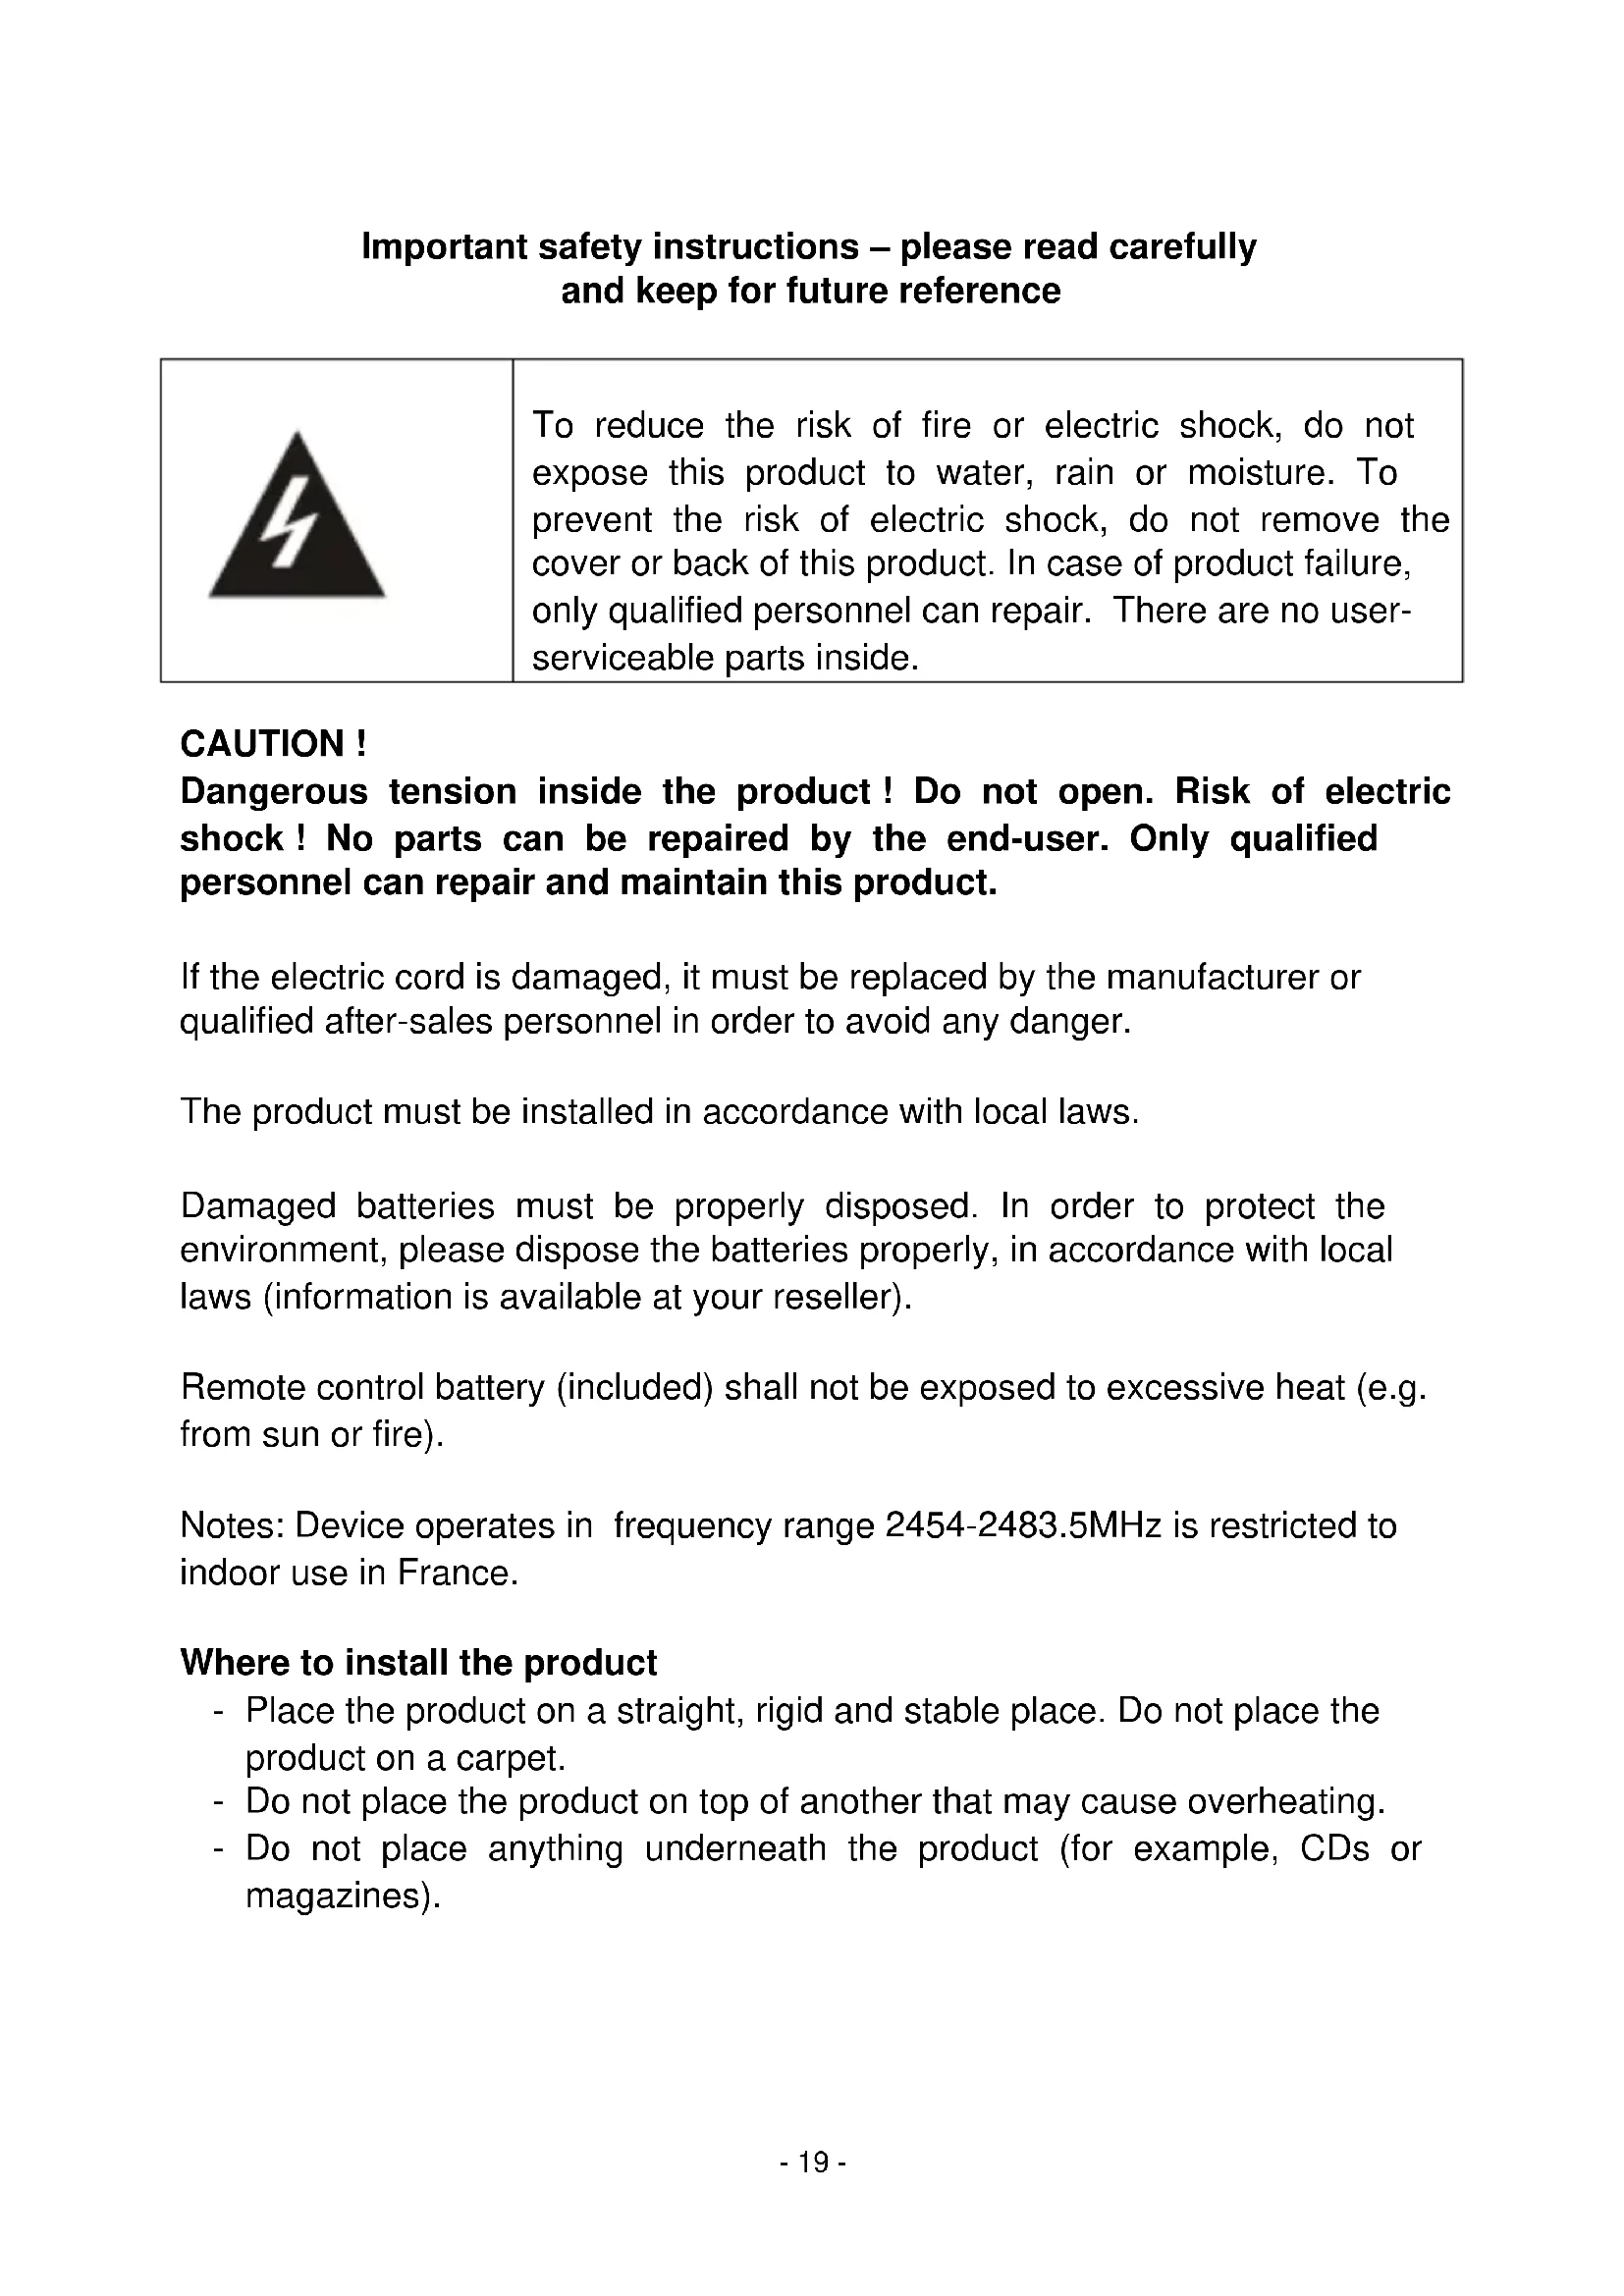
Important safety instructions – please read carefully and keep for future reference

To reduce the risk of fire or electric shock, do not expose this product to water, rain or moisture. To prevent the risk of electric shock, do not remove the cover or back of this product. In case of product failure, only qualified personnel can repair. There are no user-serviceable parts inside.
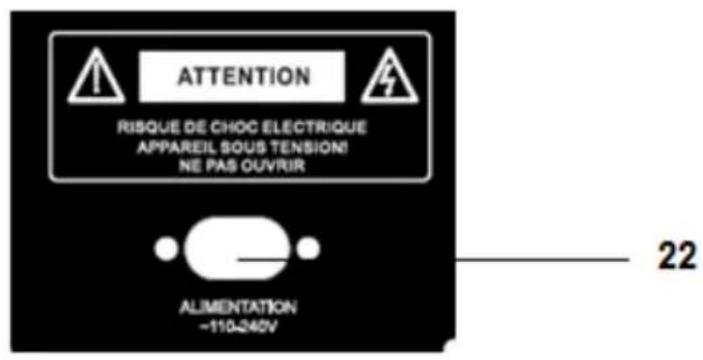
CAUTION!
Dangerous tension inside the product! Do not open. Risk of electric shock! No parts can be repaired by the end-user. Only qualified personnel can repair and maintain this product.
If the electric cord is damaged, it must be replaced by the manufacturer or qualified after-sales personnel in order to avoid any danger.
The product must be installed in accordance with local laws.
Damaged batteries must be properly disposed. In order to protect the environment, please dispose the batteries properly, in accordance with local laws (information is available at your reseller).
Remote control battery (included) shall not be exposed to excessive heat (e.g. from sun or fire).
Notes: Device operates in frequency range 2454-2483.5MHz is restricted to indoor use in France.
Where to install the product
- Place the product on a straight, rigid and stable place. Do not place the product on a carpet.
- Do not place the product on top of another that may cause overheating.
- Do not place anything underneath the product (for example, CDs or magazines).
Proper ventilation
- Place the product in a sufficiently-aerated place to avoid overheating. Allow at least 10cm spacing at the back and top of the product, and 5cm spacing on both sides to prevent overheating.
- Do not place items such as newspapers, tablecloth, curtains, in front of the ventilating openings.
Do not expose the product to high temperatures, moisture, water and dust.
- The apparatus shall not be exposed to dripping or splashing. No object filled with liquids, such as vases, shall be placed on the apparatus.
- Do not place other items close to this product that may damage it (for example, objects containing water or lightened candles).
- No naked flame sources, such as lighted candles, should be placed on the apparatus.
Electric supply
- Please unplug the product in case of prolonged non-use.
- If the supply cable is damaged, it must be replaced by the manufacturer or qualified after-sales personnel to avoid any danger.
- This product must be connected to an electrical supply 230V \~ 50Hz.
- The mains plug is used as the disconnect device, so the disconnect device shall remain readily operable
- Only use this product with the AC power cord provided.
- Do not use the product with a battery different from the one provided.
- CAUTION: Explosion risk if the battery is not replaced correctly. Do not attempt to replace the battery with a different battery version.
- Batteries (battery pack or batteries installed) shall not be exposed to excessive heat such as sunshine or fire or any other heat sources.
- If after being charged, the battery autonomy is reduced by half, the user must supervise the next charge. Caution, a damaged battery may cause a dangerous thermal overheating.
Declaration of Conformity
Hereby, Admea declares that this Portable Amplifier Speaker is in compliance with the essential requirements and other relevant provisions of Directive 1999/5/EC.
The declaration of conformity is available on website:
- This logo set on the product means that the recycling of this apparatus comes within the framework of the directive 2012/19/EC of July 4, 2012 concerning the waste on electrical and electronic equipment (WEEE).
- The presence of dangerous substances in the electrical and electronic equipments can have potential consequences on the environment and human health in the cycle of reprocessing this product.
- Therefore, at the end of its lifetime, this product shall not be disposed with other non-recycled waste.
- As the end user, your role is of prime importance in the cycles of re-using, recycling, and other forms of valorization of this electrical and electronic equipment. Local authorities and resellers have set special procedures for the purpose of collecting and recycling this product.
- You have the obligation to use the selective waste collection systems put in place by your local authorities.
1. Getting started
What's included?
1 x amplifier speaker
1 x remote control
1 x AC power cord
1 x wired microphone
1 x audio cable (3.5mm to 3.5mm)
1 x FM cable
2 x batteries for remote control: CR2032 type
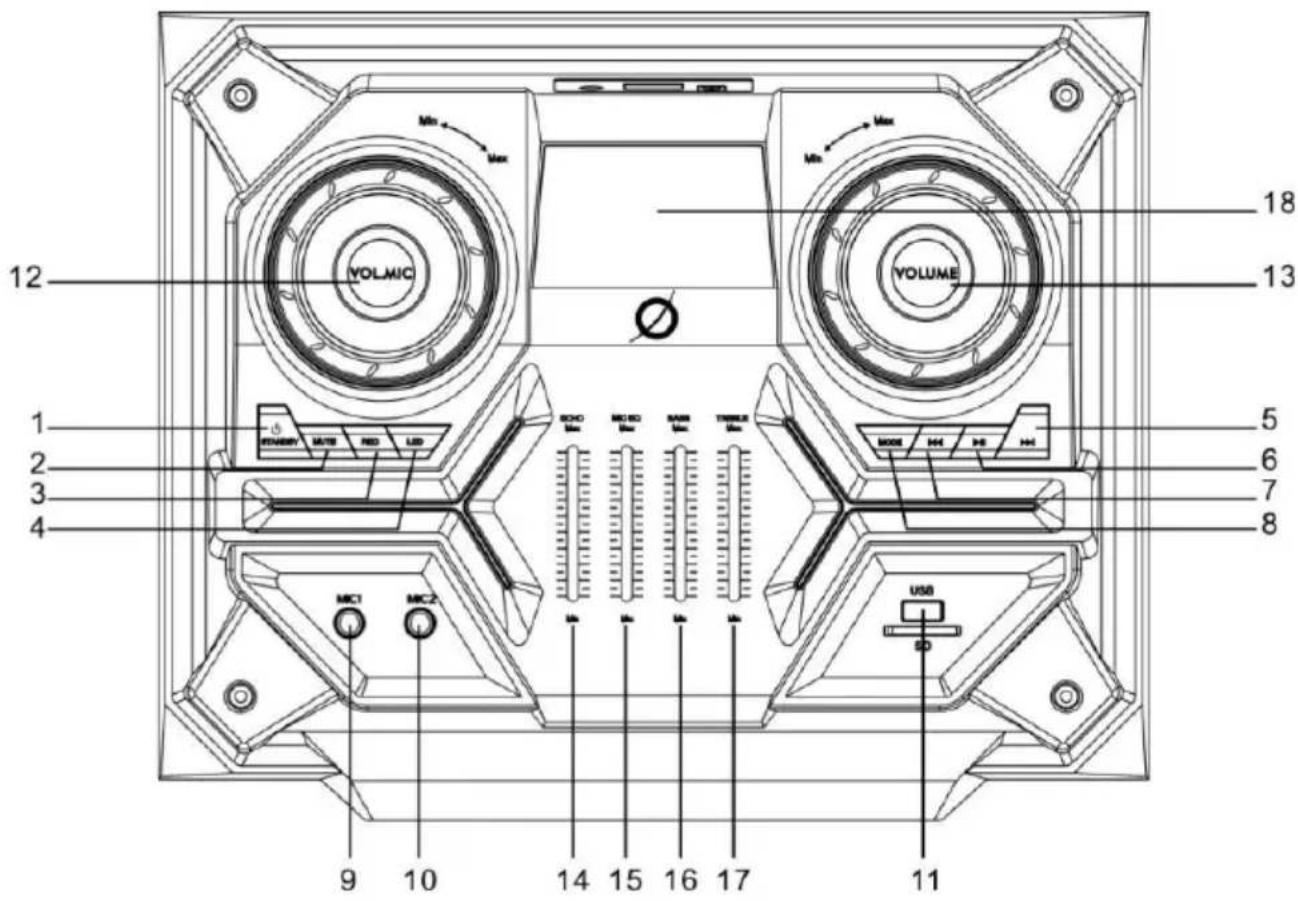
2. Overview of controls
-
STANDBY: Press this button to turn on/off the speaker.
-
MUTE: Press this button to mute or restore the sound output.
-
REC: Press this button to start recording function.
-
LED ON/OFF: Press this button to turn on/off LED disco light effects on speaker.
-
▶Press this button to play next audio.
-
▶/II: Press this button to play/pause music, FM auto scan and store.
-
Press this button to play last audio.
-
MODE: Press this button to switch to different modes: BLUETOOTH, USB, SD, AUX and FM radio mode.
-
MIC INPUT PORT: MIC-1.
-
MIC INPUT PORT: MIC-2.
-
USB /SD CARD reader: reading USB device or SD card up to 32GB for playing music in MP3 format.
-
VOL.MIC: Rotate this button clockwise/counterclockwise to increase/decrease mic volume.
-
VOLUME: Rotate this button clockwise/counterclockwise to increase/decrease the volume.
-
ECHO: Move this button up or down repeatedly to repeatedly to strengthen or lower the level of ECHO.
-
MIC EQ: Move this button up or down repeatedly to repeatedly to strengthen or lower the level of MIC EQ.
-
BASS: Move this button up or down repeatedly to repeatedly to strengthen or lower the level of BASS.
- TREBLE: Move this button up or down repeatedly to repeatedly to strengthen or lower the level of TREBLE.
- DISPLAY: Shows BLUE for Bluetooth mode, USB for USB mode, CARD for CARD mode, LINE for AUX IN/OUT mode.
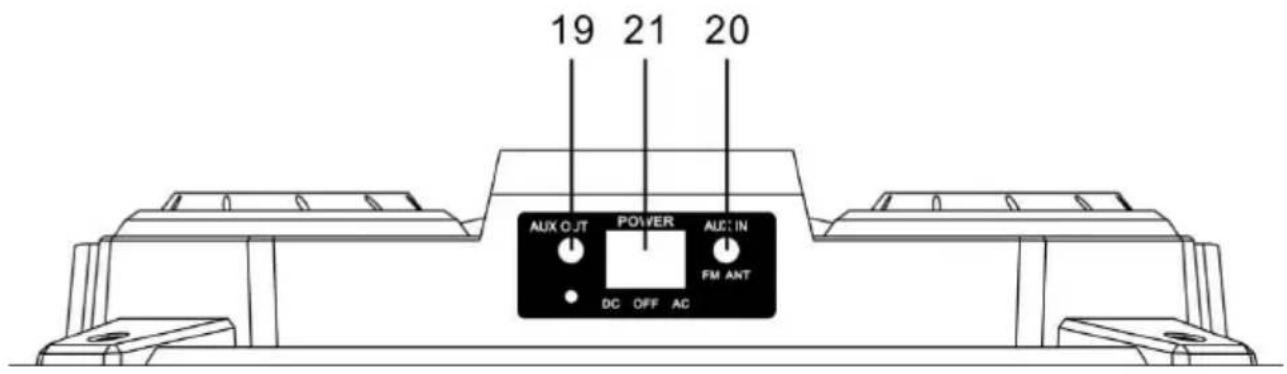
- AUX OUT: Connect any audio or video devices connecting with the Auxiliary output 3.5MM.
- AUX IN / FM ANT: Connect any audio or video devices connecting with the RCA or Auxiliary input 3.5MM. Also use this port to connect the FM antenna cable (provided).
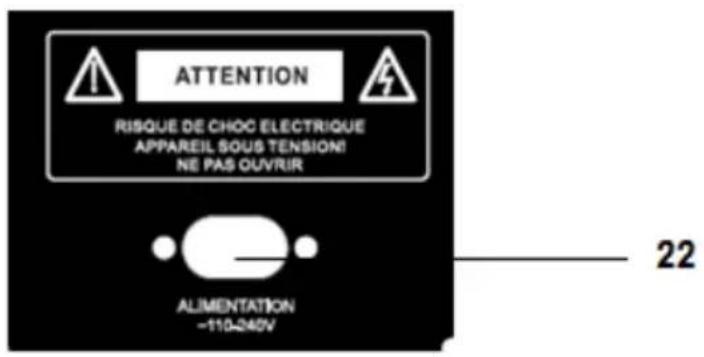
- POWER: Select AC when connects to the Mains or DC for battery use. OFF to power off the unit.
- AC POWER SOCKET: Connect the AC power plug to the power supply outlet.
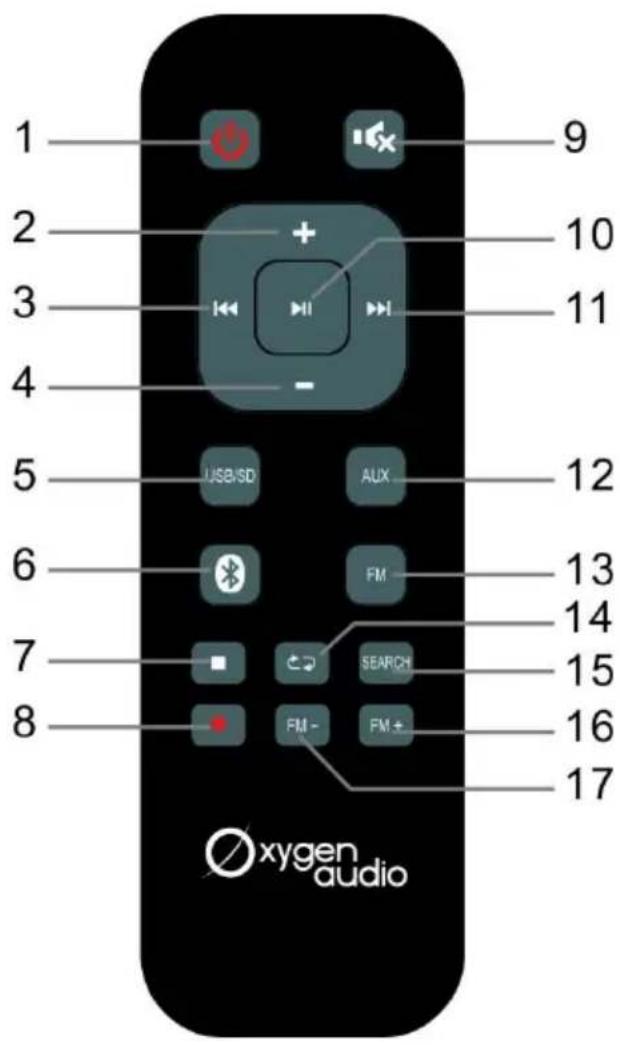
3. Remote control
-
STANDBY: Press this button to turn on/off the speaker.
-
VOL+: Increase the volume output.
-
☑: Skip to previous track during Bluetooth and USB/CARD mode playing.
-
VOL- : Decrease the volume output.
-
USB/SD: Press this button to switch to USB/SD card mode.
-
⚙: Press this button to switch to Bluetooth mode.
-
STOP: Press this button to stop audio playing in USB/SD mode only.
-
REC: Press this button to go to recording mode.
-
MUTE: Press this button to mute or restore the sound output.
10.▶/II PLAY/PAUSE: START or PAUSE the audio playing.
- : Skip to next track during Bluetooth and USB/CARD mode playing.
12.AUX: Press this button to switch to AUX-IN or AUX-OUT mode
13.FM: Press this button to switch to FM mode.
-
Repeat: Press this button to repeat the current track, and press it again to repeat all tracks. (Applicable in USB/SD card mode only.)
-
Search: During FM mode, press this button to auto search FM and save radio stations.
16.FM+: Press this button to increase 0.1MHz each time to search channels manually.
17.FM-: Press this button to decrease 0.1MHz each time to search channels manually.
Note: The radio channels which are searched manually could not be saved.)
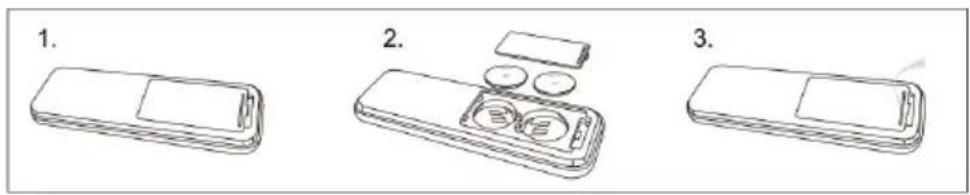
Installing batteries to the remote control
- Remove the battery cover from the back of the remote control.
- Insert and fix 2pcs of batteries (CR2032) into the battery compartment with the (+) facing upward.
- Put the battery cover on the remote control and close it.
Battery charging
This speaker has a rechargeable lead acid battery inside .Please connect the power cord to AC port to charge it. It takes around 6-8 hours to fully charge the speakers. Disconnect power cord as soon as battery is fully charged (the light on the LED display will turn to green).
Note: Battery will be charging in On and Off modes. In accordance with low power consumption directives, the battery will not charge in standby mode.
Disposal of batteries
Dispose of used batteries with regard to the recycling regulations in your area. Do NOT short circuit batteries or throw them into water, the general rubbish or in a fire. Weak batteries can leak and damage the remote control. Replace them in good time!
4. Connecting an audio device with Aux-in
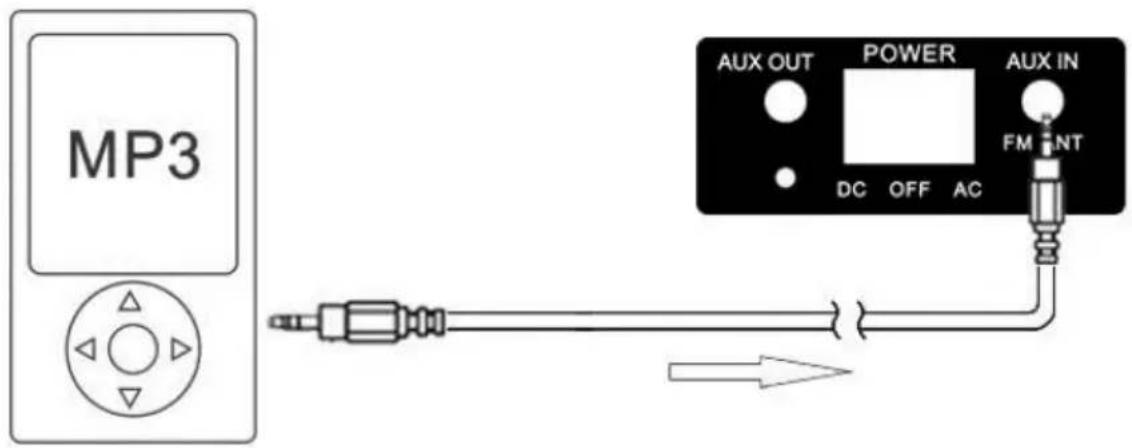
- Connect one end of the 3.5mm audio cable to the headphone output of your MP3 player.
- Connect the other end to the AUX IN input (3.5mm socket) on the amplifier speaker.
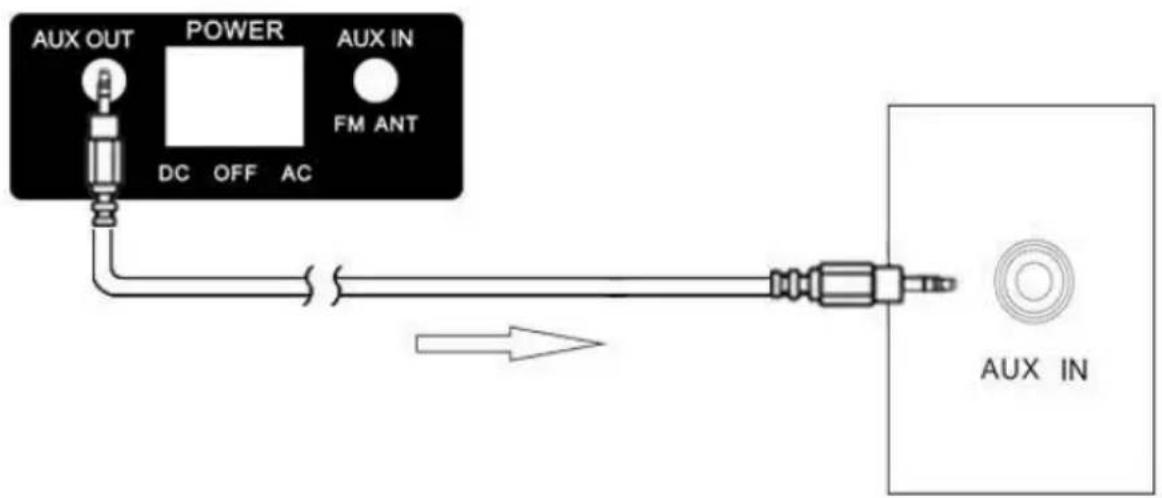
5. Connecting to a second speaker
flowchart
graph LR
    A["AUX OUT"] --> B["Power"]
    B --> C["FM ANT"]
    D["DC OFF AC"] --> E["Switch"]
    F["AUX IN"] --> G["Output Terminal"]
    style A fill:#f9f,stroke:#333
    style B fill:#ccf,stroke:#333
    style C fill:#cfc,stroke:#333
    style D fill:#fcc,stroke:#333
    style E fill:#cff,stroke:#333
    style F fill:#ffc,stroke:#333
    style G fill:#cfc,stroke:#333
- Connect one end of the 3.5mm audio cable to the AUX OUT output of the amplifier speaker.
- Connect the other end to the AUX IN input (3.5mm socket) of the other speaker.
Note: If AUX cable is plugged to one end only and not plugged to another device, it may cause buzz noise.
6. Bluetooth operation
Pairing a Bluetooth device
Before you can use the amplifier speaker with your phone or other Bluetooth capable device you will need to pair the device to the amplifier speaker.
- Press MODE button on unit or Bluetooth button on remote control repeatedly until you see the LED indicator shows "BLUE", and then Bluetooth logo on display stay flashing when no other devices paired.
- Enable the Bluetooth function on your smart phone and search for a device labelled "PULSION 12.1" in the available list.
- Select and enable pairing for the device "PULSION 12.1".
- If pairing is successful the amplifier speaker will beep and indicator stops flashing.
During playback, you can:
- ▶◀◀Press ▶/□ button to play or pause playback of the selected track on the audio device.
- Press or ▶to skip to last or next track.
Note:
- The operation range of Bluetooth is approximately 10 meters (30 feet). Any obstacles in the path between devices may reduce this range.
- Only one Bluetooth device can be paired at a time.
7. General operation
Connecting mains power
- Connect the AC power plug to the power supply outlet.
- Switch the power button to AC position, the power ON/OFF button is located at the real panel of the device. Switch the power button to DC position for battery use and OFF to power off the unit.
Standby mode
-
Press the STANDBY button on the remote to wake the unit from STANDBY mode.
-
To enter STANDBY mode, press STANDBY button.
NOTE: As part of the power saving mode, the unit will enter STANDBY mode automatically after 60 minutes (approx.) of no audio output.
LED Display and charging indicator light status
Charging indicator light located at the real panel of the device.
| Operation mode | LED light | LED Display | |
| Standby | Off | Off | |
| Power OFF | battery charging | Red | Off |
| with full battery | Green | Off | |
| AC mode | battery charging | Red |  flash flash |
| full battery | Green |  solid solid | |
| DC mode | with power plug, battery charging | RED |  logo flash logo flash |
| without power plug | Off |  logo solid and display the actual battery capacity logo solid and display the actual battery capacity | |
| AUX mode | / | Screen shows “LINE” | |
| Bluetooth-ready for pairing | Screen shows “BLUE”, logo flash. | ||
| Bluetooth paired | Screen shows “BLUE”, logo solid. | ||
| USD/SD card mode | Screen shows“USB” or “CARD”, and playing time display from “00:01”. | ||
| Recording function in USB or SD mode | Screen shows “USB” & “RECO”, or “CARD” & RECO”. | ||
| FM mode | Frequency shows on screen. | ||
| When pressing VOL+/- keys on Remote control | Screen shows volume from “000” to “032”. | ||
| In Mute | LED display blink in BLUE. | ||
8. FM radio operation
- Turn on the unit and press repeatedly the MODE key on unit, or press the FM button on remote control to select FM mode (the display will show the frequency).
-
Press the ▶/II button on the unit or SEARCH key on remote control to start an automatic search for available radio stations, and the radio stations can be saved automatically after auto-searching finished. (FM memory: a maximum of 200 channels could be saved.)
-
During FM auto searching, press button on the unit to stop searching the radio stations.
- Press the buttons ▶▶ / ◀◀ on the unit, or the keys ▶▶ / ◀◀ on the remote control to listen to the various radio stations which are saved in memory.
- Press FM+/FM- buttons on remote control to increase/decrease 0.1MHz each time to search radio stations manually.
Remark: The radio channels which are searched manually could not be saved.
9. USB/SD operation
Connecting a USB device or a SD card
1) Power-on the unit.
2) Insert a USB key / SD card to the interface.
3) When a USB/SD device is connected to the unit, press the MODE repeatedly on the unit or press USB/SD on the remote to select USB/SD mode.
4) Press stop key on remote control to stop audio playing.
Remark: Depending on the capacity of the device, the reading can take more than 1 minute.
The unit cannot read my USB device.
- Once you have plugged your device to the unit, you may need to switch on the USB device before it can operate.
- This unit does not support a direct USB connection with a computer. You need to use a USB device, a MP3 player or a PMP (Portable Multimedia Player with hard disk).
- If you are using a USB external hard disk: you need to connect your device simultaneously to an external power source and to the unit. If you are using a self-powered PMP, make sure that the battery is sufficiently loaded.
- Check that the files system of your USB device is formatted into the FAT or FAT 32 format. USB device formatted into NTFS are not compatible with this unit. Caution: if you attempt to modify your file system, formatting your device will erase all data. Please refer to your USB device's instruction manual first.
- Connect your USB device directly to the USB port of the device. Using an extension cable is not recommended and may cause interference and failure of data transfer.
The unit cannot read my memory card.
- Check firstly that your memory card is compatible with the unit. Supported memory cards are SD, SDHC formats. We have tested this unit with most of the market's memory cards; we cannot however guarantee a full compatibility with all the cards in the market because of the multiple technology standards in use. Should you have a compatibility problem: please use a memory card with a lower capacity (32GB or lower) or else connect the unit through a USB device.
10. Recording operation
- Plug the microphone to the MIC-1 or MIC-2 port.
- Insert USB/SD card into the corresponding port: press USB/SD button on remote control.
- If the USB/SD card is plugged into the speaker for the first time, the system will automatically create a folder named "RECORD" to save the recorded files (FAT32 USB file system is supported, recording quality is 128Kbits).
- When you are ready to record, press REC button on unit or REC key on remote control to go to recording mode. The current sound output will stop and go to mute status, screen shows "REC". The device starts recording when the screen shows 00:01, and users can use the microphone to record.
- Then, press REC button again on remote control to stop recording function.
- After recording finished, press ▶ button on unit or key remote control to play/pause the recording files.
Note:
- Only the microphone can be recorded. The simultaneous recording of two audio sources is not available on this device.
- When inserting a USB/SD card to the corresponding port, if there are recording files on USB/SD card, long-press REC button on device, and then short-press ▶/II key, it will play the recording files; long-press REC button on device again, it will playback the MP3 files.
11. Specification
| Portable Amplifier Speaker | |
| Power supply | Input: 110-240V ~ 50-60HzOutput: 12V, 9A |
| Power consumption | 45W |
| Standby power consumption | ≤ 0.5W |
| FM tuner | 87.5MHz-108MHz |
| Frequency response | 100Hz-20kHz |
| Input sensitivity | 1V |
| Impedance | 10k Ohm |
| Speaker | 12” BASS + 2 x 3” TREBLE |
| Cable length | 1.5 m |
| Dimensions | 437 x 353 x 682mm |
| Remote control | |
| Remote battery | 2 x CR2032 |
| Bluetooth | |
| Bluetooth compatibility | EDR, A2DP, AVRCP |
| Bluetooth version | 2.1 |
12. Trouble shooting
In the unlikely event of difficulties with your appliance please follow the trouble shooting guide below.
| PROBLEM | POSSIBLE SOLUTION |
| No Power | ·Ensure the mains plug is connected to a power supply, and the device is switched ON. The POWER button located at the rear side must be switched to AC mode.·The device is in STANDBY mode, press the STANDBY button on the remote to wake the unit from STANDBY mode or press POWER button on the real panel of the device. |
| No Sound | ·When playing from the AUX input, Make sure the external source has the volume turned up and is playing a track.·Make sure the volume is turned up.·When playing in AUX-IN mode, Make sure the other device's connection is Output not Input.·Make sure to connect to AUX-IN port and not AUX-OUT.·Bluetooth device not paired. Refer to “8. Bluetooth operation”.·USB/SD can only support the MP3 file format. Other formats could not be read. |
| In AUX-IN mode, short interruption occurs from time to time | ·Under a very large volume, speaker may enter autoprotection mode and mute for a short while. Please reduce slightly the volume in order to avoid this situation. |
| No response from the unit | ·Unplug the power cable for 1 minute then plug back in again. |
| Remote control does not work | ·Check the batteries are installed correctly.·Replace the batteries.·Aim the remote directly at the speaker. |
| FM station cannot be stored | ·The radio channels which are searched manually could not be saved |
| Speaker makes loud noise | ·Keep the microphone 2 meters away from the speaker.·Turn off microphone if not in use.·Adjust microphone volume to lower mode.·Keep mobile away from the speaker when attending a call.·Keep the speaker away from other wireless equipment.·If AUX cable is plugged to one end only and not plugged to another device, it may cause buzz noise. In this case, please unplug the cable. |
| Unit powers off after 60 minutes | ·This unit is designed to enter STANDBY mode automatically after 60 MINUTES of inactivity. Press the STANDBY or POWER button to wake the unit. |
| The battery is not charging | ·Battery will be charging in On and Off modes. In accordance with low power consumption directives, the battery will not charge in standby mode. |
After-sales service
ADMEA/LOGISAV


- MANUEL D'UTILISATION
- Important safety instructions – please read carefully and keep for future reference
- CAUTION!
- Where to install the product
- Proper ventilation
- Do not expose the product to high temperatures, moisture, water and dust.
- Electric supply
- Declaration of Conformity
- Getting started
- What's included?
- Overview of controls
- Remote control
- Installing batteries to the remote control
- Battery charging
- Disposal of batteries
- Connecting an audio device with Aux-in
- Connecting to a second speaker
- Bluetooth operation
- Pairing a Bluetooth device
- During playback, you can:
- Note:
- General operation
- Connecting mains power
- Standby mode
- LED Display and charging indicator light status
- FM radio operation
- USB/SD operation
- Connecting a USB device or a SD card
- The unit cannot read my USB device.
- The unit cannot read my memory card.
- Recording operation
- Specification
- Trouble shooting
Brand : SCHNEIDER
Model : SCCGHP121SC200
Category : Speaker