USER MANUAL Funline 310 Talamex
+gratulations on your purchase of a Talamex Funline inflatable. We take pride in bringing you a quality product which will offer you years of pleasure. Your new item is an in'estment which deser"es your care and attention. This manual has been compiled to help you to operate your product with safety and pleasure. It contains details of the product, its equipment, and information on its operation and maintenance. Read it carefully and familiarize yourself with the inflatable before using it in order to ensure the safe use and pre"ent tragic accidents.
The warnings below are ad"isories relati"e to "arious types of situations. Please obser"e them.
| CAUTION! %enotes an imminent hazard which will result in se"ere injury if you do not comply with the instructions |
| WARNING! Reminds you of safety measures which must be obser"ed. %enotes also unsafe practices which could result in injury or product or property damage if you do not comply with the instructions. |
CAUTION!
It is the owner's responsibility to make sure that all users will carefully read and follow the manual and instructions for the safe operation of this product. Observe all local and national laws. Always wear a coast guard approved Personal Flotation Device. Please observe carefully the information on the capacity plate which is printed on the item.
Your boat fulfils the requirements of EN IS9 6185-1 standard, TYPE 1 (Funline 200, 240 & 280)
TECHNICAL SPECIFICATIONS
| =odel Length | inflated
cm approx. | Width inflated
cm approx. | Weight
kg | Persons capacity | ax load capacity |
| FL200 | 125 | 2.8 1 adult + 1 child | 120 | | |
| FL240 | 140 | 4.2 2 adults | 165 | | |
| FL280 | 280 | 150 | 7.1 | 2 adults + 1 child | 250 |
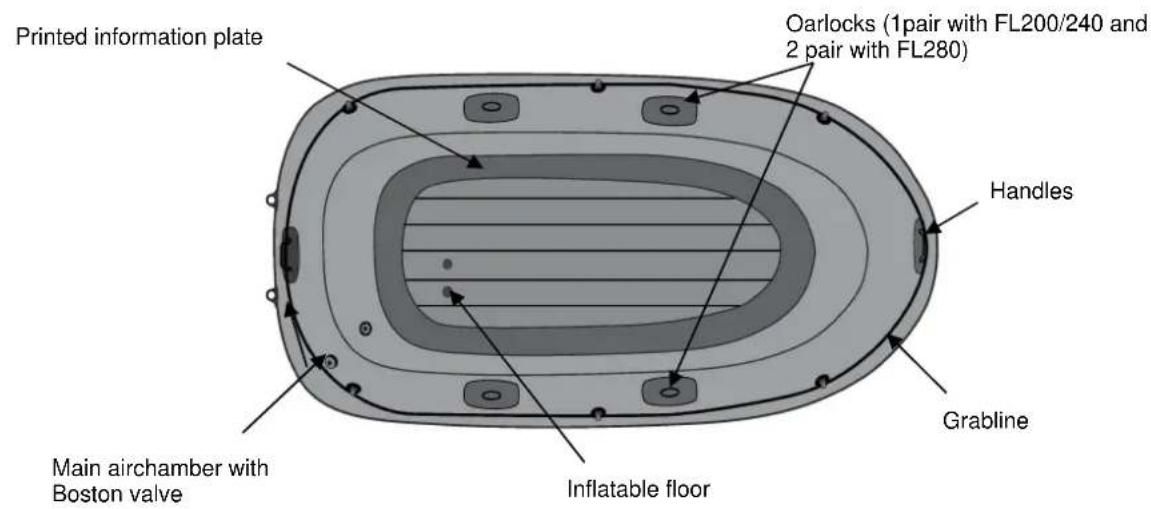
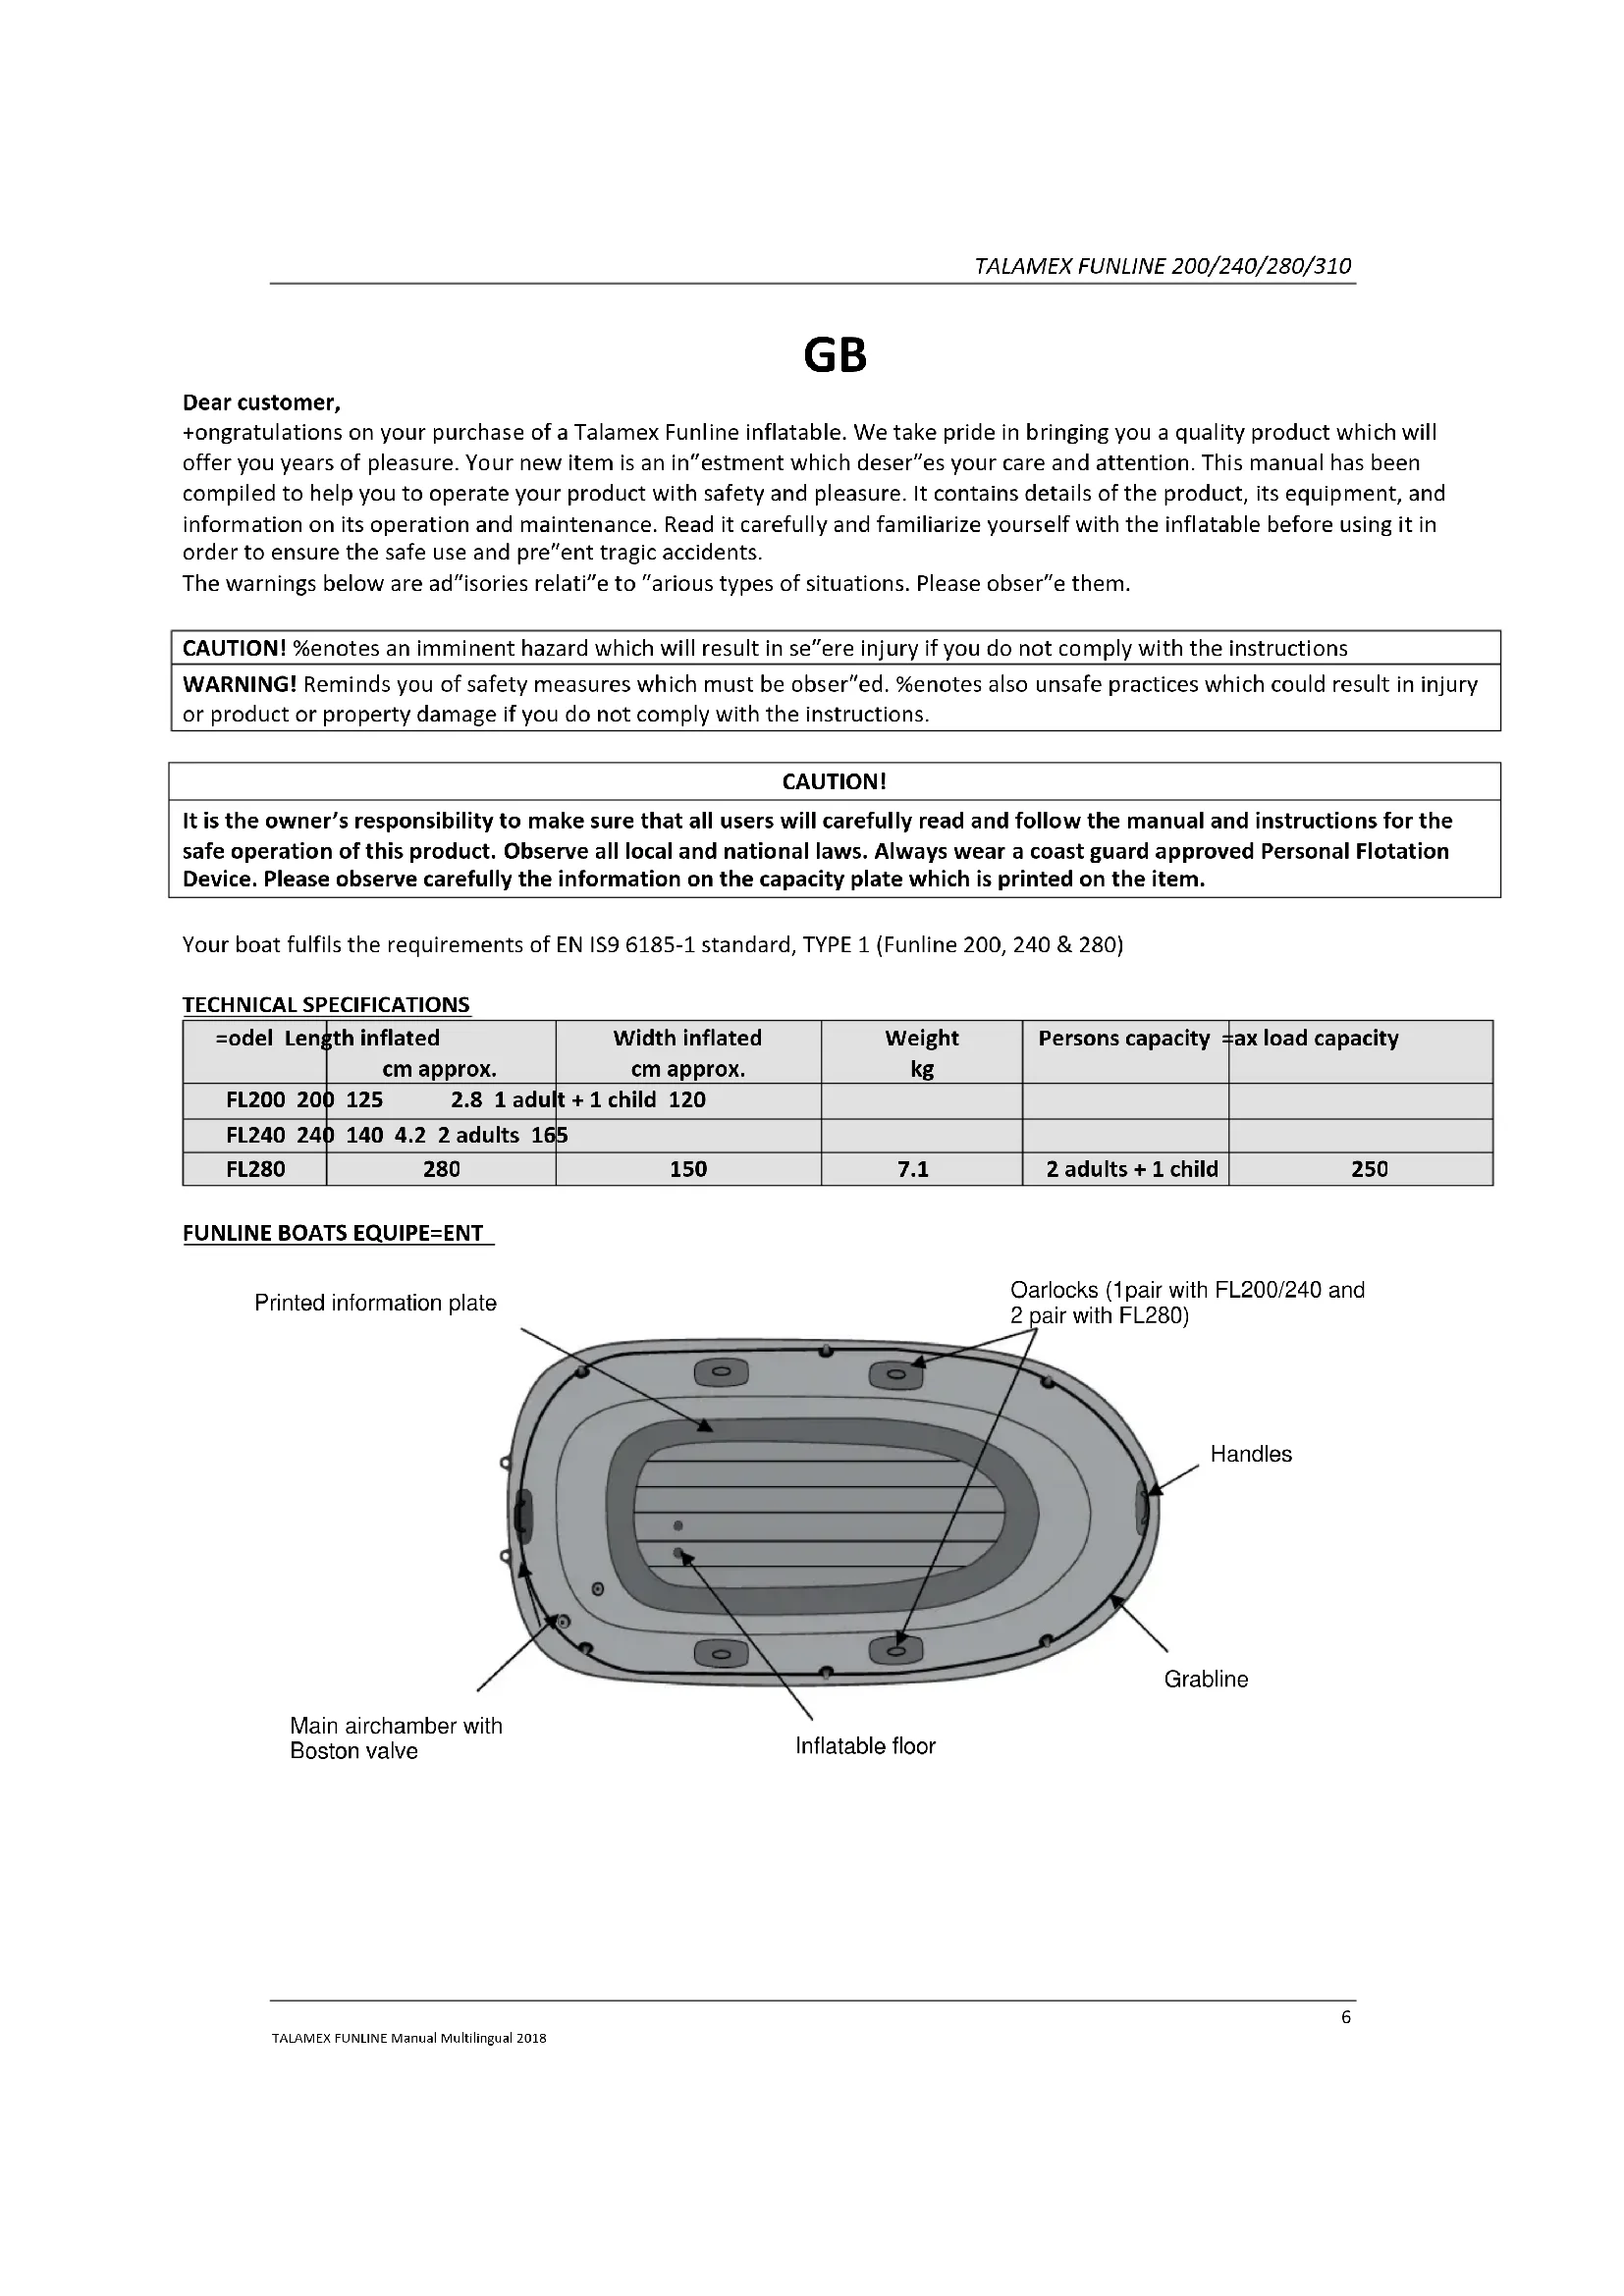
FUNLINE BOATS EQUIPE ENT
Your kayak fulfils the requirements of EN IS9 6185-1, TYPE III (Funline 310)
TECHNICAL SPECI+ICATIONS
| Model Length inflated cm approx. | Width inflated cm approx. | Weight kg | Persons capacity Max load capacity kg |
| +L310 310 84 10,1 2 adults 155 | | | |
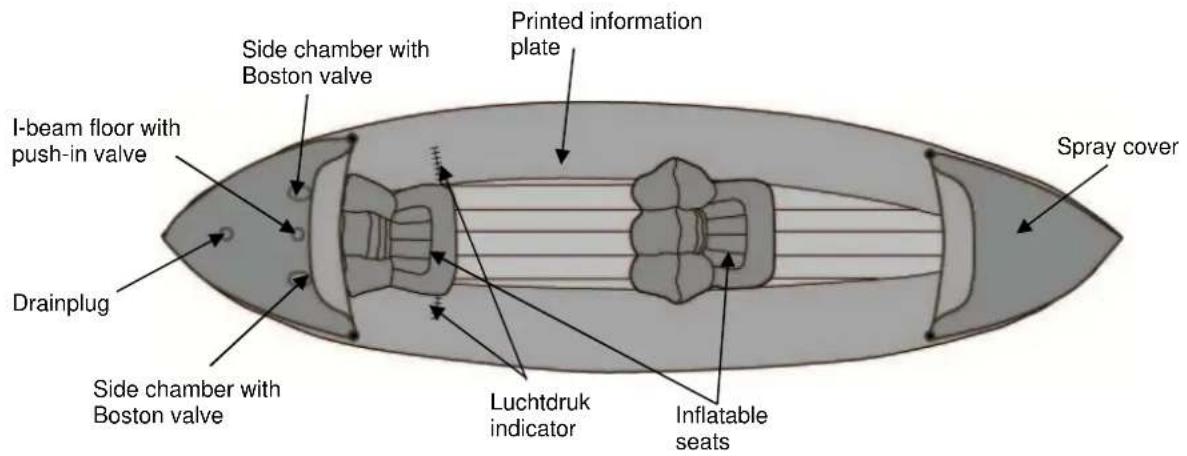
+UNLINE KAYAK EQUIPE ENT
ASSE=BLYINSTRUCTIONS/IN+LATION
CAUTION!
For the first inflation and in order to get acquainted with your new product, inflate indoors at room temperature where the PV+ will be soft and assembly process made easier.
Any use of an air compressor will damage your product and automatically void all warranties.
This manual below refers to a boat but also means kayak.
If it was stored at a temperature below 0^ + / 32^, lea"e it at 20^ + / 68^ for 12 hours before unfolding. Inflate it with the supplied pump or any inflator designed for inflatable boats, rafts, pool floats, air beds, camping mattresses, and other low pressure inflatable. These types of inflators will ha"e a hose and adapters to fit the "al"es on this product.
+choose a smooth and clean surface to unfold your product.
- Your boat is equipped with two different types of "al"es:
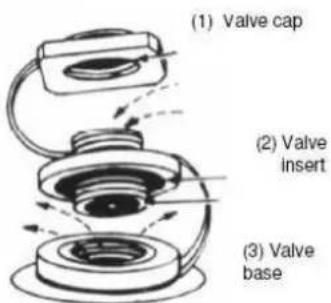
a) Boston "al"e(s) - please see opposite figure: Unscrew the "al"e cap (1). Screw the "al"e insert (2) onto its base (3) and check that the "al"e cap stays accessible.
Insert the pump hose end piece and inflate it until you will reach the required pressure (see point 3). After inflation fit all the "al"e(s) cap tight (clockwise).
NOTICE: A slight air-leak before screwing the "al"e(s) cap is normal. Only the valve(s) cap can ensure final AIR TIGHTNESS.
b) Push-in "al"e(s): pull the "al"e out slightly and remo"e the plug from the "al"e; inflate the chamber by using the adapter of the inflator which fits the "al"e.
+lose the "al"e and press it into the air chamber.
- Inflate the kayak in the order of inflation as shown on the capacity plate printed on the product.
- Max. air pressure: The correct pressure for this item is: 0,06 bar (= 60 mBar). Do not exceed it. Please check the pressure with the supplied pressure gauge (please refer to the "Instructions for the manometer") Overpressure: deflate until you reach the recommended pressure. Drop of pressure: inflate again slightly.
- Place the inflated seats (if remo"able) into the kayak.
WARNING!
If you leave your product exposed to the hot sun check the pressure and deflate it slightly, otherwise the material might be overstretched.
The ambient temperature affects the tube's internal pressure: a "ariation of 1^ causes a "ariation of the pressure in the tube of +/- 4 mBar.
OPERATING INSTRUCTIONS
WARNING!
USE THIS BOAT ONLY IN PROTECTED SHORE-ZONES, AVOID OPEN WATER AND STREAMS WITH STRONG CURRENTS!
BEWARE OF OFFSHORE WINDS AND CURRENTS!
Get informed on local regulations and hazards related to this sport or water act"ities.
Before using the product, please check it carefully.
Be careful that you do not o'er estimate your strength, your endurance or your skill.
Be careful ne"er to under estimate the forces of nature.
Do not exceed the authorized number of persons or weight.
A"oid all contact between the buoyancy tubes and sharp objects or aggressi'e liquids (such as acid).
This product is deli'ered with a line. Keep it away from children. Danger of suffocation!
NEVER LET THIS BOAT BE TOWED BY ANOTHER BOAT OR ANY OTHER VEHICLE
MAINTENANCE: DEFLATING - FOLDING THE ITEM - CLEANING - WINTERING STORAGE
- Remo"e oars/paddles and other accessories.
- To deflate, unscrew the "al"es' insert and open the "al"e cap of the push-in "al"e.
- Clean and check the item as well as all the accessories after each use. Rinse it thoroughly making sure to remo"e any residues of salt if used in salt water. Use a mild soapy solution; do not use detergents or any type of silicone based products. Make sure the product is completely dry before putting it away.
- Fold the 2 sides into the middle, then roll it up from the opposite end of the "al"es (so remaining air can escape from the "al"es); start again if you feel there is still some air in the tubes.
- When storing your inflatable, keep it in a clean and dry place that is not affected from major "ariations in temperature and other damaging factors. You may store it deflated and rolled up in a bag or assembled and lightly inflated (make sure you do not subject it to deformations). Store it away from rodents.
6OW TO R8PA7R S=ALL PUNCTUR8S
You can repair small punctures with the included repair kit. Please note that in order for the repair to be successful, the humidity le"el should be less than 60% , temperature between 65^ / 77^ or 18^ + / 25^+ . A"oid carrying out repairs in the rain or in direct sunlight.
To remo"e the inside bladder(s) please open the zippers on the inside of the canoe/kayak co"er; each air chamber features a zipper at the bow and a zipper at the stern of the canoe/kayak for quick and easy access. +heck that the tube is fully deflated and lies flat.
- Draw the shape of the patch exactly where it will be applied, cut a round patch at least 2^ / 5 cm larger than the cut/damaged area.
- +lean the damaged area and the corresponding side of the patch with a grease remo"er of the alcohol type and allow for it to dry for 5 minutes.
- Apply 3 thin layers of glue on both the patch and the damaged area, allow for it to dry for 5 minutes between layers until the glue feels tacky.
- When the third layer of glue is dry, apply the patch without pressing and adjust the positioning if required, press the air bubbles which may ha"e formed under the patch by smoothing the patch with a round object such as a spoon, do this procedure by starting in the center of the patch towards the outside, clean the excess glue with a sol"ent. 5rying: 12 hours.
| WARN7N4 ! |
| Perform all of your repairs in a well-“entilated area A”oid inhaling glue “apors or swallowing. | A”oid contact with the skin or the eyes
Keep all repair materials (glue, sol”ents, etc.) away from children’s |
N.B. the repairs on the welding's must not be glued. Only the manufacturer of the +ane/Kayak can perform the repairs on the welding's.
WARRANTY
The product is co"ered by a total parts and labor warranty for a period of 2 (two) years from its purchase date.
The warranty is not transmissible and is only "alid for the original purchaser.
The warranty is excluded in case of professional use.
The warranty applies to products that are defecti'e, from official complaint that is accompanied by a piece of e"idence with date of purchase (such as: in"oice, receipt) and a clear description of the problem.
Within the guarantee period, the product shall be either repaired, replaced or reimbursed, in full or in part. Liability to buyer under a claim shall in no e"ent exceed the price of the product.
The warranty is null and "oid and does not apply should damage arise from (I) abuse of the products (II) failure to operate and maintain the product in accordance with the instructions of use (III) repair, ser"ice, alteration or modification of the product by unauthorized third parties (IV) original parts are not used.
The warranty does not co"er the perforations, abrasion and wear and tear from normal usage.
The warranty does not apply if the boat is not used according to the owners manual
All other claims including for damages resulting from this warranty are excluded unless Lankhorst Taselaar B.V. liability is legally mandatory.
This guarantee in no way affects a Buyer's statutory rights.
DE
EC type - Examination Certificate
Dutch Marine Inspection, Notified body for certification of Recreational Crafts to Directive 2013/53/EU under number 2248 established at Scheemda, the Netherlands, herewith declares that the under mentioned vessel has been assessed according to the Recreational Craft Directive 2013/53/EU and meets all applicable essential safety requirements.
Manufacturer
Lankhorst / Taselaar BV
Binenhavenweg 31
8211 AA, Lelystad
Netherlands
Description craft
Talamex Funline 280
Type description
Inflatable boat
Designer
Type
Applied certification module
Manufacturing code
Scope of examination
Design category
Length of the hull Lh
Beam of the hull Bh
Draught T
Loaded displacement mass Mldc
Lankhorst / Taselaar
Type I, ISO 6185-1
B
NL-LAL
Complete vessel
D
2.8 [m]
1.49 [m]
0.1 [m]
257 [kg]
Maximum load on builder's plate
250 [kg]
Maximum number of persons
2 adults + 1 child [-]
Certificate number
AA038-RCD-169060
Date of release
06 January 2017


ing.A.de Roos
CEO
www.talamex.com
For more Talamex marine products