TM86 - Outboard motor Talamex - Free user manual and instructions
Find the device manual for free TM86 Talamex in PDF.


| Product Type | Electric Outboard Motor |
| Model | Talamex TM86 |
| Thrust | 86 lbs (39.0 kp) |
| Power Supply | 24V DC (two 12V batteries in series) |
| Max Power Consumption | 30A (864W) at full speed |
| Speed Settings | 5 forward, 3 reverse, plus neutral |
| Motor Type | Electric trolling motor |
| Propeller | Replaceable with shear pin |
| Mounting | Clamp bracket for transom |
| Depth Adjustment | Adjustable shaft with locking screw |
| Minimum Water Depth | 0.8 m |
| Steering Adjustment | Counter-force bolt for tension |
| Battery Level Indicator | LED plate (levels 1-10) |
| Handle | Telescopic |
| Cable Size Recommendation | 13mm² (6 AWG) if extending |
| Warranty (Motor Rotor/Magnet/Electronics) | 2 years free replacement |
| Warranty (Speed Switch/Carbon Brush) | 1 year free replacement |
| Safety | Disconnect battery before servicing; do not submerge |
| Maintenance | Wipe with damp cloth, rinse with hose, lubricate moving parts |
| Storage | Lubricate and store in dry, ventilated area; avoid winter outdoor |
| Included Manual | User manual in multiple languages |
| Environmental Compliance | WEEE, RoHS, REACH |
Frequently Asked Questions - TM86 Talamex
User questions about TM86 Talamex
0 question about this device. Answer the ones you know or ask your own.
Ask a new question about this device
Download the instructions for your Outboard motor in PDF format for free! Find your manual TM86 - Talamex and take your electronic device back in hand. On this page are published all the documents necessary for the use of your device. TM86 by Talamex.
USER MANUAL TM86 Talamex
natural_image
Line drawing of a USI electric motor with propeller and side blades (no text or symbols)GB
USER MANUAL

CE
ROHS
REACH
SVHC
Please read and retain this manual before use of this electric motor.
Table of Contents
GENERAL INFORMATION
WIRING AND BATTERY RECOMMENDATION
SAFETY INFORMATION
FIRST TIME RUNNING
Battery Connection Method
Attaching the Motor to Your Boat
Depth Adjustment
Steering
Speed Control
How to (re)place the propeller
TROUBLESHOOTING
MAINTENANCE
STORAGE
WARRANTY
GENERAL INFORMATION
Thank you for purchasing a Talamex electric engine. The trolling motors are designed and developed by professional engineering teams. With years of efforts. The power of trolling motor has widely covered 30LBS, 40LBS, 48LBS, 58LBS 66LBS and 86LBS in order to fit various costumers' requirements and provide different experiences. Please read and retain this manual before using this electrical motor. The manual contains information that describes the procedure for safe operation and daily maintenance of your trolling motor. Safe operation will prevent from personal injury and product damage.
WIRING AND BATTERY RECOMMENDATION
Battery Type
Recommended battery(s): 12-volt Deep Cycle battery or Marine battery, battery should has at least 55 ampere hour rating or higher. To extend running time an additional battery can be used. See section on battery connection method.
Cable Size
If extending the standard battery cable supplied with the product, recommends the use of 13mm^2 wire (6-gauge wire, AWG).
Warning: Be sure all switches are in the OFF position before connecting to battery or batteries. Electrical arcing near the battery could ignite hydrogen gas and cause the battery to explode.
SAFETY INFORMATION
Do not allow children under 16 to operate the electric outboard motor.
Do not modify the unit in any way or add accessories not intended for this product.
Never fully submerse the unit, if unit is accidentally submersed disconnect battery and leave to dry.
Warning: Always disconnect power from the motor when replacing propeller, removing debris around the prop, charging batteries, transporting boat or when the motor is not in use.
FIRST TIME RUNNING
BATTERY CONNECTION METHOD
Before connecting the motor's cables to the battery, ensure switch is in the OFF position and stand clear of the propeller. Connect the red cable to the positive (+) terminal and the black cable to the negative (-) terminal, making sure the terminals are clean before doing so. A clean connection will minimize power wastage and give you maximum power from the battery. (A). The battery should be kept in a well-ventilated location. We recommend using a special deep cycle marine battery for optimum performance.

(A)

natural_image
Technical line drawing of a mechanical device with no visible text or symbols(B)
ATTACHING THE MOTOR TO YOUR BOAT
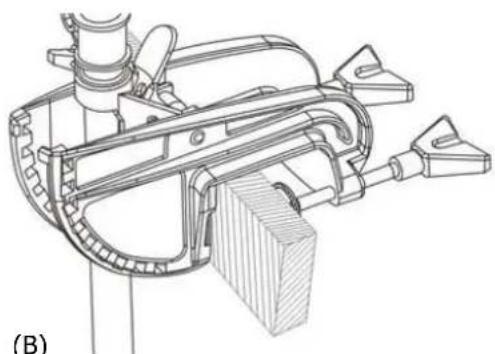
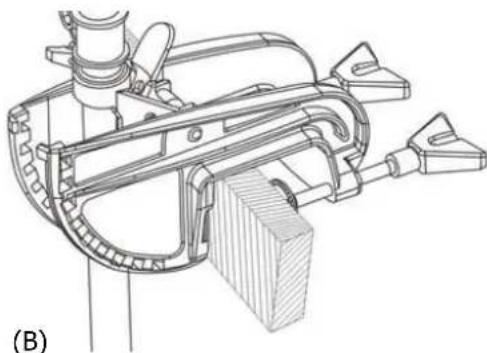
Attach the motor to the stern of the boat and tighten both mounting bolts securely while taking care not to over-tighten. To adjust the angle of the motor after attachment, hold the motor head with one hand and depress the positioning pin at the top of the mounting bracket with your other hand. Press and hold the positioning pin until the desired angle has been reached, next release the pin and ensure the mechanism locks securely. (B)
Warning: Before the installation, make sure the area between the boat wall and the motor bracket is clear.
DEPTH ADJUSTMENT
Hold the motor shaft with one hand, loosen the depth adjustment screw and set the motor to the desired depth, then retighten the adjusting screw securely. (C)

natural_image
Technical line drawing of a mechanical assembly with no visible text or symbols
natural_image
Diagram of a handheld device with circular arrows indicating rotation or movement (no text or symbols)Warning: The motor can only be used in water deeper than 0.8m.
STEERING
To adjust steering counter-force, simply loosen or tighten the counterforce bolt. The ideal setting is one where the counterforce bolt is just tight enough so that the boat will steer in the direction you are aiming without need for continual correction.
SPEED CONTROL
The speed control, featuring five forward and three reverse speeds, is integrated into the handle. Turn the handle clockwise to move forward and anti-clockwise to go backwards. When you don't want to move, set the handle into neutral. No power will be used in this setting. (D)
Warning: Remember always disconnect from batteries once the motor leaves water as a rotating propeller can cause personal injury.
How to (re)place the propeller
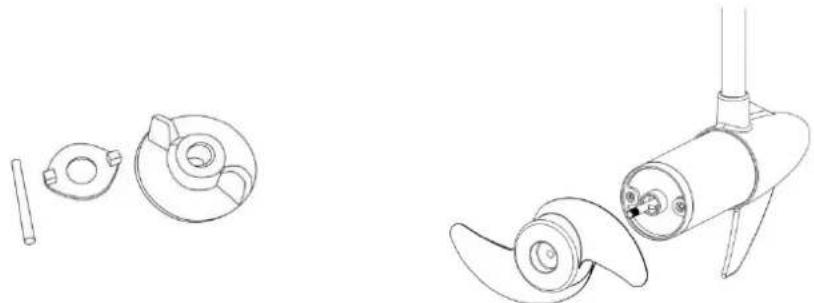
Hold the propeller blade and loosen the propeller knob. It can be done counter clock-wise manually without tools. Pull the propeller straight off. If prop is stuck, grasp one blade with one hand and tap on the backside of the opposite blade lightly with a rubber mallet, until the propeller comes off. If the propeller pin is bent, replace it. Align the new propeller with the propeller pin. Reinstall the propeller knob and tighten firmly by hand clock-wise.
natural_image
Technical line drawings of a propeller and fan assembly (no text or symbols)Warning:
Make sure that the motor has been disconnected from batteries before replacing the propeller. Do not strike bent prop pin with hammer to remove pin. Damage to motor housing may occur that would not be covered by warranty."

Battery consumption
Talamex electric engines are equipped with an LED plate. The LED plate shows how long the battery will last. Level 10 means the battery is full. Level 1 or 2 means the battery need to be recharged
| Modell Gear | Power | consumption | Performance Watt | Trust (Ibs) Trust(kp) | Recommended battery | |
| TM30 1 4A | >40 5,0 2,3 | 55/85Ah | ||||
| 2 9A 80 | 11,3 5,1 | |||||
| 3 14A | 150 | 17,5 7,9 | ||||
| 4 19A | 220 | 23,8 10,8 | ||||
| 5 24A | 280 | 30,0 13,6 | ||||
| TM40 1 6A | >70 7,0 3,2 | 55/85Ah | ||||
| 2 13A | 130 | 15,3 6,9 | ||||
| 3 20A | 230 | 23,5 10,7 | ||||
| 4 26A | 310 | 30,6 13,9 | ||||
| 5 34A | 400 | 40,0 18,1 | ||||
| TM48 1 8A | >90 9,6 4,4 | 85/120Ah | ||||
| 2 16A | 190 | 19,2 8,7 | ||||
| 3 25A | 300 | 30,0 13,6 | ||||
| 4 32A | 380 | 38,4 17,4 | ||||
| 5 40A | 480 | 48,0 21,8 | ||||
| TM58 | 1 | 10A | >110 | 11,4 | 5,2 | |
| 2 19A | 230 | 22,7 10,3 | ||||
| 3 30A | 350 | 34,0 15,4 | ||||
| 4 41A | 480 | 45,5 20,6 | ||||
| 5 51A | 610 | 58,0 26,3 | ||||
| TM66 | 1 | 12A | >140 | 14,4 | 6,6 | |
| 2 16A | 192 | 19,2 8,8 | ||||
| 3 20A | 240 | 24,0 10,9 | ||||
| 4 32A | 384 | 38,4 17,5 | ||||
| 5 55A | 660 | 66,0 30,1 | ||||
| TM86 (24V) | 1 | 6A | >144 | 15,2 | 6,9 | |
| 2 13A | 312 | 32,9 14,9 | ||||
| 3 20A | 480 | 50,6 23,0 | ||||
| 4 26A | 624 | 65,8 30,0 | ||||
| 5 30A | 864 | 86,0 39,0 | ||||
TROUBLESHOOTING
POSSIBLE CAUSE/SOLUTION
| Speed loss | 1: Check for line or weed on propeller. |
| 2: Check battery status. | |
| 3: Check terminals on battery. | |
| Motor noise/shake | 1: Check propeller for line or weed. |
| 2: Check to see propeller is secure and not damaged. | |
| 3: Check shaft to ensure it is not bent. Detach propeller and run motor visually to ensure shaft is not shaking. If shaft is damaged contact your retailer. | |
| Loss of speed setting | 1: Check all wiring connections. |
| 2: The switch in control box may be burned, contact your retailer. | |
| Tight steering | 1: Loosen counterforce screw, apply lubricant and readjust. |
MAINTENANCE
At the end of the day, wipe the motor down with a cloth soaked in warm water and then rinse unit with light spray from hose. Always check the propeller is clear of line or weed, regularly check all nuts, bolts and screws and lubricate all moving parts with an aerosol lubricant. Clean terminal connections regularly and check for frayed wires or loose connections.
STORAGE
When storing the motor, lubricate all moving parts and screws and store in a wellventilated, dry area. Do not leave the motor outside in winter for long periods, as this will damage the permanent magnet in the unit.
WARRANTY
Duration of Coverage
This Limited Warranty provides coverage for one or two years (depends on the specific parts, see next page table) the only reference for duration of warrant coverage is the serial No., which is imprinted on motor's control box. The repair or replacement of parts, or the performance of service under this warranty, does not extend the life of this warranty beyond its original expiry date.
Conditions That Must Be Met In Order To Obtain Warranty Coverage
Warranty coverage is only available from an authorized dealer to distribute the product in the country in which the sale occurred. Routine maintenance out-lined in the Operation and Maintenance section must be performed in order to maintain warranty coverage.
How To Obtain Warranty Coverage
Please deliver the product to an authorized dealer for inspection if the trolling motor is not working properly; proof of purchase will be required to receive warranty. The dealer will then arrange for the inspection and any necessary repair. The purchaser in that case shall pay for all related transport charges and/or travel time. If the service provided is not covered by the warranty, purchaser shall pay for all related labor and material, and any other expenses associated with that service.
What Is Not Covered
This limited warranty does not cover routine maintenance items, adjustments, normal wear and tear, damage caused by abuse, abnormal use, operation of the product in a manner inconsistent with the recommended operation/duty cycle section of the Operation and Maintenance Manual, neglect, accident, submersion, improper installation (proper installation specification and techniques are set forth in the Operations and First time running sections in this manual), improper service, use of an accessory or part not manufactured or sold by us, or alteration or removal of parts.
Check the following chart to see what parts are in warrant coverage.
| Warranty Parts Warranty | |
| Motor Rotor, Motor Magnet and other electrical parts Free Replace within 2 Years | |
| Speed Switch &Carbon Brush Holder Free Replace within 1 Year | |
| Propeller、Screw、Telescopic handle、LED Battery Meter、Plastic Control Box、Electrical wire、Sticker、Rubber band | No warranty |

Identification No.
Dealer Stamp
Purchase date


natural_image
Line drawing of a gebruid motor with propeller and side blades (no text or symbols on the diagram itself)NL
CE
ROHS
REACH
SVHC
AANBEVELINGEN M.B.T. BEDRADING EN ACCU
Accu Type
ACCU VERBINDINGSMETHODE
(A)

natural_image
Technical line drawing of a mechanical device with clamping mechanism and base plate (no text or symbols)DE MOTOR MET UW BOOT VERBINDEN
natural_image
Technical line drawing of a mechanical assembly with no visible text or symbols
natural_image
Line drawing of a hairdryer with motion arrows indicating rotation (no text or symbols)natural_image
Technical line drawings of a propeller and fan assembly (no text or symbols)natural_image
Line drawing of a horizontal electric motor with propeller and side blades, labeled 'BEDIEN' (no technical text or symbols on the diagram itself)DE
BEDIENUNGSANLEITUNG

CE
ROHS
REACH
SVHC
(A)

natural_image
Technical line drawing of a mechanical device with no visible text or symbolsANBRINGEN DES MOTORS AN IHREM BOOT
natural_image
Technical line drawing of a mechanical assembly with no visible text or symbols
natural_image
Line drawing of a hairdryer with motion arrows indicating rotation (no text or symbols)natural_image
Technical line drawings of a propeller and fan assembly (no text or symbols)natural_image
Line drawing of a BRU electric motor with propeller and side blades (no text or symbols)DK
BRUGERMANUAL

CE
ROHS
REACH
SVHC
(A)
natural_image
Technical line drawing of a mechanical device with no visible text or symbols(B)
MONTERING AF MOTOREN
natural_image
Technical line drawing of a mechanical assembly with no visible text or symbols
natural_image
Diagram of a handheld device with circular arrows indicating rotation or flow, labeled (D) at bottom left (no text or symbols on device itself)ADVARSEL: Motoren kan kun anvendes på vanddybder dybere end 0,8m.
STYRING
natural_image
Technical line drawings of a propeller and fan assembly (no text or symbols)ADVARSEL:
natural_image
Line drawing of a small electric motor with propeller and side blades (no text or symbols)FI
KÄYTTÖOHJE

CE
ROHS
REACH
SVHC
(A)

natural_image
Technical line drawing of a mechanical device with no visible text or symbols(B)
MOOTTORIN KIINNITTÄMINEN VENEESEEN
natural_image
Technical line drawing of a mechanical assembly with no visible text or symbols
natural_image
Line drawing of a handheld device with circular arrows indicating rotation or cycle (no text or symbols)natural_image
Technical line drawings of a propeller and fan assembly (no text or symbols)Varoitus:
natural_image
Line drawing of a BRUK electric motor with propeller and side blades (no text or symbols on the diagram itself)SE
BRUKSANVISNING

CE
ROHS
REACH
SVHC
ALLMÄNNA UPPLYSNINGAR
REKOMMENDATIONER FÖR KABEL OCH BATTERI
ALLMÄNNA UPPLYSNINGAR
(A)
natural_image
Technical line drawing of a mechanical device with no visible text or symbolsFASTSÄTTNING AV MOTORN PÅ DIN BÅT
natural_image
Technical line drawing of a mechanical assembly with no visible text or symbols
natural_image
Diagram of a handheld device with circular arrows indicating rotation or motion (no text or symbols)natural_image
Technical line drawings of two propeller components with no visible text or symbolsVarning:
natural_image
Line drawing of a multi-propeller electric motor with propellers and levers (no text or symbols)RU
Инструкция

CE
ROHS
REACH
SVHC
(A)

natural_image
Technical line drawing of a mechanical device with no visible text or symbolsnatural_image
Technical line drawing of a mechanical assembly with no visible text or symbols
natural_image
Line drawing of a handheld device with curved arrows indicating rotation or motion (no text or symbols)natural_image
Technical line drawings of a propeller and fan assembly (no text or symbols)EU DECLARATION OF CONFORMITY
We, Lankhorst Taselaar B.V., Komeet 13, NL 8448CG Heerenveen, declare that the product, description:
Electric outboard motor, type: Talamex TM30, TM40, TM48, TM58, TM66, TM86
complies with the following directives:
2006/42/EC
2014/30/EU
2011/65/EU
Standards conform to
EN ISO 12100:2010
EN ISO 60204-1:2006+A1:2009+AC:2010
EN 61000-6-3:2007+A1:2011+AC:2012
EN 61000-6-1:2007
Technical files at Lankhorst Taselaar B.V., Komeet 13, NL 8448CG Heerenveen
Heerenveen 2018/02/20
Smit, Heero
Managing Director


ENVIRONMENTAL PROTECTION
Waste electrical products must not be disposed of with household waste. Please recycle where facilities exist. Check with your local authorities or retailer for recycling advice.
Lankhorst Taselaar
EU DÉCLARATION DE CONFORMITÉ
Nous, Lankhorst Taselaar B.V., Komeet 13, NL 8448CG Heerenveen, déclaron ce prodiut, Description:
- GB
- USER MANUAL
- Table of Contents
- GENERAL INFORMATION
- WIRING AND BATTERY RECOMMENDATION
- Battery Type
- Cable Size
- SAFETY INFORMATION
- FIRST TIME RUNNING
- BATTERY CONNECTION METHOD
- ATTACHING THE MOTOR TO YOUR BOAT
- DEPTH ADJUSTMENT
- STEERING
- SPEED CONTROL
- How to (re)place the propeller
- Warning:
- Battery consumption
- TROUBLESHOOTING
- MAINTENANCE
- STORAGE
- WARRANTY
- Duration of Coverage
- Conditions That Must Be Met In Order To Obtain Warranty Coverage
- How To Obtain Warranty Coverage
- What Is Not Covered
- NL
- AANBEVELINGEN M.B.T. BEDRADING EN ACCU
- Accu Type
- ACCU VERBINDINGSMETHODE
- DE MOTOR MET UW BOOT VERBINDEN
- DE
- BEDIENUNGSANLEITUNG
- ANBRINGEN DES MOTORS AN IHREM BOOT
- DK
- BRUGERMANUAL
- MONTERING AF MOTOREN
- STYRING
- ADVARSEL:
- KÄYTTÖOHJE
- MOOTTORIN KIINNITTÄMINEN VENEESEEN
- Varoitus:
- SE
- BRUKSANVISNING
- ALLMÄNNA UPPLYSNINGAR
- FASTSÄTTNING AV MOTORN PÅ DIN BÅT
- RU
- Инструкция
- EU DECLARATION OF CONFORMITY
- ENVIRONMENTAL PROTECTION
- Lankhorst Taselaar
- EU DÉCLARATION DE CONFORMITÉ
Brand : Talamex
Model : TM86
Category : Outboard motor