
SteamMaster E 56 - Oven CASO - Free user manual and instructions
Find the device manual for free SteamMaster E 56 CASO in PDF.
| Product type | Built-in steam oven |
| Brand | CASO |
| Model | SteamMaster E 56 |
| Article number | 7420 |
| External dimensions (W×H×D) | 595 × 455 × 550 mm |
| Compartment dimensions (W×H×D) | 466 × 236 × 411 mm |
| Net weight | 28.3 kg |
| Electrical supply | 220-240 V, 50/60 Hz |
| Power consumption | 3000 W |
| Cooking functions | Top and bottom heat, air circulation, bottom heat + hot air, grill, surface heat + grill, grill + circulating air, hot air, steam cooking, steam PLUS, bread baking, keep warm, defrost, fermentation |
| Temperature range (steam cooking) | 50-100 °C (in 1 °C increments) |
| Temperature range (hot air/grill) | 50-250 °C (in 5 °C increments) |
| Water tank capacity | About 1 hour of continuous steam at 100 °C |
| Included accessories | Universal tray, perforated sheet, BBQ grill, water vacuum, oven mitt |
| Safety devices | Door lock with safety switch, child lock, overheating protection |
| Control type | Touch control panel with display screen |
| Additional functions | Steam assistant (3 levels), multi-stage cooking, delayed cooking, kitchen timer, interior lighting |
| Cleaning and maintenance | Quick steam cleaning, integrated descaling/cleaning function, removable door for cleaning |
| Warranty | 24 months from date of purchase |
Frequently Asked Questions - SteamMaster E 56 CASO
User questions about SteamMaster E 56 CASO
0 question about this device. Answer the ones you know or ask your own.
Ask a new question about this device
Download the instructions for your Oven in PDF format for free! Find your manual SteamMaster E 56 - CASO and take your electronic device back in hand. On this page are published all the documents necessary for the use of your device. SteamMaster E 56 by CASO.
USER MANUAL SteamMaster E 56 CASO
Braukmann GmbH
Raiffeisenstraße 9
D-59757 Arnsberg
Service-Hotline International:
Tel.: +49 (0) 29 32 / 80 55 4 - 99
Fax: +49 (0) 29 32 / 80 55 4 - 77
eMail: kundenservice@caso-design.de
Homepage: www.caso-design.de
Dokument-Nº: 7420 24-11-2020
10.2 Information on this manual 42
10.3 Warning notices 42
10.4 Limitation of liability 43
10.5 Copyright protection....43
11 Safety....43
11.1 Intended use....43
11.2 General Safety information 44
11.3 Sources of danger....45
11.3.1 Danger of burns & risk of scalding 45
11.3.2 Danger of fire 46
11.3.3 Danger of explosion 48
11.3.4 Dangers due to electrical power....48
11.4 Commissioning....49
11.5 Safety information....49
11.6 Delivery scope and transport inspection....49
11.7 Unpacking....49
11.8 Disposal of the packaging....49
11.8.1 Setup location requirements: 50
11.9 Electrical connection....50
12 Design and Function....53
12.1 Complete overview ....53
12.2 Accessories....53
12.3 Safety equipment 54
12.3.1 Warning notices on device....54
12.3.2 Door latch....54
12.4 Rating plate....55
12.5 Control panel and control elements....55
12.5.1 Touch control panel....55
12.5.2 Notifications in display....56
13 Operation and Handing....57
13.1 Basics of cooking ....57
13.2 Instructions concerning cookware....57
13.3 Setting the clock 57
13.4 First use of the device 57
13.5 Individual setting / quick start....59
13.5.1 Temperature setting....59
13.5.2 Timer setting 59
13.6 Additional functions 60
13.6.1 Kitchen timer 60
13.6.2 Preset cooking 60
13.6.3 Multi-stage cooking....60
13.6.4 Steam assistant 61
13.6.5 Child safety lock....61
14 Cleaning and Maintenance....61
14.1 Safety information....61
14.2 Cleaning and descaling....62
14.2.1 Quick cleaning 62
14.2.2 Regular Cleaning 62
14.2.3 Before and after long periods of non-use 62
14.2.4 Descaling / cleaning function 62
14.2.5 Removal of the door....63
15 Troubleshooting....64
15.1 Safety notices....64
15.2 Error codes....64
15.3 Causes and rectification of faults....64
16 Disposal of the Old Device 65
17 Guarantee....65
18 Technical Data....65
natural_image
Diagram of a mechanical device with a magnified inset showing a hand pressing a button (no text or symbols)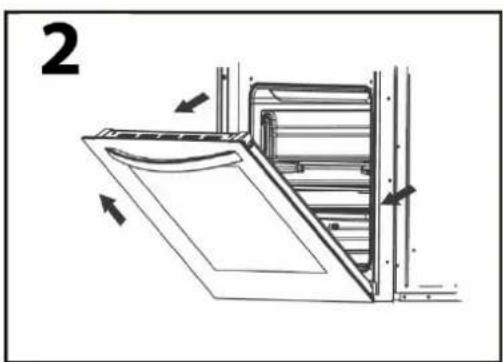
natural_image
Diagram of a refrigerator interior showing door, drawer, and window with directional arrows indicating movement (no text or symbols)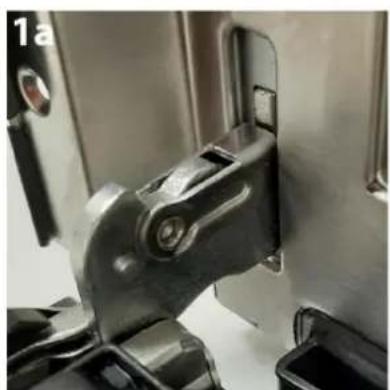
natural_image
Close-up of a mechanical clamp or bracket component (no visible text or symbols)
natural_image
Close-up of a mechanical clamp or bracket component (no visible text or symbols)6 Störungsbehebung

Item No. 7420
10 Operating Manual
10.1 General
Please read the information contained herein so that you can become familiar with your device quickly and take advantage of the full scope of its functions.
Your device will serve you for many years if you handle it and care for it properly.
We wish you a lot of pleasure in using it!
10.2 Information on this manual
These Operating Instructions are a component of the device (referred to hereafter as the Device) and provide you with important information for the initial commissioning, safety, intended use and care of the device. The Operating Instructions must be available at all times at the device. This Operating Manual must be read and applied by every person who is instructed to work with the device:
- Commissioning, • Operation • Troubleshooting and / or • Cleaning
Keep the Operating Manual in a safe place and pass it on to the subsequent owner along with the device.
10.3 Warning notices
The following warning notices are used in the Operating Manual concerned here.
⚠️GEFAHR
DANGER
A warning notice of this level of danger indicates a potentially dangerous situation.
If the dangerous situation is not avoided, this can lead to death or serious injuries.
▶ Observe the instructions in this warning notice in order to avoid the danger of death or serious personal injuries.
⚠️WARNUNG
WARNING
A warning notice of this level of danger indicates a possible dangerous situation.
If the dangerous situation is not avoided, this can lead to serious injuries.
▶ Observe the instructions in this warning notice in order to avoid the personal injuries.
▲VORSICHT
ATTENTION
A warning notice of this level of danger indicates a possible dangerous situation.
If the dangerous situation is not avoided, this can lead to slight or moderate injuries.
▶ Observe the instructions in this warning notice in order to avoid the personal injuries.
HINWEIS
PLEASE NOTE
A notice of this kind indicates additional information, which will simplify the handling of the machine.
10.4 Limitation of liability
All the technical information, data and notices with regard to the installation, operation and care are completely up-to-date at the time of printing and are compiled to the best of our knowledge and belief, taking our past experience and findings into consideration.
No claims can be derived from the information provided, the illustrations or descriptions in this manual. The manufacturer does not assume any liability for damages arising as a result of the following: • Non-observance of the manual
- Uses for non-intended purposes
- Use of unauthorized spare parts
- Improper repairs
- Technical alterations, modifications of the device
Modifications of the device are not recommended and are not covered by the guarantee. All translations are carried out to the best of our knowledge. We do not assume any liability for translation errors, not even if the translation was carried out by us or on our instructions. The original German text remains solely binding.
10.5 Copyright protection
This document is copyright protected. Braukmann GmbH reserves all the rights, including those for photomechanical reproduction, duplication and distribution using special processes (e.g. data processing, data carriers, data networks), even partially. Subject to content and technical changes.
11 Safety
This chapter provides you with important safety notices when handling the device. The device corresponds with the required safety regulations. Improper use can result in personal or property damages.
11.1 Intended use
This device is only intended for use in households in enclosed spaces for steam cooking, defrosting, warming up, cooking, grilling, reducing, baking of foods. This device is intended for use in the household and for similar applications such as:
- in kitchens for employees in shops, offices, and other commercial areas;
- in Bread & Breakfasts, • in agricultural estates;
- by customers in hotels, motels and other residential establishments.
This device is only intended for installation, please observe the installation instructions. Uses for a different purpose or for a purpose which exceeds this description are considered incompatible with the intended or designated use.
▲WARNUNG Warning
Danger due to unintended use! Dangers can emanate from the device if it is used for an unintended use and/or a different kind of use.
▶ Use the device exclusively for its intended use.
▶ Observe the procedural methods described in this Operating Manual.
Claims of all kinds due to damages resulting from unintended uses are excluded.
The User bears the sole risk.
11.2 General Safety information
HINWEIS
Please note
Please observe the following general safety notices with regard to the safe handling of the device.
Read all these instructions before using the appliance.
▶ Examine the device for any visible external damages prior to using it. Never put a damaged device into operation.
▶ The device is not intended for drying, warming up or heating up living animals.
This appliance may be used by children aged 8 and above, if they are supervised or have been instructed at to the safe use of the appliance and have understood the resulting hazards.
▶ Cleaning and maintenance by the user must not be performed by children unless they are at least 8 years old and are supervised. Children are not allowed to play with the device. The appliance and its connecting cable must be kept away from children who are less than 8 years old.
The appliance may be used by individuals with reduced physical, sensory or mental capabilities or a lack of experience and / or knowledge of their use if they are supervised or have been instructed at to the safe use of the appliance and have understood the resulting hazards.
▶ Only customer service departments authorized by the manufacturer may carry out repairs on the device, as otherwise the guarantee entitlements will be null and void in the event of any subsequent damages. Improperly performed repairs can cause considerable dangers for the user.
▶ Defective components must always be replaced with original replacement parts. Only such parts will guarantee that the safety requirements are fulfilled.
▶ Warning: Do not install the oven over a range cooktop or other heat-producing appliance. If it is installed it could be damaged and the warranty would be void.
▶ The device must not be cleaned with a steam cleaner.
HINWEIS
Please note
▶ Use this device only for its intended use as described in this manual. Do not use corrosive chemicals or vapors in this appliance. This type of oven is specifically designed to heat, cook or dry food. It is not designed for industrial or laboratory use.
▶ The device is not intended to be operated by means of an external timer or separate remote-control system.
▶ The device is for household use only and not for commercial use. The device is intended for defrosting, cooking and steaming of food only.
▶ Do not immerse the device in water or other liquids, and do not put it in the dishwasher.
▶ A damaged water tank must not be used. Risk of injury. The device may be damaged.
▶ Only use drinking water or distilled water in the water tank.
▶ Do not place anything on the opened door.
▶ Do not pull on the cable when pulling the plug out of the wall outlet. Never carry the device by the cable.
11.3 Sources of danger
11.3.1 Danger of burns & risk of scalding
⚠️WARNUNG
Warning
The food cooked in this device, the cookware used and the surface of the device can get very hot. Hot steam can escape at the front of the device between the door and the control panel. Hot steam may remain in the inside of the device and on the door after cooking.
Please observe the following safety notices in order not to burn or scald yourself or others.
▶ Caution, hot steam can escape from the device. Risk of scalding!
⚠️WARNUNG
Warning
▶ The air and steam outlet must not be covered, otherwise the device can be damaged.
▶ If you open the door of the device, hot steam can escape, which may hardly be visible, be careful. Do not pour water into the hot cooking space!
There is a risk of scalding and burns due to hot steam if the safety switch is faulty or has been manipulated. Do not operate the device if the door or door seal is damaged.
▶ Do not fry food in the device. Hot oil can damage oven parts and utensils and even result in skin burns.
▶ The food, dishes and accessories get very hot. Use pot holders or oven gloves when removing.
▶ In particular, the contents of baby bottles and baby food jars must be stirred or shaken, and the temperature must be checked before consumption to prevent scolding.
▶ The door, the touchable surfaces or the outer surfaces can get very hot during operation. Please only touch these surfaces with pot holders or oven gloves.
▶ Caution! Steam will escape, when opening lids or wrapping foil.
▶ WARNING: The device and its accessible parts become hot during use. The heating elements and the hot interior surfaces of the cooking space should therefore not be touched and children which are less as 8 years old should be kept away or supervised at all times.
11.3.2 Danger of fire
⚠️WARNUNG
Warning
There is a danger of fire due to the ignition of the content in the event the device is not used properly.
Observe the following safety notices to avoid dangers of fire:
⚠️WARNUNG
Warning
▶ Never use the device to store or dry/ heating flammable materials.
▶ Do not warm up any alcohol in an undiluted state.
The device is intended for heating food. Drying of food or clothing and heating of warming pads, slippers, sponges, damp cloth and similar may lead to risk of injury, ignition or fire.
▶ To reduce the risk of fire in the device cavity:
▶ a) Do not use containers made of plastic, paper or other flammable materials in the device.
▶ b) Remove wire twist-ties from paper or plastic bags before placing bag in oven.
▶ c) If smoke is emitted, you have to turn off the device immediately and keep the door closed to extinguish any flames.
▶ d) Avoid overheating oils and fats for extended periods. Overheated oil and fat can ignite rapidly. NEVER EXTINGUISH WITH WATER!
▶ e) Do not use the cavity for storage purposes. Do not leave paper products, cooking utensils or food in the cavity when not in use.
▶ Never leave the device unsupervised if you are warming up or cooking foods in disposable containers made of plastic, paper or other flammable materials.
▶ Always remove grease residues in the device, as these residues can otherwise ignite.
11.3.3 Danger of explosion
⚠️WARNUNG
Warning
There is a danger of explosion due to excess pressure that is created in the event the device is not used properly.
Observe the following safety notices to avoid dangers of an explosion:
▶ Liquids and other food must not be heated in closed vessels as these may explode.
▶ Do not cook eggs in the shell or extremely hard boiled eggs in the device as they can still explode, even after the operation has been completed.
▶ Pierce foods with heavy skins such as potatoes, whole squashes, apples and chestnuts before cooking.
11.3.4 Dangers due to electrical power
⚠GEFAHR
Mortal danger due to electrical power!
Mortal danger exists when coming into contact with live wires or subassemblies! Observe the following safety notices to avoid dangers due to electrical power:
▶ Do not operate this device if it has a damaged cable or plug, if it is not working properly or if it has been damaged or dropped. If the power cable or plug are damaged, then they must be replaced by the manufacturer or its service agent in order to avoid a hazard.
▶ Do not open the housing on the device under any circumstances. There is a danger of an electrical shock if live connections are touched and the electrical or mechanical structure is altered. In addition, functional faults on the device can also occur.
▶ Do not touch the device and power cable when your hands are wet!
11.4 Commissioning
This chapter provides you with important safety notices during the initial commissioning of the device. Observe the following notices to avoid dangers and damages:
11.5 Safety information
▲WARNUNG Warning
▶ Packaging materials may not be used for playing. There is a danger of suffocation.
▶ Transport, unpack and use two persons to set down the device because of the heavy weight of the device.
11.6 Delivery scope and transport inspection
As a rule, the SteamMaster E 56 is delivered with the following components:
- SteamMaster E 56
- universal tray (fat drip tray / baking tray)
- oven glove
- water absorber
- perforated tray
- metal rack
- operating instructions
HINWEIS Please note
▶ Examine the shipment for its completeness and for any visible damages.
▶ Immediately notify the carrier, the insurance and the supplier about any incomplete shipment or damages as a result of inadequate packaging or due to transportation.
11.7 Unpacking
To unpack the device, proceed as follows:
- Remove the device out of the carton and remove the packaging material.
- Remove the accessories located in the cooking chamber and remove the packaging material.
11.8 Disposal of the packaging
The packaging protects the device against damages during transit. The packaging materials are selected in accordance with environmentally compatible and recycling-related points of view and can therefore be recycled. Returning the packaging back to the material loop saves raw materials and reduces the quantities of accumulated waste. Take any packaging materials that are no longer required to “Green Dot” recycling collection points for disposal.
HINWEIS Please note
▶ If possible, keep the original packaging for the device for the duration of the guarantee period of the device, in order that the device can be re-packaged properly in the event of a guarantee claim.

11.8.1 Setup location requirements:
In order to ensure the safe and trouble-free operation of the device, the setup location must fulfil the following prerequisites:
- The device must be set up on a firm, flat, horizontal and heat-resistant surface with sufficient load-bearing capacity for the device and the maximum weight of the expected food that is to be prepared in the device.
- Choose the setup location in such a way that children cannot reach any hot surfaces on the device.
- Do not set up the device in a hot, wet or extremely damp environment or near flammable material.
- This device is only suitable for installation in a cabinet, not as a free-standing device and not in a closed cabinet.
- The installation and assembly of this device in non-stationary setup locations (e.g. on ships) must be carried out by specialist companies / electricians, provided they guarantee the prerequisites for the safe use of this device.
11.9 Electrical connection
In order to ensure the safe and trouble-free operation of the device, the following instructions must be observed for the electrical connection:
- Before connecting the device, compare the connection data (voltage and frequency) on the rating plate with those of your electrical network. This data must agree in order that no damages occur in the device If in doubt, ask your qualified electrician.
- The connection between the device and the electrical network may employ a 3 meter long (max.) extension cable with a cross-section of 1.5 mm ^2 . The use of multiple plugs or gangs is prohibited because of the danger of fire that is involved with this.
- Make sure that the power cable is undamaged and has not been installed under the device or over hot or sharp surfaces.
- The electrical outlet must be protected by a 16A safety cut-out switch, separately from other electricity consumers.
- In case the plug is no longer accessible after installation, a circuit breaker disconnecting all electrical poles with a distance of at least 3 mm between contacts must be present in the line.
- The electrical safety of the device is only guaranteed if the device is connected to a properly installed protective conductor system. If in doubt, have the house installation checked over by a qualified electrician. The manufacturer cannot be made responsible for damages that are caused by a missing or damaged protective conductor.
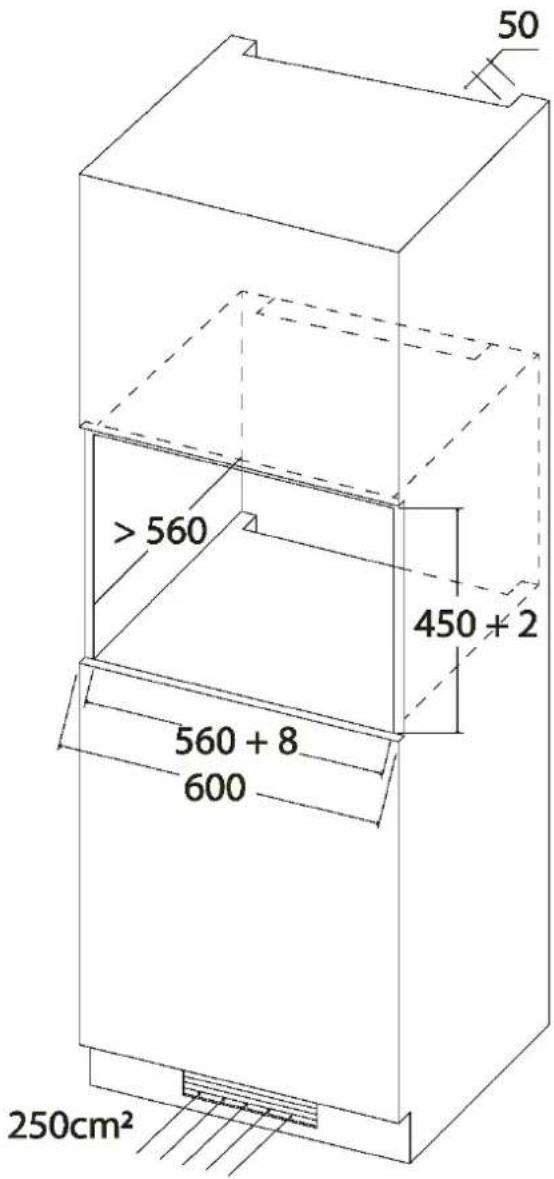
11.10 Installation instructions
The device can be installed in a 600 mm wide built-in wall cabinet.
A space of 50 mm must be left behind the cabinet.
A 250 ~cm^2 ventilation shaft is required so that sufficient fresh air can be supplied and the warm exhaust air can be discharged.

- Slowly push the device into the center of the corpus of the kitchen cabinet.
- Do not pinch or kink the power cord.
- Check the distance between the device at the top and bottom of the corpus of the cabinet, where the holes for the screws are.
- Open the door of the device.
-
If necessary, adjust the distance between the device and the corpus.
-
Mark the position of the screws. Take the device out and pre-drill the position of the screws in the corpus. Slide the device back into the corpus.
-
Plug in the power plug.
-
Insert the screws into the holes of the device and tighten them.
HINWEIS Please note
The device must be installed according to the installation instructions.

12 Design and Function
This chapter provides you with important safety notices on the design and function of the device.
12.1 Complete overview
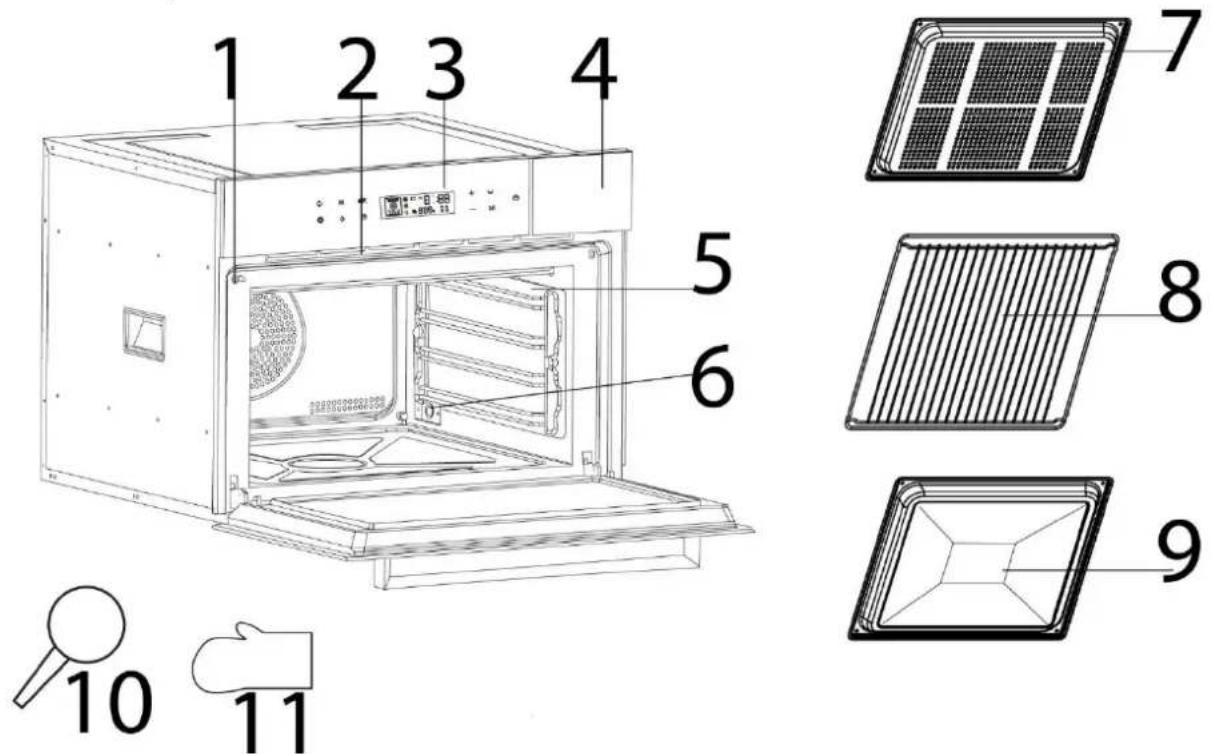
1 safety door lock 7 perforated tray
2 air and steam outlet 8 metal rack
3 control panel 9 universal tray
4 cover of water tank 10 water absorber
5 rails 11 oven glove
6 water outlet
12.2 Accessories
Metal rack
The metal rack can be used for the grill and hot air functions.
Universal tray (fat drip tray / baking tray)
You can use the universal tray for baking or as a fat drip tray, then slide it into the bottom shelf. Do not place it on the floor of the cooking chamber.
Perforated tray
You can use the perforated tray for the steam cooking functions. It is recommended to place the universal tray underneath as a drip tray.
Water tank
The water tank must be inserted and filled with steam for all functions.
Take out the water tank before use and fill it with drinking water or distilled water. Reinstall the water tank correctly.
Water absorber
Use the water absorber to suck up any remaining weater from the cooking chamber.
HINWEIS Please note
The device may only be operated when the water tank has been correctly inserted.
▶ The ventilator can continue running afterwards to cool down the device.
▶ When you have filled the water tank to the maximum, steam can be generated for up to an hour (at 100^ C).
▶ Fill the water tank only with cold water.
The outer surface of the installation corpus can become hot.
12.3 Safety equipment
12.3.1 Warning notices on device
▲VORSICHT ATTENTION
Danger due to hot surface!
There is a warning notice referring to dangers due to hot surfaces located on the upper side of the housing. The surfaces of the device can become extremely hot.
▶ Do not touch the hot surfaces of the device. Danger of burns!
▶ Do not set or lay any items on the device.
12.3.2 Door latch
A safety switch is installed in the door latch of the device, which prevents the device from being operated when the door is open.
▲VORSICHT ATTENTION
Steam hazard!
If this safety device is defective or if this safety device is bypassed, then you directly expose yourself and others to the hot steam
▶ Do not operate the device if the safety switch is defective.
▶ Do not disable this safety device.
Open door
Open the door of the device using the handle. If the device is switched on, the current cooking programme will be interrupted.
⚠️WARNUNG Warning
Leave the door open for a moment before reaching into the cooking chamber, to allow the accumulated heat and steam to escape.
▶ Ensure that your hair does or items of clothing do not get caught up in the door.
◆ Close door
Close the door until the door latch audibly locks in place. If a current cooking programme was interrupted as a result of opening the door, and the automatic cooking programme would then be automatically resumed.
12.4 Rating plate
The rating plate with the connection and performance data can be founded on the back of the device.
12.5 Control panel and control elements
12.5.1 Touch control panel

 | Steam assistant.The steam function can be added during covenction / hot air / grill functions.There are 3 levels with different intensity. |
 | Multi-stage cooking.This function can be used to program up to two cooking sequences in succession. |
 | Function selection.To switch between the functions. Press once to access the function selection,then press again accordingly or use the +/ - button. |
 | Switches the light on or off. The light switches itself off again automatically. |
 | Switching between temperature & timerSetting the temperature and cooking time |
 | Setting the time, kitchen alarm function and preset cooking.Hold down to mute the button tones. |
 | Increase value |
| — | Decrease value |
 | Display notification that water needs to be added into the water tank. Also notification that the water tank is not placed. Fill water into tank, place tank and press for confirmation. |
 | 1. Start2. Pause3. Child safety lock: Press and hold button for activation/deactivation of child safety lock. The lock symbol is shown in the display when child safety lock is activated. |
 | Press and hold to switch on / off. Press to cancel selected function. |
12.5.2 Notifications in display
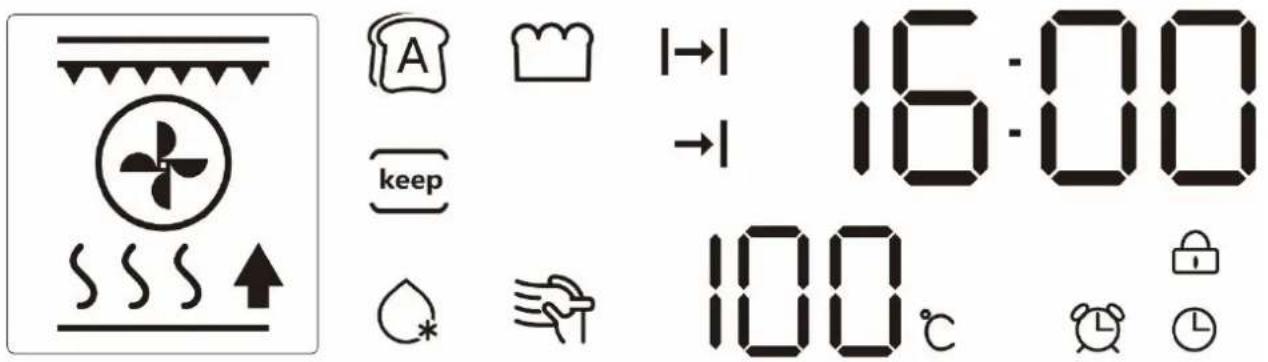
There are different notifications in the display, which are briefly explained here as follows:
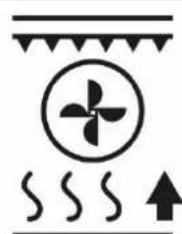 |  |  | Displays the selected operating mode / function. You can find more detailed information under "Operating modes" |
 | Cooking time | ||
| End time of preset cooking | |||
 | Clock and time (00:00 – 23:59) | ||
 | Display of temperature. °C flashes in the display until the selected temperature is reached. Then an acoustic signal sounds. The device then maintains the selected temperature. | ||
| The kitchen timer function is display when the kitchen timer is activated | ||
 | Symbol for the clock | |
| The lock symbol is shown in the display when child safety lock is activated. |
13 Operation and Handing
This chapter provides you with important notices with regard to operating the device. Observe the following notices to avoid dangers and damages:
▲WARNUNG Warning
▶ Do not leave the device unsupervised when it is in operation, so that you can intervene quickly in the event of dangers.
13.1 Basics of cooking
- The power levels and time required for cooking / warming up food items depends on the starting time, the quantity and the type and consistency of the food, etc. Use the shortest indicated cooking time and extend the cooking procedure as necessary.
- Foods with a firm skin or shell, such as tomatoes, sausages, potatoes in the skin, eggplants must be pierced or punctured repeatedly so that any developing steam can escape and so that the food does not burst.
- Open the door of the device as rarely as possible during operation and remove any accessories that are not required from the cooking chamber.
13.2 Instructions concerning cookware
During the steam cooking process the cookware must be appropriate for temperatures of at least 150^ C. During the convection oven cooking process the cookware must be appropriate for temperatures of at least 250^ C.
Do not place anything on the floor of the cooking chamber. Mount the rails and use the accessories.
13.3 Setting the clock
When you have plugged in the power plug, "00:00" flashes in the display. The clock can be set with and. You can press and hold the buttons to change the time faster.
After setting, confirm with the button.
You can adjust the time displayed at any time by pressing the button once and setting the time as described above.
13.4 First use of the device
Remove all accessories from the device. Fill the water tank with fresh water up to the MAX mark.
- Use the steam function for 20 minutes at 100^ C.
- Let the device cool down and dry the cooking space.
- Operate the device for 30 minutes with the convection function at 220 °C.
- Production residues may be segregated. This is normal. Let the device cool down. Wipe away the cold water.
4.5 Operation
* Steam assistant can be used ** Temperature setting in 5 °C steps
*** Temperature setting in 1 °C steps
4.6 Operating modes / functions
| Symbol | Funktion | Standard Temperatur in °C | Temperatur-Spanne in °C | Voreingestellte Zeit in Minuten |
 * * | top and bottom grill | 180 | ** 50-220 | 20 |
 | convection | 160 | ** 50-220 | 20 |
 | bottom grill + hot airt | 220 | ** 50-220 | 20 |
 | grill | 220 | ** 50-220 | 20 |
 | oberhitze + grill | 220 | ** 50-250 | 20 |
 | grill+ convection | 210 | ** 50-220 | 20 |
 | hot air | 180 | ** 50-250 | 20 |
 | steam cooking | 100 | *** 50-100 | 20 |
 | steam cooking plus | 110 | *** 101-250 | 20 |
 | bread baking | step 1: hotair 30 step 2: 180 top and bottom grill | step 1: 40 step 2: 28 | |
 | keep warm | 60 | *** 60-80 | 20 |
 | defrost | 50 | *** 50-60 | 20 |
 | fermentieren (for yeast dough fermentation / yoghurt production) | 30 | *** 30-80 | 20 |
 | descaling / cleaning | - | - |
HINWEIS Please note
The device preheats with the convection function. Once the desired temperature has been reached, the convection function switches off again.
▶ Attention: If you stop functions with steam cooking or the steam assistant prematurely, water will still run into the supply lines. When you use the device again, this water flows into the cooking chamber.
13.5 Individual setting / quick start
Press and hold ⏻ to activate the device. Press function button and the select the desired function, the corresponding standard temperature is displayed.
13.5.1 Temperature setting
Press once so that the temperature display flashes. Then adjust the desired
temperature with + and . -
Then, for a quick start without setting the time, start with ▷||
HINWEIS
The temperature can be adjusted at any time during the cooking process.
To cook with an individual time setting, proceed as follows:
13.5.2 Timer setting
Press 📊 again, |→| lights up and the time in the display flashes. Then adjust the desired temperature with + and — and start with .
HINWEIS Please note
▶ As soon as you start the function, the timer countdown starts.
▶ The countdown can be adjusted at any time during the cooking process.
▶ When the cooking time has ended, "END" is displayed.
13.6 Additional functions
13.6.1 Kitchen timer
If you have activated the device, selected the desired function and temperature and started it, you can also use the kitchen timer function.
Press to do this (press once during the cooking process, press twice before the
cooking process), the kitchen timer symbol flashes in the display. Then use and
to set the kitchen timer to the desired time. The kitchen timer counts down and beeps continuously after the time has elapsed until you end the alarm with ▷||
HINWEIS Please note
▶ You can use the kitchen timer, for example, if you want to add more ingredients after the cooking process has started.
The kitchen timer can be adjusted at any time during the cooking process.
13.6.2 Preset cooking
You can program the time at which a cooking process should be finished. So you can set the "end time" of the cooking process. The device then starts the cooking process appropriately so that it is ready at the desired time.
Select a function, its temperature and cooking time.
Then press three times, flashes in the display and you can now program the
end time. Set the required time with + and - and then confirm with.
Example:
You want to use the convection function at 180^ C with a cooking time of 30 minutes. It is currently 1:00 p.m. The cooking process should not be finished until 2:00 p.m.
Select the convection function, set the temperature to 180^ C and the timer for the cooking time to 30 minutes. Then press three times and set the desired end time to 2:00 p.m. and confirm with.
13.6.3 Multi-stage cooking
Select the first desired function, set the desired temperature and cooking time, start with
. When the device has started the first function, press for multi-stage cooking. Then set the desired second function, set the desired temperature and cooking time.
Confirm with ▷||
After the first function, the second function is then automatically carried out with the desired settings.
If you press, you can view the selected setting for the first and second function.
13.6.4 Steam assistant
When convection / hot air / grill functions are used then the steam assistant can be added.
There are 3 intensities, the higher the level, the more steam is added.
Press the button to switch on the steam assistant. Set the intensity by pressing the button several times. You can also change the intensity at any time during the cooking process.
13.6.5 Child safety lock
Press and hold button for activation/deactivation of child safety lock. The lock
symbol is shown in the display when child safety lock is activated.
14 Cleaning and Maintenance
This chapter provides you with important notices with regard to cleaning and maintaining the device. Please observe the notices to prevent damages due to cleaning the device incorrectly and to ensure trouble-free operation.
14.1 Safety information
▲VORSICHT Attention
Please observe the following safety notices, before you commence with cleaning the device:
The cooking chamber is hot after it is used. There is a danger of burns! Wait until the device has cooled down.
▶ Clean the cooking chamber after use as soon as it has cooled down. Extended waiting unnecessarily complicates cleaning and can make it impossible in extreme cases. Excessive accumulations of dirt can even damage the device under certain circumstances.
The device must be cleaned regularly and any food residues must be removed. Insufficient cleanliness of the device can lead to the destruction of the surface, which for its part can have a negative impact upon the service life of the device and can lead to a dangerous condition of the device as well as fungal and bacterial contamination.
▶ Clean the gasket of the door regularly; if the gasket of the door is very dirty, the door of device may no longer close properly. The surrounding kitchen furniture could be damaged.
▶ Dry the device and the water tank thoroughly as soon as they have cooled down.
▶ Empty the water tank after each use.
▲VORSICHT Attention
▶ Do not fill the water tank with flammable liquids. Only fill with water or proceed as described under cleaning and descaling.
▶ Switch the device off prior to cleaning it.
▶ If dampness penetrates into the device, this can damage the electronic components. Please ensure that no liquid can enter the interior of the device through the ventilation slots.
▶ Do not use any aggressive or abrasive cleaning agents or solvents.
▶ Do not scrape off stubborn dirt with hard items.
▶ Do not use a glass scraper for the door, it could be damaged, risk of injury!
14.2 Cleaning and descaling
14.2.1 Quick cleaning
Remove the accessories from the device. Fill the water tank. Pour approx. 50 ml of water with a drop of washing-up liquid into the recess in the center of the cooking chamber. Operate the device for at least 20 minutes in Steam cooking PLUS mode at 110 °C. Adjust the time if necessary. Then wipe out the cooking chamber and dry it.
14.2.2 Regular Cleaning
▲WARNUNG Danger of fire
▶ Always remove grease residues in the device, as these residues can otherwise ignite.
- Clean the device and its accessories regularly. You can remove the rails for this. Then wipe the device including the cooking chamber with a damp cloth. If the device is very dirty, a mild cleaning agent can be used.
- In particular, clean the door gasket regularly so that the door closes properly.
- Clean the accessories, especially the water tank, with water and a mild detergent, then rinse them with fresh water and dry the accessories.
14.2.3 Before and after long periods of non-use
It is important that you clean the device thoroughly before it is not going to be used for a long period and, in particular, that you dry the water tank thoroughly. If you then want to use the device again, first proceed as described under "First use".
14.2.4 Descaling / cleaning function
Depending on the hardness of the water, you should descale the device every 6-8 weeks.
The integrated descaling reminder also reminds you by flashing in the display and the device will beep.
You can end the alarm by pressing any button. But you will be reminded again the next time you use the device. The warning is only reset once you have used the descaling / cleaning function.
- Remove the water tank. Fill it with a mixture of water and citric acid (5%). Put the water tank back in.

- Select the descaling / cleaning function and confirm with . C01 is how displayed.
- When int the display flashes and the device beeps, then add fresh water to the tank. Put the tank back in and confirm with . C02 is now displayed.
- The limescale residues are flushed into the interior of the device. When the device displays "END", the process is complete.
- Wait until the device has cooled down and then clean the inside of the device.
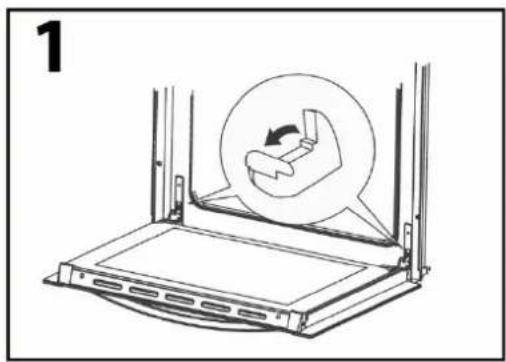
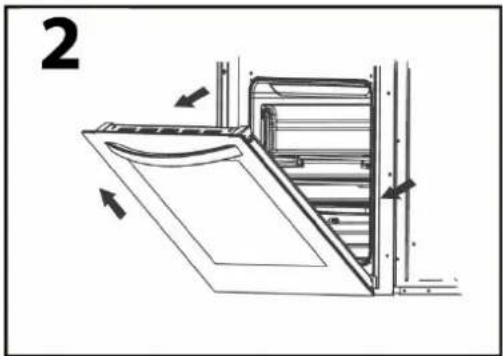
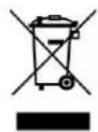
14.2.5 Removal of the door
- You can clean the door with a mild detergent and water.
- The door can be removed for better cleaning.
- To do this, open the door to the maximum (1). Then fold up the safety bar as far as possible (1a → 1b). Hold the door by the handle and lift it out of the guide. (2). You can now clean the door. Then dry it thoroughly. Insert the door hinges back into the guide from top to bottom. Then fold the safety bar down again and close the door. Check that the door is securely mounted.
natural_image
Diagram of a refrigerator interior showing door, vent, and side panel with directional arrows (no text or labels)
natural_image
Close-up of a mechanical clamp or bracket component (no visible text or symbols)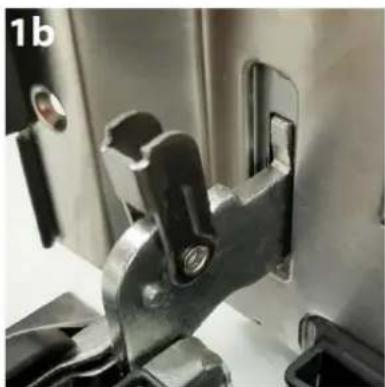
natural_image
Close-up of a mechanical clamp or bracket component with metallic parts and mounting holes (no visible text or symbols)15 Troubleshooting
This chapter provides you with important notices with regard to operating the device. Observe the following notices to avoid dangers and damages:
15.1 Safety notices
▲VORSICHT Attention
▶ Only qualified electricians, who have been trained by the manufacturer, may carry out any repairs on electrical equipment.
▶ Improperly performed repairs can cause considerable dangers for the user and damages to the device.
15.2 Error codes
In the event of a fault, an error code will appear in the display; it describes the cause of the fault.
| Display | Description | Solution |
| ER1 | Overheating protection | Overheating protection is reset after the device has cooled down |
| ER2 | ||
| ER3 | Temperature relay malfunction | Function test necessary. Contact customer service |
| ER4 | ||
| ER5 | Sensor malfunction | Contact customer service |
| ER6 |
HINWEIS Please note
▶ If error messages continue to appear after an extended waiting period and restarting the device, then the device will need to be sent to Customer Service to be inspected.
15.3 Causes and rectification of faults
The following table assists in localizing and rectifying minor faults.
| Error | Possible cause | Action |
| The selected program will not start. | Device door is not closed | Close device door |
| Power plug is not plugged in | Plug in mains plug! | |
| Fuse is not activated | Activate fuse | |
| Food is not sufficiently defrosted, warmed up or cooked after preset time has elapsed. | Incorrectly selected time or power level | Re-set time and power levelRepeat process |
HINWEIS Please note
▶ If you are unable to solve the problem with the steps shown above, please contact Customer Service.
▶ Please clean the device before sending it to customer service.
16 Disposal of the Old Device
Old electric and electronic devices frequently still contain valuable materials. However, they also contain damaging substances, which were necessary for their functionality and safety.
If these were put in the non-recyclable waste or were handled incorrectly, they could be detrimental to human health and the environment. Therefore, do not put your old device into the non-recyclable waste under any circumstances.
HINWEIS Please note
Utilise the collection point, established in your town, to return and recycle old electric and electronic devices. If necessary, contact your town hall, local refuse collection service or your dealer for information.
▶ Ensure that your old device is stored safely away from children until it is taken away.
17 Guarantee
We provide a 24 month guarantee for this product, commencing from the date of sale, for faults which are attributable to production or material faults. Your legal guarantee entitlements in accordance with § 439 ff. BGB-E remain unaffected by this.
The guarantee does not include damages, which were incurred as a result of improper handling or use, as well as malfunctions which only have a minor effect on the function or the value of the device. Consumables, transit damages, inasmuch as we are not responsible for these, as well as damages, which were incurred as a result of any repairs that were not performed by us, are also excluded from the guarantee entitlements.
This device is designed for use in domestic situations and has the appropriate performance levels. Any use in commercial situations is only covered under the guarantee to the extent that it would be comparable with the stresses of being used in a domestic situation. It is not intended for any additional, commercial use. In the event of justified complaints, we will repair the faulty device at our discretion or replace it with a trouble-free device. Any pending faults must be reported within 14 days of delivery. All further claims are excluded. To enforce a guarantee claim, please contact us prior to returning the device (always provide us with proof of purchase).
18Technical Data
| Device | Built-in steam oven |
| Name | SteamMaster E 56 |
| Item No.: | 7420 |
| Mains data | 220-240V, 50/60 Hz |
| Power consumption | 3000 W |
| External measurements (W x H x D): | 595 x 455 x 550 mm |
| Cooking chamber dimensions (W x H x D): | 466 x 236 x 411 mm |
| Net weight | 28,3 kg |


N°. d'art. 7420
natural_image
Pure diagram of airflow or heat transfer symbols without any text or labels


natural_image
Diagram of a mechanical device with a magnified inset showing a hand pressing a button (no text or symbols)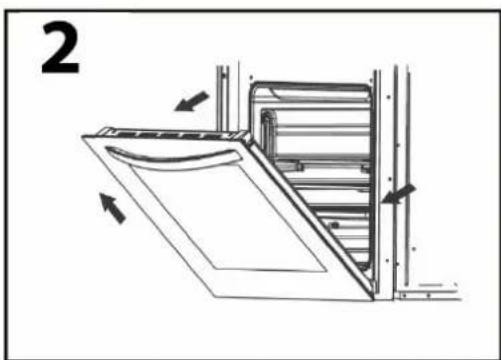
natural_image
Diagram of a refrigerator interior showing door, panel, and side panels with directional arrows (no text or symbols)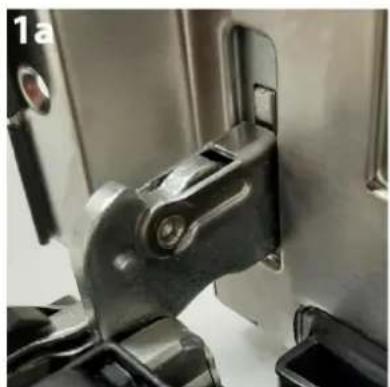
natural_image
Close-up of a mechanical clamp or bracket component (no visible text or symbols)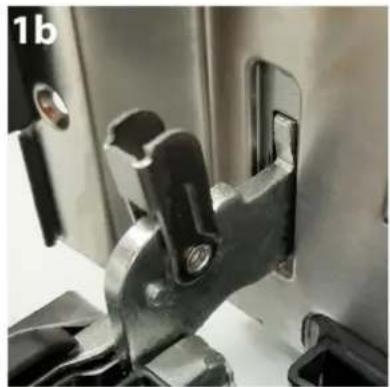
natural_image
Close-up of a metallic mechanical clamp or bracket component (no visible text or symbols)

Articolo-N. 7420
natural_image
Diagram of a mechanical device with a magnified inset showing a hand holding a circular component (no text or symbols)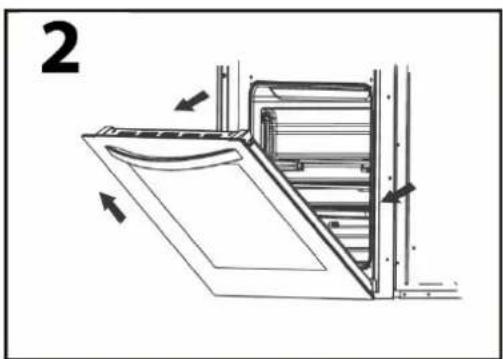
natural_image
Diagram of a refrigerator interior showing door, drawer, and window (no text or symbols)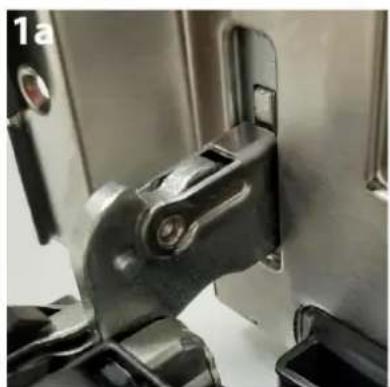
natural_image
Close-up of a mechanical clamp or bracket component (no visible text or symbols)
natural_image
Close-up of a metallic mechanical clamp or bracket component (no visible text or symbols)

Ref 7420
natural_image
Diagram of a refrigerator interior showing door, vent, and side panel with directional arrows (no text or labels)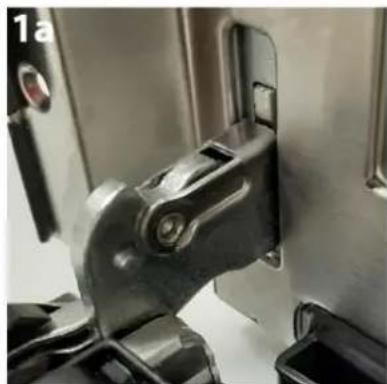
natural_image
Close-up of a mechanical clamp or bracket component (no visible text or symbols)
natural_image
Close-up of a metallic mechanical clamp or bracket component, no visible text or symbolsCE

Artikelnummer 7420
⚠️WARNUNG WAARSCHUWING
▲WARNUNG WAARSCHUWING
natural_image
Diagram of a refrigerator interior showing door, vent, and side panel with directional arrows (no text or labels)
natural_image
Close-up of a mechanical clamp or bracket component (no visible text or symbols)
natural_image
Close-up of a metallic mechanical clamp or bracket component (no visible text or symbols)Артикул номер 7420

natural_image
Diagram of a mechanical device with a magnified inset showing a hand pressing a button (no text or symbols)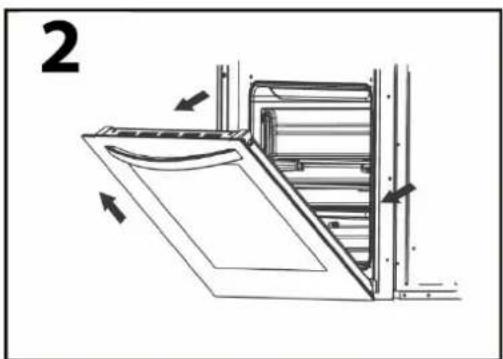
natural_image
Diagram of a refrigerator interior showing door, drawer, and window with directional arrows indicating movement (no text or symbols)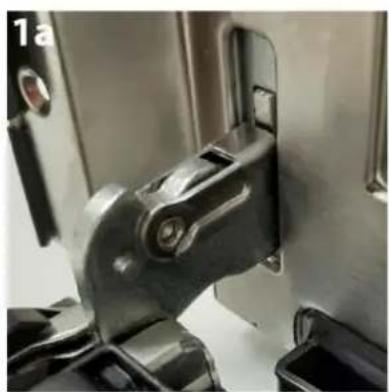
natural_image
Close-up of a mechanical component with metallic parts and a small inset view (no visible text or symbols)
natural_image
Close-up of a mechanical clamp or bracket component (no visible text or symbols)
- Braukmann GmbH
- Safety....43
- Sources of danger....45
- Störungsbehebung
- Operating Manual
- General
- Information on this manual
- Warning notices
- ⚠️GEFAHR
- DANGER
- ⚠️WARNUNG
- WARNING
- ▲VORSICHT
- ATTENTION
- HINWEIS
- PLEASE NOTE
- Limitation of liability
- Copyright protection
- Safety
- Intended use
- ▲WARNUNG Warning
- General Safety information
- Please observe the following general safety notices with regard to the safe handling of the device.
- Sources of danger
- Danger of burns & risk of scalding
- Danger of fire
- There is a danger of fire due to the ignition of the content in the event the device is not used properly.
- Danger of explosion
- There is a danger of explosion due to excess pressure that is created in the event the device is not used properly.
- Dangers due to electrical power
- ⚠GEFAHR
- Commissioning
- Safety information
- Delivery scope and transport inspection
- HINWEIS Please note
- Unpacking
- Disposal of the packaging
- Setup location requirements:
- Electrical connection
- Installation instructions
- Design and Function
- Complete overview
- Accessories
- Metal rack
- Universal tray (fat drip tray / baking tray)
- Perforated tray
- Water tank
- Water absorber
- Safety equipment
- Warning notices on device
- ▲VORSICHT ATTENTION
- Danger due to hot surface!
- Door latch
- Steam hazard!
- Open door
- ⚠️WARNUNG Warning
- ◆ Close door
- Rating plate
- Control panel and control elements
- Notifications in display
- Operation and Handing
- Basics of cooking
- Instructions concerning cookware
- Setting the clock
- First use of the device
- Operation
- Individual setting / quick start
- Temperature setting
- Timer setting
- Additional functions
- Kitchen timer
- Preset cooking
- Multi-stage cooking
- Steam assistant
- Child safety lock
- Cleaning and Maintenance
- Safety information
- Cleaning and descaling
- Quick cleaning
- Regular Cleaning
- ▲WARNUNG Danger of fire
- Before and after long periods of non-use
- Descaling / cleaning function
- Removal of the door
- Troubleshooting
- Safety notices
- Error codes
- Causes and rectification of faults
- Disposal of the Old Device
- Guarantee
- ⚠️WARNUNG WAARSCHUWING
- ▲WARNUNG WAARSCHUWING
Brand : CASO
Model : SteamMaster E 56
Category : Oven