
PizzaChef 400° - Oven CASO - Free user manual and instructions
Find the device manual for free PizzaChef 400° CASO in PDF.


| Product Type | Electric Pizza Oven |
| Model | CASO PizzaChef 400° |
| Item Number | 02983 |
| Power Consumption | 2000 W |
| Mains Data | 220–240 V; 50–60 Hz |
| Splash Water Protection | IPX4 |
| External Dimensions (W x H x D) | 500 mm x 230 mm x 475 mm |
| Net Weight | 13.3 kg |
| Max Temperature | 400°C |
| Heating Elements | Top and bottom independent |
| Pizza Stone Material | Cordierite |
| Accessories Included | Pizza paddle, pizza oven door with handle, assembly hardware (spanner, Allen key, screws, spring washer, nut) |
| Assembly Required | Yes – door handle and pizza paddle |
| Intended Use | Baking pizzas, pizza bread, Flammkuchen (indoor/outdoor) |
| Control Type | Rotary knobs for top and bottom heat |
| Indicator Lights | Separate top and bottom heat control lights |
| Safety Features | Grounded plug, IPX4 splash proof, overheat protection, safety instructions for burns and electrical shock |
| Cleaning and Maintenance | Wipe device and door with damp cloth; stone cleaned with damp cloth or bicarbonate paste; paddle washed with warm soapy water |
| Guarantee | 24 months (Germany, Austria, Netherlands; contact for other countries) |
| Reparability | Repairs must be performed by manufacturer-trained personnel; use only original spare parts |
Frequently Asked Questions - PizzaChef 400° CASO
User questions about PizzaChef 400° CASO
0 question about this device. Answer the ones you know or ask your own.
Ask a new question about this device
Download the instructions for your Oven in PDF format for free! Find your manual PizzaChef 400° - CASO and take your electronic device back in hand. On this page are published all the documents necessary for the use of your device. PizzaChef 400° by CASO.
USER MANUAL PizzaChef 400° CASO
Original operating instructions | Instruction Manual | Gebruiksaanwijzing Manual del usuario | Bruksanvisning | Istruzione d'uso Instruções de funcionamento | Kullanım Kılavuzu
Electric pizza oven PizzaChef 400° Electric pizza oven PizzaChef 400° Electric pizza oven PizzaChef 400° Electric pizza oven PizzaChef 400° Electric pizza oven PizzaChef 400° Electric pizza oven PizzaChef 400° Electric pizza oven PizzaChef 400° Electric pizza oven PizzaChef 400°
| DE | Weitere Sprachen dieser Bedienungsanleitung fi nden Sie unter www.caso-design.de oder wenn Sie den QR-Code scannen. |
| EN | To see these operating instructions in more languages, visit www.caso-design.de or scan the QR code. |
| NL | Je vindt deze gebruiksaanwijzing met vertaling in verschillende talen op de volgende link op de website www.caso-design.de. U kunt ook de QR-code scannen om toegang te krijgen tot de vertalingen. |
| ES | Este manual de instrucciones está disponible en otros idiomas en www.caso-design.de o escaneando el código QR. |
| SV | Det fi nns tillgång till fl era språk i denna bruksanvisning på www.caso-design.de eller om du scannar QR-koden. |
| IT | Ulteriori lingue di queste istruzioni per l’uso sono disponibili al seguente link www.caso-design.de o scansionando il codice QR. |
| PT | Pode encontrar este manual de instruções noutras línguas em www.caso-design.de ou através da leitura do código QR. |
| TR | Bu kılavuzun diğer dillere çevirileri için şu bağlantıya bakınız: www.caso-design.de. Bu amaçla, geçerli QR kodunu da tarayabilirsiniz. |
Technical data / Technical data / Technical data / Technical data / Technical data / Technical data / Technical specifications / Technical data
| Gerät / Device / Aparaat / Aparato / Apparat / Apparecchio / Aparelho / Cihaz | Elektrischer Pizzaofen / Electric pizza oven / Elektrische pizzaoven / Horno eléctrico para pizza / Elektrisk pizzaugn / Forno elettrico per pizza / Forno de pizza elétrico / Elektrikli pizza firini |
| Name / Name / Name / Denominación / Benämning / Nome / Nome / Adi | CASO PizzaChef 400° |
| Artikel-Nr. / Item No. / Artikelnr. / N° de art / Artikel-nr. / N. Articolo / N.° de artigo / Ürün no. | 02983 |
| Anschlussdaten / Mains data / Aansluitgegevens / Conexión / Anslutningsdata / Dati connessione / Dados de ligação / Bağlantı Bilgileri | 220 - 240 V; 50 - 60 Hz |
| Leistungsaufnahme / Power consumption / Power consumptie / Consumo de potencia / Eff ekt / Potenza assorbita / Potência / Güç tüketimi | 2000 W |
| Spritzwasserschutz / Splash water protection / Spatwaterbescherming / Protección contra salpicaduras de agua / Skydd mot stänkvatten / Protezione dagli spruzzi d'acqua / Proteção contra salpicos de água / Su sıçramasına karşı koruma | IPX4 |
| Außenabmessungen (B/H/T) / External measurements (W x H x D) / Afmetingen (BxHxD) / Dimensiones exteriores (An/H/P) / Yttermätt (B/H/D) / Misure esterne (L/H/P) / Medidas (C x A x P) / Diş Gövdenin Boyutu (Y/G/D) | 500 mm x 230 mm x 475 mm |
| Nettogewicht / Net weight / Nettogewicht / Peso net / Nettovikt / Peso netto / Peso / Net ağırlık | 13,3 kg |
The following warning notices are used in the Operating Manual concerned here.

DANGER
A warning notice of this level of danger indicates a potentially dangerous situation. If the dangerous situation is not avoided, this can lead to death or serious injuries.
Observe the instructions in this warning notice in order to avoid the danger of death or serious personal injuries.

WARNING
A warning notice of this level of danger indicates a possible dangerous situation. If the dangerous situation is not avoided, this can lead to serious injuries.
Observe the instructions in this warning notice in order to avoid the personal injuries.

ATTENTION
A warning notice of this level of danger indicates a possible dangerous situation. If the dangerous situation is not avoided, this can lead to slight or moderate injuries.
Observe the instructions in this warning notice in order to avoid the personal injuries.
PLEASE NOTE
A notice of this kind indicates additional information, which will simplify the handling of the machine.
Intended use
This device is suitable for both indoor and outdoor use to bake pizzas, pizza bread, German Flammkuchen, etc.
This device is intended for use in the household and for similar applications such as:
- in kitchens for employees in shops, offices, and other commercial areas;
- in farms,
- by customers in hotels, motels and other similar residential environments, • in bed and breakfast establishments.
Uses for a different purpose or for a purpose which exceeds this description are considered incompatible with the intended or designated use.

WARNING
Danger due to unintended use! Dangers can emanate from the device if it is used for an unintended use and/or a different kind of use.
▶ Use the device exclusively for its intended use. ▶ Observe the procedural methods described in this Operating Manual.
Claims of all kinds due to damages resulting from unintended uses are excluded. The User bears the sole risk.
General Safety information
PLEASE NOTE
Please observe the following general safety notices with regard to the safe handling of the device.
Use the appliance only as described in the user's guide to avoid possible injury from misuse. This unit may be used by children as of 8 years old and anyone with reduced physical, sensory or mental capabilities or a lack of experience and knowledge if they are supervised or have been instructed in connection with the safe use of the appliance and the dangers resulting from it. ▶ Cleaning and maintenance by the user must not be performed by children unless they are at least 8 years old and are supervised. ▶ Children are not allowed to play with the device. The device and its connecting cable must be kept away from children who are less than 8 years old. ▶ Do not operate the appliance unattended. ▶ Do not use the appliance: - if the appliance itself or parts are damaged, - if the power cord or plug is damaged, - if the appliance has been dropped. ▶ Always unwind the power cord completely before use. When doing so, ensure the power cord is not damaged by sharp edges or hot objects. ▶ Pull the plug out of the socket: - when you are not using the appliance, • after each use, - before cleaning the appliance or putting it away, - if there is an obvious malfunction during operation, • during a thunderstorm. Do not operate the unit with an external timer or a separate remote-control system. Do not make any modifications to the appliance or the power cord. Only have repairs carried out by a specialist workshop, as appliances that have not been repaired properly endanger the user. Please also observe the enclosed warranty conditions.
PLEASE NOTE
▶ Only use the device with original accessories. Place the appliance on a stable, level surface. Ensure sufficient distance between the appliance and strong heat sources such as hotplates, heating pipes, etc. Do not clean the appliance with hard, scratchy or abrasive cleaning agents such as steel wool or similar. ▶ Defective components must always be replaced with original replacement parts. Only such parts will guarantee that the safety requirements are fulfilled.
Danger of burns

WARNING
The device, the device door and the pizza stone become very hot.
Please note the following safety instructions to protect yourself and others from burns:
Do not touch the hot surface, the pizza stone or the pizza oven door (apart from the handle) when the device is in operation. ▶ Let the device and the pizza stone cool down before you remove the pizza stone from the oven. Do not place any objects or flammable materials on the device's surface. Do not cover any ventilation slots and make sure to leave 5 cm of space around the sides and 10 cm above the device. ▶ Do not cover the device until it has cooled down completely. ▶ Always use the pizza paddle to place pizzas in the device. ▶ Use gloves to protect your hands. ▶ WARNING: Charcoal or similar fuels cannot be used in this device. ▶ Do not allow metallic objects or food items to touch the heating element.
Dangers due to electrical power

DANGER
Mortal danger due to electrical power! Mortal danger exists when coming into contact with live wires or subassemblies! Observe the following safety notices to avoid dangers due to electrical power:
▶ Do not dip the cable, device or plug into water or other liquid to prevent an electric shock.

DANGER
If the power cord of this appliance is damaged, it must be replaced by the manufacturer or its customer service or a similarly qualified person in order to avoid hazards. ▶ Do not immerse the appliance in water for cleaning. ▶ WARNING! Risk of electric shock! Do not allow any liquid to run over the appliance connector. Do not open the housing on the device under any circumstances. There is a danger of an electrical shock if live connections are touched and the electrical or mechanical structure is altered. In addition, functional faults on the device can also occur.
Transport inspection

WARNING
Do not allow children to play with packaging materials due to risk of suffocation.
PLEASE NOTE
Examine the shipment to ensure the unit and manual are included and inspect the unit for any visible damage. ▶ Immediately notify the carrier and/or the supplier about an incomplete shipment or any damage as a result of inadequate packaging or mishandling.
Setup location requirements
In order to ensure the safe and trouble-free operation of the device, the setup location must fulfil the following prerequisites:
- The device must be set up on a stable, flat, heatproof surface which is strong enough to bear the weight of the device.
- Do not use the device on a textile-covered surface or near curtains.
- The device is suitable for use in a protected outdoor area (IPX 4).
- WARNING! Do not close the ventilation openings in the device housing.
- Do not operate the product near hot gas or hot stove.
- Choose the setup location in such a way that children cannot reach the device.
- The device is not intended to be installed in a wall or a built-in cupboard.
- Do not set up the device in a hot, wet or extremely damp environment or near flammable material.
- The electrical socket must be easily accessible so that the power lead can be disconnected easily, in the case of an emergency.
- The installation and assembly of this device in non-stationary setup locations (e.g. on ships) must be carried out by specialist companies / electricians, provided they guarantee the prerequisites for the safe use of this device.
Electrical connection
In order to ensure the safe and trouble-free operation of the device, the following instructions must be observed for the electrical connection:
- Before connecting the device, compare the connection data (voltage and frequency) on the rating plate with those of your electrical network. This data must agree in order that no damages occur in the device. If in doubt, ask your qualified electrician.
- The connection between the device and the electrical network may employ a 3 meter long (max.) extension cable with a cross-section of 1.5 mm². The use of multiple plugs or gangs is prohibited because of the danger of fire that is involved with this.
- Make sure that the power cable is undamaged and has not been installed under the ice maker or over hot or sharp surfaces.
- The electrical outlet must be protected by a 16A safety cut-out switch.
- This appliance must be electrically grounded. In case of a short circuit grounding will protect against electric shocks because the electrical current is diverted through the grounding lead. The appliance is fitted with an appropriate cable with a ground lead and a grounded safety plug. The plug must be inserted into a properly installed and grounded outlet.
- The electrical safety of the device is only guaranteed if the device is connected to a properly installed protective conductor system. If in doubt, have the house installation checked over by a qualified electrician. The manufacturer cannot be made responsible for damages that are caused by a missing or damaged protective conductor.
NL Veiligheid
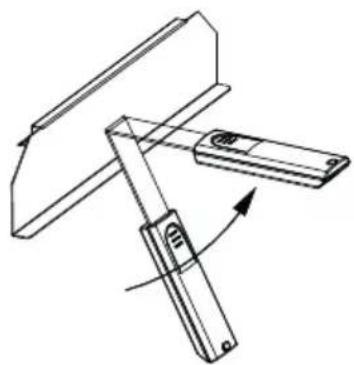
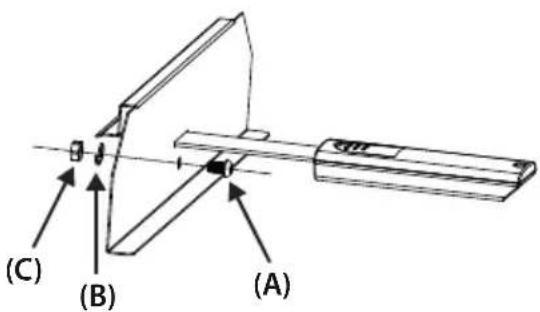
Table of contents - Operation
1 General 51 1.1 Information on this manual....52 1.2 Limitation of liability....52 1.3 Copyright protection....52 1.4 Delivery scope 52 1.5 Unpacking....53 2 Design and Function....53 2.1 Overview....53 2.2 Control Panel 54 2.3 Assembly 54
2.3.1 Assembly of the pizza oven door 54 2.3.2 Assembly of the pizza paddle....54
2.4 Rating plate....55 3 Operation and Handling 55 3.1 Before first use....55 3.2 Operation 56 4 Cleaning and Maintenance ....57 4.1 Safety information....57 4.2 Device and pizza oven door....57 4.3 Pizza stone....57 4.4 Pizza paddle....57 4.5 Storage....57 5 Troubleshooting ....58 5.1 Safety notices ....58 5.2 Troubleshooting table 58 6 Disposal of the Old Device 58 6.1 Disposal of the packaging....59 7 Guarantee....59
1 General
Please read the information contained herein so that you can become familiar with your device quickly and take advantage of the full scope of its functions. Your appliance will serve you for many years if you handle it and care for it properly. We wish you a lot of pleasure in using it!
1.1 Information on this manual
These operating instructions are a component of the electric pizza oven CASO PizzaChef 400° (referred to hereafter as the Device) and provide you with important information for the initial commissioning, safety, intended use and care of the device. The Operating Instructions must be available at all times at the device. This Operating Manual must be read and applied by every person who is instructed to work with the device:
- Commissioning, - Operation,
- Troubleshooting and/or • Cleaning
Keep the Operating Manual in a safe place and pass it on to the subsequent owner along with the device.
1.2 Limitation of liability
All the technical information, data and notices with regard to the installation, operation and care are completely up-to-date at the time of printing and are compiled to the best of our knowledge and belief, taking our past experience and findings into consideration. No claims can be derived from the information provided, the illustrations or descriptions in this manual. The manufacturer does not assume any liability for damages arising as a result of the following:
• Non-observance of the manual • Uses for non-intended purposes - Improper repairs - Technical alterations, modifications of the device - Use of unauthorized spare parts
Modifications of the device are not recommended and are not covered by the guarantee. All translations are carried out to the best of our knowledge. We do not assume any liability for translation errors, not even if the translation was carried out by us or on our instructions. The original German text remains solely binding.
1.3 Copyright protection
This document is copyright protected. CASO GmbH reserves all the rights, including those for photomechanical reproduction, duplication and distribution using special processes (e.g. data processing, data carriers, data networks), even partially. Subject to content and technical changes.
1.4 Delivery scope
As a rule, the articles are delivered with the following components:
• CASO PizzaChef 400° • Operation Manual
- Pizza oven door with handle: •Pizza paddle:
| 1xdoor | 1xpaddle |
| 1xhandle | 1x wooden handle |
| 1xspanner | 1x wing screw |
| 1x Allen key | 1x threaded bolt |
1x screw
1x spring washer
1x nut
1.5 Unpacking
To unpack the device, proceed as follows: Remove the device out of the carton and remove the packaging material. Remove the protective film from the device and accessories.
PLEASE NOTE
If possible, keep the original packaging for the duration of the guarantee period in the event a return is necessary.
2 Design and Function
This chapter provides you with important information of the design and function of the device.
2.1 Overview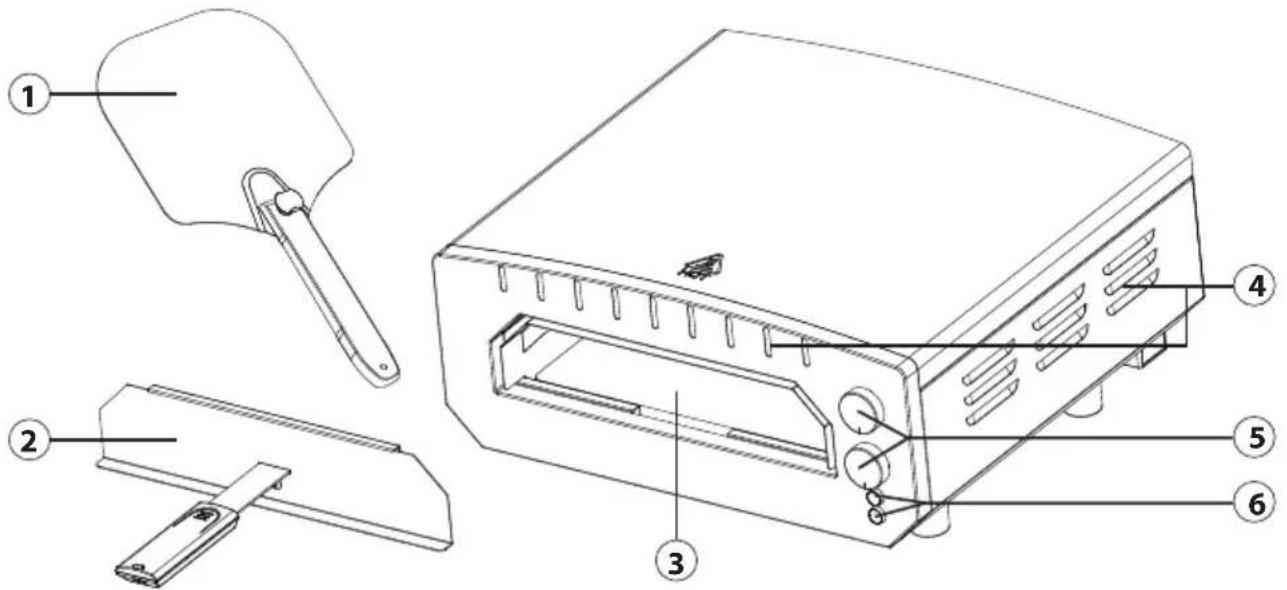
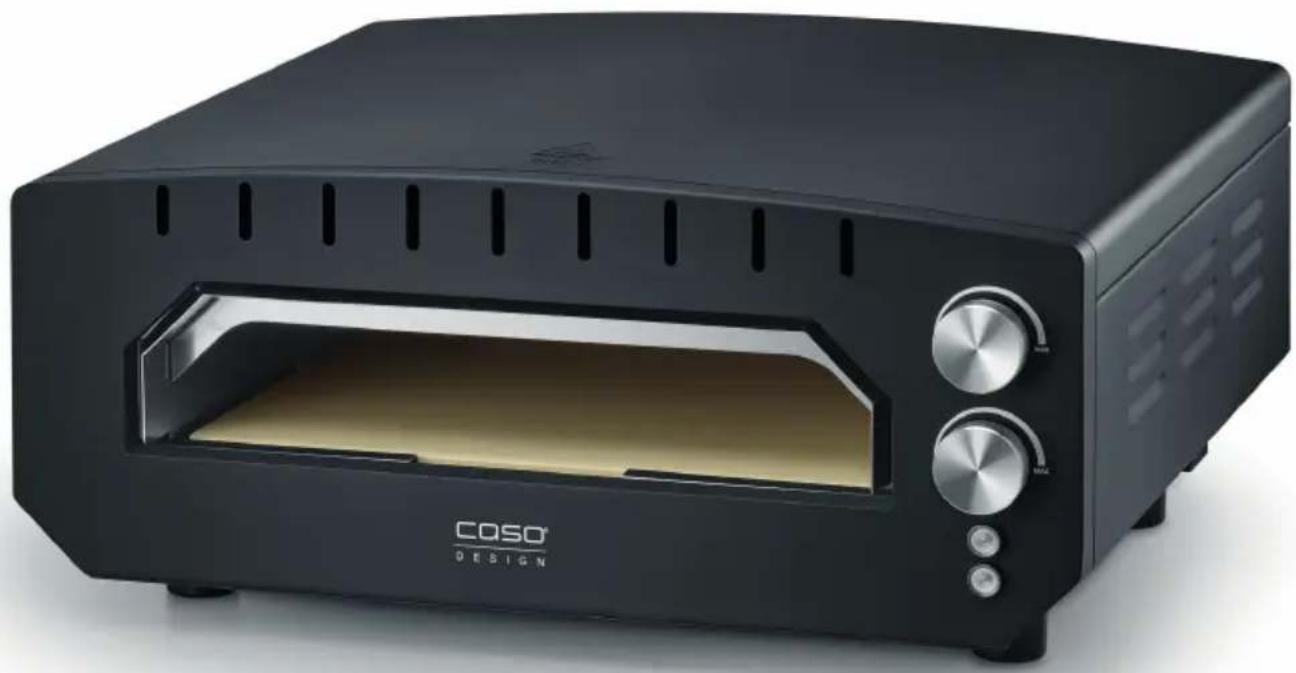
① Pizza paddle ② Pizza oven door with handle ③ Cordierite pizza stone
④ Ventilation slots ⑤ Temperature control knobs ⑥ Control lights
2.2 Control Panel
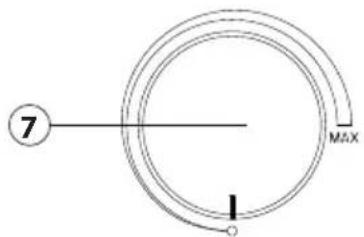
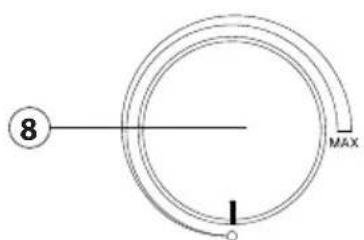
![graph TD A["7a"] --> B[" "] C["8a"] --> D[" "]](/content/2026/05/903909/images/a2644478a7fce4597dbd7973f738c61cea1924adb5399b07e236671098eed74b.jpg)
Control knobs:
⑦ Top heat ⑧ Bottom heat
Control lights:
7a Top heat 8a Bottom heat
2.3 Assembly
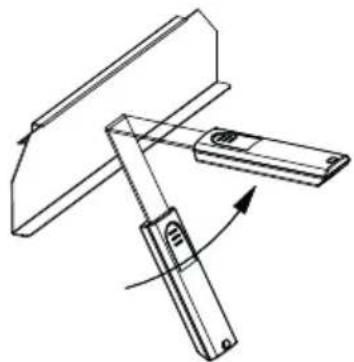
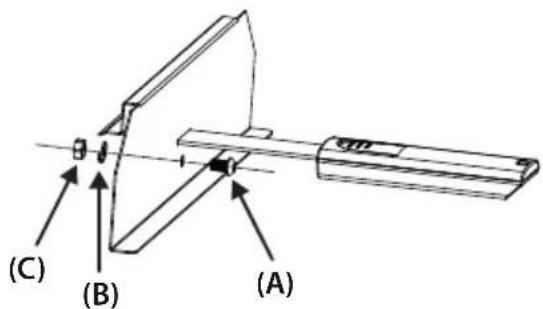
2.3.1 Assembly of the pizza oven door
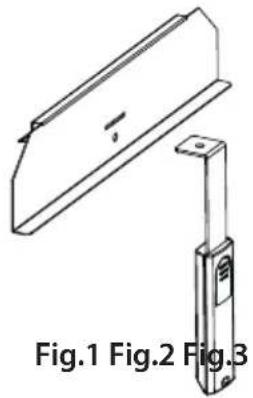
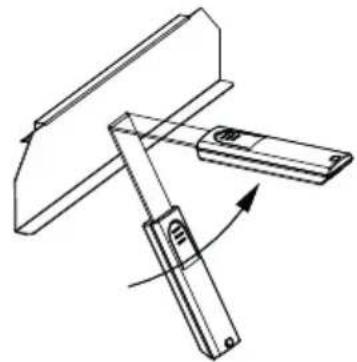
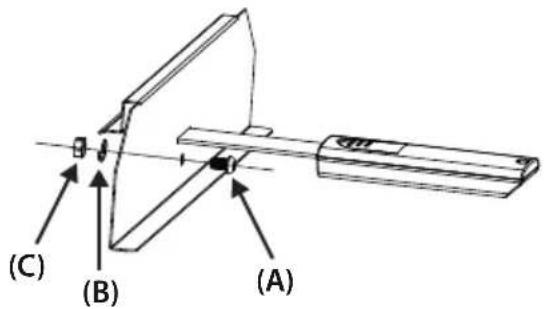
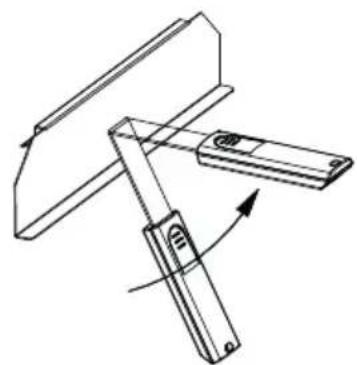
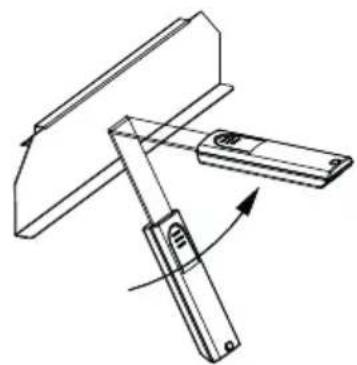
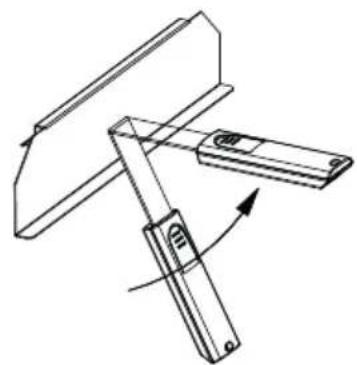
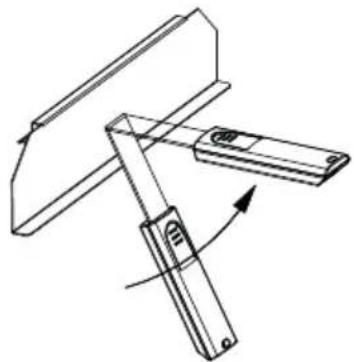
- Push the handle through the slot in the oven door (Fig. 1).
- Move the handle upwards (Fig. 2).
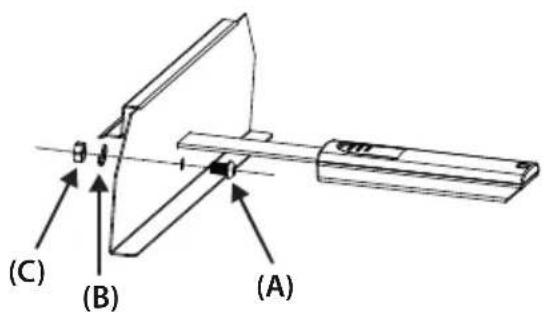
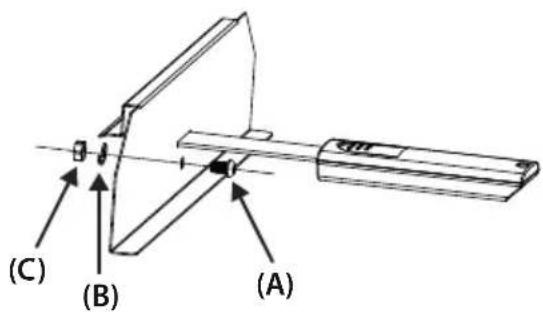
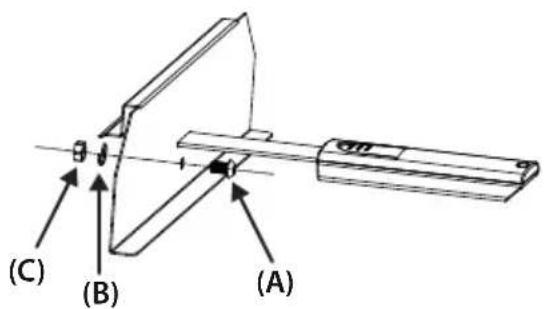
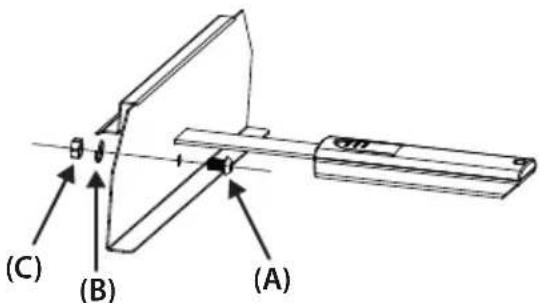
- Firmly screw the handle to the door (Fig. 3). Use the items supplied with the oven (spanner, Allen key, screw (A), spring washer (B) and nut (C)) to do this.
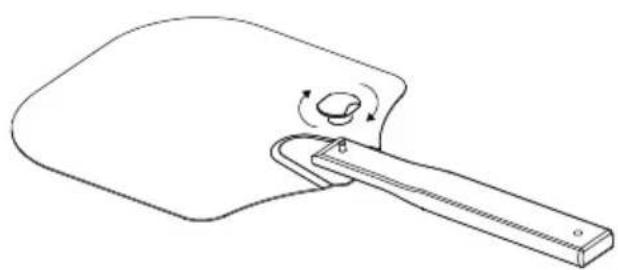
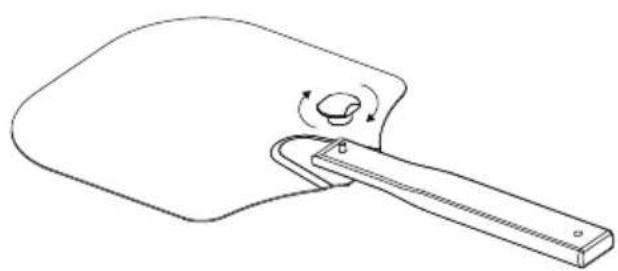
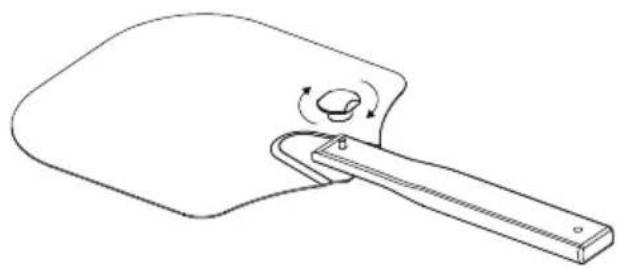
2.3.2 Assembly of the pizza paddle
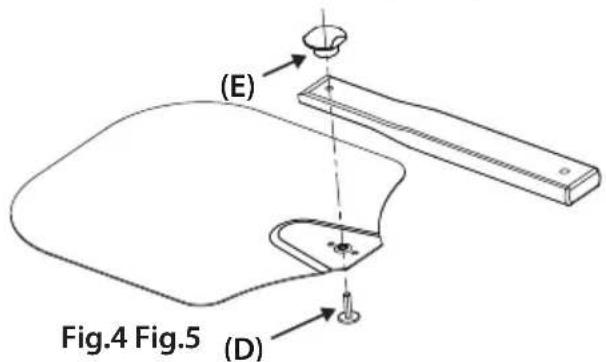
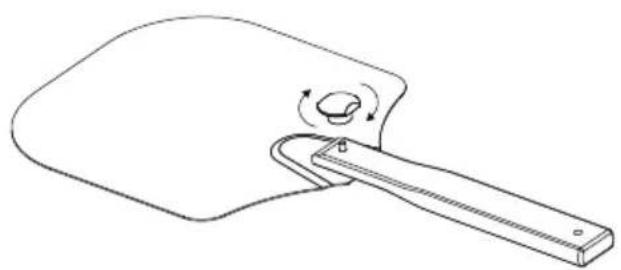
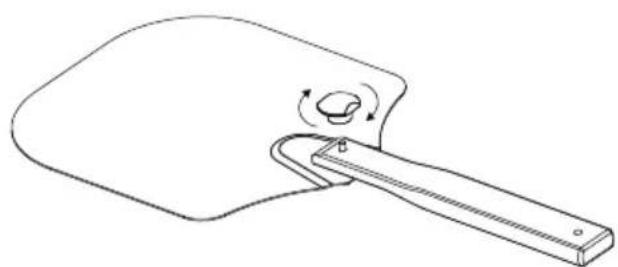
- Push the threaded bolt (D) through the opening in the paddle and the wooden handle (Fig. 4).
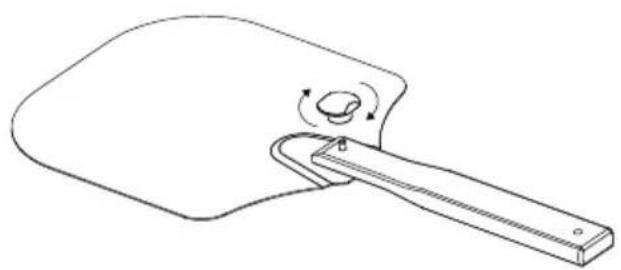
- Use the wing screw to firmly screw the wooden handle to the paddle (Fig. 5).
2.4 Rating plate
The rating plate with the connection and performance data is located on the back of the device.
3 Operation and Handling
This chapter provides you with important information and notes on the operation and basic settings of the appliance.

WARNING
Do not leave the device unsupervised during operation. WARNING! The device's surfaces can become hot during use. Make sure not to touch the housing or the pizza stone until they have cooled down completely. Only touch the pizza oven door handle, not the door itself. Do not place the hot pizza oven door on the top of the device or on other combustible surfaces. Keep the hot door away from combustible materials. The stone is impact sensitive and may break if dropped. If you want to transport the device, take the pizza stone out of the oven and pack it separately to avoid breakage.

3.1 Before first use
The device must be operated empty for approximately 10 minutes to remove any possible protective substances from the heating elements. Make sure that the location where you are using the oven is well-ventilated, as the oven may give off smoke. This smoke is normal.
- Check that you have removed all the packaging.
- Place the oven on a flat, dry, heat-resistant surface.
- Completely unwind the power cord and insert the plug into an earthed power socket.
- Use a damp cloth to wipe the pizza stone.
- Dry the pizza stone thoroughly and put it into the device.
- Shut the device by placing the pizza oven door in front of the opening.
- Turn the top and bottom control knobs clockwise to the "Max." mark. The top control knob is for the top heat, the bottom one for the bottom heat. The control lights will turn on while the device is heating up and turn off when it has reached the desired temperature.
- Let the device run at full power for approx. 10 minutes.
- The device is now ready for use.
3.2 Operation

WARNING
▶ Only use the device when the pizza stone is in it! Remove all packaging from frozen pizzas and other food items before you put them in the pizza oven. The pizza stone cannot withstand extreme temperature fluctuations. Allow frozen food to thaw slightly before you put it on the hot stone. Do not cover food with aluminium foil before you put it in the oven. Do not use baking paper, non-stick pans or silicone moulds. Do not put aluminium foil or plastic containers on the hot surfaces. The stone gets very hot during use and stays hot for a long time after use. Do NOT use water to cool down the stone. Smoke will develop, especially if you remove the pizza oven door from the oven opening! Use the oven in a well-ventilated area. When removing the pizza, make sure you hold the pizza peel straight so that you do not touch the heating elements with the pizza.
- Proceed as described in the "Before first use" section.
- After preheating the oven, turn the bottom control knob down to half power (the bottom control light will turn off).
- Leave the top control knob on full power. This ensures that cheese is optimally melted and other toppings are heated through.
- Sprinkle the paddle with a small amount of flour to prevent dough from sticking to the paddle and the stone. Use the pizza paddle to put pizzas on the pizza stone inside the oven.
- Use the pizza oven door to close the oven opening.
- Different types of dough will require different temperatures and preparation times. When first using the oven, we recommend that you start with a small pizza without too many toppings.
- Watch the pizza while it is in the oven. The baking time will be around 2-4 minutes.
- Turn the pizza around to ensure that it is evenly cooked. The back of the oven is slightly warmer than the front.
- Use the pizza paddle to remove the pizza from the device.
PLEASE NOTE

Guide for optimum temperature settings:![graph TD A["0°C"] --> B["100°C"] B --> C["200°C"] C --> D["300°C"] D --> E["MAX"] E --> F["400°C"]](/content/2026/05/903909/images/402320c8069111ec3db187649464efb125e0dfdbb7c0373b380e7dc067b5396e.jpg)
4 Cleaning and Maintenance
This chapter provides you with important notices with regard to cleaning and maintaining the device. Please observe the notices to prevent damages due to cleaning the device incorrectly and to ensure trouble-free operation.
4.1 Safety information

ATTENTION
Please observe the safety instructions before cleaning your device:
▶ Unplug the device when not in use and before any cleaning. ▶ Never immerse the device, cord, or plug in water or other liquids and do not place in the dishwasher. Do not use iron brushes, abrasives, kitchen cleaners, or sharp cleaning tools for cleaning. Clean the device after use as soon as it has cooled down. Extended waiting unnecessarily complicates cleaning and can make it impossible in extreme cases. Excessive accumulations of dirt can even damage the device under certain circumstances.
4.2 Device and pizza oven door
Wipe the outside of the device and the oven door with a damp cloth.
4.3 Pizza stone
PLEASE NOTE
The pizza stone will change colour after it has been used. This is normal and cannot be prevented. Do not soak the stone in water; do not use cleaning agents and do not put it in a dishwasher. It is essential that the stone is completely dry before you use it again.
Remove the pizza stone from the oven to clean it. Handle the stone carefully. Wipe the pizza stone with a soft, damp cloth after every use. If the stone is very discoloured, you can clean it by mixing a bicarbonate of soda and water paste and applying it to the stone with a sponge. Following this, wipe the stone with a clean, damp cloth.
4.4 Pizza paddle
Use warm soapy water and a soft sponge to clean the paddle surface, then dry it thoroughly.
4.5 Storage
After using the device, store it in a closed room or a place protected from the elements. The pizza oven must be completely dry and cold before it is moved or stored. We recommend storing the pizza stone in a dry place. The stone absorbs large amounts of moisture, so if it is stored outside, you should always allow it to dry thoroughly before you use it again.
PLEASE NOTE
If you are near the sea or a body of salt water, protect the pizza oven by storing it inside when not in use.
5 Troubleshooting
This chapter provides you with important notices with regard to operating the device. Observe the following notices to avoid dangers and damages:
5.1 Safety notices

ATTENTION
Repairs of electrical appliances must be carried out by qualified persons who are trained by the manufacturer. Repairs performed by untrained persons may result in considerable hazards for the user and damage the machine.
5.2 Troubleshooting table
The table below will help you to locate and solve small problems.
| Problem Solution | |
| The device cannot be turned on. | Check if the plug has been properly inserted into the power socket. |
| Steam is coming out of the pizza oven door. | This is normal. The door is ventilated to allow steam from food items with a high moisture content to escape. If the work surface is damp, simply wipe it dry. |
| Smoke is coming out of the device. | The extremely high temperatures may cause smoke to develop. Use the oven in a well-ventilated location. |
PLEASE NOTE
If you cannot solve the problem by carrying out the steps described above, our Customer Service will help you free of charge. Clean the device before you send it to customer service.
6 Disposal of the Old Device
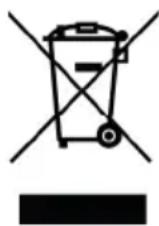
Old electric and electronic devices frequently still contain valuable materials. However, they also contain damaging substances, which were necessary for their functionality and safety. If these were put in the non-recyclable waste or were handled incorrectly, they could be detrimental to human health and the environment. Therefore, do not put your old device into the non-recyclable waste under any circumstances.
PLEASE NOTE
Use the collection point established in your town to return and recycle old electric and electronic devices. If necessary, contact your town hall, local refuse collection service, or your dealer for information. ▶ Ensure that your old device is stored safely away from children until it is taken away.
6.1 Disposal of the packaging
The packaging protects the device against damage during transit. The packaging materials are selected in accordance with environmentally compatible and recycling-related points of view and can therefore be recycled. Returning the packaging back to the material loop saves raw materials and reduces the quantities of accumulated waste. Take any packaging materials that are no longer required to "Green Dot" recycling collection points for disposal.

7 Guarantee
We provide a 24-month guarantee for defects caused by production or material faults, beginning on the date of purchase. Our guarantee is valid for Germany, Austria, and the Netherlands. For all other countries, please contact us.
Your legal guarantee claims as per Art. 437 ff. German Civil Code (BGB) will remain unaffected by this. You may exercise your statutory guarantee rights free of charge. The guarantee does not cover damage caused by improper handling or use of the product or defects which have only a minor impact on the product's functionality or value. In addition to this, the guarantee also excludes parts which are subject to wear and tear; transport damages insofar as we are not responsible for them; and damages caused by repairs which were not carried out by us.
This product has been constructed for non-commercial use (domestic use) and its performance is designed to meet the corresponding needs. The guarantee only covers commercial use insofar as it is comparable to domestic use. The product is not intended for any other type of commercial use.
In the case of legitimate complaints, we may either repair the defective product or replace it with a defect-free product at our discretion. Obvious defects must be notified to us within 14 days of the product's delivery. Any further claims are excluded.
When making a guarantee claim, please contact us before you return the product (always with the purchase receipt!). Our contact details ("Guarantor") are provided at the beginning of this instruction manual.
⑦ Top heat ⑧ Bottom heat
Indicator lights:
7a Top heat 8a Bottom heat
2.3 Assembly
Rotary knob:
⑦ Top heat ⑧ Bottom heat
① Pizza peel ② Pizza oven door with handle ③ Cordierite pizza stone
① Pizza peel ② Pizza oven door with handle ③ Cordierite pizza stone
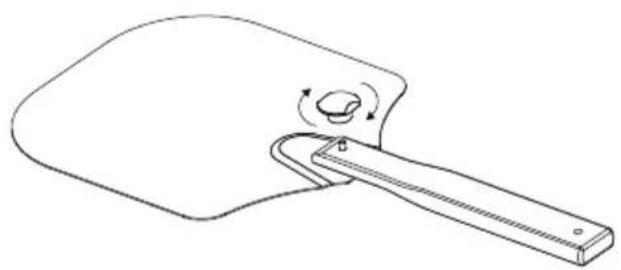
- Insert the threaded pin (D) into the opening on the pizza surface and into the wooden handle (Fig. 4).
- Tighten the wooden handle firmly with the wing screw (E) (Fig. 5).
Rotary knob:
| DE | Weitere Sprachen dieser Bedienungsanleitung fi nden Sie unter www.caso-design.de oder wenn Sie den QR-Code scannen. |
| EN | To see these operating instructions in more languages, visit www.caso-design.de or scan the QR code. |
| NL | Je vindt deze gebruiksaanwijzing met vertaling in verschillende talen op de volgende link op de website www.caso-design.de. U kunt ook de QR-code scannen om toegang te krijgen tot de vertalingen. |
| ES | Este manual de instrucciones está disponible en otros idiomas en www.caso-design.de o escaneando el código QR. |
| SV | Det fi nns tillgång till fl era språk i denna bruksanvisning på www.caso-design.de eller om du scannar QR-koden. |
| IT | Ulteriori lingue di queste istruzioni per l’uso sono disponibili al seguente link www.caso-design.de o scansionando il codice QR. |
| PT | Pode encontrar este manual de instruções noutras línguas em www.caso-design.de ou através da leitura do código QR. |
| TR | Bu kılavuzun diğer dillere çevirileri için şu bağlantıya bakınız: www.caso-design.de. Bu amaçla, geçerli QR kodunu da tarayabilirsiniz. |

- DANGER
- WARNING
- ATTENTION
- PLEASE NOTE
- INTENDED USE
- GENERAL SAFETY INFORMATION
- PLEASE OBSERVE THE FOLLOWING GENERAL SAFETY NOTICES WITH REGARD TO THE SAFE HANDLING OF THE DEVICE
- DANGER OF BURNS
- THE DEVICE, THE DEVICE DOOR AND THE PIZZA STONE BECOME VERY HOT
- DANGERS DUE TO ELECTRICAL POWER
- TRANSPORT INSPECTION
- SETUP LOCATION REQUIREMENTS
- ELECTRICAL CONNECTION
- NL VEILIGHEID
- TABLE OF CONTENTS - OPERATION
- GENERAL
- INFORMATION ON THIS MANUAL
- LIMITATION OF LIABILITY
- COPYRIGHT PROTECTION
- DELIVERY SCOPE
- UNPACKING
- DESIGN AND FUNCTION
- CONTROL PANEL
- CONTROL KNOBS
- CONTROL LIGHTS
- ASSEMBLY
- ASSEMBLY OF THE PIZZA OVEN DOOR
- ASSEMBLY OF THE PIZZA PADDLE
- RATING PLATE
- OPERATION AND HANDLING
- BEFORE FIRST USE
- OPERATION
- CLEANING AND MAINTENANCE
- SAFETY INFORMATION
- DEVICE AND PIZZA OVEN DOOR
- PIZZA STONE
- PIZZA PADDLE
- STORAGE
- TROUBLESHOOTING
- SAFETY NOTICES
- TROUBLESHOOTING TABLE
- DISPOSAL OF THE OLD DEVICE
- DISPOSAL OF THE PACKAGING
- GUARANTEE
- INDICATOR LIGHTS
- ROTARY KNOB
Brand : CASO
Model : PizzaChef 400°
Category : Oven