
CY 7088 - Vacuum Cleaner SEVERIN - Free user manual and instructions
Find the device manual for free CY 7088 SEVERIN in PDF.

| Brand | Severin |
| Model | CY 7088 |
| Product Type | Cyclonic Canister Vacuum Cleaner |
| Category | Vacuum Cleaner |
| Separation Technology | Cyclonic (Bagless) |
| Dust Container Capacity | Approx. 1.2 L |
| Suction Power | Progressively adjustable via regulator |
| Filters | HEPA filter, Motor protection filter, Dust container filter |
| Power Cord Length | Approx. 5 m |
| Included Accessories | Crevice tool, 2-in-1 tool with brush, Telescopic tube, Carpet/hard floor switchable brush |
| Storage | Storage notch for the brush |
| Cord Rewind Function | Yes, cord rewind button |
| Overheat Protection | Automatic shut-off in case of overheating |
| Suction Type | Dry only |
| Usage | Household, dry floors, furniture, cushions |
| Cleaning and Maintenance | Dust container and filters washable (except HEPA filter washable?); HEPA filter to be brushed |
| Available Spare Parts | Dust container filter + HEPA (ref. 5103-048), Parquet brush (PB7217), Turbo brush (TB7216), Flexible long crevice tool (ZB7214) |
| Warranty | 2 years against material and manufacturing defects |
Frequently Asked Questions - CY 7088 SEVERIN
User questions about CY 7088 SEVERIN
0 question about this device. Answer the ones you know or ask your own.
Ask a new question about this device
Download the instructions for your Vacuum Cleaner in PDF format for free! Find your manual CY 7088 - SEVERIN and take your electronic device back in hand. On this page are published all the documents necessary for the use of your device. CY 7088 by SEVERIN.
USER MANUAL CY 7088 SEVERIN
natural_image
Exterior view of a white and black vacuum cleaner with attached hose (no text or symbols visible)ART.-NO. CY 7088
GB Instructions for use
FR Mode d'emploi
Cyclone vacuum cleaner 11
natural_image
3D rendered mechanical part with cutaway view showing internal structure (no text or symbols)natural_image
Diagram of a hand adjusting a button on a device, with an arrow indicating direction (no text or symbols present)Cyclone vacuum cleaner
Dear Customers,
Before using the appliance, read the instructions carefully and keep them for future reference. The appliance may only be used by persons who are familiar with the safety instructions.
Structure
- Dust container
- Main unit
- Power control
- Parking hook
- Mains power plug
- HEPA filter cover
- On/Off button
- Floor nozzle
- Suction hose
- 2-in-1 tool
- Telescopic tube
-
Motor pre-filter
-
Dust container release button
-
Power cable retraction button
Safety Instructions
Connecting the appliance
Since the appliance is operated with electrical current, there is a danger of electric shock. Therefore:
- Only connect and start up the vacuum cleaner according to the de-tails on the name plate (underside of the appliance).
- Check the appliance and power cable for possible damage beforeuse. Never operate a defective appliance or an appliance with a defective power cable.
-
Never try to repair the appliance or its power cable yourself. To prevent hazards, repairs to the appliance and the power cable may only be made by our customer service. Give a defective appliance to a dealer or make contact with SEVERIN customer service.
-
Do not immerse appliance in water or other liquids or treat it with liq-uids. Do not operate the appliance outdoors or in rooms with high humidity. Do not handle the plug with wet hands.
- Caution: the power cable must only be pulled out from the appliance as far as the first mark.
- Make sure that the power cable is not kinked, crushed or run over and that it does not come into contact with sources of heat, humidity and sharp edges. Make sure that the power cable does not become a stumbling hazard.
- Do not pull or transport the appliance using the power cable. Whenunplugging the plug from the outlet, always pull directly on the plug.
- If possible, do not use an extension cable. If this is unavoidable, only use GS-tested, simple extension cables (no multi-outlet adapters) that are designed for the appliance's power consumption.
- Before cleaning or maintaining the appliance, as well as before changing accessories, switch off the appliance and unplug the plug from the outlet.
Safety of particular groups of people
- This appliance may only be used by children over the age of 8 and by persons with reduced physical, sensory or mental capacities or a lack of experience and/or knowledge when they are supervised or if they have been instructed about the safe use of the appliance and have understood the risks resulting from the use of the appliance.
- Children may not play with the appliance or stand or sit on the appliance. Cleaning and user maintenance may not be performed by children without supervision.
- Keep children younger than 8 away from the appliance and power cable.
- Keep packaging materials out of the reach of children and dispose of them. Otherwise they present a suffocation risk.
Intended use
The appliance may only be used in households. Only vacuum dry, normally-soiled floors or, depending on the accessories, also furniture and upholstery. Any other use is improper and is forbidden.
In order to prevent injuries, fires and damage, the appliance may not be used to vacuum:
- People, animals and plants. Always keep nozzles and vacuum open-ings away from all body parts, hair and clothing. Do not vacuum near your head.
- Glowing or burning particles (such as ash, coals, charcoal, ciga-rettes, matches).
- Explosively or flammable materials or toner.
-
Water and other liquids, e.g. damp carpet cleaners.
-
Pointy objects such as glass splinters, needles or constructionwaste.
- Fine dust, such as plaster, cement, fine drilling dust, powder.
CE Marking
This device is compliant with the mandatory EU directives for CE marking.
Using the appliance
Before using for the first time
- Remove any remaining packaging or inserts from the appliance.
- Assemble the appliance as shown below and check that the dust container and filters are fitted correctly (also see the sections on "Emptying the dust container" and "Cleaning or replacing the filter").
Assembling
- Only assemble appliance parts when the plug has been disconnected from the mains socket.
- If necessary, push the dust container into the appliance until you hear it click into place.
- Attach the hose to the appliance and lock it in place with a quarter turn.
- Push the telescopic tube onto the hose until you hear a click and adjust it to the required length.
- Select the right nozzle for the surface to be vacuumed:
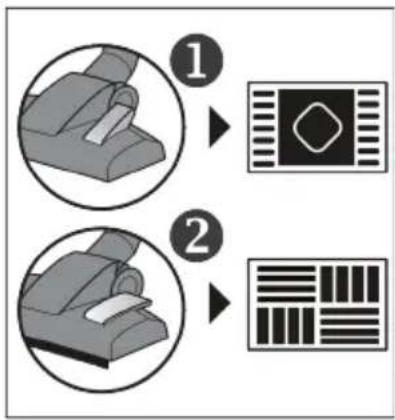
flowchart
graph TD
    A["Step 1: Chair"] --> B["Pad Icon"]
    C["Step 2: Barcode"] --> D["Barcode"]
The switchable floor nozzle has 2 settings:
Position 1 is excellently suited to cleaning dirt and fibres from carpets, rugs etc. and for deep cleaning of these surfaces.
Position 2 is ideal for all kinds of smooth hard floors.
natural_image
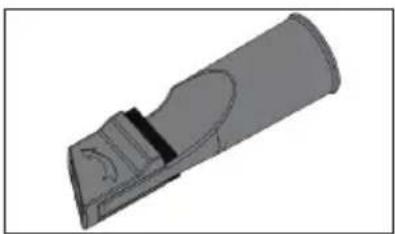
3D rendered mechanical part with cutaway view showing internal features (no text or symbols)With the brush folded, the 2-in-1 tool is perfect for sofa crevices and other areas that are difficult to reach.
With the brush unfolded, it is ideal for vacuuming your furniture.
- Never use a damaged nozzle. A damaged nozzle could cause scratching of surfaces.
Vacuum cleaning
- Especially when vacuuming stairs, make sure that you are always above the appliance. Other-Vacuum cleaning wise the appliance may fall down and cause injuries.
- When using of a brush with rotating bristles, keep it away from people, animals, plants, cables and lines at all times.
- Only use the appliance if the dust container and the filters have been correctly inserted.
- Assemble the appliance, plug into mains power and switch on the appliance.
- Follow the cleaning and maintenance instructions of the floor covering, carpet or furniture manufacturer!
natural_image
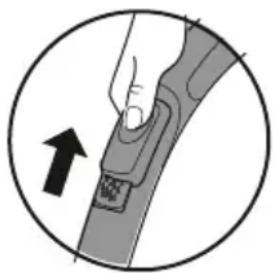
Diagram of a hand adjusting a seatbelt with an arrow indicating direction (no text or symbols)- If curtains or other objects are accidentally suctioned, quickly open the slide vent to release the objects again.
- Always make sure that you have adjusted the suction power to be right for the type of surface (see the section on “Adjusting suction power”).
• After using the appliance, switch it off and unplug from mains power.
- When you press the power cable retraction button, the power cable will be retracted into the appliance. Be sure to hold the plug and guide it by hand towards the cable storage. Otherwise the cable could move around in an uncontrolled way with a risk of injuring those nearby, causing a tripping hazard or damaging objects.
Adjusting suction power
- The power control is infinitely adjustable over the whole scale of settings. Depending on the surface to be vacuumed, the position of the power control should be adjusted as follows:
• maximum power: for hard floors with crevices, heavily soiled flooring
• high power: for carpets, runners and similar items
- low power: for upholstered furniture, cushions and mattresses
• minimum power: for curtains, hangings and similar items
Maintaining and cleaning
Before carrying out any maintenance or cleaning of your appliance, switch it off and unplug it from the mains power socket!
Emptying the dust container
• Empty the dust container at the latest:
• If suction power is lower than it should be
• before longer storage or
• before sending to the service centre.
- Press then button and remove the dust container.
- Press the button on the bottom of the dust container, open the flap and empty out the contents of the dust container.
- The contents of the dust container can be disposed of in normal household garbage unless it contains dirt that is forbidden in the household garbage.
- Close the dust container and insert it into the appliance - you should hear a click.
Cleaning the dust container
- Clean the dust container regularly, particularly under the following conditions:
- if the suction power seems to be reduced
- before storing the appliance for an extended period
- before sending the appliance to the service centre.
- Press the button and remove the dust container.
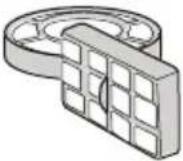
- Turn the dust container lid anti-clockwise (→) and remove it.
- Unlock the dust container filter (turn anti-clockwise) and remove it. If necessary, clean the filter as indicated in the section on “Cleaning or replacing the filters”.
- Unlock the dust container insert (turn anti-clockwise) and remove it.
- Use the unfolded brush of the 2-in-1 tool to brush out the dust container insert. Do not use water on the insert!
- Rinse the dust container with water (use a mild detergent added to the water if necessary). Dry the dust container thoroughly before putting it back into the appliance.
- Put the dust container insert back into the dust container and lock it in by turning clockwise.
- Place the dust container filter into the dust container with the black side facing downwards and lock it clockwise.
- Put the dust container lid on and lock it clockwise (▼/♂ → ▼/♂).
Cleaning or replacing the filter
- Clean the filter regularly, particularly under the following conditions:
- If suction power is lower than it should be
- before storing the appliance for an extended period, or
• before sending to the service centre. - With household use, the filters must be replaced after 6 months.
Dust container filter:
- Take the filter out of the dust container (see the section on "Cleaning the dust container"). Remove the black insert.
- First, tap out the white filter, and then use the unfolded brush of the 2-in-1 tool to brush it out. Then tap out any loosened dust residues again.
- The black foam insert in the filter can be washed, but must not be put in the dishwasher or washing machine.
- Rinse this insert thoroughly under running water.
• After cleaning, leave it to dry at room temperature for about 24 hours. Only put it back when it is completely dry.
Motor pre-filter:
• Take out the dust container and then take the motor pre-filter out of the appliance.
- The filter can be washed, but must not be put in the dishwasher or washing machine.
- Rinse the filter thoroughly under running water.
• After cleaning, leave it to dry at room temperature for about 24 hours. Only put it back when it is completely dry.
HEPA filter:
- Open the HEPA filter cover and take the filter out.
- First, tap out the filter, and then use the unfolded brush of the 2-in-1 tool to brush it out. Then tap out any loosened dust residues again.
- Put the filter back in and close the cover.
Cleaning
- The housing and power cable may not be handled with liquids or immersed in liquids for reasons of electrical safety. Rub housing with a slightly damp cloth and then dry.
- For cleaning, do not use any sharp or scouring cleansers or hard brushes.
Storing the appliance
- For easy storage, when not in use, the floor nozzle can be hooked into the parking hook below the power control.
Troubleshooting by yourself
- So that as few problems as possible arise, it is important to empty the dust container regularly and take this opportunity to check the filters and clean them if they are dirty.
• Before contacting our customer service, check with the help of below table whether you can correct the problem yourself.
| Problem Solution | |
| The appliance stops suddenly | The integrated overheating protection has tripped (possibly due to a full dust bag or the like) In this case, clear the problem as follows:1. Switch off the appliance.2. Pull plug from main socket.3. Eliminate the cause of overheating (either the dust container needs emptying - see the section on “Emptying the dust container”, or the filters need cleaning - see the section on “Cleaning or replacing the filters” or there is a blockage somewhere, which needs to be removed).4. Be sure to also check hose, nozzles and telescopic tube when searching for the cause of overheating.5. Close the cover and re-fit all accessory.6. Wait another 45 minutes.After the appliance has cooled off, you may switch it on again. |
| The appliance hardly picks up any dust and/or the suction power drops | The dust container needs to be emptied (see the section on “Emptying/cleaning the dust container”).It is best to clean the filters at the same time (see the section on “Cleaning or replacing the filters”). |
| With the switchable floor nozzle attached, the switch is not in a position appropriate to the type of floor.Select the correct position for the switch. | |
| Odours spread or even dust escapes from the appliance | It is probable that dust container parts or vacuum cleaner accessories have not been put back in or closed correctly after being dismantled in order to clean the filter or replace accessories.Check that all parts are correctly and firmly in place. |
• If this does not help, please contact our customer service.
The contact data is in the appendix to this instruction manual or on our home page.
Spare parts, warranty and disposal
 | 5103-048:1 Dust container filter +1 HEPA filter | 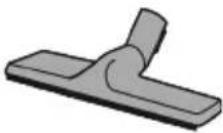 | PB7217:1 parquet brush |
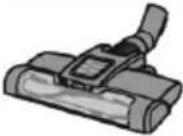 | TB7216:1 turbo brush | 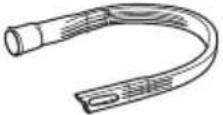 | ZB7214:1 long, flexible crevice nozzle |
Disposal
Devices marked with this symbol must be disposed of separately from your household waste, as they contain valuable materials which can be recycled. Proper disposal protects the environment and human health. Your local authority or retailer can provide information on the matter.
Guarantee
This product is guaranteed against defects in materials and workmanship for a period of two years from the date of purchase. Under this guarantee the manufacturer undertakes to repair or replace any parts found to be defective, providing the product is returned to one of our authorised service centres. This guarantee is only valid if the appliance has been used in accordance with the instructions, and provided that it has not been modified, repaired or interfered with by any unauthorised person, or damaged through misuse.
This guarantee naturally does not cover wear and tear, nor breakables such as glass and ceramic items, bulbs etc. This guarantee does not affect your statutory rights, nor any legal rights you may have as a consumer under applicable national legislation governing the purchase of goods. If the product fails to operate and needs to be returned, pack it carefully, enclosing your name and address and the reason for return. If within the guarantee period, please also provide the guarantee card and proof of purchase.
Chère cliente, Cher client,
flowchart
graph TD
    A["Step 1: Device with handle"] --> B["Step 2: Device with barcode"]
    B --> C["End"]
natural_image
3D rendered mechanical component with curved and rectangular features (no text or symbols)natural_image
Illustration of a hand holding a cable with a belt, enclosed in a circle (no text or symbols)natural_image
3D rendered mechanical part with curved cutaway and mounting features (no text or symbols)natural_image
Illustration of a hand adjusting a cable buckle with an arrow indicating direction (no text or symbols)flowchart
graph TD
    A["Step 1: Seat Replacement"] --> B["Arrow to Bar Pattern"]
    C["Step 2: Seat Replacement"] --> D["Arrow to Bar Pattern"]
natural_image
3D rendered mechanical part with curved cutaway view (no text or symbols)natural_image
Diagram of a hand holding a cable buckle with an arrow indicating direction (no text or symbols)natural_image
3D rendered mechanical component with curved and rectangular features (no text or symbols)natural_image
Diagram of a hand adjusting a button on a device, with an arrow indicating direction (no text or symbols present)flowchart
graph TD
    A["Step 1: Device with lever mechanism"] --> B["Step 2: Display icon with diamond symbol"]
    B --> C["Step 2: Grid pattern with bar chart"]
natural_image
3D rendered mechanical part with cutaway view showing internal features (no text or symbols)natural_image
Diagram of a hand holding a cable buckle with an arrow indicating direction (no text or symbols)natural_image
3D rendered mechanical component with curved and rectangular features (no text or symbols)natural_image
Diagram of a hand holding a seatbelt with an arrow indicating left motion (no text or symbols)natural_image
3D rendered mechanical component with curved and rectangular features (no text or symbols)natural_image
Diagram of a hand adjusting a button on a device, with an arrow indicating direction (no text or symbols present)natural_image
3D rendered mechanical part with cutaway view showing internal features (no text or symbols)natural_image
Diagram of a hand adjusting a button component, enclosed in a circle with an arrow indicating direction (no text or symbols)natural_image
3D rendered mechanical part with cutaway view showing internal structure (no text or symbols)natural_image
Diagram of a hand adjusting a button on a device, with an arrow indicating direction (no text or symbols present)natural_image
3D rendered mechanical component with curved and rectangular features (no text or symbols)natural_image
Illustration of a hand holding a button or grip, with an arrow indicating direction (no text or symbols present)AVEDA Lifestyle EOOD
ul. Angel Kanchev 1, et. 5
BG 1124
Sofia
Croatia
Koracell d.o.o.
Donje Svetice 40
26 Oaktree Business Park
Trim Co., Meath
Tel.: 046 94 83100
Fax: 046 94 83663
Web: www.bluestone.ie
Italia
ASSISTENZA POST-VENDITA
NUMERO VERDE 800224155
E-Mail: assistenza@severin.com
Indonesia
PT. Setai Modern Elektronik
Email.: info@severin.co.id
Web.: www.severin.co.id
Jakarta
Komp. Glodok Plaza Blok F No. 9, Jl. Pinangsia Raya,
Jakarta Barat
021 65911888 / 021 6592889
Medan
Dr.Waleed Maraga commercial center, Level 1
Khalda, Amman Zip code: 11953
Tel: +962 6 5346429
Fax: +962 6 5341706
Mob Jordan: +962 797426108
Kuwait
Mohammed Abdulrahman Al Bahar
Al Bahar Building P.O. Box 148
Safat 13002 Kuwait
Tel.: +965 4810855
Latvia
SIA GTCL BALTIC
Piedrujas iela 7
LV - Riga 1073
Tel.: +371 29119989
Fax: +371 67297769
Lebanon
Khoury Home
7th Floor, Cité Dora 3 Building, Dora
P.O.Box 70611
Antelias, Lebanon
Tel.: +961 1 244200
Fax:+966 1 253535
E-Mail: info@khouryhome.com
Internet: www.khouryhome.com
Lithuania
UAB Topo Grupe
Savanoriu PR. 206A,
50193 Kaunas, Lithuania
Tel.: +370 660 00200
A.A.K & Partners L.L.C.
P.O Box:-1650, Muttrah
Postal Code - 114
Sultanate of Oman
Tel.: +968 24834470
Fax.: +968 24835186
E-Mail: aakpllc@gmail.com
Peru
SEVERIN PERU / Comercial Rebeca S.R.L
Mezzanine 1, South Center Tower
2206 Venture Street, Madrigal Business Park
Alabang, Muntinlupa City
Tel.: 809 34 41
E-Mail: severinconsumercare@colombophils.com.ph
Polska
Severin Polska Sp.z o.o.
6 Tagore Drive, #03-04
Singapore 787623
Tel.: +65 6455 0005
Fax: +65 6455 4010
Web: www.beste.com.sg
E-Mail: info@beste.com.sg
Slovenia
SEVTIS d.o.o.
Smartinska 130
1000 Ljubljana
Tel.: +386 1 542 1927
Fax: +386 1 542 1926
Slowak Republic
BVZ Commerce s.r.o.
Odbavovací centrum
Závodu míru 974/66a
360 17 Karlovy Vary
Tel.: +420 233 557 825
3rd Floor, Grove Exchange
Grove Avenue
Claremont
South Africa
7708
Tel: +27 21 674 0294
Fax: +27 21 674 0295
Web: http://www.alcdashley.co.za
Mail: service@alcdashley.co.za
Svenska
El & Digital Service AB
Folkungagatan 144
11630 Stockholm
Tel.: +46 8 845180
www.eldigital.se
E-Mail: info@eldigital.se
Switzerland
SPC Electronics AG
Mövenstrasse 12
CH-9015 St. Gallen
Tel.: +41 71 227 99 99
E-Mail: service@spcag.ch
www.spc.ch
Thailand
Verasu Ltd. part.
83/7 Wireless Rd., Lumpini,
Patumwan, Bangkok 10330
Tel.: +662 254 81 008
E-Mail: askverasu@verasu.com
Tunisie
GEI
54, rue du Mercure
Zone Industrielle 2013-BEN AROUS
TUNISIE
Ukrayina
Service for Modern Electronics LLC
Sim'i Khokhlovykh Str.8
4119 Kiev
Tel.: + 38 044 247 67 34
E-Mail: info1@photoservice.com.ua
United Kingdom
Homespares Centres Limited
Peel House
2 Chorley Old Road
BL1 3AA
Tel.:01204558160
Fax: 01204 558169
E-Mail: office@homespares.co.uk
Web: www.homespares.co.uk
Vietnam
BRAND PARTNER
CTY TNHH DOI TAC NHAN HIEU
FLOOR 8, DAG HOLDINGS
87A HAM NGHI
NGUYEN THAI BINH WARD, DISTRICT 1
HO CHI MINH CITY, VIETNAM
Tel.: +84-28-62 899 648
E-Mail: kenny.clark@brandpartner.vn
trang.hau@brandpartner.vn
Stand: 07.2021